Management of Digital Nerve Injuries and Interfascicular Grafting
Key Takeaway
Digital nerve injuries require meticulous microsurgical repair to restore hand sensation and function. Critical repairs include the thumb ulnar digital nerve and index radial digital nerve. When primary tension-free coaptation is impossible, interfascicular nerve grafting using the Millesi step-cut technique is indicated. Successful outcomes depend on precise fascicular mapping, tension-free coaptation in a well-vascularized bed, and a structured postoperative rehabilitation protocol monitoring the advancing Tinel sign.
INTRODUCTION TO DIGITAL NERVE INJURIES
Distal to the wrist, the digital nerves are the most frequently severed peripheral nerves in the upper extremity. The restoration of protective and tactile sensation is paramount for optimal hand function, fine motor dexterity, and the prevention of inadvertent thermal or mechanical injury. While all digital nerve lacerations warrant evaluation for repair, it is critically important to prioritize the repair of specific nerves that govern primary pinch and grip biomechanics.
The most functionally vital digital nerves include:
* The ulnar digital nerve of the thumb: Essential for key pinch and opposition.
* The radial digital nerve to the index finger: Critical for pulp-to-pulp pinch and fine manipulation.
* The radial digital nerves to the long and ring fingers: Important for power grip and spatial orientation.
* The ulnar digital nerve to the little finger: Crucial for the ulnar border of the hand during power grip and resting on surfaces.
Furthermore, a comprehensive knowledge of the anatomy of the cutaneous sensory branches of the nerves on the dorsum of the hand allows for the meticulous repair of these dorsal branches, which, while often overlooked, contribute significantly to overall hand proprioception and sensory feedback.
SURGICAL ANATOMY AND BIOMECHANICS
Digital nerves can be reliably repaired distal to the distal volar flexion crease of the fingers, extending into the region of the terminal branches. The digital nerves travel volar to the digital arteries within the neurovascular bundle. They are tethered by Cleland’s ligaments (dorsal to the bundle) and Grayson’s ligaments (volar to the bundle).
Biomechanically, peripheral nerves possess an inherent elasticity due to the undulating arrangement of the bands of Fontana within the endoneurium. However, when a nerve is transected, the proximal and distal stumps retract due to this inherent elasticity and the surrounding tissue edema.
Surgical Warning: Tension at the repair site is the primary enemy of nerve regeneration. Tension compromises the delicate microvascular supply (vasa nervorum) within the mesoneurium, leading to ischemia, excessive fibroblast proliferation, and ultimately, a dense scar that blocks axonal sprouting. If a primary repair cannot be achieved without tension, a nerve graft is strictly indicated.
INDICATIONS AND TIMING OF SURGERY
Primary vs. Secondary Repair
Primary repair (within 48 to 72 hours) is the gold standard for sharp, clean lacerations. However, in cases of severe crush injuries, avulsions, or highly contaminated wounds, delayed primary or secondary repair is indicated.
If digital nerves are repaired secondarily, the surgical environment must be optimized. The suture line must lie in a well-vascularized bed completely free of fibrotic scar tissue. Placing a nerve repair or graft into a scarred, avascular bed will inevitably result in failure due to ischemic necrosis of the advancing axonal sprouts.
Preoperative Localization of the Proximal Stump
In the delayed or secondary setting, the proximal nerve stump will have formed a neuroma. Locating this stump amidst dense scar tissue can be challenging.
Clinical Pearl: Before secondary repair, the proximal end of the nerve can often be localized clinically in the outpatient setting. By passing a firm, blunt object—such as a paper clip—gently and distally along the anatomical course of the nerve, the surgeon can map the nerve's progression. Upon reaching the terminal neuroma, the patient will indicate exquisite, electrifying tenderness (a localized Tinel's sign). This precise mapping guides the proximal extent of the surgical incision.
SURGICAL APPROACH AND PREPARATION
Patient Positioning and Equipment
The patient is positioned supine with the arm extended on a radiolucent hand table. A well-padded pneumatic tourniquet is applied to the upper arm. Microsurgical instruments, jeweler's forceps, microscissors, and optical magnification (operating microscope or high-powered 4.5x to 6.0x loupes) are mandatory for interfascicular dissection and coaptation.
Exposure and Neuroma Resection
- Incision: Utilize a Bruner zig-zag volar incision or a mid-axial incision to expose the neurovascular bundle. Never cross flexion creases perpendicularly to avoid flexion contractures.
- Dissection: Identify the nerve in virgin tissue proximal and distal to the zone of injury. Trace the nerve ends toward the central zone of scarring.
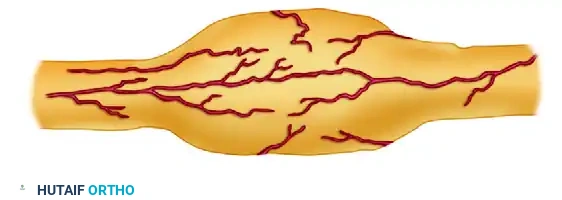
- Neuroma Excision: The terminal neuroma on the proximal stump and the glioma on the distal stump must be resected back to healthy, viable fascicles.
The image above illustrates the classic appearance of a neuroma-in-continuity or a scarred nerve segment prior to resection. The thickened, fibrotic epineurium and disorganized internal architecture must be completely excised. Using a fresh surgical blade or specialized nerve scissors, "bread-loaf" the nerve ends by making sequential 1-mm transverse cuts until healthy fascicles "mushroom" out of the epineurium, indicating normal endoneurial pressure and viable tissue.
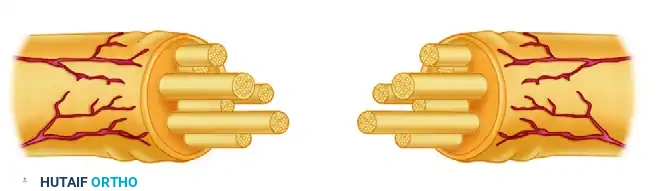
THE MILLESI STEP-CUT INTERFASCICULAR TECHNIQUE
When a gap exists after adequate debridement of the proximal and distal stumps, interfascicular nerve grafting is required. The step-cut technique, popularized by Millesi, is highly recommended for polyfascicular nerves to maximize the surface area for coaptation and prevent the confluence of scar tissue across a single transverse plane.
As demonstrated in the step-cut technique of Millesi (Figures A to C above):
* Step A: The epineurium is longitudinally incised and resected over a short distance to expose the underlying fascicular groups.
* Step B: The fascicular groups are separated using meticulous interfascicular dissection.
* Step C: The fascicles are transected at different levels (staggered or "step-cut"). This ensures that the individual nerve grafts will protrude from the nerve stump at varying lengths after the completion of the interfascicular dissection.
Carry out this similar staggered dissection on both the proximal and distal stumps. This staggering prevents a single, circumferential ring of scar tissue from forming, which could otherwise constrict regenerating axons.
FASCICULAR MAPPING AND SKETCHING
In polyfascicular nerves, such as the median and ulnar nerves at the wrist, or even more proximal digital nerves, appropriate alignment of sensory and motor fascicles (or specific sensory territories) is critical to prevent axonal misdirection.
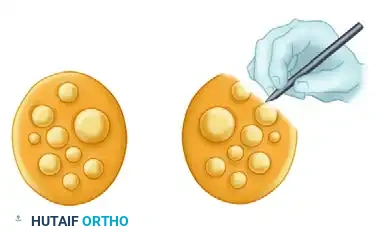
As shown in the illustration above, it is highly helpful to physically sketch the ends of the two nerve stumps with their respective fascicular patterns.
* Use a sterile marker and a piece of the sterile glove wrapper to draw the cross-section of the proximal and distal stumps.
* Map the fascicles based on their size, the number of fascicles, and their spatial arrangement within the stumps.
* Utilize longitudinal epineurial blood vessels as landmarks to ensure rotational alignment.
Surgical Pitfall: Clinical estimation of fascicular alignment is relatively straightforward over short distances but becomes exponentially more difficult over longer defects where the internal topography of the nerve naturally rotates and branches. Rely on your intraoperative sketches to allow matching of the respective fascicles and appropriate placement of the graft.
NERVE GRAFTING PRINCIPLES
Donor Site Selection
Select a donor site that is appropriate for the size of the nerve and the gap to be filled.
* Antebrachial Cutaneous Nerves: Generally, for common and proper digital nerves, the medial or lateral antebrachial cutaneous nerves are highly satisfactory. They offer an excellent caliber match for digital nerves and result in a relatively inconspicuous area of donor site numbness.
* Sural Nerve: If a great deal of nerve tissue is required (e.g., multiple digital nerves or a large gap in the median/ulnar nerve), the sural nerve is the gold standard in our experience. It provides up to 30-40 cm of graft material and can be cut into multiple cables.
Graft Placement and Coaptation
- After the nerve graft has been harvested, reverse its orientation (distal end of the graft to the proximal nerve stump) to minimize axonal loss through any small, unnoticed branches within the graft.
- Place the graft between the proximal and distal nerve stumps. In polyfascicular nerves, attempt to use your intraoperative sketch of the fascicle groups to allow appropriate, topographically matched placement of the graft cables.
- Suturing: When coaptation of the graft has been achieved, suture the graft using 10-0 monofilament nylon. The needle should pass through the epineurium of the graft and the perineurium of one of the fascicles in the group, or into the interfascicular connective tissue of the host stump.
- Minimal Suture Technique: Multiple sutures may not be required. If the bed is well-prepared and the graft is perfectly sized, 2 to 3 sutures per coaptation site are often sufficient. Excessive suturing introduces foreign body reactions and scarring. The natural fibrin clot will provide significant adhesive strength within minutes.
WOUND CLOSURE AND DRAINAGE
Meticulous hemostasis is mandatory before closure to prevent hematoma formation, which acts as a physical barrier to regeneration and a nidus for infection.
* Drains: Insert small Silastic drains as needed to prevent fluid accumulation.
* Strict Warning: Avoid the use of suction drainage. Active suction can easily displace the delicate nerve grafts or disrupt the 10-0 nylon coaptations.
* Closure: Close the skin carefully. Ensure that the graft is not displaced, kinked, or subjected to shearing forces during wound closure. If skin closure causes tension over the graft, a local flap or full-thickness skin graft must be utilized to ensure a tension-free, well-vascularized envelope.
POSTOPERATIVE CARE AND REHABILITATION
The success of a microsurgical nerve repair relies heavily on strict adherence to a phased postoperative rehabilitation protocol.
Phase I: Immobilization (Days 0 to 10)
- The extremity is immobilized in a well-padded dorsal blocking splint.
- The splint should hold the hand in as near an anatomical, tension-free position as possible (typically slight wrist flexion, MCP joints flexed to 30-45 degrees, and IP joints gently extended, depending on the exact site of the graft).
- The part is strictly immobilized for about 10 days to allow the initial fibrin clot to organize and early tensile strength to develop at the coaptation sites.
- Complication Management: Hematomas that develop early in the postoperative period must be surgically evacuated immediately. Unsatisfactory or necrotic skin must be aggressively débrided. Local flaps or skin grafts are used urgently to cover a nerve graft that may have become exposed as a result of wound necrosis, as exposed grafts will desiccate and fail.
Phase II: Early Mobilization (2 Weeks Onward)
- At approximately 10 to 14 days, the splint is removed, and free movement of the joints is allowed to prevent tendon adhesions and joint stiffness.
- Physical therapy is formally begun with supervised active and active-assisted range-of-motion exercises.
- Sensory re-education programs are initiated once protective sensation begins to return.
Phase III: Monitoring Regeneration
- The progress of axonal regeneration is followed clinically using the advancing Tinel sign. Axons typically regenerate at a rate of 1 mm per day (or roughly 1 inch per month) after an initial latency period of 3 to 4 weeks.
- Measure and document the most distal point of the Tinel sign at each follow-up visit.
- Indications for Re-exploration: If the Tinel sign stops advancing and shows no further progression for 3 to 4 months at the distal end of the graft (the distal coaptation site), this indicates a failure of axons to cross the distal suture line. In such cases, the nerve graft should be surgically explored, with resection of the distal suture line neuroma and another end-to-end repair performed.
You Might Also Like
