Interfascicular Nerve Grafting: Surgical Techniques and Protocols

Key Takeaway
Interfascicular nerve grafting is the gold standard for bridging peripheral nerve defects where tension-free primary repair is impossible. Pioneered by Millesi, this microsurgical technique relies on precise fascicular alignment and tensionless coaptation using autologous donor grafts, most commonly the sural nerve. Success demands meticulous intraneural dissection, accurate fascicular mapping, and rigorous postoperative rehabilitation to optimize axonal regeneration and functional recovery.
INTRODUCTION TO INTERFASCICULAR NERVE GRAFTING
The fundamental principle of peripheral nerve surgery is that a repair must be entirely free of tension. Biomechanical studies have conclusively demonstrated that tension across a nerve repair site exceeding 8% to 10% of the nerve's resting length induces a critical reduction in intraneural blood flow. Tension exceeding 15% results in complete ischemia, leading to profound intraneural fibrosis, scarring at the coaptation site, and ultimate failure of axonal regeneration.
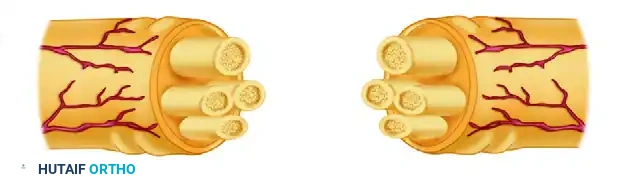
When a peripheral nerve defect is too large to permit a tension-free primary end-to-end neurorrhaphy, interfascicular nerve grafting becomes the gold standard of treatment. Pioneered and popularized by Hanno Millesi, the interfascicular grafting technique abandons the concept of bulk epineurial approximation in favor of precise, tensionless coaptation of individual fascicles or fascicular groups using autologous nerve grafts. This technique maximizes the cross-sectional area of axonal alignment, minimizes misdirection of regenerating motor and sensory fibers, and mitigates the fibrotic response by excising redundant epineurial tissue.
INTRANEURAL ANATOMY AND FASCICULAR PATTERNS
A profound understanding of intraneural topography is mandatory before undertaking interfascicular grafting. The internal architecture of a peripheral nerve is not static; it is a dynamic plexus of fascicles that divide, anastomose, and migrate as they traverse the extremity.
Millesi stressed the critical importance of recognizing that most cross-sections of peripheral nerves exhibit one of four distinct fascicular patterns. Identifying these patterns at the proximal and distal stumps is the first step in successful graft mapping.
1. Monofascicular Nerves
These nerves consist of a single, large fascicle enveloped by epineurium. They are typically found in the distal terminal branches of peripheral nerves.
2. Oligofascicular Nerves
These nerves contain a small number of relatively large fascicles. Dissection and group matching in oligofascicular nerves are generally straightforward.

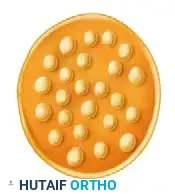
3. Polyfascicular Nerves with Group Arrangements
In this pattern, numerous smaller fascicles are clustered into distinct, identifiable groups separated by interfascicular epineurium. This is the most common pattern encountered in major mixed motor-sensory nerves (e.g., the median or ulnar nerves in the forearm) and is highly amenable to group interfascicular grafting.

4. Polyfascicular Nerves without Group Arrangements
This is the most complex pattern, characterized by numerous small fascicles scattered diffusely throughout the cross-section without distinct grouping. Matching these fascicles requires meticulous clinical estimation and often necessitates grouping them artificially based on regional quadrants.
Surgical Pearl: Fascicular Mapping
Always create a detailed intraoperative sketch of the cross-sectional ends of both the proximal and distal nerve stumps. Attempt to identify corresponding groups in the distal stump by evaluating the size, number of fascicles, and spatial arrangement within the proximal stump. Over short defects, identifying corresponding fascicular groups is highly reliable. However, due to the complex fascicular plexus formation within the nerve, identifying corresponding groups in longer defects becomes a challenging clinical estimation.
PREOPERATIVE PLANNING AND DONOR NERVE SELECTION
The ideal donor nerve must provide sufficient length, possess a favorable fascicular architecture (preferably oligofascicular or polyfascicular with small amounts of connective tissue), and result in minimal donor site morbidity.
Nerves historically utilized as donors include:
* The Sural Nerve (Most Common)
* The Saphenous Nerve
* The Medial and Lateral Cutaneous Nerves of the Forearm
* The Superficial Branch of the Radial Nerve
* The Intercostal Nerves (typically reserved for brachial plexus reconstruction)
The Sural Nerve Harvest
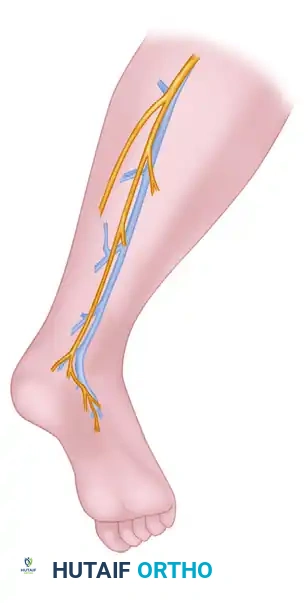
The sural nerve remains the workhorse for interfascicular grafting. It provides up to 30 to 40 cm of graft material, has an excellent ratio of axonal tissue to epineurial connective tissue, and its harvest results in a well-tolerated area of numbness over the lateral aspect of the foot.
The nerve is located posterolateral to the lateral malleolus, running in close proximity to the lesser saphenous vein.
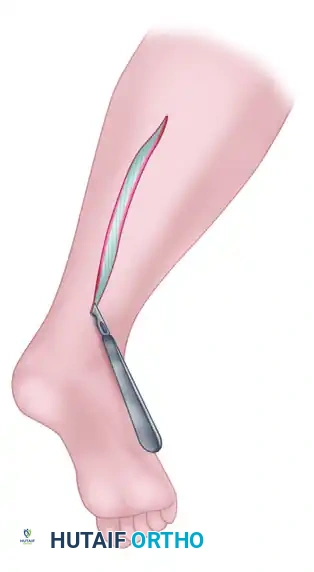
While minimally invasive nerve strippers are available, harvesting the nerve through a single, continuous longitudinal incision is strongly recommended. This open technique facilitates the removal of the nerve with minimal trauma, preventing the traction injuries and inadvertent transection of branches that frequently occur with blind stripping.
SURGICAL TECHNIQUE: STEP-BY-STEP
1. Preparation and Neuroma Excision
Expose and dissect the injured nerve in a completely bloodless field utilizing a pneumatic tourniquet. The dissection must proceed from healthy, unscarred tissue proximally and distally toward the zone of injury.
The neuroma at the proximal stump and the glioma at the distal stump must be meticulously excised. Using a fresh diamond knife or a specialized nerve cutting instrument, sequentially section the nerve ends ("bread-loafing") until healthy, pouting fascicles are visualized, free of interfascicular fibrosis.
Once the resection is complete and healthy fascicles are exposed, deflate the tourniquet. Achieving absolute hemostasis is critical; any postoperative hematoma will organize into a fibrotic scar, creating a mechanical barrier to regenerating axons.
2. Graft Preparation
Once harvested, keep the nerve graft continuously moist with Ringer's solution to prevent desiccation.
Surgical Warning: Graft Length Calculation
A common pitfall is cutting the graft too short. The nerve graft must be cut into sections that are 10% to 15% longer than the measured defect. This measurement must be taken with the adjacent joints (e.g., elbow and wrist) fully extended. This redundancy compensates for the natural shrinkage of the free graft and accommodates the normal excursion of the nerve bed during joint movement.
Using a diamond knife, transect the graft gently. It is imperative to prevent redundant epineurial tissue from draping over the ends of the graft, as this will block axonal crossing. Meticulously excise any redundant epineurial and areolar connective tissue from the graft ends under high-power microscopic magnification.
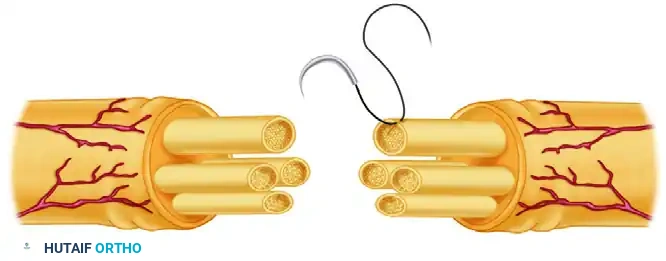
3. Interfascicular Coaptation
Place the prepared nerve grafts between the proximal and distal nerve stumps. Refer to your intraoperative sketch of the fascicle groups to determine the precise spatial orientation and attachment site for each graft segment.
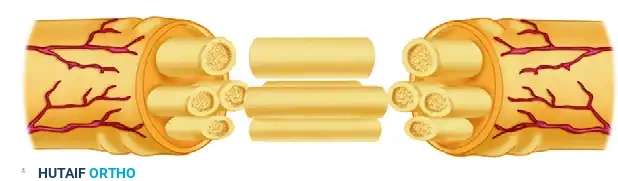
The goal is exact coaptation of the nerve graft to the corresponding fascicle groups. Suture the nerve graft at each end utilizing a single 10-0 monofilament nylon suture. The needle should pass through the epineurium of the graft and anchor into the perineurium of one of the fascicles in the host group, or into the robust interfascicular connective tissue of the fascicular group.
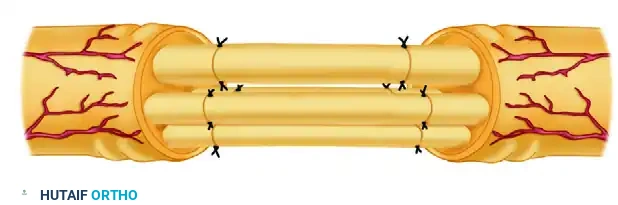
With perfect coaptation of the graft to the stump ends, many additional sutures are not required. The natural fibrin clot that forms within minutes will provide significant adhesive stability. However, if the grafts are not perfectly aligned, rotate them around the axis of the first suture to optimize the fit, and add as few additional 10-0 sutures as absolutely necessary. Excessive suturing introduces foreign body material, inciting inflammation and subsequent fibrosis.
4. Wound Closure and Drainage
Wound closure must be executed with extreme care to ensure the graft is not displaced by shearing forces. The soft tissue bed must be well-vascularized to support the free graft, which relies entirely on plasmatic imbibition for the first 72 hours before neovascularization occurs.
If the skin closure is tight—particularly in the distal forearm—shearing forces can easily disrupt the delicate 10-0 repairs. In such scenarios, Millesi recommends making an ulnar midlateral incision to relax the skin tension over the primary graft site, subsequently covering the secondary midlateral defect with a split-thickness skin graft.
Drainage: Strictly avoid the use of active suction drainage, as the negative pressure can easily disrupt the delicate interfascicular coaptations or aspirate the stabilizing fibrin clot. If drainage is necessary, utilize passive Silastic drains.
POSTOPERATIVE CARE AND REHABILITATION
The immediate postoperative phase is critical for the survival and stabilization of the nerve graft.
Immobilization Phase
Immobilize the extremity in a well-padded plaster splint in the exact position that was maintained throughout the surgical procedure. The part is strictly immobilized for 8 to 10 days. This period allows the initial fibrin clot at the coaptation sites to organize into early, stable collagenous tissue.
Mobilization and Wound Management
After 8 to 10 days, the splint is removed, and free motion of the adjacent joints is permitted.
* Hematoma Management: Any hematomas must be evacuated early in the postoperative period to prevent compressive ischemia and excessive scarring.
* Wound Breakdown: Necrotic skin must be aggressively débrided. If a nerve graft becomes exposed, it will rapidly desiccate and fail. Local rotational flaps or free tissue transfer must be utilized immediately to cover an exposed graft.
Physical Therapy
Formal physical therapy, consisting of active and active-assisted range-of-motion exercises, is instituted under the supervision of a specialized hand or occupational therapist 2 weeks after nerve grafting. This prevents joint contractures and encourages the gliding of the nerve bed, which prevents restrictive perineurial adhesions.
Monitoring Axonal Regeneration
The progress of axonal regeneration is monitored clinically by observing the advancing Tinel sign. Regenerating axons typically advance at a rate of approximately 1 mm per day, though this varies based on the patient's age, the nerve involved, and the proximity of the lesion to the cell body.
Clinical Pitfall: The Distal Block
When regeneration progresses to a point roughly corresponding to the distal end of the graft and stops with no further progression for 3 to 4 months, a mechanical block at the distal suture line must be assumed. In this scenario, the nerve graft should be surgically re-explored. The fibrotic distal suture line is resected until healthy fascicles are encountered, and a secondary end-to-end repair is performed. Because the graft has now been vascularized and tethered to the surrounding bed, this secondary repair can often be accomplished without tension.
📚 Medical References
- Interfascicular nerve grafting, Clin Orthop Relat Res 163:65, 1982.
- Pringle RM, Protheroe K, Mukherjee SK: Entrapment neuropathy of the sural nerve, J Bone Joint Surg 56B:465, 1974.
- Riley DA, Lang DH: Carbonic anhydrase activity of human peripheral nerves: a possible histochemical aid to nerve repair, J Hand Surg 9A:112, 1984.
- Ruhmann O, Wirth CJ, Gosse F, et al: Trapezius transfer after
You Might Also Like