Masterclass in Flexor Tendon Repair: Timing, Anatomy, and Surgical Techniques
Key Takeaway
The timing of flexor tendon repair is critical for optimal functional outcomes. Primary repair within the first 12 hours is indicated for clean, sharp lacerations. This comprehensive guide details the anatomical zones, biomechanics of the pulley system, and step-by-step surgical techniques for complete and partial tendon lacerations, including distal phalanx reinsertion and postoperative rehabilitation protocols essential for orthopedic surgeons.
INTRODUCTION TO FLEXOR TENDON INJURIES
The management of flexor tendon lacerations remains one of the most exacting challenges in hand surgery. Successful outcomes depend not only on meticulous surgical technique but also on a profound understanding of tendon biomechanics, the timing of intervention, and rigorous postoperative rehabilitation. Historically, outcomes in specific anatomical regions—most notably "No Man's Land" (Zone II)—were fraught with high rates of adhesion and rupture. Today, advancements in suture materials, core suture configurations, and early active motion protocols have revolutionized the standard of care.
This comprehensive academic guide delineates the critical timing of flexor tendon repair, the anatomical nuances of the flexor sheath and pulley system, and the step-by-step surgical execution required for both complete and partial tendon lacerations, with a specific focus on Zone I reinsertion techniques.
TIMING OF FLEXOR TENDON REPAIR
The chronological classification of flexor tendon repair dictates the surgical approach and significantly influences the prognosis.
If a wound is caused by a sharp object, such as a knife or glass, and is reasonably clean, the tendons of the hand should ideally be repaired at the time of primary wound closure.
- Primary Repair: Performed within the first 12 to 24 hours of injury. This is the gold standard for clean, sharp lacerations.
- Delayed Primary Repair: Performed between 24 hours and 14 days post-injury. This is often indicated when the initial wound is contaminated, requiring serial debridement before definitive tendon reconstruction, or when appropriate surgical expertise was not immediately available.
- Secondary Repair: Performed after 14 days. At this stage, tendon retraction, muscle belly contracture, and sheath scarring often preclude direct end-to-end repair, frequently necessitating a staged tendon graft or tendon transfer.
Clinical Pearl: If possible, especially with sharp injuries, it is vastly superior to stabilize concomitant fractures and suture digital nerves and tendons initially rather than to delay and perform a secondary procedure. Delaying repair increases the likelihood that a tendon graft will be required due to irreversible myostatic contracture.
ANATOMY AND BIOMECHANICS OF THE FLEXOR SYSTEM
A masterful repair requires an intimate knowledge of the flexor tendon zones and the retinacular pulley system. Treatment algorithms and prognoses vary significantly according to the level of severance.
The Flexor Zones of the Hand
The flexor surface of the hand is divided into five distinct zones to guide surgical decision-making. As a rule, all flexor tendons should be repaired at whatever level they are severed.

- Zone I (Distal to Sublimis): Extends from the insertion of the flexor digitorum superficialis (FDS) to the insertion of the flexor digitorum profundus (FDP) on the distal phalanx. Injuries here isolate the FDP.
- Zone II (No Man's Land): Extends from the proximal A1 pulley to the insertion of the FDS. Both the FDS and FDP lie within a tight fibro-osseous canal. Because of the vincular system of the profundus tendon, when both have been severed, evidence suggests outcomes are superior when both are repaired rather than repairing the profundus tendon alone.
- Zone III (Lumbrical Origin): Extends from the distal border of the transverse carpal ligament to the proximal A1 pulley. Tendons here are outside the tight synovial sheath, generally yielding better surgical outcomes.

- Zone IV (Carpal Tunnel): The zone covered by the transverse carpal ligament. Injuries here often involve multiple tendons and the median nerve.
- Zone V (Proximal to Carpal Tunnel): Extends from the musculotendinous junction in the forearm to the proximal border of the transverse carpal ligament.
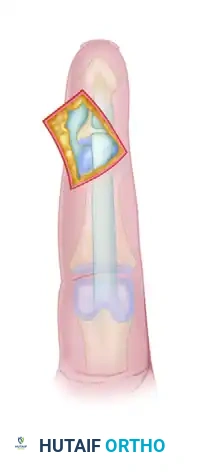
The Flexor Sheath and Pulley System
The flexor tendon sheath is a complex synovial and retinacular structure designed to provide mechanical advantage and nutrition to the tendons.
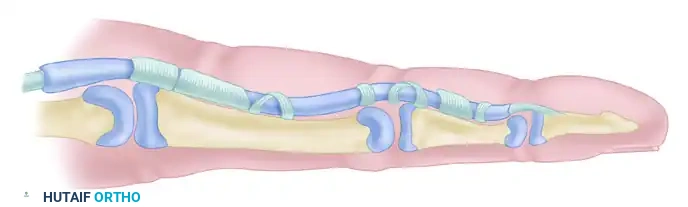

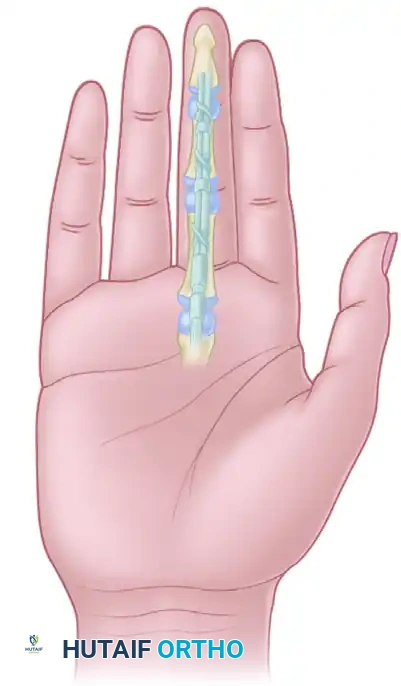
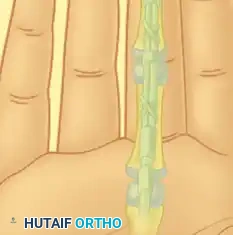
The retinacular system consists of annular (A) and cruciate (C) pulleys. Maintenance of the second anulus (A2) and fourth anulus (A4) is absolutely essential to retain the appropriate angle of approach and prevent "bowstringing" of the flexor tendons or a subsequent tendon graft.
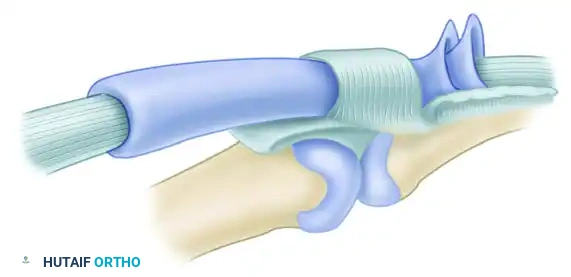
The diagram above illustrates the relationship of the two synovial layers and the anulus. The visceral and parietal layers of the synovium facilitate frictionless gliding, while the robust A2 (over the proximal phalanx) and A4 (over the middle phalanx) pulleys keep the tendon closely apposed to the bone during flexion.
Surgical Warning: It is essential that at least the A2 and A4 annular pulley areas of the flexor sheath be preserved. Failure to do so will result in tendon bowstringing, a biomechanical disadvantage leading to a flexion deformity of the finger and severely impaired tendon excursion.
MANAGEMENT OF PARTIAL FLEXOR TENDON LACERATIONS
Partial lacerations, particularly in Zone II, present a unique clinical dilemma. The surgeon must balance the risk of tendon rupture against the risk of triggering and adhesion formation caused by bulky repairs.
Based on rigorous clinical findings, a standardized approach to managing partial tendon lacerations is as follows:
Lacerations $\ge$ 60% of the Tendon Diameter
If a tendon is lacerated 60% or more, it lacks the structural integrity to withstand early active motion protocols. It must be treated identically to a complete transection.
* Surgical Technique: A multi-strand core suture is placed in the tendon to provide tensile strength. The surface of the tendon is then meticulously sutured with a continuous 6-0 nylon epitendinous suture to smooth the repair site and reduce gliding resistance.
* Sheath Management: The flexor sheath is repaired when possible to restore the synovial environment.
* Postoperative Protocol: Immobilization followed by early controlled passive motion. Restoration of forceful activities is delayed until 10 to 12 weeks postoperatively.
Lacerations < 60% of the Tendon Diameter
Lacerations involving less than 60% of the tendon cross-section generally possess sufficient intrinsic strength to heal without core suture placement, provided they are managed correctly to prevent mechanical catching.
* Evaluation: The injury is dynamically evaluated intraoperatively for the risk of triggering against the pulley system.
* Surgical Technique: If triggering is observed, the protruding flap of the tendon is smoothly and conservatively débrided. The flexor sheath is then repaired to help avoid entrapment or triggering of the tendon flap within the sheath defect.
* Postoperative Protocol: The digit is protected with dorsal block splinting for 6 to 8 weeks. More forceful activities are resumed gradually after approximately 8 weeks.
SURGICAL TECHNIQUES: ZONE I INJURIES
Zone I injuries involve the isolated laceration or avulsion of the Flexor Digitorum Profundus (FDP). Because the distal stump is often too short to accommodate a standard core suture, the FDP tendon is frequently repaired by advancement and direct insertion into the distal phalanx.
Pitfall: The FDP tendon should never be advanced more than 1 cm. Excessive advancement alters the resting tension cascade of the hand, leading to the "quadriga effect," which limits the flexion of adjacent, uninjured digits.
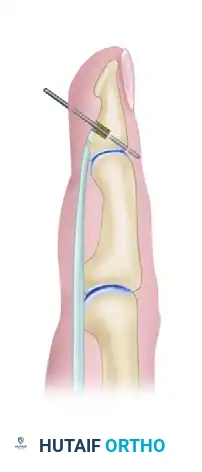
Technique 1: Pull-Out Wire Suture and Tie-Over Button
When the distance from the laceration to the insertion site is minimal, the profundus tendon is advanced and reinserted into the distal phalanx using a pull-out wire suture and a tie-over button.

Step-by-Step Execution:
1. Bone Preparation: If several tendon ends are to be fixed to bone, they are best inserted into a large hole drilled in the bone. After an area of the volar cortex has been elevated or a large hole made, perforate the distal phalanx with a small Kirschner wire in a power drill to create suture passage tunnels.
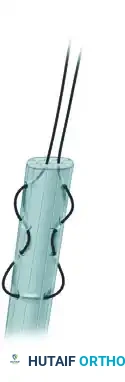
2. Tendon Grasping: Using the first needle, run the suture diagonally two or three times through the distal end of the tendon in a crisscross fashion (Bunnell or Krackow type weave).
3. Wire Looping: Loop a pull-out wire over the second needle, and complete the crisscross diagonal suture. This pull-out wire will exit proximally and allow for the removal of the fixation construct once healing is complete.
4. Suture Passage: Using the needles, pass the two ends of the core suture through the pre-drilled bone tunnels and snug the tendon firmly against the decorticated bone.
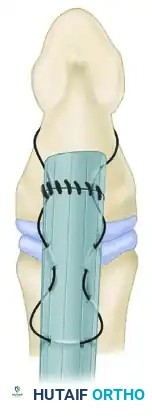
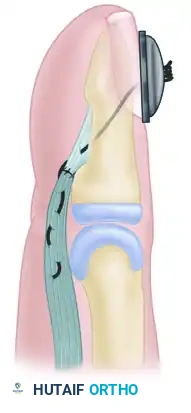
- Button Fixation: To avoid injuring the nail bed—which may occur if a pull-out suture is passed directly through drill holes exiting the dorsal nail bed—pass the suture closely along the palmar surface of the distal phalanx and out the distal end of the digit, just palmar to the tip of the fingernail.
- Securing the Construct: Pass the sutures through a sterile felt pad and a rigid button, tying them securely to maintain tension on the tendon-to-bone interface. Injury to the nail bed may also be avoided if the suture passage is made strictly distal to the lunula of the nail bed.
Technique 2: Suture Anchor Tendon Attachment
If the bone of the distal phalanx is large enough, and if adequate space is available, suture anchors provide a modern, highly biomechanically stable alternative to the traditional pull-out button technique. This eliminates the need for external buttons and reduces the risk of pin-tract infections or nail bed deformities.
Step-by-Step Execution:
1. Exposure: Perform a standard volar exposure of the distal phalanx. Identify the avulsed or lacerated FDP tendon.
2. Anchor Placement: Debride the anatomical footprint of the FDP on the volar base of the distal phalanx. Insert one or two micro-suture anchors (typically 1.0 mm to 1.5 mm in diameter) into the cancellous bone of the distal phalanx.
3. Suture Weave: Pass the needles attached to the anchor through the distal stump of the FDP tendon using a locking Krackow or modified Kessler configuration.

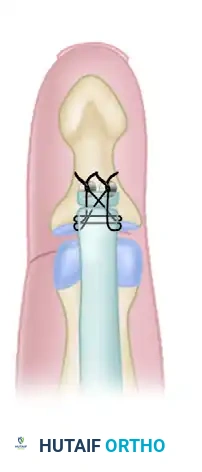
- Tensioning and Tying: Advance the tendon to the bony footprint. Tie the sutures securely, ensuring broad apposition of the tendon to the decorticated bone to facilitate primary osseotendinous healing.
THE CONTROVERSY OF FLEXOR SHEATH REPAIR
The decision to repair the flexor sheath over the tendon repair remains a topic of significant debate among hand surgeons.
- Arguments for Repair: Restores the synovial fluid environment, which provides vital nutrition to the healing tendon via diffusion. It also acts as a mechanical barrier to extrinsic adhesion formation from surrounding tissues.
- Arguments against Repair: Can constrict the swollen, repaired tendon, increasing the work of flexion and leading to triggering or secondary rupture.
Evidence-Based Consensus:
Repairing the flexor sheath is appropriate if the area of tendon repair appears to catch on the sheath edges during passive excursion, and if the sheath can be repaired easily without causing constriction.
If the sheath is severely damaged or cannot be repaired without tension, a circumferential epitendinous suture on the tendon itself is mandatory. Creating a "funnel" opening of the sheath along one side is highly helpful to allow the bulky repair site to glide smoothly into the pulley system without catching. Regardless of the sheath management strategy, the structural integrity of the A2 and A4 pulleys must never be compromised.
POSTOPERATIVE REHABILITATION PROTOCOLS
The surgical repair of a flexor tendon is only the first phase of treatment; the postoperative rehabilitation protocol is equally critical to the final functional outcome. The goal is to apply enough stress to the healing tendon to promote intrinsic healing and prevent adhesions, without applying so much force that the repair ruptures.
- Immobilization Phase (0-3 Days): The hand is placed in a dorsal blocking splint. The wrist is typically positioned in 20-30 degrees of flexion, the metacarpophalangeal (MCP) joints in 50-70 degrees of flexion, and the interphalangeal (IP) joints in full extension.
- Early Passive Motion (3 Days - 4 Weeks): Protocols such as the modified Kleinert or Duran protocols are initiated. Patients perform controlled passive flexion and active extension within the constraints of the dorsal block splint.
- Active Place-and-Hold (4 - 6 Weeks): The splint may be modified to allow neutral wrist positioning. Patients begin gentle active place-and-hold exercises to initiate active tendon gliding.
- Discontinuation of Splint (6 - 8 Weeks): The dorsal block splint is discontinued. Active range of motion is progressed. Blocking exercises are introduced to isolate FDS and FDP excursion.
- Strengthening and Return to Activity (8 - 12 Weeks): Progressive resistance exercises are initiated. Restoration of forceful activities, heavy lifting, and contact sports is strictly prohibited until 10 to 12 weeks postoperatively.
CONCLUSION
Mastery of flexor tendon repair requires a synthesis of anatomical knowledge, precise surgical execution, and disciplined postoperative care. By adhering to the principles of early intervention (<12 hours), respecting the biomechanics of the A2 and A4 pulleys, appropriately managing partial lacerations, and utilizing robust reinsertion techniques in Zone I, the orthopedic surgeon can consistently achieve excellent functional outcomes and restore the intricate mechanics of the human hand.
You Might Also Like