Two-Stage Flexor Tendon Reconstruction: A Comprehensive Surgical Guide
Key Takeaway
Two-stage flexor tendon reconstruction is a salvage procedure indicated for severe flexor tendon injuries complicated by extensive scarring or pulley incompetence. Stage one involves scar excision, pulley reconstruction, and placement of a silicone rod to form a pseudosheath. Stage two, performed months later, replaces the rod with an autologous tendon graft. Precise surgical technique and rigorous postoperative rehabilitation are paramount for restoring digital kinematics and functional outcomes.
INTRODUCTION TO TWO-STAGE FLEXOR TENDON RECONSTRUCTION
Severe flexor tendon injuries—particularly those occurring in Zone II (the "no man's land" of Bunnell) complicated by delayed presentation, extensive scarring, infection, or previous failed primary repairs—often preclude direct primary or secondary repair. In these complex scenarios, the fibro-osseous canal is typically obliterated by dense adhesions, and the critical pulley system may be incompetent.
The two-stage flexor tendon reconstruction, pioneered by Hunter and Salisbury, remains the gold standard salvage procedure. The fundamental biological principle relies on the placement of a passive silicone implant (Stage 1) to stimulate the formation of a mesothelial-lined pseudosheath. Once this biological conduit has matured and the digit has regained passive suppleness, the implant is replaced with an autologous free tendon graft (Stage 2).
This comprehensive guide details the precise surgical techniques, biomechanical considerations, and rigorous postoperative protocols required to execute this demanding procedure successfully.
STAGE 1: EXCISION OF TENDON AND SCAR, AND RECONSTRUCTION OF THE FLEXOR PULLEY
The primary objectives of Stage 1 are the radical excision of scar tissue, the creation of a supple bed for the future tendon graft, the reconstruction of a biomechanically sound pulley system, and the secure placement of a silicone rod to induce pseudosheath formation.
Preoperative Planning and Surgical Approach
Thorough preoperative assessment of digital neurovascular status and passive range of motion (ROM) is mandatory. Any severe joint contractures must be addressed either preoperatively through serial casting or intraoperatively via capsulotomies.
- Incision Design: Utilize a Brunner zigzag incision or a midlateral incision to expose the entire flexor sheath from the distal phalanx to the palm.
- Incision Rationale: If previous surgical scars are present, it is generally safer to incorporate them into the new incision to prevent the creation of narrow, ischemic skin flaps.
- Proximal Extension: Expose the palm either by continuing the zigzag incision proximally or by making a separate transverse or oblique incision at the level of the A1 pulley.
🔪 Surgical Warning: Meticulous handling of the neurovascular bundles is critical during the initial exposure, as normal anatomical planes are often distorted by dense fibrotic scar tissue.
Tendon Excision and Bed Preparation
Once the fibro-osseous canal is exposed, the scarred remnants of the flexor digitorum profundus (FDP) and flexor digitorum superficialis (FDS) must be excised.
- Distal Stump Preservation: Retain a 1 cm stump of the FDP tendon at its insertion on the distal phalanx. This stump is critical for the distal fixation of the silicone rod and, subsequently, the tendon graft.
- Proximal Transection: Transect the FDP tendon proximally at the level of the lumbrical origin in the palm.
- Lumbrical Management: If the lumbrical muscle is severely scarred and contracted, it should be excised to prevent paradoxical extension during the final reconstructive phase.
Pulley Assessment and Reconstruction
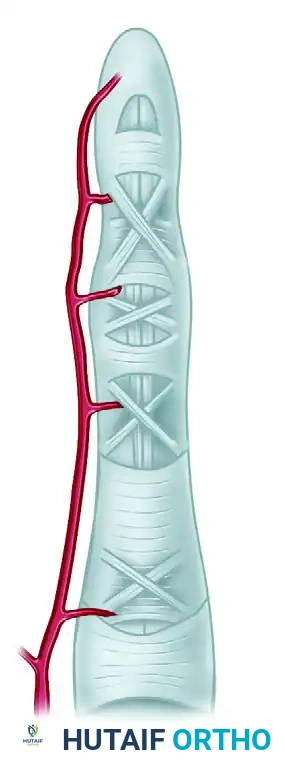
The biomechanical integrity of the digit relies heavily on the flexor pulley system, which prevents bowstringing and maintains the moment arm of the flexor tendons.
- Minimum Requirements: The A2 (proximal phalanx) and A4 (middle phalanx) pulleys are the absolute minimum required for functional digital kinematics.
- Tissue Preservation: Retain all unscarred portions of the native flexor pulley system. Preserve the insertion of the FDS to reinforce the A3 or A4 pulleys if possible.
- Reconstruction: If the A2 or A4 pulleys are incompetent or destroyed, they must be reconstructed during Stage 1. The excised FDS or FDP tendons serve as excellent autologous graft material for pulley reconstruction. The graft is typically passed circumferentially around the phalanx (extraperiosteal) or woven through the remnants of the native retinaculum.
Silicone Rod (Implant) Placement
The selection and placement of the Dacron-reinforced silicone rod are critical for the development of a functional pseudosheath.
- Implant Selection: Select a rod of appropriate diameter. It is generally advisable to choose a slightly smaller rod to ensure a snug but freely gliding fit within the reconstructed sheath. Rinse the rod thoroughly in sterile saline to remove any particulate lint, which could incite a foreign body reaction.
- Proximal Insertion: Insert the rod into the palm and use blunt dissection to pass it proximally. Depending on the planned motor for Stage 2, the rod may terminate in the palm or extend proximally above the wrist level. Excision of the entire FDS tendon may be necessary to accommodate the rod at the wrist.
- Distal Fixation: Secure the rod distally beneath the preserved 1 cm stump of the FDP. Fixation is achieved using 3-0 monofilament stainless steel wire or heavy nylon, reinforced with two 4-0 nonabsorbable sutures passed directly through the Dacron core of the rod. Alternatively, the rod can be secured directly to the distal phalanx using a micro-screw.
- Kinematic Testing: After seating the prosthesis, passively flex and extend the digit. Observe the rod for any tendency to buckle. Traction on the proximal end of the prosthesis will reveal any bowstringing, dictating the need for further pulley reconstruction or scar excision.
Stage 1 Closure and Postoperative Care
After obtaining meticulous hemostasis, repair any digital nerves as indicated and close the wounds.
- Immobilization: Apply a bulky compressive dressing and a dorsal blocking splint. The wrist should be positioned at approximately 35 degrees of flexion, the metacarpophalangeal (MCP) joints at 60 to 70 degrees of flexion, and the interphalangeal (IP) joints in full extension.
- Rehabilitation: Gentle passive motion of the finger joints is initiated at 7 to 10 days postoperatively. The primary goal is to maintain joint suppleness while the pseudosheath forms around the gliding implant.
- Monitoring: Examine the digit regularly for signs of synovitis or rod buckling. If buckling occurs, external thermoplastic rings can be fabricated to support the implant. If sterile synovitis develops, prompt and complete immobilization is usually sufficient for resolution.
💡 Clinical Pearl: The second stage should never be rushed. It is performed only when the finger is soft, supple, well-healed, and exhibits full passive mobility. This maturation process typically requires a minimum of 8 weeks, though 3 to 4 months is often optimal.
STAGE 2: ROD REMOVAL AND TENDON GRAFT INSERTION
Stage 2 involves the atraumatic removal of the silicone rod and its replacement with an autologous tendon graft. The success of this stage depends on precise tensioning and the creation of robust proximal and distal anastomoses.
Donor Tendon and Motor Selection
The choice of donor tendon depends on the required length, which is dictated by the planned proximal attachment (palm vs. forearm).
- Palmaris Longus: The preferred graft for a single digit requiring a proximal attachment in the palm.
- Plantaris or Extensor Digitorum Longus (EDL): Required when longer grafts are needed for attachments extending from the forearm to the digit. The EDL to the three central toes provides excellent length and caliber.
- Motor Selection: The FDP muscle mass is typically selected for the long, ring, and little fingers. The FDP to the index finger is used independently if suitable. FDS muscles can also serve as robust motors.
Surgical Approach and Graft Passage
- Incision: Under appropriate anesthesia, open the previous distal incision to expose the flexor sheath over the middle phalanx. Make a second incision proximally in the palm or forearm to expose the proximal end of the rod and the selected motor tendon.
- Tourniquet Management: While the tendon grafts are being harvested from the leg or contralateral arm, deflate the primary tourniquet, cover the hand wounds with sterile compresses, and allow for reperfusion. Once the graft is harvested, exsanguinate the limb and reinflate the tourniquet.
- Graft Passage: Suture the distal end of the harvested tendon graft to the proximal end of the silicone implant. Apply gentle, steady traction to the distal end of the implant, pulling it out of the sheath while simultaneously trailing the tendon graft atraumatically through the newly formed pseudosheath.
- Implant Disposal: Once the graft is fully seated within the canal, separate the implant from the tendon graft and discard the rod.
Distal Fixation
The distal attachment must be strong enough to withstand early active motion protocols.
- Pull-Out Technique: Secure the distal end of the tendon graft to the distal phalanx or the FDP stump using a classic Bunnell pull-out wire technique or modern suture anchors. If attaching to the tendon stump, utilize a robust core suture technique (e.g., modified Kessler or cruciate) supplemented by an epitendinous repair.
Proximal Fixation and Tensioning
Tensioning the graft is arguably the most challenging and critical step of the procedure. Incorrect tensioning will result in either a severe flexion contracture or a profound lag in active flexion.
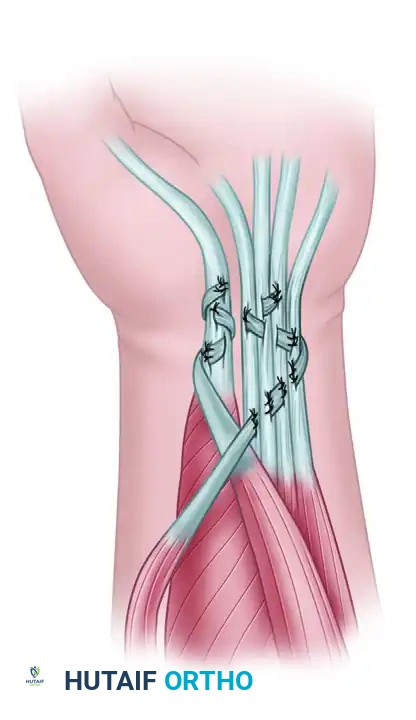
- Pulvertaft Weave: The proximal attachment is universally performed using a Pulvertaft fish-mouth weave, which provides superior biomechanical strength.
- Tensioning via the Cascade: If the proximal attachment is in the forearm, allow the dorsum of the hand and wrist to lie flat on the operating table. Inspect the normal "cascade of the fingers" (Schneider's cascade), where each ulnar digit is progressively more flexed than its radial neighbor.
- Interweave and Test: Pass the tendon graft through the motor tendon in an interweave fashion without tying the sutures. Apply traction to the graft until the reconstructed finger assumes its proper anatomical position relative to the adjacent fingers.
- Tenodesis Test: Place a temporary mattress suture through the weave. Test the tension by passively flexing and extending the wrist. Wrist extension should cause spontaneous digital flexion, and wrist flexion should allow full digital extension.
- Final Fixation: Once the tension is deemed perfect, complete the Pulvertaft weave with multiple nonabsorbable mattress sutures.
🔪 Surgical Warning: Always err slightly on the side of over-tensioning (placing the digit in slightly more flexion than the normal cascade), as tendon grafts inevitably stretch during the postoperative rehabilitation phase.
Stage 2 Closure and Postoperative Care
Deflate the tourniquet, obtain meticulous hemostasis, and close the wounds. Drains may be utilized in the forearm if extensive dissection was required.
- Immobilization: Apply a bulky compression dressing and a short-arm dorsal blocking splint. Maintain the wrist in 35 degrees of flexion, the MCP joints in 70 degrees of flexion, and the IP joints in full extension.
- Early Protected Motion: An early protected motion program (e.g., modified Kleinert or Duran protocol) is highly recommended to prevent restrictive adhesions. This typically begins 3 to 5 days postoperatively.
- Rubber Band Traction: If dynamic traction is utilized, a rubber band is attached to the fingernail and anchored proximally. The surgeon and hand therapist must closely monitor the patient to prevent proximal interphalangeal (PIP) joint flexion contractures.
- Suture Removal: The distal pull-out suture (if used) is removed at 4 weeks.
- Progression: At 4 to 5 weeks, the dorsal splint is transitioned, and active blocking exercises are initiated. Static extension splinting may be introduced to combat flexion contractures. Heavy resistance and forceful gripping must be strictly avoided for 9 to 12 weeks to prevent graft rupture.
SPECIAL CONSIDERATIONS: THUMB FLEXOR RECONSTRUCTION
Reconstruction of the Flexor Pollicis Longus (FPL) presents unique biomechanical challenges due to the independent function and high force requirements of the thumb.
Primary and Secondary Repair
The FPL tendon can often be repaired secondarily by direct suture at any level within the thumb, provided the ends can be approximated without excessive tension. Within the first few weeks post-injury, muscle contracture can often be overcome by flexing the wrist.
- Zone Avoidance: Avoid primary repair of the FPL directly beneath the proximal pulley (at the MCP joint level), as the bulky suture knot is highly prone to adhering to the pulley, obliterating glide.
- Advancement: Tendon advancement, or advancement combined with Z-lengthening at the musculotendinous junction in the distal forearm, is a viable alternative for small defects.
Tendon Transfer and Salvage
In difficult situations where the FPL muscle belly has undergone irreversible fibrosis, ischemic contracture, or denervation (e.g., anterior interosseous nerve injury), a free tendon graft will fail due to the lack of a functional motor.
- FDS Transfer: The FDS tendon of the ring finger is the premier choice for transfer to substitute for FPL function. It provides excellent excursion and synergistic power.
- Arthrodesis: As a definitive last resort in cases of massive tissue loss or failed multiple reconstructions, arthrodesis or tenodesis of the thumb interphalangeal joint provides a stable, functional post for pinch and grasp.
CONCLUSION
Two-stage flexor tendon reconstruction is a highly demanding but immensely rewarding procedure that can restore functional prehension to a severely crippled hand. Success is predicated not only on flawless surgical execution—meticulous scar excision, robust pulley reconstruction, atraumatic graft passage, and precise tensioning—but equally on a highly disciplined, closely monitored postoperative rehabilitation program. Surgeons undertaking this procedure must work in lockstep with specialized hand therapists to navigate the delicate balance between preventing adhesions and protecting the integrity of the reconstructed tendon.
You Might Also Like