Flexor Digitorum Profundus Advancement: Surgical Technique
Key Takeaway
The Wagner profundus advancement is a specialized surgical technique indicated for Zone I flexor digitorum profundus (FDP) avulsions or distal lacerations where primary end-to-end repair is unfeasible. By advancing the proximal FDP tendon up to 1 cm and securing it to the distal phalanx via a pull-out wire and button, surgeons can restore distal interphalangeal joint flexion while mitigating the risk of the quadriga effect and preserving flexor digitorum superficialis function.
Introduction to Profundus Advancement
The flexor digitorum profundus (FDP) advancement, classically described by Wagner, is a highly specialized surgical intervention utilized primarily for Zone I flexor tendon injuries. These injuries typically manifest as closed avulsions of the FDP tendon from its insertion at the base of the distal phalanx (commonly known as "Jersey finger") or as distal lacerations occurring within 1 cm of the tendon's insertion.
When the distal stump of the FDP is too short to accommodate a robust primary end-to-end core suture repair, advancing the proximal tendon and anchoring it directly into the distal phalanx becomes the procedure of choice. This technique restores the critical flexion arc of the distal interphalangeal (DIP) joint while bypassing the biomechanical limitations of a compromised distal tendon stump. However, profundus advancement is a procedure of strict tolerances; it requires meticulous handling of the flexor tendon sheath, precise routing through the flexor digitorum superficialis (FDS) bifurcation, and a profound understanding of hand biomechanics to prevent debilitating postoperative complications.
Surgical Anatomy and Biomechanics
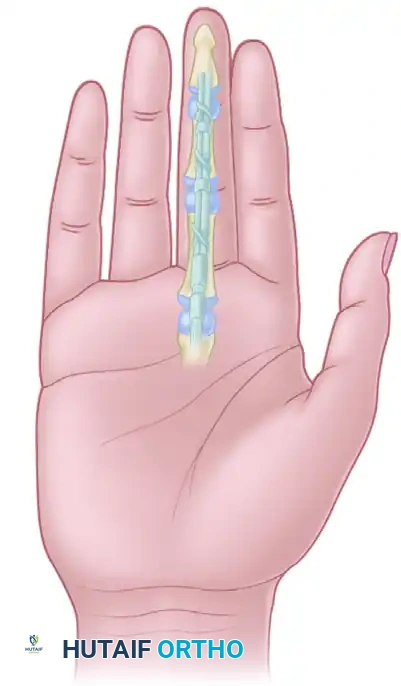
A comprehensive grasp of Zone I flexor tendon anatomy is mandatory before attempting a profundus advancement. Zone I extends from the insertion of the FDS on the middle phalanx to the insertion of the FDP on the distal phalanx.
The Pulley System and Camper's Chiasm
The FDP tendon travels through a highly engineered fibro-osseous tunnel. As it passes over the proximal phalanx, it traverses through the bifurcation of the FDS tendon—a structural decussation known as Camper's chiasm. Preserving the anatomical relationship between the FDS and FDP at this juncture is paramount. Furthermore, the annular pulley system, specifically the A2 (over the proximal phalanx) and A4 (over the middle phalanx) pulleys, must be preserved to prevent tendon bowstringing, which drastically reduces mechanical advantage and active range of motion.
The Quadriga Effect
The most critical biomechanical concept governing FDP advancement is the Quadriga Effect. The FDP muscle bellies to the middle, ring, and small fingers share a common muscle origin and often interdigitate.
🚨 Surgical Warning: The 1-Centimeter Rule
You must never advance the FDP tendon more than 1 cm. Advancing the tendon beyond this physiological limit over-tensions the involved digit. Because the ulnar three digits share a common muscle belly, over-tensioning one tendon restricts the proximal excursion of the entire muscle unit. Consequently, the patient will be unable to fully flex the adjacent, uninjured fingers—a phenomenon known as the Quadriga syndrome. Additionally, excessive advancement will result in a fixed flexion contracture of the DIP joint.
Indications and Contraindications
Indications
- Zone I Lacerations: Lacerations occurring less than 1 cm from the FDP insertion where the distal stump is insufficient to hold a multi-strand core suture.
- Type I and Type II FDP Avulsions (Jersey Finger):
- Type I: The tendon retracts into the palm, disrupting both vincula. Early surgical intervention (within 7-10 days) is required before myostatic contracture occurs.
- Type II: The tendon retracts to the level of the proximal interphalangeal (PIP) joint, held by an intact vinculum longum.
- Delayed Presentations: Cases where primary repair is not possible, but the tendon can still be mobilized without exceeding the 1 cm advancement limit.
Contraindications
- Retraction Requiring >1 cm Advancement: If the tendon cannot reach the distal phalanx without excessive tension, advancement is contraindicated. Alternatives such as a staged tendon graft or DIP joint arthrodesis must be considered.
- Compromised FDS Function: If advancing the FDP will tether or impair an otherwise functional FDS tendon.
- Severe Joint Destruction: Concomitant highly comminuted intra-articular fractures of the DIP joint may necessitate primary arthrodesis rather than tendon advancement.
Preoperative Planning and Patient Positioning
- Anesthesia: General anesthesia or regional brachial plexus block is preferred. Wide-awake local anesthesia no tourniquet (WALANT) can be utilized by experienced surgeons to assess active tendon excursion intraoperatively.
- Positioning: The patient is placed supine with the operative arm extended on a radiolucent hand table.
- Tourniquet: A well-padded pneumatic upper arm tourniquet is applied and inflated to 250 mm Hg (or 100 mm Hg above systolic blood pressure) after exsanguination of the limb.
- Magnification: Surgical loupes (minimum 2.5x to 3.5x magnification) are essential for identifying digital nerves and preserving the vincula and pulley systems.
Step-by-Step Surgical Technique
1. Incision and Exposure
Begin by designing the surgical approach to maximize exposure while preventing postoperative scar contractures.
* Make a volar oblique, Bruner zigzag, or midlateral incision over the profundus insertion at the distal phalanx.
* Carefully elevate the skin flaps, taking care to identify and protect the terminal branches of the digital neurovascular bundles.
* Incise the tendon sheath at the level of the C4 pulley (over the distal interphalangeal joint) and retract it.
* Crucial Step: You must meticulously preserve the A4 and A2 annular pulleys. Do not incise them unless absolutely necessary for tendon retrieval, and if so, only vent a small portion.
2. Tendon Retrieval
In most Type I avulsions or delayed lacerations, the proximal end of the profundus has retracted proximally, often into the palm, due to the pull of the lumbrical muscle and inherent muscle tone.
* To determine the location of the retracted tendon, make a small window in the flexor sheath distal to the A2 pulley.
* If the tendon is not visible within the digital canal, it has likely retracted into the palm.
* Make a separate transverse incision near the distal palmar crease to recover the retracted FDP tendon. Identify the tendon, tag it with a core suture (such as a Kessler or Krackow stitch using 3-0 or 4-0 non-absorbable braided suture), and prepare it for distal routing.
3. Tendon Routing and Pulley Management
This is the most technically demanding phase of the procedure. The FDP must be passed back through its anatomical tunnel without twisting or tethering.
* Carefully thread the tagged FDP tendon through the bifurcation of the sublimis (FDS) and advance it into the distal end of the finger.
* Use a pediatric feeding tube or a specialized tendon passer to guide the suture and tendon through the intact A2 and A4 pulleys.
💡 Clinical Pearl: Managing FDS/FDP Disruption
If the FDP cannot be threaded accurately through Camper's chiasm with absolute assurance that the relationship between the sublimis and profundus is normal, you face a critical decision. You have two choices:
1. Abandon the advancement procedure: Proceeding blindly will tether the FDS, impairing the function of both the FDP and FDS. Consider a tendon graft or arthrodesis instead.
2. Extend the exposure: Make a volar oblique incision over the proximal phalanx, open a small portion of the A2 pulley (venting), and deliver the profundus tendon under direct, magnified vision to ensure it passes smoothly through the FDS slips.
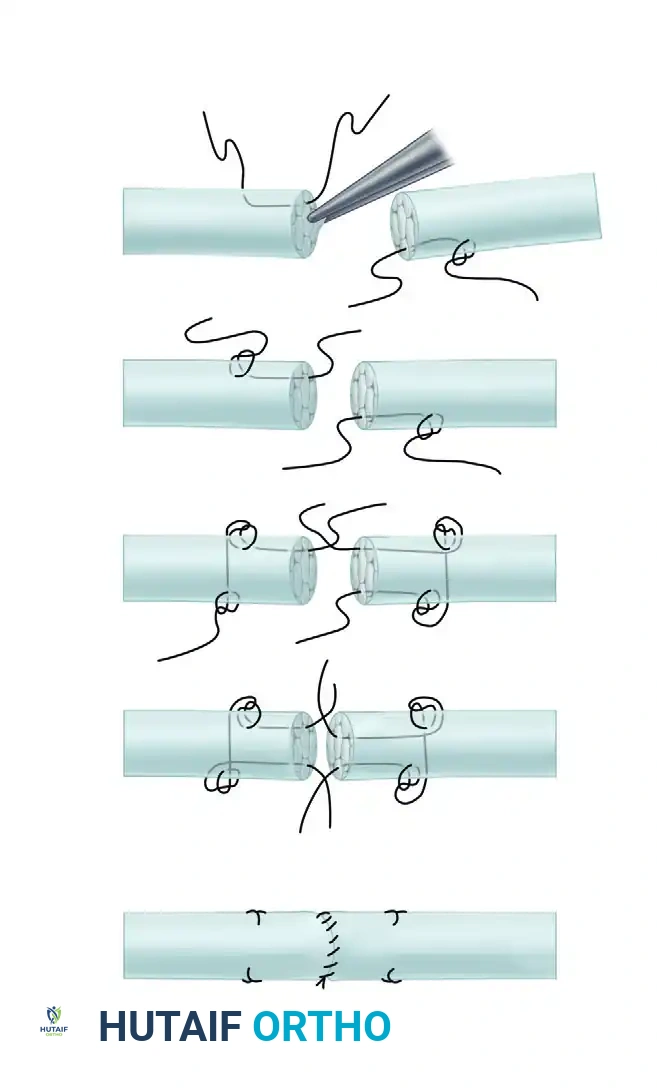
Figure: Volar view demonstrating the repair of finger flexor tendons. The graft/advanced tendon has been sutured in place, and the proximal and distal pulleys have been managed to ensure smooth gliding without bowstringing.
4. Preparation of the Distal Stump
Once the proximal FDP is successfully routed to the distal phalanx, attention is turned to the insertion site.
* Resect the distal segment of the profundus at a level just proximal to the distal interphalangeal joint.
* Strict Adherence: Take no more than 1 cm of tendon to avoid the Quadriga effect.
* Split the remaining distal stump of the FDP in a transverse plane to create a receptive bed for the advanced proximal tendon.
* Preservation of the Capsule: Do not disturb the capsular attachment of the profundus stump at the base of the distal phalanx. This capsular tissue is vital; it protects the volar plate, prevents joint subluxation, and helps to ensure a smooth gliding surface for a mobile DIP joint.
5. Tendon Fixation and Pull-Out Wire Application
Fixation must be rigid enough to withstand early passive motion protocols. The classic Wagner technique utilizes a pull-out wire system.
* Utilize a Bunnell retrograde pull-out wire suture or an antegrade pull-out wire technique.
* Pass the needles attached to the core suture of the proximal FDP tendon through the split distal profundus stump.
* Drive the needles straight through the distal phalanx, aiming to exit through the sterile matrix of the nail bed or just distal to the hyponychium.
* Draw the proximal tendon firmly into the split distal stump. Ensure there is broad tendon-to-tendon and tendon-to-bone contact.
* Tie the suture at the end of the finger tightly over a sterile, padded button. The padding (often a small piece of felt or Xeroform) prevents ischemic necrosis of the fingertip skin.
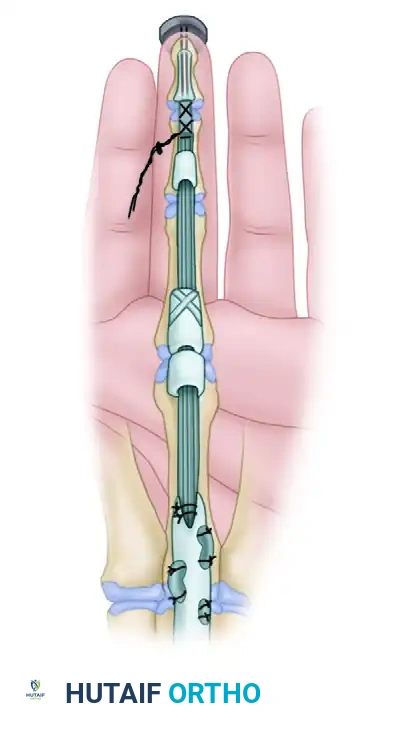
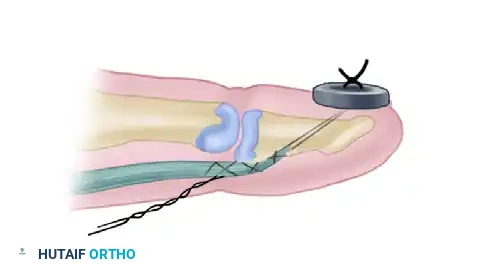
Figure: Lateral schematic demonstrating the pull-out wire technique. The advanced FDP tendon is secured to the distal phalanx, with the wire exiting the fingertip and tied securely over a padded button.
6. Final Inspection and Closure
- Release the tourniquet and achieve meticulous hemostasis using bipolar electrocautery. Hematoma formation within the tendon sheath will lead to severe adhesions.
- Inspect the repair under direct vision. Passively flex and extend the wrist and digits to confirm that the advanced FDP glides smoothly and that the DIP joint rests in a physiological cascade without excessive flexion contracture.
- Repair any divided digital nerves at this time using 8-0 or 9-0 epineural sutures under microscopic or high-loupe magnification.
- Close the skin incisions with non-absorbable monofilament sutures (e.g., 5-0 nylon) using interrupted or horizontal mattress techniques to avoid skin edge necrosis.
Postoperative Care and Rehabilitation
The success of a profundus advancement relies as much on the postoperative rehabilitation protocol as it does on surgical execution. The goal is to promote intrinsic tendon healing while preventing restrictive peritendinous adhesions.
Immediate Postoperative Splinting
Immediately following skin closure, apply a sterile, non-adherent dressing followed by a custom-molded dorsal blocking splint. The splint must be positioned precisely to relieve tension on the advanced FDP tendon:
* Wrist: 45 degrees of flexion.
* Metacarpophalangeal (MCP) Joints: 60 to 70 degrees of flexion.
* Interphalangeal (PIP and DIP) Joints: Full extension.
⚠️ Postoperative Pitfall: IP Joint Flexion in Splinting
Allowing the PIP or DIP joints to rest in flexion within the dorsal blocking splint is a common error. This leads to rapid development of flexion contractures that are notoriously difficult to resolve. Ensure the splint straps hold the IP joints in full, neutral extension at rest.
Rehabilitation Protocol
Postoperative care should follow a structured early passive motion protocol (such as the modified Kleinert or Duran protocols), tailored to the security of the pull-out wire fixation.
* Weeks 0-3: The patient remains strictly in the dorsal blocking splint. Passive flexion of the digits is performed by the patient or hand therapist to maintain tendon glide. Active extension within the limits of the splint is encouraged to prevent extensor lag.
* Weeks 3-4: The pull-out suture and button are removed in the clinic. This is typically done between 21 and 28 days postoperatively, once primary tendon-to-bone healing has initiated.
* Weeks 4-6: The dorsal blocking splint is gradually discontinued. Active range of motion exercises are initiated. Blocking exercises are introduced to isolate FDP excursion at the DIP joint.
* Weeks 6-8: Passive extension stretching is permitted if flexion contractures are present.
* Weeks 8-12: Progressive strengthening exercises are introduced. Return to heavy manual labor or contact sports is generally restricted until 12 weeks postoperatively.
Complications and Management
Despite meticulous surgical technique, profundus advancement carries inherent risks. Surgeons must be prepared to identify and manage these complications promptly.
- Quadriga Syndrome: As previously discussed, advancing the FDP more than 1 cm will restrict the excursion of adjacent digits. If a patient presents postoperatively with an inability to make a full fist and restricted flexion of uninjured fingers, the advancement was too tight. Surgical release and conversion to a tendon graft or arthrodesis may be required.
- Button Site Infection and Necrosis: The pull-out button exerts continuous pressure on the fingertip. If inadequately padded, it can cause pressure necrosis or serve as a nidus for infection. Routine inspection of the button site is mandatory. If erythema or purulence develops, early removal of the wire and oral antibiotics are indicated.
- Tendon Rupture: Rupture of the advancement typically occurs at the insertion site due to premature active flexion or non-compliance with the splinting protocol. Management usually involves salvage procedures, such as DIP joint arthrodesis, as a secondary advancement is rarely feasible.
- Flexion Contracture of the DIP Joint: Some degree of DIP flexion contracture is expected due to the shortening of the tendon. However, severe contractures (>30 degrees) interfere with daily activities. Aggressive hand therapy, dynamic extension splinting, and night splinting are the first lines of treatment.
- Adhesion Formation: The most common complication following any flexor tendon surgery. Adhesions between the FDP, FDS, and the surrounding fibro-osseous sheath will limit active motion. If conservative management with a certified hand therapist fails to improve motion by 3 to 6 months postoperatively, a surgical tenolysis may be indicated.
Conclusion
The Wagner profundus advancement remains a powerful technique in the armamentarium of the hand surgeon for addressing distal Zone I flexor tendon injuries. By strictly adhering to the 1-centimeter rule, meticulously preserving the pulley system, and ensuring accurate routing through Camper's chiasm, surgeons can reliably restore DIP joint function. Coupled with a rigorous, therapy-driven postoperative protocol, this technique yields excellent functional outcomes, allowing patients to regain critical grip strength and digital dexterity.
You Might Also Like