Modified Watson-Jones Technique for Lateral Ankle Instability
Key Takeaway
The modified Watson-Jones technique is a non-anatomic tenodesis utilizing the peroneus brevis tendon to reconstruct the anterior talofibular and calcaneofibular ligaments. Indicated for severe chronic lateral ankle instability, this procedure provides robust mechanical stability through precise osseous tunnels in the fibula and talus. This guide details the surgical approach, tendon routing, biomechanical considerations, and postoperative rehabilitation protocols for optimal patient outcomes.
Introduction to Lateral Ankle Reconstruction
Chronic lateral ankle instability (CLAI) is a debilitating condition frequently encountered in orthopedic practice, typically resulting from recurrent inversion injuries that lead to the attenuation or rupture of the anterior talofibular ligament (ATFL) and the calcaneofibular ligament (CFL). While anatomic repairs, such as the modified Broström-Gould procedure, remain the gold standard for the majority of patients, a distinct subset of the population requires a more robust, non-anatomic reconstruction.
The Watson-Jones procedure, and its subsequent modifications, represents a cornerstone in the surgical armamentarium for non-anatomic lateral ankle reconstruction. By utilizing the peroneus brevis tendon as a tenodesis graft, the modified Watson-Jones technique effectively restricts abnormal anterior talar translation and excessive talar tilt. This comprehensive guide delineates the biomechanical rationale, precise surgical steps, and postoperative protocols required to execute the modified Watson-Jones repair successfully.
Biomechanics and Rationale of the Modified Watson-Jones Technique
The primary objective of the modified Watson-Jones technique is to recreate the stabilizing vectors of the ATFL and, to a lesser extent, the CFL, without relying on attenuated native ligamentous tissue.
In a healthy ankle, the ATFL is the primary restraint to anterior talar translation in plantarflexion, while the CFL restrains inversion in dorsiflexion. The Watson-Jones routing utilizes the peroneus brevis tendon, passing it from the fibula to the talar neck, effectively creating a robust checkrein against anterior subluxation of the talus.
💡 Clinical Pearl: Biomechanical Trade-offs
While non-anatomic tenodesis procedures like the Watson-Jones provide excellent static stability, they inherently alter normal hindfoot kinematics. Surgeons must counsel patients that a mild to moderate loss of subtalar inversion and eversion is an expected outcome. This stiffness is the biomechanical trade-off for achieving a stable, brace-free ankle in high-demand patients.
Indications
- Failed Anatomic Repair: Patients who have undergone a previous Broström procedure with recurrent instability.
- Severe Ligamentous Attenuation: Cases where native tissue is insufficient for primary repair (e.g., long-standing chronic instability).
- Generalized Ligamentous Laxity: Patients with hypermobility syndromes (e.g., Ehlers-Danlos, Marfan syndrome) where native tissue repair is prone to stretching out.
- High-Demand Patients: Heavy manual laborers or specific athletes (e.g., linemen) who require absolute mechanical stability over maximal subtalar motion.
Contraindications
- Peroneal Tendon Pathology: Pre-existing tears, tendinopathy, or weakness of the peroneus brevis precludes its use as a graft.
- Uncorrected Malalignment: Fixed hindfoot varus must be corrected (e.g., via a lateralizing calcaneal osteotomy) prior to or concurrently with ligamentous reconstruction to prevent premature graft failure.
- Advanced Osteoarthritis: Significant tibiotalar or subtalar arthritis may necessitate arthrodesis rather than ligamentous reconstruction.
Preoperative Planning and Patient Positioning
Thorough preoperative clinical evaluation must include the anterior drawer test and talar tilt test, ideally corroborated by stress radiography. Magnetic Resonance Imaging (MRI) is highly recommended to assess the integrity of the peroneal tendons, evaluate for osteochondral lesions of the talus (OCLs), and confirm the absence of native lateral ligamentous structures.
Positioning and Anesthesia
- Anesthesia: General or regional anesthesia (popliteal block) is utilized based on patient and anesthesiologist preference.
- Positioning: The patient is placed in the lateral decubitus position, or supine with a large bump under the ipsilateral hip to internally rotate the leg, providing unimpeded access to the lateral malleolus and lateral hindfoot.
- Tourniquet: A well-padded pneumatic thigh tourniquet is applied to ensure a bloodless surgical field.
- Preparation: The limb is prepped and draped in a standard sterile orthopedic fashion, ensuring the foot is entirely free to allow intraoperative manipulation of the ankle and subtalar joints.
Surgical Technique: Step-by-Step
The modified Watson-Jones technique requires meticulous soft tissue handling and precise osseous tunnel placement to ensure optimal graft tensioning and prevent iatrogenic fractures of the lateral malleolus or talus.
1. Incision and Exposure
- Incision Trajectory: Make a curvilinear lateral incision over the ankle. Begin proximally at the junction of the middle and distal thirds of the fibular shaft.
- Continue the incision distally along the anterior border of the fibular shaft.
- Curve the incision gently anteriorly as it crosses the ankle joint, ending approximately 5 cm anterior to the tip of the lateral malleolus, over the sinus tarsi region.
- Deep Dissection: Carefully dissect through the subcutaneous tissues.
🚨 Surgical Warning: Nerve Protection
The superficial peroneal nerve (SPN) lies anterior to the proximal extent of the incision, and the sural nerve lies posterior to the distal extent. Meticulous blunt dissection and the use of self-retaining retractors with care are paramount to avoid painful postoperative neuromas.
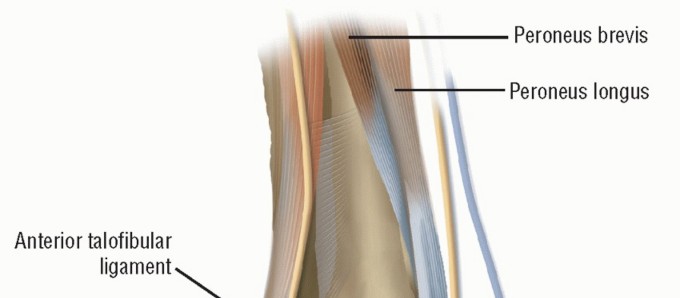
2. Tendon Harvest and Preparation
- Sheath Incision: Open the peroneal sheath as far proximally as the incision allows.
- Tendon Separation: Identify the peroneus brevis and peroneus longus tendons. Sharply separate the peroneus brevis tendon from its muscle belly.
- Fascial Extension: To ensure the transferred tendon is of adequate length for the complex routing, dissect proximally, taking an extension of the muscle fascia along with the tendon.
- Muscle Tenodesis: To preserve the eversion power generated by the proximal peroneus brevis muscle belly, suture the severed distal end of the brevis muscle to the adjacent, intact peroneus longus tendon using non-absorbable braided sutures (e.g., #1 or 0-Vicryl).
- Distal Mobilization: Free the peroneus brevis tendon as far distally as the lateral malleolus.
- Retinaculum Preservation: Crucial Step: Do not disturb or release the superior or inferior peroneal retinaculum. The intact retinaculum acts as a critical pulley, preventing bowstringing of the tendon during active eversion and dorsiflexion.
3. Osseous Tunnel Preparation
The creation of bone tunnels must be performed with fluoroscopic guidance if necessary, ensuring adequate bone bridges to prevent fracture. The tunnels must be large enough to smoothly receive the folded or flattened peroneus brevis tendon (typically requiring a 4.5 mm to 5.5 mm drill bit).
- Fibular Tunnel (Tunnel 1): Drill the first tunnel in an oblique, anteroposterior direction through the lateral malleolus. The entry point should be approximately 2.5 cm proximal to the tip of the lateral malleolus. Ensure the tunnel does not violate the articular surface of the distal tibiofibular syndesmosis or the tibiotalar joint.
- Talar Tunnel (Tunnel 2): Drill the second tunnel in the longitudinal axis of the leg through the lateral part of the neck of the talus, just anterior to the talofibular joint articulation.
- Technical Tip: To facilitate a smooth, curved tunnel in the talus, it is often easier to drill two intersecting holes. Drill one hole in the superolateral margin of the talar neck and a second hole in the inferolateral margin. Direct the drill bits so they intersect and join to form a continuous, V-shaped or U-shaped tunnel. Use a curette or a passing loop to clear the apex of the tunnel.
4. Tendon Routing and Fixation
The routing of the tendon is the defining characteristic of the Watson-Jones procedure, creating a mechanical block to anterior talar translation.
- First Pass (Fibula): Guide the mobilized peroneus brevis tendon through the first tunnel in the lateral malleolus, passing it from posterior to anterior.
- Second Pass (Talus): Pass the tendon through the second tunnel in the talar neck, routing it from inferior to superior.
- Tendon Flattening: Unroll the remainder of the tendon to make it flat. This increases the surface area for healing and reduces the bulk of the final construct.
- Final Routing: Carry the flattened tendon posteroinferiorly across the lateral surface of the lateral malleolus.
- Periosteal Preparation: Make an oblique incision through the periosteum on the lateral aspect of the malleolus at the level where the tendon crosses.
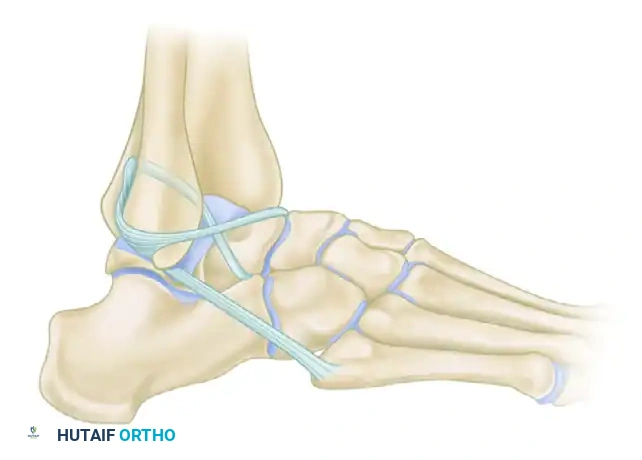
FIGURE 89-26 A: Modified Watson-Jones technique demonstrating the routing of the peroneus brevis tendon through the fibula and talus, effectively reconstructing the anterior talofibular ligament vector.
- Tensioning and Fixation:
- Hold the ankle in neutral dorsiflexion (0 degrees) and slight eversion (approx. 5 degrees). Do not overtension in excessive eversion, as this will lock the subtalar joint.
- Suture the tendon to itself (creating a closed loop) and to the robust periosteum on the posterior aspect of the malleolus using heavy non-absorbable sutures (e.g., #0 or #2 FiberWire or Ethibond).
- Suture the incised periosteum over the tendon on the lateral side of the malleolus to further secure the construct and promote biological integration.
Comparative Note: The Evans Technique
While the Watson-Jones technique routes the tendon through both the fibula and the talus, other historical non-anatomic tenodeses exist. For instance, the Evans technique (shown below for comparative anatomical context) routes the peroneus brevis solely through a single fibular tunnel from anterior to posterior, primarily addressing the ATFL vector but offering less rotational control than the Watson-Jones or Chrisman-Snook procedures.
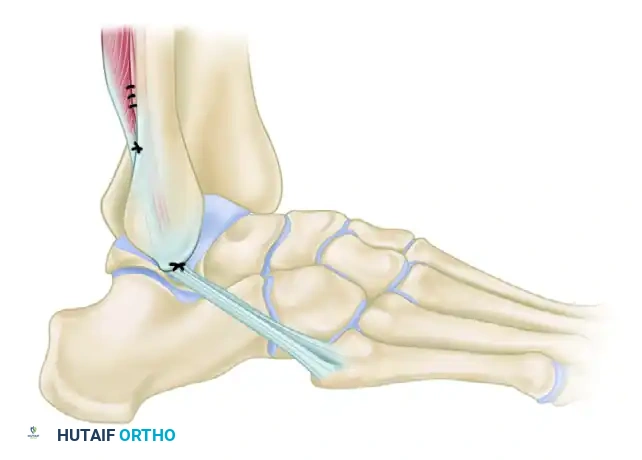
FIGURE 89-26 B: Evans technique. Note the simpler routing through a single fibular tunnel, contrasting with the dual-tunnel Watson-Jones approach.
5. Closure
- Thoroughly irrigate the surgical wound with sterile saline.
- Obtain meticulous hemostasis after deflating the tourniquet.
- Close the subcutaneous tissue in layers using absorbable sutures (e.g., 2-0 or 3-0 Vicryl) to eliminate dead space.
- Close the skin using non-absorbable sutures or surgical staples based on surgeon preference.
- Apply sterile dressings and a well-padded short-leg splint with the ankle held in neutral dorsiflexion and slight eversion.
Postoperative Care and Rehabilitation Protocol
The success of a non-anatomic tenodesis relies heavily on strict adherence to postoperative immobilization to allow for tendon-to-bone healing, followed by a structured, phased rehabilitation program to restore proprioception and functional strength.
Phase 1: Maximum Protection (Weeks 0 to 6)
- Immobilization: A rigid cast or posterior splint is applied in the operating room, extending from the base of the toes to the tibial tuberosity. The ankle is maintained in neutral dorsiflexion and slight eversion.
- Weight-Bearing: The patient is strictly non-weight-bearing (NWB) on the operative extremity. Crutches, a knee scooter, or a wheelchair must be utilized.
- Edema Control: Strict elevation of the limb above heart level is emphasized for the first 1-2 weeks to minimize swelling and promote wound healing.
- Follow-up: At 2 weeks, the splint is removed, the wound is inspected, and sutures are removed. The patient is then placed into a short-leg fiberglass cast for the remaining 4 weeks of this phase.
Phase 2: Transition and Early Motion (Weeks 6 to 10)
- Immobilization: At the 6-week mark, the cast is removed. The patient is transitioned into a controlled ankle motion (CAM) boot.
- Weight-Bearing: Weight-bearing is initiated and progressively advanced as tolerated. Patients typically transition from partial weight-bearing with crutches to full weight-bearing in the boot over a 2-week period.
- Physical Therapy: Formal physical therapy is initiated.
- Active range of motion (AROM) exercises for dorsiflexion and plantarflexion are encouraged.
- Caution: Inversion and eversion exercises should be introduced cautiously to avoid stressing the healing tenodesis.
- Gentle isometric strengthening of the peroneal muscles is begun.
Phase 3: Functional Rehabilitation (Weeks 10 to 16+)
- Immobilization: The CAM boot is weaned, and the patient transitions to standard supportive footwear, often supplemented with a lace-up ankle brace (e.g., ASO brace) for high-risk activities.
- Weight-Bearing: Full, unassisted weight-bearing.
- Physical Therapy: Functional rehabilitation is heavily emphasized.
- Proprioception: Aggressive proprioceptive training using balance boards, BAPS boards, and single-leg stance exercises.
- Strengthening: Isotonic and isokinetic strengthening of the entire lower extremity kinetic chain, with a specific focus on peroneal strengthening to compensate for the harvested brevis tendon.
- Agility: Plyometrics, figure-of-eight running, and sport-specific drills are introduced around weeks 12-14, provided the patient demonstrates adequate strength and no pain.
Complications and Pitfalls
While highly effective for stabilizing the ankle, the modified Watson-Jones procedure carries specific risks that the orthopedic surgeon must anticipate and mitigate.
- Subtalar Stiffness: The most common consequence of any non-anatomic tenodesis. Patients will experience a permanent reduction in inversion/eversion. This must be discussed preoperatively.
- Sural or Superficial Peroneal Nerve Injury: Iatrogenic injury during exposure or entrapment in scar tissue can lead to complex regional pain syndrome (CRPS) or painful neuromas.
- Lateral Malleolar Fracture: Drilling tunnels that are too large or placed too close to the articular surface or the tip of the malleolus can result in an intraoperative or postoperative stress fracture.
- Overtensioning: Securing the graft with the ankle in excessive eversion will "capture" the subtalar joint, leading to severe lateral column pain and an inability to accommodate uneven terrain.
- Recurrent Instability: Rare, but can occur if the graft stretches out, particularly if underlying varus malalignment was not addressed concurrently.
Conclusion
The modified Watson-Jones lateral repair remains a powerful technique for addressing severe, chronic lateral ankle instability when anatomic repair is not feasible. By meticulously harvesting the peroneus brevis, preserving the peroneal retinaculum, and executing precise osseous routing through the fibula and talus, the surgeon can provide the patient with a highly stable, functional ankle. Strict adherence to postoperative immobilization and a dedicated functional rehabilitation program are paramount to maximizing clinical outcomes and returning the patient to their desired level of activity.
You Might Also Like