Akin Osteotomy Masterclass: Precision Correction for Hallux Valgus Interphalangeus
Key Takeaway
Welcome to the OR, fellows. Today, we're performing an Akin osteotomy, a crucial procedure for correcting hallux valgus interphalangeus. This masterclass will guide you through meticulous preoperative planning, essential surgical anatomy, and a granular, step-by-step intraoperative execution. We'll cover precise instrument use, critical pearls, and potential pitfalls, ensuring a comprehensive understanding of this powerful corrective technique.
Alright, fellows, gather around. Welcome to the operating theater. Today, we have a fascinating case that will allow us to demonstrate the nuances of an Akin osteotomy. This procedure, a proximal medial closing wedge osteotomy of the proximal phalanx of the great toe, is a powerful tool in our arsenal for correcting hallux valgus interphalangeus. We’ll be fixing this with a varisation staple, specifically designed for stable fixation in cancellous bone.
Indications and Contraindications
First, let's review our indications. The primary indication for an Akin osteotomy is hallux valgus interphalangeus, where the deformity is distal to the metatarsophalangeal (MTP) joint. You’ll also find it invaluable in cases where residual hallux valgus, even after a more proximal osteotomy like a Scarf or Chevron, continues to cause pressure on the second toe, especially evident on a dynamic load stimulation test. It’s most commonly used as an accompanying procedure to a first metatarsal osteotomy, enhancing the overall correction of the bunion complex.
Surgical Warning: An isolated Akin osteotomy is contraindicated for the primary treatment of hallux valgus. It addresses the interphalangeal component, not the MTP joint deformity. Using it alone for hallux valgus will lead to inadequate correction and potential recurrence.
The beauty of this osteotomy lies in its location: it's fashioned within the metaphyseal cancellous bone of the proximal phalanx, ensuring excellent healing potential. By being so close to the apex of the deformity at the interphalangeal joint, it provides a very powerful and direct correction of the interphalangeal valgus.
Preoperative Planning and Patient Positioning
Before we even make an incision, meticulous planning is paramount.
Preoperative Assessment
Our patient today presented with significant pain and shoe wear issues related to a prominent great toe, exacerbated by hallux valgus interphalangeus. We've reviewed their weight-bearing anteroposterior, lateral, and oblique radiographs of the foot. Specifically, we're looking at the hallux valgus interphalangeus (HVI) angle, which is the angle between the longitudinal axis of the proximal phalanx and the longitudinal axis of the distal phalanx. In this patient, it's significantly elevated, confirming our indication. We've also assessed the overall hallux valgus angle and the intermetatarsal angle to ensure this Akin is appropriately complementing the planned first metatarsal osteotomy.
Templating
On the radiographs, we've templated the approximate size of the closing wedge we intend to remove and pre-selected our varisation staple. For most feet, an 8mm staple is suitable, but for larger feet, a 10mm staple might be necessary. Having this plan in mind helps us execute the osteotomy precisely.
Anesthesia and Tourniquet
Our patient has received a regional ankle block in addition to general anesthesia, which provides excellent postoperative pain control. We've applied a thigh tourniquet, which we will inflate to 250 mmHg after exsanguinating the limb to ensure a bloodless field – critical for visualization in this delicate area.
Patient Positioning
The patient is positioned supine on the operating table. The foot of the bed has been dropped to allow optimal access to the forefoot. We ensure the entire lower extremity is prepped and draped from the knee down, providing us with ample sterile field. A small bump can be placed under the ipsilateral hip if needed to internally rotate the limb slightly, bringing the medial aspect of the foot into a more accessible position. Crucially, the fluoroscopy unit is positioned to allow immediate, unobstructed intraoperative imaging in both AP and lateral planes without repositioning the patient or the C-arm.
Comprehensive Surgical Anatomy of the Hallux Proximal Phalanx
Let's quickly review the anatomy here, as it's vital for safe and effective dissection.
Osteology
We are operating on the proximal phalanx of the hallux. This bone has a base (proximal), a shaft, and a head (distal). The osteotomy will be performed in the metaphyseal region of the shaft, approximately 3mm distal to the phalangeal flare – this is crucial as it places us in excellent cancellous bone, which promotes robust healing. Proximally, it articulates with the first metatarsal head (MTP joint), and distally, with the distal phalanx (IP joint). We must avoid violating either articular surface.
Soft Tissues and Muscular Intervals
- Dorsally: The extensor hallucis longus (EHL) tendon runs along the dorsum of the phalanx. We must protect this tendon, as injury can lead to extensor lag or claw toe deformity.
- Plantarly: The flexor hallucis longus (FHL) tendon runs along the plantar aspect. Though deeper, it's important to be mindful of its location during deeper dissection or if drilling plantarly.
- Medially: The abductor hallucis muscle runs along the medial aspect, contributing to hallux abduction.
- Laterally: The adductor hallucis muscle inserts more proximally, but its tendons are not typically encountered with this medial approach.
Neurovascular Structures
This is where we must be most vigilant.
* Dorsal Digital Nerves: The medial dorsal digital nerve of the hallux typically runs along the dorsomedial aspect. It's a sensory nerve, and injury can cause numbness, dysesthesia, or painful neuroma. We achieve exposure by dissecting directly onto the bone, carefully elevating the periosteum while sweeping these delicate nerves dorsally and plantarly away from our operative field.
* Dorsal Digital Arteries: Accompanying the nerves are the dorsal digital arteries. While smaller than their plantar counterparts, injury can contribute to wound healing issues.
* Plantar Digital Nerves and Arteries: These are deeper and generally not at direct risk with a dorsal/medial approach, but excessive deep dissection or misplaced deep retractors could theoretically endanger them.
Our approach will be directly onto the bone, with meticulous subperiosteal dissection, which helps protect these vital neurovascular structures by keeping them superficial to our plane of dissection.
Step-by-Step Intraoperative Execution: The Akin Osteotomy
Alright, fellows, let's begin. Observe closely.
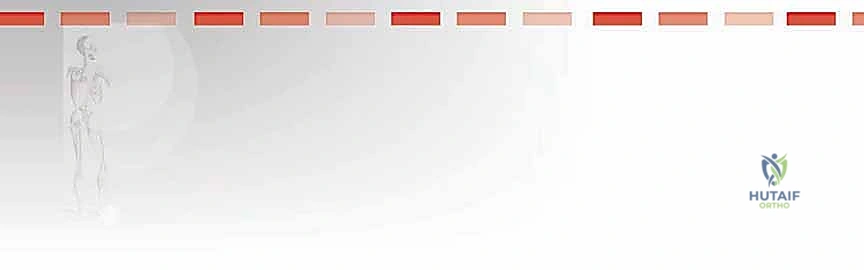
1. Incision and Initial Exposure
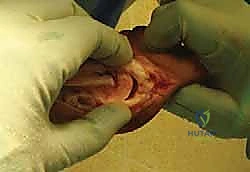
We'll start with our incision. In this case, we've already performed our primary first metatarsal osteotomy, so we'll extend our existing medial longitudinal incision distally along the medial aspect of the proximal phalanx. If this were an isolated Akin, the incision would be a straight longitudinal incision centered over the medial aspect of the proximal phalanx, extending from just proximal to the MTP joint to the mid-shaft of the distal phalanx.
Surgeon: "Scalpel, please. We're going to make a precise incision through the skin and subcutaneous tissue. See how I'm keeping it directly over the bone, minimizing lateral and dorsal dissection. We want to avoid unnecessary soft tissue trauma."
Now, using fine dissecting scissors or a small scalpel, we carefully spread through the subcutaneous fat. You'll notice the delicate dorsal digital nerve and vessels here. We're gently pushing them dorsally and plantarly with blunt dissection to expose the periosteum.
Surgeon: "Once we've identified the periosteum, we'll make a sharp incision directly onto the bone. This is critical for our subperiosteal dissection."
We now use a small, sharp periosteal elevator (a Freer or a small Cobb works well here) to meticulously elevate the periosteum from the medial, dorsal, and plantar aspects of the proximal phalanx. We need enough exposure to safely perform our osteotomy.
Surgeon: "Observe the subperiosteal plane. This is our safe zone. We're exposing the bone while protecting the overlying soft tissues, including the extensor hallucis longus dorsally and the neurovascular bundles."
2. Tendon Protection and Retraction
Now that we have adequate bony exposure, we need to ensure our retractors protect the surrounding structures.
Surgeon: "Nurse, could I have two small pointed retractors, please? Mini Hohmanns or Senns are ideal here."
We carefully place one small pointed retractor above the phalanx, gently retracting the extensor hallucis longus tendon and the dorsal neurovascular structures. The second retractor is placed below the phalanx, protecting the flexor hallucis longus tendon and any plantar soft tissues.
Surgeon: "Notice how these retractors provide excellent visualization of the bone while safeguarding the vital structures. Always check their position to ensure they aren't impinging on the neurovascular bundles."
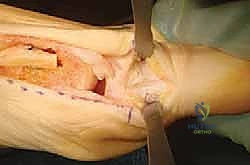
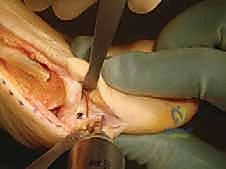
3. Kirschner Wire Placement for Osteotomy Planning
Next, we'll use a 1mm Kirschner wire to mark our osteotomy location. This is a crucial step for accurate placement.
Surgeon: "We'll position this K-wire in the mid-portion of the phalanx in the sagittal plane. The key is to place it approximately 3 mm distal to the phalangeal flare proximally. This ensures we are in the robust metaphyseal cancellous bone, which has excellent healing potential, and well away from the MTP joint."
4. Intra-Articular Check
Before proceeding, we must confirm that our K-wire is not intra-articular. Penetrating the joint surface can lead to painful arthritis.
Surgeon: "Now, apply gentle axial traction to the big toe. As you do this, carefully inspect the interphalangeal joint. Can you see any evidence of the K-wire violating the articular cartilage?"
Surgeon: "Visually, it looks good. If there were any doubt, we would use fluoroscopy to confirm the wire's position in both AP and lateral views. This step is non-negotiable for preventing iatrogenic joint damage."
5. Marking the Osteotomy Site
Once confirmed extra-articular, we'll mark this pilot hole.
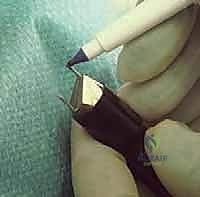
Surgeon: "Okay, let's carefully remove the Kirschner wire. Now, using a surgical marking pen or a small amount of methylene blue on a toothpick, we'll clearly mark the hole. This will serve as our reference point for the proximal cut of our osteotomy."
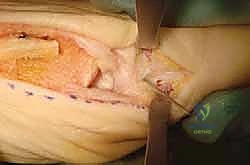
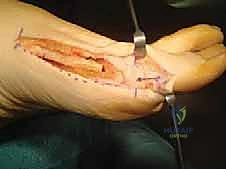
6. Performing the Closing Wedge Osteotomy
This is the core of the procedure, fellows. Precision here is paramount. We're aiming for a proximal medial closing wedge osteotomy.
Surgeon: "I'll take the oscillating saw with a fine, sharp blade. Our first cut, the proximal cut, will be parallel to the phalangeal base, aligning it with our marked pilot hole. The crucial technique here is to score the lateral cortex but not completely penetrate it. This allows the lateral cortex to act as a hinge, enabling us to 'greenstick' it and achieve a controlled closure."
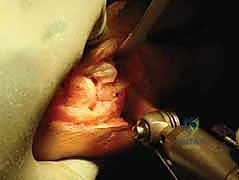
Surgeon: "Now for the second cut. This cut will converge distally to create our wedge. It should produce a small sliver of bone, with the apex of the wedge directed laterally. Think of it like slicing a very fine piece of lemon peel. The amount of bone removed directly correlates to the degree of correction. We want a conservative, thin wedge initially."
Surgeon: "Once the cuts are made, we'll carefully remove that wafer of bone. Now, with gentle, direct pressure, we'll close the wedge. You should feel that characteristic 'greenstick' sensation as the intact but weakened lateral cortex bends. The osteotomy should close without 'bouncing back' once pressure is removed."
7. Staple Selection and Marking
With the osteotomy closed and the correction achieved, we prepare for fixation.
Surgeon: "Let's select our varisation staple. As templated, an 8mm staple should be perfect for this patient. Always have a 10mm available as a backup. Before placement, I'll take a surgical marking pen and mark the tip of the distal leg of the staple. This will help us accurately drill our pilot hole."
8. Staple Positioning and Pilot Drilling
Accuracy in staple placement is key for stable fixation.
Surgeon: "While maintaining compression on the osteotomy to hold the correction, we'll place the marked staple over the medial aspect of the phalanx. Ensure it's perfectly centered in the sagittal plane, spanning the osteotomy. The distal leg mark should align with the desired distal drill point."
Surgeon: "Now, with the staple held firmly in position, we'll use a 1mm Kirschner wire to drill a pilot hole precisely at that ink mark left by the distal staple leg. This pre-drilling prevents undue stress on the bone during staple insertion, especially near the hard subchondral bone."

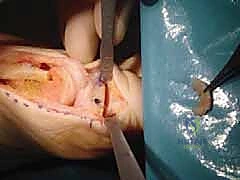
9. Staple Insertion
With our pilot hole ready, we insert the staple.
Surgeon: "Maintain that compression, fellows. Now, we'll insert the staple into both the pre-drilled distal hole and the proximal limb into the bone. Use the specialized staple inserter and gently tap it into place. We want it flush with the bone surface, but not excessively deep."
Surgeon: "Once inserted, gently apply axial traction to the great toe again. This allows us to visually confirm that the staple has not inadvertently penetrated the interphalangeal joint. Also, check for the stability of the fixation. It should feel robust."
10. Final Assessment and Closure
Surgeon: "Excellent. The correction looks superb, and the fixation is stable. We'll now thoroughly irrigate the wound with sterile saline to remove any bone dust or debris. Check for meticulous hemostasis. Any bleeding points should be cauterized carefully."
We close the wound in layers. First, the periosteum, using fine absorbable sutures. Then, the subcutaneous tissue. Finally, the skin is closed with a continuous Monocryl suture, ensuring good eversion of the skin edges.
Surgeon: "Finally, we apply a sterile forefoot bandage. This dressing is not just for protection; it's crucial for maintaining the achieved correction in the immediate postoperative period and providing gentle compression."
💡 Pearls and Pitfalls
Let's discuss some common challenges and how to navigate them effectively.
Staple Insertion: Resistance from Hard Subchondral Bone
Often, you'll encounter significant resistance when inserting the staple, especially if one leg approaches the hard subchondral bone near the joint.
* Avoid using excessive force: Forcing the staple can fracture the delicate lateral "greensticked" cortex, compromising your fixation.
* Salvage: If you encounter resistance, stop. Either repeat the Kirschner wire drilling to ensure an adequate pilot hole, perhaps aiming a fraction differently, or accept the staple being 2 to 3 mm proud if you've achieved a good, stable hold. A slightly proud staple is better than a fractured phalanx. If the staple is very proud and causing soft tissue irritation, it may need removal later, but the immediate goal is stable bone fixation.Inadvertent Lateral Cortex Fracture
Despite our best efforts to greenstick, sometimes the lateral cortex fractures completely during osteotomy closure or staple insertion.
* Salvage: If the lateral cortex fractures, your staple alone may not provide adequate compression or stability. The best salvage is to insert a small compression screw (e.g., a 2.0 or 2.4 mm cannulated screw) from medial to lateral, spanning the osteotomy. This provides robust compression across the fracture site and the osteotomy. Ensure proper screw length to avoid penetration of the lateral soft tissues or joint.Overcorrection
The Akin osteotomy is incredibly powerful due to its proximity to the interphalangeal joint. It's easy to overcorrect if you remove too large a wedge.
* Prevention: Always aim for a very fine segment of bone initially. It's much easier to take a second, small cut to remove more bone if needed, than to try and reverse an overcorrection. Err on the side of under-correction and reassess.Unable to Greenstick the Lateral Cortex
This often occurs if you've removed a rectangular block of bone instead of a true wedge, or if your lateral cortex scoring wasn't sufficient. Forcing it to close will inevitably crack the lateral cortex.
* Salvage: Instead of brute force, use a gentle, controlled to-and-fro motion with the running saw, applying gentle compressive force simultaneously. This technique gradually thins the lateral cortex until the osteotomy closes smoothly without "bouncing back" once pressure is removed. This controlled thinning helps achieve the greenstick effect. Recognize that propagation of an uncontrolled lateral cortex fracture may increase the risk of subsequent displacement.Neurovascular Injury
Even with careful subperiosteal dissection, the dorsal digital nerves are vulnerable.
* Prevention: Always visualize and protect these structures. Use blunt dissection to sweep them away. Keep retractors in the subperiosteal plane.
* Management: If a nerve is transected, a primary repair may be considered, though often challenging for digital nerves. If a neuroma develops postoperatively, surgical excision may be required.Infection
As with any surgical procedure, infection is a risk.
* Prevention: Strict aseptic technique, appropriate prophylactic antibiotics, thorough wound irrigation.
* Management: Superficial infections may respond to oral antibiotics and local wound care. Deep infections (osteomyelitis) require surgical debridement, intravenous antibiotics, and potentially hardware removal.Hardware Prominence or Failure
The staple can sometimes be palpable or cause irritation, or in rare cases, fail.
* Management: If prominent and symptomatic, hardware removal can be performed after bony union (typically 3-6 months). If failure occurs early, revision surgery with alternative fixation (e.g., compression screw) may be necessary.
Postoperative Rehabilitation and Complication Management
Our job isn't done when the patient leaves the OR. Postoperative care is critical for a successful outcome.
Immediate Postoperative Period (Days 0-14)
- Dressing: The forefoot bandage applied in the OR will remain in place for approximately 1-2 weeks. It provides compression and helps maintain the correction.
- Elevation: Strict elevation of the foot above heart level for the first 48-72 hours is crucial to minimize swelling and pain.
- Pain Management: A multimodal approach including NSAIDs, acetaminophen, and potentially short-term opioids will be prescribed. The ankle block typically provides excellent relief for the first 12-24 hours.
- Weight-bearing: Patients are typically placed in a postoperative shoe or a stiff-soled shoe that allows for heel-weight bearing only for the first 2-4 weeks. Full forefoot weight-bearing is usually restricted to protect the osteotomy. Some surgeons prefer strict non-weight bearing for the first 2 weeks, especially if concomitant procedures were performed.
- DVT Prophylaxis: Standard DVT prophylaxis protocols, such as early mobilization of the unaffected limb and chemical prophylaxis (e.g., low molecular weight heparin) for high-risk patients, are followed.
Early Rehabilitation (Weeks 2-6)
- Wound Care: The dressing is changed at the first postoperative visit (around 10-14 days), and sutures are removed. The wound is inspected for signs of infection or dehiscence.
- Weight-bearing Progression: Gradual progression to flat-foot weight-bearing in the postoperative shoe, then to supportive athletic shoes, as tolerated and based on radiographic healing.
- Range of Motion (ROM): Gentle active and passive range of motion exercises for the interphalangeal joint are initiated to prevent stiffness. Avoid aggressive stretching or forced motion that could stress the healing osteotomy.
Late Rehabilitation (Weeks 6-12 and beyond)
- Radiographic Assessment: X-rays are typically taken at 6 weeks and 12 weeks to assess osteotomy healing.
- Shoe Wear: Transition to comfortable, wide-toe box shoes. Avoid high heels or restrictive footwear.
- Activity Progression: Gradual return to activities. Low-impact activities can usually resume around 8-12 weeks, with higher-impact sports returning after 3-6 months, depending on complete radiographic union and symptom resolution.
- Physical Therapy: May be beneficial to address any residual stiffness, weakness, or gait abnormalities.
Complication Management
- Wound Dehiscence: Minor dehiscence can be managed with local wound care. Significant dehiscence may require debridement and secondary closure.
- Infection: Superficial infections are treated with oral antibiotics. Deep infections require surgical debridement, IV antibiotics, and potentially hardware removal.
- Nonunion or Delayed Union:
REFERENCES
OUTCOMES 1. Frey C, Jahss M, Kummer FJ. The Akin procedure: an analysis of results. Foot Ankle 1991;12:1–6.
-
Garrido IM, Rubio ER, Bosch MN, et al. Scarf and Akin osteotomies for moderate and severe hallux valgus: clinical and radiographic results. Foot Ankle Surg 2008;14:194–203.
-
Hammel E, Abi Chala ML, Wagner T. Complications of first ray osteotomies: a consecutive series of 475 feet with first metatarsal Scarf osteotomy and first phalanx osteotomy. Rev Chir Orthop Reparatrice Appar Mot 2007;93:710–719.
-
Mitchell LA, Baxter DE. A Chevron-Akin double osteotomy for correction of hallux valgus. Foot Ankle 1991;12:7–14.
-
The most common indication for an Akin osteotomy is in combination with a metatarsal osteotomy for hallux valgus. Outcomes are therefore reported together with satisfaction rates at between 85% and 95%. 1,2,4 Very few studies have concentrated solely on the Akin.
COMPLICATIONS
- Complications of this osteotomy are rare 3 but can include nonunion, nerve damage, infection, displacement of the osteotomy, and overcorrection or undercorrection. Failure to
You Might Also Like


