Proximal Crescentic Osteotomy and Distal Soft Tissue Reconstruction for Hallux Valgus
Key Takeaway
The proximal crescentic osteotomy combined with a distal soft tissue procedure is a powerful surgical technique for correcting severe hallux valgus deformities. Indicated for intermetatarsal angles of 20 to 25 degrees and hallux valgus angles of 40 to 50 degrees, this technically demanding procedure achieves multiplanar correction. Success relies on meticulous lateral soft tissue release, precise medial capsulorrhaphy, and a carefully executed basilar osteotomy to restore forefoot biomechanics.
INTRODUCTION AND HISTORICAL CONTEXT
The management of moderate-to-severe hallux valgus requires a comprehensive approach that addresses both the osseous deformity and the deforming soft tissue contractures. Popularized by Mann, Rudicel, and Graves, the proximal crescentic osteotomy combined with a distal soft tissue procedure remains a cornerstone in the armamentarium of the foot and ankle surgeon. In their landmark review of 109 feet, 93% of patients achieved satisfactory outcomes, with only 7% reporting dissatisfaction due to residual pain or recurrence of the deformity.
While technically demanding, this procedure is highly powerful. It is capable of correcting severe deformities, specifically intermetatarsal (IM) angles of 20 to 25 degrees and hallux valgus (HV) angles of 40 to 50 degrees. For patients presenting with mild-to-moderate deformity, simpler distal procedures (such as a distal chevron osteotomy) may provide similarly excellent results with less technical complexity and a lower risk of proximal nonunion or malunion.

INDICATIONS AND PATIENT SELECTION
Most hallux valgus deformities severe enough to require a comprehensive distal soft tissue release will concurrently require a proximal osteotomy to adequately reduce the intermetatarsal angle. The proximal crescentic osteotomy is specifically indicated for:
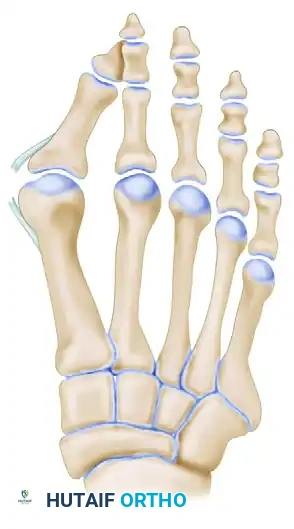
* Severe Hallux Valgus: HV angles between 40° and 50°.
* High Intermetatarsal Angles: IM angles between 20° and 25°.
* Congruent or Incongruent Joints: Where the primary pathology is a widened 1-2 IM angle driven by a hypermobile or deviated first ray.
Contraindications
This procedure is strictly contraindicated in the following scenarios:
1. Excessive Valgus Posturing of the DMAA: If the distal metatarsal articular angle (DMAA) exceeds 15 degrees on a weight-bearing radiograph, a proximal osteotomy will further rotate the articular cartilage laterally, exacerbating joint incongruency. In such cases, a double osteotomy or a distal biplanar osteotomy is required.
2. Degenerative Joint Disease: Patients with moderate-to-severe osteoarthritic changes of the first metatarsophalangeal (MTP) joint are better served by an MTP arthrodesis.
3. First Tarsometatarsal (TMT) Hypermobility: Severe hypermobility or arthritis at the first TMT joint is an indication for a Lapidus procedure (first TMT arthrodesis) rather than a basilar osteotomy.
Clinical Pearl: The "Spring-Back" Test
The final decision to perform a proximal osteotomy should be made intraoperatively after the distal soft tissue release is complete. By passively reducing the intermetatarsal angle (pushing the first metatarsal head laterally), the surgeon assesses the stability of the reduction. If the first metatarsal does not translate laterally, or if it springs back quickly into varus after the laterally directed pressure is released, a basilar osteotomy is definitively required.
SURGICAL TECHNIQUE: STEP-BY-STEP APPROACH
The procedure is systematically performed through three distinct incisions, addressing the lateral contractures, the medial eminence, and finally the proximal metatarsal deformity.
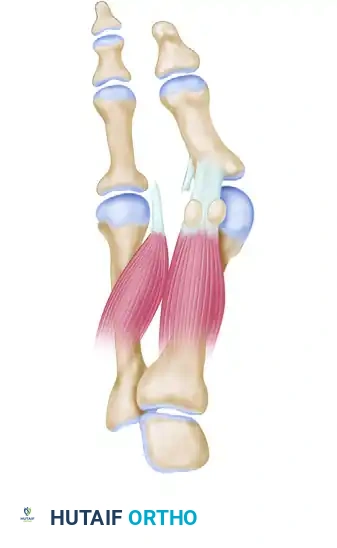
Phase 1: The Distal Soft Tissue Procedure (Lateral Release)
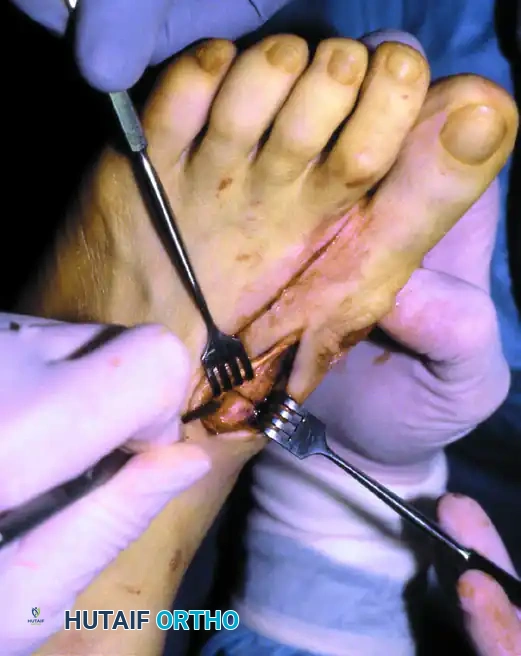
The first incision is made dorsally in the first intermetatarsal space. Its purpose is to release the deforming lateral structures: the adductor hallucis, the deep transverse intermetatarsal ligament, and the lateral capsule of the first MTP joint.
- Incision and Dissection: Make a longitudinal incision in the first intermetatarsal space, beginning at the proximal end of the web space and extending proximally for 3 to 4 cm.
- Nerve Protection: Carefully dissect the subcutaneous tissues using blunt scissors to identify and protect the terminal branches of the deep peroneal nerve.
- Exposure: Place a Weitlaner retractor in the first intermetatarsal space to widen the interval. Use a surgical sponge to bluntly clear away the adipose and soft tissue, exposing the adductor hallucis tendon.
- Adductor Hallucis Release: The adductor hallucis approaches the base of the proximal phalanx obliquely. Once identified, release it completely from its insertion at the base of the proximal phalanx and from the lateral edge of the fibular sesamoid.
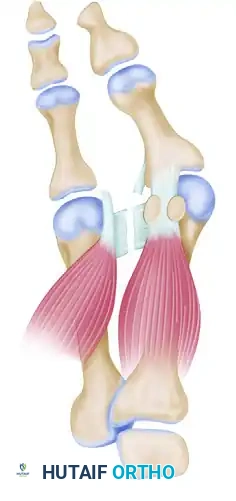
- Transverse Intermetatarsal Ligament Release: Release the deep transverse intermetatarsal ligament, which lies plantar to the adductor tendon.
- Surgical Warning: The neurovascular bundle to the first web space is located immediately plantar to this ligament. Use only the tip of a #15 blade. Placing a small Freer elevator on the plantar surface of the ligament prior to transection provides a physical barrier to protect the neurovascular bundle.

- Lateral Capsulotomy: Make multiple small stab wounds in the lateral capsule of the MTP joint. Complete the capsular release by manually forcing the hallux into 25 to 30 degrees of varus while simultaneously pushing the first metatarsal head laterally.
- Sesamoid Apparatus Release: Ensure the deep transverse intermetatarsal ligament attaching to the fibular sesamoid is fully released. This eliminates the deforming force that pulls the sesamoid apparatus laterally from under the metatarsal head.
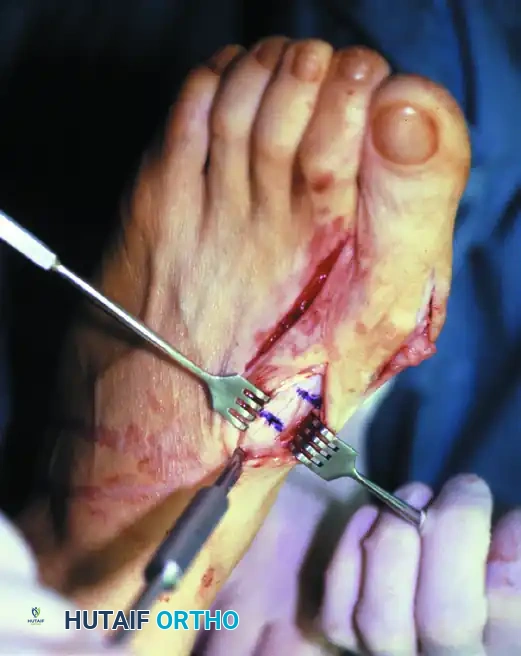
- Suture Preparation: Retrieve the completely freed adductor hallucis tendon and lift it into the wound. Pass three absorbable 2-0 sutures through the lateral capsule on the first metatarsal head (just proximal to the release), then through the adductor hallucis tendon, and finally through the capsuloligamentous intrinsic tissue on the medial side of the second metatarsal head. Do not tie these sutures yet. Clamp them with hemostats and allow them to rest in the web space.
Phase 2: Medial Eminence Excision and Capsulorrhaphy
The second incision is a midline-medial approach over the first MTP joint to address the medial eminence and perform a medial capsulorrhaphy.
- Incision: Make a midline-medial incision over the MTP joint.
- Anatomic Danger Zones: Avoid the dorsal sensory branch of the superficial peroneal nerve (dorsally) and the proper branch of the medial plantar nerve to the medial side of the hallux (plantarward).
- Flap Elevation: Deepen the incision to the capsule. Raise the dorsal flap deep to the dorsal sensory nerve. Raise the plantar flap until the plantar aspect of the abductor hallucis muscle is reached (just millimeters from the tibial sesamoid).
- Technical Tip: Flexing the hallux to 30 degrees relaxes the digital nerve, moving it safely plantar to the dissection field.


- Capsulotomy: Make a vertical incision in the capsule 2 to 3 mm proximal to the base of the proximal phalanx. Extend this from just medial to the extensor hallucis longus tendon, moving plantarward through the thickened abductor hallucis tendon-capsule junction, ending 2 mm medial to the tibial sesamoid. Make the inferior portion of this cut from plantar to dorsal to avoid the digital nerve.
- Wedge Excision: Depending on the redundancy of the stretched medial capsule, remove an elliptical wedge measuring 4 to 8 mm at its widest point. Taper this incision dorsally and plantarward into a V-shape.
- Exposure of the Eminence: Extend the capsular incision proximally from the dorsal edge of the vertical limb, creating an inverted "L" shape. End this 2 to 3 mm proximal to the junction of the medial eminence and the metatarsal shaft. Raise this flap (dorsal-distal to plantar-proximal) to expose the exostosis.
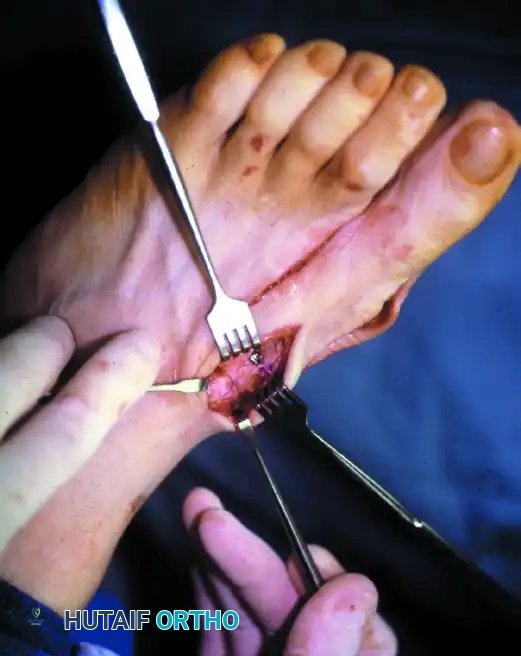
- Exostectomy: Resect the medial eminence using an oscillating saw. The cut must be strictly parallel to the medial shaft of the first metatarsal, beginning 1 to 2 mm medial to the sagittal groove to preserve the tibial sesamoid articulation.
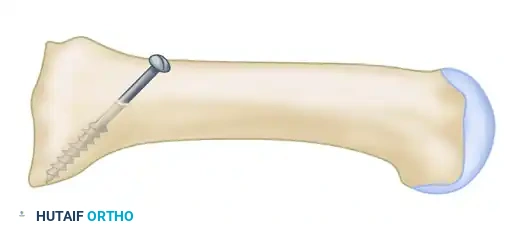
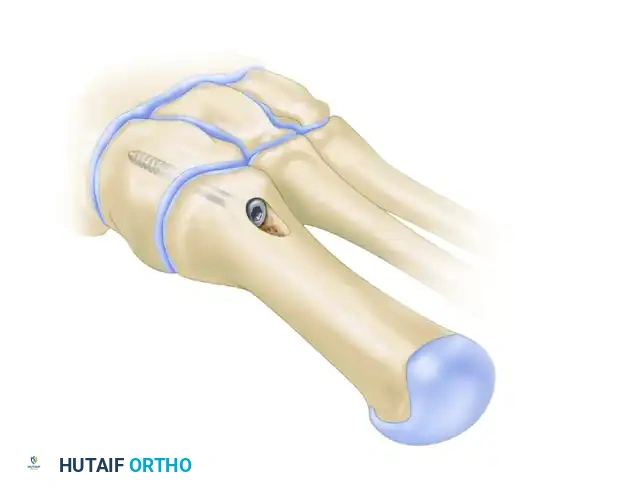
Phase 3: The Proximal Crescentic Osteotomy
The third incision is placed dorsally over the proximal metatarsal to execute the basilar osteotomy.
- Incision and Exposure: Make a dorsal longitudinal incision over the proximal third of the first metatarsal, extending proximally over the medial cuneiform. Retract or ligate the dorsal venous arch and protect the superficial peroneal nerve branches.
- Periosteal Incision: Identify the metatarsocuneiform (MTC) joint. Incise the periosteum longitudinally, medial to the extensor hallucis longus tendon.
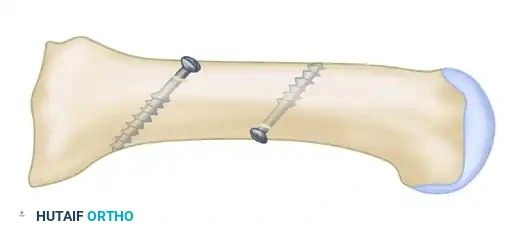
- Marking the Bone: Score the dorsal metatarsal transversely at two levels: 1 cm distal to the MTC joint (the osteotomy site) and 2 cm distal to the MTC joint (the screw fixation site).
- Soft Tissue Clearance: Release the soft tissues dorsally, medially, and laterally around the proximal metatarsal.
- Surgical Warning: Strictly avoid the penetrating branch of the dorsalis pedis artery located in the proximal aspect of the first intermetatarsal space.
- Pre-drilling the Glide Hole: Crucial Step. Drill a 3.5-mm glide hole at the 2-cm mark (1 cm distal to the planned osteotomy) in the center of the metatarsal shaft, directing it proximally. Performing this before the osteotomy ensures absolute stability during drilling.
- Executing the Osteotomy: Use a specialized curved crescentic saw blade. The convexity of the blade must face distally.
- Biomechanics: A distally convex cut prevents overcorrection of the intermetatarsal angle and minimizes shortening of the first ray.
- Score the dorsal cortex, then gently rock the blade medially and laterally. Ensure the lateral aspect of the blade exits the lateral cortex cleanly. The medial cortex can be finished with a small osteotome if necessary.

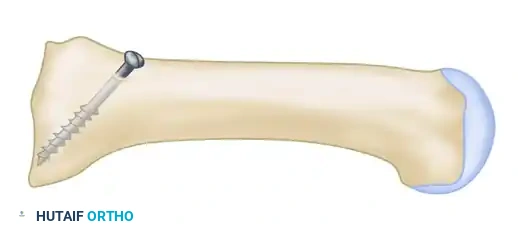
Phase 4: Reduction and Internal Fixation
Achieving and holding the correct multiplanar reduction is the most technically demanding portion of the procedure.
- Mobilization: Insert a Freer elevator into the osteotomy site to verify that no periosteal hinges remain medially or laterally. The fragment must be completely mobile.
- Displacement and Rotation:
- Displace the proximal fragment medially and hold it securely with a Freer elevator.
- Simultaneously, rotate the distal fragment laterally around the osteotomy site (typically requiring 2 to 4 mm of lateral translation/rotation).
- Pitfall Avoidance: Strictly prevent the distal fragment from sliding dorsally (which causes transfer metatarsalgia) or plantarward.
- Fixation: While the surgeon holds the exact reduction, an assistant completes the fixation.
- Place a centering device ("golf tee" or "mushroom" guide) into the pre-drilled 3.5-mm glide hole.
- Drill the proximal fragment with a 2.0-mm or 2.5-mm drill bit.
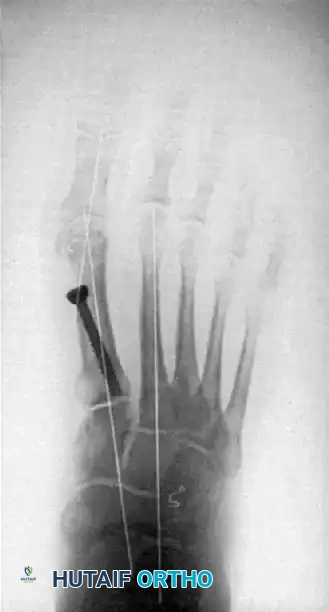
- Tap the proximal fragment with a 4.0-mm tap.
- Insert a 4.0-mm fully threaded cancellous screw (typically 26 mm in length).
Clinical Pearl: Countersinking is Mandatory
Use a countersink in the dorsal glide hole before inserting the screw. This gently removes cortical bone from the distal hole, allowing the screw head to sit flush. If omitted, the screw head will abut the dorsal cortex during the final turns, acting as a wedge that will inevitably fracture the intervening cortical bone bridge, leading to catastrophic loss of fixation.

Phase 5: Final Soft Tissue Balancing and Closure
- Medial Capsulorrhaphy: With the osteotomy fixed, return to the medial incision. Hold the hallux in neutral alignment (0 degrees of valgus/varus) and close the medial capsule using interrupted 2-0 absorbable sutures. Ensure the tibial sesamoid is reduced beneath the metatarsal head.
- Lateral Suture Tying: Return to the first web space. Tie the previously placed 2-0 absorbable sutures. This approximates the adductor hallucis to the lateral capsule and the second metatarsal, stabilizing the lateral soft tissue envelope and preventing splaying of the intermetatarsal space.
- Closure: Deflate the tourniquet, achieve meticulous hemostasis, and close the skin with non-absorbable sutures (e.g., 4-0 nylon) in a standard fashion.
POSTOPERATIVE PROTOCOL AND REHABILITATION
The postoperative management is critical to protect the basilar osteotomy while maintaining the soft tissue correction at the MTP joint.
- Weeks 0-2: The foot is placed in a bulky, compressive Jones dressing with a rigid postoperative shoe or a short-leg cast. The patient is strictly non-weight-bearing (NWB) to protect the proximal osteotomy. Elevation is paramount to control edema.
- Weeks 2-6: Sutures are removed at 14 days. The patient is transitioned to a rigid-soled postoperative shoe or CAM boot. Heel-weight-bearing only is permitted. A toe spacer is placed between the first and second toes, and the hallux is taped in a neutral or slightly plantarflexed/varus position to protect the medial capsulorrhaphy.
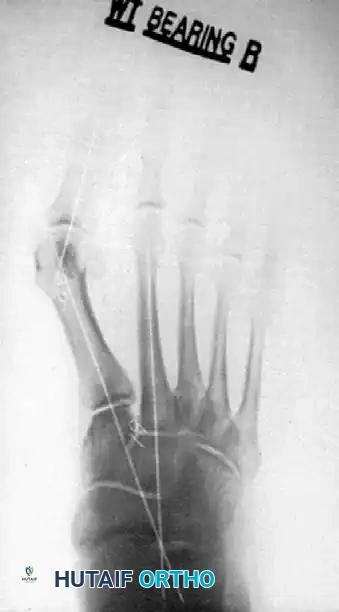
- Weeks 6-8: Radiographs are obtained to confirm osseous union at the osteotomy site. Once bridging callus is visualized, the patient may transition to progressive weight-bearing in a wide-toe-box athletic shoe. Active and passive MTP joint range of motion exercises are initiated.
- Months 3-6: Return to high-impact activities and normal footwear is allowed as tolerated, though maximum medical improvement and complete resolution of swelling may take up to 6 to 12 months.
COMPLICATIONS AND PITFALLS
While highly effective, the proximal crescentic osteotomy carries specific risks inherent to basilar metatarsal surgery:
- Dorsal Malunion (Elevation of the First Ray): This is the most common and detrimental complication. If the distal fragment is allowed to translate dorsally during fixation, the first ray becomes incompetent during the toe-off phase of gait. This inevitably leads to severe transfer metatarsalgia beneath the lesser metatarsal heads. Meticulous intraoperative control of the fragment in the sagittal plane is required.
- Cortical Bridge Fracture: As noted, failure to adequately countersink the dorsal screw hole will cause the screw head to split the dorsal cortex, resulting in loss of fixation and subsequent malunion or nonunion.
- Hallux Varus: Over-resection of the medial eminence, over-tightening of the medial capsule, or excessive lateral release can lead to an iatrogenic hallux varus. The medial exostectomy must preserve the sagittal groove.
- Nonunion: The proximal metatarsal has robust vascularity, making nonunion rare (<2%). However, excessive periosteal stripping or thermal necrosis from the saw blade can compromise healing.
- Nerve Injury: The dorsal sensory branch of the superficial peroneal nerve and the proper medial plantar digital nerve are highly vulnerable during the medial and dorsal approaches. Meticulous blunt dissection and retraction are mandatory to prevent painful postoperative neuromas.
You Might Also Like
