Percutaneous Distal Metatarsal Osteotomy: Surgical Technique & Evidence
Key Takeaway
The percutaneous distal metatarsal osteotomy is a minimally invasive technique for correcting mild to moderate hallux valgus. By utilizing a specialized micromotorized burr and fluoroscopic guidance, surgeons can achieve extra-articular deformity correction with minimal soft tissue disruption. While proponents cite rapid recovery and high union rates, careful patient selection is paramount due to reported risks of osteonecrosis and malunion. This guide details the precise surgical steps, biomechanical principles, and postoperative protocols.
Introduction and Historical Context
The evolution of foot and ankle surgery has seen a paradigm shift toward minimally invasive surgery (MIS). The percutaneous distal metatarsal osteotomy represents a specialized technique designed to correct hallux valgus deformities through millimeter-length incisions. Originally popularized by pioneers in European orthopaedic centers, this simple linear distal metatarsal osteotomy aims to achieve the structural correction of traditional open procedures (such as the Chevron osteotomy) while mitigating soft tissue trauma.
Proponents of the technique, notably Magnan et al., have cited numerous advantages: minimal soft tissue dissection, avoidance of capsular disruption, preservation of the vascular supply to the metatarsal head, reduced operative time, and the ability to perform the procedure under distal ankle-block anesthesia. In their series, Magnan et al. reported patient satisfaction rates of approximately 90% across 118 procedures, with high union rates and early weight-bearing capabilities.
However, the procedure is not without significant controversy. The literature presents a dichotomy of outcomes. Prominent foot and ankle surgeons, including Kadakia, Smerek, and Myerson, have reported unacceptable complication rates associated with the percutaneous approach—specifically citing osteonecrosis (avascular necrosis of the metatarsal head), nonunion, malunion, and recurrence of the deformity. Consequently, some institutions have abandoned the technique.
Clinical Pearl: The percutaneous distal metatarsal osteotomy possesses a notoriously steep learning curve. The lack of direct visualization demands an exceptional three-dimensional spatial awareness of first ray anatomy and absolute mastery of fluoroscopic imaging.
Indications and Patient Selection
Careful patient selection is the cornerstone of success in percutaneous forefoot surgery. The procedure is not a panacea for all hallux valgus deformities.
Primary Indications:
* Mild to moderate hallux valgus deformities.
* Intermetatarsal angle (IMA) less than 15 degrees.
* Hallux valgus angle (HVA) less than 30 degrees.
* Congruent or subluxated first metatarsophalangeal (MTP) joint that is manually reducible.
* Patients with high surgical risk for open procedures (e.g., mild vascular compromise where extensive incisions might fail to heal, though severe ischemia is an absolute contraindication).
Contraindications:
* Severe hallux valgus (IMA > 15°, HVA > 40°).
* Hypermobility of the first tarsometatarsal (TMT) joint (requires a Lapidus procedure).
* Significant osteoarthritis of the first MTP joint (hallux rigidus).
* Active infection or severe peripheral arterial disease.
* Revision surgery for previously failed hallux valgus corrections.
Biomechanical Principles of Correction
The percutaneous technique relies on the concept of "guiding the correction" using a strategically placed Kirschner wire (K-wire) and the intact soft tissue envelope. Unlike open procedures that utilize rigid internal fixation (e.g., screws or plates), this technique often relies on K-wire stabilization combined with specialized postoperative taping to maintain the capital fragment in its translated position.
The osteotomy is performed in the subcapital region. By translating the metatarsal head laterally, the intermetatarsal angle is reduced. The K-wire, inserted extraperiosteally, acts as a joystick.
Surgical Warning: The exact dorsal-plantar entry point of the K-wire dictates the sagittal plane translation of the metatarsal head. If the metatarsal head requires plantar translation (to prevent transfer metatarsalgia), the wire must engage the head more dorsally. Conversely, for dorsal translation, the wire should engage more plantarly.
Preoperative Planning and Setup
Anesthesia and Positioning
The procedure is highly amenable to regional anesthesia. A comprehensive ankle block (targeting the tibial, deep peroneal, superficial peroneal, sural, and saphenous nerves) provides excellent intraoperative anesthesia and postoperative analgesia.
Position the patient supine on the operating table. A below-the-knee wedge bracket is utilized to allow 90 degrees of knee flexion, placing the foot in a plantigrade position firmly on the table.
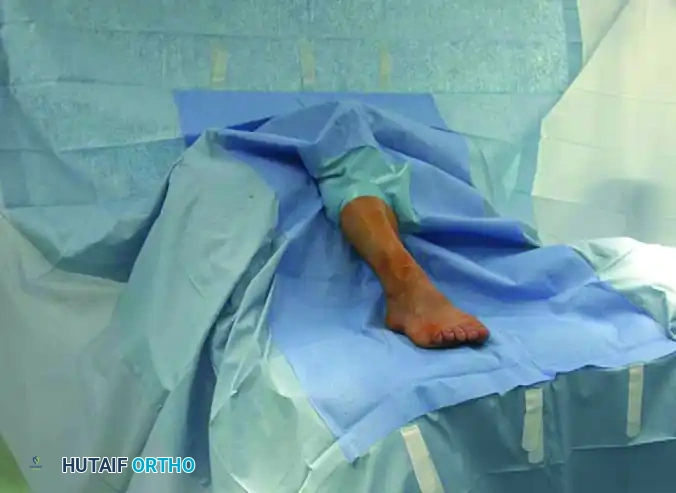
Position the fluoroscopic image intensifier (C-arm) to the side of the patient. The primary surgeon stands directly in front of the patient at the end of the table, allowing an unobstructed axial view of the first ray and easy manipulation of the C-arm for orthogonal views.
Step-by-Step Surgical Technique
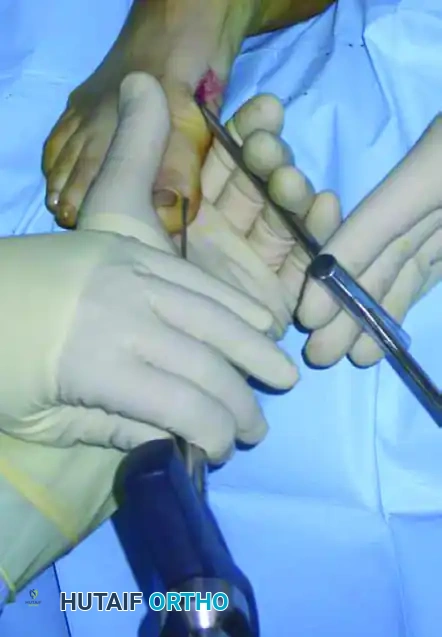
1. Kirschner Wire Insertion
The initial step involves placing the K-wire that will eventually capture and stabilize the osteotomized metatarsal head.
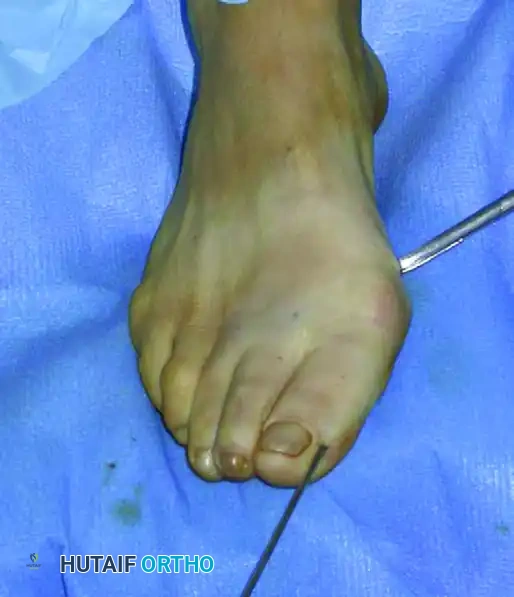
Insert a 2.0-mm diameter K-wire starting from the medial corner of the hallux nail.
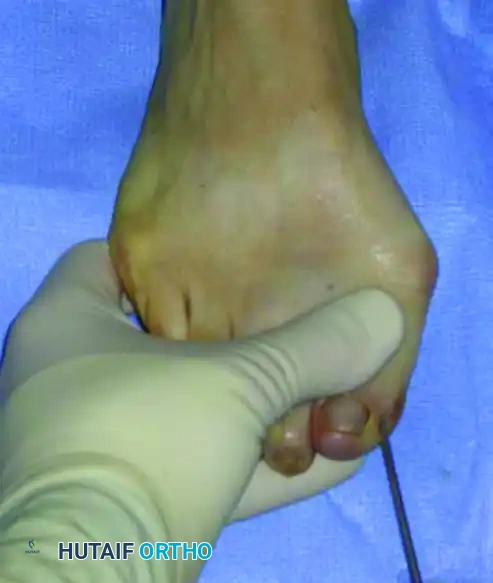
Pitfall: Strictly avoid penetrating the distal corner or the germinal matrix of the nail. Transfixing the nail matrix can lead to severe postoperative pain, nail dystrophy, or skin sloughing while the wire remains in situ.
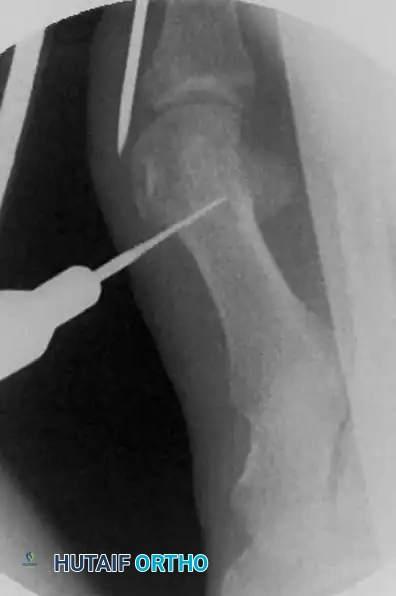
Advance the wire proximally. It is imperative that the wire is placed in an extraperiosteal position along the medial aspect of the proximal phalanx and the MTP joint. This extraperiosteal trajectory is what allows the lateral displacement of the capital fragment later in the procedure.
The wire must be centered midway between the dorsal and plantar aspects of the great toe to correctly engage the center of the metatarsal head. Drive the wire until it firmly engages the medial aspect of the metatarsal head. Firm engagement is critical; loss of contact during the osteotomy will result in uncontrolled, free-floating displacement of the capital fragment.
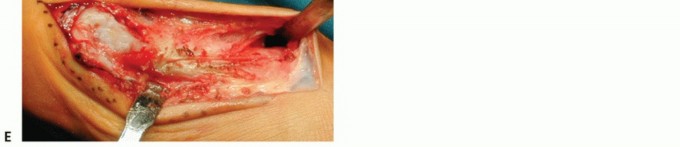
2. Skin Incision and Periosteal Detachment
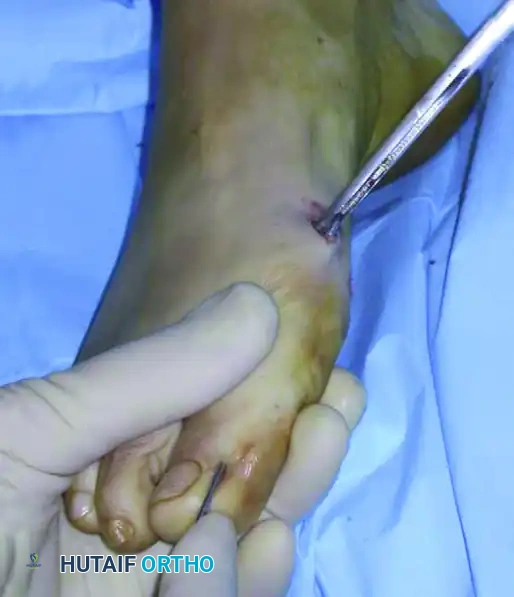
Identify a point approximately 1 cm proximal to the engaged tip of the K-wire. Make a micro-incision (3 to 5 mm) at this location.
Carry the incision directly down to the bone, incising the periosteum. To avoid damaging the dorsal or plantar neurovascular bundles, ensure the incision remains strictly in the midline (equator) of the medial metatarsal neck.
Insert small, sharp scissors through the skin incision to detach the periosteum around the planned osteotomy site, sweeping both dorsally and plantarly.
This crucial step creates a safe working space, keeping the delicate soft tissues, capsule, and neurovascular structures safely away from the high-speed bone cutter.
3. The Percutaneous Osteotomy
The osteotomy is performed using a specialized 2.33-mm-diameter micromotorized Lindemann bone cutter (e.g., Aesculap, Tuttlingen, Germany). This burr is designed for side-cutting with high torque and low speed to minimize thermal necrosis.
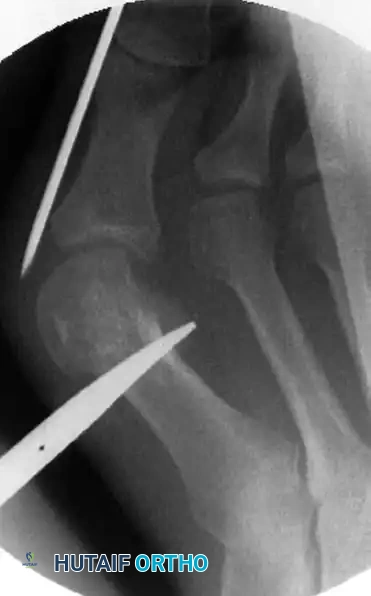
Introduce the burr through the incision to the subcapital region of the first metatarsal. Before activating the burr, verify the exact level of the cut using fluoroscopy.
Osteotomy Geometry:
* Sagittal Plane: The cut must be strictly perpendicular to the long axis of the first metatarsal shaft.
* Frontal Plane: Introduce a slight mediolateral obliquity. Because the burr itself removes 2 to 3 mm of bone (kerf), a slight inclination facilitates relative lengthening or shortening of the metatarsal as dictated by preoperative planning.
Surgical Warning - Thermal Necrosis: Continuous, copious cold saline irrigation directly onto the burr shaft during the osteotomy is mandatory. Failure to irrigate will cause thermal necrosis of the bone (leading to nonunion or AVN) and thermal burns to the skin edges (leading to wound breakdown and infection).
Execute the osteotomy using a corticotomy technique. Drill the medial cortex first, then advance the tip of the burr into the medullary canal. From within the canal, drill the lateral cortex.
Keep the bone cutter in the same medial entry hole, pivoting it to drill multiple holes circumferentially until the cut is complete. Once finished, manually stress the hallux and check radiographically to confirm the osteotomy is completely through all cortices and the metatarsal head is fully mobile.
4. Deformity Correction and Fixation
With the osteotomy complete, the metatarsal head must be translated laterally to correct the intermetatarsal angle.
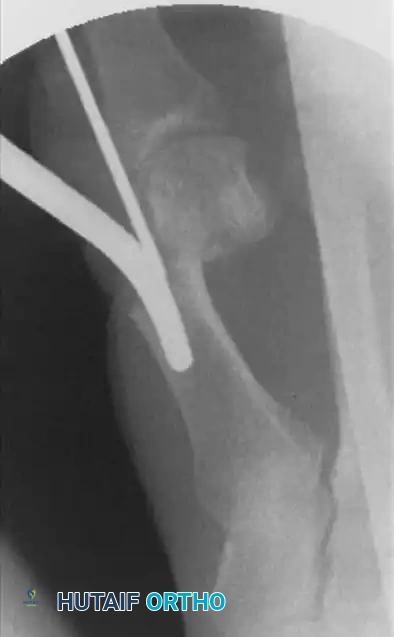
Insert the curved end of a specially designed grooved intramedullary instrument (e.g., Tecres, Verona, Italy) through the incision and into the medullary canal of the proximal first metatarsal diaphysis.
Advance the previously placed K-wire manually until the proximal tip of the wire can be visualized or felt engaging into the groove of the intramedullary instrument.
To execute the correction, use the grooved instrument as a lever. Lever the instrument distally to physically push the metatarsal head segment laterally. Simultaneously, use your opposite hand (which is holding the hallux and the K-wire) to tilt and control the metatarsal head.
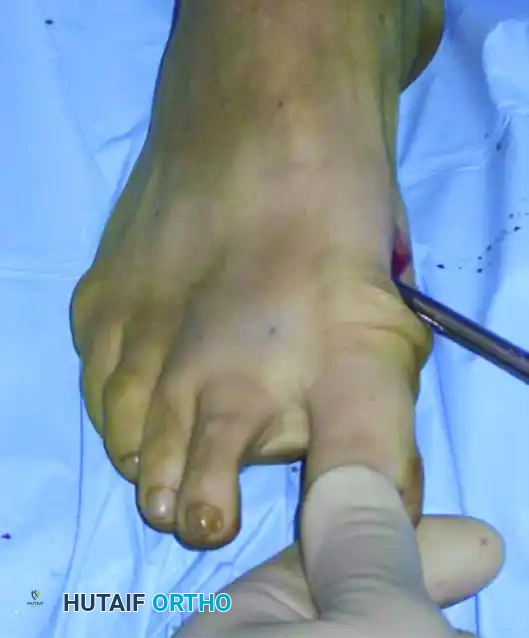
Pitfall: Displace the capital fragment gradually. Over-aggressive translation can cause the metatarsal head to "fall off" the diaphyseal fragment entirely into the first intermetatarsal space. If this loss of contact occurs, you must manually manipulate the head back onto the distal end of the diaphyseal fragment before proceeding.
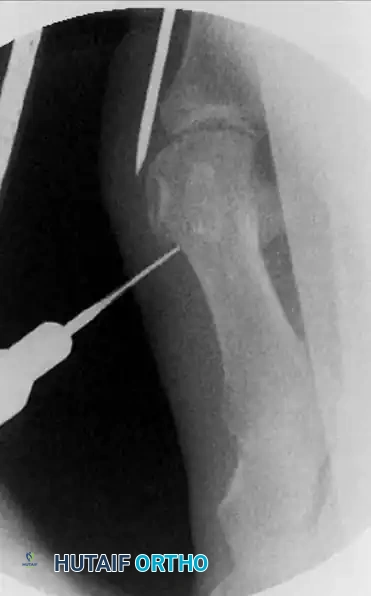
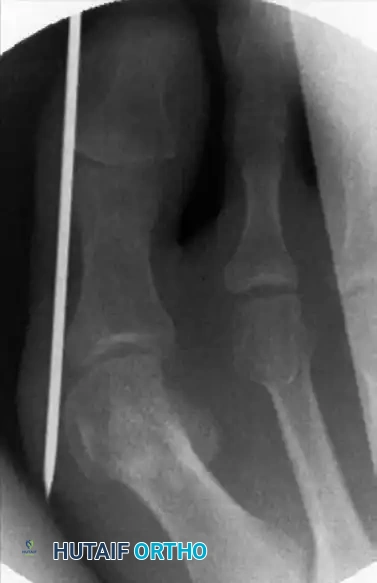
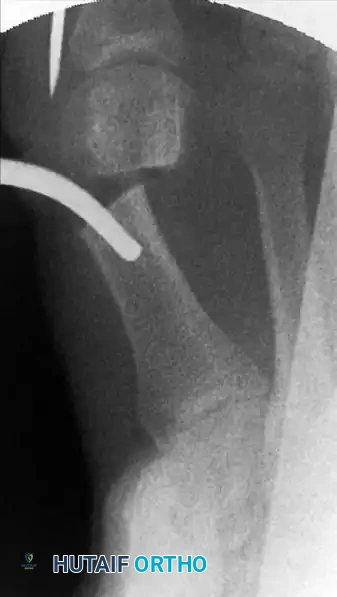
Once satisfactory lateral translation and axial alignment are achieved, drive the K-wire from distal to proximal, passing it out of the metatarsal head and deep into the medullary canal of the proximal metatarsal shaft to lock the correction in place.
Confirm the final correction, translation, and hardware placement with orthogonal fluoroscopic views. Satisfactory correction is generally achieved when the medial aspect of the metatarsal head is flush with the lateral cortex of the metatarsal shaft.
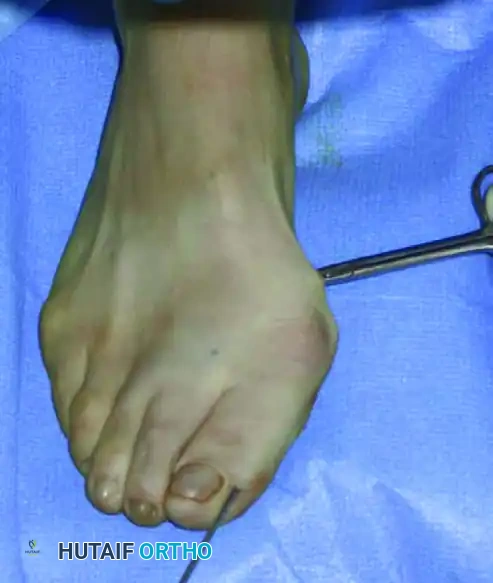
Cut the K-wire outside the skin and bend the end to prevent proximal migration. Close the micro-incision with a single non-absorbable suture or sterile adhesive strips.
Postoperative Protocol and Rehabilitation
The success of percutaneous forefoot surgery is heavily reliant on meticulous postoperative care, particularly the dressing. Because internal fixation is minimal (a single K-wire), the soft tissue dressing acts as an external splint.
- Immediate Postoperative Taping: Apply a specialized compressive dressing. The hallux is taped in a slightly overcorrected (varus) and plantarflexed position. This taping must be maintained and changed only by the surgical team for the first 4 weeks.
- Weight-Bearing: Patients are typically allowed immediate full weight-bearing on the heel and lateral border of the foot using a rigid-soled postoperative shoe.
- Hardware Removal: The K-wire is generally removed in the clinic at 4 to 6 weeks postoperatively, once clinical and radiographic signs of early soft callus formation are evident.
- Physical Therapy: Following wire removal, aggressive range-of-motion exercises for the first MTP joint are initiated to prevent arthrofibrosis. Transition to standard wide-toe-box footwear occurs between 6 and 8 weeks.
Complications and Pitfalls
As highlighted by the conflicting literature, surgeons must be acutely aware of the potential complications associated with this technique:
- Osteonecrosis (Avascular Necrosis): The primary concern raised by critics. While the percutaneous approach spares the capsule, aggressive burring or damage to the plantar lateral arterial network can compromise the head's vascularity.
- Thermal Necrosis: Utilizing high-speed burrs without adequate irrigation will burn the bone, leading to delayed union, nonunion, or deep infection. Always use low-speed, high-torque settings with continuous cold saline.
- Malunion and Loss of Fixation: A single K-wire provides inferior biomechanical stability compared to crossed screws or locking plates. Non-compliant weight-bearing or improper taping can lead to dorsal elevation of the metatarsal head (resulting in transfer metatarsalgia) or recurrence of the hallux valgus.
- Nerve Injury: The dorsal medial cutaneous nerve is at risk during the percutaneous stab incision. Blunt dissection to the bone is mandatory.
Conclusion
The percutaneous distal metatarsal osteotomy is a powerful, minimally invasive tool in the armamentarium of the modern foot and ankle surgeon. When performed with precise indications, meticulous fluoroscopic guidance, and strict adherence to biomechanical principles, it offers rapid recovery and excellent cosmetic and functional outcomes. However, the steep learning curve and the potential for severe complications demand that surgeons approach this technique with profound respect for forefoot anatomy and rigorous postoperative management.
You Might Also Like