Modified McBride Bunionectomy: A Comprehensive Surgical Guide
Key Takeaway
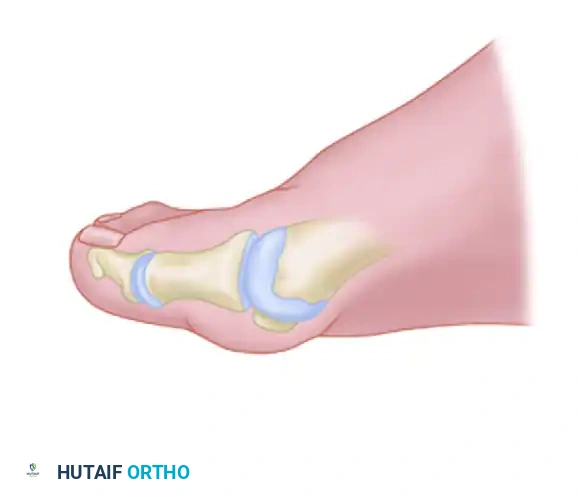
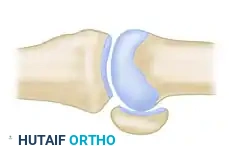
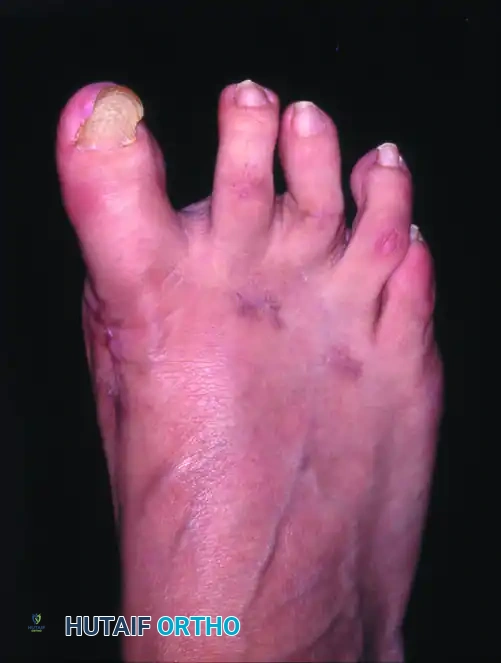
The Modified McBride Bunionectomy is a powerful soft-tissue procedure for correcting mild to moderate hallux valgus. It involves a medial eminence exostectomy, medial capsulorrhaphy, and a lateral soft-tissue release, including the adductor hallucis tendon. This guide details the precise surgical steps, biomechanical principles, and postoperative protocols necessary to achieve optimal alignment, restore first ray mechanics, and minimize recurrence in carefully selected patients.
Introduction and Biomechanical Principles
The Modified McBride Bunionectomy remains a foundational soft-tissue procedure in the armamentarium of the foot and ankle surgeon. Originally described by Earl McBride in 1928, the classic procedure involved excision of the medial eminence, release of the adductor hallucis, and routine excision of the fibular (lateral) sesamoid. However, the routine removal of the fibular sesamoid frequently led to a devastating iatrogenic hallux varus deformity due to the unopposed pull of the abductor hallucis and the medial head of the flexor hallucis brevis.
The Modified McBride procedure, refined over decades of orthopedic practice, preserves the fibular sesamoid in the vast majority of cases. It relies on a meticulous lateral soft-tissue release combined with a medial capsulorrhaphy and exostectomy to restore the dynamic balance of the first metatarsophalangeal (MTP) joint. By realigning the deforming forces—specifically the adductor hallucis tendon and the lateral capsule—the procedure centralizes the sesamoid apparatus beneath the first metatarsal head, thereby correcting the hallux valgus deformity without compromising the intrinsic stability of the first ray.
Indications and Patient Selection
The Modified McBride Bunionectomy is not a panacea for all hallux valgus deformities. It is strictly a soft-tissue balancing procedure and is therefore indicated only for specific anatomical and radiographic parameters.
Primary Indications:
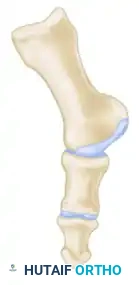
* Mild to Moderate Hallux Valgus: Intermetatarsal angle (IMA) less than 13 to 15 degrees, and a Hallux Valgus Angle (HVA) less than 30 to 35 degrees.
* Congruent First MTP Joint: The joint must be congruent or only mildly subluxated. Severe lateral subluxation typically requires a concomitant osseous procedure (e.g., distal metatarsal osteotomy).
* Absence of Degenerative Joint Disease: The articular cartilage of the first MTP joint must be well-preserved.
* Adequate Bone Quality: While primarily a soft-tissue procedure, the medial eminence exostectomy requires healthy cancellous bone for capsular reattachment.
Surgical Warning: Performing a Modified McBride procedure in isolation on a patient with a high intermetatarsal angle (>15 degrees) or significant first ray hypermobility will almost certainly result in a high rate of recurrence. In such cases, a proximal metatarsal osteotomy or a Lapidus arthrodesis must be added to the surgical plan.
Preoperative Planning and Positioning
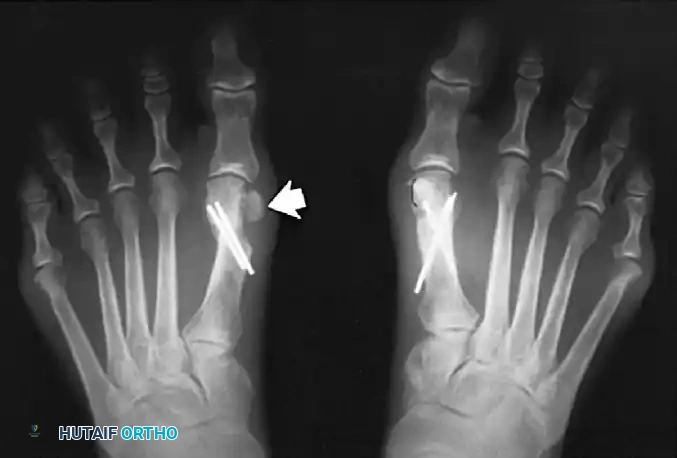
Thorough preoperative clinical and radiographic evaluation is mandatory. Weight-bearing anteroposterior (AP), lateral, and sesamoid axial radiographs must be scrutinized to assess the IMA, HVA, distal metatarsal articular angle (DMAA), and the position of the sesamoid apparatus.
Patient Positioning:
* The patient is placed in the supine position on the operating table.
* A well-padded thigh or calf tourniquet is applied to ensure a bloodless surgical field, which is critical for identifying delicate neurovascular structures.
* The foot is positioned at the edge of the table to allow unrestricted manipulation of the hallux and access to both the medial and dorsal aspects of the foot.
* Intravenous antibiotics are administered prior to tourniquet inflation.
Surgical Technique: Step-by-Step
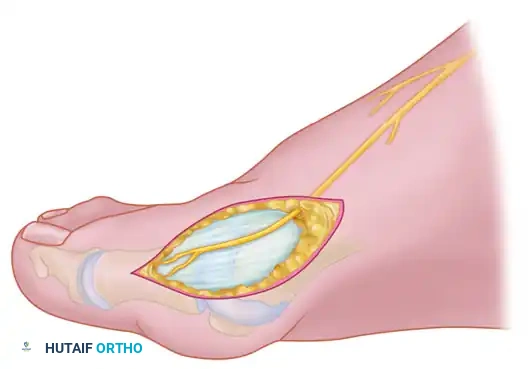
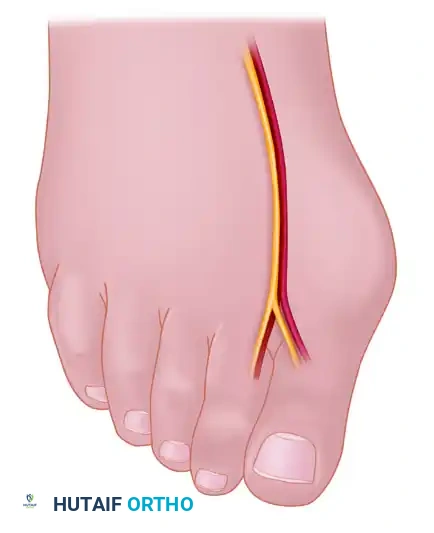
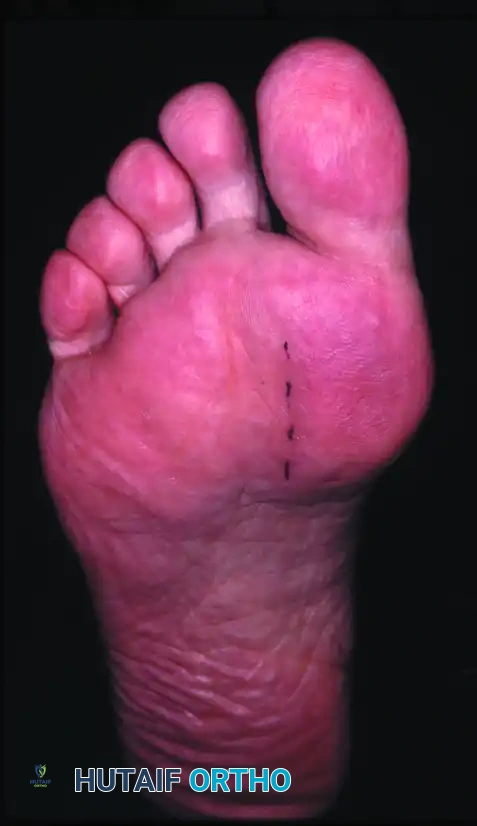
Medial Skin and Capsular Incision
The approach to the medial eminence must be meticulously planned to avoid injury to the cutaneous nerves, which can lead to painful postoperative neuromas.
- With the tourniquet inflated, extend a midline, straight, medial incision starting from the middle of the proximal phalanx and extending proximally to approximately 2 cm proximal to the junction of the medial eminence with the metatarsal shaft.
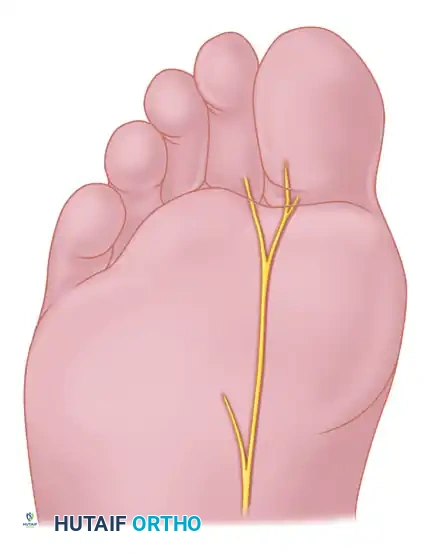
- This incision strategically utilizes an internervous plane between the most medial branches of the superficial peroneal nerve dorsally and the medial proper digital branch of the medial plantar nerve plantarward.
- Mobilize the skin 2 to 3 mm dorsally and plantarward. This minimal mobilization is crucial to ensure that no sensory nerve branches are inadvertently injured during the subsequent capsular incision.
- Coagulate the superficial veins as they are encountered to minimize postoperative hematoma formation and swelling.
- Utilize delicate, two-tooth retractors and 1.5-mm forceps during this initial dissection to avoid unnecessary skin trauma and edge necrosis.
- Make a longitudinal capsular incision approximately 3 to 4 mm plantar to the line of the skin incision. (Note: The original McBride capsular incision was transverse, but a longitudinal approach offers superior exposure and easier closure).
- By sharp dissection, raise the periosteum and the capsule dorsally and plantarward from the base of the proximal phalanx to the proximal edge of the medial eminence.
Clinical Pearl: At the proximal end of the medial eminence, strictly avoid releasing the proximal bony attachments of the medial capsule on the metatarsal neck (especially in the dorsal direction). Disruption of this proximal attachment can destabilize the capsule and complicate the final capsulorrhaphy.
- Elevate the capsule by sharp dissection dorsalward and plantarward to expose the dorsal aspect of the metatarsal head, the entire medial eminence, and the plantar plate. The use of a periosteal elevator is generally not recommended here, as blunt elevation increases the risk of inadvertently releasing the critical proximal capsular attachments.
The L-Shaped Capsulotomy Alternative
Depending on surgeon preference and the specific anatomical presentation, an inverted-L shaped capsulotomy may be utilized instead of a longitudinal incision.
- Make the capsular incision in an inverted-L shape. Raise the dorsal flap deep to the nerve and veins until the accessory slip of the extensor hallucis longus (EHL) tendon is visualized in the proximal portion of the incision.
- Begin the incision proximally on the dorsomedial side of the first metatarsal shaft, approximately 2 to 3 mm medial to the accessory slip of the EHL tendon. Carry the incision down to the bone at the level of the first metatarsal joint, extending it proximally for 4 to 6 cm.
- Make the transverse limb of the capsular incision at the level of the joint, stopping 2 to 3 mm from the tibial sesamoid bone. This transverse limb effectively transects the capsular insertion of the abductor hallucis muscle.
- Beginning on the plantar aspect of the incision, carefully remove the capsule from the medial eminence from the inside out. Direct the small-bladed knife down the slope of the eminence to avoid "buttonholing" the capsule at the junction of the medial eminence and the metatarsal shaft.
- Free the capsule subperiosteally on its dorsomedial surface, and retract it proximally and plantarward.
- Insert one small Hohmann retractor over the dorsolateral surface of the metatarsal head and another beneath the head at the head-neck junction. Distract and plantarflex the hallux to fully expose the articular surface of the metatarsal head. Evaluate the cartilage for degenerative changes and assess the orientation of the distal metatarsal articular angle (DMAA).
- Reduce the hallux congruently onto the metatarsal head. If the hallux remains in more than 15 degrees of valgus after reduction, a concomitant distal metatarsal osteotomy (e.g., Chevron) is definitively required.
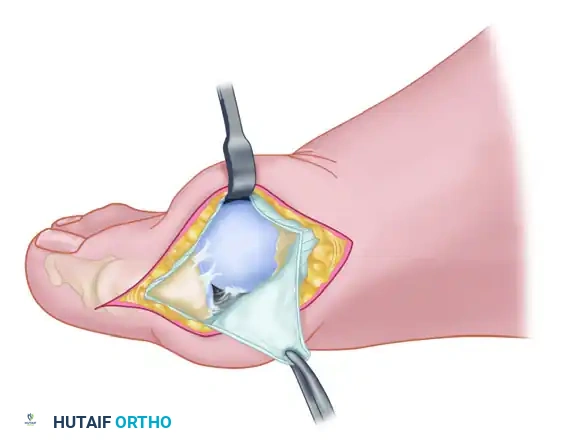
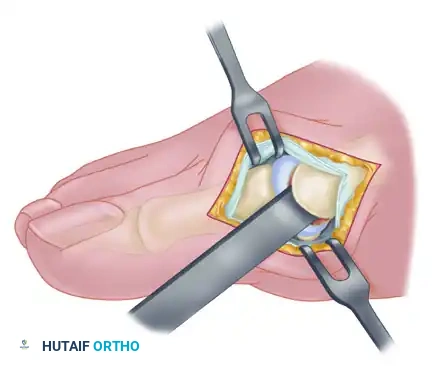
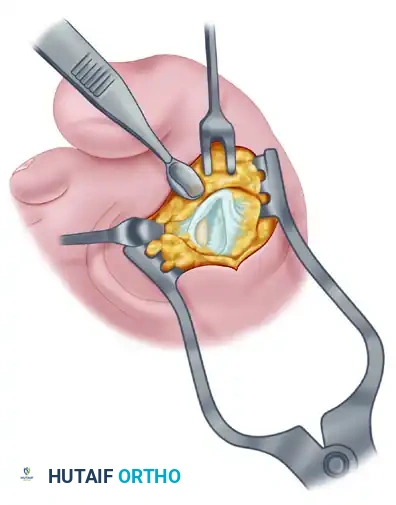
Medial Eminence Removal (Exostectomy)
The goal of the exostectomy is to remove the prominent medial bump without compromising the weight-bearing surface of the metatarsal head or the tibial sesamoid articulation.
- After inspecting the MTP joint for loose bodies or synovial hypertrophy, prepare for the exostectomy. Always consult the preoperative weight-bearing radiographs to determine the exact amount of medial eminence to be resected. Over-resection can lead to loss of tibial sesamoid support and subsequent hallux varus.
- First, score the proximal edge of the eminence with an osteotome where it meets the metatarsal shaft. This critical step prevents the osteotomy from propagating proximally and splitting the metatarsal shaft.
- Using a power saw (a 9-mm blade is preferred over a 4- to 5-mm blade for stability) or a sharp osteotome, begin the exostectomy distally at the parasagittal groove. Direct the cut medially toward the previously scored area on the metatarsal shaft.
- After the medial eminence has been removed, use a small rongeur to round off the sharp dorsal and plantar edges of the medial aspect of the metatarsal head.
- Conclude this stage by rasping the raw cancellous bone to a smooth contour. Apply bone wax to the raw bony surfaces of the metatarsal head to minimize postoperative osseous bleeding and hematoma formation.
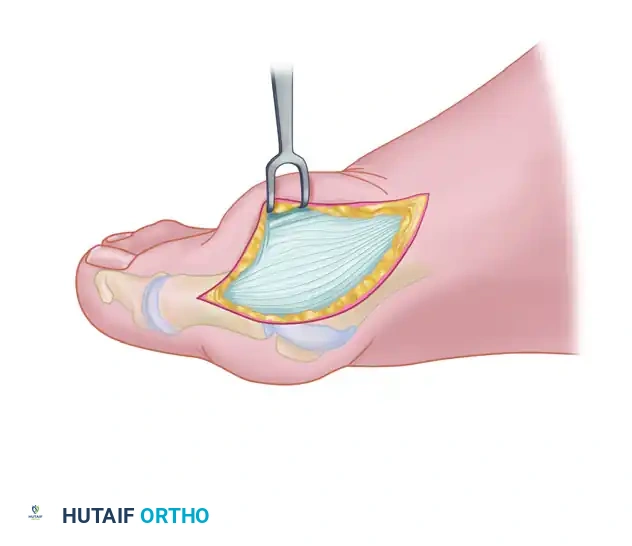
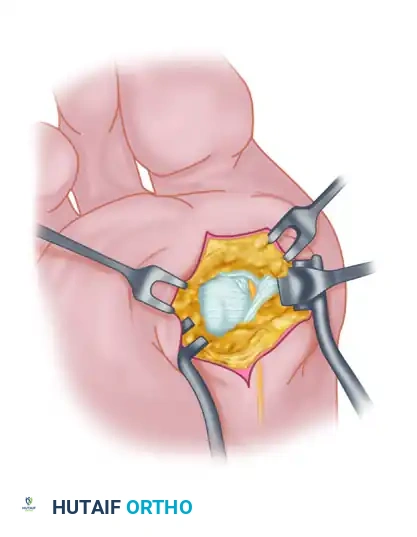
Adductor Tendon and Lateral Capsular Release
The lateral release is the biomechanical heart of the Modified McBride procedure. It mobilizes the tethered lateral structures, allowing the sesamoid apparatus to reduce beneath the metatarsal head.
- Begin the second stage with a dorsal longitudinal incision. Start 2 to 3 mm proximal to the dorsal aspect of the first web space to avoid postoperative web contracture. Extend the incision proximally between the first and second metatarsal heads for 3 to 4 cm.
- This approach provides adequate exposure of the adductor hallucis insertion into the base of the proximal phalanx, the lateral head of the flexor hallucis brevis (FHB) muscle converging on the fibular sesamoid, and the entire lateral capsule.
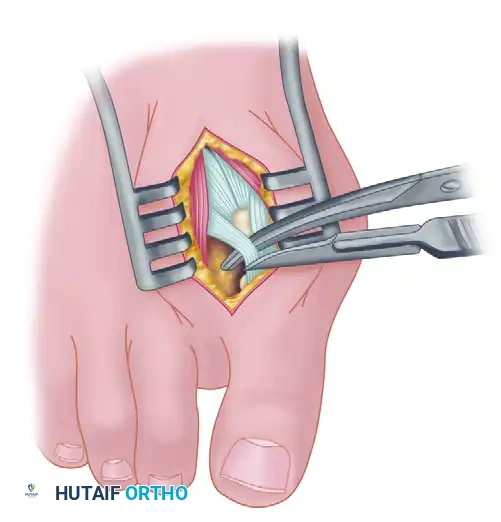
- Delicate retraction of the skin exposes the dorsal digital branches of the veins, which should be cauterized. Be highly vigilant for the terminal branches of the first dorsal intermetatarsal artery, which may be encountered adjacent to the proper digital branches of the deep peroneal nerve supplying the first web space.
- The main portion of the adductor tendon inserts into the base of the proximal phalanx just plantar to the longitudinal axis of the phalanx. It also possesses a smaller insertion, confluent with the lateral head of the FHB, into the fibular sesamoid.
Surgical Technique Tip: To easily identify the insertion of the adductor hallucis tendon, place a small, pointed, curved hemostat on the dorsolateral base of the proximal phalanx. Slide it firmly plantarward, then lift the hemostat dorsally and laterally. The tip of the instrument will reliably rest in the axilla of the adductor tendon insertion.
- Once the primary insertion is released from the proximal phalanx, grasp the tendon with a hemostat. Apply traction and displace it dorsally and laterally toward the second metatarsal.
- Spread the first and second metatarsal heads using a small Inge retractor or a Weitlaner retractor. Holding the adductor tendon under tension greatly facilitates deep exposure. The lateral head of the FHB, the lateral border of the fibular sesamoid, and the conjoined slip of the adductor tendon will come into clear view.
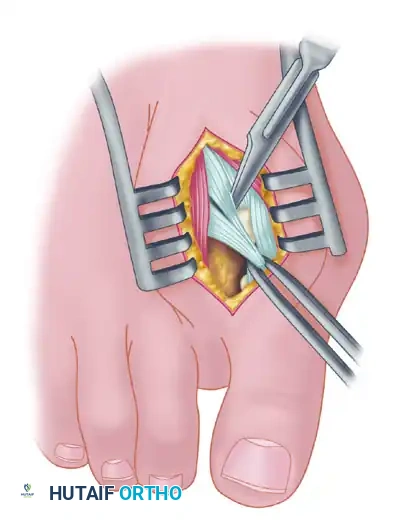
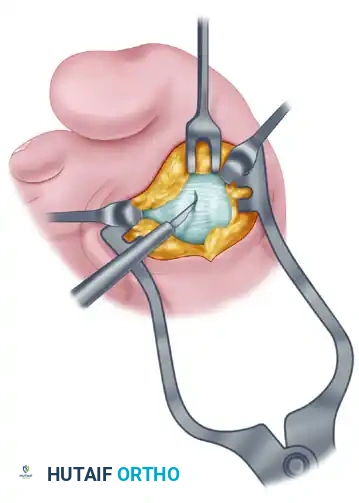
- Sever all attachments of the adductor into its conjoined insertion with the lateral head of the FHB into the fibular sesamoid. When fully released, traction on the adductor should result in free, independent movement without tethering the fibular sesamoid.
- Next, address the deep transverse intermetatarsal ligament, which lies just plantar to the adductor. Release this ligament carefully.
- Critical Pitfall: Release of the deep transverse metatarsal ligament severely endangers the neurovascular bundle to the first web space, which lies immediately beneath it. Slide a small Freer elevator between the ligament and the neurovascular bundle to protect these structures before incising the ligament. Following this, complete the lateral capsulotomy.
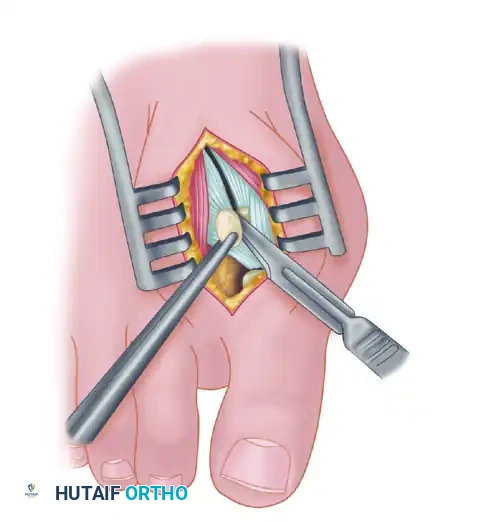
Fibular (Lateral) Sesamoidectomy: Dorsal Approach
In the modern Modified McBride procedure, the fibular sesamoid is rarely excised. However, if a severe, rigid valgus deformity persists after a complete adductor release and lateral capsulotomy, and the sesamoid cannot be mobilized, a fibular sesamoidectomy may be indicated.
- Adequately separate the first and second metatarsal heads using a lamina spreader or Inge retractor.
- Plantarflex the MTP joint 10 to 20 degrees to reduce tension on the sesamoid apparatus.
- Grasp the fibular sesamoid firmly with a small Kocher clamp or sturdy tissue forceps, pulling it laterally into the intermetatarsal space.
- Carefully release the intersesamoid ligament. Once incised, the fibular sesamoid can be delivered into the intermetatarsal space for straightforward removal.
- Surgical Warning: Extreme care must be taken when incising the intersesamoid ligament to avoid severing the flexor hallucis longus (FHL) tendon, which lies immediately plantar to it. If the FHL is inadvertently severed at this level, it generally should not be repaired, as repair often results in a rigid, fixed flexion contracture of the interphalangeal joint, whereas loss of the tendon causes minimal functional impairment.
- Alternative to Excision: Release part or all of the FHB lateral head at its insertion into the fibular sesamoid. Remember, performing both a metatarsal osteotomy and a fibular sesamoidectomy drastically increases the risk of iatrogenic hallux varus.
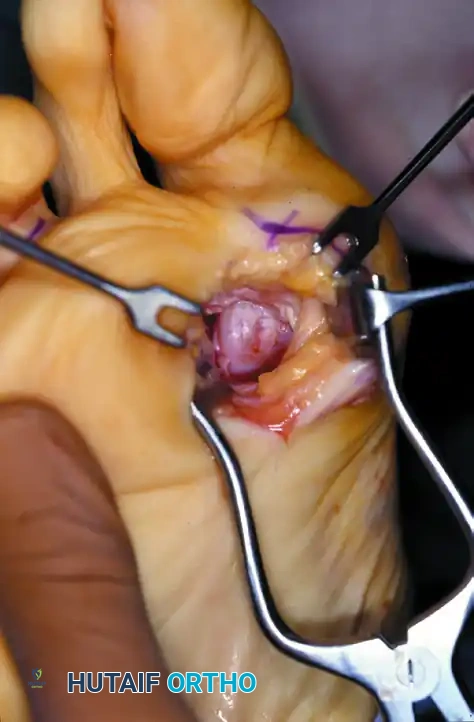
Fibular (Lateral) Sesamoidectomy: Plantar Approach
If the dorsal approach proves too difficult due to anatomical constraints, a plantar approach can be utilized for fibular sesamoidectomy.
- Have an assistant hold the ankle in dorsiflexion. A surgical headlight is highly recommended to visualize the full depth of the plantar wound.
- Flex and extend the hallux while palpating the plantar aspect of the foot to locate the sesamoid.
- Beginning 1.0 to 1.5 cm distal to the MTP joint, make a longitudinal incision on the plantar surface of the foot, extending proximally 3.5 to 4.0 cm between the first and second metatarsals.
- Separate the skin and fascial septa within the forefoot pad, and insert a small self-retaining retractor.
- Using small, blunt-tipped dissecting scissors, meticulously identify the neurovascular bundle to the first web space. Retract it laterally or medially, depending on the exact subluxated position of the sesamoid.
- Incise the plantar capsule and isolate the fibular sesamoid. Carefully shell it out from its soft tissue envelope, taking great care to protect the adjacent FHL tendon.
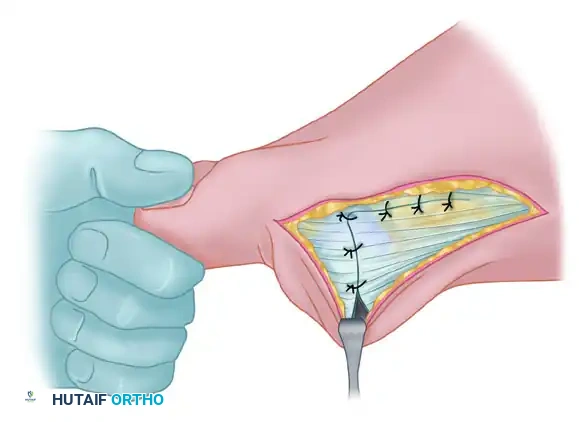
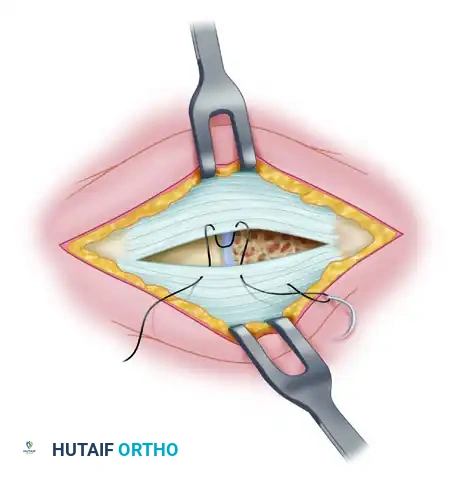
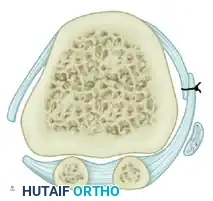
Medial Capsulorrhaphy and Closure
The final step is the medial capsulorrhaphy, which plicates the redundant medial capsule to hold the hallux in its newly corrected alignment.
- Hold the hallux in a congruently reduced position (approximately 0 to 5 degrees of valgus). Avoid over-correcting into varus.
- Excision of a redundant wedge of the medial capsule may be necessary.
- Imbricate the medial capsule, typically bringing the plantar flap over the dorsal flap, using strong, absorbable sutures (e.g., 2-0 Vicryl).
- Ensure the tension is sufficient to maintain the correction but not so tight as to restrict MTP joint plantarflexion and dorsiflexion.
- Deflate the tourniquet and achieve meticulous hemostasis.
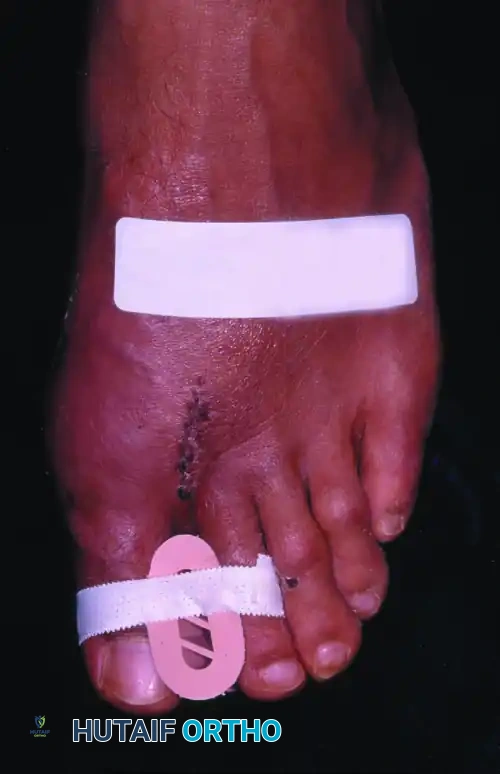
- Close the skin incisions with non-absorbable monofilament sutures (e.g., 4-0 Nylon) using a horizontal mattress or simple interrupted technique.
Postoperative Protocol and Rehabilitation
Optimal surgical technique must be paired with strict postoperative management to ensure long-term success and prevent recurrence.
- Immediate Postoperative Phase (Weeks 0-2): A bulky, compressive soft dressing is applied in the operating room, splinting the hallux in neutral alignment. A toe spacer is placed between the first and second toes. The patient is allowed heel-weight-bearing in a rigid postoperative shoe. Elevation is critical to control edema.
- Suture Removal (Week 2): Dressings are removed, and incisions are inspected. Sutures are removed if the wounds are fully healed.
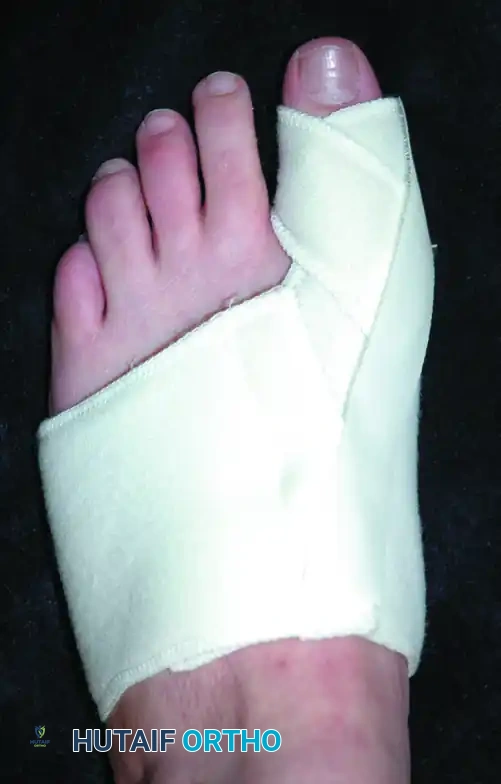
- Intermediate Phase (Weeks 2-6): The patient continues to wear a rigid postoperative shoe. A bunion splint or taping is utilized to maintain the hallux in a neutral position. Active and passive range of motion (ROM) exercises of the MTP joint are initiated to prevent capsular adhesions and stiffness.
- Late Phase (Weeks 6-12): Transition to wide-toe-box, supportive athletic shoes. High heels and narrow shoes are strictly prohibited. Physical therapy may be prescribed to optimize gait mechanics, strengthen the intrinsic foot musculature, and maximize first MTP joint dorsiflexion.
Complications and Pitfalls
While highly effective, the Modified McBride procedure carries specific risks that the orthopedic surgeon must anticipate and mitigate.
- Hallux Varus: The most dreaded complication. It is typically caused by over-resection of the medial eminence (loss of tibial sesamoid support), over-plication of the medial capsule, or unnecessary excision of the fibular sesamoid. Treatment ranges from soft-tissue release to EHL transfer or MTP arthrodesis.
- Recurrence of Hallux Valgus: Usually results from poor patient selection (e.g., performing the procedure on a patient with an IMA > 15 degrees or severe hypermobility) or failure to adequately release the adductor hallucis and lateral capsule.
- Avascular Necrosis (AVN) of the Metatarsal Head: Rare in an isolated Modified McBride, but the risk increases if extensive lateral and medial stripping is performed simultaneously, disrupting the metaphyseal blood supply.
- Nerve Injury: Injury to the dorsal cutaneous nerves or the proper digital nerve to the first web space can lead to debilitating neuromas. Meticulous dissection and the use of internervous planes are mandatory.
By adhering to strict indications, executing a precise anatomical dissection, and respecting the delicate biomechanical balance of the first ray, the Modified McBride Bunionectomy provides excellent, durable outcomes for patients suffering from symptomatic mild to moderate hallux valgus.
You Might Also Like
