Increased Displacement Distal Chevron Osteotomy: A Comprehensive Surgical Guide
Key Takeaway
The increased displacement distal chevron osteotomy is an advanced surgical technique for correcting moderate-to-severe hallux valgus with an intermetatarsal angle up to 18 degrees. By translating the metatarsal head up to 90%, surgeons achieve corrections comparable to proximal osteotomies. This guide details the biomechanical principles, meticulous surgical steps, and postoperative protocols required to optimize outcomes and minimize complications like hallux varus.
Introduction to the Increased Displacement Distal Chevron Osteotomy
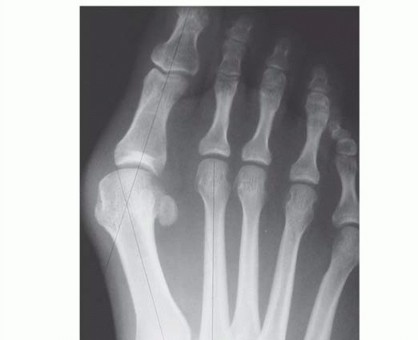
The standard distal chevron osteotomy has long been the workhorse procedure for the correction of mild-to-moderate hallux valgus deformities. However, the degree of correction obtained by traditional distal osteotomies is inherently limited by a strict geometric principle: approximately 1 mm of lateral translation of the metatarsal head corresponds to exactly 1 degree of intermetatarsal angle (IMA) correction. Consequently, severe deformities have historically mandated proximal osteotomies or lapidus arthrodesis.
To bridge this gap, Murawski and Beskin pioneered the Increased Displacement Distal Chevron Osteotomy. This advanced technique challenges traditional limits by increasing the amount of lateral displacement at the osteotomy site to greater than 6 mm, or beyond the 50% maximum translation generally recommended in classical literature. By allowing up to 90% translation of the metatarsal head, this procedure achieves IMA correction comparable to that of a proximal crescentic osteotomy or a standard chevron osteotomy combined with a lateral soft tissue release.
While highly effective, this procedure is technically demanding. The massive translation significantly reduces the bony contact area, necessitating meticulous surgical technique, precise osteotomy angles, and robust fixation to prevent instability, malunion, or avascular necrosis (AVN) of the metatarsal head.
Indications and Patient Selection
Proper patient selection is the cornerstone of success for the increased displacement distal chevron osteotomy. The procedure is not universally applicable and must be reserved for specific clinical scenarios.
Primary Indications
- Symptomatic Hallux Valgus: Moderate-to-severe deformities that have failed conservative management (e.g., shoe wear modifications, orthotics).
- Intermetatarsal Angle (IMA): Deformities with an IMA of 18 degrees or less.
- Hallux Valgus Angle (HVA): Typically between 30 and 40 degrees.
- Joint Congruency: Best suited for subluxated joints where the lateral soft tissue release will restore congruency.
Contraindications
- Severe Deformity: IMA greater than 18–20 degrees (consider proximal osteotomy or Lapidus procedure).
- First Tarsometatarsal (TMT) Hypermobility: Gross instability at the first TMT joint necessitates a fusion (Lapidus).
- Degenerative Joint Disease: Moderate-to-severe osteoarthritis of the first metatarsophalangeal (MTP) joint (consider arthrodesis).
- Poor Bone Stock: Severe osteopenia or osteoporosis, which compromises the fixation of a highly translated osteotomy.
⚠️ Clinical Warning: Hallux Varus Risk
Murawski and Beskin reported that the risk of iatrogenic hallux varus is notably increased with this technique. The combination of massive lateral bony translation, aggressive lateral soft tissue release, and over-plication of the medial capsule can easily overcorrect the deformity. Surgeons must exercise extreme caution during capsulorrhaphy.
Preoperative Planning and Biomechanics
The success of the increased displacement technique relies on altering the standard geometry of the chevron cut. A traditional chevron osteotomy utilizes a 60-degree angle between the dorsal and plantar limbs. However, if a 60-degree cut is translated by 80–90%, the remaining bony contact area is insufficient for stability and healing.
To counteract this, the increased displacement technique utilizes an acute angle of 35 to 45 degrees. This creates longer dorsal and plantar limbs extending well into the metatarsal diaphysis.
Biomechanical Advantages of the Acute Angle:
- Increased Surface Area: Longer limbs provide greater cancellous bone contact, promoting reliable osteogenesis despite massive translation.
- Enhanced Stability: The elongated plantar limb acts as a robust shelf, preventing plantar tilt or dorsal elevation of the metatarsal head under weight-bearing loads.
- Rotational Control: The extended V-shape inherently resists torsional forces better than short-limb cuts.
Step-by-Step Surgical Technique
The procedure is typically performed under regional anesthesia (ankle block or popliteal block) with a calf or ankle tourniquet for hemostasis. The patient is positioned supine with a bump under the ipsilateral hip to maintain the foot in a neutral, upward-facing position.
Phase 1: Lateral Soft Tissue Release
If preoperative clinical and radiographic evaluation reveals marked sesamoid subluxation, a lateral soft tissue release is mandatory to mobilize the sesamoid apparatus.
- Incision: Expose the lateral capsule through a dorsal first web space incision.
- Dissection: Deepen the incision carefully, protecting the first dorsal metatarsal artery and the terminal branches of the deep peroneal nerve.
- Release: Use a Freer elevator to identify the dorsal margin of the subluxed lateral sesamoid. Incise the capsule longitudinally from the base of the proximal phalanx to a point well proximal to the lateral sesamoid.
- Mobilization: This release allows the entire sesamoid complex to be medialized during the medial capsular repair at the conclusion of the procedure.
Phase 2: Medial Approach and Exostectomy
- Medial Incision: Make a standard medial longitudinal incision centered over the first MTP joint, extending from the mid-diaphysis of the first metatarsal to the interphalangeal joint of the hallux.
- Capsulotomy: Perform a longitudinal capsulotomy slightly plantar to the midaxial axis of the metatarsal. This plantar-biased incision preserves the robust dorsal capsular tissue for later repair and protects the dorsal vascular supply.
- Exposure: Reflect the capsule dorsally and plantarly to expose the medial eminence.
- Eminence Resection: Remove the medial eminence (bunion) using an oscillating sagittal saw. The cut should be made 1 to 2 mm medial to the articular margin or the sagittal groove.
- Pitfall: Do not resect flush with the metatarsal shaft. Over-resection ("staking the head") removes the medial buttress for the tibial sesamoid, virtually guaranteeing a postoperative hallux varus.
Phase 3: Osteotomy Design and Execution
Precise marking and execution of the osteotomy are the most critical steps of this procedure.
- Marking the Apex: Use a surgical marker to define the apex of the osteotomy, which must be located 15 to 20 mm proximal to the articular joint line in the center of the metatarsal head.
- Marking the Limbs: Draw the dorsal and plantar limbs at an angle of 35 to 45 degrees. The limbs must exit the diaphysis of the metatarsal proximally.
- Positioning Note: If the limbs are too short, the construct will be grossly unstable upon translation. If they are too long, translating or rotating the distal head fragment becomes physically restricted by the cortical shafts.
Figure A: The apex is marked 15 to 20 mm proximal to the joint, with limbs angled at 35 to 45 degrees exiting the diaphysis.
-
Soft Tissue Preservation: Use a Freer elevator to gently strip the periosteum and soft tissue only over the anticipated osteotomy cuts.
- Critical Pearl: To minimize vascular compromise and prevent AVN of the metatarsal head, strictly leave all soft tissues intact distal to the osteotomy on the lateral and plantar aspects of the metatarsal head.
-
The Cut: Complete the osteotomy using a fine-blade sagittal saw. Ensure the saw blade remains perfectly perpendicular to the metatarsal shaft in the transverse plane to avoid unintended plantar or dorsal angulation.
Phase 4: Translation and Fixation
- Displacement: Once the cuts are complete, apply gentle longitudinal traction to the hallux. Simultaneously, translate the distal head fragment laterally.
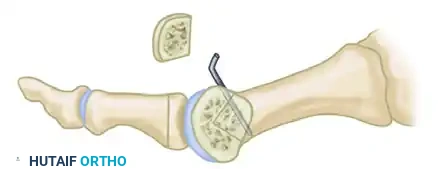
Figure B: Gentle lateral translation of the distal head fragment while applying traction to the toe.
- Positioning: Position the head fragment so that it rests securely on the lateral spike of the proximal metatarsal fragment. With the acute limb angles, up to 90% lateral translation is possible while maintaining adequate bony contact for union.
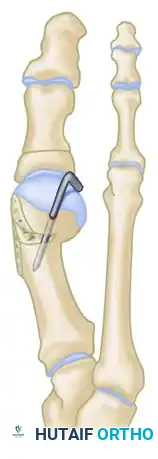
Figure C: The head fragment is positioned on the lateral spike of the proximal fragment, achieving maximum translation.
- Temporary Fixation: Hold the osteotomy in its corrected position. Ensure the metatarsal head has not tilted dorsally (which would cause transfer metatarsalgia).
- Definitive Fixation: Stabilize the osteotomy using two 0.054-inch smooth Kirschner wires (K-wires). Insert the wires percutaneously from the medial aspect of the proximal metatarsal shaft, directing them distally and laterally across the osteotomy site into the metatarsal head fragment.
- Pin Management: Bend the proximal ends of the K-wires and cut them, leaving them protruding through the skin (percutaneous) to facilitate easy removal in the clinic setting.
Phase 5: Contouring the Medial Diaphyseal Bump
Because the metatarsal head has been translated massively to the lateral side, the medial aspect of the proximal metatarsal shaft will now protrude prominently into the medial subcutaneous space.
🔪 Surgical Pitfall: The Medial Diaphyseal Bump
Murawski and Beskin noted that a "medial diaphyseal bump" was present in 5 of their 33 patients, and was highly symptomatic in 3, requiring revision surgery or shoe modifications. Aggressive contouring of this prominence is mandatory.
- Resection: Use a sagittal saw or a rongeur to cut and contour the large bony prominence on the proximal-medial metatarsal.
- Smoothing: Use a rasp to smooth the bone so that the proximal shaft is perfectly in line with the medial margin of the newly translated distal head.
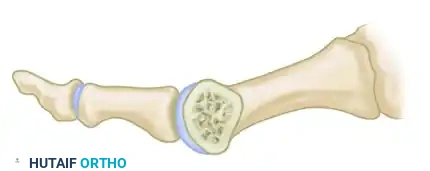
Figure D: The prominent medial spike of the proximal fragment is resected and contoured flush with the translated metatarsal head.
Phase 6: Capsulorrhaphy and Closure
Proper capsular closure is vital for maintaining sesamoid reduction and preventing hallux varus.
- Medial Capsulorrhaphy: During closure of the medial capsule, excise a U-shaped wedge of redundant tissue from the plantar portion of the capsule, near the level of the medial sesamoid.
- Suturing: Close this defect using strong, absorbable figure-of-eight sutures. This plication pulls the sesamoid apparatus medially, correcting the rotational deformity.
- Pants-Over-Vest Closure: Utilize a "pants-over-vest" suture configuration to imbricate the plantar capsule to the dorsal capsule. This technique significantly improves and maintains the corrected sesamoid position.
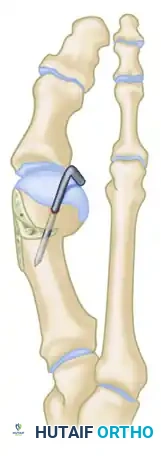
Figure E: Final stabilized construct demonstrating K-wire fixation, flush medial contouring, and corrected alignment.
- Dressing: After skin closure, apply a standard soft bunion dressing. The dressing must be applied with mild tension to gently support the hallux in the corrected, neutral position. Avoid forcing the toe into excessive varus.
Postoperative Care and Rehabilitation Protocol
Because the increased displacement distal chevron osteotomy relies on a smaller surface area of bony contact compared to standard osteotomies, the postoperative protocol requires a delicate balance between protecting the fixation and preventing joint stiffness.
Phase 1: Immediate Postoperative (Weeks 0–2)
- Weight-Bearing: Patients are allowed to bear weight immediately, but strictly on their heels.
- Immobilization: A rigid, stiff-soled postoperative shoe or a controlled ankle motion (CAM) boot is mandatory. Crutches should be used as needed for balance and safety.
- Wound Care: The initial surgical dressing remains intact. Elevation and icing (behind the knee or at the ankle) are encouraged to minimize edema.
Phase 2: Suture Removal and Pin Care (Weeks 2–6)
- Clinic Visit (Week 2): Sutures are removed. The surgical site is inspected for signs of infection or skin necrosis.
- Redressing: A new, supportive bunion dressing or toe spacer is applied to maintain the hallux in neutral alignment.
- Activity: Heel weight-bearing in the stiff-soled shoe continues. Active range of motion (ROM) of the MTP joint is generally delayed until the pins are removed to prevent pin-tract irritation or loss of fixation.
Phase 3: Pin Removal and Transition (Weeks 5–6)
- Pin Removal: The percutaneous 0.054-inch K-wires are removed in the clinic at 5 to 6 weeks postoperatively. This is typically done without local anesthesia.
- Footwear: The stiff-soled postoperative shoe is discontinued. The patient is transitioned into a wide-toe-box, supportive athletic shoe.
- Physical Therapy: Aggressive active and passive ROM exercises for the first MTP joint are initiated to combat capsular stiffness.
Phase 4: Long-Term Healing and Return to Activity (Months 2–5)
- Radiographic Healing: Due to the massive translation and reduced bony contact, complete radiographic consolidation of the osteotomy can take 3 months or more.
- Activities of Daily Living (ADLs): Despite delayed radiographic union, the osteotomy is usually clinically stable enough to permit normal ADLs within 2 months.
- High-Impact Activities: Sports, running, and strenuous physical activities must be strictly delayed until 3 to 5 months after surgery, contingent upon radiographic evidence of complete bony union and the restoration of pain-free MTP joint mechanics.
Conclusion
The increased displacement distal chevron osteotomy is a powerful tool in the orthopedic surgeon's armamentarium, effectively bridging the gap between standard distal osteotomies and more invasive proximal procedures. By utilizing an acute 35-to-45-degree cut, surgeons can safely translate the metatarsal head up to 90%, achieving profound correction of moderate-to-severe hallux valgus. However, the procedure demands exacting surgical precision—particularly regarding soft tissue preservation, osteotomy geometry, and medial contouring—to mitigate the risks of hallux varus, avascular necrosis, and symptomatic bony prominences. Strict adherence to the biomechanical principles and postoperative protocols outlined in this guide will ensure optimal, reproducible patient outcomes.
You Might Also Like