Disorders of the Hallux
Disorders of the Hallux
E. Greer Richardson Chapter 78
Hallux valgus (bunion) ........ 4471 Preoperative management ........ 4471 Soft-tissue procedures ............... 4476 Combined soft-tissue and bony procedures ............................. 4487 Keller resection arthroplasty .............. 4487 Metatarsal osteotomy ................ 4495 Osteotomy of the proximal fi rst metatarsal .............................. 4509 Proximal crescentic osteotomy with a distal soft-tissue procedure ............. 4510 Proximal chevron fi rst metatarsal osteotomy .................................. 4516 Proximal phalangeal osteotomy .............................. 4522 Arthrodesis of the fi rst metatarsophalangeal joint for hallux valgus ................... 4526
Juvenile and adolescent hallux valgus (10 to 19 years old) ... 4533 Hallux valgus in cerebral palsy ...................................... 4540 Complications after surgery for hallux valgus ................... 4540 Preventing complications .................. 4541 Recurrent deformity after simple bunionectomy ............................. 4541 Complications after chevron osteotomy .................................. 4547 Acquired hallux varus and intrinsic minus hallux ............................. 4549 Complications of resection arthroplasty of the fi rst metatarsophalangeal joint (Keller) .................................... 4562 Complications after arthrodesis of the fi rst metatarsophalangeal joint ........ 4563
Hallux rigidus ........................ 4563 Nonoperative treatment ........... 4565 Operative treatment ................. 4565 Arthrodesis of the fi rst metatarsophalangeal joint .............. 4571 Resection arthroplasty (Keller procedure) ................................. 4571
Sesamoid injuries of the hallux ................................... 4572 Treatment ................................. 4575
HALLUX VALGUS (BUNION)
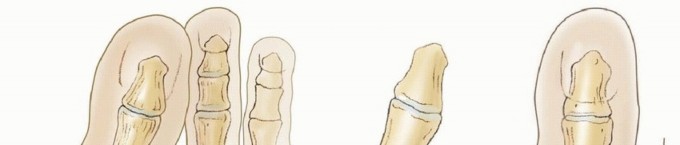
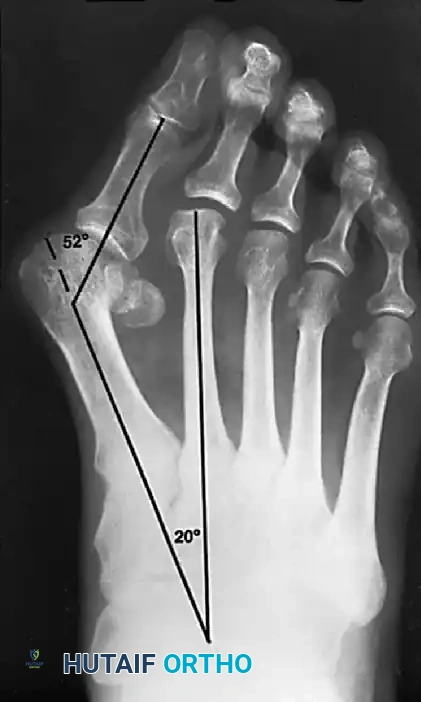
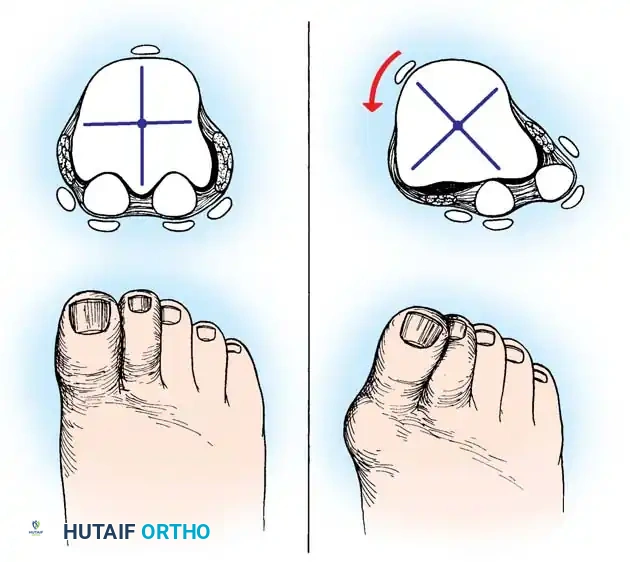
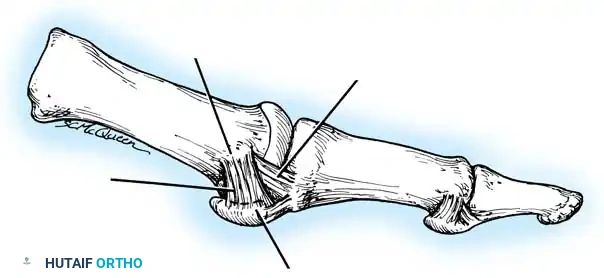
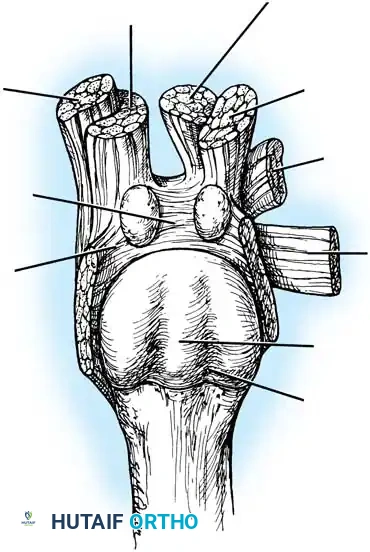
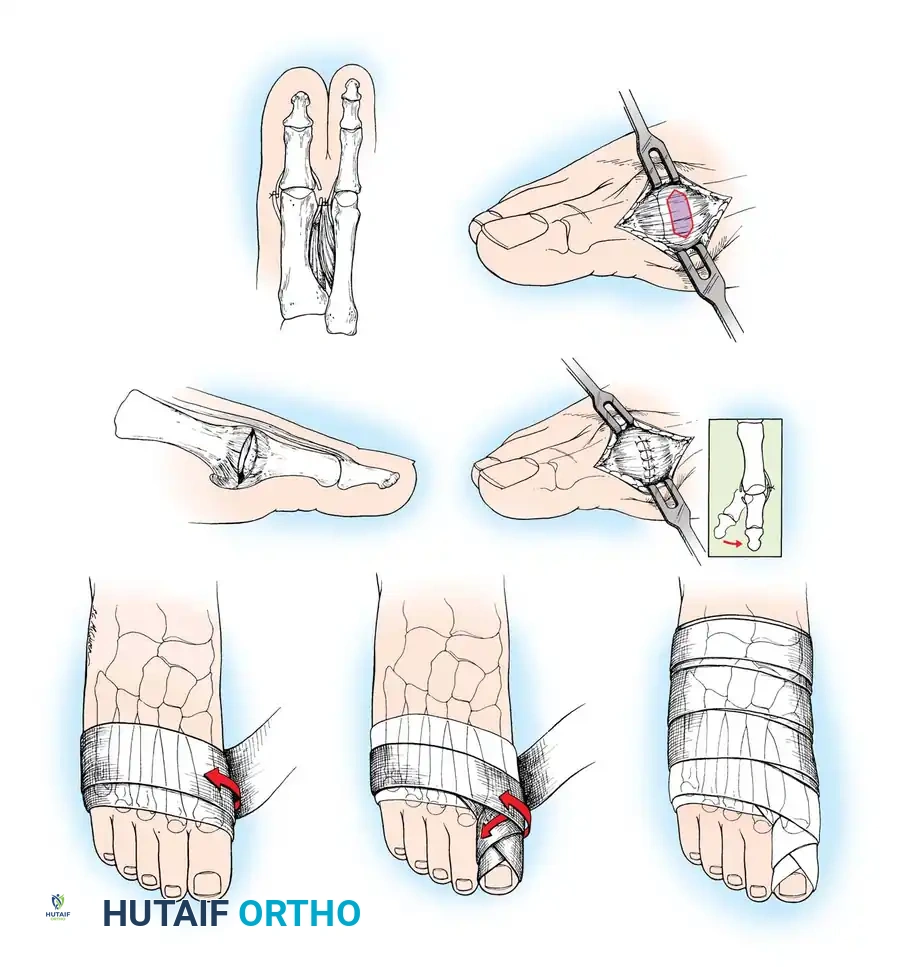
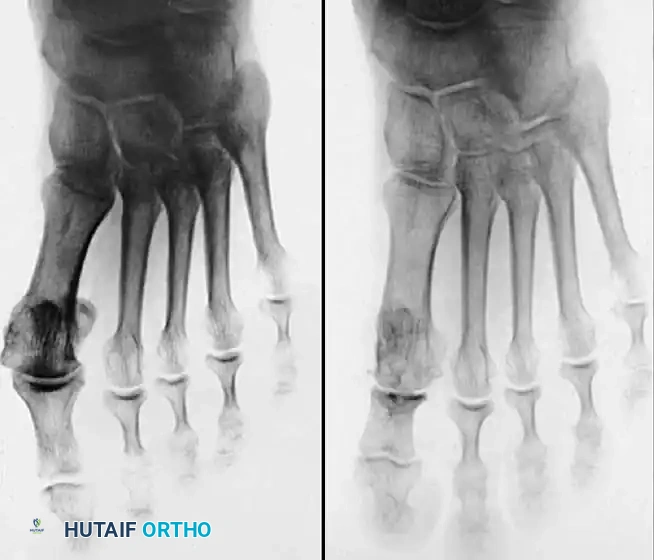
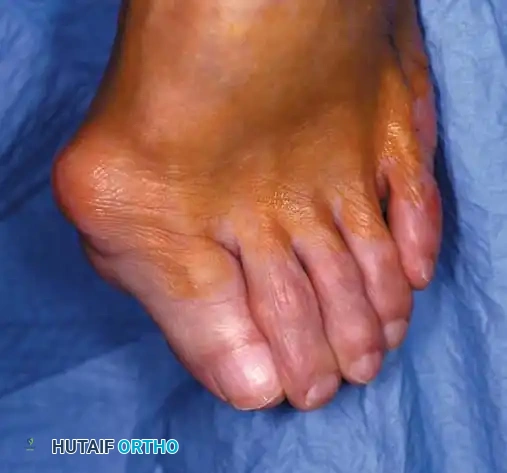
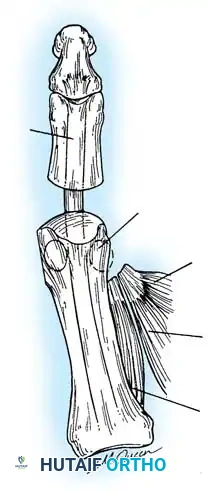
Hallux valgus (lateral deviation of the great toe) is not a single disorder, as the name implies, but a complex deformity of the fi rst ray that frequently is accompanied by deformity and symptoms in the lesser toes (Fig. 78-1). Often the angle between the fi rst and second metatarsals is more than the 8 to 9 degrees usually considered to be the upper limits of normal. The valgus angle of the fi rst metatarsophalangeal joint also is more than the 15 to 20 degrees considered to be the upper limits of normal (Fig. 78-2). If the valgus angle of the fi rst metatarsophalangeal joint exceeds 30 to 35 degrees, pronation of the great toe usually results. With this abnormal rotation, the abductor hallucis, which is normally plantar to the fl exion-extension axis of the fi rst metatarsophalangeal joint, moves further plantarward (Fig. 78-3). In this case, the only restraining medial structure is the medial capsular ligament with its capsulosesamoid portion (inserting into the base of the proximal phalanx) (Fig. 78-4) and capsulophalangeal portion (inserting into the plantar plate). The adductor hallucis, which is unopposed by the abductor hallucis, pulls the great toe further into valgus, stretching the medial capsular ligament (particularly the capsulosesamoid), attenuating this structure, and allowing the metatarsal head to drift medially from the sesamoids. In addition, the fl exor hallucis brevis, fl exor hallucis longus, adductor hallucis, and extensor hallucis longus increase the valgus moment at the metatarsophalangeal joint, further deforming the fi rst ray. The deep transverse intermetatarsal ligament runs between the plantar plates at the metatarsophalangeal joints and does not insert into bone on the adjacent sides of the metatarsal heads. Finally, the sesamoid ridge on the plantar surface of the fi rst metatarsal head (the crista) fl attens because of pressure (abutment) from the tibial sesamoid (Fig. 78-5). With this restraint lost, the fi bular sesamoid displaces partially or completely into the fi rst intermetatarsal space (see Fig. 78-2). In this situation, the patient is bearing less weight on the fi rst ray and more on the lesser metatarsal heads, increasing the likelihood of transfer metatarsalgia, callosities, and stress fracture of a lesser metatarsal.
Fig. 78-1 Multiple components of hallux valgus and associated deformities.

EHB EHB
AbH AbH
AdH
AdH
FHBM FHBM FHBL FHBL
Normal Hallux valgus
Medial
A B
Medial Lateral Lateral
Epicondyle
Plantar plate and sesamoids
Medial capsular ligament—accessory portion (ligament of medial sesamoid)
Medial capsular ligament— cord portion
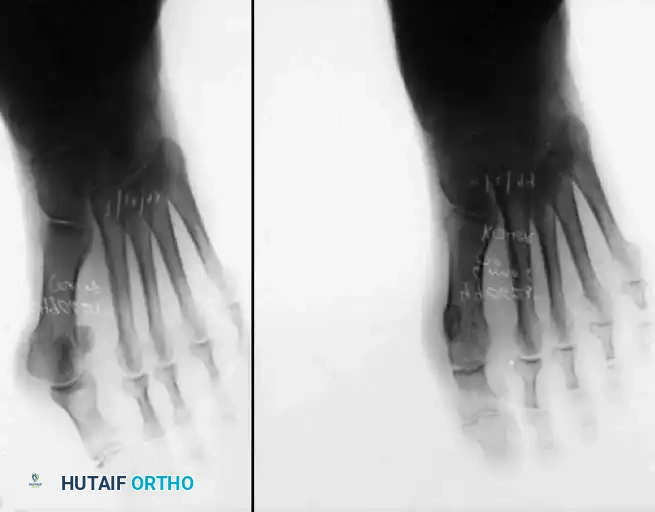
Fig. 78-2 Hallux valgus complex. Note increase in intermetatarsal angle, lateral dislocation of sesamoids, subluxation of fi rst metatarsophalangeal joint (leaving metatarsal head uncovered), and pronation of great toe associated with marked hallux valgus.
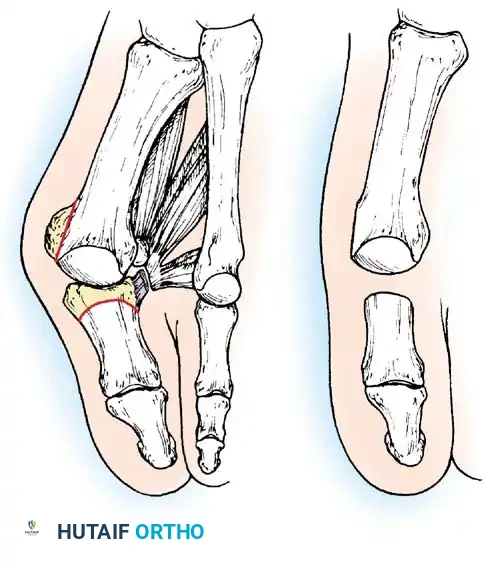
Fig. 78-3 Pronation of hallux. A, Normal. B, Note plantar shift of abductor hallucis and lateral shift of sesamoids with associated intrinsic muscles of hallux. (Redrawn from Miller J: Acquired hallux varus a preventable and correctable disorder, J Bone Joint Surg 57A:183, 1975.)
Fig. 78-4 Anatomy of medial capsular ligament. Note accessory portion of medial capsular ligament inserting into tibial sesamoid and cord portion inserting into base of proximal phalanx plantar to longitudinal axis of fi rst ray. (Redrawn from Haines R, McDougall A: The anatomy of hallux valgus, J Bone Joint Surg 36B:272, 1954.)
Two other anatomical variants involving the articular surface of the fi rst metatarsophalangeal joint can lead to hallux valgus. In the fi rst variant, the articular surface of the metatarsal head is offset, resembling a scoop of ice cream sitting at an angle on a cone (Fig. 78-6). This has been described as the distal metatarsal articular angle (see Fig. 78-8). In the second, the articular angle of the base of the proximal phalanx in relation to its longitudinal axis is offset. This has been described as the phalangeal articular angle. Although the normal range of these angles is generally considered to be 7 to 10 degrees for the phalangeal articular angle and 10 to 15 degrees for the distal metatarsal articular angle, exact measurements are diffi cult to reproduce because of the variability of radiographic and measurement techniques. Increasing evidence indicates, however, that the failure to correct these two deformities, especially the distal metatarsal articular angle, can cause unsatisfactory results after surgery in some patients. Forceful straightening of the hallux should be avoided if it sacrifi ces tarsalgia. The entire forefoot must be evaluated for these multiple components of hallux valgus before surgical planning is complete and recommendations can be made to the patient. The controversy continues over which deformity is the essential lesion in hallux valgus: metatarsus primus varus or lateral deviation of the great toe. Each is incriminated as the cause of the other. The strongest data probably support lateral deviation of the great toe as the primary deformity in most patients, followed by medial angulation of the fi rst metatarsal, but metatarsus primus varus may be the principal cause in adolescents. Further controversy surrounds the role of footwear as the prime offender in the development of hallux valgus. Most orthopaedic surgeons have seen unilateral hallux valgus when both feet are clinically and radiographically the same structurally except that one foot has a bunion deformity and the other foot is normal. Evidence supports that hallux valgus may be familial, especially when it occurs in adolescents. Although no study of shod and unshod societies has implicated inappropriate footwear as the sole cause of hallux valgus, after genetic factors, binding, unphysiologically designed footwear probably is the major cause in modern societies. Hypermobility of the fi rst ray also has been suggested as a causative factor in the development of hallux valgus and fi rst metatarsal varus, but this is controversial. Coughlin and Shurnas, Myerson and Badekas, King and Toolan, and Faber et al. offer excellent discussions of this problematic area. Finally, certain anatomical and structural abnormalities almost certainly play a causative role in hallux valgus. Pronated fl atfeet, abnormal insertion of the posterior tibial tendon, increased obliquity of the fi rst metatarsomedialcuneiform joint, an abnormally long fi rst ray, incongruous articular surfaces of the fi rst metatarsophalangeal joint, and excessive valgus tilt of the articular surface of the fi rst metatarsal head and proximal phalangeal articular surface may contribute singly or in combination to the deformity and infl uence the recommended treatment. Hypertrophy of the medial eminence has been described as a component of hallux valgus deformity since the earliest reports; however, more recent investigations, including those of Thordarson and Krewer, have found that bony proliferation is not a component of the pathoanatomy of hallux valgus and that the prominence of the medial eminence results from the combination of metatarsus primus varus and medial deviation that uncovers the articular surface. Thordarson and Krewer compared radiographs of 50 feet in patients who had surgery for hallux valgus deformity with radiographs of 50 feet from a control group without hallux valgus deformity and found little difference in the average width of the medial eminence (4.4 mm and 4.1 mm). With more than 130 operations recommended for the treatment of hallux valgus, it is practical to describe only
Medial head— flexor hallucis brevis
Abductor hallucis
Intersesamoid ligament
A
B
Plantar plate
Deep transverse metatarsal ligament
Crista
Groove for sesamoid
Transverse head— adductor hallucis
Oblique head— adductor hallucis
Lateral head— flexor hallucis brevis
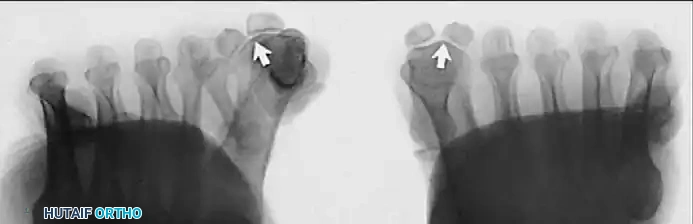
Fig. 78-5 A, Plantar surface of fi rst metatarsal head. Entire sesamoid sling with attached intrinsic musculature has been rotated distally off metatarsal head to present schematically relationships of muscle, tendon, capsule, ligaments, and articular confi guration of fi rst metatarsophalangeal joint. B, As metatarsal head moves medially, sesamoid sling apparatus becomes valgus deforming force, and metatarsal rotates (pronates) on its longitudinal axis. Intrinsic and extrinsic muscle balance is lost, and deformity increases. ( A after Beverly Kessler; courtesy of LTI Medica and The Upjohn Company.)
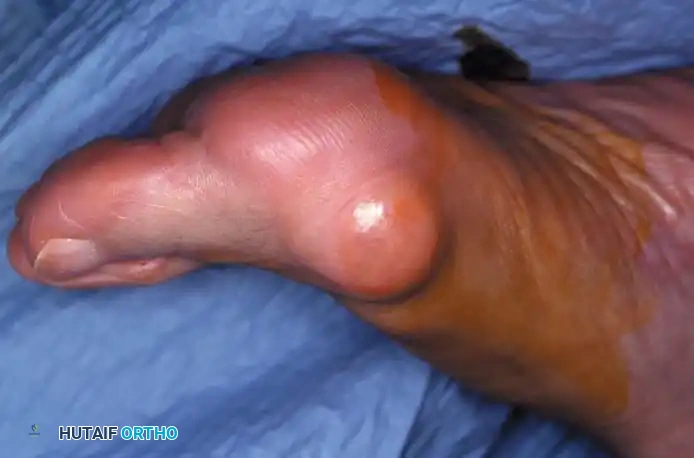
a congruent metatarsophalangeal articulation; phalangeal osteotomy or distal metatarsal osteotomy, rather than tightening of the medial capsular repair, should be used for further correction. The valgus posture of the great toe frequently causes a hammer toe–like deformity of the second toe (Fig. 78-7). In addition, the splaying of the forefoot makes the wearing of shoes more diffi cult; with shoes that have a narrow toe box, corns often develop, as does bursal hypertrophy over the medial eminence of the fi rst metatarsal head (bunion). With valgus subluxation of the fi rst metatarsophalangeal joint, osteoarthritis frequently develops. In this case, the entire spectrum of hallux valgus is present: varus deformity of the fi rst metatarsal, valgus of the great toe, bunion formation, arthritis of the fi rst metatarsophalangeal joint, hammer toe of one or more toes, corns, calluses, and meta-

A B
Fig. 78-6 A, Note valgus orientation of articular surface of fi rst metatarsal head. B, After proximal metatarsal osteotomy on right foot. Sesamoid sling remains dislocated, articular surface of metatarsal head maintains valgus posture, and joint is congruous in valgus. Double osteotomy of fi rst metatarsal (proximally for varus correction and distally for valgus correction of articular surface) and soft-tissue realignment are necessary. Alternatively, arthrodesis of fi rst metatarsophalangeal joint or distal metatarsal osteotomy (chevron) can be performed. Without anatomical reduction of sesamoid sling apparatus, distal metatarsal osteotomy would fail.
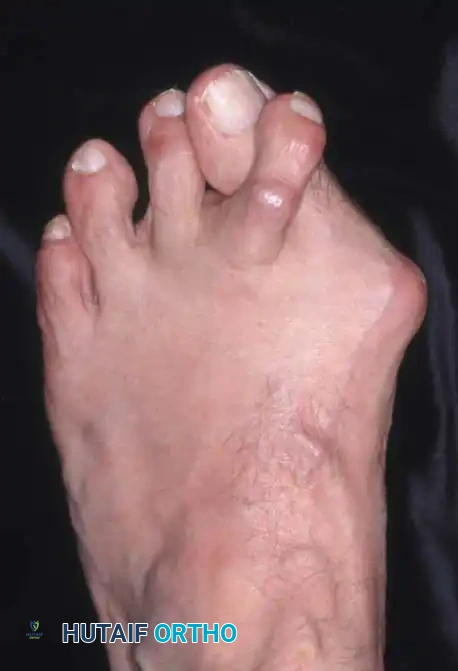
Fig. 78-7 Hammer toe deformity. Note severe crossover-toe deformity of second toe associated with severe hallux valgus. Primary complaint frequently is not severe hallux valgus deformity, but pain beneath second metatarsal head.
a few. Although Spiers made the following observation in 1920, most procedures to correct hallux valgus still use one or more of the components he described:
Operative attempt to relieve the pain and disability accompanying hallux valgus is far from a new procedure. Removal of the exostosis, dissection of the bursa, tenotomy and transplantation of the tendons, removal of the sesamoids, partial and complete removal of the head of the fi rst metatarsal, and removal of the proximal end of the proximal phalanx, together with numerous combinations of the foregoing, have all been advocated and practiced.
This chapter presents in detail the soft-tissue procedures, bony procedures, and procedures combining soft-tissue and bony correction that have endured the clinical test of adequate numbers of patients, lengthy and detailed review, and reports by multiple observers using essentially the same techniques. Different groups of procedures are successful for different surgeons, and none of the following treatment recommendations is meant to be the conclusive opinion on “bunion surgery.” Surgeons should be technically comfortable with several different procedures for the correction of hallux valgus, including one or more bony, soft-tissue, or combined procedures. Mann described an excellent algorithm for selecting the appropriate operative procedure in the treatment of hallux valgus and hallux rigidus (Box
78-1). Finally, Thordarson et al., using validated scoring systems, correlated hallux valgus surgery with clinical and radiographic outcomes and found that four of the SF36 (QualityMetric, Inc, Lincoln, RI) health survey domains and four of fi ve of the American Academy of Orthopaedic Surgeons Lower Extremity Outcomes scores showed improvement after operative treatment of hallux valgus.
Preoperative Management
No procedure should be recommended until the entire foot, not just the fi rst ray, is thoroughly examined clinically while the patient is standing, sitting, and lying supine and prone (if practical). Particular attention should be given to the remainder of the forefoot, and corns, calluses, warts, interdigital neuromas, bunionettes, hammer toes, and claw toes should be identifi ed. Although pain and deformity may be relieved after correction of the hallux valgus, the result can be marred if symptoms in the lesser toes or the metatarsals remain. This should be explained carefully to the patient before surgery to avoid false expectations and disappointment. Finally, the midfoot and hindfoot must be examined carefully before making treatment recommendations for forefoot surgery. Initially, most patients can be treated nonsurgically with appropriate shoe modifi cations, exercises, and activity adjustments. Surgical treatment of hallux valgus for cosmetic reasons alone is seldom indicated except in an adolescent with a signifi cant progressive deformity. Even the mildest symptoms in an adolescent often worsen, especially when there is a family history of hallux valgus. Correction of hallux valgus in adolescents can be diffi cult and often disappointing. Any procedure chosen must take into account the following structural components:
- Valgus deviation of the great toe (hallux valgus) 2. Varus deviation of the fi rst metatarsal 3. Pronation of the hallux, fi rst metatarsal, or both 4. Hallux valgus interphalangeus 5. Arthritis and limitation of motion of the fi rst metatarsophalangeal joint 6. Length of the fi rst metatarsal relative to lesser metatarsals 7. Excessive mobility or obliquity of the fi rst metatarsomedial cuneiform joint 8. The medial eminence (bunion) 9. The location of the sesamoid apparatus 10. Intrinsic and extrinsic muscle-tendon balance and synchrony
Inadequate vascularity or sensibility should be investigated thoroughly before bunion surgery is considered. In addition, the position of the articular surface of the metatarsal head in relation to the longitudinal axis of the fi rst metatarsal should be determined (Fig. 78-8). Standard preoperative radiographs should include standing dorsoplantar and lateral views, a nonstanding lateral oblique view, and axial sesamoid views (Fig. 78-9). The hallux valgus angle and the fi rst-second intermetatarsal angle should fi rst be drawn on the standing dorsoplantar view by bisecting the shafts of the bones (Fig. 78-10), with an awareness of the normal ranges. These angles are most frequently cited as guidelines for treatment decisions, but Donnelly et al. reported that interobserver measurements of the hallux valgus angle varied by approximately 6 degrees and of the intermetatarsal angle by 4 degrees. They cautioned that potential errors in measurement should be considered when these parameters are used to make treatment decisions. The hallux valgus interphalangeus angle and any evidence of degenerative arthritic changes at the fi rst metatarsophalangeal or metatarsocuneiform joints should be documented. Oddities may be present and, if overlooked, may compromise a technically well-done procedure. Mann emphasized that the presence of an os inter-
Box 78-1 • Treatment of Hallux Valgus and Hallux Rigidus
Hallux Valgus < 25 Degrees Congruent Joint Chevron osteotomy Mitchell osteotomy
Incongruent Joint Distal soft-tissue realignment (subluxation) Chevron osteotomy Mitchell osteotomy
Hallux Valgus 25-40 Degrees Congruent Joint Chevron osteotomy with Akin procedure Mitchell osteotomy
Incongruent Joint Distal soft-tissue realignment with proximal osteotomy Mitchell osteotomy
Severe Hallux Valgus > 40 Degrees Congruent Joint Double osteotomy Akin and chevron osteotomy Akin and fi rst metatarsal osteotomy Akin and fi rst cuneiform opening wedge osteotomy
Incongruent Joint Distal soft-tissue realignment with proximal osteotomy First metatarsal crescentic osteotomy First cuneiform opening wedge osteotomy
Hypermobile First Metatarsocuneiform Joint Distal soft-tissue realignment and fusion fi rst metatarsocuneiform joint
Modifi ed from Mann RA: Decision making in bunion surgery, Instr Course Lect 39:3, 1990.
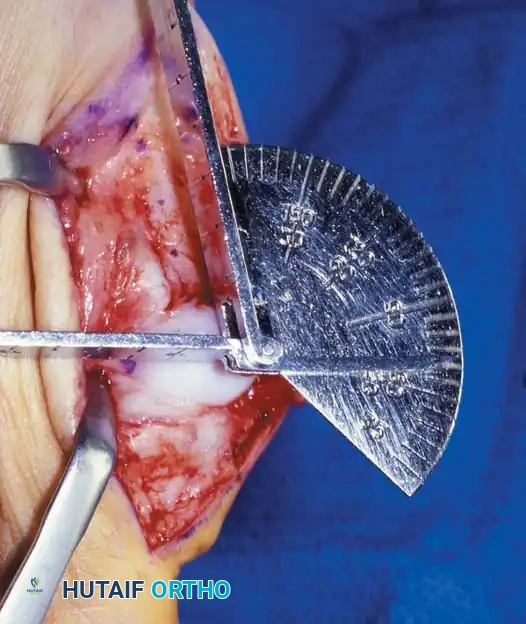
A B
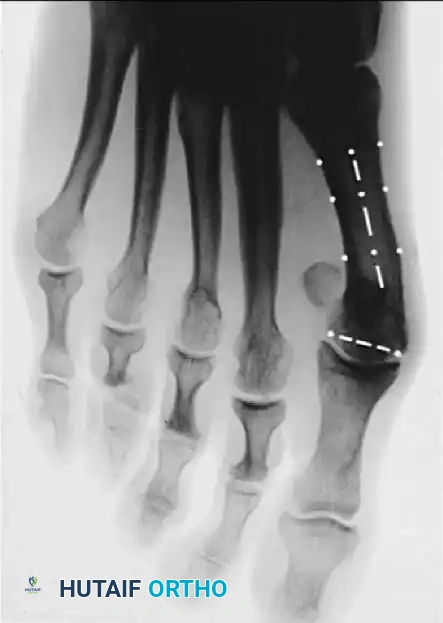
Fig. 78-8 A, Determination of position of articular surface of metatarsal head in relation to longitudinal axis of fi rst metatarsal. B, Measurement of distal metatarsal articular angle at time of surgery. Markings are at medial and lateral margins of articular surface of fi rst metatarsal head and longitudinal axis of fi rst metatarsal shaft. metatarseum between the bases of the fi rst and second metatarsals might preclude the effectiveness of a soft-tissue procedure alone to provide suffi cient correction of the increased intermetatarsal angle. Likewise, accessory sesamoids and prominent ungual tuberosities at the interphalangeal joint contribute to a painful callus at the tibial side of this joint. An os tibialis externum frequently is associated with excessive hallux valgus interphalangeus. Varus of the fi rst metatarsal might be a signifi cant part of the overall deformity of the foot even with an intermetatarsal angle of less than 10 degrees. Metatarsus varus with a relatively small hallux valgus angle (15 to 20 degrees) may produce signifi cant deformity even though the angles are not excessive. The usefulness of computer-assisted compared with manual measurement of the intermetatarsal angle, hallux valgus angle, and distal metatarsal articular angle is still uncertain. Both methods have closer interobserver and intraobserver correlation in measurement of the intermetatarsal angle and hallux valgus angle than in measurement of the distal metatarsal articular angle. The reliability of either method has such a wide range (5 degrees), however, that measurements of these angles, although useful as a guide, do not provide a completely reliable indication of the magnitude of deformity. Condon et al. suggested that the reliability of the intermetatarsal angle can be improved by careful technique and by making the measurements at least twice and averaging them. Schneider et al. reported two methods of determining angular measurements based on distinctly different reference points: (1) a longitudinal axis of the fi rst metatarsal using middiaphyseal reference points, and (2) a center-head technique using a center head (center of the articular surface) and center base
(center of the proximal diaphysis) as reference points. They found that measured correction of the hallux valgus and intermetatarsal angles varied by approximately 9 degrees depending on which reference points were used. Recommendations of Coughlin, Saltzman, and Nunley (American Orthopaedic Foot and Ankle Society Ad Hoc Committee on Angular Measurements) included standardized radiographic technique, specifi c placement of reference points (Fig. 78-11), use of a protractor rather than a goniometer for measurements, and, after distal osteotomies, dual measurements using a center-head technique and a Mose sphere.
Soft-Tissue Procedures
The usual candidate for soft-tissue correction of the hallux valgus complex is a 30to 50-year-old woman with clinical symptoms and a valgus angle at the metatarsophalangeal joint of 15 to 25 degrees, an intermetatarsal angle of less than 13 degrees, valgus of the interphalangeal joint of less than 15 degrees, no degenerative changes at the metatarsophalangeal joint, and a history of conservative management failure. The modifi ed McBride procedure is basically a combination of the procedures described by Silver in 1923 and McBride in 1928 and later modifi ed by DuVries and popularized by Mann. The results of this procedure are successful in properly selected patients (Fig. 78-12). In a study of 118 patients, Romash et al. determined that stress view radiographs can provide objective data to help determine which patients can be treated with a modifi ed McBride procedure. “Booking open” of the medial side of the metatarsocuneiform joint on stress views may indicate incongruous motion, lateral impingement, and loss of bony
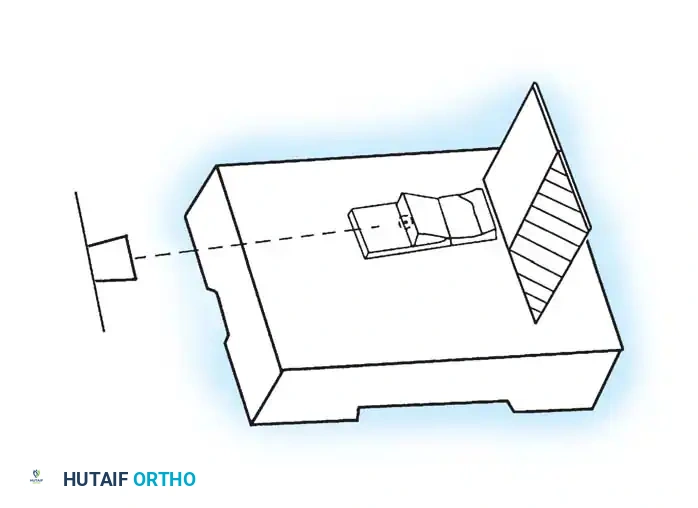
Roentgen beam
Platform Sesamoid view stand
Cassette
Slot for cassette
40 inches from x-ray source to cassette and 15° from “vertical”
A
B
D
C
40 inches from x-ray source to cassette
40 inches from x-ray source to cassette
1/2 cm 1/2 cm
1/2 cm 1/2 cm
1 cm
1 cm
1 cm
1 cm
1 cm
1 cm
1 cm
1 cm
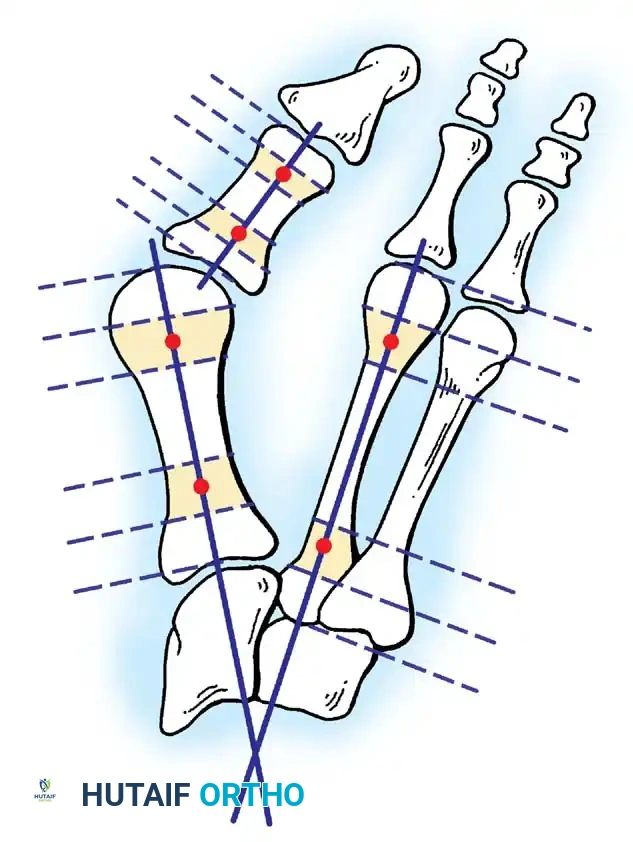
Fig. 78-10 Method of measuring hallux valgus angle and intermetatarsal angle. Center points are connected, and intersecting lines defi ne angles.
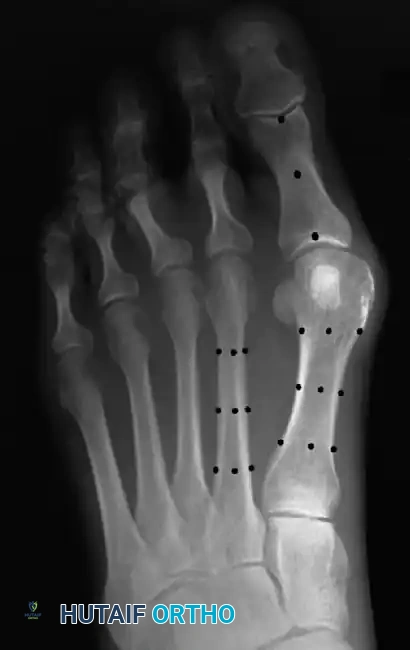
Fig. 78-11 Location of reference points for fi rst and second metatarsals are between 1 and 2 cm from distal articular surface and proximal articular surface of each metatarsal. Because of shorter length of hallux, reference points are placed between 0.5 and 1 cm from proximal and distal articular surface of proximal phalanx. (From Coughlin MJ, Saltzman CL, Nunley JA II: Angular measurements in the evaluation of hallux valgus deformities: a report of the ad hoc committee of the American Orthopaedic Foot and Ankle Society on angular measurements, Foot Ankle Int 23:68, 2002.) support and the medial capsule acting as a spring on stretch. Osteotomy usually is indicated in patients with this medial wedged opening of the joint. If a fi rm forefoot wrap reduces the intermetatarsal angle to a normal value and decreases the hallux valgus angle, however, while congruously rotating the base of the fi rst metatarsal on the medial cuneiform without levering the joint open medially, the McBride procedure can correct the deformity. Correction is improved by excision of the fi bular (lateral) sesamoid because the adductor hallucis and lateral head of the fl exor hallucis brevis are released, markedly reducing the valgus moment at the fi rst metatarsophalangeal joint. In addition, the pull of the fi bular sesamoid on the fl exor hallucis longus through its tendon sheath and pulley system is prevented, reducing another important valgus-producing force on the hallux at the metatarsophalangeal joint. If the fi bular sesamoid is excised, the medial capsule should be repaired with the hallux held in 10 to 15 degrees of valgus. This position must be maintained by a postoperative dressing for 3 or 4 weeks.
Modifi ed McBride Bunionectomy TECHNIQUE 78-1
SKIN AND CAPSULAR INCISION
• With the patient supine and a tourniquet on the limb, extend a midline, straight, medial incision from the middle of the proximal phalanx to 2 cm proximal to the junction of the medial eminence with the metatarsal shaft (Fig. 78-13). This incision usually is in an internervous plane between the most medial branches of the superfi cial peroneal nerve dorsally and the medial proper digital branch of the medial plantar nerve plantarward. (McBride recommended a single incision beginning at the fi rst web space and extending proximally and medially across the metatarsal, ending on the medial side of the fi rst metatarsal proximal to the exostosis.)
• Mobilize the skin 2 to 3 mm dorsally and plantarward to ensure that no sensory nerve would be injured by the capsular incision.
• Coagulate the superfi cial veins as encountered to minimize postoperative bleeding.
• Use delicate, two-tooth retractors and 1.5-mm forceps in this initial dissection to avoid unnecessary skin trauma.
• Make a longitudinal capsular incision (the original McBride capsular incision was transverse) 3 to 4 mm plantar to the line of the skin incision (Fig. 78-14).
A
C
B

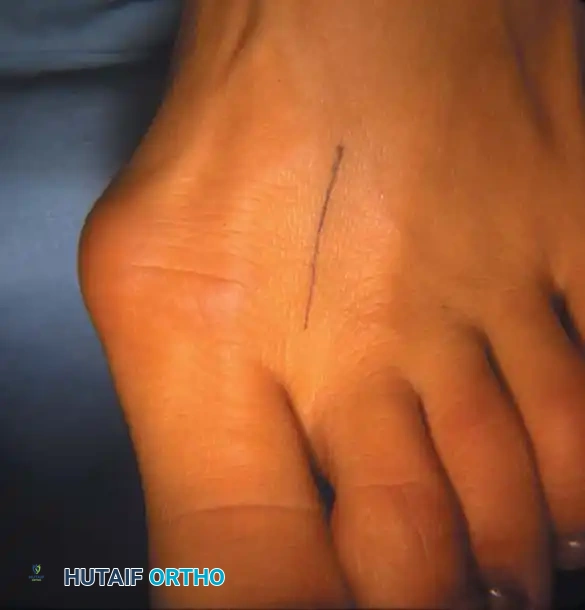

Fig. 78-12 Hallux valgus treated by modifi ed McBride procedure. A, Preoperative deformity in 30-year-old patient. B, Correction obtained at surgery. C, Preoperative and postoperative radiographs (note fi bular sesamoid was not removed). More deformity can be corrected by fi bular sesamoidectomy, but overcorrection (hallux varus) is risk. If fi bular sesamoid is excised, medial capsule should be closed while holding hallux in 5 to 10 degrees valgus and kept in that position until capsular healing.
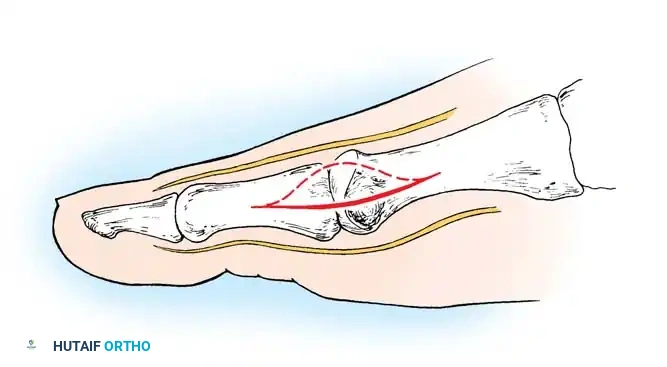
Fig. 78-13 Modifi ed McBride procedure: fi rst incision. Dotted line denotes dorsally curved incision; solid line indicates preferred incision (internervous plane).
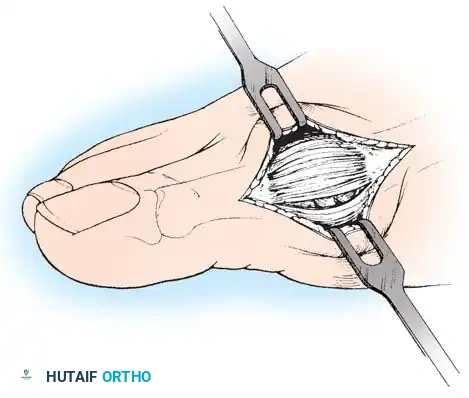
Fig. 78-14 Modifi ed McBride procedure. Longitudinal capsular incision is 3 to 4 mm plantar to skin incision.
Modifi ed McBride Bunionectomy TECHNIQUE 78-1—cont’d
• By sharp dissection, raise the periosteum and the capsule dorsally and plantarward from the base of the proximal phalanx to the proximal edge of the medial eminence (Fig. 78-15). At the proximal end of the medial eminence, avoid releasing the proximal bony attachments of the medial capsule on the metatarsal neck (especially in the dorsal direction) in an attempt to expose the medial eminence. To ensure adequate exposure without disruption of this proximal attachment, a longitudinal capsular incision is suggested.
• Elevate the capsule by sharp dissection dorsalward and plantarward to expose the dorsal aspect of the metatarsal head, the entire medial eminence, and the plantar plate. A periosteal elevator is not recommended because of the possibility that the proximal attachments of the capsule may be released.
L-SHAPED CAPSULAR INCISION
• Alternatively, make the capsular incision in an inverted L shape (Fig. 78-16A).
• Raise the dorsal fl ap deep to the nerve and veins until the accessory slip of the extensor hallucis longus tendon is seen in the proximal portion of the incision where it is easier to identify. The tendon almost always can be located with careful searching. If it is not seen at the dorsomedial aspect of the fi rst metatarsal, however, begin the longitudinal limb of the incision at this slope of the metatarsal from dorsal to medial.
• Begin the incision proximally on the dorsomedial side of the fi rst metatarsal shaft and 2 to 3 mm medial to the accessory slip of the extensor hallucis longus tendon. Carry the incision to the bone at the level of the fi rst metatarsal joint, extending proximally 4 to 6 cm.
• Make the transverse limb of the capsular incision at the level of the joint, stopping 2 to 3 mm from the tibial sesamoid bone; this limb transects the capsular insertion of the abductor hallucis muscle (Fig. 78-16B and C).
Fig. 78-15 Modifi ed McBride procedure. Capsule is opened, and attachment of capsule on metatarsal neck (arrow) is carefully preserved.
• Beginning on the plantar aspect of the incision, remove the capsule from the medial eminence from the inside out. Avoid buttonholing the capsule at the junction of the medial eminence and the metatarsal by directing the small-bladed knife down the slope of the eminence.
• Free the capsule subperiosteally on its dorsomedial surface, and retract it proximally and plantarward (Fig. 78-16D).
• Insert one small Hohmann retractor over the dorsolateral surface of the metatarsal head and another beneath the head at the head and neck junction, while distracting and plantar fl exing the hallux to expose the articular surface of the metatarsal head for evaluation of its condition and orientation. Reduce the hallux congruently on the metatarsal head.
• If the hallux is in more than 15 degrees of valgus after reduction, a distal metatarsal osteotomy is needed.
MEDIAL EMINENCE REMOVAL
• After inspecting the metatarsophalangeal joint for degenerative changes, loose bodies, or synovial abnormalities, remove the medial eminence by fi rst scoring with an osteotome its proximal edge where the eminence meets the shaft. Always consult the preoperative radiographs to determine how much of the medial eminence should be removed.
• Using the same osteotome or a power saw, begin the exostectomy distally at the parasagittal groove, and direct it medially toward the scored area on the metatarsal shaft (Fig. 7817). If a power saw is used, a 9-mm blade, rather than a 4to 5mm blade, is preferred. The medial direction of the osteotomy prevents splitting of the metatarsal shaft, especially if the proximal edge of the osteotomy has been scored as recommended.
• After the medial eminence has been removed, use a small rongeur to round off the dorsal and plantar edges of the medial aspect of the metatarsal head. Rasping the raw bone concludes the initial stage of the procedure. Use bone wax on the raw surfaces of bone of the metatarsal head.
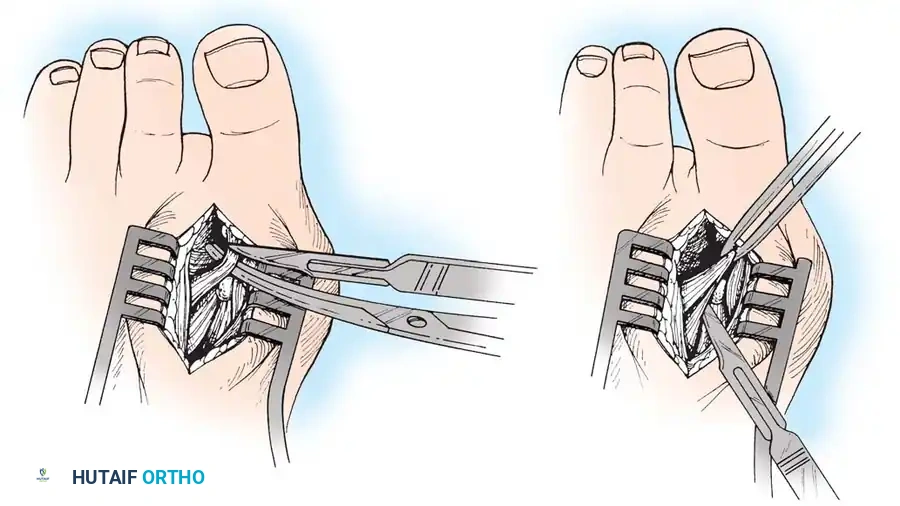
ADDUCTOR TENDON AND LATERAL CAPSULAR RELEASE
• Begin the second stage with a dorsal longitudinal incision beginning 2 to 3 mm proximal to the dorsal aspect of the fi rst web space to avoid web contracture postoperatively; extend it proximally between the fi rst and second metatarsal heads for 3 to 4 cm (Fig. 78-18). This allows adequate exposure of the adductor insertion into the base of the proximal phalanx, the lateral head of the fl exor hallucis brevis muscle converging on the fi bular sesamoid, and the entire lateral capsule from the extensor hallucis longus muscle to the plantar plate.
• Delicate retraction of the skin exposes the dorsal digital branches of the veins, which should be cauterized if they obscure the deeper dissection. The terminal branches of the fi rst dorsal intermetatarsal artery may be encountered at a location adjacent
A
B
D
C
E
Fig. 78-16 InvertedL capsulotomy. A, Skin incision. B, Most medial branch of superfi cial peroneal nerve. C, Limits of capsulotomy. D, Capsule raised to expose articular surface of metatarsal head for assessment of orientation on metatarsal head. E, Closure of L -shaped capsulotomy holding fi rst metatarsophalangeal joint reduced.

A B
Modifi ed McBride Bunionectomy TECHNIQUE 78-1—cont’d to the proper digital branches of the deep peroneal nerve to the fi rst web space.
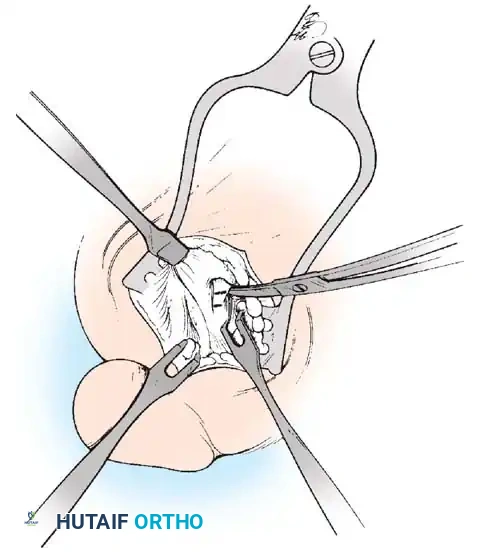
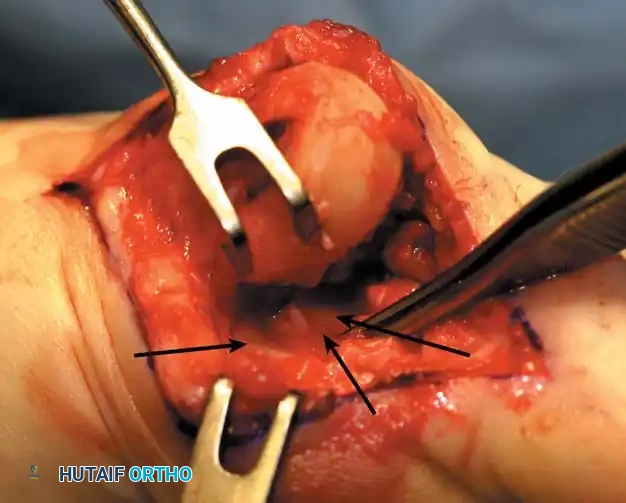
• The main portion of the adductor tendon inserts into the base of the proximal phalanx just plantar to the longitudinal axis of the phalanx. It also has a smaller insertion, along with the lateral head of the fl exor hallucis brevis muscle, into the fi bular sesamoid. The simplest technique to identify the insertion of the adductor hallucis tendon is to place a small, pointed, curved hemostat on the dorsolateral base of the proximal phalanx, slide it fi rmly plantarward, and lift the hemostat dorsally and laterally; the tip of the instrument usually rests in the axilla of the insertion of the adductor tendon (Fig. 78-19A). This is comparable to securing the iliopsoas tendon for tenotomy at the lesser trochanter.
• When the primary insertion is released, grasp the tendon with forceps or a hemostat, and, with traction, displace it dorsally and laterally toward the second metatarsal so that further dissection is on the medial side of the adductor or push the sesamoid sling laterally through the previously placed medial incision to aid exposure.
• While spreading the fi rst and second metatarsal heads with a small Inge retractor, heavy-duty two-tooth retractors, or a Weitlaner retractor, hold the adductor tendon under tension, which facilitates exposure. The lateral head of the fl exor hallucis brevis muscle, the lateral border of the fi bular sesamoid, and the slip of the adductor tendon (confl uent with the lateral head of the fl exor hallucis brevis muscle) come into view in the depths of the wound.
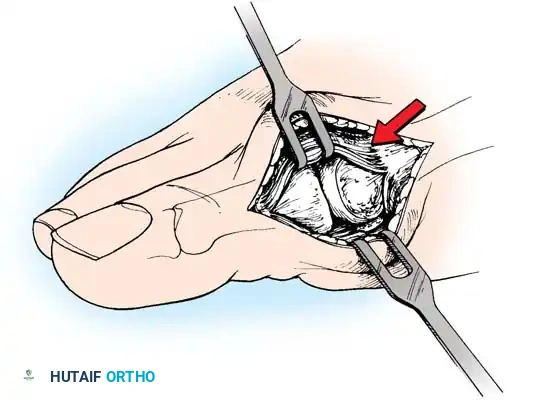
• All attachments of the adductor into its conjoined insertion with the lateral head of the fl exor hallucis brevis muscle into the fi bular sesamoid must be severed; with traction on the adductor, it freely and independently moves without tethering the fi bular sesamoid (Fig. 78-19B).
• This deep transverse intermetatarsal ligament, which lies just plantar to the adductor, may be released by the incision along the lateral border of the sesamoid. If not, release this ligament, carefully preserving the neurovascular bundle immediately beneath it, and incise the lateral capsule. Mann emphasized that release of the deep transverse metatarsal ligament endangers the neurovascular bundle to the fi rst web space, which lies immediately beneath this ligament. Sliding a small Freer elevator between this ligament and the neurovascular bundle would protect the latter structures.
FIBULAR (LATERAL) SESAMOIDECTOMY: DORSAL APPROACH
• If after complete adductor hallucis release and preferably after a lateral capsular release, a fi bular sesamoidectomy is needed to correct the valgus deformity of the great toe fully, it should be done at this time.
• Adequately separate the fi rst and second metatarsal heads for exposure.
• Plantar fl ex the metatarsophalangeal joint 10 to 20 degrees, which reduces tension on the sesamoids.
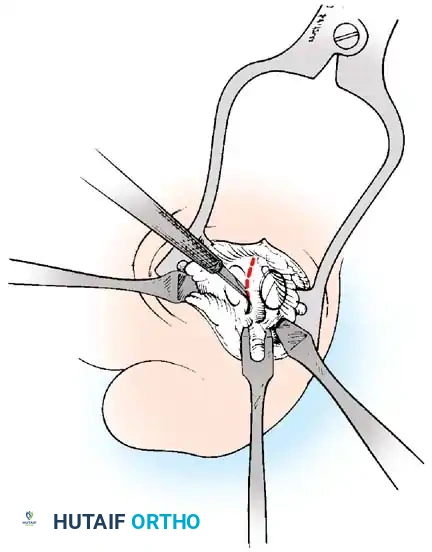
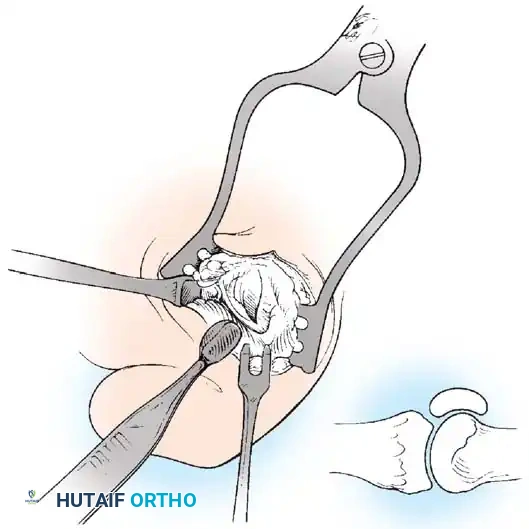
• Grasp the fi bular sesamoid with a small Kocher clamp or sturdy tissue forceps, and pull it laterally into the intermetatarsal space (Fig. 78-20).
• Release the intersesamoid ligament. When this ligament has been incised, bring the fi bular sesamoid into the intermetatarsal space, where its removal is straightforward. Care must be taken when incising the intersesamoid ligament to avoid severing the fl exor hallucis longus tendon immediately plantar to it. If the tendon is severed, it probably should not be repaired at this level; loss of the tendon causes little if any functional impairment, and
Fig. 78-19 Modifi ed McBride procedure. A and B, Adductor hallucis is exposed and released (see text).
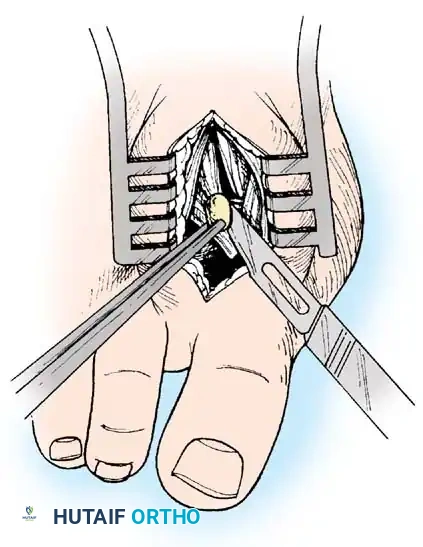
Fig. 78-20 Modifi ed McBride procedure. Fibular sesamoid is removed.
repair may result in a fi xed fl exion contracture of the interphalangeal joint.
An alternative to fi bular sesamoidectomy was recommended by Mauldin, Sanders, and Whitmer, who released part or all of the fl exor hallucis brevis lateral head at its insertion into the fi bular sesamoid. This release of the sesamoid is needed only if fi xed valgus remains after the adductor hallucis has been released, a lateral capsulotomy has been performed, and the fi bular sesamoid has been mobilized. Also, in this situation, a metatarsal osteotomy may be needed, rather than a fi bular sesamoidectomy. Performing both may cause hallux varus.
FIBULAR SESAMOIDECTOMY: PLANTAR APPROACH
• If a plantar approach (Fig. 78-21A) is chosen for fi bular sesamoidectomy, have an assistant hold the ankle dorsifl exed, and use a headlight for seeing into the full depth of the wound. Avoid the fl exor hallucis longus tendon and the neurovascular bundle to the fi rst web space.
• Flex and extend the hallux, and inspect the radiograph to locate the sesamoid. Beginning 1 to 1.5 cm distal to the metatarsophalangeal joint, make a longitudinal incision in the plantar surface of the foot, extending the incision proximally 3.5 to 4 cm between the fi rst and second metatarsals.
• If the fi bular sesamoid requires excision, it usually is subluxed.
• When the skin and fascial septa within the forefoot pad have been separated, insert a small self-retaining retractor.
• Using small, blunt-tip dissecting scissors, identify the neurovascular bundle to the fi rst web space, and retract it laterally or medially, depending on the position of the sesamoid (Fig. 78-21B).
• Palpate the sesamoids, and fl ex and extend the hallux to locate the fl exor hallucis longus tendon.
• Open the pulley over the fl exor hallucis longus tendon, and retract the tendon medially. This maneuver is made easier by having an assistant hold the foot in dorsifl exion at the arch with one hand and fl ex the metatarsophalangeal joint to relax the fl exor hallucis longus tendon with the opposite hand.
• At this point, the intersesamoid ligament should come into view; divide it completely (Fig. 78-21C). This may require moving the scalpel 1 or 2 mm laterally or medially to fi nd the groove between the sesamoids.
• Incise the cleavage plane between the two sesamoids, while retracting the fl exor hallucis longus muscle medially and the neurovascular bundle laterally.
• Grasp the fi bular sesamoid with a strong pick-up or small Kocher clamp, and remove the lateral head insertion of the fl exor hallucis brevis muscle on the proximal end of the sesamoid using direct vision (loupe magnifi cation makes this easier, but is not necessary).
• When the medial and proximal restraints of the sesamoid have been released, sever the attachment of the adductor hallucis muscle to its lateral distal edge close to the bone with a scalpel or scissors.
• Sever the last attachment of the sesamoid distally where the plantar plate continues its distal insertion into the proximal phalanx (Fig. 78-21D).
• When the sesamoid has been removed, inspect the wound carefully for any bleeding. Pressing on the edges of the wound helps identify any potential bleeding vessels, which should be cauterized.
• Excising the sesamoid does not release the adductor insertion on the base of the proximal phalanx. This can be released through the plantar incision. Continuing to retract the neurovascular bundle laterally and the fl exor hallucis longus muscle medially, and adducting the hallux, while the opposite index fi nger palpates the adductor, helps identify the structure (Fig. 78-21E).
• Using right-angle retractors, expose the adductor, excise a small section of the tendon, and move the hallux medially.
• At the conclusion of this procedure, the surgeon should be unable to palpate any restraining structures on the fi bular side of the metatarsophalangeal joint. The transverse natatory fi bers in the dorsal aspect of the web space should be released manually. All restraints pulling the hallux laterally (except the extrinsic tendons) must be removed.
• Inspect the neurovascular bundle and the fl exor hallucis longus tendon.*
*McBride recommended an additional step: approximate the fi rst and second metatarsal heads by passing a heavy suture either through the capsules of the adjacent fi rst and second metatarsal heads or circumferentially around the metatarsal necks.
A
B

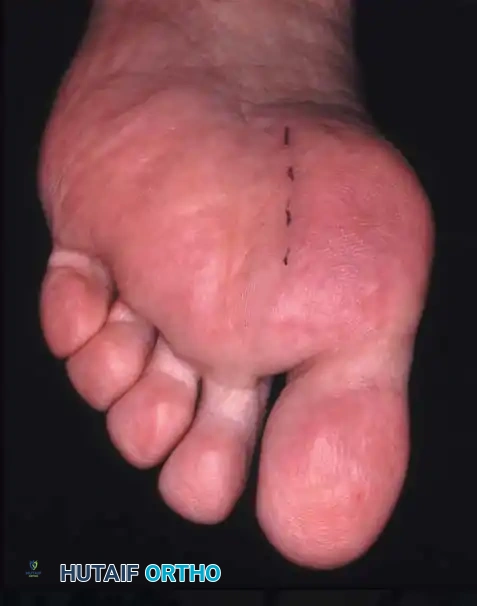
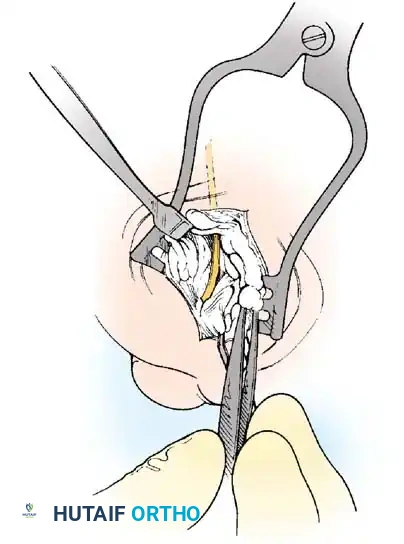
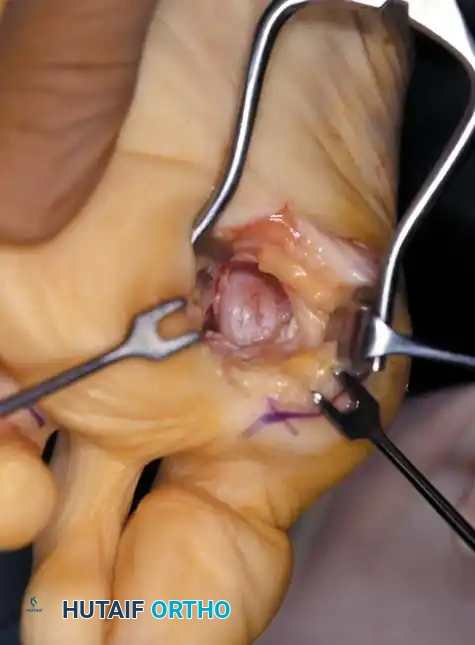
Fig. 78-21 Fibular sesamoidectomy (plantar approach). A, Incision. B, Common digital nerve to fi rst web space.
Modifi ed McBride Bunionectomy TECHNIQUE 78-1—cont’d
MEDIAL CAPSULAR IMBRICATION AND WOUND CLOSURE
• With an assistant holding the metatarsophalangeal joint in a congruously reduced position in the varus-valgus and fl exionextension planes, imbricate the medial capsule in the following manner (Fig. 78-22).
• Using absorbable 3-0 or interrupted sutures, place the initial suture through the plantar fl ap of the capsule at a point 4 to 5 mm medial to the proximomedial border of the medial (tibial) sesamoid and in an outside-to-inside direction.
• Turn the needle on itself, and pass it through the dorsal fl ap at the same level in an outside-to-inside direction. Immediately pass the suture back through the dorsal fl ap from inside out and fi nally through the plantar fl ap from inside out (a swedged-on needle would suffi ce, but a small, cutting needle is recommended).
C D
E
F
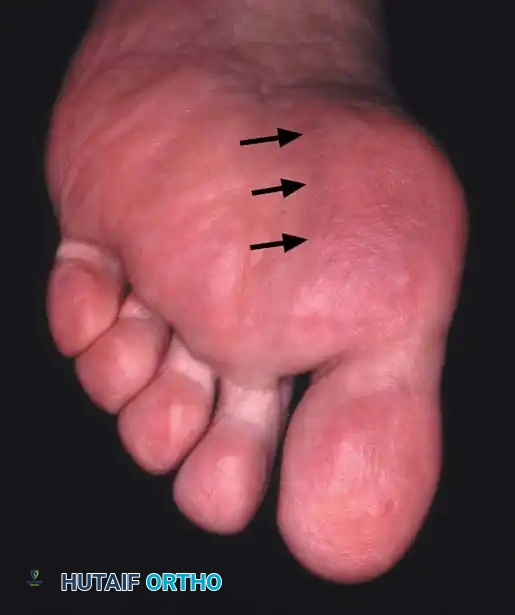
Fig. 78-21, cont’d C, Flexor hallucis longus tendon is retracted medially, and neurovascular bun– dle is retracted laterally; intersesamoid ligament is divided. D, Fibular sesamoid ligament is removed, and lateral border of tibial sesamoid is exposed. E, Tendon of oblique head of adductor hallucis. F, Healed plantar incision.
• With the hallux held in the desired position, tie this suture, bringing the plantar fl ap over the dorsal fl ap and pulling the plantar-displaced abductor hallucis toward the midline of the longitudinal axis of the proximal phalanx and fi rst metatarsal.
• Allow the toe to rest unassisted to judge its resting posture and the tension on the capsular repair.
• If the fi bular sesamoid has been removed, do not imbricate the medial capsule, to avoid pulling the tibial sesamoid medial to the metatarsal head (Fig. 78-23). If a large medial eminence has persisted for many years with increased capsular reaction and redundancy, a portion of the dorsal fl ap may need to be excised before closure.
• It is imperative to avoid pulling the medial side of the tibial sesamoid medial to the articular surface of the fi rst metatarsal head; do not uncover the tibial sesamoid (Fig. 78-24).
• If the resting posture of the hallux is acceptable, close the remaining portion of the capsule with interrupted 2-0 or 3-0 absorbable sutures.
CLOSURE OF THE INVERTED-L CAPSULOTOMY
• Begin the closure proximally using 3-0 sutures on a small swedged-on needle; bending the needle to increase the curve makes passage easier in a small wound (see Fig. 78-16E).
• While an assistant applies tension distally on the free corner of the capsule, place the most proximal suture in the longitudinal limb of the capsular incision; place two or three sutures at 5-mm intervals. Do not place the corner suture.
AbH
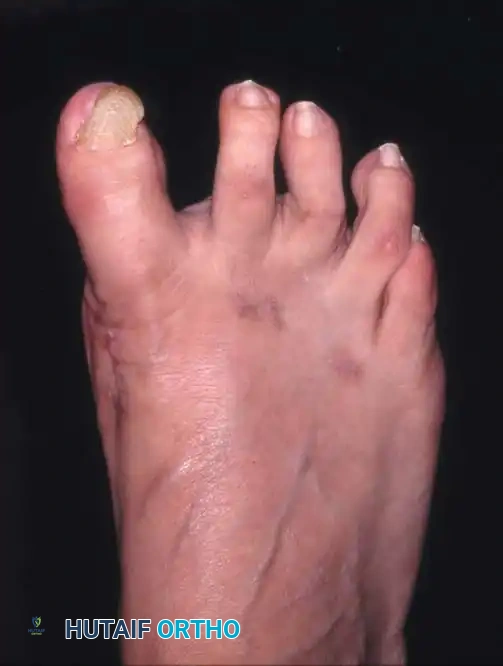

Fig. 78-22 Modifi ed McBride procedure. Medial capsule is imbricated, with plantar fl ap over dorsal fl ap. Inset, Cross section through metatarsal head.
Fig. 78-23 Hallux varus deformity after McBride bunionectomy and fi bular sesamoidectomy through plantar incision.
Fig. 78-24 Dislocation of tibial sesamoid caused by overtightening of medial capsule and too much lateral shift of capital fragment (left) . Right foot has correct sesamoid position.
Modifi ed McBride Bunionectomy TECHNIQUE 78-1—cont’d
• Begin to close the transverse limb of the incision at the medial plantar corner.
• Hold the hallux reduced on the metatarsal head while tying all sutures.
• Unless the capsule is redundant, do not imbricate the medial capsule over the area of eminence removal. Close this portion of the transverse limb with side-to-side sutures, and place the imbricating suture in the dorsomedial corner of the capsulotomy.
• Begin this fi nal suture distally on the transverse limb of the inverted L , passing the needle from the outside in.
• Reverse the needle, and enter the capsular fl ap from the outside in on the transverse limb.
• Reverse the needle, and reenter the capsular fl ap from the inside out on the longitudinal limb of the fl ap.
• Make the fi nal pass of the needle from the inside out on the dorsal side of the longitudinal limb of the incision. Holding the joint in its reduced position, tie the suture.
• If the joint reduction is congruent, but the hallux is still in an unacceptable valgus position, metatarsal osteotomy should be considered.
• If the transverse limb of the capsular repair is too loose, allowing the hallux to slide into valgus, remove the midline medial suture in the transverse limb. While holding the hallux in the proper position, place the suture 2 to 3 mm farther away from the incision, or excise more capsule from the proximal portion. Take care in removing any extra capsule because removal of even a small portion results in a signifi cant correction of capsular laxity and may cause varus of the hallux.
• At the conclusion of the procedure, the hallux should rest on the metatarsal head in about 5 degrees of valgus and 10 degrees of extension.
• If an elastic wrap has been used as a tourniquet, remove it, and have the patient fl ex and extend the toe (if a local anesthetic has been used) to assess function and congruence of the repositioned hallux.
• Lavage the wound, secure hemostasis, and close the skin with interrupted or simple mattress sutures. If simple sutures are used, ensure that the skin edges are not inverted or overlapped. If everted mattress sutures are used, do not evert the edges so much that they do not approximate evenly.
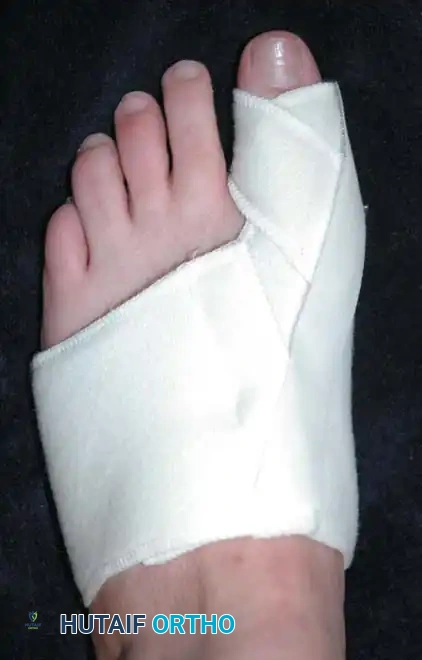
AFTERTREATMENT A bulky compression dressing is applied to the forefoot, and the foot is placed in a position of maximal elevation for 48 to 72 hours. Bathroom privileges only are allowed, and the patient must wear a woodensoled shoe. Increased ambulation after 72 hours is allowed as tolerated by the patient. The need for crutches or a walker varies, but assisted ambulation is not encouraged unless the patient is unsteady. At 3 weeks, if the wounds are healed, the sutures are removed, and adhesive strips are applied if needed; leaving the sutures in longer has no untoward effect. Some type of immobilizer or toe spacer to hold the toe in proper alignment is used (Fig. 78-25). The wooden-soled shoe is used for 3 to 4 weeks, at which time a deep shoe with a wide toe box is recommended; a jogging shoe is suffi cient; an extra-depth orthopaedic shoe with a soft toe box also is permissible. The toe spacer is worn for 6 weeks. At 12 to 14 weeks, a reasonably attractive shoe usually can be worn. The period of postoperative edema varies, however, and it may take 4 to 6 months before this type of shoe is tolerated. This is explained to the patient before surgery. DuVries and Mann made major modifi cations in the McBride bunionectomy, including the following:
-
Reattach the adductor hallucis muscle to the periosteal cuff on the lateral aspect of the fi rst metatarsal head. 2. Suture the medial capsule of the second metatarsal head to the lateral capsule of the fi rst metatarsal, with interposition of the released adductor hallucis tendon (Fig. 78-26A).
-
Perform a coronal or vertical medial capsulotomy beginning 2 to 3 mm proximal to the base of the proximal phalanx. This initial capsular incision is the most distal limb of a partial capsulectomy. The proximal incision is parallel to the fi rst and 5 to 8 mm proximal to it (Fig. 78-26B). The two parallel incisions are joined by an inverted V -incision made dorsally with its apex ending 5 mm medial to the extensor hallucis longus tendon. The plantar V -incision, joining the plantar ends of the parallel incisions, ends at the medial margin of the tibial sesamoid. The intervening capsule is removed and rarely exceeds 8 mm in width (Fig. 78-26C). 4. Close the capsule while the hallux is held in a varus angle of 5 degrees (Fig. 78-26D).
Weekly postoperative dressing changes for 6 to 8 weeks are emphasized (Fig. 78-26E), followed by use of a night splint that holds the hallux in position until the end of the third month (Fig. 78-27). Mann recommended using the McBride procedure alone in only 10% to 15% of patients undergoing hallux valgus correction. The decision is made intraoperatively by checking reduction of the intermetatarsal angle with manual lateral displacement of the fi rst metatarsal. If the reduction is secure, no proximal metatarsal osteotomy is necessary. In the remaining patients, proximal crescentic fi rst metatarsal osteotomy is done in addition to the distal soft-tissue realignment.
Combined Soft-Tissue and Bony Procedures
Keller Resection Arthroplasty The Keller procedure combines resection hemiarthroplasty of the fi rst metatarsophalangeal joint with removal of the medial eminence of the fi rst metatarsal (Fig. 78-28). Although removing the base of the proximal phalanx decompresses the joint and mobilizes the hallux, allowing marked correction of valgus, the varus of the fi rst metatarsal is not corrected, and maintaining correction of the valgus of the hallux is diffi cult. Other complications of the Keller procedure have been emphasized in the literature to such an extent (with neither the incidence nor the severity of such complications clearly documented) that the indications for this procedure have been limited severely. In our experience, however, complications are uncommon if patients are selected carefully. Modifi cations in the original technique also have allowed expansion of the indications for the Keller bunionectomy. Candidates for the Keller procedure are patients older than 50 years with moderate-to-severe hallux valgus (30 to 45 degrees); intermetatarsal angles of 13 degrees or less, indicating mild-to-moderate metatarsus primus varus; and pain over the medial eminence with any shoe worn, so the variety of shoes the patient can wear is severely limited. An incongruous fi rst metatarsophalangeal joint caused by
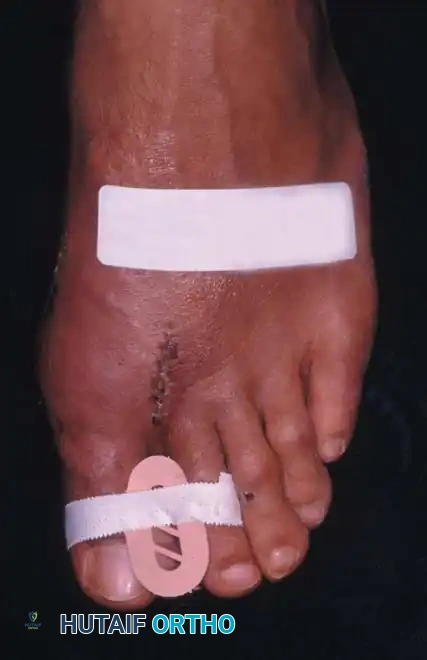
Fig. 78-25 Toe spacer is worn for 6 weeks after surgery to maintain medial capsular stabilization.
5 to 8 mm
A
B
C D
E
Fig. 78-26 Modifi ed McBride bunionectomy (DuVries; Mann). A, Medial capsule of second metatarsophalangeal joint is sutured to lateral capsule of fi rst metatarsophalangeal joint with interposition of released adductor hallucis. B, Medial capsular resection. C, Confi guration after capsular resection. D, After capsular imbrication, hallux should rest in neutral position or not exceed 5 degrees of varus. E, Postoperative dressing technique (Mann). ( E after Beverly Kessler; courtesy of LTI Medica and The Upjohn Company.) lateral subluxation of the phalanx on the metatarsal head, severe lateral displacement of the sesamoids, and any evidence of degenerative cartilage changes in the joint all are radiographic indications for the Keller procedure. Two modifi cations in technique can expand these indications, however, to include patients with more severe deformities (Fig. 78-29) (but not to include younger patients): fi bular sesamoidectomy and lateral displacement of the fi rst metatarsal. Using these modifi cations, Donley et al. obtained an average 18-degree correction of the metatarsophalangeal angle and an average 6-degree correction of the intermetatarsal angle in 38 patients (50 feet);
A B
Fig. 78-27 Hallux valgus night splint to be worn for 6 to 8 weeks after dressing changes are completed.
Fig. 78-28 A, Anteroposterior radiograph of right foot of 65-year-old patient shows mild-to-moderate deformity and mild degenerative changes at fi rst metatarsophalangeal joint; patient had intraarticular and periarticular symptoms. B, Twelve years after Keller procedure with excision of fi bular sesamoid; note correction of fi rst metatarsal varus and maintenance of enough joint space to allow functional range of motion.
95% of patients were satisfi ed with their results. Patients with 50 degrees or more of valgus of the hallux (18 to 20 degrees of varus of the fi rst metatarsal), complete lateral dislocation of the sesamoids, marked degenerative changes, and severe pronation of the hallux may benefi t functionally and cosmetically from alterations of the standard technique.
🔪 Surgical Technique 78-2
• If pedal pulses are good, use an Esmarch wrap tourniquet.
• Use 1% lidocaine (Xylocaine) and 0.5% bupivacaine (Marcaine) in equal portions within standard dose limits for the forefoot block.
• Make a straight midline medial incision 1 cm proximal to the interphalangeal joint of the hallux, and extend it proximally to the junction of the distal and middle thirds of the fi rst metatarsal. This lengthy incision is made to avoid excessive traction tension on the skin.
• By blunt dissection, locate the most medial branch of the superfi cial peroneal nerve at the proximal-dorsal edge of the medial eminence, and retract it for protection.
• Carry the dissection to the fi rst metatarsal in the midline medially, beginning in the proximal limit of the wound and extending distally across the midline of the medial eminence and along the proximal phalanx to the distal extent of the wound.
• Raise the deep fl ap of tissue by sharp dissection dorsally, beginning at the junction of the medial eminence and shaft of the fi rst metatarsal.
• Raise the periosteum and capsule dorsally up to one third to one half the width of the metatarsal.
• At the joint, continue the capsular elevation along the extensor hallucis brevis insertion until the proximal third of the proximal phalanx is exposed as far laterally as possible under direct vision. To make exposure easier, have an assistant pronate the hallux as the dissection proceeds laterally. Subperiosteal dissection should expose only the portion of the proximal phalanx that is to be removed.
• Plantarly dissect just enough to expose the plantar aspect of the medial eminence proximally, the tibial sesamoid in the center of the wound, and the plantar-medial corner of the proximal phalanx.
• Supinate the proximal phalanx to expose the plantar corner and proximal third of the shaft for the sharp dissection. The proximal phalanx is round on three sides, but its plantar surface is fl at and even concave in the midline where the fl exor hallucis longus tendon passes. This change in contour must be taken into account when dissecting to avoid injury of the fl exor hallucis longus tendon.
• By blunt dissection, identify the fl exor hallucis longus tendon, and retract it plantarward with a small right-angle retractor to protect it throughout the dissection of the proximal phalanx.
• Resect the medial eminence at the sagittal groove, beginning dorsally at its distal edge and directing a 9-mm oscillating blade
A B
C
D
Fig. 78-29 Severe hallux valgus with bursa formation in 70-year-old woman. A and B, Anteroposterior and lateral clinical photographs of patient’s right foot. C, Correction of deformity by modifi ed Keller procedure. D, Preoperative and postoperative weight bearing radiographs of same patient.
🔪 Surgical Technique 78-2
(or osteotome) plantarward and slightly medially (5 to 10 degrees).
• Remove the base of the proximal phalanx at the metaphysealdiaphyseal junction, which usually constitutes the proximal third of the phalanx (Fig. 78-30A and B). To prevent damage to the fl exor hallucis longus and the neurovascular bundles, place a retractor over the bone dorsally and plantarward, and rotate the phalanx into view. Also, do not allow the saw blade to exit bone more than 1 to 2 mm.
• When the osteotomy has been completed, grasp the basilar fragment with a small Kocher clamp or towel clip, and rotate the fragment while applying medial pull to excise it. Lift it away from its lateral attachments, which are primarily the lateral collateral ligaments and the adductor muscle tendinous insertion (Fig. 78-30C).
• With the ankle at 90 degrees, bring the hallux into a corrected position, while manually pushing the fi rst metatarsal as far laterally as possible. Evaluate the alignment, keeping the metatarsal and hallux straight.
A B
C
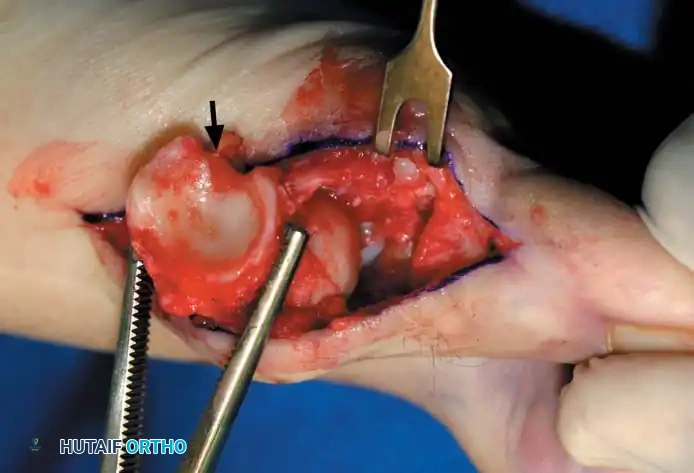
Fig. 78-30 Keller technique. A, Re section of proximal phalanx, release of adductor tendon, and resection of medial eminence. B, Metaphyseal-diaphyseal junction of proximal phalanx (arrow) . C, Note concave plantar aspect of proximal phalanx for course of fl exor hallucis longus tendon (arrow) .
• Grasp the hallux in one hand and displace the proximal remnant medially so that, under direct vision, two longitudinal 0.062-inch Kirschner wires can be inserted.
• Hold the interphalangeal joint straight while drilling the wires from proximal to distal, emerging a few millimeters plantar to the nail plate.
• Return the foot to the corrected position, and drill the wires into the metatarsal head.
• While holding the metatarsal as far laterally as possible, cross the joint, and drive the wires out the plantar cortex just proximal to the head, while holding the hallux in 10 to 15 degrees of extension, neutral abduction, adduction, and rotation, and no translation dorsally or plantarward on the metatarsal head. The wires should penetrate only 2 to 3 mm past the cortex to avoid tenderness over the wires with weight bearing.
• If the Kirschner wires tend to “walk” on the rounded articular surface of the metatarsal head, use a small hemostat snugged up against the wire while it is being drilled to allow accurate placement. Proper placement of the wires and the desired position of the hallux on the metatarsal may require several attempts. The medial aspect of the proximal phalanx should not rest medial to the medial aspect of the metatarsal head.
• Place the hallux in the neutral medial-lateral plane and in 10 degrees of extension.
• Before the second wire is driven into the fi rst metatarsal head, place the hallux in proper rotation, using the plane of the nail as a guide. The initial length of the hallux is maintained by the wires. Later, collapse occurs when the wires are removed, but improved encapsulation of the hemiarthroplasty, by maintaining length for the fi rst few weeks, may help maintain a more desirable position long-term.
• Cut the wires off 2 to 3 mm distal to the skin edge.
• Remove the tourniquet, and secure hemostasis.
🔪 Surgical Technique 78-2
• Close the capsule with interrupted 2-0 or 3-0 absorbable sutures. A fi rm, complete capsular closure is imperative. A box stitch is recommended. Increasing the curve of the needle manually is helpful.
• Starting proximal and plantarward, pass the suture through the capsule from the outside in.
• The second pass of the suture is from the inside out through substantial soft tissue on the plantar medial aspect of the phalangeal base.
• Reenter the soft tissue at the base of the proximal phalangeal remnant dorsomedially for the third pass. Move the suture back and forth to ensure uninhibited excursion.
• Make the fourth pass from inside out through the dorsal capsule in line with the initial plantar capsular suture. Have an assistant grasp the ends of the capsule, pulling them together, while the tie is completed. This is basically a four-corner box stitch, which may leave a small area of capsule in the middle that cannot be approximated, but this is of no consequence.
• Intersperse interrupted sutures as needed to complete a fi rm closure.
• Release the tourniquet, and close the skin with nonabsorbable 4-0 sutures.
• Apply a compression forefoot dressing extending just distal to the tarsonavicular tuberosity so that only the toenails are exposed, and no loose edges of gauze are raised above the dressing. A snug but nonconstricting, layered, contoured forefoot dressing is vital to reduce edema.
• Cover the tips of the wires with circular adhesive bandages or commercially available “pin balls.”
The following modifi cations of the Keller technique can expand the indications for use with more severe deformities.
REMOVAL OF THE FIBULAR SESAMOID
• When the medial eminence and phalangeal base have been excised, remove the fi bular sesamoid.
• Place a sturdy two-toothed retractor beneath the metatarsal head, and have an assistant lift it dorsally.
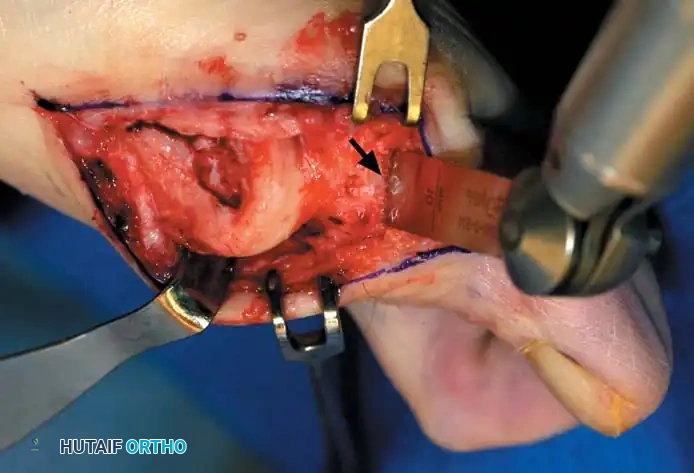
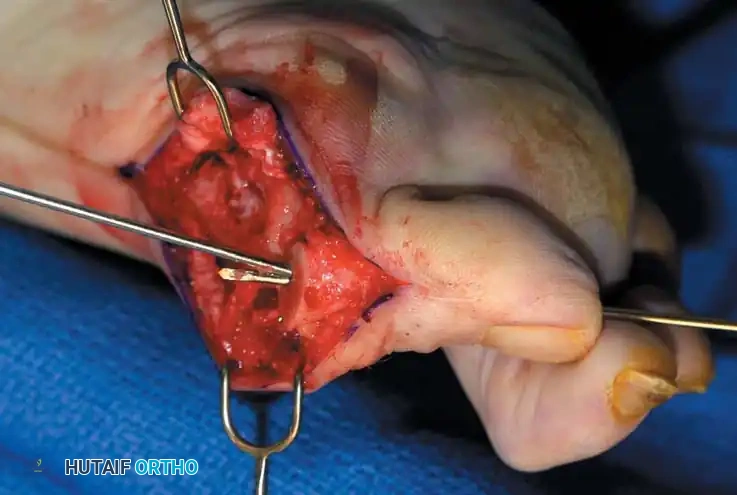
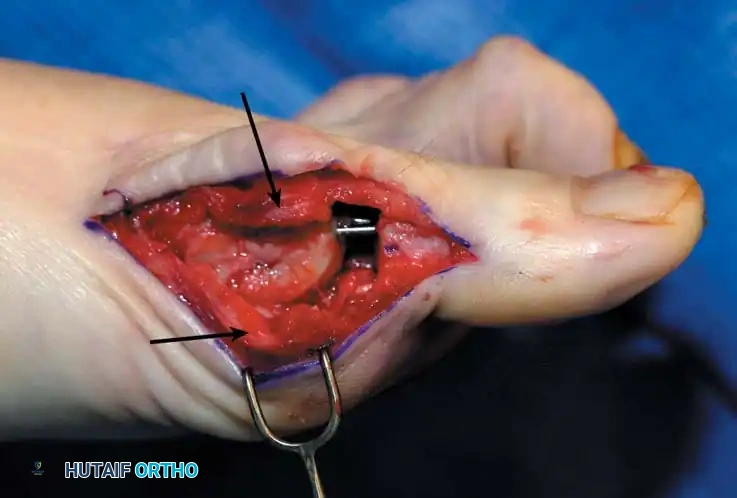
• Using a Freer elevator or a small osteotome for its strength, mobilize the fi bular sesamoid (Fig. 78-31A to C). This may be diffi cult in elderly patients with signifi cant deformity and adherence of the sesamoid to the metatarsal head. Lift the metatarsal dorsally for exposure (Fig. 78-31D and E).
• When the sesamoid is mobile, identify the fl exor hallucis longus tendon by placing traction on the hallux and fl exing and extending the interphalangeal joint of the hallux. The tendon is visible just distal to and in alignment with the sesamoids, which straddle it.
• Identify and expose the lateral neurovascular bundle just lateral to the tendon by blunt dissection.
• Pull the plantar medial capsule medially. This requires a fi rm grasp on the capsule. The medial traction brings the intersesamoid “ligament” into better view.
• Incise the intersesamoid ligament longitudinally with a No. 67 Beaver or No. 15 Bard-Parker blade. If tenotomy scissors are used, place one arm of the scissors under the ligament (this arm rests on the dorsal side of the fl exor hallucis longus) and the other arm dorsal to the ligament.
• When the intersesamoid ligament is incised, grasp the sesamoid fi rmly with forceps or a small Kocher clamp, fl ex the toe at the interphalangeal and metatarsophalangeal joints to relax the fl exor hallucis longus tendon, and pull the fi bular sesamoid distally and medially.
• With release of the intersesamoid ligament, the medial surface of the fi bular sesamoid is free from soft tissue. Distally, the sesamoid is free because of resection of the base of the proximal phalanx. This leaves two sides of the sesamoid, distal and medial, free of soft tissue.
• While pulling the sesamoid distally and medially, use a small blade to incise along the lateral margin of the sesamoid under direct vision. Keep pulling the head of the metatarsal dorsally and holding the hallux distracted and in fl exion. This greatly aids in identifi cation of the margins of the fi bular sesamoid, particularly laterally and proximally.
• The most diffi cult part of the sesamoidectomy and that which should be done last is release of the proximal lateral corner of the sesamoid where the fl exor hallucis brevis lateral head inserts. While incising the lateral capsular attachments to the sesamoid, do not bury the blade of the knife because the neurovascular bundle to the lateral side of the hallux is just lateral to the capsule.
• Now all attachments to the fi bular sesamoid have been removed except the lateral head of the fl exor hallucis brevis, which inserts on the proximal lateral margin of the sesamoid. This is a diffi cult section to remove; however, this section can be released under direct vision by pulling the sesamoid distally and medially and lifting the metatarsal head dorsally with a strong two-toothed retractor.
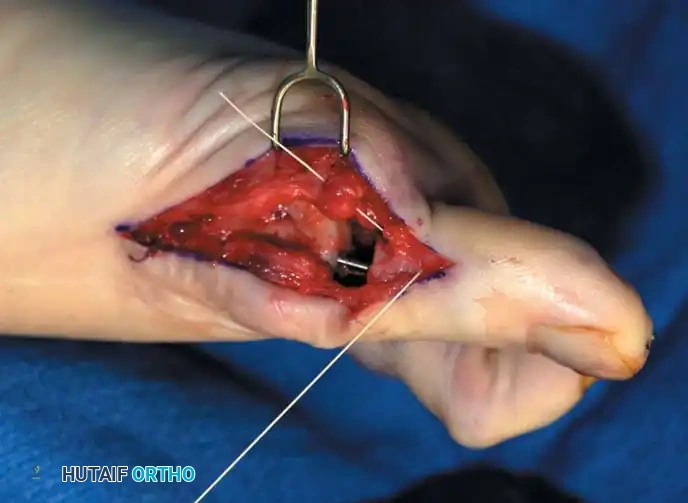
• When the sesamoid has been removed, insert two 0.062-inch Kirschner wires retrograde from the tip of the toe 2 to 3 mm plantar to the nail bed, leaving about 5 to 7 mm of the pins exposed at the base of the phalangeal remnant to help align the phalanx on the metatarsal before antegrade passage of the pins into the metatarsal (Fig. 78-31F).
LATERAL DISPLACEMENT OF THE FIRST METATARSAL
• Push the metatarsal laterally several times. Occasionally, this does not move the metatarsal, but some lateral mobility usually is present.
A B
C
Flexor hallucis longus
Lateral sesamoid excised
Adductor hallucis (transverse head)
Adductor hallucis (oblique head)
Flexor hallucis brevis (lateral head)
D

Fibular sesamoid
E
Tibial sesamoid
Intersesamoid ligament
Fibular sesamoid
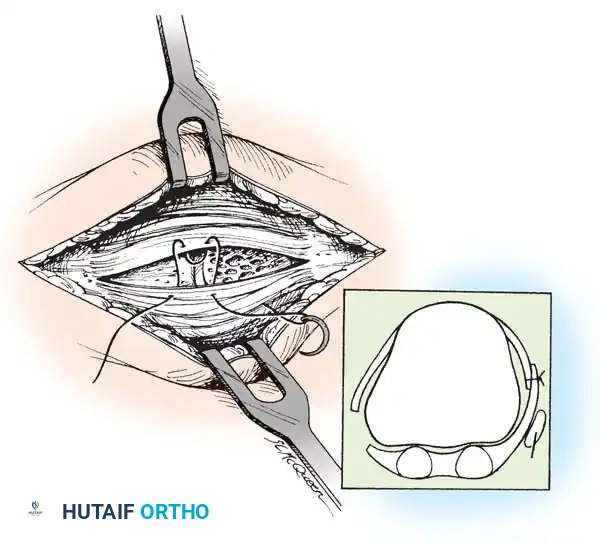
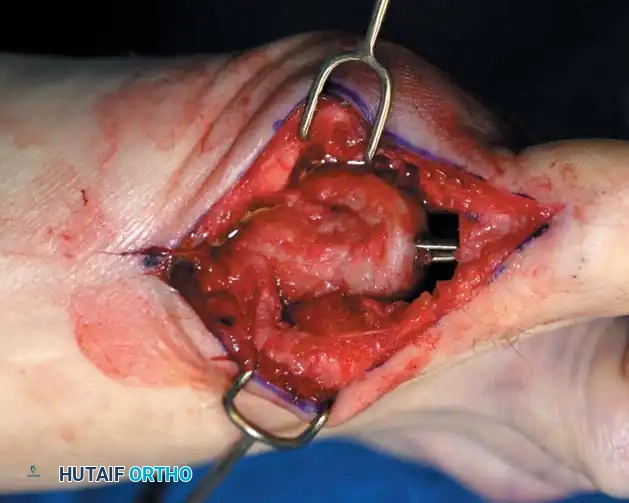
Fig. 78-31 Excision of fi bular sesamoid in modifi ed Keller procedure. With base of proximal phalanx removed and medial eminence excision, exposure of fi bular sesamoid is not as diffi cult from medial incision. A, Operative photograph showing elevation of fi rst metatarsal with strong two-tooth retractor and use of small osteotome to mobilize fi bular sesamoid and lateral capsuloligamentous (frequently contracted) structures. Osteotome is between metatarsal head and lateral sesamoid. When mobilization of fi bular sesamoid is complete, entire sesamoid is visible for excision. Note chondromalacia of tibial sesamoid articular surface medial to osteotome. B, Fibular sesamoid has been excised, and lateral capsular structures and conjoined tendon (in forceps) have been released. Neurovascular bundle to lateral side of hallux is adjacent to these structures. C, Diagrammatic representation of modifi ed Keller procedure. By excising fi bular sesamoid, valgus moment of conjoined tendon of fl exor hallucis brevis and adductor hallucis no longer pulls fl exor hallucis longus tendon laterally (carrying hallux with it) through capsulosesamoid plantar plate and pulley system. D, Metatarsal head must be lifted dorsally to excise fi bular sesamoid under direct vision. E, Note exposure of fi bular sesamoid after mobilization of metatarsal head. Continued
F G
H I
Capsule
Capsule
J

Fig. 78-31, cont’d F, Two 0.062-inch Kirschner wires are drilled distally. G, First metatarsal head is manually displaced laterally, and hallux is placed end-on the fi rst metatarsal. Kirschner wires are drilled proximally across joint. H, Capsule is mobilized dorsally and plantarward. I, 2-0 or 3-0 absorbable sutures placed in purse-string fashion are used for capsular closure. J, Capsule must be closed over joint. Note pins cut off at skin level; they also can be bent at skin level.
AFTERTREATMENT A fi rm-soled, postoperative shoe is worn, and weight bearing is allowed to tolerance with or without the assistance of crutches or a walker. Bathroom privileges only are allowed for the fi rst 72 hours. The foot is elevated except during meals and bathroom visits. After this period, the patient may be up and about as symptoms allow. Taking more pain medication to allow increased activity is discouraged. For 7 to 10 days after surgery, the foot should be elevated when the patient is sitting. The dressing is changed at 19 to 23 days, and the wires remain in place for 21 to 28 days. If the hallux migrates proximally on the wires and the wires protrude too far before time to remove them, the tips are cut 1 to 2 mm distal to the skin edge. The Kirschner wires are removed in the offi ce by placing a large or medium-sized needle holder longitudinally over the tip of the wire, rotating it back and forth gently and pulling with gentle traction. To prevent excessive bleeding, the foot is elevated for 5 minutes after the wires have been removed. A good method of elevation is to place the patient supine with the unoperated knee fl exed 90 degrees and the foot fl at on the table, and then to place the ankle of the operated foot on the fl exed knee. A small plastic strip bandage is placed over the holes when the bleeding has stopped. A small or medium-sized toe spacer (commercially available) is worn in the fi rst web for an additional 4 to 6 weeks; this spacer is removed only for bathing. A wide, soft shoe is allowed after the pins have been removed. Dress shoes are allowed only after most of the edema has resolved, which may take 3 to 4 months. The expected results are a satisfactorily well-aligned hallux with 40 to 50 degrees of motion at the metatarsophalangeal joint, relief of pain, and some improvement in the variety of shoes that can be worn.
Metatarsal Osteotomy
In 1881, Reverdin, displeased with the Heuter procedure of metatarsal head resection, reported the benefi ts of metatarsal osteotomy in the correction of hallux valgus. In 1884, Barker performed a similar procedure, but without exostectomy or suture fi xation of the osteotomy and evidently without knowledge of Reverdin’s technique. In the German literature, Hohmann described a closing trapezoid extracapsular resection of the distal metatarsal, based medially and without excision of the exostosis, to correct hallux valgus. In addition, Trethowan suggested an opening wedge fi rst metatarsal osteotomy performed just distal to the cuneiform metatarsal joint and suggested holding the osteotomy open with bone from the excised medial eminence. In 1925, Truslow introduced the term primus to metatarsus varus, implying that varus of the fi rst metatarsal was the prime or initial deformity, and that valgus deviation of the hallux only followed it. He advised a cuneiform osteotomy based medially at the medial cuneiform–fi rst metatarsal
🔪 Surgical Technique 78-2
• While standing next to the patient looking distally at the dorsum of the foot, dorsifl ex the ankle to neutral.
• Viewing the foot as the patient would, hold the fi rst metatarsal fi rmly, and move its distal end laterally. Hold this position with one hand, and use the other hand to place the hallux on the metatarsal head and out to length.
• While holding the fi rst ray straight with the foot vertical, have an assistant insert the wires from distal to proximal (Fig. 78-31G). Often these wires, which run through the fi rst metatarsal and hallux, hold the fi rst ray straight, and most of this correction is maintained after the wires have been removed.
• Close the capsule with a purse-string suture as previously described in the original technique (Fig. 78-31H to J).
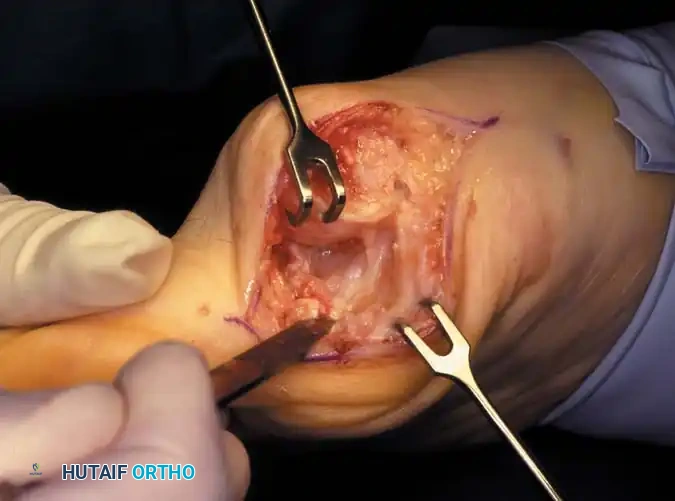
Fig. 78-32 Firm fi brous band connects fi bular sesamoid to base of proximal phalanx. Traction on band pulled hallux into valgus. Removing fi bular sesamoid and holding hallux straight for 4 weeks improved results.
Presumably, the laterally displaced fi bular sesamoid, when pulled proximally by the lateral head of the relaxed fl exor hallucis brevis, pulls the fl exor hallucis longus laterally through the sesamoid apparatus, which encases it and contributes to recurrent hallux valgus. In addition, while reoperating after a failed Keller procedure, we observed a strong, linear, fi brous attachment of the fi bular sesamoid to the proximal phalangeal remnant (Fig. 78-32), which pulled the hallux into valgus when tension was applied to it. For these reasons, when the deformity is severe, the hallux and fi rst metatarsal maintain better alignment if excision of the fi bular sesamoid and lateral displacement of the metatarsal are added to the procedure. joint, lateral capsulotomy at the metatarsophalangeal joint, and lengthening of the extensor hallucis longus tendon. Hohmann recommended lateral displacement and plantar tilting of the distal fragment, following osteotomy at the metatarsal neck to correct hallux valgus. In 1945, a report by Mitchell et al. of 100 osteotomies gave the procedure his name. Since then, several authors have presented large retrospective reviews of the Mitchell operation to correct hallux valgus in adults and adolescents, with satisfactory results ranging from 74% to 94%. Gibson and Piggott described a peg-in-hole distal metatarsal osteotomy that differed from the Mitchell procedure in its use of a lateral plantar spike on the proximal fragment in place of the lateral spike on the distal fragment (as recommended by Mitchell). The nonunion rate has been negligible in all series of the Mitchell procedure, and recurrence of the deformity has been infrequent. The most troublesome complication has been metatarsalgia, attributable to dorsifl exion malunion of the distal fragment, excessive shortening of the metatarsal, or both (Fig. 78-33). In a long-term (average 21 years) follow-up study of 105 Mitchell procedures, Fokter, Podobnik, and Vengust found that the most common complication was recurrent hallux valgus with medial eminence pain. Their good-to-excellent results deteriorated from 97% at follow-up ranging from 2 to 11 years to 64% at follow-up ranging from 15 to 24 years, primarily because of recurrence of deformity with medial eminence pain. The use of a Kirschner wire for fi xation (instead of sutures) prevented malunion; all osteotomies healed in 6 weeks with only secondary displacement. Likewise, with the pegin-hole procedure, metatarsalgia has been the most common complication. Relief of pain, narrowing of the forefoot, and correction of the deformity have been achieved in most patients, however. A closing wedge osteotomy at the subcapital level of the fi rst metatarsal to correct valgus of the hallux also has its proponents. Although opponents emphasize that metatarsus primus varus is worsened, and recurrence of the valgus deformity of the great toe is likely, published series have not confi rmed this. Of 32 osteotomies reported by Peabody and 76 reported by Funk and Wells, no nonunions or signifi cant recurrences of the deformity were recorded. A popular osteotomy of the distal metatarsal is the chevron intracapsular osteotomy, which was described by Corless in 1976 as a modifi cation of the Mitchell procedure to correct the bunion associated with mild-to-moderate metatarsus primus varus. The procedure consists of two parts: (1) correction of metatarsus primus varus by a V shaped osteotomy in the sagittal plane through the metatarsal head and neck, followed by lateral shifting of the metatarsal head and trimming of the proximal fragment without internal fi xation (because of the inherent stability of the osteotomy) and (2) correction of the hallux valgus by suturing a previously raised fl ap of joint capsule into the abductor hallucis tendon. Several series of this osteotomy with adequate clinical follow-up have been published. Austin and Leventen reported, in 100 osteotomies randomly selected for analysis from a group of 1200, that no nonunions, osteonecrosis, or infections occurred. Hattrup and Johnson reported, in 225 feet (157 patients), that pain, shoe fi t, and cosmesis were improved in all but a few patients. Because their best results were in younger patients, the authors indicated that
A B
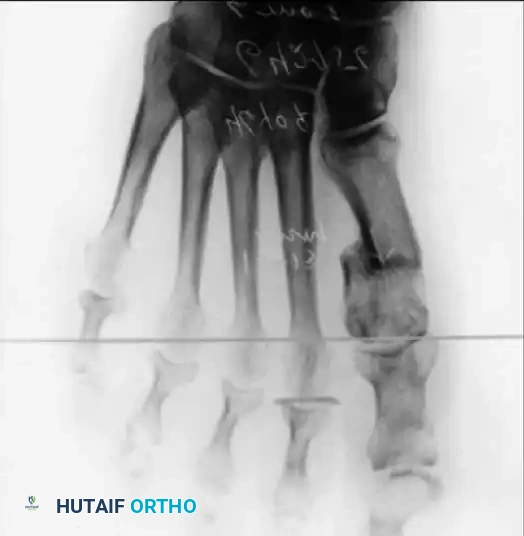
Fig. 78-33 A and B, Anteroposterior and lateral weight bearing radiographs of Mitchell procedure that, through excessive shortening and dorsally angulated malunion, has resulted in transfer metatarsalgia. This biplanar deformity is most diffi cult to correct.
the procedure probably should be reserved for patients who are younger than 50 years old. More recently, Trnka et al. reported 2and 5-year follow-up of 43 patients (57 feet) with chevron osteotomies; they found that outcome did not differ according to age: patients 50 years old or older had results as good as those in younger patients. Schneider et al. described consistently excellent clinical results after 112 chevron osteotomies in 73 patients; only one patient required a revision procedure because of recurrence of a painful deformity. Horne, Tanzer, and Ford modifi ed the technique of Corless and Johnson by placing the arms of the V -shaped osteotomy at a 90-degree angle (instead of a 45to 60degree angle) and by using a 2-mm drill hole as a marker at the apex of the intended V -shaped osteotomy. After reviewing the procedure in 76 feet, the authors concluded that the results of a chevron osteotomy are satisfactory, but that the technique demands attention to detail. They recommended it for the treatment of hallux valgus in patients with an intermetatarsal angle of more than 10 degrees, no degenerative metatarsophalangeal joint changes, and at least 60 to 70 degrees of fi rst metatarsophalangeal joint dorsifl exion. Meier and Kenzora reported satisfactory results in 86% of 41 patients (60 feet) after chevron osteotomy. Although they found a 20% incidence of osteonecrosis of the fi rst metatarsal head, a satisfactory result was not precluded by the development of osteonecrosis, even if the entire metatarsal head was involved or the subchondral bone had collapsed. The chevron distal osteotomy has been modifi ed to include an intracapsular-to-extracapsular extension of the osteotomy cuts, with the apex of the osteotomy at or slightly proximal to the center of the metatarsal head. The angle of the osteotomy is about the same (50 to 70 degrees), but the length of the two cuts can be modifi ed to accommodate the small amounts of bone removal needed to correct metatarsals with excessive valgus position of the articular surface of the metatarsal head. Some stability is sacrifi ced at the osteotomy site, however, and internal fi xation is recommended. Shifting the capital fragment laterally more than 5 to 6 mm is not recommended because of the loss of bone apposition. The primary advantage of the slightly more proximal placement of the osteotomy cuts is the correction of a wider range of deformities. Borton and Stephens modifi ed the chevron osteotomy by placing the bone wedge taken from the exostosis into the dorsal limb of the osteotomy to supinate, plantar fl ex, and distract the metatarsal. Internal fi xation was not used because distraction of the upper limb of the osteotomy tightened the soft tissues enough to provide stability. These authors suggested that supination and plantar fl exion of the metatarsal at the osteotomy are necessary to correct the pronation and metatarsus elevatus components of the hallux valgus deformity. In their series of 32 feet, the average correction of the hallux valgus angle was 21.7 degrees and of the intermetatarsal angle was 9.7 degrees. All but one of the 31 patients were satisfi ed with their results.
Box 78-2 • Avoiding Complications of the Mitchell Osteotomy
In 1958, Mitchell et al., having extensive experience with this procedure, made the following recommendations to avoid technical complications: Make the osteotomy no farther proximally than noted in the technique because the cortical bone of the shaft (as opposed to the cancellous bone of the neck) takes longer to heal, and if the osteotomy is too far proximal, maintaining the toe in the desired position is more diffi cult. Protect the suture during the osteotomy, and tie it fi rmly but not roughly to avoid weakening it by subsequently displacing the osteotomy. Drill the holes for the suture perpendicular to the shaft, or they may communicate with the osteotomy site and lose fi xation. Avoid an uneven or asymmetrical lateral spike on the distal fragment because it may result in instability. Align the fi rst metatarsal head with the second metatarsal so that the varus of the fi rst metatarsal is corrected where it is most signifi cant—at the metatarsophalangeal joint. Avoid dorsal angulation or displacement of the metatarsal head to prevent transfer metatarsalgia after surgery. Do not carry the arms of the Y -shaped capsular incision too far proximally because the thinner tissues in that area make the repair more diffi cult. Avoid stripping the lateral capsule from the metatarsal head to reduce the chance of osteonecrosis of the metatarsal head.
Mitchell Osteotomy
The Mitchell osteotomy procedure consists of (1) removal of the medial eminence, (2) an osteotomy of the distal portion of the fi rst metatarsal shaft, (3) lateral displacement and angulation of the capital fragment, and (4) medial capsulorrhaphy. Box 78-2 contains recommendations to avoid complications of this procedure.
🔪 Surgical Technique 78-3
SKIN AND CAPSULAR INCISION
• Make the initial incision dorsomedially, beginning at the midshaft of the proximal phalanx, coursing dorsally over the bunion, and ending 3 cm proximal to the metatarsophalangeal joint on the medial side of the fi rst metatarsal (the internervous midline medial incision is preferred). Avoid the terminal branches of the medial division of the superfi cial peroneal nerve when making the dorsomedial incision (Fig. 78-34A).
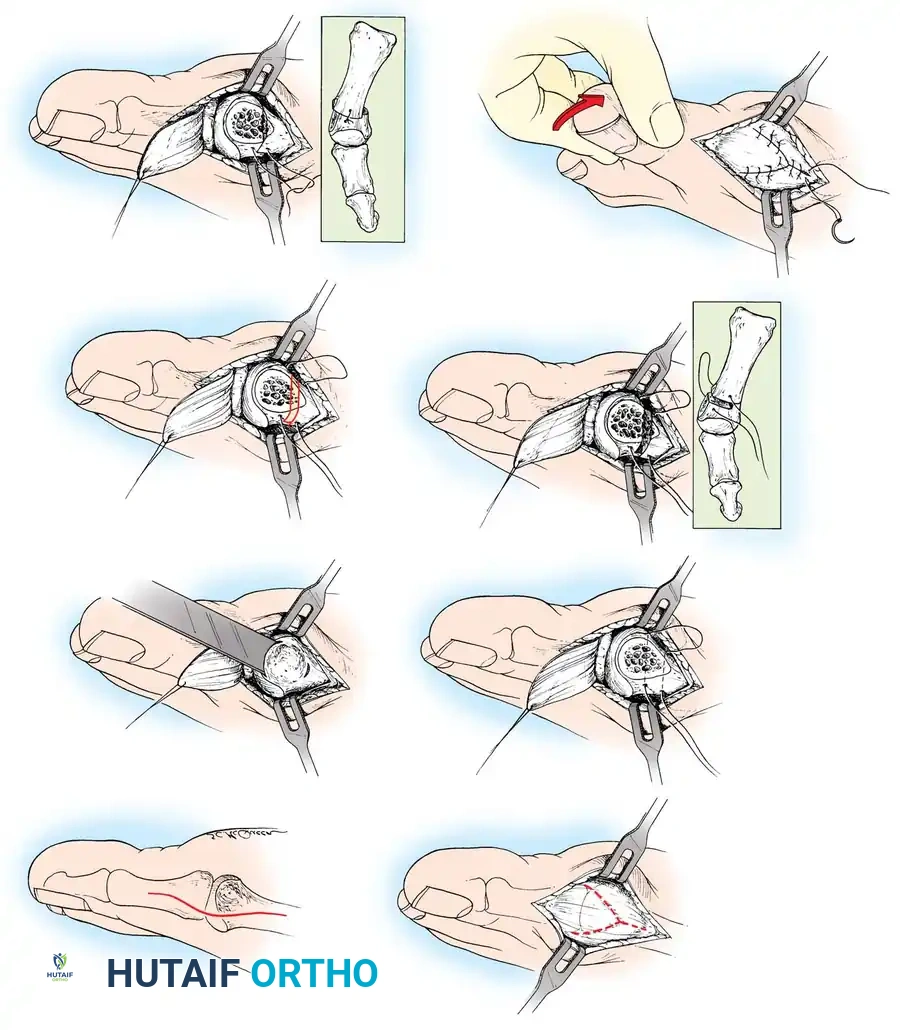
A B
C D
E F
G H
Fig. 78-34 Mitchell osteotomy. A, Skin incision (medial longitudinal incision preferred). B, Capsular incision. C, Medial eminence removal (do not denude metatarsal neck of soft tissue). D, Placement of offset drill holes and passage of suture. E, Double osteotomy (incomplete and complete). F, Excision of bone from between osteotomies. G, Displacement of capital fragment and tying of suture. H, Medial capsulorrhaphy. (Redrawn from Mitchell CL, Fleming J, Allen R, et al: Osteotomy-bunionectomy for hallux valgus, J Bone Joint Surg 40A:41, 1958.)
🔪 Surgical Technique 78-3
• By sharp and blunt dissection, identify the medial eminence with its overlying capsule and bursa.
• Begin a Y -shaped incision at the dorsomedial edge of the metatarsophalangeal joint, and angle it toward the midmedial line of the metatarsal shaft where the medial eminence and shaft meet. This limb of the Y -shaped incision usually is 10 to 15 mm long, depending on the size of the medial eminence and the length of the fi rst metatarsal.
• The plantar limb of the Y -shaped incision is the same length and angles toward the plantar medial aspect of the metatarsophalangeal joint.
• The straight limb of the Y -shaped incision proceeds proximally along the subcutaneous shaft of the metatarsal (Fig. 78-34B).
• Carefully coagulate the small vessels encountered up to this step.
• By sharp dissection, raise the capsular fl ap, which is based distally on the base of the proximal phalanx, and inspect the joint by valgus posturing of the hallux. As the fl ap is raised from the proximal to the distal position, care must be taken not to remove all of the remaining capsular attachments to the metatarsal shaft because the attachments are quite thin at the neck of the metatarsal. These capsular remnants will be needed when the fl ap is advanced proximally to correct the valgus of the great toe at the end of the procedure.
MEDIAL EMINENCE REMOVAL
• Identify the parasagittal groove and the junction of the medial eminence with the metatarsal shaft, then score the bone at the latter point with a sharp 3 / 8 or 1 / 2 -inch osteotome.
• Using this same osteotome or a power saw with a 10-mm blade, begin removing the eminence at the dorsal lip of the parasagittal groove.
• Direct the osteotomy proximally, plantarward, and slightly medially toward the scored bone. By directing the osteotomy in this manner, the chance of splitting the metatarsal shaft is minimal (Fig. 78-34C).
EXPOSURE OF THE METATARSAL NECK AND DISTAL SHAFT AND PLACEMENT OF GUIDE HOLES
• By sharp dissection, raise the periosteum dorsally and plantarward to expose the dorsal aspect of the metatarsal neck and distal 2 to 3 cm of the shaft. Do not dissect the lateral capsule off the metatarsal head and neck, because it contributes to the blood supply of the metatarsal head.
• Drill two holes perpendicularly through the metatarsal shaft from the dorsal to the plantar direction, making the holes just large enough to allow for the passage of a 1-0 suture. Drill the fi rst hole about 1.5 cm proximal to the distal margin of the articular surface of the metatarsal head and toward its medial cortex. Drill the second hole 1 cm proximal to the fi rst hole, but toward the lateral cortex of the metatarsal shaft.
• Pass a 1-0 single-stranded absorbable suture through the holes so that it can be tied dorsally (Fig. 78-34D).
DOUBLE OSTEOTOMY OF THE METATARSAL NECK
• Make the fi rst cut distally (using a power saw with a 9-mm blade is helpful), perpendicular to the medial border of the metatarsal neck and beginning 3 to 4 mm proximal to the distal hole. This osteotomy is incomplete and should leave 3 to 6 mm of lateral shaft intact. The width of the lateral spike created depends on the amount of correction needed to relax the lateral soft tissue of the metatarsophalangeal joint; in other words, it depends on the severity of the deformity. (If the intermetatarsal angle is 10 to 12 degrees, a 3to 4-mm spike should suffi ce; if the intermetatarsal angle is 13 to 15 degrees, a 5to 6-mm spike is needed.)
• Make the second osteotomy in a similarly perpendicular direction to the metatarsal shaft, starting medially 3 to 4 mm proximal to the fi rst cut. This proximal or second osteotomy cut is a complete one and passes through the lateral cortex of the metatarsal (Fig. 78-34E).
• Remove the intervening 3 to 4 mm of bone from the distal fragment (Fig. 78-34F). (Carr and Boyd suggested diverging the osteotomies about 10 degrees in a plantar direction to facilitate plantar fl exion of the distal fragment.)
LATERAL DISPLACEMENT OF THE CAPITAL FRAGMENT
• With the osteotomies completed and the lateral spike fashioned, manually shift the entire capital fragment laterally until the spike rests on the lateral cortex of the proximal fragment (Fig. 78-34G). This maneuver shortens the metatarsal 5 to 6 mm, reduces the varus inclination of the metatarsal, aligns the articular surface of the fi rst metatarsal with that of the second, and relaxes the adductor.
• Tie the suture while the capital fragment is plantar fl exed about 10 degrees.
CAPSULAR CLOSURE (MEDIAL CAPSULORRHAPHY)
• Before closing the capsule (Fig. 78-34H), resect any medial projection of bone on the proximal side of the osteotomy so that it is fl ush with the medial edge of the displaced capital fragment.
• Advance the V -shaped incision into the straight limb of the Y shaped incision while holding the hallux in 5 degrees of varus and in plantar fl exion.
AFTERTREATMENT Mitchell recommended that padded tongue blades be placed plantar, medially, and dorsally and held in place with rolled gauze for the fi rst 10 days after surgery. The sutures are then removed, and a short leg walking cast with a toe plate is applied, being careful to avoid angulating the distal fragment or displacing it dor- sally. The cast is worn until the osteotomy is healed, usually for 6 to 8 weeks. We routinely use a bulky dressing, followed by a plaster splinting or casting.
Distal Chevron Osteotomy
Johnson and Corless recommended the chevron osteotomy for patients younger than 50 years old with a hallux valgus angle of less than 40 degrees and an intermetatarsal angle of less than 20 degrees. The chevron osteotomy has advantages over metatarsal neck osteotomy (the Mitchell procedure and its modifi cations): It is made through cancellous bone, shortens the metatarsal less, and is inherently stable. If the hallux valgus angle is more than 35 degrees, however, the hallux frequently is pronated and cannot be corrected by medial capsulorrhaphy alone or at the osteotomy. A hallux valgus angle of more than 30 degrees is not consistently correctable to a cosmetically acceptable angle (10 to 20 degrees), especially if the intermetatarsal angle is more than 12 degrees. This procedure is useful for younger patients (adolescence through the 30s) with a hallux valgus angle of 30 degrees or less and an intermetatarsal angle of less than 13 degrees. Trnka et al. found, however, that outcome did not differ on the basis of age in their 43 patients (57 feet): Patients 50 years old or older did as well as younger patients. It narrows the forefoot, brings the hallux into cosmetically acceptable valgus (when combined with a medial capsulorrhaphy), and maintains adequate dorsifl exion of the fi rst metatarsophalangeal joint to allow some variety in footwear. Fixation of the osteotomy with one or two Kirschner wires, a cortical screw, or a biodegradable pin adds stability to the osteotomy. Porter and Anderson reported good results with the use of polylevolactic acid rods for the fi xation of 51 consecutive osteotomies: no infections or sterile abscesses and no radiographic evidence of osteolysis or fi xation loss at 2-year follow-up. They suggested the polylevolactic acid rods might be preferable to those made of polyglycolic acid or polydioxanone because of the longer degradation time, which decreases the frequency of foreign body reactions and osteolysis that occur with the more rapidly hydrolyzed devices. Schneider et al. reported that at 10-year follow-up only one of 112 chevron osteotomies had required a revision procedure because of recurrence of the hallux valgus deformity. They also noted that their patients showed further improvement over time. The progression of arthritis of the fi rst metatarsophalangeal joint was signifi cant between the 6and 12-year follow-up evaluations, but did not affect the clinical results. Trnka et al. also confi rmed that there was only minimal change in overall patient satisfaction and American Orthopaedic Foot and Ankle Society (AOFAS) scores between the 2and 5-year follow-up evaluations of 43 patients (57 feet). The procedure consists of (1) medial eminence removal, (2) a V -shaped intracapsular osteotomy through the fi rst metatarsal head, (3) lateral displacement of the capital fragment, (4) removal of the resulting projection of the fi rst metatarsal, and (5) medial capsulorrhaphy.
🔪 Surgical Technique 78-4
SKIN INCISION
• Begin a dorsomedial incision at the midportion of the proximal phalanx, and gently curve it dorsally and proximally over the medial eminence so that, coursing plantarward, it ends 2 cm proximal to the medial eminence along the medial subcutaneous surface of the fi rst metatarsal shaft. Currently, we use a straight midline medial incision.
• Raise the skin fl ap gently, being careful to preserve the sensory nerve (the terminal branch of the medial division of the superfi cial peroneal nerve) to the dorsomedial aspect of the hallux. Protect as many branches of the superfi cial venous system as possible to decrease postoperative edema.
• Make the capsular incision longitudinal in the midline (medial) of the medial eminence, and extend it distally along the shaft of the proximal phalanx and proximally along the metatarsal shaft until the medial eminence is exposed.
• Be careful not to loosen all the proximal attachments of the capsule on the metatarsal neck (an alternative capsular incision is the Y -shaped capsular incision).
• In addition, to preserve vascularity to the capital fragment, do not strip the capsule from the dorsolateral and lateral aspects of the metatarsal head and neck (Fig. 78-35A).
MEDIAL EMINENCE REMOVAL
• Begin the osteotomy dorsomedially at the parasagittal groove, and direct the blade (9 mm wide) proximally and medially, angled toward the junction of the medial eminence with the metatarsal shaft.
• If using a power saw with a small blade (4 mm wide), take care not to scoop out a portion of the cancellous bone in the metatarsal head because this decreases the surface contact of the osteotomy and can delay union (Fig. 78-35B).
V-SHAPED OSTEOTOMY IN TRANSVERSE PLANE
• Using a power saw with a 9-mm-wide blade, begin the dorsal arm of the osteotomy in the metatarsal head near the subchondral bone. This usually is 3 to 4 mm proximal to the medial edge of the articular surface of the head of the fi rst metatarsal. Angle the blade dorsally about 30 degrees from the longitudinal plane of the metatarsal (Fig. 78-35C).
• In a similar manner, angle the plantar arm of the osteotomy 30 degrees from the longitudinal plane of the metatarsal, making the angle between the two limbs 60 to 70 degrees. This angle is suggested to maximize metaphyseal cancellous bone contact, while maintaining stability of the osteotomy when it is displaced. The stability decreases as the angle increases. An angle of less than 50 to 60 degrees places the proximal ends of the osteotomy limbs in the cortical bone of the metatarsal neck instead of in the cancellous bone of the metatarsal head (Fig. 78-35D).
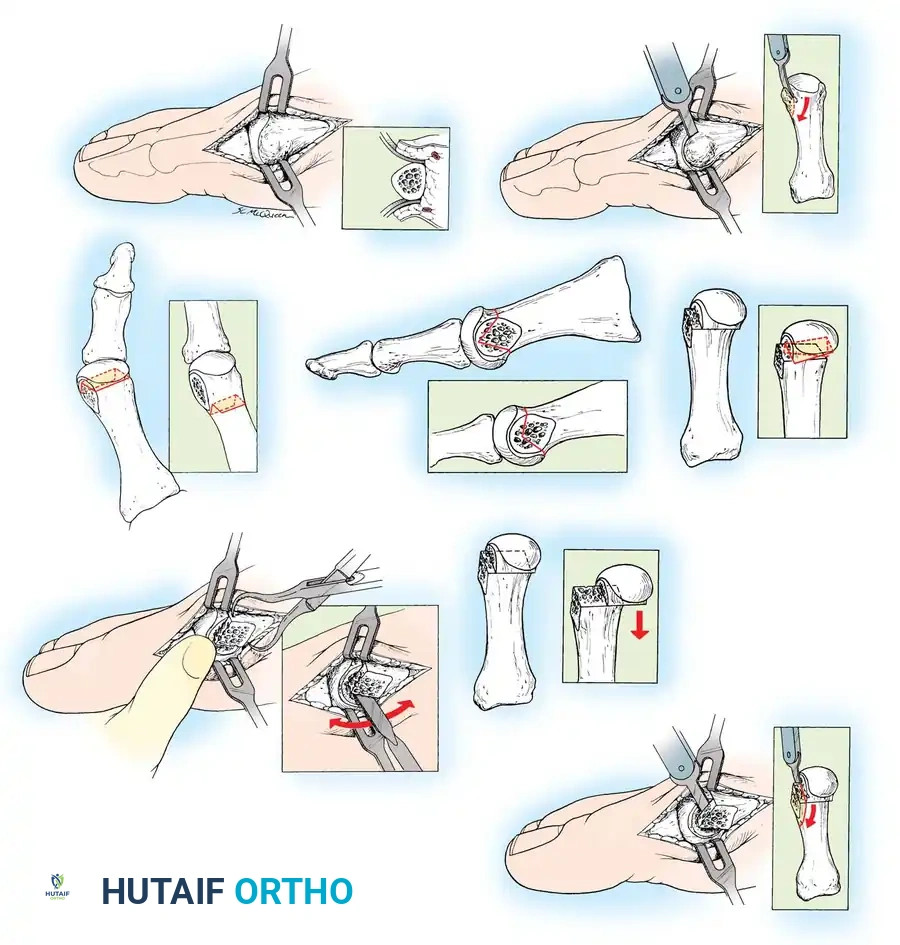
Incorrect
A
B
C
D E
F G
H
Incorrect
Incorrect Incorrect
Incorrect
Incorrect
Incorrect
Incorrect
Fig. 78-35 Chevron osteotomy. A, Skin and capsular incision (do not denude metatarsal head of soft tissue). B, Medial eminence removal. C, Osteotomy should be in cancellous bone—not in cortical bone of metatarsal neck. D, Proper angle of osteotomy in horizontal plane. E, Correct coronal plane of osteotomy. F, Correct technique of pushing metatarsal head fragment laterally. G, Avoid excessive lateral displacement of capital fragment. H, Removal of overlapping proximal fragment. (Modifi ed from Johnson KA: Chevron osteotomy of the fi rst metatarsal: patient selection and technique, Contemp Orthop 3:707, 1981.)
🔪 Surgical Technique 78-4
• When making the second limb of the osteotomy, avoid diverging the blade from or converging it toward the fi rst cut because this makes displacement of the capital fragment diffi cult (Fig. 78-35E).
• The arms of the V usually are 10 to 12 mm long. Do not overpenetrate the bone with the blade to avoid placing the blood supply to the head of the metatarsal further at risk.
LATERAL SHIFT OF THE CAPITAL FRAGMENT
• Stabilize the metatarsal shaft manually or with a towel clip while shifting the capital fragment laterally by thumb pressure (Fig. 78-35F). This lateral displacement should be 4 to 5 mm and no more than 40% to 50% of the width of the metatarsal (Fig. 78-35G).
• Care should be taken to avoid making the osteotomy unstable, which may occur if an instrument is used to lever the osteotomy open to facilitate displacement.
REMOVAL OF THE METATARSAL PROJECTION
• After displacement of the capital fragment laterally, a medial projection of the metatarsal on the proximal side of the osteotomy remains. Shape this projection into the contour of the metatarsal neck and distal shaft by beginning a saw cut dorsomedially and directing it medially and proximally (Fig. 78-35H).
• A small rongeur can be employed, using its beveled side and taking small bites, to smooth the medial surface of the two fragments further.
MEDIAL CAPSULORRHAPHY
• Bring the hallux into 5 degrees of valgus, and inspect the osteotomy.
• If it is stable, proceed with the capsulorrhaphy; if not, internally fi x the osteotomy, and perform the capsulorrhaphy, which holds the hallux in 5 to 10 degrees of valgus.
• We prefer the pants-over-vest technique because of its strength, but excising a portion of the capsule dorsally and closing the capsule side-to-side also is appropriate. Pulling the plantar fl ap of the capsule dorsally (instead of vice versa) repositions the sesamoids if no contracture exists.
• Release of the adductor through the joint before the osteotomy is suggested if the hallux valgus angle is 30 degrees or more.
AFTERTREATMENT Three days after surgery, the bulky soft dressing is removed, a small dressing and a short leg walking cast with dorsal and plantar toe plates are applied, and touch-down weight bearing is allowed with crutches until the osteotomy has healed (6 to 8 weeks).
Modifi ed Chevron Osteotomy
The modifi ed chevron osteotomy is simply a more proximal placement of the apex of the osteotomy in the metatarsal head. Potential problems of this modifi cation of the chevron osteotomy are instability of the osteotomy and insuffi cient metaphyseal bony contact. Proper placement of the osteotomy cuts is mandatory. The metatarsal osteotomy must be internally fi xed. With some modifi cations, however, the chevron osteotomy can be used for more severe deformities (up to 35 degrees of hallux valgus and up to 15 degrees of fi rst to second intermetatarsal diversion) (Fig. 78-36). As an alternative, the valgus appearance of the hallux can be corrected by an additional few degrees with an additional osteotomy of the proximal phalanx (see Akin procedure). This phalangeal osteotomy augments cosmetic correction only if the metatarsophalangeal joint has been rendered congruent in the corrected position. Also, a basal osteotomy of the proximal phalanx adjacent to the distal metatarsal osteotomy may cause more limitation of motion of the fi rst metatarsophalangeal joint than a single osteotomy. The patient should be informed of this possibility.
🔪 Surgical Technique 78-5
• Make a medial midline incision as described in Technique 784, protecting the dorsal veins and dorsal and plantar sensory nerves to the medial side of the hallux (Fig. 78-37A).
• When the capsule is exposed, make a longitudinal incision along the dorsomedial aspect of the fi rst metatarsal.
• Begin the second limb of the capsulotomy 1 to 2 mm proximal to the base of the proximal phalanx and in a coronal plane at right angles to the fi rst limb of the capsulotomy (Fig. 78-37B).
• Extend the coronal incision plantarward 1 to 2 mm proximal to the junction with the tibial sesamoid (Fig. 78-37C).
• Raise the capsule, beginning medially and plantarward, by sharply dissecting it from the inside out and off the most prominent part of the medial eminence until its dorsal aspect is reached (Fig. 78-37D).
• Maintain the incision close to bone, curving over the medial eminence as the contour demands, and take a full-thickness piece of capsule from the medial eminence and proximally along the metatarsal shaft for 3 to 4 cm. This should leave the fascial attachment of the abductor hallucis in continuity with the periosteum and fascial covering of the fi rst metatarsal shaft.
• Ensure that the plantar aspect of the metatarsal head where it meets with the shaft is adequately exposed so that the plantar osteotomy cut can be made under direct vision. Remove the medial eminence.
• Using a 0.062-inch Kirschner wire and starting 1 to 1.3 cm proximal to the subchondral bone and in the center of the fi rst
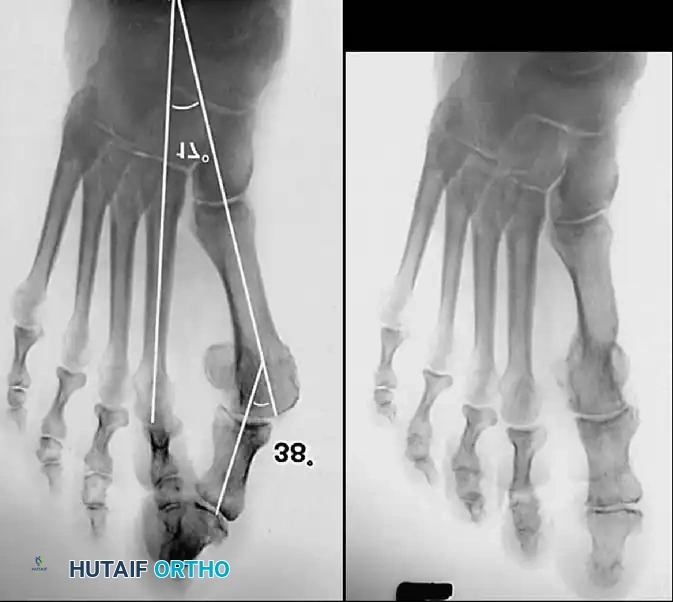
A B
C
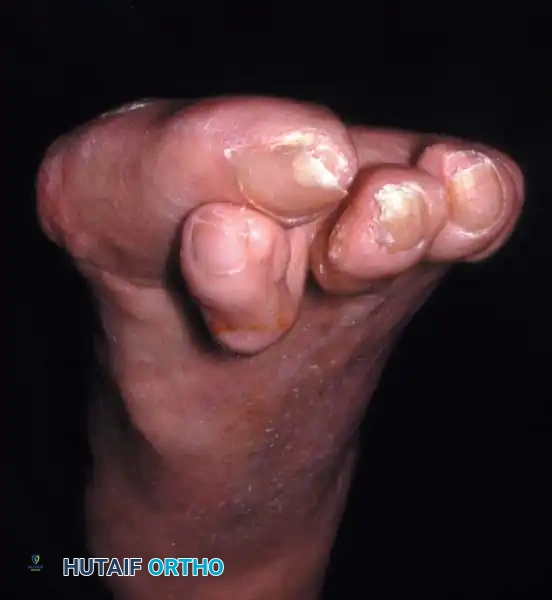
Fig. 78-36 A, This degree of deformity (left foot) is diffi cult to correct with standard chevron osteotomy when apex is at subchondral bone of capital fragment. B, Standing radiograph of left foot before correction. C, Standing radiograph 1 year after chevron osteotomy, release of adductor hallucis, Akin osteotomy, and correction of hammer toe.
metatarsal head, drill a hole from medial to lateral marking the apex of the intended osteotomy (Fig. 78-37E and F).
• Mark the limbs of the osteotomy with a sharp osteotome or a marking pen, and begin the osteotomy with the dorsal cut. Avoid pushing the saw blade in and out of the bone; slowly glide the blade across the head-neck fragment with gentle back-andforth rather than in-and-out movements.
• When there is no further resistance to the blade laterally, extract it, and return to the centering hole. Ensure that the dorsal and lateral aspects of the cortical bone have been incised.
• Begin the plantar limb of the osteotomy at a point approximately 30 degrees from the midline or 60 degrees from the original dorsal osteotomy. Make this cut slowly and deliberately at right angles to the bone, exiting plantarward 2 to 3 mm proximal to where the articular surface of the metatarsal head meets the shaft (Fig. 78-37G). A small, right-angle retractor pulling the capsule plantarward increases exposure.
• If the osteotomy cuts have been made appropriately, the capital fragment usually displaces laterally with minimal lateral pressure; if this is not the case, either the osteotomy cuts are not parallel, or the plantar cortex, dorsal cortex, or both have not been penetrated laterally.
• If gentle pressure on the head fragment does not displace it laterally while the shaft fragment is held stable, reposition the saw blade, being careful not to start the saw until the blade is in the depths of the osteotomy cut.
• When the capital fragment has been freed from the proximal fragment, shift it laterally 4 to 5 mm (Fig. 78-37H).
• Impact the head fragment on the shaft by applying gentle pressure to the hallux.
• While holding the capital fragment straight on the metatarsal shaft, internally fi x the osteotomy. Insert one or two 0.062-inch Kirschner wires obliquely across the osteotomy site (Fig. 78-37I).
• Begin inserting the fi rst wire dorsomedially and far enough proximally in the shaft to leave cortical bone between the pin and the cancellous portion of the distal-medial shaft when the overhanging ridge of bone is made fl ush with the capital fragment. Direct the wire so that it reaches the lateral aspect of the capital fragment.
• Insert the second wire into the metatarsal head at a point 3 to 4 mm plantar and parallel to the fi rst.
• Test the osteotomy for stability, and gently open the metatarsophalangeal joint by pushing the toe laterally.
• Examine the entire surface of the metatarsal head with a small Freer elevator to locate any Kirschner wire points. If the joint has been entered, retract the wire slightly so that it rests in subchondral bone. Because the entrance of the wire into subchondral bone and its exit through the cartilage of the head usually can be felt while drilling, withdrawing the wire about 2 mm usually places it in the proper position.
• Circumduct the hallux on the fi rst metatarsal head; if any catching occurs, reinspect the joint for wire points. If there is any doubt, obtain radiographs.
A B
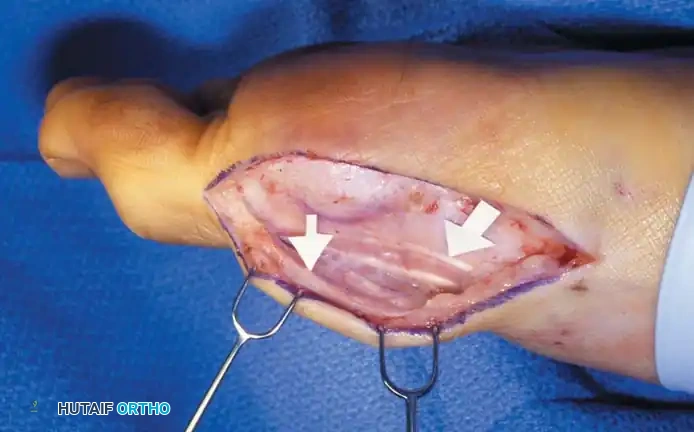
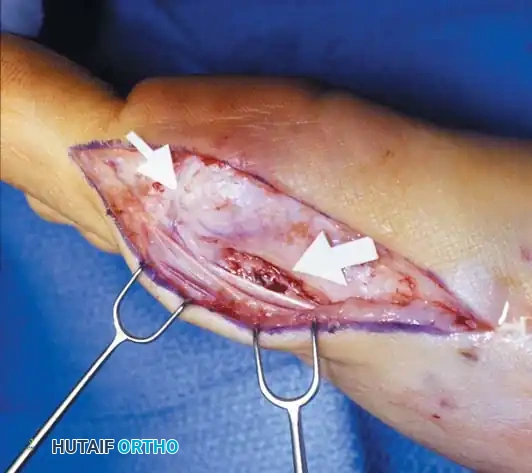
C
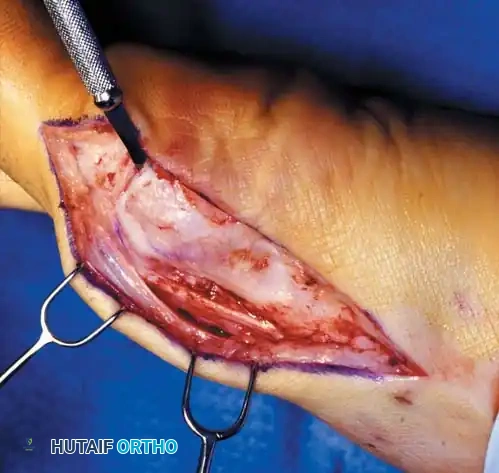
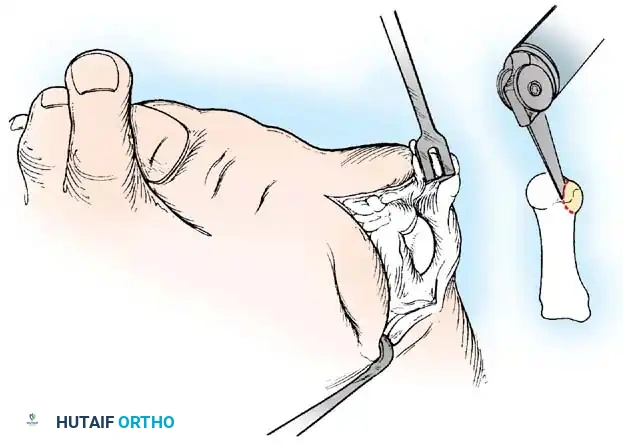
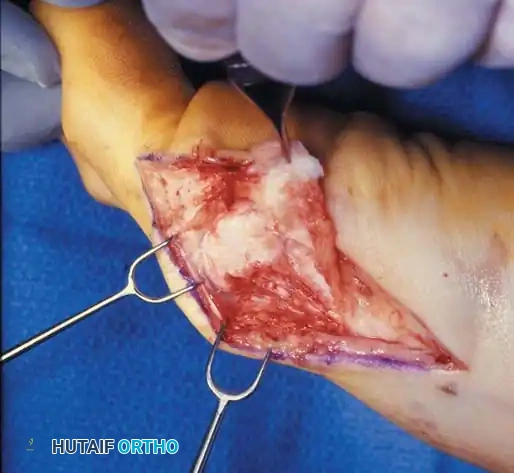
D
Fig. 78-37 A, Sensory branch of superfi cial peroneal nerve (top arrow) and accessory extensor hallucis longus (bottom arrow) . B, Inverted L –shaped capsulotomy. C, Transverse limb of L -capsulotomy. D, Refl ection of capsule.
🔪 Surgical Technique 78-5
• Incise the overhanging segment on the medial side of the proximal fragment, and with a rasp smooth it fl ush with the capital fragment (Fig. 78-37J and K).
• Place the hallux on the metatarsal head in a congruous position, which can be determined by fl exing, extending, abducting, adducting, and rotating the hallux on the fi rst metatarsal head and observing the foot from the top (Fig. 78-37L).
• While an assistant holds the toe reduced, close the capsular incision by fi rst closing its proximal part with two or three interrupted 2-0 or 3-0 absorbable sutures.
• Dorsally, pass the needle through the periosteum and deep fascia, over the metatarsal shaft, and through the accessory extensor hallucis longus tendon.
E
F
G
H
1-1.5 cm
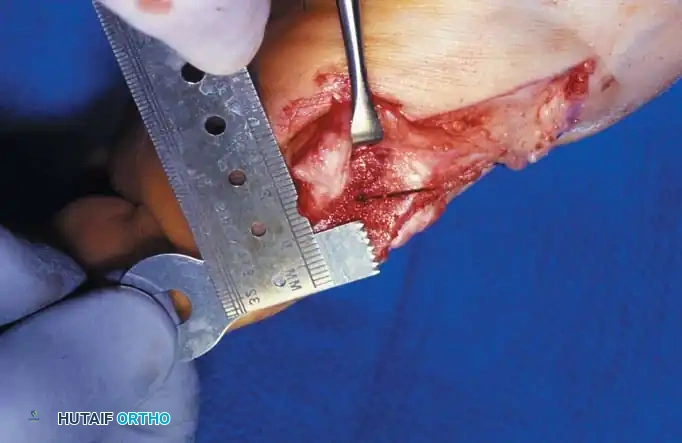
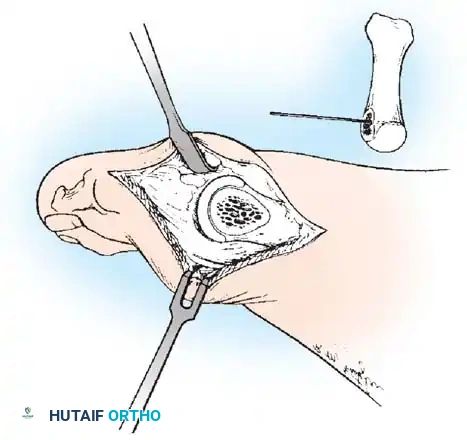
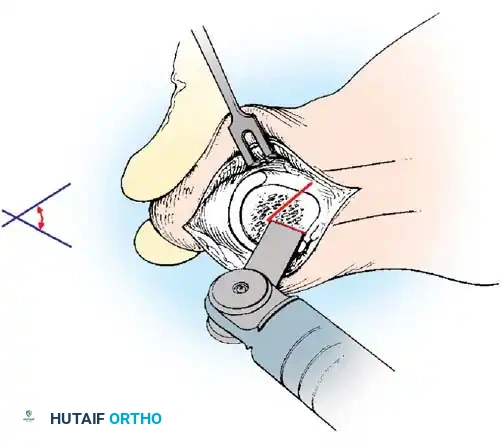
60°
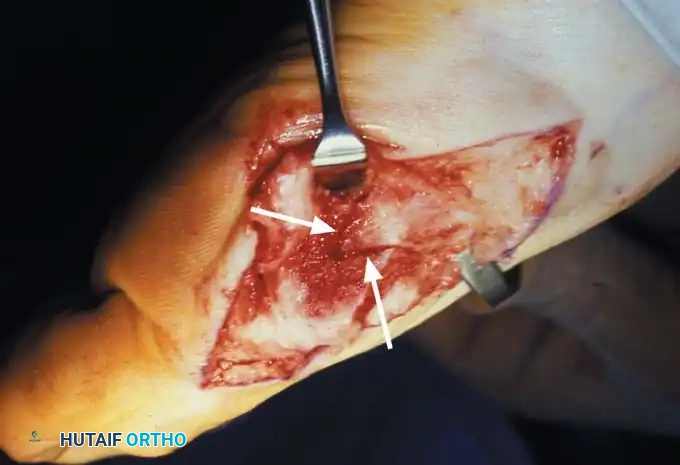
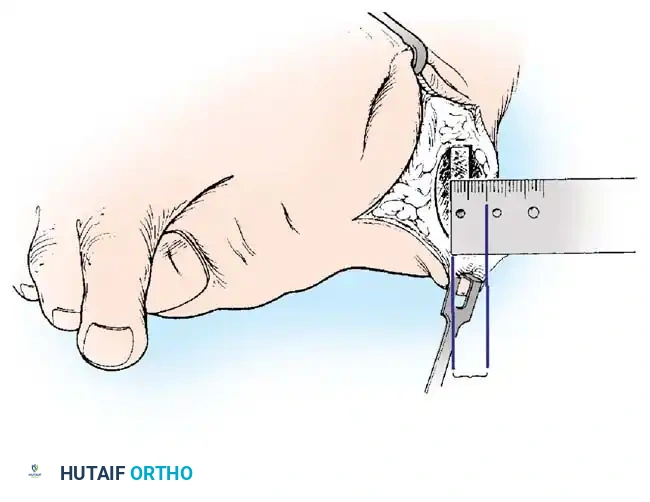
4-5 mm shift of capital fragment laterally
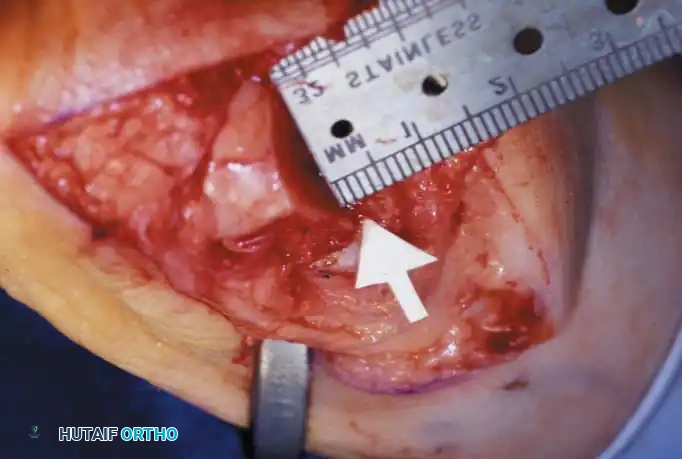
I
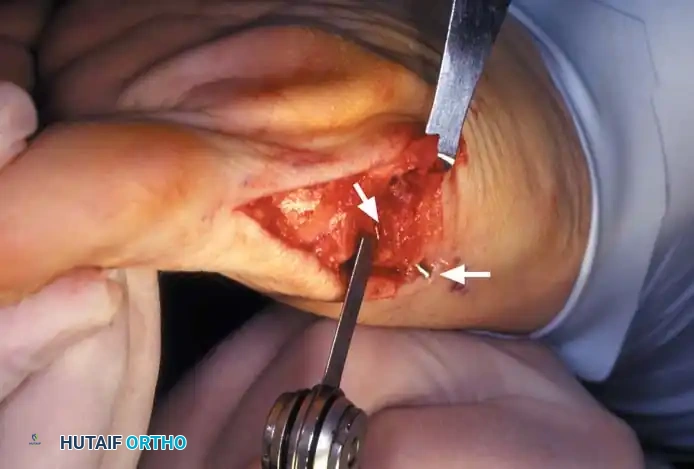
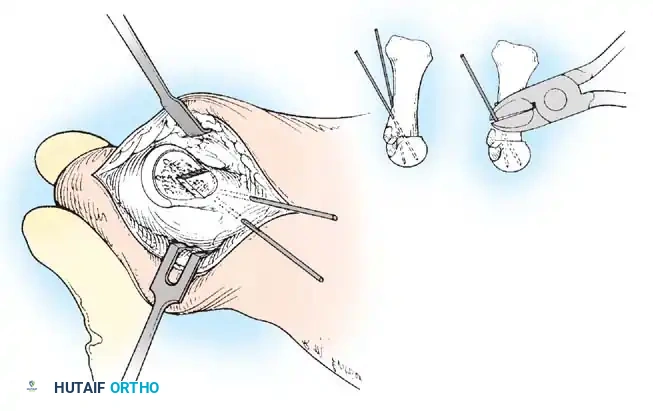
L M
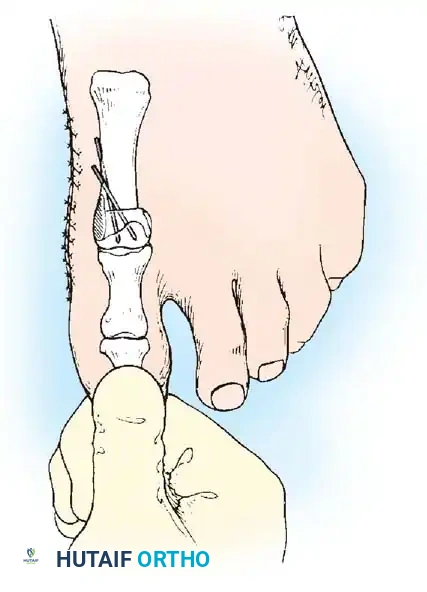
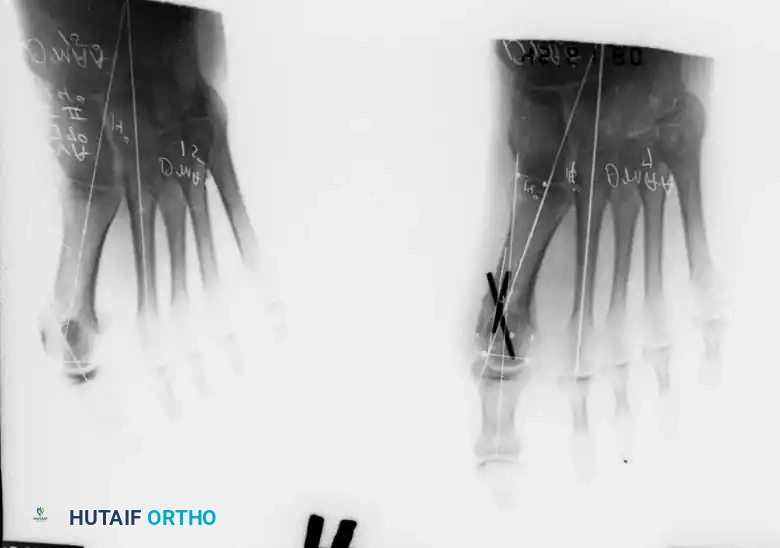
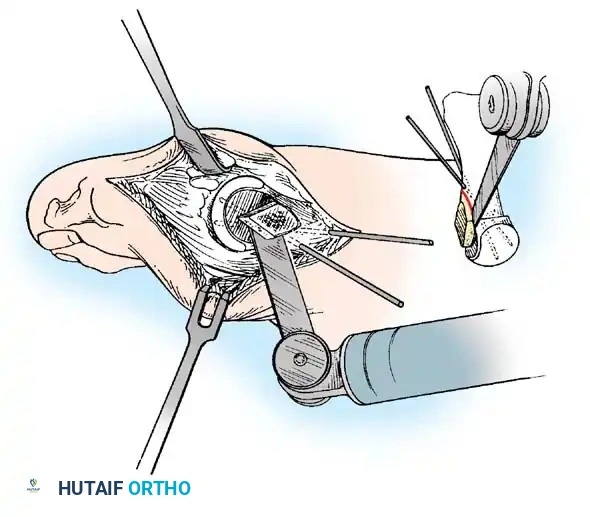
J
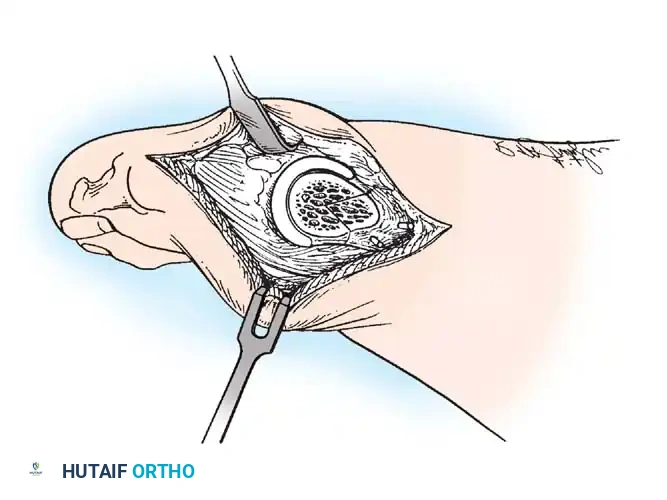
K
Fig. 78-37, cont’d I and J, Kirschner wire in place (top arrow) ; resection of overhang of proximal metatarsal (bottom arrow) . K, Completed osteotomy. L, Hallux is placed in corrected position while dressing is applied. M, Healed chevron osteotomy with Kirschner wire fi xation (absorbable pins can be used as alternative).
🔪 Surgical Technique 78-5
• Plantarward, the strong tissue is the deep, investing fascia over the abductor hallucis and the tendinous edge of this muscle; anchoring the capsular repair proximally before beginning the distal repair is important. Close the plantar-medial corner of the capsule with one or two interrupted sutures.
• The most important sutures, which hold the hallux congruously on the metatarsal head, form a pants-over-vest closure as follows. Enter the transverse limb of the capsular incision 2 to 3 mm plantar to the apex of the incision from the outside in; turn the needle 180 degrees, and reenter the corner of the capsule from the outside in. Reverse the needle 180 degrees, and reenter it from the inside out, still on the proximal part of the capsule. Place the fi nal pass of the stitch through the distal capsule on the dorsal side of the apex of the incision. Pull the capsule into the corner in a pants-over-vest manner, and suture it. During capsular closure, observe the dorsal aspect of the foot while an assistant externally rotates the foot slightly to judge the proper alignment of the hallux.
• To obtain more correction of the valgus deformity, carefully imbricate the transverse or coronal limb of the capsulotomy. Do not attempt to correct hallux valgus interphalangeus by pulling the hallux into a more varus position at the metatarsophalangeal joint with imbricating sutures during capsular repair because hallux varus can develop if the imbrication is too tight. In most instances, close the transverse limb by approximating the edges, unless the capsule is so redundant that it requires partial excision. Finish closing the capsule at any weak points.
• The hallux should be in neutral to 5 degrees of valgus at completion of the capsulorrhaphy. Correct any varus by removing capsular sutures one at a time and observing the position of the hallux. Begin by removing one or more transverse limb sutures. If necessary, remove all of the distal capsular repair, and start over.
• Secure hemostasis, and close the wound in layers. Apply a forefoot dressing with the hallux taped in the proper position (Fig. 78-37M).
AFTERTREATMENT The dressing and sutures are removed at 19 to 23 days, and a toe spacer is worn to hold the hallux in the proper position. A wooden-soled shoe is worn for 4 weeks, and then a deep, wide jogging shoe with a toe spacer is worn for the next 6 to 8 weeks. Usually by the third or fourth month a reasonably attractive shoe can be worn, but this varies. A short leg walking cast worn for 4 weeks after surgery is an alternative, but it is not routinely recommended except in adolescents. The Kirschner wires can be removed at 3 months or earlier if they cause symptoms, or they may be left if the patient is asymptomatic.
Johnson Modifi ed Chevron Osteotomy
Johnson, who popularized the chevron osteotomy, also modifi ed it by changing the length and position of the limbs of the osteotomy in the metatarsal head, which extended the indications for the osteotomy to severe deformities with intermetatarsal angles of 15 or 16 degrees. Also, in the modifi ed procedure, a 2.7-mm screw is used for internal fi xation. Johnson did not recommend this osteotomy for patients older than 60 years or for patients who had previous hallux valgus surgery or diminished joint mobility with crepitance.
🔪 Surgical Technique 78-6
• Make a midline, longitudinal, medial capsular incision, and expose the medial eminence.
• Expose the metatarsal head dorsally and plantarward just enough to see the dorsal and plantar limbs of the osteotomy, laterally enough to place a 2.7-mm screw. Avoid excessive stripping of the capsule.
• Using a power saw with a 9-mm blade, remove the medial eminence at an angle that is parallel to the medial border of the foot as opposed to the medial border of the cortical shaft or metatarsal.
• Begin the inferior or plantar limb of the osteotomy approximately 5 or 6 mm proximal to the medial articular surface of the fi rst metatarsal and midway between the superior and inferior margins of the metatarsal head in its center portion. This plantar extension of the osteotomy exits extracapsularly at the inferior aspect of the metatarsal head and neck junction or just proximal to that.
• The lateral portion of this osteotomy cut can be diffi cult, so ensure that it is completely through the bone before attempting to shift the metatarsal head laterally.
• Make the second limb of the osteotomy from the apex or distal extension of the fi rst osteotomy, and direct it dorsally at an approximate angle of 70 degrees to the fi rst limb of the osteotomy. Exit this limb of the osteotomy dorsally just proximal to the dorsal border of the articular surface of the head of the metatarsal (Fig. 78-38A).
• Stabilize the metatarsal shaft proximally with a manual grip or a towel clip while the capital fragment is displaced laterally 4 to 6 mm without any tilting or opening of the osteotomy site medially, laterally, superiorly, or inferiorly.
• Compress the great toe longitudinally on the head of the metatarsal shaft fragment to impact the osteotomy site.
• For insertion of a 2.7-mm screw, use a 2-mm bit to drill a hole in the dorsal surface of the distal shaft of the metatarsal just proximal to the dorsal limb of the osteotomy. Leave an approximately 3-mm ledge of bone between the drill hole and the superior arm of the osteotomy.
AFTERTREATMENT The patient is allowed partial weight bearing with crutches for the fi rst 3 to 4 days, then the dressing is changed, and a short leg walking cast is applied. The cast, which should extend distal to the great toe for gentle support, is primarily for comfort and patient mobility, allowing ambulation without crutches or a walker. It is removed approximately 1 week later, and gentle exercises of the great toe are begun. A hallux valgus night splint is applied to protect the medial capsular repair, and a stiffsoled postoperative shoe is worn for approximately 3 weeks; after this a deep, wide, soft shoe can be worn.
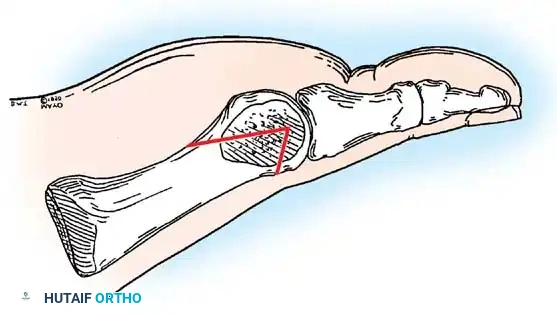
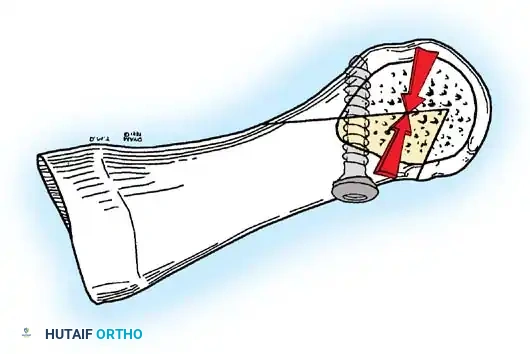
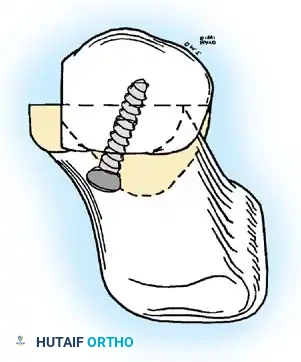
A B C
Fig. 78-38 A, Angle and confi guration of modifi ed chevron osteotomy with short dorsal arm and long plantar arm. B, Sagittal view showing screw placement with 10to 15-degree dorsalproximal to plantar-distal angle. C, Coronal view showing dorsal-medial to plantar-lateral screw angulation. (From Donnelly RE, Saltzman CL, Kile T, et al: Modifi ed chevron osteotomy for hallux valgus, Foot Ankle 15:642, 1994. By permission of Mayo Foundation.)
🔪 Surgical Technique 78-6
• Direct the drill bit from proximal to distal at about a 10-degree angle and about 10 to 15 degrees lateralward to place the screw in the substance of the transposed capital fragment (Fig. 78-38B and C).
• Pass the 2-mm drill bit through the dorsal cortex of the distal shaft of the metatarsal and then through the cancellous bone of the capital fragment into subchondral bone of the fragment.
• Ream the proximal aspect of the hole with a 2.7-mm drill bit to create a lag effect at the osteotomy, then measure the screw length (usually 16 to 18 mm) with a depth gauge.
• Tap the drill hole with a 2.7-mm tap. Insert the 2.7-mm screw, and tighten it to close the osteotomy. Do not allow the screw to exit through the articular surface of the metatarsal head because it may impair sesamoid glide.
• Using a power saw, contour the overhang of the medial aspect of the distal metatarsal that resulted from lateral shift of the capital fragment with the medial aspect of the fi rst metatarsal shaft. Do not skive laterally into the center of the shaft of the metatarsal. Use a small rongeur to smooth the dorsomedial aspect of the metatarsal head.
• Overlap the capsule while holding the hallux in neutral fl exion and extension and about 10 degrees of varus, and excise any excess capsule (usually 3 to 5 mm). Close the capsule with multiple 2-0 or 3-0 nonabsorbable sutures.
• After completing the capsular closure, the hallux should rest in a straight position with the medial aspect of the proximal phalanx resting against the medial aspect of the displaced capital fragment.
• Apply the dressing in such a way as to hold the hallux in proper position and to take some of the pressure off the medial capsular repair (see Fig. 78-37).
Chevron-Akin Double Osteotomy
Mitchell and Baxter described a combination of the chevron and Akin osteotomies to gain greater correction of mildto-moderate hallux valgus deformities. They reported satisfactory results in 95% of 24 feet in 16 patients using this combined procedure. They cautioned, however, that this procedure should not be used in feet that have advanced sesamoid subluxation with wide intermetatarsal angles.
🔪 Surgical Technique 78-7
• Make a longitudinal medial skin and capsular incision to expose both osteotomies, and make the distal metatarsal osteotomy fi rst (Fig. 78-39A).
• Perform the chevron osteotomy as described in Technique 784 except place a single 0.045-inch smooth pin percutaneously dorsal to plantar and in a slightly more proximal position to secure the distal metatarsal osteotomy (Fig. 78-39B and C).
• The lateral displacement of the metatarsal head is approximately 3 mm. at 2 weeks after surgery. At 4 weeks, the wearing of shoes is gradually resumed.
Osteotomy of the Proximal First Metatarsal
If varus of the fi rst metatarsal, whether primary or secondary, contributes to the hallux valgus complex, correction near the origin of the deformity is reasonable, combined with a soft-tissue procedure at the fi rst metatarsophalangeal joint to correct the valgus of the hallux. In addition, a few degrees’ shift of the metatarsal at its base causes marked improvement at the distal end of the metatarsal; the forefoot is narrowed, and the chance of pressure symptoms over the former bunion is reduced. A patient without signifi cant degenerative arthritis in the fi rst metatarsophalangeal joint and with hallux valgus of more than 35 degrees and an intermetatarsal angle of more than 10 degrees (or a fi rst to fi fth intermetatarsal angle of ≥ 30 degrees with a hallux valgus of ≥ 35 degrees) may benefi t from a proximal metatarsal osteotomy and a distal soft-tissue procedure at the metatarsophalangeal joint. Deformities with intermetatarsal angles of 13 degrees or less and hallux valgus angles of 30 degrees or less can be corrected by a less technically demanding procedure.
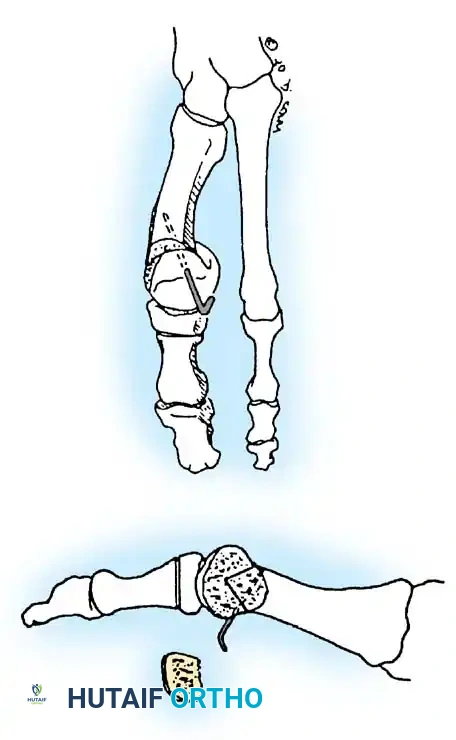
D
E
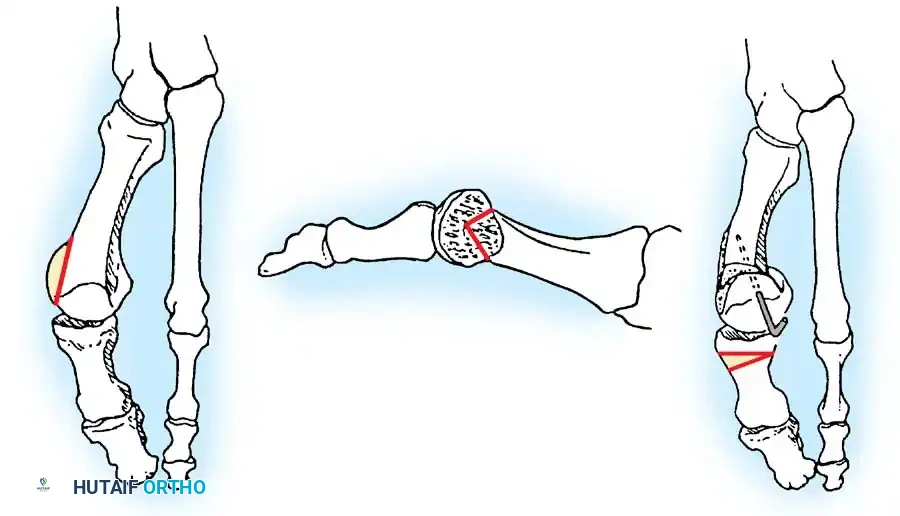
A C
B
Fig. 78-39 A, Resection of medial eminence parallel to medial border of foot. B, Chevron osteotomy cut is made, and metatarsal head is shifted laterally 2.5 to 3 mm. C, Osteotomy is fi xed with 0.045-inch smooth pin, and protruding medial border of metatarsal is osteotomized fl ush with metatarsal head. D, Akin cut parallels concavity at base of proximal phalanx, and 1-mm wedge of bone is removed. E, Suture closure of Akin osteotomy corrects residual valgus of hallux. (From Mitchell LA, Baxter DE: A chevron-Akin double osteotomy for correction of hallux valgus, Foot Ankle 12:7, 1991.)
• Do not perform an adductor tenotomy.
• Expose the proximal phalanx subperiosteally, and perform a phalangeal closing wedge osteotomy as described in Technique 78-13. Direct the cut away from the articular surface so as to parallel the concavity of the base of the proximal phalanx, and remove a 1-mm wedge of bone (Fig. 78-39D). Do not attempt to remove the contiguous lip of the proximal phalanx.
• Place a 3-0 polyglactin 910 (Vicryl) suture from the periosteum on the distal side of the cut through the proximal undisturbed capsular tissues to maintain the osteotomy closure (Fig. 78-39E).
• Carefully imbricate the capsular incision with absorbable sutures to hold the toe in the corrected position.
• Close the skin with interrupted silk sutures, and apply a bulky compressive dressing.
AFTERTREATMENT Ambulation is allowed in a postoperative sandal the day of surgery as tolerated by the patient. The gauze wrap dressing is changed weekly for 2 weeks. The pin is removed, and an elastic bandage is used to hold the corrected toe position. Passive and active plantar fl exion and dorsifl exion exercises of the great toe are encouraged
An osteotomy at the base of the metatarsal has the following advantages:
- Cancellous bone and broad contact surfaces of the fragments promote early stability (3 to 5 weeks) and union (6 to 8 weeks). 2. Small changes in position at the osteotomy produce excellent correction at the distal end of the metatarsal where the symptoms are located. 3. The metatarsal is shortened minimally, if at all, unless the surgeon chooses a technique that intentionally shortens it (the width of the osteotomy cut itself is more than compensated for by the “straightening of the bone”). 4. Large angles between the fi rst and second metatarsals can be corrected. 5. Slightly tilting the distal fragment plantarward reduces load bearing by the second metatarsal, decreasing the chance of transfer metatarsalgia. 6. Narrowing of the forefoot improves the variety of footwear possible and gives an excellent cosmetic result.
This type of osteotomy has the following disadvantages:
-
Extensive soft-tissue dissection is required. 2. The distal fragment tends to displace dorsally or migrate medially to its original position unless securely fi xed internally. 3. The second ray may be overloaded if the fragment displaces or migrates. 4. Three incisions are required if the basilar osteotomy is performed dorsally. 5. The procedure is more diffi cult to perform with regional block anesthesia.
-
The immediate convalescence usually is characterized by more pain, swelling, and immobility than the convalescence that follows a distally placed osteotomy. 7. Cast immobilization is more frequently needed.
Currently, the most frequently used proximal metatarsal osteotomies are the crescentic, chevron, Ludloff, and scarf osteotomies (Fig. 78-40). The specifi c technique of a proximal osteotomy probably is not as important as is meticulous attention to detail. Any proximal osteotomy that allows the fi rst metatarsal to deviate laterally and remain stable in that position with no dorsal tilt to the distal fragment should accomplish the goal of narrowing the intermetatarsal angle. Overcorrection of this angle is possible, but this should not occur with careful attention to detail.
Proximal Crescentic Osteotomy with a Distal Soft-Tissue Procedure Mann, Rudicel, and Graves popularized the proximal crescentic osteotomy with a distal soft-tissue repair and documented their results in 109 feet. Of their patients, 93% had satisfactory results; only 7% were dissatisfi ed and continued to have pain or recurrence of the deformity. Although 28% of the feet had slight dorsifl exion of the fi rst metatarsal on weight bearing lateral radiographs, no new symptomatic callosities beneath the second metatarsal heads were noted. Thirty of 48 feet that had symptomatic callus before surgery had complete resolution afterward; 13 remained unchanged, but were no longer painful; only fi ve remained painful. Mann et al. concluded that slight dorsifl exion malunion does not lead to symptomatic overload of the metatarsal head with callus formation. Veri et al. reported that, at
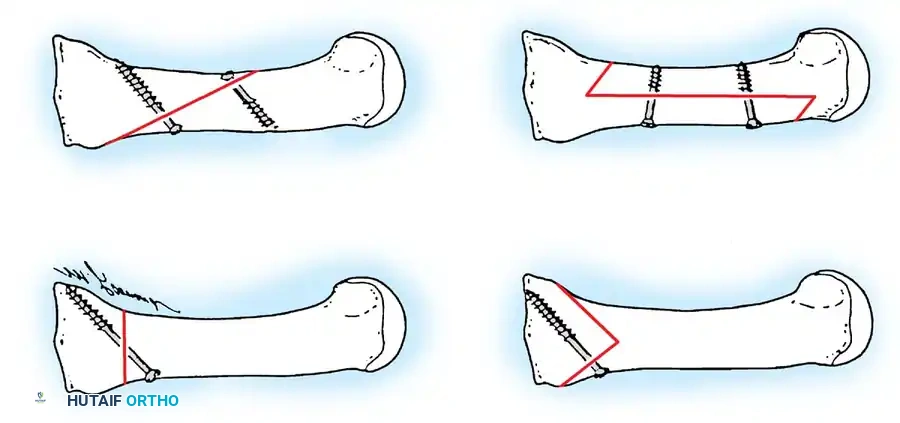
A B
C D
Fig. 78-40 Four commonly used metatarsal shaft osteotomies. A, Proximal crescentic osteotomy. B, Proximal chevron osteotomy. C, Ludloff osteotomy. D, Scarf osteotomy. (From Trnka HG, Parks BG, Ivanic G, et al: Six fi rst metatarsal shaft osteotomies: mechanical and immobilization comparisons, Clin Orthop Relat Res 381:256, 2000.)
12-year follow-up, 94% of 31 patients (37 feet) treated with proximal crescentic osteotomy and distal soft-tissue reconstruction for moderate-to-severe hallux valgus deformities stated that they would have the surgery again. These authors noted that it is essential to avoid undercorrection, which can lead to recurrence, and overcorrection, which can cause symptomatic hallux varus. Although this procedure is technically demanding, it corrects intermetatarsal angles of 20 to 25 degrees and hallux valgus angles of 40 to 50 degrees. For patients with mild-to-moderate deformity, however, a simpler procedure may provide similar good results. Mann and Coughlin and Mann and Pfeffi nger over a 10-year period studied numerous patients who had distal soft-tissue procedures for hallux valgus (DuVries modifi cation of McBride technique), and they concluded that in moderate-to-severe bunion deformities, a soft-tissue procedure, even with removal of the fi bular sesamoid, would not consistently correct moderateto-severe deformities, especially when the intermetatarsal angle is more than 13 to 15 degrees. Thordarson and Leventen also recommended this procedure for correction of complex bunion deformities with large intermetatarsal and hallux valgus angles. Veri et al. reported that correction of moderate-to-severe hallux valgus deformities in almost 90% of their 25 patients (35 feet) was maintained at long-term follow-up of 12 years. The mean hallux valgus angle correction was 24 degrees, and the mean intermetatarsal angle correction was 10 degrees; 94% of patients said they would have the operation again. Complications included two patients (5%) who were overcorrected into varus and four patients (11%) who were undercorrected and developed asymptomatic recurrences. Mann et al. suggested that 85% of hallux valgus deformities that require a distal soft-tissue procedure also require a proximal osteotomy. They did not recommend the procedure if excessive valgus posturing ( > 15 degrees) of the distal metatarsal articular angle is present on the weight bearing radiograph or in patients with moderate-to-severe degenerative arthritic changes of the metatarsophalangeal joint. The decision to perform an osteotomy should be made at the time of surgery by passively reducing the intermetatarsal angle. If the fi rst metatarsal does not move laterally, or if it springs back quickly into varus after the laterally directed pressure is released, according to Mann, a basilar osteotomy should be done.
🔪 Surgical Technique 78-8
• This procedure is performed through three incisions. The fi rst incision is made dorsally in the intermetatarsal space to release the adductor hallucis, the deep transverse intermetatarsal ligament, and the lateral capsule of the fi rst metatarsophalangeal joint. The second incision is made midline-medial over the medial eminence to remove the medial eminence and perform a capsulorrhaphy. The third incision is made dorsally over the proximal end of the fi rst metatarsal and extends a few millimeters over the medial cuneiform.
• Make the fi rst incision in the fi rst intermetatarsal space beginning at the proximal end of the web space and extending proximally 3 to 4 cm.
• Dissect the soft tissue with scissors to identify the branches of the deep peroneal nerve, and be sure to protect them.
• Place a Weitlaner retractor in the fi rst intermetatarsal space, and widen this space to expose the adductor hallucis.
• Use a sponge to clear away the soft tissue in the fi rst web space.
• The adductor hallucis approaches the base of the proximal phalanx in an oblique direction. When it has been identifi ed, release it completely from the base of the proximal phalanx and from the lateral edge of the fi bular sesamoid (Fig. 78-41A).
• Release the deep transverse intermetatarsal ligament that is plantar to this tendon (Fig. 78-41B). Because the neurovascular bundle to the fi rst web space is immediately plantar to the transverse intermetatarsal ligament, use just the tip of the blade to release this. Placing a small Freer elevator on the plantar surface of this ligament helps avoid the neurovascular bundle as the incision is made.
• Make multiple small stab wounds in the lateral capsule.
• Complete the capsular release by manually forcing the hallux into 25 to 30 degrees of varus and pushing the fi rst metatarsal lateralward.
• When the lateral release has been completed, release the deep transverse intermetatarsal ligament that attaches to the fi bular sesamoid. Releasing the deep transverse intermetatarsal ligament prevents its deforming force on the fi bulosesamoid from pulling the sesamoid apparatus laterally from under the metatarsal head.
• Push the fi rst metatarsal head laterally. If it tends to rest in that position, an osteotomy is not necessary; however, if it springs back to the varus position, an osteotomy should be performed (Fig. 78-41C).
• Return to the adductor hallucis, which is completely freed, and lift it up into the wound from the bottom of the foot.
• Pass three absorbable 2-0 sutures fi rst through the lateral capsule on the fi rst metatarsal head just proximal to the lateral capsular release. Make the second throw of the suture through the adductor hallucis tendon and the third throw through the capsuloligamentous intrinsic tendinous tissue on the medial side of the second metatarsal head. Do not tie these sutures, but hold them with hemostats, and allow them to fall into the fi rst web space.
• Make a second midline incision (Fig. 78-41D), avoiding the dorsal sensory branch of the superfi cial peroneal nerve dorsalward and the proper branch of the medial plantar nerve to
Adductor hallucis
A
C
Flexor hallucis brevis
Transverse metatarsal ligament
Flexor hallucis brevis
Abductor hallucis
Joint capsule
Transverse metatarsal ligament
Adductor hallucis
B
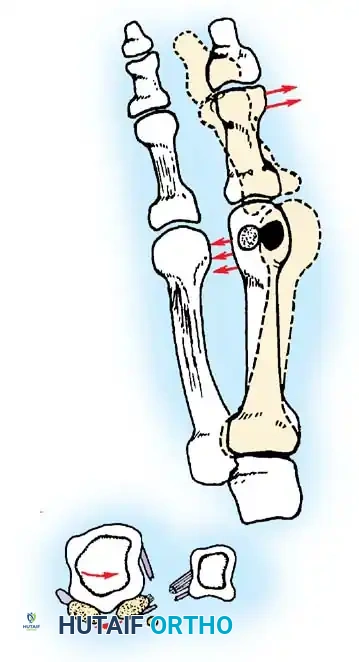
Joint capsule
Transverse metatarsal ligament
Adductor hallucis Sesamoids
D D
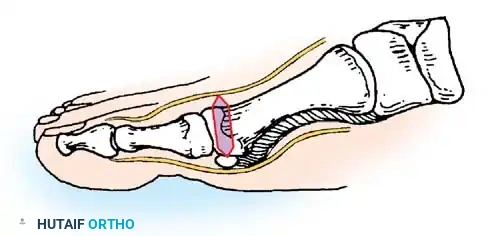
Dorsal digital nerve
Plantar digital nerve Tibial sesamoid
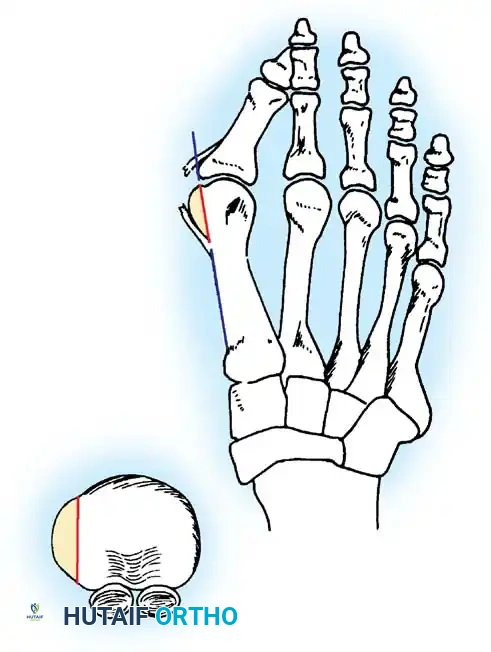
Sagittal sulcus
Exostectomy
Fig. 78-41 A, Adductor tendon released from insertion into lateral aspect of fi bular sesamoid and base of proximal phalanx. B, Transverse metatarsal ligament has been transected. Inset shows that at this point, contracted lateral joint capsule, adductor hallucis, and transverse intermetatarsal ligament have been released. C, If metatarsal head springs back medially when pushed laterally, osteotomy should be considered. D, Medial capsular incision, beginning 2 to 3 mm proximal to base of proximal phalanx. Second incision is made 3 to 8 mm more proximal, removing fl ap of tissue. Size of fl ap is determined by severity of deformity. Wedge of tissue approximately 6 mm is removed. Capsular cut is V -shaped through abductor hallucis tendon with apex at tibial sesamoid. Medial eminence is exposed by making incision along dorsomedial aspect of capsule and peeling it off medial eminence with sharp dissection. E, Removal of medial eminence is done on line projected along medial aspect of the fi rst metatarsal shaft, and exostectomy should be done 1 to 2 mm medial to sagittal sulcus.

F G
H I
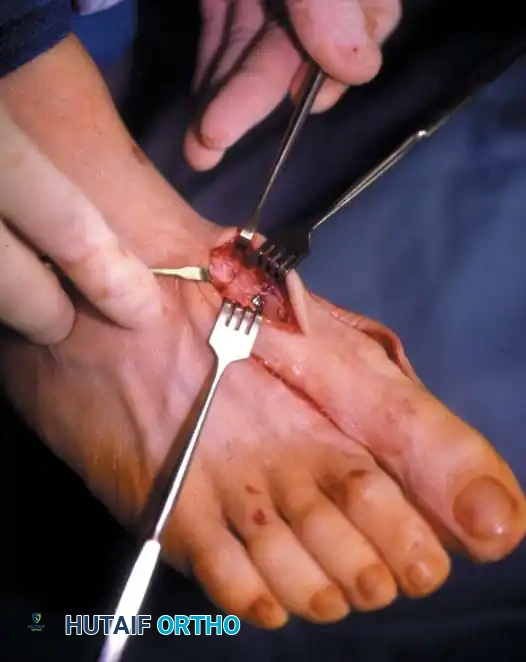
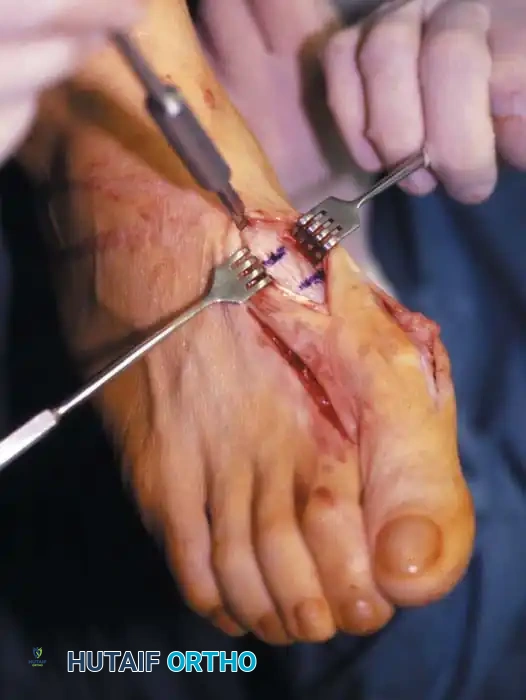
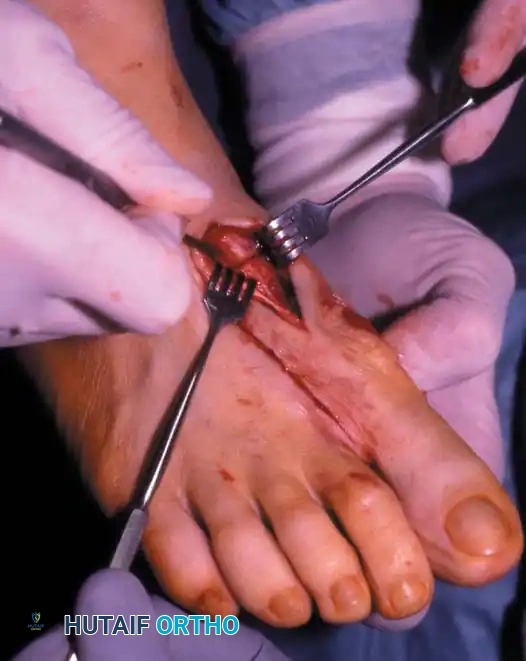
Fig. 78-41, cont’d F, Knife blade is in metatarsocuneiform joint, and two lines marked on metatarsal represent osteotomy site (proximal line) and location of screw for fi xation (distal line) . G, Final position of screw and position of metatarsal after correction of fi rst metatarsal. H, Note Freer elevator is displacing or rotating proximal fragment medially, whereas fi rst metatarsal head and distal fragment are being angulated laterally by manual pressure. I, Postoperative dressings after correction of hallux valgus. Metatarsal heads are fi rmly bound together, and great toe is rotated to keep sesamoids aligned beneath metatarsal head. Right toe should be dressed in counterclockwise direction and left toe in clockwise direction when standing at foot of bed. ( A-D from Mann RA, Coughlin MJ: The video textbook of foot and ankle surgery , St Louis, 1991, Medical Video Productions; E and I from Mann RA, Coughlin MJ, eds: Surgery of the foot and ankle , 6th ed, St Louis, 1993, Mosby.)
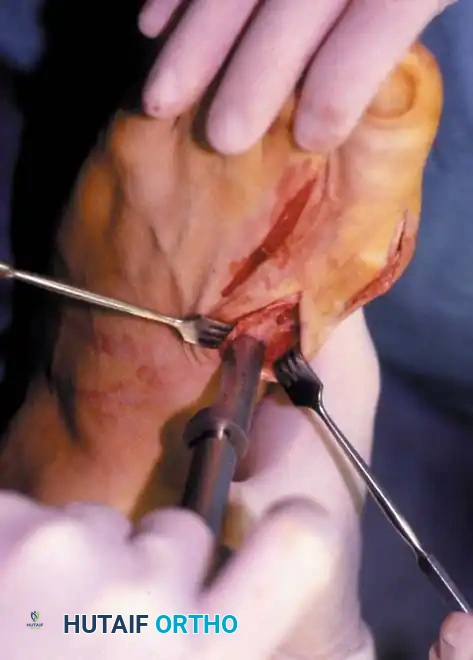
TECHNIQUE 78-8 Mann and Coughlin—cont’d
the medial side of the hallux plantarward. Continue this incision down to the capsule, and raise the dorsal fl ap deep to the dorsal sensory nerve.
• Raise the plantar fl ap on the capsule until the plantar aspect of the abductor hallucis muscle is reached, which is just a few millimeters from the tibial sesamoid. This is best done with the hallux in about 30 degrees of fl exion, which relaxes the digital nerve just plantar to the dissection.
• Make a vertical incision in the capsule 2 to 3 mm proximal to the base of the proximal phalanx extending from a few millimeters medial to the extensor hallucis longus tendon in a plantar direction through the medial capsule and through the thickened portion of the capsule plantarward, which is actually the abductor hallucis tendon capsule junction. This vertical limb ends 2 mm medial to the tibial sesamoid. The most inferior portion of this vertical limb is best made from plantar to dorsal to avoid the digital nerve.
• Depending on the enlargement of the medial eminence and the subsequent redundancy and stretching of the medial capsule, remove an elliptical wedge of capsule, measuring 4 to 8 mm wide at its widest section. Dorsally and plantarward, taper this incision into a V shape, and excise the elliptical wedge of capsule.
• Extend the capsular incision proximally, beginning at the dorsal edge of the vertical limb. This limb of the incision (an inverted L ) should end 2 to 3 mm proximal to the junction of the medial eminence with the metatarsal shaft.
• Raise this capsular fl ap from dorsal distal to plantar proximal to expose the entire medial eminence.
• Remove the medial eminence. Do this in a plane parallel to the shaft of the fi rst metatarsal, and begin just medial to the sagittal groove (Fig. 78-41E).
• Begin a third incision on the dorsal aspect of the proximal third of the metatarsal. Extend this incision proximally over the dorsal surface of the medial cuneiform. Avoid the superfi cial peroneal nerve sensory branch to the hallux. Retract or ligate the dorsal venous arch.
• Identify the metatarsocuneiform joint, and incise the periosteum of the fi rst metatarsal and medial cuneiform longitudinally medial to the extensor hallucis longus tendon.
• Score the dorsal aspect of the metatarsal transversely at 1and 2-cm levels distal to the metatarsocuneiform articulation. The fi rst scored mark represents the osteotomy site, and the second represents the area for placement of the screw for internal fi xation of the osteotomy (Fig. 78-41F).
• Release the soft tissue dorsally, medially, and laterally, being careful to avoid the penetrating branch of the dorsalis pedis artery in the proximal part of the fi rst intermetatarsal space.
• If a screw is to be used for fi xation, make a glide hole. This is much easier to do at this point than when the metatarsal becomes less stable after the osteotomy.
• Drill a 3.5-mm hole 1 cm distal to the osteotomy site in the center of the metatarsal shaft, and direct it proximally 45 degrees to the metatarsal shaft, penetrating only the dorsal cortex.
• Use a countersink to enlarge the entrance hole. It is important to enlarge this at its most distal extension rather than at the proximal edge of the drill hole because it gives the screw head a place to sit and does not permit it to rise dorsally, which might crack the cortical bridge into the osteotomy site as the screw is tightened.
• If a 5 / 16 -inch smooth Steinmann pin is to be placed in an oblique direction from distal medial to proximal lateral, drill the hole in the medial aspect of the metatarsal before the osteotomy.
• Using a 1 / 16 -inch drill bit, drill a hole in the medial aspect of the metatarsal in an oblique direction, crossing the osteotomy site.
• After the osteotomy is complete, and the intermetatarsal angle has been corrected, the pin is placed through the drill hole into the proximal fragment and into the tarsus if necessary (Fig. 78-41G).
• Using an oscillating saw with a crescent-shaped saw blade (Fig. 78-42) placed convex distally, begin the osteotomy on the most proximal scored mark.
Fig. 78-42 Curved saw blade is held fi rmly with one hand and stabilized with opposite hand.
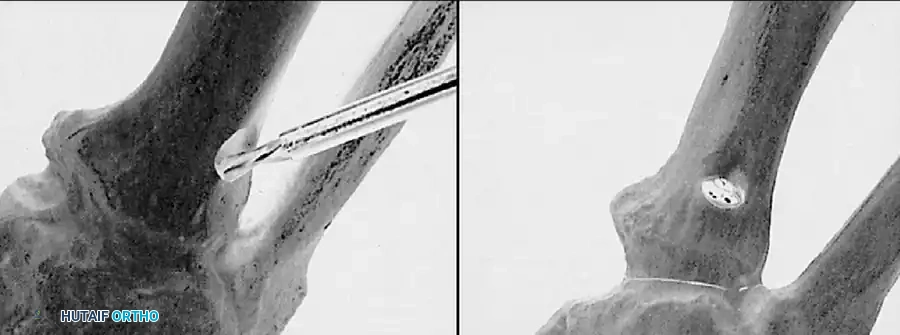
A B
Fig. 78-43 Screw hole preparation. A, Notch is made for passage of screw head. Drilling should begin near surface of bone, not in depths of notch. B, Screw head sits in untapered end of notch after passing through it. Joint or fusion surfaces remain well reduced. (From Manoli A, Hansen S: Screw hole preparation in foot surgery, Foot Ankle 11:105, 1990.)
• The initial cut should just be a deeper scoring. Place the saw blade gently into the fi rst metatarsal base without oscillation or manual turning of the blade.
• When this superfi cial scoring has been performed with the crescentic blade, evaluate the angle of the osteotomy carefully. It should not be perpendicular to the fi rst metatarsal shaft, and it should not be perpendicular to the sole of the foot, but should bisect that angle.
• Drop the handle of the saw 10 to 15 degrees proximally to direct the osteotomy correctly.
• When the dorsal cortex has been scored, complete the osteotomy by gently rocking the blade medially and laterally. Mann emphasized that the lateral aspect of the blade must exit the lateral side of the metatarsal shaft. It is not as important that the blade exit the medial side because a small osteotome can be used to complete that part of the osteotomy.
• When the osteotomy is completed, use a Freer elevator to ensure that there are no periosteal attachments medially or laterally that would prevent displacement of the osteotomy (see Fig. 78-41H)
• The following steps are crucial:
• Displace the proximal fragment medially, and hold with a Freer elevator or some other instrument.
• While holding the proximal fragment medially displaced, rotate the distal fragment around the osteotomy site (usually 2 to 4 mm of lateral displacement or rotation of the distal fragment).
• Do not let the distal fragment slide dorsally or plantarward.
• Have an assistant complete the drilling, tapping, and placing of the screw while the surgeon holds the osteotomy in the corrected position.
• With the osteotomy held reduced, enter the initial hole with a centering device, sometimes referred to as a “golf tee” or
“mushroom,” which guides the 2or 2.5-mm drill bit into the basilar fragment.
• Use a 4-mm tap, and insert a 4-mm fully threaded cancellous screw (usually 26 mm long).
• Be careful on the last few turns of the screw that the head of the screw does not rise dorsally on the cortex because this would fracture the intervening cortical bridge. If this appears to be happening, remove the screw, and countersink deeper so that part of the head of the screw would rest just plantar to the cortex.
• According to Mann, making the osteotomy convex distally should prevent overcorrection of the intermetatarsal angle.
• A useful technical tip is to use the countersink in the drill hole before placing the screw. This gently removes bone from the distal part of the screw hole, allowing the screw to sit fi rmly in the metatarsal (Fig. 78-43A). If this is not done, as the screw is placed the screw head abuts this bone distally, and the screw displaces dorsally. This causes the fragile dorsal lip of bone between the screw hole and the osteotomy to break and lose the ability to achieve stable fi xation with a screw. Because the screw is placed at an angle to the cortex, a true countersinking is not actually done, but a pathway for the screw head to travel is created (Fig. 78-43B). Manoli and Hansen suggested using a small burr for this purpose.
• After completing screw or pin fi xation of the osteotomy, return to the dorsal wound in the fi rst intermetatarsal space, and tie the three sutures to bind the adductor hallucis and the fi rst and second metatarsal heads together. The fi rst ray should rest in a corrected position.
• Close the medial capsule to hold it in place. Excise only capsular overlap. Mann emphasized the importance of passing the sutures through the abductor hallucis tendon and capsule toward the plantar aspect of the vertical limb of the
🔪 Surgical Technique 78-8
capsulotomy. Place the hallux in about 5 degrees of varus while the sutures are tied. It is unnecessary to close the dorsal proximal limb of the inverted L –shaped capsulotomy.
• Apply a bulky compression dressing, and remove the tourniquet (see Fig. 78-41I).
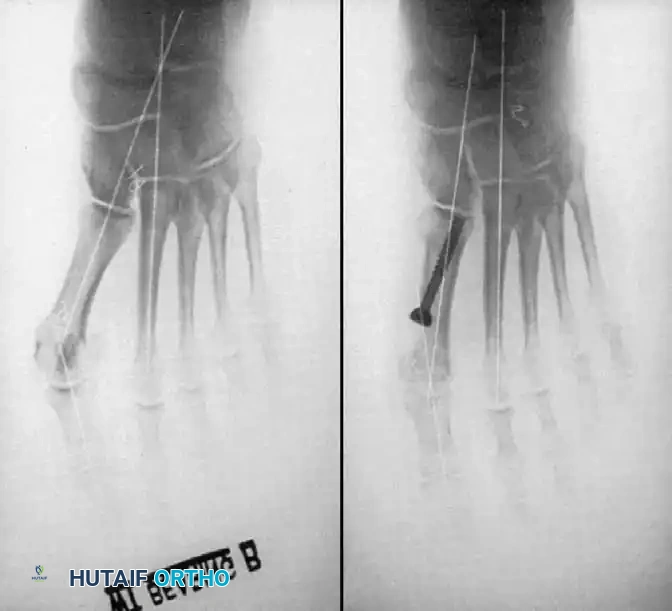
A B
AFTERTREATMENT The bulky compression dressing holding the hallux in a corrected position is changed the following day and at weekly intervals for 6 to 8 weeks, holding the hallux in the corrected position. Weight bearing to tolerance is allowed the day of surgery. The patient usually prefers to walk on the lateral border of the foot or to use crutches for a few days. The major complications of this procedure have been hallux varus, dorsifl exion malunion of the osteotomy site with transfer metatarsalgia, and limitation of motion of the fi rst metatarsophalangeal joint; however, these complications in a large series (109 feet) reported by Mann et al. were infrequent, and 93% of patients were satisfi ed. Although hallux varus occurred in 14 of 109 feet and averaged 5.6 degrees, none of the patients complained of pain, and none had cock-up deformity or intrinsic minus hallux. Mann reported more than 250 of these procedures with only one nonunion, which was corrected with a bone graft and repeat internal fi xation. Thordarson and Leventen found a 6.2-degree angle of dorsifl exion malunion in 33 feet followed for at least 2 years. They also reported a 93% satisfaction rate.
Proximal Chevron First Metatarsal Osteotomy The proximal chevron metatarsal osteotomy has been described for correction of moderate-to-severe deformities (Fig. 78-44). The primary benefi t of this confi guration of the osteotomy is the increased stability at the osteotomy site, although it must be internally fi xed with a pin or screw. Sammarco, Brainard, and Sammarco reported the results of this procedure in 51 feet with moderate-tosevere bunion deformity with hallux valgus and metatarsus primus varus. The hallux valgus angle was reduced an average of 19 degrees, and the intermetatarsal angle was reduced an average of 7.3 degrees. Using the Maryland Foot Score Profi le, good-to-excellent results were obtained in 78%. Sharma et al., in a biomechanical analysis, determined that the average load-to-failure and stiffness of a proximal chevron osteotomy fi xed with a plantar-to-dorsal lag screw confi guration were signifi cantly greater than an osteotomy fi xed with the more conventional dorsal-to-plantar confi guration.
Fig. 78-44 A, Preoperative anteroposterior weight bearing radiograph showing hallux valgus angle of 35 degrees and intermetatarsal angle of 19 degrees. B, Postoperative anteroposterior weight bearing radiograph showing hallux valgus and intermetatarsal angles corrected to 10 degrees and 7 degrees, respectively. (From Sammarco GJ, Conti SF: Technique tips: proximal chevron metatarsal osteotomy: single incision technique, Foot Ankle 14:44, 1993.)
🔪 Surgical Technique 78-9
• After standard preparation and draping, make a 6-cm curvilinear incision beginning at the proximal phalanx medially, curving plantarward beneath the bunion, just above the sole, and continuing proximally along the medial fi rst metatarsal shaft to a point 1 cm distal to the metatarsocuneiform joint. Divide the deep tissues in line with the skin incision.
• Elevate the metatarsophalangeal capsule sharply from the medial condyle of the fi rst metatarsal, and resect redundancy from the dorsal fl ap.
• Remove the exostosis 1 mm medial to the sulcus on the distal metatarsal articular surface in line with the medial cortex of the metatarsal shaft with an oscillating microsaw.
• Release the proximal plantar capsular attachment at the metatarsal neck to mobilize the sesamoids.
• Apply longitudinal traction to the great toe while it is fl exed slightly plantarward.
• Elevate the fi rst metatarsal neck with a small bone hook, and expose the fi bular sesamoid.
• Working beneath the metatarsal head and neck, retract the lateral border of the fi bular sesamoid by pulling it medially with a skin hook.
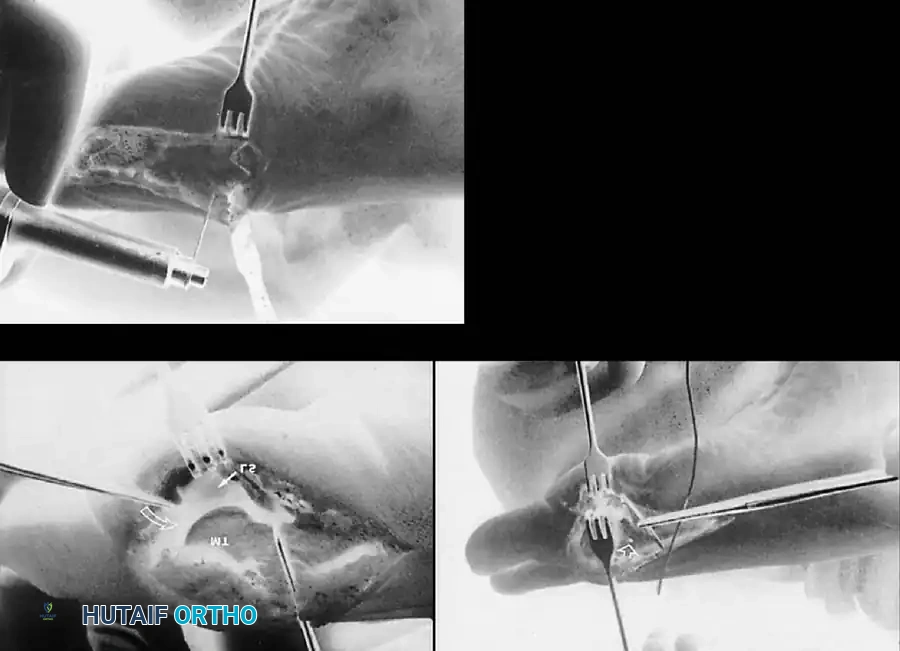
A B
C
Fig. 78-45 A, First metatarsal is retracted dorsally, and skin hook is used to pull fi bular sesamoid medially. Conjoined tendon of adductor hallucis is released along lateral border of sesamoid and proximal phalanx. Incision is extended dorsally at proximal phalanx to release lateral capsule. B, Dacron suture passed percutaneously around lateral side of second metatarsal neck. Plantar leg of suture is passed from lateral to medial through 0.062-inch transverse drill hole in fi rst metatarsal. Dorsal leg of suture is pulled beneath extensor tendons to be tied over metatarsals. C, Proximal chevron osteotomy cut. (From Sammarco GJ, Conti SF: Technique tips: proximal chevron metatarsal osteotomy: single incision technique, Foot Ankle 14:44, 1993.)
• Using sharp dissection, carefully detach the fi bular sesamoidmetatarsal ligament and the conjoined tendon of the adductor hallucis muscle from the lateral aspect of the sesamoid (Fig. 7845A). Cut the fi bers of the conjoined tendon under direct vision as they come into view.
• Medial traction on the sesamoid pulls the capsule and tendon away from the neurovascular bundle in the fi rst web space.
• Release the fi bers of the conjoined tendon longitudinally from the fi bular sesamoid-phalangeal ligament and from their attachment to the proximal phalanx.
• Do not divide the transverse metatarsal ligament.
• Extend the incision dorsally to release the lateral capsule.
• Manipulate the hallux to ensure that all tight lateral structures have been released.
• With a cutting needle, percutaneously pass a large Dacron braided polyester suture around the second metatarsal neck. The needle emerges beneath the fi rst metatarsal into the wound (Fig. 78-45B).
• Pass a curved hemostat over the fi rst and second metatarsal necks and beneath the toe extensor tendons to exit through the needle puncture wound. Grasp the free end of the suture with the hemostat, and pull it beneath the skin and tendons to emerge over the fi rst metatarsal through the wound medially.
• Using a suture passer, pass the deep leg of the suture through a 2-mm transverse hole drilled in the dorsal half of the fi rst metatarsal head-neck junction.
• Make a transverse chevron osteotomy with an angle of 45 degrees and with the apex directed distally at the diaphysealmetaphyseal junction of the fi rst metatarsal. The proximal arm of the osteotomy should end 1.5 cm from the metatarsocuneiform joint (Fig. 78-44C).
• After rotating the distal fragment of the osteotomy laterally to correct the metatarsus primus varus, hold the osteotomy in the corrected position with a guide pin, and check the position with radiographs.
• Insert a 4-mm screw (usually 34 mm in length). The screw should not cross the tarsometatarsal joint. Use a countersink to ensure that the cortex does not split when the screw is inserted. Insert the screw from the plantar aspect of the distal fragment, and direct it laterally and dorsally across the osteotomy into the proximal fragment.
• Before fi nal tightening of the screw, tie the large Dacron “lashing” suture.
• Use image intensifi cation to confi rm proper positioning of the screw. At this point, the alignment of the sesamoids is partially corrected.
🔪 Surgical Technique 78-9
• To correct the hallux valgus and reduce the sesamoids, close the medial capsule with 2-0 absorbable mattress sutures placed from dorsal distal to plantar proximal. The capsular closure holds the sesamoids beneath the fi rst metatarsal head and corrects the hallux valgus.
• Close the skin incision with a subcuticular 4-0 absorbable skin suture. Apply a compression dressing, and provide the patient with a postoperative wooden clog.
Scarf Osteotomy
The scarf osteotomy is a horizontally directed displacement Z -osteotomy made at the diaphyseal level (Fig. 78-46). In architectural and carpentry terminology, “scarf” refers to a joint made by notching, grooving, or otherwise cutting the ends of two pieces and fastening them together so that they overlap and join to form one continuous piece. This confi guration has a high level of intrinsic stability, particularly in the sagittal plane, and provides a broad surface area of bony healing. Cadaver studies by Trnka et al. and Newman et al. confi rmed that under loaded conditions the scarf osteotomy has double the stability of a distal chevron or proximal crescentic osteotomy. Jones et al. suggested that the scarf osteotomy has become popular because of its versatility: it allows lateral displacement of the plantar bone fragment to reduce the intermetatarsal angle, medial displacement of the capital fragment to correct hallux varus, plantar displacement to increase the load of the fi rst ray, and elongation or shortening of the fi rst metatarsal. The stability of the osteotomy allows early weight bearing and return to activities. The scarf osteotomy usually is combined with a lateral soft-tissue release, excision of the medial bony eminence, and medial capsulorraphy. Barouk also recommended a proximal phalangeal osteotomy. Jones et al. reported good results in 24 patients (35 feet) at an average of 20 months after scarf osteotomies combined with Akin closing wedge osteotomies for correction of hallux valgus: 50% were very satisfi ed, 42% were satisfi ed, and 8% were dissatisfi ed with their outcomes. Statistically signifi cant improvements in the intermetatarsal angle and hallux valgus angle were noted, but the change in the distal metatarsal articular angle was not signifi cant. Only one patient required further surgery. Crevoisier et al. reported similar results in 71 patients (84 feet): 39% very satisfi ed, 50% satisfi ed, and 11% dissatisfi ed; however, nine of the osteotomies required an additional procedure. Despite these and other clinical reports of good results, Coetzee reported a high rate of complications after 20 scarf osteotomies, the most common of which was “troughing” of the metatarsal with loss of height resulting in functional malunion with elevation of the fi rst ray (35%). Other complications included delayed union (5%), rotational malunion
🔪 Surgical Technique 78-10
• With the patient supine, administer general or regional anesthesia, and apply a thigh tourniquet.
• Make a 6-cm straight medial incision to expose the medial aspect of the fi rst metatarsal and metatarsophalangeal joint capsule. Incise the capsule longitudinally to expose the medial eminence and joint.
• Make a 2-cm incision between the fi rst and second metatarsals to expose the lateral joint capsule; incise the capsule longitudinally to allow the sesamoids to reduce under the metatarsal head.
• With the lateral aspect of the fi rst metatarsal exposed, make the fi rst cut of the Z -osteotomy. Make the distal cut 5 mm proximal to the articular surface of the fi rst metatarsal, from dorsal to plantar.
• Kirschner wires placed at the corner points of the planned osteotomy can help determine proper placement of the cuts. Place the proximal pin 2 cm distal to the fi rst metatarsal–medial cuneiform joint line, over the concavity of the inferior aspect of the metatarsal, and place the distal pin across the metatarsal head 5 mm proximal to the dorsal cartilage surface; ensure the wires are parallel to each other (Fig. 78-46A).
• Begin the proximal cut approximately 4 cm proximal to the distal limb of the osteotomy in the metatarsal shaft, directing it from plantar to dorsal.
• Make the longitudinal cut to connect the other two limbs (Fig. 78-46B).
• To shorten the fi rst metatarsal, increase the obliquity of the transverse limbs with respect to the longitudinal axis of the second metatarsal; to lengthen the fi rst metatarsal, decrease the obliquity, and resect the overhanging edge of bone after screw fi xation (Fig. 78-46C and D).
(30%), proximal fracture (10%), infection (5%), and early recurrence of deformity (25%). He suggested that the scarf osteotomy probably should be reserved for moderate deformities in young people with good bone quality. Other reported complications include transfer metatarsalgia, osteonecrosis of the fi rst metatarsal head, prominent screw causing irritation, screw back-out, neuralgia, and refl ex sympathetic dystrophy. Current indications for the scarf osteotomy are mild-tomoderate deformities (intermetatarsal angle of 11 to 18 degrees and hallux valgus angle 20 to 40 degrees). Barouk, Weil, and Coetzee all noted that this procedure is technically demanding, and that there is a steep learning curve. Suggested methods for preventing “troughing” include avoiding the cancellous bone with the step-cuts, using a noncompressing screw, making the long limb of the osteotomy from the fi rst metatarsal head to its base parallel to the inferior metatarsal shaft, and making the short limbs of the osteotomy 45 degrees to the long limb.
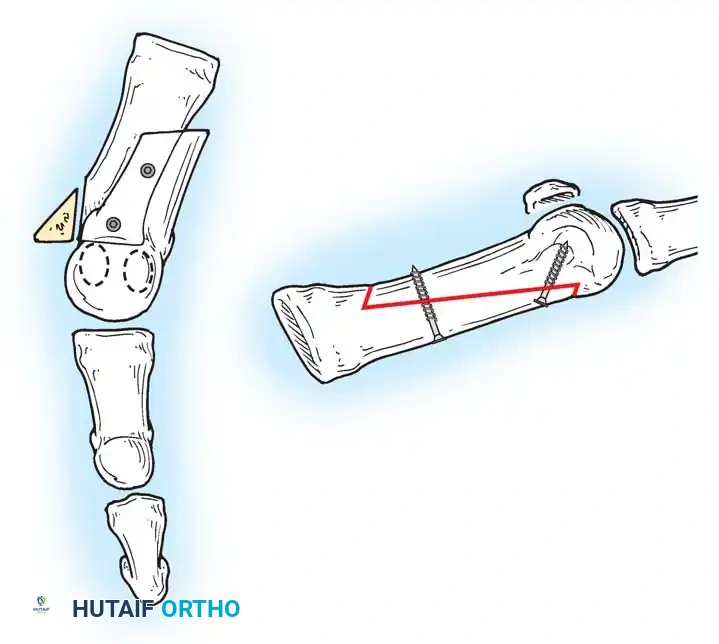
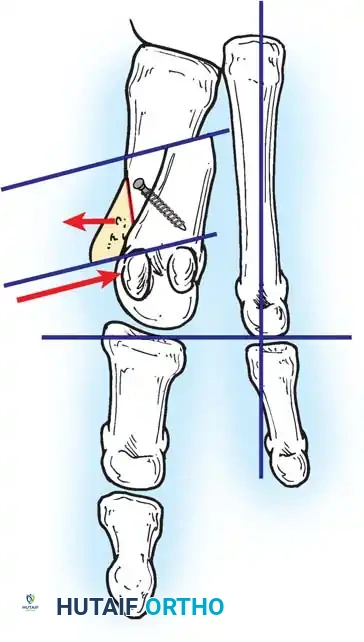
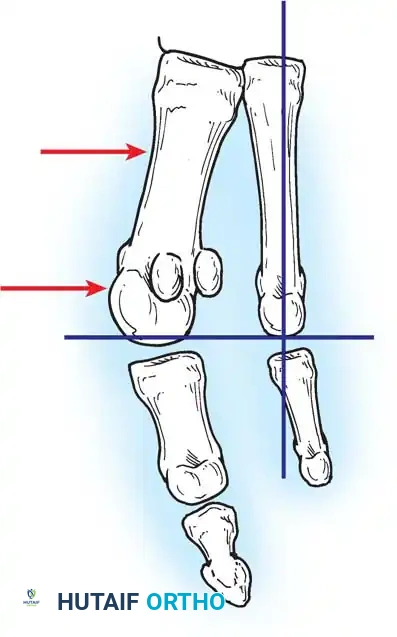
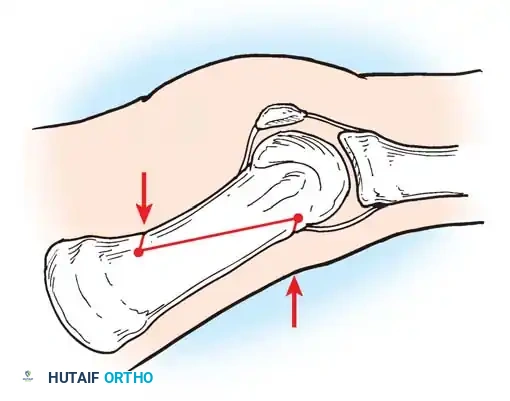

A
A
XY
XY
Inclination angle
A
C
E
D
B
Fig. 78-46 Scarf osteotomy. A, Placement of Kirschner wires at corner point of planned osteotomy. Standard orientation for lateral translation is 90 degrees to longitudinal axis of second metatarsal (A) and in approximately 20 degrees horizontal inclination to plantar surface (XY) . B, Osteotomy cuts. C, Lateral displacement is obtained if short osteotomy cuts are perpendicular to longitudinal axis of foot. D, Proximally oriented inclination of short osteotomy cuts caused shortening depending on angle of inclination and amount of translation. E, After lateral displacement, osteotomy is fi xed with two minifragment screws. ( A-D redrawn from Kristen KH, Berger C, Stelzig S, et al: The scarf osteotomy for the correction of hallux valgus deformities, Foot Ankle Int 23:221, 2002; E redrawn from Jones S, Al Hussainy HA, Ali F, et al: Scarf osteotomy for hallux valgus: a prospective clinical and pedobarographic study, J Bone Joint Surg 86B:830, 2004.)
AFTERTREATMENT Coetzee’s patients were kept non– weight bearing for 2 weeks in a short leg cast, then were allowed partial weight bearing in a cast shoe for 4 weeks before beginning a rehabilitation program. Jones et al. used a forefoot cast for 3 weeks, allowing immediate weight bearing on the heel; after 3 weeks, patients were encouraged to return to normal activities and to normal footwear.
Ludloff Osteotomy
In 1918, Ludloff described an oblique osteotomy of the fi rst metatarsal oriented from dorsoproximal to distal plantar. He originally shortened the metatarsal without using internal fi xation; this technique was abandoned for many years because of its inherent instability. With the development of newer fi xation methods that added stability, the technique has gained popularity. Biomechanical studies by Acevedo et al., Lian et al., and Trnka et al. have shown that the Ludloff osteotomy fi xed with lag screw compression is more rigid than proximal crescentic and other proximal fi rst metatarsal osteotomies. Nyska et al., in a comparative geometrical analysis, determined that the Ludloff osteotomy provided lateral and angular correction similar to those of crescentic and closing wedge osteotomies with less elevation and shortening. Chiodo et al. reported excellent correction of the intermetatarsal angle in 70 patients with moderate-to-severe hallux valgus and cited as advantages, in addition to mechanical stability that allows early ambulation, simplicity (involving only a single cut in the bone), angular correction through bony rotation that allows the surgeon to “dial in” the precise amount of correction desired, and slight supination of the cut (8 degrees) that allows plantar fl exion of the fi rst metatarsal, theoretically minimizing the risk of transfer metatarsalgia further. Complications included prominent hardware requiring removal (fi ve), hallux varus (four), delayed union (three), superfi cial infection (three), and neuralgia (three). At preliminary follow-up (33 months), Trnka reported correction to normal values of the hallux valgus angle and intermetatarsal angle in 80% of 75 procedures done for moderateto-severe hallux valgus (average preoperative hallux valgus
🔪 Surgical Technique 78-10
• Translate the plantar-distal portion laterally to close the intermetatarsal gap (Fig. 78-46E).
• Use two minifragment screws (2.0 or 2.7 mm) to secure the osteotomy.
• Remove the exposed medial eminence and dorsomedial metatarsal shaft.
• Repair the medial joint capsule, defl ate the tourniquet, obtain hemostasis, and close the incisions in routine fashion.
🔪 Surgical Technique 78-11
• Separate dorsal and medial incisions are used.
• First make the dorsal incision aligned over the fi rst web space, and release the transverse metatarsal ligament, adductor hallucis tendon, and lateral capsule.
• Make an 8-cm medial longitudinal incision next, extending from the metatarsocuneiform joint to the base of the proximal phalanx, to expose the medial aspect of the fi rst metatarsal and metatarsophalangeal joint.
• Make a cruciate or L -shaped medial capsulotomy.
• Begin the oblique osteotomy approximately 2 mm distal to the metatarsocuneiform joint, and extend it from dorsal proximal to plantar distal; the plane of the osteotomy should be oriented at an angle approximately 30 degrees from the long axis of the fi rst metatarsal so that it exits the plantar distal metatarsal a few millimeters proximal to the sesamoids.
• When the proximal three quarters of the osteotomy has been completed, loosely fi x it with a cannulated lag screw (3.0 or 3.5 mm) placed perpendicular to the plane of the cut (Fig. 7847A). Position this screw within the proximal rather than the middle portion of the osteotomy to bring the center of correction proximally toward the apex of the deformity to increase the correction and minimize shortening of the fi rst metatarsal.
• Complete the osteotomy, and rotate the distal fragment around the axis of the screw until the desired correction of the intermetatarsal angle is obtained (Fig. 78-47B).
• When the desired correction is obtained, tighten the screw.
• Insert a second, more distal, screw perpendicularly across the osteotomy (Fig. 78-47C).
• If there is space, a third screw can be added. If screw purchase is poor for the second screw, Jung et al. determined that two supplemental axial Kirschner wires can be used without signifi cant loss of fi xation strength. Stamatis et al. also determined that fi xation with threaded Kirschner wires alone provides adequate strength when screw fi xation is impossible because of a short osteotomy or an intraoperative metatarsal fracture.
AFTERTREATMENT Patients are allowed to bear weight as tolerated immediately on the heel and lateral forefoot in an open, hard-soled surgical shoe, followed by gradual resumption of full weight bearing on the fl at foot as toler- angle 26.5 degrees and intermetatarsal angle 17 degrees). Fifteen feet had increased callus formation around the osteotomy, indicating some motion at the osteotomy site, and six of those were considered to be delayed unions. Because the average age of the patients with this complication was 67 years, Trnka cautioned that care should be taken in elderly patients with osteopenic bone.
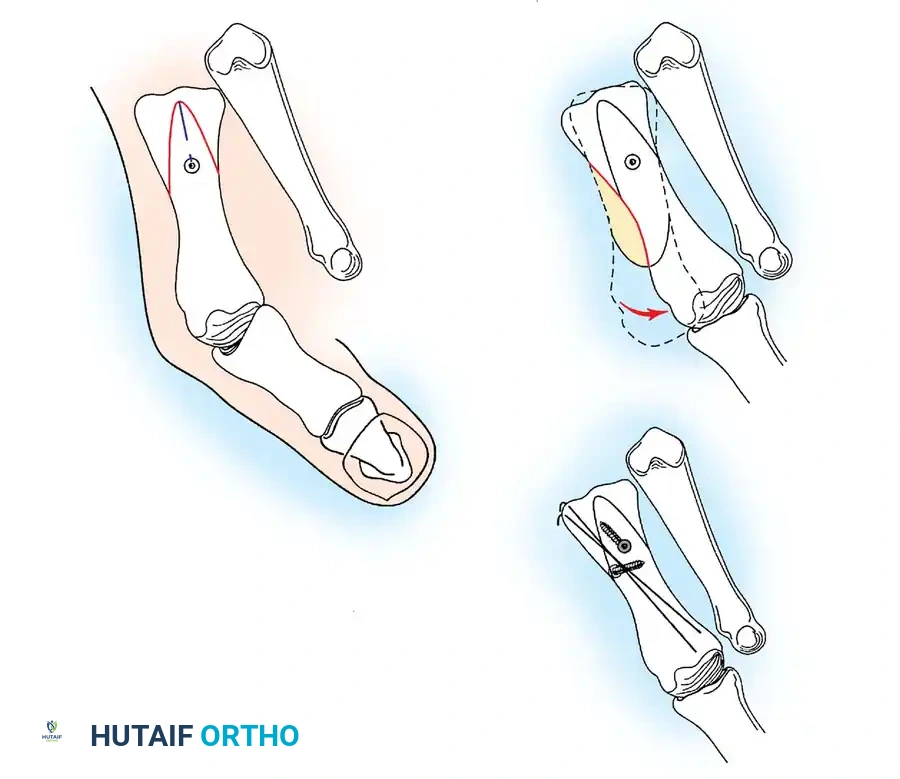
1st screw dorsal to plantar
A
B
C
After osteotomy, before rotation
Section of prominent bone to be removed
After rotation, before 2nd screw fixation
After 2nd screw insertion, after extra bone resection, after insertion of K-wires
2nd screw from plantar to dorsal
K-wires supplemental support
14mm
Fig. 78-47 Ludloff osteotomy. A, Placement of fi rst screw after osteotomy and before rotation of distal fragment. B, Rotation of distal fragment. C, Placement of supplementary Kirschner wires after placement of second screw and resection of bone. (From Schon LC, Dorn KJ, Jung HG: Clinical tip: stabilization of the proximal Ludloff osteotomy, Foot Ankle Int 26:579, 2005.)
🔪 Surgical Technique 78-12
• Center a medial longitudinal incision over the fi rst cuneiform. The medial cuneiform is approximately 2 cm long, and the osteotomy should be centered in the middle of the bone.
• Identify the navicular-cuneiform and the metatarsocuneiform joints.
• Direct the osteotomy in a mediolateral plane, and carry it to a depth of 1.5 cm (Fig. 78-49A and B), ensuring that the dorsal and the plantar cortices are transected.
• The medial eminence of the metatarsal head can be used as an interposition graft, or, in adolescents with little medial eminence, a wedge-shaped piece of bone from the iliac crest or lyophilized, freeze-dried iliac bicortical graft can be used. A 3cm-long graft is required because of the height of the fi rst cuneiform. The base of the graft should be 1 cm or less and ated. Dressing changes are done at 7 to 10 days, and the postoperative shoe is discontinued at 4 to 6 weeks when evidence of bone healing and stability of the osteotomy are noted radiographically.
Osteotomy of the Medial Cuneiform
In 1886, Riedl fi rst described medial cuneiform osteotomy for the correction of primus varus, although he did not call it that at the time. Truslow coined the term in 1925 to describe varus of the fi rst metatarsal associated with hallux valgus. Later, Coughlin and others used this procedure to treat hallux valgus deformity in adolescents with open proximal metatarsal physes, especially patients with an abnormally wide intermetatarsal angle (Fig. 78-48). The osteotomy is combined with removal of the medial eminence and imbrication of the medial capsule.
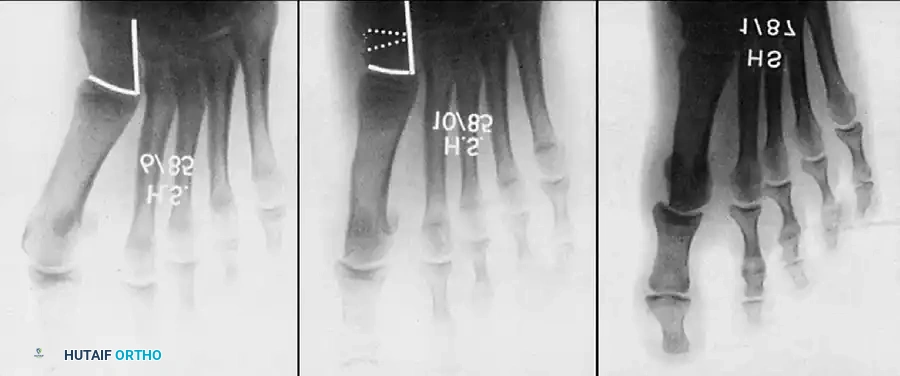
A B C
Fig. 78-48 A, Metatarsus primus varus and open physis in an adolescent. B, After opening wedge cuneiform osteotomy and distal soft-tissue realignment. C, At 18-month follow-up visit. Note incongruous metatarsophalangeal joint. (From Coughlin MJ: Juvenile bunions. In Mann RA, Coughlin MJ, eds: Surgery of the foot and ankle , 6th ed, St Louis, 1993, Mosby.)
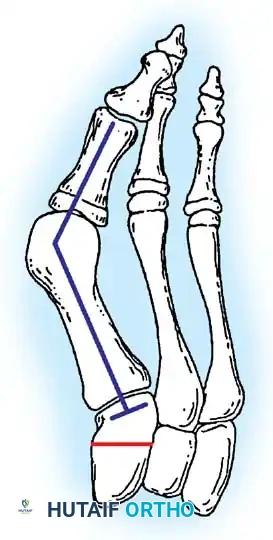
Cuneiform osteotomy
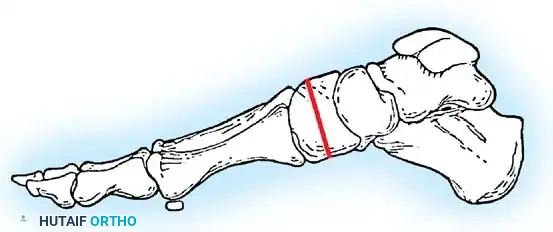
Line of osteotomy
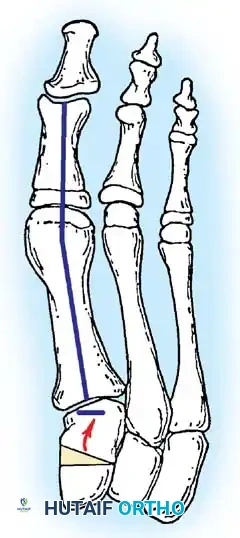
Graft
A B C
Fig. 78-49 A, Anteroposterior projection of cuneiform osteotomy before distraction. B, Lateral view of cuneiform osteotomy. C, Osteotomy site distracted, and bone graft impacted. (From Coughlin MJ: Juvenile bunions. In Mann RA, Coughlin MJ, eds: Surgery of the foot and ankle , 6th ed, St Louis, 1993, Mosby.)
🔪 Surgical Technique 78-12
should taper to a fi ne point at the apex. Remove all cortical bone.
• Distract the osteotomy site with a lamina spreader, and impact the bone graft (Fig. 78-49C).
• Fix the osteotomy with crossed 0.062-inch Kirschner wires (or a 3.5 to 4.5 fully threaded cortical or cancellous screw), and close the wound in the routine manner. walking boot until both ends of the graft are incorporated. This may take 4 to 6 months.
Proximal Phalangeal Osteotomy
In 1925, Truslow popularized the term metatarsus primus varus, or varus of the fi rst metatarsal, and recommended correcting this component to treat hallux valgus. In the same year, Akin suggested a medially based closing wedge osteotomy at the base of the proximal phalanx, combined with medial eminence removal to correct the deformity of the hallux. He also suggested removal of the medial condylar fl are of the base of the proximal phalanx. With minor AFTERTREATMENT A short leg, well-padded, nonwalking cast is worn for 6 weeks followed by a removable modifi cations, this procedure has proved helpful in correcting hallux valgus in selected patients, mostly as an adjunctive procedure to the primary bunion repair. Frey, Jahss, and Kummer reported good results in 89% of patients with asymptomatic great toe valgus deformity that caused symptoms of the second toe. Angulation apex plantarward at the osteotomy site was the most common technical problem, reported in 22% of patients, and the closing wedge osteotomy caused shortening of the hallux in all patients. Bony apposition of less than 50% was the only technical problem associated with long-term complications. Frey et al. noted, however, that the Akin procedure alone rarely is indicated for correction of hallux valgus deformity, and in most patients, this procedure should be performed along with some other procedure to correct all components of the hallux valgus. Frey et al. emphasized that the degree of deformity should be measured on weight bearing anteroposterior radiographs. The intermetatarsal angle, the metatarsophalangeal angle, and the interphalangeal joint angle all are measured to determine the degree of metatarsus primus varus, hallux valgus, and hallux valgus interphalangeus. They further emphasized that persistent lateral displacement of the sesamoids after completion of the bunion procedure predisposes to recurrence of the valgus deformity. The Akin procedure is of limited value if the sesamoid apparatus is subluxed. Beskin emphasized the phalangeal articular angle and degree of hallux valgus interphalangeus by measuring on the weight bearing anteroposterior radiograph the degrees of difference between a perpendicular line drawn among lines parallel to the phalangeal articular surfaces (Fig. 78-50). According to Beskin, the Akin osteotomy corrects approximately 8 degrees of valgus for each 2.5 to 3 mm of wedge removal at the base of the proximal phalanx. Frey et al. and Beskin also suggested measuring the distal metatarsal articular angle. If this is more than 10 to 15 degrees, and a basilar osteotomy has been used to correct the excessive intermetatarsal angle, the Akin procedure may gain an additional correction of the valgus of the hallux without disrupting joint congruity. This procedure was not originally combined with adductor tenotomy or lateral capsulotomy, but this modifi cation is attractive for elderly patients who primarily desire that the hallux and second toe do not impinge on each other. The patient profi le for the procedure if used alone is as follows:
- Patient older than 55 years 2. Excessive hallux valgus interphalangeus (in patient of any age) 3. Hallux valgus of no more than 25 degrees 4. Intermetatarsal angle of less than 13 degrees 5. Good metatarsophalangeal joint motion without localized joint pain
Contraindications for the procedure are the following:
- Rheumatoid arthritis 2. Moderate-to-severe osteoarthritis at the metatarsophalangeal joint 3. Intermetatarsal angle more than 13 degrees 4. Hallux valgus angle more than 30 degrees 5. Subluxation laterally of the tibial sesamoid more than 50% of its width 6. Open physis of the proximal phalanx
Although the originally described osteotomy at the base of the phalanx is contraindicated if the physis is open, an osteotomy at the neck of the phalanx can be performed to correct hallux valgus interphalangeus even in adolescents. Goldberg, Bahar, and Yosipovitch reported that 47% of their patients (351 feet) were dissatisfi ed because the Akin procedure failed to correct the deformity, motion of the fi rst metatarsophalangeal joint was limited, and arthritic changes developed at the fi rst metatarsophalangeal joint. These authors concluded that because the operation does not correct the principal deforming forces of the adductor hallucis and the varus of the fi rst metatarsal, the Akin procedure is indicated primarily in combination with other procedures designed to correct these two abnormalities in the hallux valgus complex, but after which slight residual valgus deformity remains. After long-term review of their patients, Plattner and Van Manen also concluded that the Akin osteotomy was inadequate as a single procedure for hallux valgus deformity. Combining this procedure with another bunion procedure, if the primary one does not correct the deformity suffi ciently or if a patient has severe hallux valgus interphalangeus, is reasonable (Fig. 78-51). The Akin procedure is most useful to correct hallux valgus interphalangeus or to add 5 to 10 degrees of additional correction if the primary procedure has not satisfactorily corrected the deformity and if the aforementioned
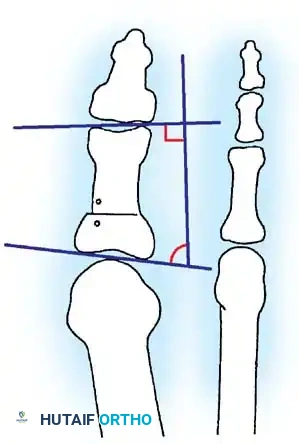
–7°
90°
83°
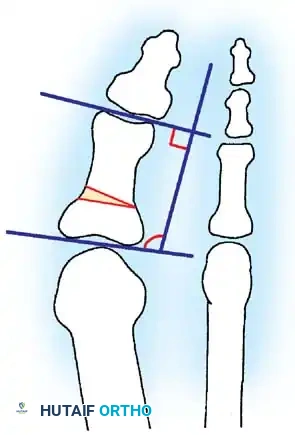
+8° 90°
98°
A B
Fig. 78-50 Measurement of phalangeal articular angle to assess hallux valgus interphalangeus and amount of correction postoperatively. (From Beskin JL: Akin’s phalangeal osteotomy for bunion repair. In Myerson M, ed: Current therapy in foot and ankle surgery , St Louis, 1993, Mosby.)
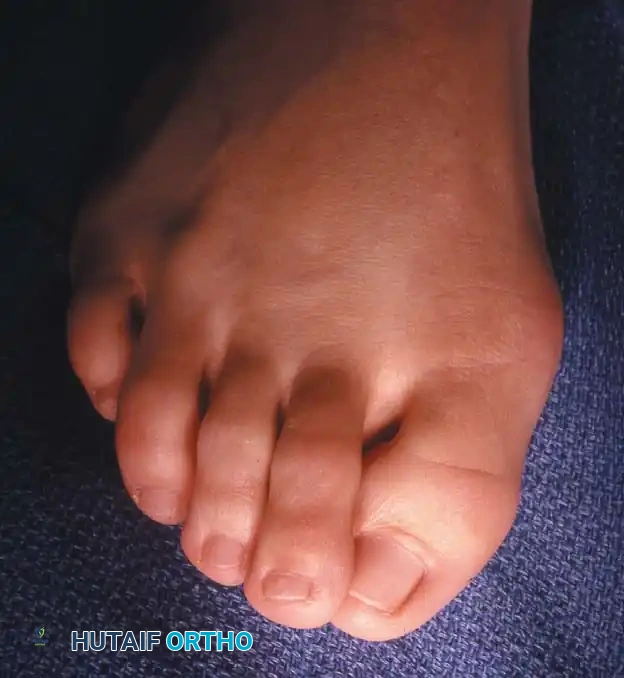
A B
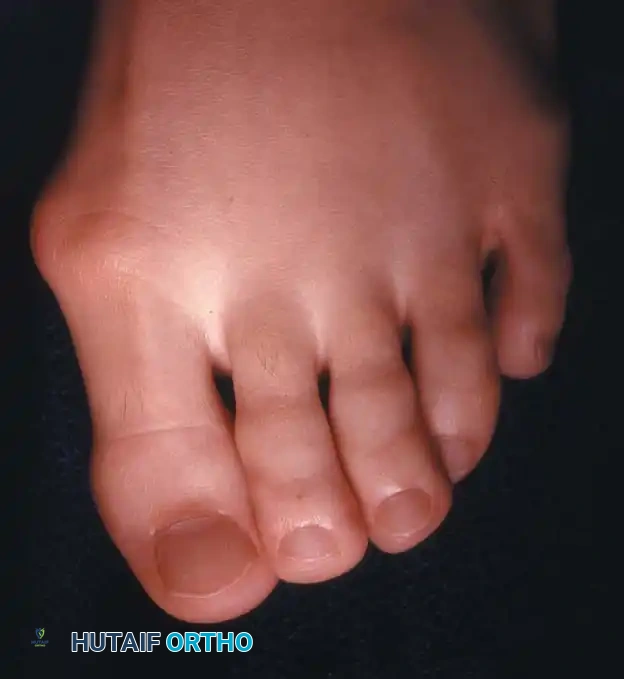
Fig. 78-51 A, Mild hallux valgus and signifi cant hallux valgus interphalangeus is a deformity that can be corrected with an Akin osteotomy. B, Deformity that is not appropriate for Akin osteotomy.
criteria regarding correction of the intermetatarsal angle and sesamoid position have been achieved. The procedure often is appropriate in elderly patients with moderate deformities when combined with adductor release and medial eminence removal and with medial capsular imbrication if the capsule is strong enough to suture. It must be emphasized to the patient, however, that the cosmetic appearance of the toe would not be appreciably changed, although the hallux should fi t in a shoe better and should not cause symptomatic impingement of the second toe.
Akin Procedure TECHNIQUE 78-13 Akin; Frey; Beskin
MEDIAL EMINENCE REMOVAL
• Make a longitudinal medial incision along the proximal two thirds of the proximal phalanx, and extend it over the medial eminence to expose the distal metatarsal shaft capsule 2 to 3 mm proximal to its attachment on the metatarsal neck.
• Expose the proximal phalanx by sharp dissection (not with a periosteal elevator) just enough to make the osteotomy cuts. Avoid stripping the periosteum any more than is necessary because delayed union or nonunion may result. Also, raise the capsule surrounding the exostosis by sharp dissection, and expose the medial eminence, but preserve as much of the proximal capsular attachment to the metatarsal neck as possible.
• Remove the medial eminence as previously described, using the parasagittal groove as a starting mark. Smooth the rough margins of the cancellous bone remaining after exostectomy with a rongeur or rasp (Fig. 78-52A).
ADDUCTOR TENOTOMY
• Make a second linear incision, and expose the adductor tendon. Begin the incision 2.5 to 3 cm proximal to the dorsal edge of the fi rst web space, and end it 2 to 3 mm before entering the skin fold. Carefully preserve as many superfi cial veins as possible; if one or more branches of the fi rst dorsal metatarsal artery limit the exposure, carefully ligate or coagulate each one.
• Retract branches of the deep peroneal nerve, and identify the adductor hallucis tendon. Incise it sharply from its attachment to the base of the proximal phalanx and from the lateral edge of the fi bular sesamoid (Fig. 78-52A).
PROXIMAL PHALANGEAL OSTEOTOMY AND REMOVAL OF THE MEDIAL FLARE
• Return to the initial incision, and use small, right-angle retractors for exposure.
• Begin the proximal phalangeal transverse osteotomy 6 to 8 mm distal to the metatarsophalangeal joint articular surface of the proximal phalanx and parallel to the apex of the concavity of the proximal articular surface of the phalanx. A power saw with
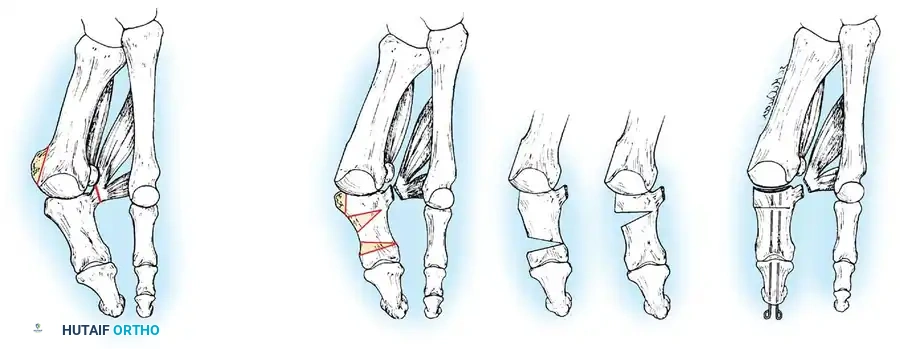
3-4 mm
Alternative osteotomy location
A B C
Fig. 78-52 A, Medial eminence removal and adductor tenotomy. B, Basilar osteotomy and removal of medial condyle. Shaded area shows alternative location of phalangeal closing wedge osteotomy. C, Final position of hallux. a 4-mm-wide blade is recommended, but do not penetrate the lateral cortex.
• Begin the second osteotomy 3 to 4 mm distal to the fi rst, and direct it obliquely and proximally to intersect the fi rst osteotomy at the lateral cortex (Fig. 78-52B).
• Remove the wedge of bone by gently rocking it back and forth with a small Kocher clamp or towel clip, and close the osteotomy by osteoclasis of the lateral cortex. During this closure, a few degrees of pronation of the hallux can be corrected by supinating the toe.
• Drill a 0.062-inch smooth Kirschner wire through the distal and proximal phalanges while holding the interphalangeal joint in the neutral position. Inserting this wire 2 to 3 mm plantar to the tip of the nail facilitates its passage into the medullary canals of the two phalanges. Drill the Kirschner wire across the osteotomy and into the subchondral bone of the proximal phalanx.
• Place another 0.062or 0.045-inch Kirschner wire parallel to the fi rst to control rotation of the osteotomy (Fig. 78-52C).
• If the capsule is too attenuated to hold the hallux reduced on the metatarsal head, run the wires across the joint and into the metatarsal to protect the capsular repair. Frey et al. recommended maintaining the corrected position with two crossed Kirschner wires placed from distal to proximal and bent outside the skin.
• As an alternative, sutures can be passed through bone as described by Beskin. Using a 0.045-inch Kirschner wire as a drill, place two sets of parallel holes medially on either side of the osteotomy site. Leaving a 2to 3-mm bone bridge on either side, angle the holes 45 to 60 degrees to allow easier passage of the suture. Pass a 2-0 absorbable, monofi lament, polydioxanone suture through the holes with a needle. Beskin suggested that this suture has a slight elasticity that provides excellent compression at the osteotomy, precluding the need for buried wires or wires exiting the skin with the risk of skin irritation and infection.
• The medial fl are of the base of the proximal phalanx can be removed with a rongeur if it is likely to produce an annoying bony prominence (Fig. 78-52B and C).
• This same osteotomy can be performed at the neck of the proximal phalanx (Fig. 78-52B, inset ).
CAPSULAR CLOSURE AND DRESSING
• Overlap the capsule to judge redundancy; remove an appropriate amount from the dorsal side. Use 2-0 or 3-0 absorbable sutures for capsular closure.
• Remove the tourniquet, and secure hemostasis.
• Close the skin and bend loops in the Kirschner wire tips, which protrude from the distal end of the toe, to prevent migration of the wires.
• Apply a sterile compression dressing.
AFTERTREATMENT The patient is instructed to rest and elevate the extremity for 72 hours, with bathroom privileges only, but weight bearing to tolerance is allowed. No cast generally is needed. In adolescent patients with excessive hallux valgus interphalangeus, however, it is best to use a short leg walking cast that extends past the toes for the fi rst month. The sutures and pins are removed at 3 to 4 weeks, and a deep, wide, soft shoe can be worn. After the pins have been removed, gentle active and passive range of motion are begun. Frey et al. and Beskin emphasized that the osteotomy usually is clinically stable at 4 to 6 weeks, but radiographic healing may take 3 to 6 months or longer. Nonunion is uncommon, occurring in 1% of patients.
Arthrodesis of the First Metatarsophalangeal Joint for Hallux Valgus
In properly selected patients, arthrodesis of the fi rst metatarsophalangeal joint for hallux valgus is the most appropriate operation (Figs. 78-53 and 78-54). In 1894, Clutton fi rst reported this treatment of hallux valgus in the English literature. In 1952, McKeever reported his operative technique for fusion of this joint in 56 feet (33 patients). Moynihan and Fitzgerald reported that 84% of their patients were pleased with the results of this procedure. Mann and Oates and Mann and Thompson reported successful fusion of the fi rst metatarsophalangeal joint in more than 90% of patients with osteoarthritis and rheumatoid arthritis. Although radiographic evidence of degenerative arthritis of the interphalangeal joint of the hallux was common, no patient had signifi cant clinical symptoms. Mann and Katchurian reported a 4to 5-degree average reduction of the intermetatarsal angle after arthrodesis alone, suggesting that proximal metatarsal osteotomy combined with arthrodesis is not indicated except for the most severe deformities. Arthrodesis of the fi rst metatarsophalangeal joint for hallux valgus is indicated in the following circumstances:
- Severe deformity (an intermetatarsal angle > 20 to 22 degrees, a hallux valgus angle > 45 degrees, and severe pronation of the hallux) (Fig. 78-55), especially when painful callosities are present beneath the second and third metatarsal heads with an atrophic forefoot pad. 2. Degenerative arthritis with hallux valgus. Although uncommon, erosion along the lateral aspect of the sagittal groove with loss of articular cartilage occasionally is seen in patients older than 60 years. 3. Possibly for mild-to-moderate deformity when motion of the metatarsophalangeal joint is limited and painful. Resection arthroplasty is a reasonable alternative. 4. Recurrent hallux valgus. The McBride procedure, a metatarsal osteotomy, or a Keller procedure may be used instead. 5. Hallux valgus caused by muscle imbalance in patients with neuromuscular disorders, such as cerebral palsy, to prevent recurrence. 6. Posttraumatic hallux valgus with severe disruption of all medial capsular structures that cannot be adequately reconstructed. 7. Hallux valgus in patients with rheumatoid arthritis. Arthrodesis of the fi rst metatarsophalangeal joint is preferred to resection arthroplasty, particularly in patients younger than 55 to 60 years.
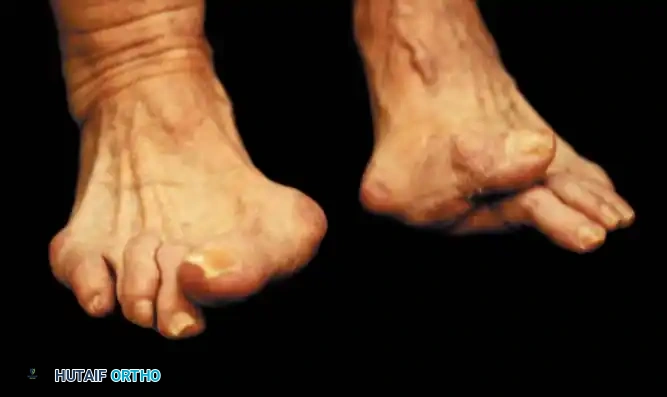
Fig. 78-54 Severe hallux valgus is good indication for arthrodesis of fi rst metatarsophalangeal joint, particularly in recurrent hallux valgus after previous attempt at correction (left foot).
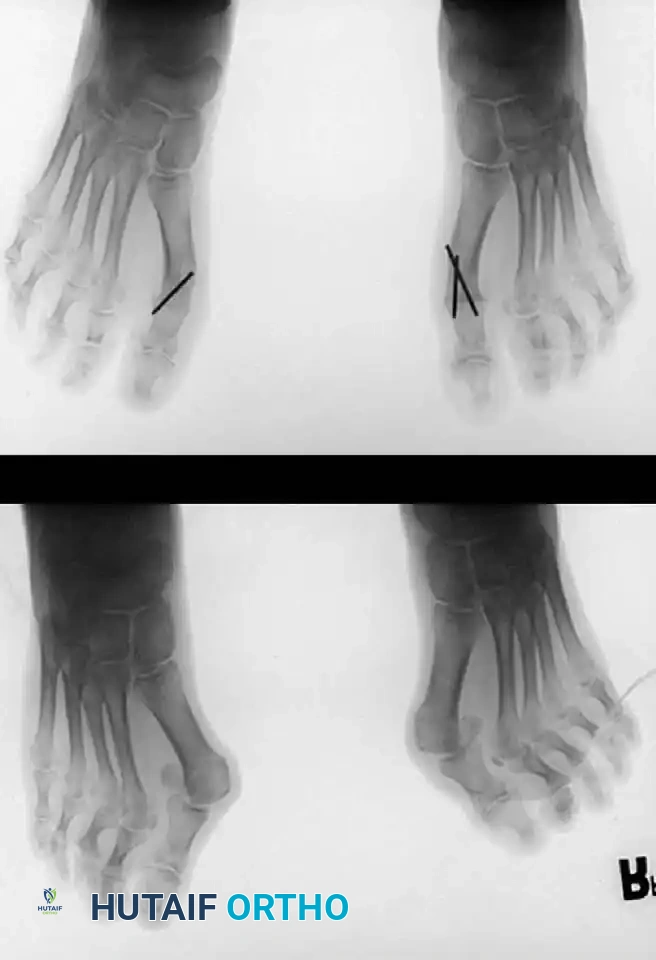
B
A
Fig. 78-53 A, Hallux valgus in 46-year-old woman. B, One year after arthrodesis.
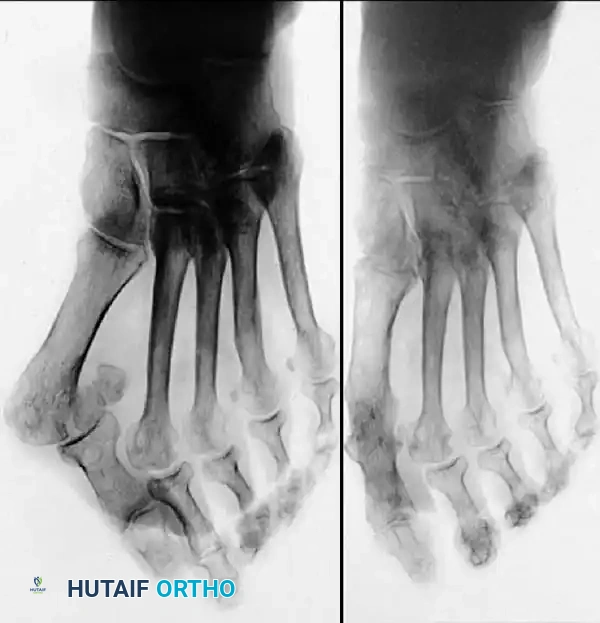
A B
Fig. 78-55 A, Severe hallux valgus with severe metatarsus primus varus. B, After proximal metatarsal osteotomy and arthrodesis of fi rst metatarsophalangeal joint.
The surgical technique for arthrodesis of the fi rst metatarsophalangeal joint may vary according to the type of osteotomy and the kind of fi xation used. Various fi xation methods have been described. Mann and Thompson used a dorsal one-quarter tubular plate with one oblique interfragmentary screw, whereas Holmes used a one-third tubular plate. In patients with poor bone stock, such as patients with rheumatoid arthritis, Mann and Thompson used two 1 / 8 -inch Steinmann pins placed through the hallux into the fi rst metatarsal. Four techniques are described: small plate fi xation, truncated cone, wire loop, and ball-and-socket.
Arthrodesis of the First Metatarsophalangeal Joint with Small Plate Fixation TECHNIQUE 78-14 Mankey and Mann
• Begin a dorsal incision on the medial edge of the extensor hallucis longus tendon a few millimeters proximal to the interphalangeal joint of the hallux, and extend it proximally 5 to 6 cm (Fig. 78-56A). Incise the skin and subcutaneous tissue and the extensor mechanism. Identify and preserve the proper branch of the superfi cial peroneal nerve to the dorsomedial aspect of the hallux. Carry the incision through the extensor mechanism at the base of the proximal phalanx and through the periosteum over the fi rst metatarsal.
• With sharp dissection, expose the fi rst metatarsophalangeal joint dorsally, medially, and laterally.
• Uncover the medial eminence, using small, right-angle retractors to expose fully three sides of the metatarsophalangeal joint.
• Remove any dorsal osteophytes at the base of the proximal phalanx or over the metatarsal head with a rongeur.
• Using a 9-mm-wide blade in a power saw, remove the distal surface of the fi rst metatarsal 3 to 4 mm proximal to the articular cartilage, making the cut perpendicular to the shaft of the fi rst metatarsal (Fig. 78-56B).
• Align the hallux with the fi rst metatarsal in 15 degrees of dorsifl exion to the plantar surface of the foot or 25 to 30 degrees of dorsifl exion to the inclination angle of the fi rst metatarsal and approximately 15 degrees of valgus and neutral rotation (Fig. 78-56C and D).
• With the hallux in this position, remove the base of the proximal phalanx parallel to the previous cut in the fi rst metatarsal. Leave as much metaphyseal fl are of the base as possible for later screw fi xation.
• In severely eburnated bone, drill multiple small holes in the base of the proximal phalanx and in the head of the fi rst metatarsal with a 0.062-inch Kirschner wire; if cancellous bone is reached after making the osteotomy cuts, this step is unnecessary.
• When the hallux is aligned properly, fi x it temporarily with one or two 0.045-inch Kirschner wires placed from dorsal distal to proximal medial. These wires must be placed in the upper quarter of the phalanx and metatarsal head to leave room for the interfragmentary screw to be placed just plantar to the midline of the proximal phalanx (Fig. 78-56E).
• Ensure that all soft tissue has been excised around the base of the proximal phalanx, with no soft tissues invaginated in the arthrodesis site, and that the fl exor hallucis longus tendon has been preserved.
• Place an interfragmentary 4-mm cancellous screw through the plantar-medial aspect of the base of the proximal phalanx directed laterally into the metatarsal head. Using a drill guide, drill a glide hole with a 3.5-mm bit, and then drill the hole with a 2-mm bit. This should be placed at the fl are of the base of the proximal phalanx where there is good bone stock. Measure the length of the screw, tap the hole, and insert the screw. A countersink usually is not required for the screw head, but can be used if there is concern that the head of the screw would lever in a dorsal direction and crack through the cortical bridge. Just before fi nal tightening of the screw, remove the Kirschner wires to maximize compression.
• Remove the medial eminence, and ensure that no osteophytes remain on the lateral side.
• Mann emphasized that in rheumatoid feet, the bone stock may be so poor that interfragmentary screw fi xation is
D
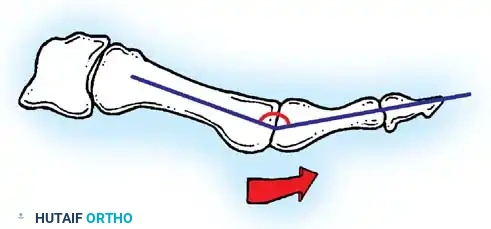
30°
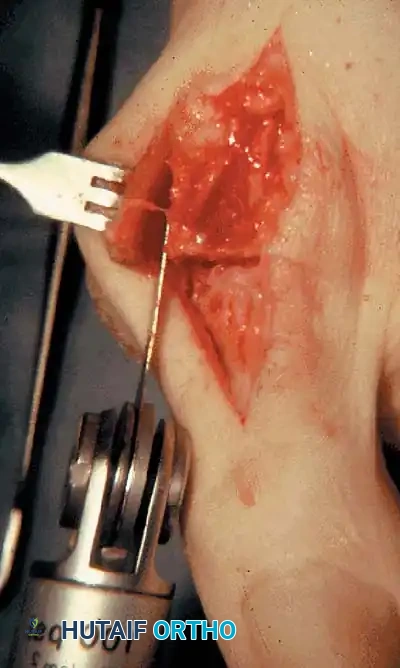
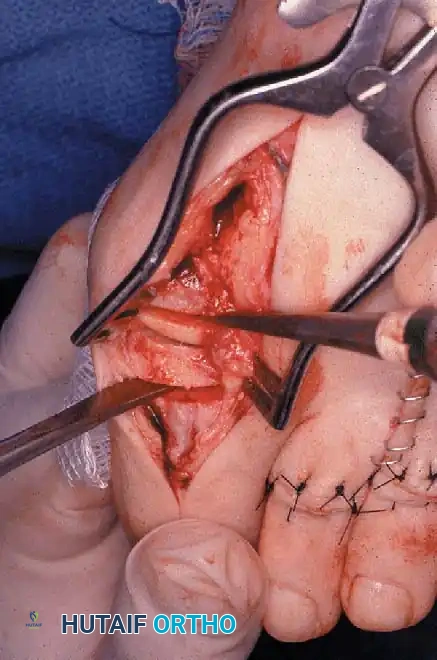
A
E F
B C
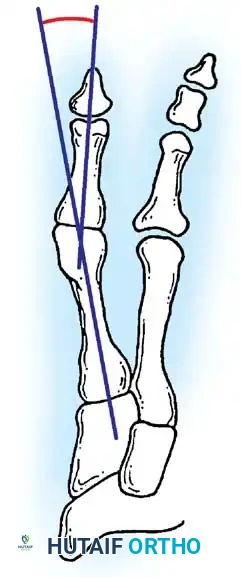
15°
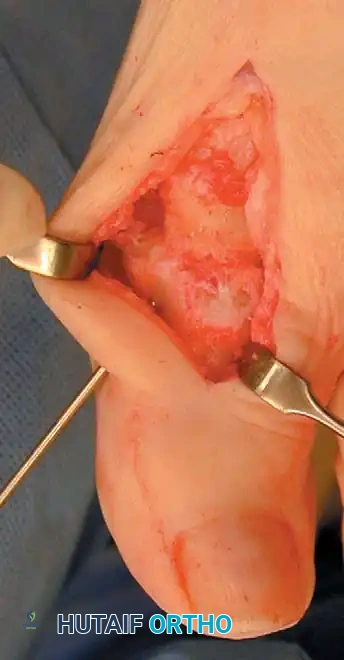
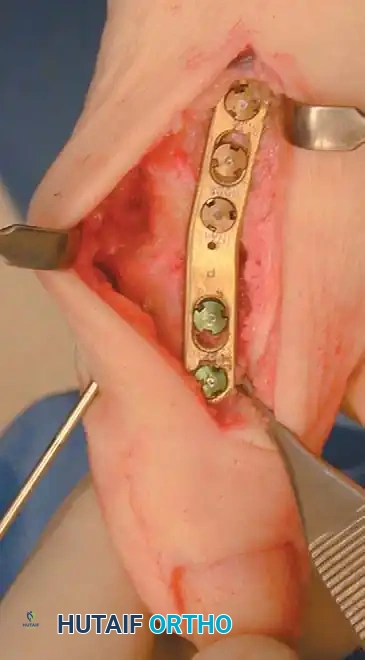
Fig. 78-56 Technique for arthrodesis of fi rst metatarsophalangeal joint. A, Dorsal skin incision. B, Excision of metatarsal head. C, Fusion site placed in 15 to 20 degrees of valgus. D, Approximately 30 degrees of dorsifl exion in relation to metatarsal shaft or approximately 10 to 15 degrees of dorsifl exion in relation to fl oor. E, Two parallel cuts are made. F, Six-hole, onequarter tubular plate in place. (From Mann RA, Coughlin MJ, eds: Surgery of the foot and ankle, 7th ed, St Louis, 1999, Mosby; C and D from Mann RA, Coughlin MJ: The video textbook of foot and ankle surgery , St Louis, 1991, Medical Video Productions.)
Arthrodesis of the First Metatarsophalangeal Joint with Small Plate Fixation TECHNIQUE 78-14 Mankey and Mann—cont’d impossible. In that case, use a dorsal plate or intramedullary Steinmann pins.
• When limited fi xation with the interfragmentary screw is achieved, place a one-quarter tubular AO plate or its equivalent dorsally. Usually, three holes are made in the metatarsal and two in the proximal phalanx, but in some patients the phalanx is long enough to place three screws on each side of the arthrodesis site. Secure the plate proximally with a 4-mm cancellous screw. No lag technique is needed, and no compression is gained with this type of plate. If the bones are quite small, use 2.7-mm screws designed for the one-quarter tubular plate. First secure the plate proximally through the screw hole closest to the arthrodesis site (Fig. 78-56F).
• Before the fi nal seating of the screw, check the position of the arthrodesis and the plate: The plate should rest in the midline of the hallux and proximal phalanx, and the lateral edge of the proximal phalanx should line up with the lateral edge of the fi rst metatarsal head.
• Place another screw in the metatarsal and two or three screws in the proximal phalanx. Measure the screw lengths accurately so that they do not impinge on the fl exor hallucis longus. Place the fi nal screw in the most proximal hole in the plate.
• If there are any small areas of unapposed bone, use the deep surface of the medial eminence for cancellous bone graft.
• Close the capsule with 2-0 absorbable suture, repositioning the extensor hallucis longus dorsally, and close the skin with nonabsorbable sutures.
• Apply a compression dressing to the foot, and secure it around the ankle using multiple unfl uffed fl uffs and gauze wrap.
AFTERTREATMENT The dressing is changed to a more snug-fi tting dressing at the fi rst postoperative visit, and the patient is allowed to bear weight to tolerance with a postoperative shoe. Assisted walking with crutches or a walker is optional. Fusion usually is complete by 12 weeks after surgery, and the patient is allowed to wear any shoes that accommodate the foot.
Truncated Cone Arthrodesis of the First Metatarsophalangeal Joint TECHNIQUE 78-15 Johnson and Alexander
• With the patient under regional or general anesthesia, make a medial midline incision over the metatarsophalangeal joint between the branch of the superfi cial peroneal nerve dorsally and the proper branch of the medial plantar nerve plantarly.
Begin the incision over the proximal half of the proximal phalanx, and extend it proximally over the medial eminence and along the shaft of the fi rst metatarsal.
• Do not raise any fl aps until bone is reached. We recommend raising a small fl ap at this point to ensure that the superfi cial peroneal nerve, which is vulnerable at the level on the metatarsal where the medial eminence enters the shaft, is not tethered in the midline medially as the protruding medial eminence displaces the nerve dorsally at the site of the bunion.
• By sharp dissection, denude the base of the proximal phalanx and the metatarsal head of soft tissue, being careful to preserve the fl exor hallucis longus tendon. The base of the proximal phalanx must be visible end-on.
• Place a guidewire in the center of the base of the proximal phalanx, and drill it into the subchondral bone of the head of the proximal phalanx.
• With a conical reamer (Marin Reamer System; Downs, Inc, UK), ream the proximal phalanx (Fig. 78-57A).
• Expose the metatarsal head, and insert a guide pin into it. This guide pin must be placed at an appropriate angle in reference to the dorsal aspect of the fi rst metatarsal. Use an angle guide to ensure dorsifl exion of the hallux 25 to 30 degrees to the inclination angle of the fi rst metatarsal (Fig. 78-57B).
• When the guide pin has been properly positioned in the metatarsal head, place the truncated cone reamer system (Biomet, Inc, Warsaw, Ind) for the metatarsal head over the guide pin (Fig. 78-57C), and use it to produce a truncated cone confi guration of the distal metatarsal for optimal cancellous bone contact (Fig. 78-57D).
• Impact the two prepared surfaces, and place a fully threaded 4-mm cancellous screw from the medial base of the proximal phalanx laterally into the metatarsal head. Countersink the screw head, and avoid fracture through the cortical bridge of the medial aspect of the base of the proximal phalanx. Use a lag technique by overreaming the phalangeal side of the arthrodesis.
• Before placement of the screw, temporary fi xation with one or two 0.062or 0.045-inch Kirschner wires may be needed. Occasionally in osteoporotic bone, two crossed screws may be needed for secure fi xation.
AFTERTREATMENT The patient may walk fl atfooted, bearing weight to tolerance, in a postoperative shoe with specifi c instructions not to load the hallux. The dressing is changed at 2-week intervals, and the arthrodesis is manually tested each time. If the fi xation is not rigid, the patient wears a cast for 6 weeks. If an interposition graft was necessary, such as for marked bone loss at the fi rst metatarsophalangeal joint from previous total joint replacement or hemiarthroplasty, the postoperative management is altered. No weight bearing is allowed for 3 months, during which time the patient wears a cast. A walking cast is applied until the arthrodesis is solid.
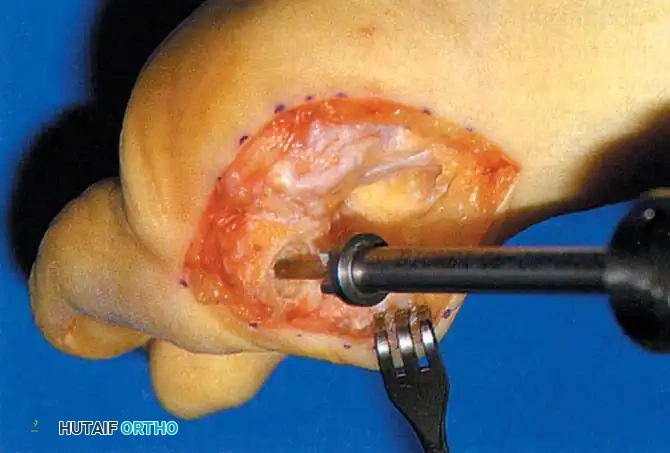
A B
C D
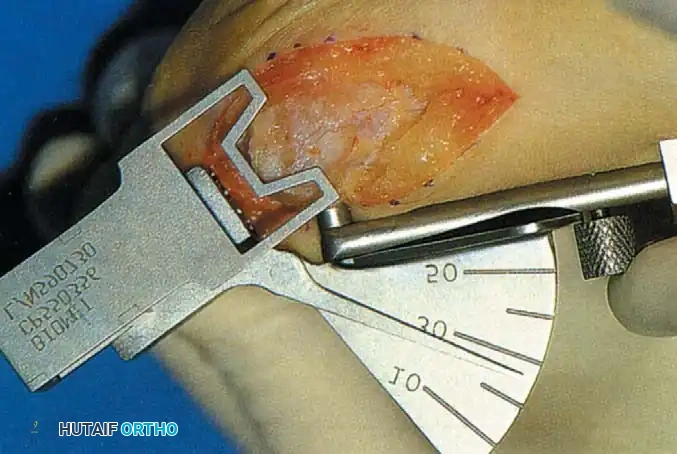
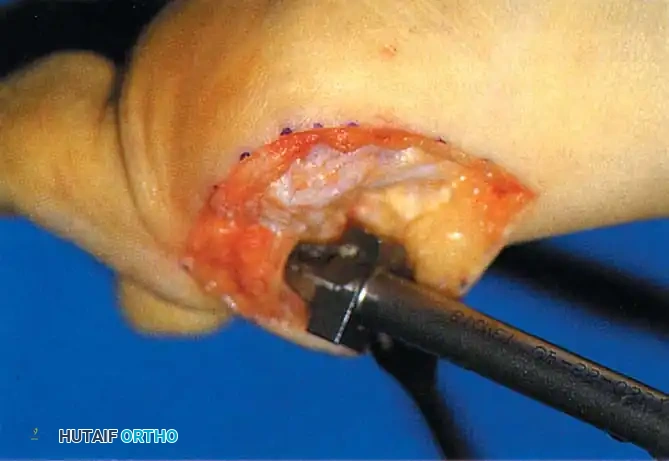
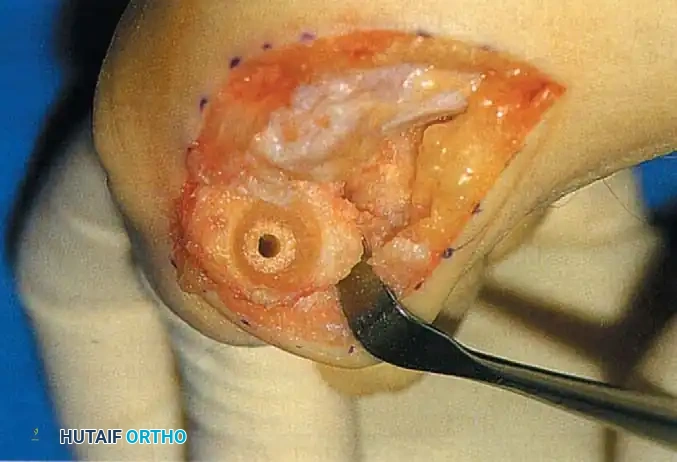
Fig. 78-57 Truncated cone arthrodesis. A, Preparation of phalangeal base with end-cutting reamer. B, Metatarsal angle guide for reaming. C, Cutting truncated cone with side-cutting reamer. D, Base of proximal phalanx after reaming. (From Johnson KA, ed: Master techniques in orthopaedic surgery: the foot and ankle , New York, 1994, Raven.)
Arthrodesis Using Multiple Threaded Kirschner Wires TECHNIQUE 78-16 Smith et al. (Fig. 78-58)
• Make a longitudinal incision dorsomedially over the great toe metatarsophalangeal joint, and carry it down longitudinally through the capsular tissues. Avoid the dorsal sensory nerve. Make the incision more dorsally than most midmedial bunion incisions to allow placement of the multiple fi xation pins through the larger plantar fl ap.
• Resect the cartilage and subchondral cortex of the metatarsal head with a rongeur. Apply a conical reamer (Marin) on the fi rst metatarsal head with the axis of the cone parallel to the second metatarsal.
• Drill a 1 / 4 -inch hole in the center of the base of the proximal phalanx, and resect the cartilage and subchondral cortex peripheral to the hole with a 4-mm burr.
• Place the nose of the solid cone reamer in the hole, and shape the intramedullary surface. Do not violate the rim of the base of the phalanx.
• Appose the bony surfaces of the fi rst metatarsal and the base of the proximal phalanx.
• When the desired position of the toe is established, apply axial loading. Insert fi ve parallel, 0.062-inch threaded Kirschner wires through the medial skin fl ap, directing them from distal medial to proximal lateral across the metatarsophalangeal joint. Cut the pins off about 1 cm outside the skin.
• Apply a short leg, weight bearing cast.
AFTERTREATMENT Two months after surgery, the wires are removed by “unscrewing” them with a large needle holder using local anesthetic at the skin site. A wooden-
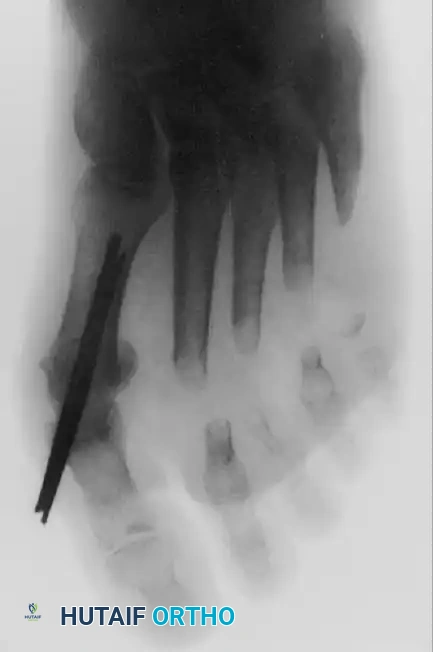
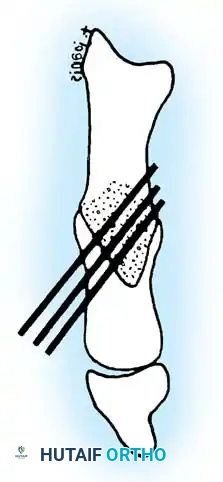
Fig. 78-58 Smith technique. (Courtesy of R.W. Smith, MD.)
soled shoe is worn for 1 month after the pins are removed.
Arthrodesis of the First Metatarsocuneiform Articulation (Lapidus Procedure) TECHNIQUE 78-17 Myerson et al.; Sangeorzan and Hansen; Mauldin et al.
• The procedure is performed through three incisions: over the medial eminence, dorsally in the fi rst web space, and dorsally over the metatarsocuneiform articulation.
• Make the fi rst incision medially over the medial eminence, and incise the capsule in an inverted L shape distally (Fig. 78-59A and B). Remove the medial eminence.
• Make a second incision dorsally in the fi rst web space, and release the adductor hallucis from its attachments at the base of the proximal phalanx and the lateral margin of the fi bulosesamoid ligament. Incise the capsulosesamoid ligament in an axial plane, and mobilize the sesamoids beneath the metatarsal head. Do not resuture the adductor hallucis in the fi rst intermetatarsal space.
• Make a third incision dorsally over the fi rst metatarsocuneiform articulation. This should be long enough to expose adequately the dorsal venous arch and the most medial branch of the superfi cial peroneal nerve. To fi nd the joint, make a longitudinal incision with a small blade over the base of the fi rst metatarsal onto the medial cuneiform with gentle subperiosteal dissection medially and laterally. Avoid the penetrating branch of the dorsalis pedis artery during the lateral dissection.
• Remove the small wedge of bone from the articulation laterally and plantarward to ensure plantar fl exion of the fi rst metatarsal (Fig. 78-59C and D). Remove as little bone as possible. Myerson recommended removing only the articular cartilage laterally and plantarward, leaving the articular surface of the medial aspect of the joint intact.
• The fi rst metatarsal should plantar fl ex and adduct, and the dorsal part of the arthrodesis site should never be wider than the plantar part, which is diffi cult to achieve because of the deep plantar recession at the base of the fi rst metatarsocuneiform articulation.
• Use a small, fl exible, thin chisel blade or a long-handled, small rongeur to reach deep within the joint. Osteotomes, even thin ones, are not recommended because too much bone is removed dorsally.
• Hold the metatarsal in the corrected position with a 0.062inch Kirschner wire and verify correct positioning of the metatarsal with radiographs or fl uoroscopy.
• Insert a 3.5-mm cortical screw dorsal to plantar from the medial cuneiform proximally into the fi rst metatarsal distally, using a lag screw technique by overdrilling the proximal cortex.
• Place another screw transversely from the fi rst metatarsal into the second (and third, if necessary for stability) metatarsal (Fig. 78-59E).
• Use a small burr to create two or three small troughs on the dorsal and medial sides of the arthrodesis site, and fi ll them with autogenous bone graft. The small quantity of bone graft required can be obtained from one of the adjacent tarsal bones, the calcaneus, or the distal tibia.
• Move the fi rst metatarsophalangeal joint through a range of motion to locate the exact position in which the joint is most congruent. This step is important because if the intermetatarsal angle is undercorrected, or if the hallux valgus angle is excessive, placing the hallux in a straight position may cause impingement or incongruency, resulting in loss of motion of the fi rst metatarsophalangeal joint.
• When the position of fi rst metatarsophalangeal joint congruency is located, repair the capsule in that position.
• If the hallux impinges on the second toe or is in unattractive valgus, perform an Akin basal phalangeal osteotomy, rather than force the hallux into a straight position, producing incongruency of the joint (Fig. 78-59F).
• If the corner of the L -shaped capsulotomy cannot be resutured because of a lack of soft tissue, use a Kirschner wire to drill a small hole in the metatarsal neck for attachment of the capsule.
AFTERTREATMENT Initially, a non–weight bearing cast is used. When the patient can bear weight to comfort in the cast, a walking cast is applied and is worn until 6 weeks after surgery. A removable walking cast can be used for the next 3 to 6 weeks. Myerson et al. emphasized that swelling
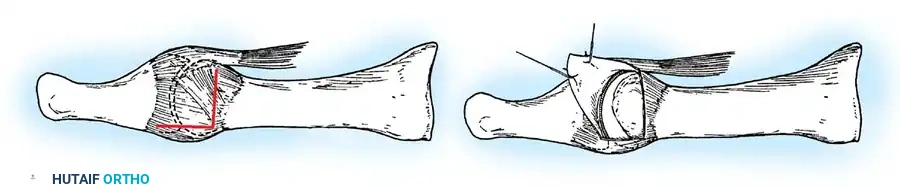
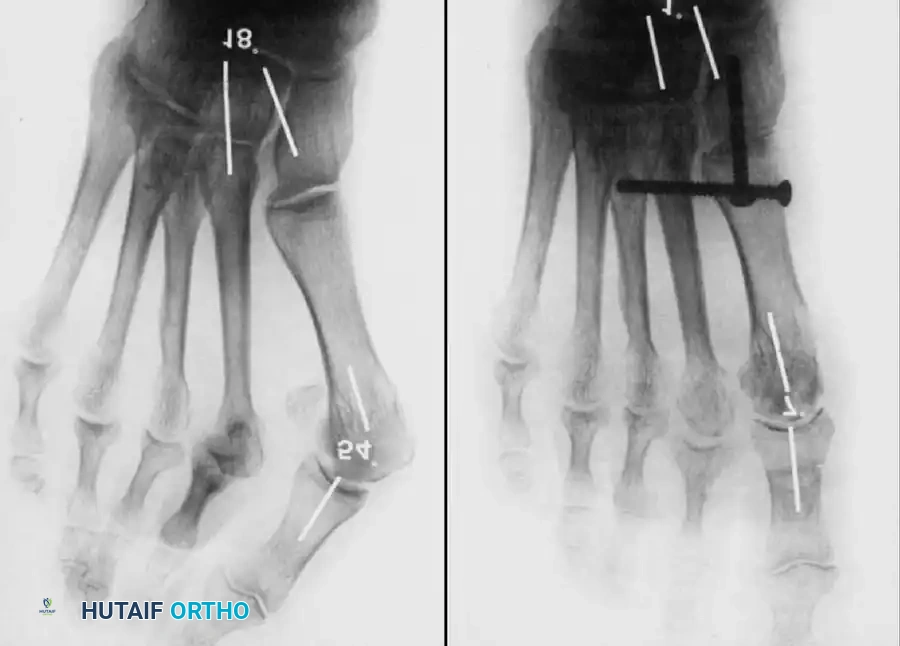
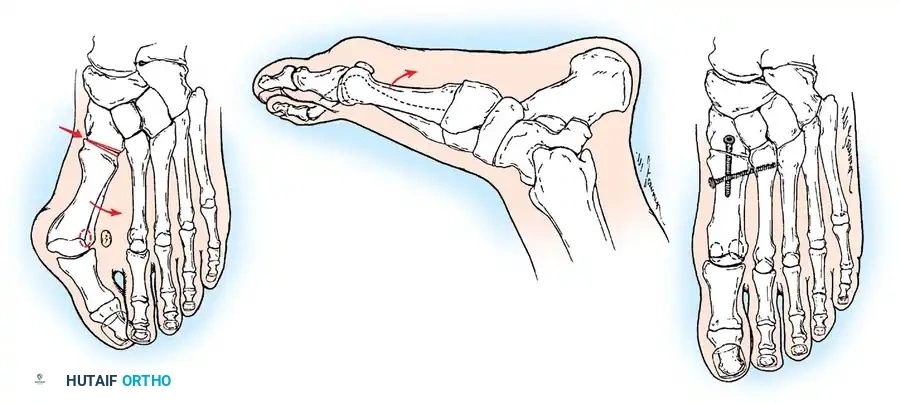
A B
F
C D E can be bothersome for 4 to 6 months, and the patient cannot expect to wear normal shoes until this period is over. Because of the challenging technique and prolonged convalescence of this procedure, it is most benefi cial for patients with recurrence of the metatarsus primus varus component of the hallux valgus complex after failed bunion surgery, for patients with marked ligamentous laxity, or for patients with cerebral palsy who have spastic equinovalgus, metatarsus primus varus, and hallux valgus.
AFTERTREATMENT The patient is allowed to bear weight to tolerance in a removable short leg walking boot. The dressing is changed 14 to 21 days after surgery, and the removable walking boot is used for another 3 weeks. All protection can be removed by 6 to 12 weeks after surgery. A short leg nonwalking cast for 3 to 4 weeks and a walking cast for 3 to 4 additional weeks are advised if patient compliance is a concern. The surgical treatment of hallux valgus in rheumatoid arthritis is discussed in Chapter 81.
Juvenile and Adolescent Hallux Valgus (10 to 19 Years Old)
It is helpful for the surgeon to consider adolescents with hallux valgus separately from adults with the deformity for the following reasons:
- Pain, either at the metatarsophalangeal joint or beneath the lesser metatarsal heads, may not be the primary complaint in many instances. 2. A bunion secondary to the medial eminence and bursal hypertrophy may be a minor part of the deformity. 3. Varus of the fi rst metatarsal with a widened intermetatarsal angle is almost always present. 4. Hypermobile fl atfoot with pronation of the foot during weight bearing frequently is associated with the deformity. (Coughlin’s data do not support this.) 5. Recurrence of the deformity is more frequent, especially in the presence of fl atfoot deformity. 6. Hallux valgus interphalangeus may be prominent, yet easily overlooked, and may cause unsatisfactory correction of the deformity. 7. The family history frequently is positive for hallux valgus. In Coughlin’s series of 45 patients, 34 (76%) had a family history of hallux valgus. 8. Soft-tissue procedures alone are unlikely to result in permanent correction. 9. Osteotomy, single or double, of the fi rst metatarsal is almost always necessary to obtain and maintain correction of the deformity.
The indications for surgical correction of a hallux valgus deformity in an adolescent are neither rigid nor clearly defi ned, and the timing of the procedure during adolescence is not agreed on. Debate continues over whether the
Molded (Ball-and-Socket) Arthrodesis of the First Metatarsophalangeal Joint TECHNIQUE 78-18
• Make a midline medial incision from the midportion of the proximal phalanx to the junction of the neck and shaft of the metatarsal. Raise the skin and capsule in one piece dorsal and plantarward far enough to expose the articular surfaces.
• Using a small rongeur and following the natural contours of the metatarsal head, remove all cartilage and subchondral bone.
• Prepare the base of the proximal phalanx by deepening the natural concave surface with a small rongeur. If the subchondral bone of the base of the proximal phalanx is eburnated, use a small 1 / 8 to 1 / 4 -inch osteotome to fi sh scale the surfaces, and then use a rongeur to reach cancellous bone.
• Drill multiple holes with a 0.062-inch Kirschner wire in the base of the proximal phalanx and into the metatarsal head.
• Align the joint surfaces in the proper position of dorsifl exion, valgus, and neutral rotation.
• Impact the surfaces, and hold them with two 0.062-inch Kirschner wires drilled from the metatarsal head into the proximal phalanx from medial to lateral. This wire is dorsal to the midline. The second Kirschner wire is placed plantar to the midline, usually in the fl are of the plantar surface of the metatarsal head. Evaluate the fi nal position of the metatarsophalangeal joint (15 degrees of valgus, 25 degrees of extension to the longitudinal axis of the fi rst metatarsal and neutral rotation). If changes in position need to be made, do them now, and then reinsert the Kirschner wires.
• Drill a hole with a 2-mm bit and a drill sleeve through the metatarsal head into the proximal phalanx.
• Overream the metatarsal side of the arthrodesis with a 3.5mm bit.
• Measure the screw length, and tap the hole with a 4-mm cancellous tap. Before placing the screw, use a countersink to allow the head of the screw to rest just inside the cortex of the metatarsal without levering distally and breaking the cortical bridge.
• Insert a full-threaded, 4-mm cancellous screw from the metatarsal head into the proximal phalanx. It also is important in the initial preparation not to remove so much from the medial eminence that no shoulder is left where the medial eminence meets the shaft because this ridge of bone acts as a buttress for the screw head. This usually provides enough fi xation so that the Kirschner wires can be removed, but one or both wires can be left in place for additional fi xation if needed. If the wires are left in place, cut them off beneath the skin. procedure should be postponed until the physes of the phalanx and metatarsal are closed, whether radiographic confi rmation of progression should be documented before recommending surgery, and whether pain should be a primary indication for operative treatment, as in adults. Several well-documented series recommend operative correction only for adolescents with painful, progressive deformity after the physes have closed. Other well-documented, retrospective studies indicate that surgery before 15 years of age, with or without open physes, yields the best longterm results, especially if preservation of normal metatarsophalangeal motion is considered an essential element of acceptable results. Any adolescent 12 to 18 years old with cosmetically unattractive hallux valgus deformity that the patient and family report to be progressive and whose family history is positive for hallux valgus is considered a candidate for surgery. Pain and shoe-fi tting problems are even stronger indications for operative correction of the deformity. The patient and family must be informed of the chance of recurrence of the deformity and, if the patient is free of pain before surgery, that no guarantee can be made that pain will not develop after surgery. Coughlin emphasized that valgus angulation of the metatarsophalangeal joint can be caused not only by displacement of the hallux in a lateral direction on the metatarsal head, but also by tilting of the articular surfaces of the respective sides of the joint in relation to the long axis of the metatarsal or phalanx, and he suggested that an increased distal metatarsal articular angle may be the defi ning characteristic of juvenile hallux valgus. Recognition of this distinction is important to avoid excessive lateral tilt of the distal articular surface of the metatarsal after correction of the hallux valgus angle. An abnormal obliquity to the metatarsal-cuneiform articulation, allowing the fi rst metatarsal to slide into varus, also has been implicated as a primary deforming factor in adolescent hallux valgus. The medial eminence may or may not require excision, depending on its size. Any intermetatarsal angle of 10 degrees or more requires a metatarsal osteotomy. If the intermetatarsal angle is corrected to 6 degrees or less, and the hallux valgus angle is corrected to 15 degrees or less, the likelihood of unattractive, symptomatic recurrence is rare. Pronation of the great toe in juvenile and adolescent patients is uncommon, but may result from pronation of the fi rst ray and not simply of the hallux. If this is true, derotation to the neutral position should be performed at the time the varus inclination of the metatarsal is corrected. In addition, an osteotomy of the proximal phalanx may be required to correct residual hallux valgus not corrected by the primary procedure. The most diffi cult combination of deformities to correct is hypermobile fl atfoot, metatarsus primus varus, and hallux valgus; recurrence is common. Often proximal metatarsal osteotomy, distal metatarsal osteotomy, or both are required.
The patient and parents should be fully advised that no operative procedure always prevents recurrence of the deformity in this particular anatomical confi guration. Any procedure that relieves discomfort, retains a functional range of motion of the metatarsophalangeal joint, corrects the excessive valgus posture of the hallux, and narrows the forefoot probably would please the patient and the family. Considering these criteria, the following procedures are useful, alone or in combination, for correcting hallux valgus in juveniles and adolescents. Adductor tenotomy, lateral capsulotomy, medial eminence removal, and medial capsulorrhaphy are recommended in patients with lesser deformities and lower intermetatarsal angle, hallux valgus angle, and distal metatarsal articular angle. If the fi rst metatarsal physis is fully open in an immature foot, a medial opening wedge osteotomy distal to it, with use of the resected medial eminence for a graft, is recommended. If the metatarsal physis is closed or near closure, a proximal crescentic osteotomy is recommended because it changes the metatarsal length little if at all. Internal fi xation is used (Fig. 78-60; see Technique 78-8). Coughlin and Mann recommended proximal crescentic osteotomy and a distal soft-tissue procedure for adolescent patients with moderate-to-severe deformities, but cautioned that this procedure is contraindicated in juvenile and adolescent patients who have increased distal metatarsal articular angles. This procedure is recommended for older adolescent patients who are near the end of foot growth and who have moderate-to-severe deformities. Coughlin recommended that proximal osteotomy not be used until the physis has closed. Mann and Coughlin emphasized that an opening wedge osteotomy in adolescents lengthens the fi rst metatarsal, whereas a closing wedge osteotomy shortens the fi rst metatarsal. A crescentic (dome) osteotomy maintains length. The chevron osteotomy has been recommended for deformities with a hallux valgus angle of 30 degrees and an intermetatarsal angle of 15 degrees (Zimmer et al.). The chevron osteotomy is described in Technique 78-4. The modifi ed chevron osteotomy may be helpful in moderate deformity (Fig. 78-61). If the physis is open, this location for the osteotomy is even more advantageous. Most published series do not recommend the chevron osteotomy for hallux valgus with intermetatarsal angles of more than 12 degrees. Mild-to-moderate deformities in adolescents can be corrected by proximal or distal metatarsal osteotomy combined with soft-tissue realignment, but care must be taken not to disturb the physis of the fi rst metatarsal. In more severe deformities (hallux valgus angle > 30 degrees and intermetatarsal angle > 13 degrees), the cosmetic correction using either one of those procedures has not been consistently satisfactory. Peterson and Newman recommended double fi rst metatarsal osteotomies, an opening wedge proximally and a closing wedge distally to correct the
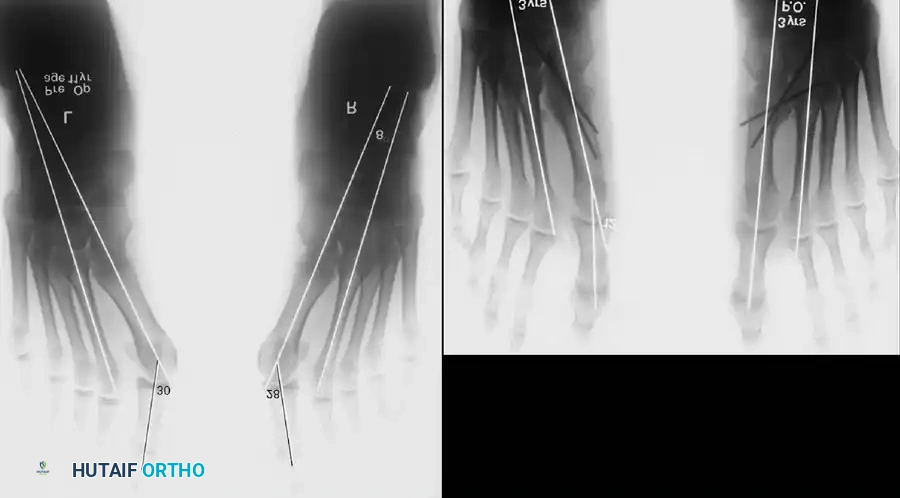
A B
Fig. 78-60 Adolescent hallux valgus treated by proximal osteotomy, adductor tendon release, medial capsular imbrication, and medial eminence removal. A, Preoperative standing radiographs. B, Postoperative standing radiographs. Note incongruous metatarsophalangeal joint on right probably from overcorrection of intermetatarsal angle.
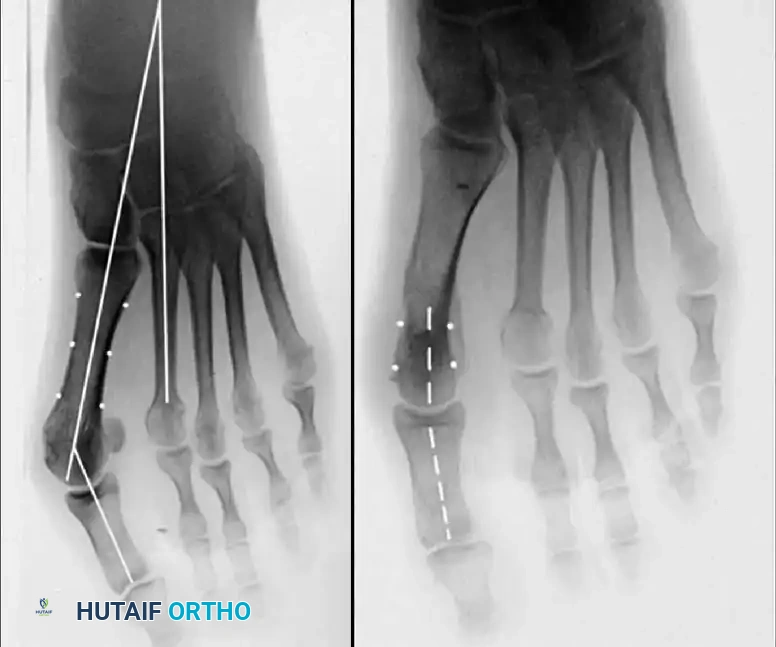
A B C
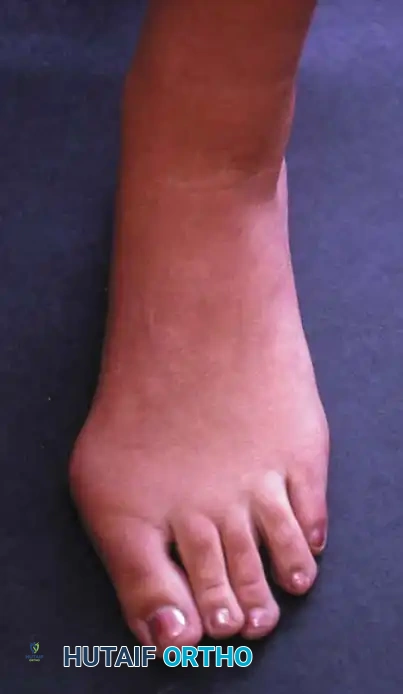
Fig. 78-61 A, Moderately severe hallux valgus in 17-year-old patient. B, Note congenital shortening of second metatarsal on radiograph. C, After chevron osteotomy and adductor release.
abnormal distal metatarsal articular angle and the abnormal intermetatarsal angle. They reported excellent correction in 13 of 15 feet in patients 12 to 21 years old treated with a double osteotomy. The mean age of the patients was 16 years, 10 months. The physes were closed in all patients except one. Aronson, Nguyen, and Aronson modifi ed this technique by using plate and screw fi xation with an osteoperiosteal fl ap to decrease laxity in the medial capsular repair. They reported healing of all osteotomies in 18 feet in 16 patients (average age 14.9 years). At an average follow-up of almost 2 years, the average preoperative hallux valgus angle of 34 degrees was reduced to 16 degrees, and the average intermetatarsal angle was decreased from 14 degrees preoperatively to 6 degrees postoperatively. Deformity recurred in three feet, which the authors attributed to undercorrection. Plate removal was unnecessary in any patient. More recently, Johnson et al. reported goodto-excellent results, at an average follow-up of 27 months, in nine of 10 feet in seven adolescent patients (average age 15 years) treated with double osteotomies. Three patients complained of stiffness of the fi rst metatarsophalangeal joint. Two complications occurred: a nonunion that required open reduction and plate fi xation and an infection that resolved without sequelae. Although the use of Steinmann pins distally ensured optimal alignment, it also resulted in a high rate of fi rst metatarsophalangeal joint stiffness, and the authors reported discontinuing the use of longitudinal pin fi xation. For severe deformities in adolescents, Coughlin and Mann recommended a triple osteotomy, which includes a medial cuneiform opening wedge osteotomy, a distal metatarsal osteotomy to correct the abnormal distal metatarsal articular angle, and an Akin osteotomy. They recommended this procedure only for patients with markedly splayed forefeet and a widened fi rst to fi fth metatarsal angle of more than 30 degrees, an excessive fi rst to second intermetatarsal angle of more than 15 degrees, a hallux valgus angle of more than 35 degrees, and a distal metatarsal articular angle of more than 15 degrees. The Akin osteotomy is described in Technique 78-13. If the deformity at the interphalangeal joint is prominent, when the metatarsus primus varus and hallux valgus have been corrected, a proximal phalangeal osteotomy may be needed. The osteotomy can be performed near the base of the proximal phalanx if the physis is closed or at the neck if the physis is open. If a phalangeal osteotomy is required, the pronation and the valgus at the distal hallux must be corrected. The patient and the family should be informed before surgery that two separate osteotomies may be needed to correct the deformity. The original rationale for arthrodesis of the fi rst metatarsocuneiform articulation was an assumed developmental varus posture of the fi rst metatarsal as the prime offender in the hallux valgus complex. Twenty-two years after fi rst reporting the procedure, Lapidus stated that he was using the procedure less often as a primary treatment of the hallux valgus–metatarsus primus varus complex and was reserving it for severe deformity. Excellent reviews of the procedure for hallux valgus and metatarsus primus varus associated with a hypermobile fi rst ray by Sangeorzan and Hansen, Myerson, Allon, and McGarvey, and Mauldin, Sanders, and Whitmer emphasized the technical challenges of the procedure. Although good or excellent results were reported in about 75% of the feet studied, primary complications included nonunion (10% in the review by Sangeorzan and Hansen, 9.5% in the review by Myerson et al.), malunion with associated dorsal bunion of the fi rst metatarsal and transfer metatarsalgia to the lesser metatarsals, hallux varus, and traumatic cutaneous neuromas. Despite the high rate of radiographic nonunion in the report of Mauldin et al., no patients had symptoms related to the nonunion. Dorsifl exion of the fi rst metatarsal resulting from a malunion at the arthrodesis site can cause a dorsal bunion that severely limits fi rst metatarsophalangeal motion, and transfer metatarsalgia may occur from decreased weight bearing on the fi rst ray. The best results were obtained in patients in whom bone grafts were used to preserve metatarsal length, rigid fi xation was obtained with a two-screw technique, and dorsifl exion at the arthrodesis site was avoided by placing the fi rst metatarsal in approximately 5 degrees of plantar fl exion compared with the preoperative weight bearing angle of inclination of the fi rst metatarsal.
Double First Metatarsal Osteotomies TECHNIQUE 78-19 Peterson and Newman
• Begin a longitudinal incision over the medial side of the fi rst metatarsal, and curve it dorsally over the metatarsophalangeal joint onto the medial side of the base of the proximal phalanx.
• Incise the periosteum in the midline longitudinally, and create a distally based, Y -shaped capsular fl ap, which is retracted distally.
• Expose the metatarsal diaphysis and both metaphyses subperiosteally on the dorsal, medial, and volar surfaces, leaving the periosteum intact laterally (i.e., three fourths of the circumference of the metatarsal is exposed).
• Excise the medial eminence, and preserve the medial sulcus if present (Fig. 78-62A).
• Remove a wedge of bone with its base medial from the junction of the head and neck of the metatarsal to create a transverse closing wedge osteotomy (Fig. 78-62B). The width of the base of the wedge medially is 5 to 8 mm, depending on the size of the bone and the amount of correction desired. In adolescent patients, the size of the bone does not vary much, although that of boys usually is larger than that of girls. The angle of the apex differs with the degree of deformity, but usually it is approximately 20 degrees. The angle should be
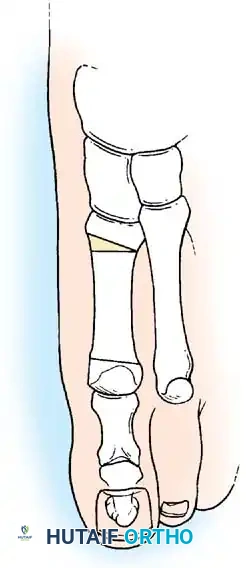
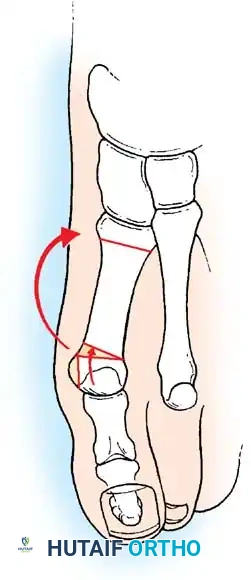
A B
Fig. 78-62 A and B, Double fi rst metatarsal osteotomies (see text). measured carefully with a sterile goniometer. This closing wedge allows the entire head of the metatarsal, the metatarsal and proximal phalangeal joint surfaces, and the great toe to angle medially to a neutral position, placing the phalanges in line with the fi rst metatarsal shaft. This procedure corrects the hallux valgus deformity without disturbing the capsular or articular surface relationships of the metatarsophalangeal joint. At this point, any malrotation of the toe can be corrected.
• Leaving the distal osteotomy without fi xation, hold the diaphysis of the metatarsal with a bone clamp, and make a second transverse osteotomy perpendicular to the metatarsal about 1.5 cm distal to the proximal articular surface of the metatarsal.
• Insert the 20-degree wedge that was removed from the distal end of the bone into this proximal opening wedge osteotomy to correct the abnormally wide fi rst to second intermetatarsal angle.
• Insert a 3 / 16 -inch smooth Steinmann pin under direct vision, beginning at the tip of the great toe 2 or 3 mm below the end of the nail in its midpoint.
• Drive the pin through the distal phalanx, the proximal phalanx, and all four pieces of the metatarsal. When the pin gets to the metatarsal, its position in the closing wedge osteotomy can be seen. Close the osteotomy, and drill the pin down the shaft of the metatarsal.
• Similarly, at the proximal osteotomy, the tip of the pin can be seen as it is carried into the proper position. Place the bone graft, and drive the pin into the graft and into the proximal metatarsal fragment to provide fi rm fi xation. This prevents malunion in the sagittal and axial planes. It does not control rotation in the frontal (coronal) plane (Fig. 78-63). Rotation of

Fig. 78-63 Intramedullary fi xation with Steinmann pin secures longitudinal alignment of metatarsal and both phalanges.
the fragment and the hallux is prevented by holding the hallux in neutral rotation while the Y capsular fl ap is resutured (into the bone if necessary). A well-applied forefoot dressing also helps to control rotation.
• Apply a bulky compression bandage, and a few days after surgery apply a short leg, non–weight bearing cast.
AFTERTREATMENT Six weeks after surgery, the cast and pin are removed (without anesthesia), and a short leg walking cast is applied, which is worn approximately 5 weeks.
Modifi ed Peterson Bunion Procedure TECHNIQUE 78-20 Aronson, Nguyen, and Aronson
• Make a straight medial incision from the palpable base of the fi rst metatarsal to the midproximal phalanx. While retracting the veins and nerves dorsally and plantarly, use blunt dissection to expose the periosteum of the metatarsal. Raise fl aps dorsal to the extensor hallucis longus tendon and plantar to the tibial sesamoid, exposing the plantarly subluxed abductor hallucis tendon.
• With a marking pen, identify the location of the medial periosteal incision. The incision extends from just distal to the physis to the base of the bunion and branches in a U -shaped fashion to include the bunion and the proximal phalanx (Fig. 78-64A). Sharply incise the periosteum from the physis to the U , and incise the U dorsally and plantarward across the metatarsophalangeal joint to the base of the proximal phalanx.
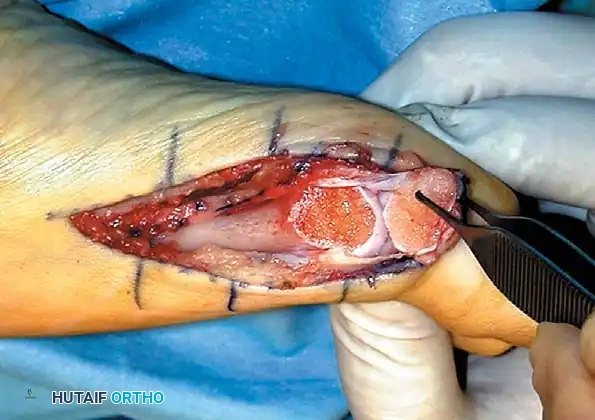
A B
C D
E F
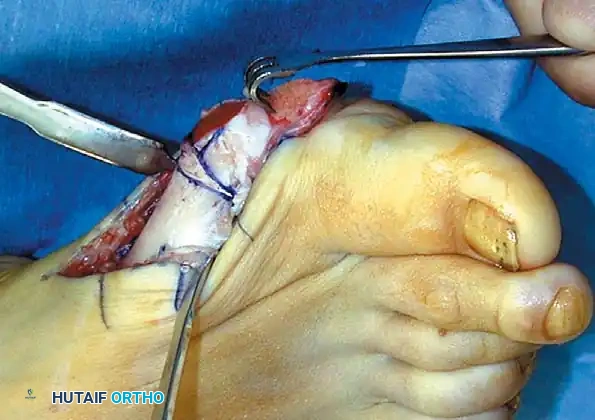
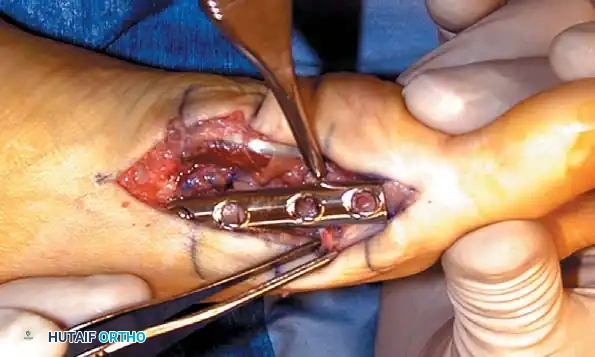
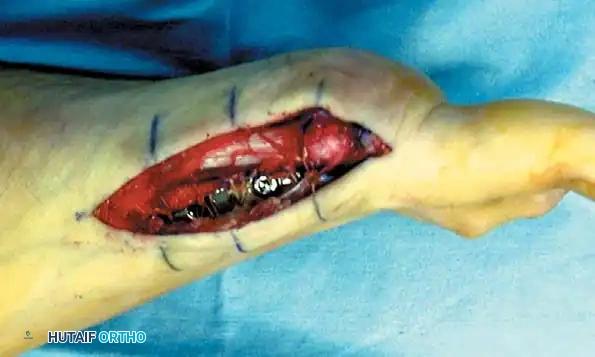
G
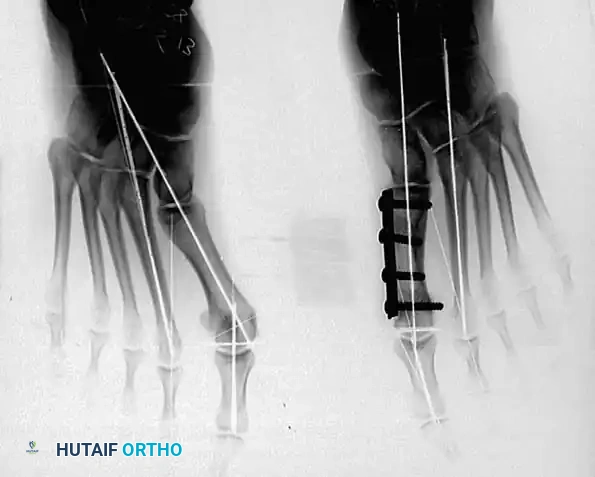
AFTERTREATMENT The patient remains non–weight bearing in the short leg cast for 6 weeks, at which time radiographs are obtained. If healing is evident, weight bearing to tolerance is allowed in a hard-soled shoe or sandal, which is worn for 4 weeks. Active range of motion of the ankle, foot, and toes is begun when the cast is removed.
Modifi ed Peterson Bunion Procedure TECHNIQUE 78-20 Aronson, Nguyen, and Aronson—cont’d
• Use a beveled osteotome or oscillating saw to raise an osteoperiosteal distally based fl ap over the bunion (Fig. 78-64B). Raise the fl ap from distal to proximal with a 1-mm thickness of bone.
• Retract the fl ap distally, and incise the residual capsular attachments to expose the metatarsal head (Fig. 78-64C).
• Add Hohmann retractors subperiosteally at the metatarsal neck, and use an oscillating saw to remove the remaining bunion at the sulcus. Save the bone wafer for possible bone grafting.
• Calculate the size of the closing wedge using preoperative standing radiographs and intraoperative fl uoroscopy. This calculation is based on exact measurement of the hallux valgus angle, either on the preoperative radiograph (taking into account any magnifi cation) or by determining the sine of the angle using the diameter of the metatarsal at the level of the cut as the hypotenuse.
• Make the distal cut at the base of the previous bunion cut, and base the proximal cut on the previously calculated number of millimeters. For example, the width of the wedge is exactly half the diameter of the metatarsal for a 30-degree hallux valgus angle (sine 30 = 0.5). Leave enough distal metatarsal head to allow insertion of a single 3.5-mm screw (Fig. 78-64D). Make the osteotomy with an attempt to greenstick the lateral cortex. Save the wedge for later bone grafting.
• Make a second cut transversely in the proximal metatarsal, leaving enough space for another 3.5-mm screw between the cut and the physis. Lever open the proximal osteotomy with a straight osteotome, again attempting to greenstick the lateral cortex. The precalculated wedge (degrees to millimeters) is derived from the prior bone wedges to equal the intermetatarsal angle exactly. Insert this wedge into the proximal osteotomy, creating an opening wedge medially to reduce the intermetatarsal angle. Close the distal osteotomy manually.
• Stabilize the osteotomies with a four-hole small fragment tubular plate or a fi veor six-hole mini tubular plate with three to fi ve 3.5-mm screws (Fig. 78-64E). Plate size is determined by the space available between the physis and the metatarsal head. Insert the fi rst screw into the proximal hole, loosely fi xing the plate. The distal hole of the plate must fi t exactly over the metatarsal head.
• Reduce the sesamoids indirectly by manually supinating the great toe.
• Pull the distally based osteoperiosteal fl ap under the plate to cover the distal osteotomy, and pull it slightly dorsal to hold the supination correction. Be careful that the fl ap is not too tight, or it would decrease metatarsophalangeal motion.
• Place the distal screws across the osteoperiosteal fl ap into the metatarsal head.
• Place the remaining two or three central screws with inboard compression of each osteotomy.
• Close the periosteum over the plate up to the distal end, where it is approximated to the osteoperiosteal fl ap (Fig. 78-64F and G).
• Transfer the abductor hallucis tendon from the plantar to medial base of the proximal phalanx or to the extensor hallucis longus over the periosteal closure.
• It is imperative to confi rm metatarsophalangeal motion before closing.
• Apply a short leg cast to the toes over loosely placed cotton gauze over the wound and in the fi rst web space.
First Cuneiform Osteotomy
Coughlin recommended the fi rst cuneiform osteotomy for severe deformities with a hypermobile fi rst ray. It can be combined with a distal fi rst metatarsal osteotomy and an Akin proximal phalangeal osteotomy (triple osteotomy).
🔪 Surgical Technique 78-21
• Make a medial longitudinal incision over the medial cuneiform.
• Dissect the tibialis anterior subperiosteally, and lift it anteriorly, leaving its remaining portion intact on the base of the fi rst metatarsal.
• Identify the cuneiform-navicular and cuneiform–fi rst metatarsal articulations with a small knife blade. The medial cuneiform is 3 cm wide × 3 to 3.5 cm long.
• Use a 9-mm-wide saw blade on a power sagittal saw to make the osteotomy in the center of the cuneiform, parallel to the cuneiform-metatarsal joint, which would be at an angle of about 10 to 15 degrees distal to the coronal plane. This angle of the osteotomy would give the least disruption of the intermediate cuneiform–second metatarsal and medial cuneiform articulations.
• Because the medial cuneiform is only about 1.5 cm deep, carry the saw blade through a little more than 1 cm, and use a small blade (4 mm wide) to create perforations through the lateral cortex. This maintains some stability of the bony fragments and prevents them from shifting in a dorsoplantar direction.
Hallux Valgus in Cerebral Palsy
Symptomatic hallux valgus in patients with cerebral palsy is uncommon. It occurs most commonly in spastic diplegic patients with equinovalgus deformity. Varus of the fi rst metatarsal may contribute to the hallux valgus deformity. A symptomatic dorsal bunion also may occur if extension of the fi rst metatarsal develops secondary to muscle imbalance. Indications for surgery include pain (usually at the fi rst metatarsophalangeal joint), inability to fi nd properly fi tted shoes, interference with walking, and recurrent skin breakdown because of pressure from bony deformity.
In their evaluation of 14 feet in 11 patients with cerebral palsy, Renshaw, Sirkin, and Drennan concluded that arthrodesis of the fi rst metatarsophalangeal joint was necessary to prevent recurrence of the deformity. Goldner and Gaines recommended proximal osteotomies of the fi rst metatarsal and proximal phalanx to correct metatarsus primus varus and hallux valgus. They included adductor transfer to the fi rst metatarsal and lateral capsular release, medial capsular imbrication, and exostectomy. If the fi rst metatarsal is extended and causes hallux fl exus and symptomatic dorsal bunion, the anterior tibial muscle is transferred to the second metatarsal, and the fl exor hallucis longus tendon is moved to the extensor hallucis longus tendon proximal to the fi rst metatarsophalangeal joint. Arthrodesis of the fi rst metatarsophalangeal joint is the most reliable and enduring procedure for spastic cerebral palsy patients with hallux valgus. Davids et al. reported fi rst metatarsophalangeal joint arthrodesis in 26 patients with cerebral palsy (mean age 16 years). At an average 5year follow-up, they found signifi cant improvements in the hallux valgus and intermetatarsal angles and in pain relief, function, and appearance of the foot. These authors suggested that hallux valgus in children with cerebral palsy is best treated by fi rst metatarsophalangeal arthrodesis. If the hindfoot is not in marked valgus, a proximal osteotomy of the fi rst metatarsal or an arthrodesis of the fi rst metatarsocuneiform joint to correct metatarsus varus combined with an Akin osteotomy of the proximal phalanx, transfer of the adductor hallucis to the fi rst metatarsal, and lateral capsular release to correct the hallux valgus deformity may result in permanent correction. If a fi rst metatarsal extension posture causes a dorsal bunion, the distal fragment can be plantar fl exed at the same time the varus is corrected. If arthrodesis of the fi rst metatarsophalangeal joint is performed, the recommended position is 15 to 20 degrees of valgus and 10 to 15 degrees of extension, as measured by the plantar surface of the foot and hallux. The operative techniques for the metatarsal and phalangeal osteotomies are described earlier in this chapter, as is the technique for arthrodesis of the fi rst metatarsophalangeal joint. When an osteotomy is combined with a soft-tissue procedure, the latter should be performed before the metatarsal is inclined laterally.
Complications after Surgery for Hallux Valgus
Complications after hallux valgus procedures can be discouraging for orthopaedic surgeons. Long-time practice experience, detailed physical and radiographic evaluations, excellent surgical technique, and careful postoperative care do not guarantee that a complication will not occur. Recurrence of the original hallux valgus deformity or development of the opposite deformity, hallux varus, malunion, clawed hallux, transfer keratotic lesions that cause
🔪 Surgical Technique 78-21
• Open the plantar aspect of the osteotomy with a small, smooth-tipped lamina spreader or small osteotome.
• Using iliac crest allograft material, cut a 1-cm, wedge-shaped graft. (We have found these allografts to be useful in procedures around the foot.) Tap the graft in place, reducing the fi rst metatarsal varus. Although this usually is stable, Coughlin recommended using crossed 0.062-inch Kirschner wires to ensure that the graft does not slip.
• If the distal metatarsal articular angle is excessive, perform a closing wedge osteotomy at the metatarsal head and neck junction.
• Make a medial incision over the medial eminence, and remove any medial eminence present (usually there is little medial eminence in juvenile patients).
• Make a 5to 8-mm-wide, laterally based wedge osteotomy in a transverse or axial direction. Ensure that the width of the blade (1 mm) is included in the measurements on each side of the wedge (the wedge itself should not be more than 4 to 7 mm wide).
• Remove the medially based wedge of bone. If needed, the wedge can be used as additional bone graft in the cuneiform osteotomy.
• Correct the distal metatarsal articular angle, and fi x the osteotomy with two 0.062-inch Kirschner wires inserted from proximal to distal. If the wires penetrate the joint, they can be backed out into subchondral bone.
• If excessive hallux valgus interphalangeus remains, or if the double osteotomy at the cuneiform and distal fi rst metatarsal does not adequately correct the deformity even with soft-tissue repair, perform a third osteotomy at the base of the proximal phalanx. The Akin osteotomy (see Technique 78-13) consists of a 3to 4-mm wedge, based medially, just distal to the insertion of the extensor hallucis brevis and held with either sutures, as recommended by Beskin, or crossed pins, as recommended by Frey. We use pins placed longitudinally across the interphalangeal joint from distal to proximal, ending in the subchondral bone of the base of the proximal phalanx. intractable discomfort, and other complications all have been reported to occur after surgery. This section presents the most common reasons for failure of hallux valgus surgery. The clinical, anatomical, radiographic, and surgical nuances that may start the path to a complication are discussed, and recommendations to reduce the chance of a poor result are offered.
Preventing Complications In the treatment of hallux valgus, preventing a complication begins at the time of initial evaluation of a patient. A careful physical examination can identify problems that ultimately may lead to failure in certain patients. Before any decision is made regarding treatment of hallucal disorders, the feet should be examined carefully with the patient sitting, standing, and lying supine and prone. As much or more time should be spent evaluating the deformity clinically as is spent reviewing the radiographs. Although a bunion typically is present with hallux valgus deformity, this is not always the case. Also, fi rst metatarsal varus is not always present. Rotation of the hallux is an important element of the deformity and may tell a great deal about the prospects for a successful outcome, as would the condition of the entire capsulosesamoid apparatus. Recurrence of hallux valgus deformity is more likely when subluxation or dislocation of the fi rst metatarsophalangeal joint is present. Pronation of the hallux (frequently an indication of severe deformity), dislocation of the sesamoids laterally, fi xed deformity, pes planus, joint hypermobility, and a tight heel cord may increase the likelihood of recurrence of the deformity after hallux valgus repair. Noting these clinical points may help to avoid failed hallux valgus surgery. As in the physical examination, radiographic examination of the feet is incomplete without weight bearing views (Boxes 78-3 to 78-6). The difference in the magnitude of the deformity on non–weight bearing and weight bearing views often is striking. A concise, detailed evaluation of weight bearing radiographs is imperative before planning a procedure to correct hallux valgus deformity. Correction of each anatomical component contributing to the hallux valgus deformity is necessary to avoid or correct a complication.
Recurrent Deformity after Simple Bunionectomy Recurrence of the deformity is a frequent complication after simple bunionectomy (medial eminence excision and capsular imbrication). Although it is tempting to do a minor procedure for a minor deformity, soft-tissue repair alone should not be done except in elderly patients with skin breakdown over the medial eminence even if the hallux is congruously reduced on the fi rst metatarsal head, and the hallux valgus and intermetatarsal angles are normal. A fi rst web space dissection and lateral release always should
Box 78-3 • Observations on Weight Bearing Anteroposterior Views
Varus of fi rst metatarsal (normal intermetatarsal angle is ≤ 9 degrees) Severity of valgus of hallux (normal hallux valgus angle is ≤ 15 degrees) Congruity or incongruity of fi rst metatarsophalangeal joint (hallux valgus deformity can exist even in a congruous joint) Length of fi rst metatarsal relative to second (is second metatarsal > 6 to 7 mm longer than fi rst?) Subluxation of sesamoid bones (if present, to what extent?) Well-developed facet between fi rst and second metatarsals, suggesting diffi culty displacing fi rst metatarsal laterally at fi rst metatarsocuneiform joint Sloping of fi rst metatarsocuneiform articulation laterally to medially at a severe angle Degenerative arthritic changes at interphalangeal, metatarsophalangeal, or metatarsocuneiform articulations Hallux valgus interphalangeus of ≤ 10 degrees in neutral fl exion and extension of interphalangeal joint Excessive distal metatarsal articular angle (normal distal metatarsal angle is ≤ 15 degrees) Convex medial bowing of proximal phalanx
Box 78-4 • Observations on Weight Bearing Lateral Views
Observations on weight bearing lateral views that help determine the degree of valgus thrust on hallux metatarsophalangeal joint during the stance phase of gait, which infl uences treatment decisions: Collapse deformity of metatarsocuneiform, cuneiform-navicular, or naviculotalar articulation Increased talocalcaneal angle, suggesting valgus posture of hindfoot Calcaneal inclination angle ( ≥ 10 degrees is normal; reduced angle indicates valgus hindfoot and possibly pes planus) Dorsifl exion of fi rst metatarsal, indicating incongruous reduction into concavity of base of proximal phalanx Angle between diaphysis of proximal phalanx and diaphysis of fi rst metatarsal ( ≥ 20 degrees is normal) Delineation of cortical outlines of fi fth, fourth, and third metatarsals even if overlapped (if fi fth and fourth metatarsal cortical borders are not clearly outlined on weight bearing lateral radiograph, pronation of foot should be suspected) be done with medial eminence removal and medial capsular imbrication. If the hallux does not remain in the desired position at the conclusion of surgery, adduction of the hallux recurs. The adductor must be released not only from the proximal phalanx, but also from its conjoined insertion with the lateral head of the fl exor hallucis brevis on the fi bular sesa-
Box 78-5 • Observations on Non–Weight Bearing Medial Oblique Views
Arthritic changes in fi rst metatarsal–medial cuneiform articulation Calcaneonavicular tarsal coalition not visible on other views
Box 78-6 • Observations on Weight Bearing Sesamoid View
Observations on weight bearing sesamoid view (especially useful in evaluation of recurrent hallux valgus deformity): Repositioning the intrinsic and extrinsic muscles and the capsulosesamoid apparatus into their anatomical positions is the key to correction, and the weight bearing sesamoid view is helpful in planning the best means to accomplish this. Location of sesamoid bones in relation to their facets on fi rst metatarsal (often diffi cult on anteroposterior view) moid. Whether reattaching the adductor to the capsule at the lateral side of the fi rst metatarsal head (or through a tunnel in the metatarsal neck) is an improvement over adductor tenotomy alone in correcting the deformity and preventing recurrence is inconclusive. Tenotomy alone probably is effective, but the entire adductor insertion must be incised, and a section must be removed proximal to the metatarsophalangeal joint. The capsular release and repair also are important factors that may contribute to recurrence. The lateral capsule is incised beginning at the lateral margin of the extensor hallucis longus tendon and progressing plantarward to the lateral edge of the fi bular sesamoid, or, in Mann’s technique, multiple perforations are made in the lateral capsule, and the capsulotomy is completed by manually placing the hallux in 20 to 25 degrees of varus before returning it to a normal position. Also, if the excessive medial capsule is not trimmed to hold the hallux in correct alignment, recurrence is likely. Failure to reposition the articular surface of the metatarsal head to a normal 5to 15-degree alignment with the metatarsal shaft (see Fig. 78-8) would compromise correction. If the metatarsophalangeal joint is congruent, but is in a position of unacceptable valgus, correction can be obtained by a proximal phalangeal osteotomy, distal metatarsal osteotomy, or both if needed. The distal metatarsal osteotomy (chevron confi guration) allows for a slight tilting of the metatarsal head to correct the valgus position of the articular surface if a medially based sliver of bone no wider
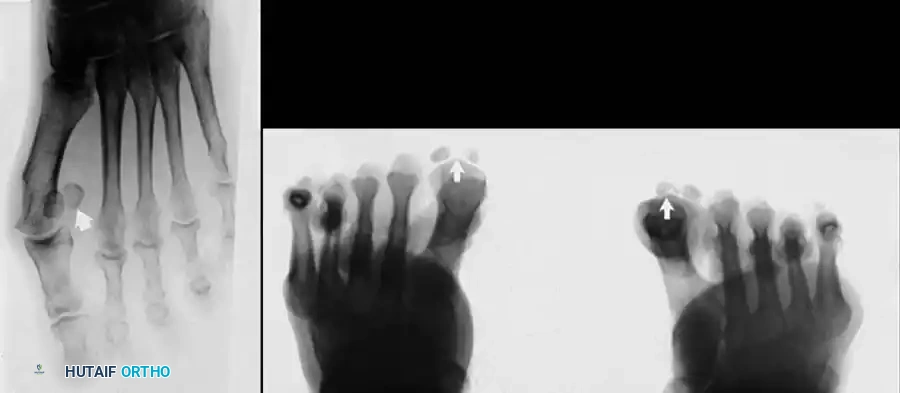
A
B
Fig. 78-65 A, Failure to reduce sesamoid sling apparatus after soft-tissue procedure for hallux valgus. B, Recurrence of deformity caused pain beneath tibial sesamoid. than the saw blade is removed from the dorsal proximal side of the chevron cut. A phalangeal osteotomy corrects another 3 to 4 degrees of valgus of the hallux, but this is primarily for interphalangeal joint valgus and most often is used as supplemental correction with a soft-tissue procedure. Failure to reduce the sesamoid sling allows the lateral head of the fl exor hallucis brevis muscle to pull the hallux into valgus along with the extensor hallucis longus and fl exor hallucis longus muscles (Fig. 78-65). These extrinsic muscles, particularly the fl exor hallucis longus, bowstring laterally across the metatarsophalangeal joint, increase the valgus moment, and increase the chances of recurrence of the deformity. Releasing the capsulosesamoid ligament in an axial plane is integral to repositioning the sesamoid apparatus. Postoperative care may be as crucial to success of hallux valgus surgery as the actual procedure, especially after softtissue repair. Adequate serial dressing changes and taping (with 1 / 2 -inch adhesive tape) maintain the hallux in the desired position (0 to 5 degrees of valgus or 10 to 15 degrees of valgus if the fi bular sesamoid has been excised). These dressing changes must continue until the hallux rests unattended in the proper alignment, which usually takes 4 to 8 weeks. A toe spacer is worn for another month. In addition, an abnormally long fi rst ray, made even longer by straightening of the toe, can contribute to the recurrence of the deformity. Stockings and narrow shoes must be avoided for at least 12 weeks because of their deforming force.
Recurrent Hallux Valgus with Normal Distal Metatarsal Angle after Bunionectomy The magnitude and rigidity of the recurrent deformity should be used as guides to treatment. As a rule, a deformity that occurred after a soft-tissue procedure should not be treated with another soft-tissue procedure, unless the deformity is completely fl exible (the hallux can be easily reduced into varus and the fi rst metatarsal freely translates laterally by manual pressure). First web space dissection, lateral release, and repeat medial capsular imbrication with manual medial displacement of the fi rst metatarsal are recommended in patients with mild, fl exible deformity that is symptomatic despite appropriate shoes. For severe deformity, Kitaoka and Patzer recommended proximal fi rst metatarsal osteotomy with distal soft-tissue reconstruction (see Technique 78-8). They emphasized, however, that although their results were satisfactory, they were not as successful as well-performed primary surgeries that appropriately corrected the valgus deformity. Indications for a soft-tissue repair are listed in Box 78-7.
Box 78-7 • Indications for Soft-Tissue Repair for Recurrent Hallux Valgus
First-second intermetatarsal angle of ≤ 13 degrees Hallux valgus angle of ≤ 30 degrees Normal distal metatarsal articular angle ( < 10-15 degrees) Minimal degenerative changes at fi rst metatarsophalangeal joint Fifty to 60 degrees of passive motion of fi rst metatarsophalangeal joint Subluxation but not complete dislocation of sesamoid bones Ability to displace fi rst metatarsal laterally at metatarsocuneiform joint from its abnormal varus inclination Some degree of longitudinal arch present when weight bearing, determined clinically and radiographically If arch is improved with passive dorsifl exion of hallux while standing, deformity is not fi xed (structural pes planus), and a soft-tissue repair is likely to endure
First Web Space Dissection, Lateral Release, and Repeat Capsular Imbrication (Hallux Valgus Angle < 30 Degrees and First-Second Intermetatarsal Angle < 15 Degrees) TECHNIQUE 78-22
• Make a straight midline medial incision, extending from the middle of the proximal phalanx to 3 to 4 cm proximal to the fi rst metatarsophalangeal joint. This incision is in the plane between the most medial branch of the superfi cial peroneal nerve and the dorsomedial aspect of the hallux and the proper branch of the medial plantar nerve to the medial side of the hallux. This nerve rests plantar-medially and blends with overlying superfi cial fascia so well that it is quite vulnerable to injury.
• Raise a dorsal fl ap the entire length of the incision until the extensor hallucis longus tendon and dorsal aspect of the fi rst metatarsophalangeal joint are exposed proximally, and the extensor hood is exposed distally. The plane of dissection of the dorsal fl ap is important. Do not enter the extensor mechanism, but raise the fl ap adjacent to it so that the fl ap would carry with it the dorsal veins and dorsal sensory nerve. Use blunt dissection proximally because the dorsal nerve frequently is in the center of the incision where the medial eminence joins the metatarsal shaft.
• Using an inverted L confi guration, extensively expose the area dorsally (relative to the initial procedure) to maximize the effectiveness of the capsular imbrication. Commonly, a thin slip of accessory extensor tendon is visible. This is a helpful landmark; however, if it is not present, locate the dorsal and medial juncture of the rounded distal fi rst metatarsal head.
• Using either the medial aspect of the accessory tendon or the dorsomedial border of the fi rst metatarsal as a starting point, complete a capsular-periosteal excision from the fi rst metatarsophalangeal joint line to the junction of the middle and distal thirds of the metatarsal.
• Begin the transverse limb of this incision at the joint line. Traction on the hallux helps to identify the distal edge of the metatarsal head and avoid injury to the articular cartilage. The transverse limb extends from dorsal to plantar through the capsule and the conjoined capsular–abductor hallucis tendon insertion and terminates 2 to 3 mm medial to the tibial sesamoid.
• With a small, pointed blade, carefully raise the medial capsule from bone. Begin at the plantar aspect, and develop the capsular fl ap until the junction of the inverted L is reached. Dorsally, at the joint line, raise the fl ap by sharp dissection with the point of the small bladed knife. Avoid penetrating or placing a button hole in the capsule because an intact fl ap results in stronger capsular repair.
• When this capsular fl ap is elevated, and the hallux is placed in marked valgus, almost the entire head of the metatarsal can be seen by distracting, dorsifl exing, and plantar fl exing the hallux. Avoid the temptation to reach across the joint to release the lateral capsuloligamentous structures and continuous intrinsic tendon insertion through the medial incision. Although occasionally it may be successful, the predictability of permanent correction is improved with a formal web space dissection and direct exposure of the structure to be released. This surgery is for recurrence of valgus deformity, so every effort must be made to decrease the likelihood of a second failure. A second incision in
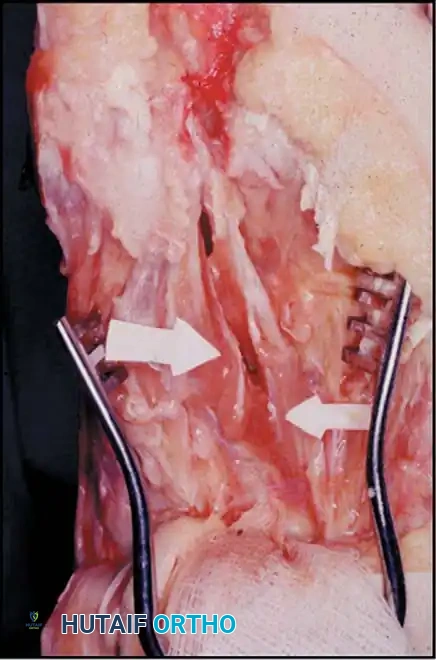
First Web Space Dissection, Lateral Release, and Repeat Capsular Imbrication (Hallux Valgus Angle < 30 Degrees and First-Second Intermetatarsal Angle < 15 Degrees) TECHNIQUE 78-22—cont’d the fi rst web space into the fi rst intermetatarsal space allows more complete lateral release.
• Return the dorsal skin fl ap to its anatomical position.
• Bring the hallux to neutral, and begin an incision 2 to 3 mm proximal to the web space. With varus tension on the hallux, make an incision proximally 4 to 5 cm. Although this seems to be a lengthy incision just to release the lateral structures, exposure must be complete, and with a shorter incision the skin would be under constant tension. The deeper dissection is kept at or distal to the metatarsal head.
• When the skin incision is complete, cauterize any dorsal veins inhibiting deeper dissection. Using blunt dissection, expose and retract the subcutaneous fat and deep peroneal nerve.
• Clear the distal aspect of the web space of the transverse cutaneous ligaments (natatory ligaments) with blunt dissection to expose the fi rst dorsal interosseous muscle and overlying fascia, the superfi cial transverse intermetatarsal ligaments, and the depth of the web space plantarward. In this space, the neurovascular bundle emerges from beneath the distal aspect of the intermetatarsal ligament.
• The adductor hallucis tendon rests dorsal to the deep transverse intermetatarsal ligament. To expose the adductor muscle-tendon unit, place a small self-retaining retractor between the fi rst and second metatarsals so that the distal edge of the retractor is proximal to the deep transverse intermetatarsal ligament, and the lateral arm of the retractor is beneath or deep to the fi rst dorsal interosseous muscle. Spread the fi rst and second metatarsals, and continue blunt dissection, exposing the adductor hallucis, the conjoined tendon and its muscle belly, the juncture of the adductor hallucis muscle with the lateral head of the fl exor hallucis brevis, the adductor hallucis tendon with the lateral capsule of the fi rst metatarsophalangeal joint, and the lateral border of the fi bular sesamoid. It is diffi cult to distinguish the adductor tendon from the capsule and fi bular sesamoid; the easiest way is to fi nd the junction proximal to the joint where the adductor muscle becomes confl uent with the muscle belly of the lateral head of the fl exor hallucis brevis (Fig. 78-66).
• With the adductor hallucis muscle-tendon unit clearly demarcated and retracted laterally, remove the tendon from the capsule and the capsulosesamoid ligament and the lateral border of the fi bular sesamoid. This tendon’s insertion is more plantar than anticipated. Ensure that all of it is resected, particularly from its fi bular sesamoid attachment.
• Displace the tendon laterally, and remove it by sharp dissection from its insertion into the base of the proximal phalanx. This is a wider insertion than anticipated.
Fig. 78-66 Adductor muscles become confl uent with lateral head of fl exor hallucis brevis.
• Bring the tendon proximally, dissecting on its deep or plantar surface.
• When proximal to the metatarsophalangeal joint, cut out a section of the tendon, and place the muscle in the depths of the wound. Removing the adductor tendon without severing the deep transverse intermetatarsal ligament contiguous with its plantar surface is diffi cult. Section this ligament to allow medial mobility of the fi bular sesamoid; remember that the neurovascular bundle to the fi rst web space is immediately plantar to the ligament.
• With the fi bular sesamoid visible in an axial plane, release it from the capsulosesamoid ligament, exposing the articular surface of the fi bular sesamoid. This allows evaluation of the mobility of the sesamoid.
• If the fi bular sesamoid cannot be placed into its facet on the inferior surface of the fi rst metatarsal head or the hallux reduced on the fi rst metatarsal head, section the lateral capsule from dorsal (at the level of the extensor hallucis brevis and extensor hallucis longus tendons) to the fi bular sesamoid. This release is in the frontal or coronal plane.
• At this point, evaluate the mobility of the fi rst metatarsal, the hallux, and the sesamoids. If all components contributing to the deformity can be corrected passively, most of the correction probably would be maintained. (This repair for recurrent hallux valgus does not consider the variant of excessive valgus posture of the articular surface of the fi rst metatarsal head [distal metatarsal articular angle]). If the fi bular sesamoid is excised, however, even more caution is required to avoid overtightening the medial capsule, which would cause a varus deformity.
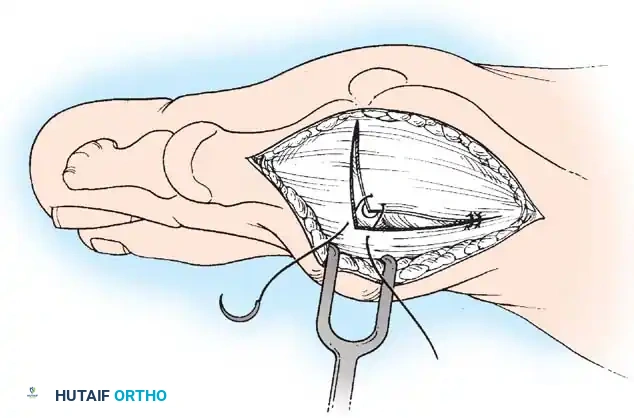
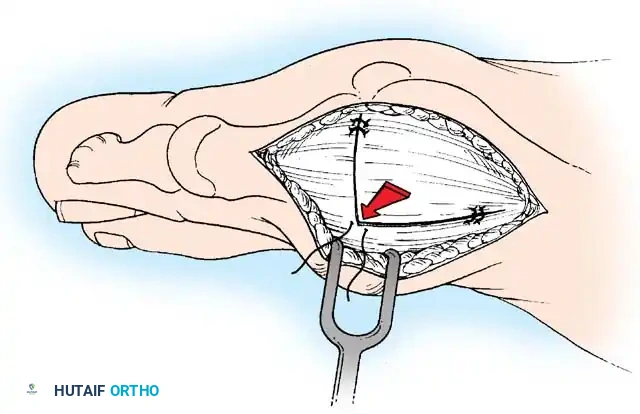
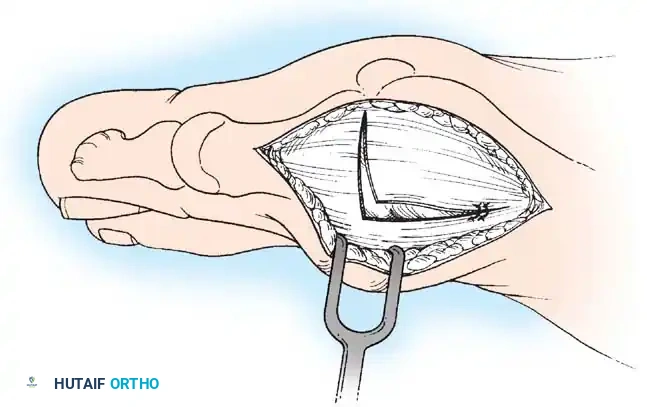
A
C
B
Fig. 78-67 Suture placement to anchor capsule to proximal confl uence of fi rst metatarsal periosteum and tendon of abductor hallucis. A, Two proximal sutures anchor capsule to proximal confl uence of fi rst metatarsal periosteum and tendon of abductor hallucis. B, Corner of raised capsular fl ap is sutured beneath corner of stationary dorsal capsule. C, Two or three sutures are placed in transverse limb of incision.
• While an assistant displaces the fi rst metatarsal laterally and places the hallux congruously reduced on the fi rst metatarsal head under direct view, begin the capsular repair. Do not displace the fi rst metatarsal too far laterally because this may lead to a hallux varus deformity. When the hallux is placed in a neutral position and held there with a capsular repair, the hallux rests in varus relative to the articular surface of the fi rst metatarsal, even though it appears to be well aligned. Initially, displace the fi rst metatarsal completely laterally, until it abuts the second metatarsal. This position of the fi rst metatarsal produces a negative intermetatarsal angle. Allow the fi rst metatarsal to spring back about one half of the total displacement, and reduce the hallux on the fi rst metatarsal head under direct observation. Close the capsule to maintain this position.
• Place two sutures proximally to anchor the capsule to the proximal confl uence of the fi rst metatarsal periosteum and the tendon of the abductor hallucis (Fig. 78-67A). This proximal anchoring would allow the transverse limb of the repair to have a stable base against which to pull, allowing the capsular repair to exert maximal restraints on the hallux and fi rst metatarsal. Use 3-0 absorbable sutures on a small needle, and increase the curve of the needle maximally to facilitate passage through cramped areas. Use the “two-bite” technique in suture passing; otherwise, the strength of repair may be compromised.
• To close the dorsal capsule, the corner of the raised capsular fl ap is tucked under the dorsal corner of the capsule. To accomplish this, start the dorsal capsule closure through the transverse limb, 3 to 4 mm from its junction with the longitudinal limb of the dorsal capsule. This is an outside-in stitch. Reverse the needle, and enter the raised capsular fl ap on its transverse limb 3 to 4 mm from its junction with the longitudinal limb of the capsular fl ap. This also is an outside-in stitch. Reverse the needle again, and reenter the capsular fl ap that was just exited; however, reenter it on the opposite side (its longitudinal limb), from inside out. At this point, ensure that the suture moves freely in the dorsal and the distal sides of the raised capsular fl ap. To lock this stitch at any passage would compromise not only the strength of the capsular repair, but also the entire procedure.
• When it is known that the suture is freely movable, make the last stitch by reversing the needle for a fi nal time and passing an inside-out suture through the stationary dorsal capsule, 3 to 4 mm proximal to the junction of dorsal limb and stationary transverse limb. Pull on each end of the suture, in turn, ensuring that the suture moves through the fl aps freely. Maintaining the exact position of correction regarding the fi rst metatarsal and hallux alignment, pull the corner of the raised capsular fl ap beneath the corner of the stationary dorsal capsule (Fig. 78-67B).
• Place two or three sutures in the transverse limb not more than 2 to 3 mm from the joint (Fig. 78-67C). Occasionally, 2 to 3 mm of excessive capsule must be excised from the transverse side of the raised capsular fl ap. Do not excise too much of the a low heel and round toe box, are discouraged for at least 3 months. For postoperative management, a “rule of three” applies: 3 days of rest and elevation, 3 weeks in a postoperative shoe and dressing, and 3 months before the swelling is suffi ciently reduced to attempt wearing a low-heeled, round toe box dress shoe with a soft, yielding material for the box.
Recurrent Valgus Deformity with Abnormal Distal Metatarsal Articular Angle When an increased distal metatarsal articular angle is present in recurrent hallux valgus, reducing the hallux would place the metatarsophalangeal joint incongruously on the metatarsal head (Fig. 78-68). The phalanx would rest in varus on the fi rst metatarsal head and would leave the lateral aspect of the fi rst metatarsal head uncovered. This deformity is corrected with medial capsulorrhaphy, distal metatarsal displacement osteotomy (chevron; see Technique 78-4), and fi rst web space dissection with lateral soft-tissue release. Osteonecrosis of the fi rst metatarsal head is a risk with distal metatarsal osteotomy and lateral release, but the extent of necrosis and its clinical signifi cance are unknown. This complication probably is not to be feared as much as previously thought.
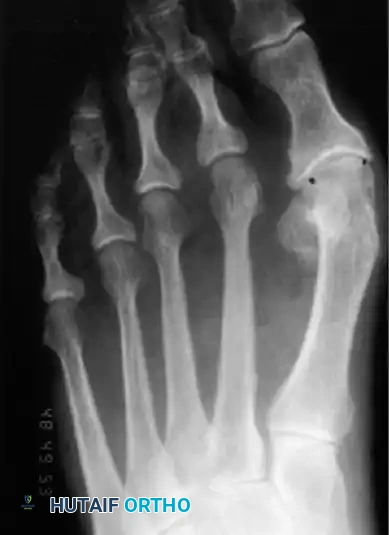
First Web Space Dissection, Lateral Release, and Repeat Capsular Imbrication (Hallux Valgus Angle < 30 Degrees and First-Second Intermetatarsal Angle < 15 Degrees) TECHNIQUE 78-22—cont’d capsule, or place the sutures in the transverse capsular limb too far from the joint. Overtightening of the transverse capsular repair can pull the hallux into varus, which may not be recognized until weight bearing radiographs are obtained postoperatively.
• This repair should maintain acceptable alignment, while allowing 40 to 50 degrees of passive motion. Do not try to move the joint passively through a greater arc of motion because the strength of capsular repair may be compromised.
• Dorsifl ex the foot to neutral by pushing up on the arch, not the forefoot, and inspect the forefoot. Gently push the hallux medially and laterally to determine if the hallux stays in the corrected position.
• If the medial capsular repair is not tight enough, and the hallux drifts laterally, add one transverse stitch at a time until this laxity is corrected. Remove a stitch, and replace it if necessary until the tension is suffi cient for the hallux to remain reduced on the fi rst metatarsal head without drifting medially or laterally.
• If the hallux is pulled medially by the capsular repair, remove one suture from the transverse limb of the capsular repair. Continue to alter the tension on the capsular repair until the hallux remains in the correct position.
• Before skin closure, obtain a radiograph with the foot placed fl at on a cassette or transparent image board to ensure the hallux is congruously reduced.
• As crucial to success as repair of the capsule is the meticulous application of a forefoot dressing holding the hallux in the corrected position. Use 4 × 4 gauze sponges, unfolded (some sectioned) for the interdigital spaces, and 2and 3-inch rolling gauze, wrapped over the conforming dressing. Apply a 3or 4inch elastic gauze wrap, loosely placed on the forefoot with dressing to avoid constriction, but to allow gentle pressure as the edema resolves.
AFTERTREATMENT The patient wears a rigid-soled, loosely applied shoe for 3 weeks. Weight bearing to tolerance is allowed immediately, but only to the bathroom. For 3 days after surgery, the patient should rest supine with the foot elevated 18 inches. After this, the patient can be up and about to tolerance. Driving is allowed when the patient can drive with confi dence. The same dressing is kept dry and left in place for 19 to 23 days. The sutures are removed at 3 weeks, and a medium toe spacer is placed in the fi rst metatarsal space for another 3 weeks. Shoes should not place pressure on the great toe. Dress shoes, even ones with
Fig. 78-68 Anteroposterior weight bearing radiograph in elderly woman, 20 years after McBride bunionectomy. In reality, this is congruous hallux valgus that assumed its normal position on fi rst metatarsal head after a soft-tissue realignment for hallux valgus. Biplanar correcting distal metatarsal osteotomy is needed.
🔪 Surgical Technique 78-23
• The incision, inverted L capsulotomy, elevation of the capsular fl ap, web space dissection, lateral release, partial adductor resection, and capsular fl ap closure are the same as in the softtissue repair technique previously described (see Technique 7822). The web space dissection, lateral release, and adductor
Recurrent Deformity after Basilar Metatarsal Osteotomy and First Web Space Dissection or Release Recurrent deformity after basilar metatarsal osteotomy and fi rst web space dissection or release should be treated with a second basilar metatarsal osteotomy, medial capsular imbrication of the fi rst metatarsophalangeal joint, and fi rst web space dissection with release of the contracted lateral structures. Alternatively, in selected patients, particularly men, an arthrodesis of the fi rst metatarsophalangeal joint is reasonable. Indications for this procedure include (1) an intermetatarsal angle of 14 degrees or more, (2) hallux valgus angle of more than 30 degrees, (3) normal distal metatarsal articular angle (10 to 15 degrees), (4) splayed forefoot, (5) minimal-to-mild osteoarthritic changes at the fi rst metatarsophalangeal joint (arthrodesis is indicated if the articular cartilage is damaged), (6) markedly subluxed or dislocated sesamoid bones, (7) 50 to 60 degrees of passive range of motion of the fi rst metatarsophalangeal joint, and (8) arch structures that increase valgus stress on the metatarsophalangeal joint. A combination of chevron and Akin osteotomies can be used for greater correction of valgus deformity. Although
Mitchell and Baxter reported satisfactory results with this combined procedure, they cautioned against its use if sesamoid subluxation and a wide intermetatarsal angle are present. For severe recurrent deformity after basilar metatarsal osteotomy, arthrodesis of the fi rst metatarsophalangeal joint often is the most appropriate operation (see Technique 7814). The surgical technique varies according to the type of osteotomy and the kind of fi xation used. Nonunion, malunion, and degenerative arthritis of the interphalangeal joint of the hallux are the most frequent complications after arthrodesis of the fi rst metatarsophalangeal joint. Accurate positioning of the hallux is essential during the procedure. Lapidus recommended combining arthrodesis of the fi rst metatarsal–medial cuneiform joint with distal soft-tissue release for treating severe recurrent deformities.
Recurrent Deformity in Elderly Patients with Osteoarthritis Resection and Arthrodesis or Replacement Arthroplasty of the First Metatarsophalangeal Joint Resection (Keller) arthroplasty can be used for correction of recurrent deformity in elderly patients who have limited physical demands on their feet and have some degree of osteoarthritis at the fi rst metatarsophalangeal joint. Its usefulness may be expanded if the hallux, after resection of its base, is secured to the fi rst metatarsal with two longitudinal Kirschner wires (see Technique 78-2) after the metatarsal is manually displaced laterally as far as possible. Excision of the fi bular sesamoid bone is recommended before the hallux is secured to the fi rst metatarsal. The results of replacement arthroplasty of the fi rst metatarsophalangeal joint for correction of recurrent hallux valgus have varied. Cracchiolo recommended replacement arthroplasty of the fi rst metatarsophalangeal joint in patients with rheumatoid arthritis and severe destruction of the metatarsophalangeal joints, but in most patients resection of the base of the proximal phalanx, lateral displacement of the fi rst metatarsal, temporary internal fi xation after fi bular sesamoid excision, and medial capsular repair provide just as good results as replacement arthroplasty with less expense and fewer complications. Arthrodesis of the fi rst metatarsophalangeal joint is a good choice for recurrent hallux valgus in elderly patients (see Fig. 78-54).
Complications after Chevron Osteotomy Johnson described several complications of the chevron osteotomy and suggested the following ways to avoid them:
- Recurrent metatarsophalangeal joint valgus can be prevented by ensuring the medial capsular imbrication is fi rm and by maintaining the hallux in the proper position before skin closure. release and tendinous resection should be done before the osteotomy because the displaced metatarsal head after the osteotomy markedly limits exposure of the tissues to be released or resected. Keep the dissection distal to the neck of the fi rst metatarsal when the soft-tissue release is performed. This preserves some perfusion to the fi rst metatarsal head.
• Perform a chevron osteotomy as described in Technique 78-4. One reason for recurrence is an unrecognized and uncorrected excessive distal metatarsal articular angle. The goal is to reduce the valgus tilt of the articular surface of the fi rst metatarsal head to approximately 10 degrees and bring the hallux into a congruous position on the metatarsal head by a medial capsulorrhaphy with or without a fi rst web space dissection and lateral soft-tissue release.
• To reduce the distal metatarsal articular angle to an acceptable value, remove a 1to 2-mm, wedge-shaped sliver of bone from the medial aspect of the distal metatarsal (or from the capital fragment), a “closing wedge osteotomy.” The size of the wedge is deliberately small because slight impaction occurs medially as the surfaces are manually pressed together.
• Use small absorbable or nonabsorbable pins to secure the osteotomy.
• Reduce the hallux congruously on the articular surface of the metatarsal head, and maintain the position with capsulorrhaphy.
• Evaluate the repair radiographically by imaging or plain fi lms. Obtain an anteroposterior radiograph with the foot resting fl at (fl ex the knee) on a cassette or radiolucent image board. Although this is not routinely necessary with an initial repair, it should always be done when surgically treating recurrence of a hallux valgus deformity.
- Insuffi cient narrowing of the forefoot, most often associated with preoperative metatarsus adductus and insuffi cient room to shift the metatarsal head laterally, can be avoided by paying careful attention to the preoperative radiographs. 3. Osteonecrosis can be prevented by preserving the lateral blood supply to the capital fragment. 4. Incongruity at the metatarsophalangeal joint results from failure to recognize a valgus posture of the articular surface before surgery or from closure of the osteotomy medially, placing the capital fragment in a straight or a varus position 5. Unfulfi lled patient expectations can be minimized by providing a detailed explanation of the benefi ts and drawbacks of bunion surgery. A common mistake is trying to correct too much valgus deformity with this procedure; it is most useful in mild-to-moderate deformities.
If lateral capsular perforation distal to the metatarsal head and release of the adductor hallucis tendon across the joint are required, they should be done distal to the vascular supply of the metatarsal head; however, these seldom are necessary for the degree of deformity described for this procedure. Jones et al. identifi ed two technical errors that can result in damage to the vessels that supply the metatarsal head: cutting of the fi rst dorsal metatarsal artery by overpenetration of the saw blade and incorrect placement of the proximal arms of the osteotomy inside the joint capsule. They concluded that a correctly performed chevron osteotomy, with or without a lateral capsular release, should not disrupt the vascular supply to the fi rst metatarsal head, and they identifi ed a “safe zone” for performance of the chevron osteotomy and the lateral capsular release (Fig. 78-69). Malunion after a chevron osteotomy is uncommon if three steps in operative technique are followed: (1) The osteotomy is internally fi xed and manually tested, and fi xation is augmented with additional fi xation if any movement occurs; (2) the distal fragment is placed plantar or inferior to the proximal fragment and secured in that position with internal fi xation; and (3) weight bearing is guarded if fi xation is not rigid. The diffi culty in correcting a dorsal malunion after chevron osteotomy is preserving length. The initial chevron osteotomy often shortens the hallux 3 to 5 mm, and impaction and necrosis at the osteotomy site can decrease length another 3 to 5 mm, resulting in 6 to 10 mm of shortening that causes transfer metatarsalgia beneath the second metatarsal head or prevents relief of existing metatarsalgia. Varus or valgus malunion can occur after a chevron osteotomy, but this is not as common as dorsal malunion. Varus or valgus malunion of a chevron osteotomy, even with mildto-moderate incongruity of the fi rst metatarsophalangeal joint, is tolerated better by the patient than a dorsal malunion with transfer metatarsalgia. Regardless of the plane of the malunion, the surgical technique to correct the deformity is basically the same.

Safe zones—Dorsal view
Safe zone for osteotomy
Osteotomy
Safe zone for lateral capsular release
Deep branch of first dorsal metatarsal artery
Deep branch of first dorsal metatarsal artery
First plantar metatarsal artery
First plantar metatarsal artery
First dorsal metatarsal artery
Nutrient artery Superficial branch of medial plantar artery
Dorsal medial hallucal artery Nutrient artery
Perforators into metatarsal head
Saw
Fig. 78-69 Safe zones for chevron osteotomy and lateral capsular release. Medial view shows that sites of cortical osteotomy must remain in interval between pericapsular perforators distally and nutrient artery proximally. Safe zone for lateral capsular release spares all perforators into metatarsal head proximally and all perforators into proximal phalanx distally, as long as capsulotomy is performed in line with metatarsophalangeal joint in coronal plane. Dorsal view shows relationship between osteotomy and nutrient artery and distal pericapsular perforators. First dorsal metatarsal artery and its branches are especially vulnerable to overpenetration of lateral cortex by oscillating saw. (From Jones KJ, Feiwell LA, Freedman EL, et al: The effects of chevron osteotomy with lateral capsular release on the blood supply to the fi rst metatarsal head, J Bone Joint Surg 77A:197, 1995.)
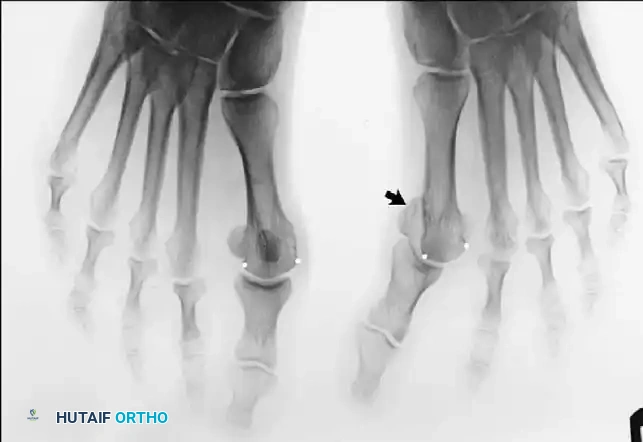
A B
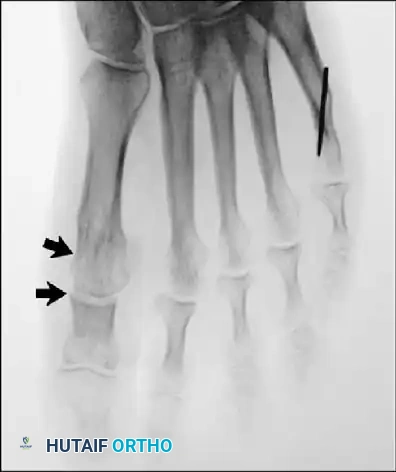
🔪 Surgical Technique 78-24
• Expose the distal metatarsal from the junction of the middle and distal thirds to the base of the proximal phalanx.
• Inspect the previous osteotomy, but do not allow its “limbs” to predetermine the plane of the corrective osteotomy.
• With a 2-mm drill bit (even smaller if available), make a semicircle of unicortical holes from dorsal to plantar adjacent to or within the previous osteotomy site (an arc of approximately 150 degrees).
• Connect these holes using only the corner of a 5or 6-mm sharp, straight, thin osteotome as a cutting edge. Do not penetrate the lateral cortex with the osteotome.
• Using the 2-mm (or smaller) drill bit, make numerous holes in the lateral cortex through the unicortical osteotomized semicircle, and complete the osteotomy with a thin (4 mm wide) blade on a small power saw. This technique reduces the amount of shortening.
• Manually rotate the head plantarward until the dorsal cortex of the capital (distal) fragment is inferior (plantar) to the dorsal cortex of the shaft (proximal) fragment. This slightly plantar fl exes the fi rst metatarsal head, allowing it to assume more of the weight bearing load across the metatarsal heads.
• If the capital fragment has healed in varus or valgus, reverse the deformity until the capital fragment is reduced to normal anatomical alignment with the shaft. The malunion may be in two or more planes, but this “broomstick” osteotomy would allow correction of all planes of deformity.
• Internally fi x the osteotomy with Kirschner wires, small screws, or absorbable pins. Interfragmentary wires are technically diffi cult to use in this location, but are not contraindicated.
AFTERTREATMENT Depending on the rigidity of fi xation and body habitus of the patient and the anticipated compliance by the patient, protected weight bearing can begin
Fig. 78-70 A, Hallux varus after McBride bunionectomy with subluxation of tibial sesamoid. B, Correction of hallux varus after Keller procedure. immediately. A short leg cast that extends distal to the toes and crutches or a walker may be necessary. The patient should be told before surgery that permanent loss of some metatarsophalangeal joint motion is possible, but that function should not be compromised. Full, unprotected weight bearing is allowed when union of the osteotomy is apparent clinically and radiographically. Final range of motion often is not reached for 12 to 18 months postoperatively.
Acquired Hallux Varus and Intrinsic Minus Hallux Hallux varus is a complication of hallux valgus surgery (Figs. 78-70 and 78-71). Orthopaedists were not widely informed of this reversal of deformity until McBride in 1935 reported its occurrence in 5.1% of the patients treated with his procedure (medial eminence removal, medial capsulorrhaphy, and fi bular sesamoidectomy) (Fig. 78-72). Since then, many authors have reported this complication, with incidences ranging from 2% (Peterson et al.) to 17% (Trnka et al.) after almost all operations for hallux valgus, including distal and proximal metatarsal osteotomies. Few patients with hallux varus complain about appearance (only if varus is > 10 to 15 degrees) or discomfort (rare and usually associated with degenerative changes of the fi rst metatarsophalangeal joint). The main causes for hallux varus after hallux valgus surgery are (1) complete release of the lateral structures of the metatarsophalangeal joint combined with excessive plication of the medial capsule, which pulls the sesamoids too far medially; (2) excessive resection of the medial eminence, leading to loss of medial bony buttress for the proximal phalanx; (3) excision of the fi bular sesamoid; (4) release of the lateral head of the fl exor hallucis brevis at its insertion into the fi bular sesamoid; and (5) closure of the intermetatarsal angle to neutral or a negative value. Hawkins classifi ed hallux varus into two types: static (supple) and dynamic (fi xed). There are two reasons to divide hallux varus deformities. The fi rst is to place the focus on the intrinsic and extrinsic muscle imbalance,
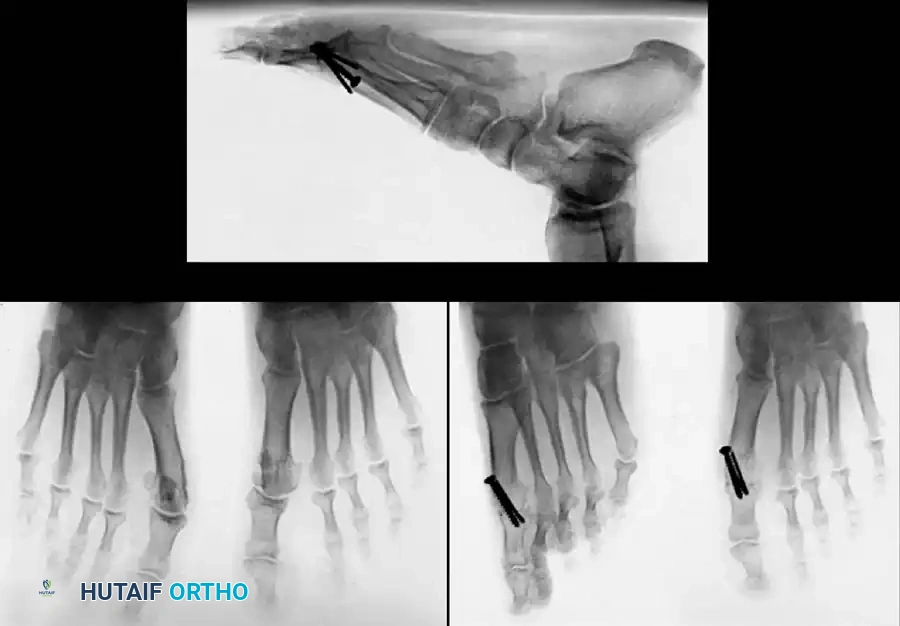
A B
C
Fig. 78-71 A, Relatively mild hallux varus with symptomatic degenerative arthritis of fi rst metatarsophalangeal joint. B and C, Arthrodesis was chosen because of degenerative joint disease.
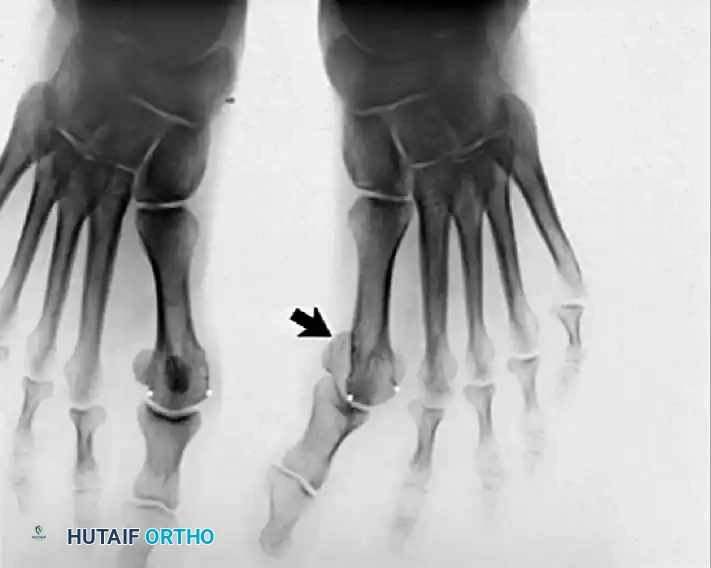
A B
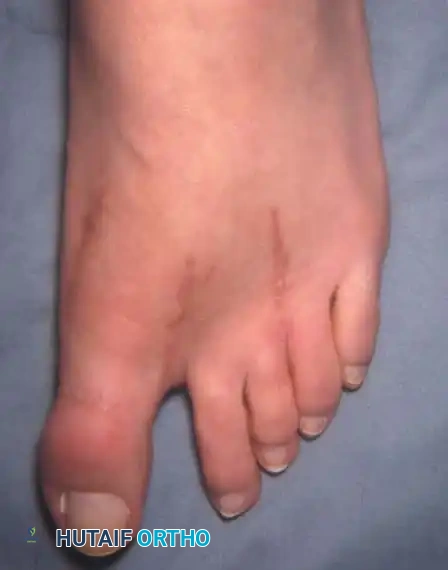
Fig. 78-72 A, Fixed hallux varus after McBride bunionectomy. B, Hallux varus after McBride bunionectomy with fi bular sesamoid excision. Removing fi bular sesamoid removes valgusproducing moments of adductor hallucis and fl exor hallucis brevis (lateral head) muscles.
which explains the single and multiplanar types of deformity, and the second is to alert the surgeon that presurgical planning for correction would be different. Static hallux varus, which is supple, uniplanar, and passively correctable, usually is asymptomatic and mainly is a cosmetic complication. When the foot is viewed in a weight bearing position, the hallux rests in varus, the metatarsophalangeal joint rests in a normal position in the sagittal plane (10 degrees to the plantar surface of the foot or 20 to 25 degrees to the fi rst metatarsal), and the interphalangeal joint is in a normal position. Most often, the hallux is not rotated abnormally in an axial plane and does not assume a “snake-in-thegrass” appearance in the frontal plane. All the deformity occurs at the metatarsophalangeal joint, but only in the transverse or frontal plane. Dynamic hallux varus deformity is a multiplanar deformity that often is fi xed, symptomatic, and diffi cult to correct surgically (Fig. 78-73). The term that best describes the deformity is intrinsic minus deformity of the hallux with a varus component. This is a true intrinsic-extrinsic muscle imbalance. In dynamic hallux varus, the fi rst metatarsophalangeal joint is hyperextended (usually with some degree of fi xed soft-tissue contracture), and the interphalangeal joint is acutely fl exed. The hallux is rotated, and its varus and extended posture makes shoe wear diffi cult. The most common complaint is that the toe box of the shoe rubs on the dorsomedial surface of the interphalangeal joint. A keratotic lesion may be present beneath the fi rst metatarsal head, caused by the extended hallux pushing the fi rst metatarsal head plantarward. The lesser toes may develop a hammer deformity and metatarsalgia as the hallux assists less and less in the stance phase of the gait cycle.
Anatomy and Pathogenesis The intrinsic muscles balance the hallux on the fi rst metatarsal head, whereas the extrin- sic muscles add gross balance and greatly increase the mobility of the hallux. The fi rst metatarsophalangeal joint is a shallow, ball-and-socket joint with little stability from bony confi gurations. The tendon insertions of the abductor-adductor hallucis, the fl exor hallucis brevis (both components), and the extensor hallucis brevis balance the hallux congruently on the fi rst metatarsal head and act synchronously with the extrinsic muscle-tendon units of the extensor fl exor hallucis longus. This balance is disrupted if the positions of these tendon insertions are altered relative to the axis of rotation in fl exion or extension at the metatarsophalangeal joint. The pathogenesis of hallux varus can best be explained after a McBride procedure with a fi bular sesamoidectomy. Fibular sesamoidectomy and release of the adductor tendon can allow the tibial sesamoid (medial head fl exor hallucis brevis) to drift medially, exerting a varus movement on the proximal phalanx (Fig. 78-74), and allow the abductor tendon to overpower its antagonist, the released adductor tendon. With varus of the metatarsophalangeal joint, the extensor hallucis longus, the fl exor hallucis longus, and the fl exor hallucis brevis medial head are positioned medial to the midline in the axial plane, increasing the varus deformity. This is exactly the opposite of the mechanism of action in hallux valgus, in which the musculotendinous structures of the metatarsophalangeal joint accentuate the hallux valgus when they are positioned lateral to the axial midline of the metatarsophalangeal joint. After release of the lateral head of the fl exor hallucis brevis from the fi bular sesamoid (fi bular sesamoidectomy) and medial subluxation of the medial head of the fl exor hallucis brevis (tibial sesamoid), the medial head of the fl exor hallucis brevis is no longer an effi cient fl exor of the metatarsophalangeal joint and is overpowered by the retained extensors of the metatarsophalangeal joint, creating an extension deformity of the metatarsophalangeal joint. As extension of the metatarsophalangeal joint increases, the fl exor hallucis longus tightens, and the extensor hallucis longus loosens, creating a fl exion deformity of the interphalangeal joint (Fig. 7875). This deformity may quickly become fi xed and is described as clawed hallux deformity or intrinsic minus hallucal deformity. Uniplanar deformity most commonly occurs when a mild-to-moderate hallux valgus deformity is treated with a lateral soft-tissue release combined with medial capsular imbrication and medial eminence excision. According to Trnka et al., excising too much of the medial eminence (within or immediately lateral to the sagittal groove) is a major contributing factor to hallux varus. Excision of the fi bular sesamoid and overcorrection of the fi rst intermetatarsal angle to less than 5 degrees also can produce hallux varus uniplanar deformity. Normally, the hallux rests on the fi rst metatarsal head in about 10 degrees of valgus. If the intermetatarsal angle is reduced to less than 5 degrees, and the hallux is reduced congruously on the metatarsal
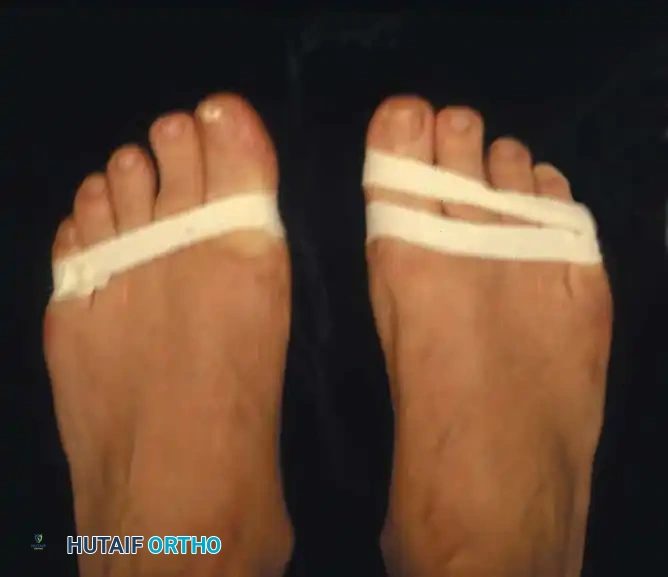
Fig. 78-73 Passively correctable dynamic hallux varus.
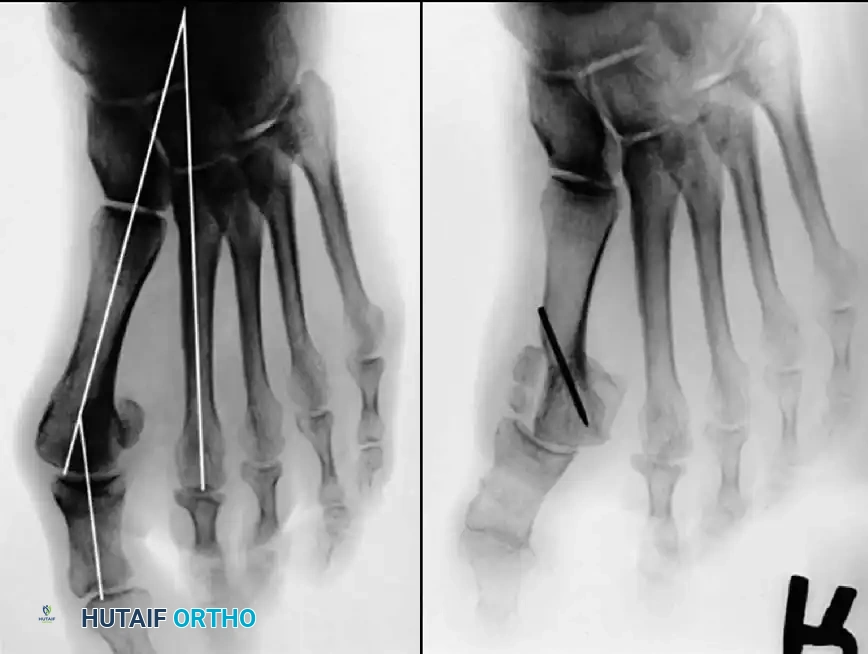
A B
Fig. 78-74 A, Hallux valgus deformity. B, Dislocation of tibial sesamoid after distal metatarsal osteotomy and fi bular sesa moidectomy. head, the necessary valgus angulation must be 15 degrees (5 degrees varus of the fi rst metatarsal plus 10 degrees distal metatarsal articular angle). Often the hallux is aligned parallel to the second toe if that toe is straight or to the medial border of the foot if it is not, but this clinically straight posture places the hallux into varus in relation to the articular surface of the fi rst metatarsal head. When the lateral restraining structures are released, and the medial eminence is removed, the hallux is at risk of drifting further into varus. Overcorrection of the intermetatarsal angle and removal of the medial eminence at the sagittal groove instead of medial to it may contribute to the development of hallux varus deformity. Correction of the intermetatarsal angle to less than 5 degrees, excision of the fi bular sesamoid, lateral capsulotomy, adductor release, and imbrication of the medial capsule, in combination or alone, may contribute to a hallux varus deformity. The powerful fl exor hallucis brevis can be a signifi cant valgus or varus deforming force if the sesamoid is not in its facet.
Correction of Uniplanar (Static) Hallux Varus Deformity
Not all patients with acquired hallux varus require operative treatment. After performing a basilar metatarsal osteotomy with a distal soft-tissue procedure in 109 patients, Mann reported that none of the 14 patients who developed hallux varus complained of pain, and only three were unhappy with the position of the toe. Mann suggested that varus deformity of 5 to 6 degrees is minimal and is only a radiographic fi nding, rather than a deformity that compromises the clinical result. In addition to an unsatisfactory appearance of the toe, some patients complain of diffi culty
🔪 Surgical Technique 78-25
SOFT-TISSUE CORRECTION
• Make an incision on the medial side of the hallux at the midline in the internervous plane, extending from the midportion of the diaphysis of the proximal phalanx to 4 to 5 cm proximal to wearing shoes, pain, instability, weakness with push-off, and metatarsalgia. A conservative program of modifi ed shoe wear and taping of the hallux should be attempted in all patients before surgery is contemplated, although Skalley and Myerson found conservative treatment to be benefi cial in only 12 of 54 patients. If uniplanar hallux varus develops after a soft-tissue procedure alone and is not fi xed, weekly dressings and tapings of the hallux in a valgus posture of 10 to 15 degrees may correct the deformity if this treatment begins within the fi rst 4 to 6 weeks, continues for 8 to 12 weeks, and is followed by treatment with a night splint that holds the hallux in slight valgus for an additional 3 months. If the deformity goes unnoticed for 2 months or longer after surgery and is symptomatic, however, surgical correction is required. This should be delayed until the soft tissue has no evidence of infl ammation from the fi rst procedure. A medial capsulotomy in the sagittal plane, placing the sesamoids in their proper location if subluxed medially, and holding the hallux in 10 to 15 degrees of valgus with a Kirschner wire for 6 weeks may be all that is necessary, especially if the deformity is passively correctable, and 10 to 15 degrees of valgus is achievable. The success or failure rests almost entirely on the position and the moment of the fl exor hallucis brevis. The surgical treatment of this deformity is straightforward, and results are predictable.
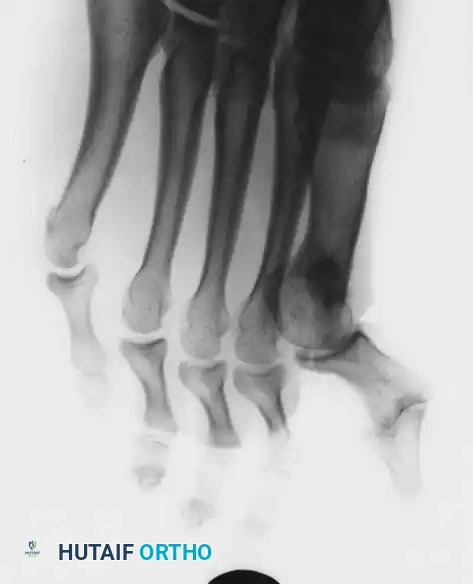
A B
C D
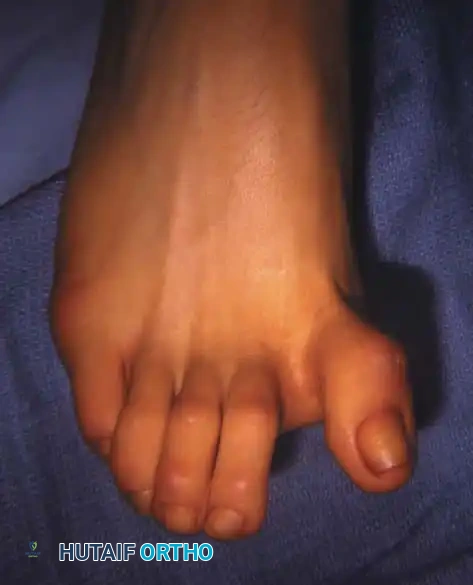
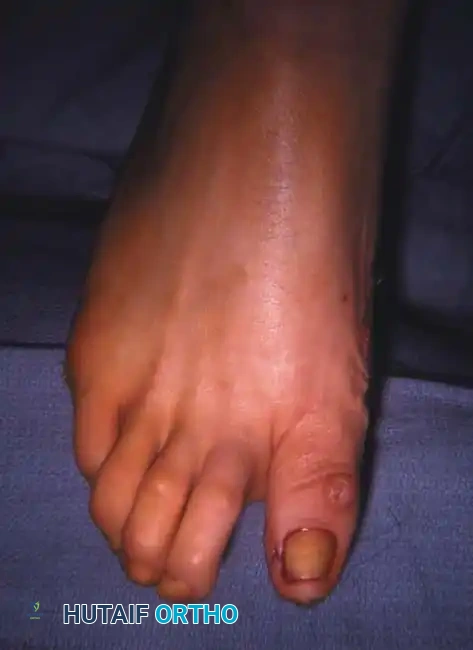
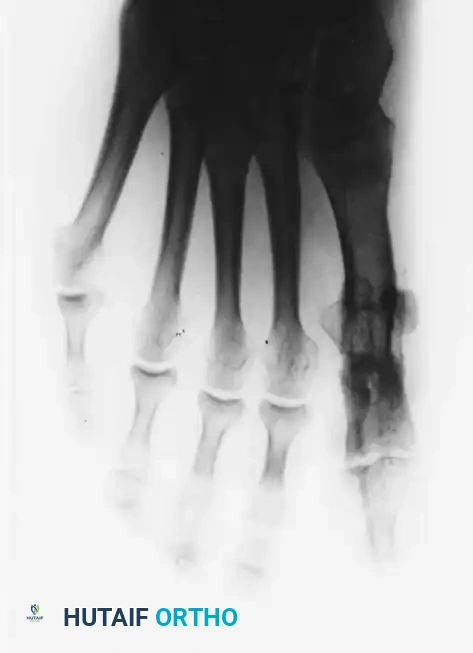
Fig. 78-75 A and B, Hyperextension of metatarsophalangeal joint and hyperfl exion of interphalangeal joint, in addition to varus and rotation of hallux. C and D, Dynamic (supple) deformity treated by arthrodesis of fi rst metatarsophalangeal joint and plantar release of interphalangeal joint.
the metatarsophalangeal joint. Raise a dorsal skin fl ap (on the capsule) 4 to 5 mm and a plantar fl ap 2 to 3 mm. Do not injure the dorsal sensory nerve near the junction of the (former) medial eminence and fi rst metatarsal.
• Make a capsular incision in the midline medially.
• Elevate the dorsal and plantar capsular fl aps until the dorsomedial corner of the fi rst metatarsal and the tibial sesamoid plantarward are clearly exposed.
• After the hallux is adducted to the midline, fl ex and extend the fi rst metatarsophalangeal joint. Carry the soft-tissue release dorsally and plantarward until the hallux can be placed into 10 to 15 degrees of valgus on the fi rst metatarsal head. Flex and extend the hallux, and passively dorsifl ex it 40 to 50 degrees in this valgus position.
• Place a small osteotome or periosteal elevator between the articular surface of the tibial sesamoid and the fi rst metatarsal head. If the tibial sesamoid slides back into its facet on the metatarsal head with passive valgus of the hallux or requires only gentle levering and pushing to reduce and maintain it in the facet, the correction will be long lasting. If the tibial sesamoid cannot be reduced and maintained in its facet, soft-tissue balance and realignment will fail, and an arthrodesis or hemiresection arthroplasty to loosen the soft tissue must be performed.
AFTERTREATMENT The initial dressing is maintained for 10 to 14 days (19 to 21 days is permissible) to ensure skin healing without interruption of the dermal adhesion. A removable short leg walking boot is preferred to immobilize the ankle, but it is optional. The patient is allowed touch-down weight bearing with crutches for 3 weeks, then weight bearing to tolerance without crutches another 3 weeks in the removable walking boot. The boot can be removed only to bathe the fi rst 3 weeks, after which it can be removed during bed and bath periods. The pin is removed in the offi ce in 4 to 6 weeks. (If reduction was diffi cult, the pin should be left in for 6 weeks.) The pin should not be removed before 3 weeks unless pressing circumstances require it. If it is necessary to remove the pin earlier than planned, the hallux is taped to the second and third toes until the hallux has no tendency to drift medially from its valgus posture when the patient is standing.
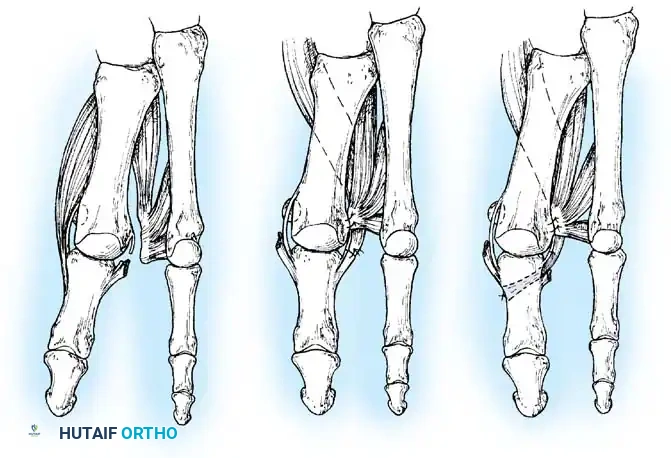
A B C
Fig. 78-76 Hawkins technique for correction of hallux varus. A, Hallux varus secondary to muscle imbalance. B, Repositioning of abductor hallucis to remnant of adductor hallucis. C, Suturing of abductor hallucis lengthened by tendon graft into base of proximal phalanx and repositioning of conjoined tendon. (Redrawn from Hawkins FB: Acquired hallux varus: cause, prevention and correction, Clin Orthop Relat Res 76:169, 1971).
🔪 Surgical Technique 78-25
• With the hallux positioned in 15 degrees valgus, 10 degrees extension, and neutral rotation, place a 0.062-inch Kirschner wire obliquely from distal medial in the proximal phalanx to proximal lateral in the fi rst metatarsal, starting at the metaphysealdiaphyseal fl air of the proximal phalanx.
• Cut the wire beneath the skin so that it can be removed in the offi ce under local anesthesia. Leaving it external to the skin is more likely to cause premature removal from pin track soft-tissue irritation.
• Release the tourniquet, and obtain hemostasis. Do not close the capsule. Close the skin with permanent 4-0 monofi lament nylon sutures in one layer. Place simple stitches near the wound margins because the skin is under tension, and mattress sutures may compromise the blood supply to the skin margins further. Because neither capsular nor subcutaneous sutures are allowed, use more stitches than usual to avoid gaps between the stitches that could cause a synovial fi stula or an infection.
• Apply a forefoot dressing. The dressing does not have to help maintain the reduced position of the hallux because of the articular wire, but should be gently conforming and snug to reduce edema.
• In the Hawkins technique, the lateral structures are released, and the muscle-tendon unit of the abductor hallucis is transferred to the base of the proximal phalanx plantar to the transverse intermetatarsal ligament and through a long bone tunnel and sutured to the soft tissue medially. The adductor hallucis and fl exor hallucis brevis conjoined tendon is moved proximally and sutured into the lateral aspect of the metatarsal head dorsal to the transferred abductor hallucis tendon (Fig. 78-76).
Transfer of Extensor Hallucis Longus with Arthrodesis of the Interphalangeal Joint of the Hallux
Occasionally, an arthrodesis or tendon transfer may be required in a static, uniplanar deformity, but the patient must be informed preoperatively that one or the other may be required if the deformity cannot be corrected otherwise. When the metatarsophalangeal joint deformity is static, usually the interphalangeal joint deformity also is static. Johnson and Spiegl recommended extensor hallucis longus transfer for supple deformity of the metatarsophalangeal joint (Fig. 78-77), combined with interphalangeal joint fusion whether the interphalangeal joint deformity is dynamic or static. For a combined supple interphalangeal and metatarsophalangeal joint deformity, Mann recommended transfer of only half of the extensor hallucis longus tendon without arthrodesis of the hallux interphalangeal joint to allow free interphalangeal joint motion; he noted that if the extensor hallucis longus transfer fails to correct the hallux varus, and a subsequent metatarsophalangeal joint fusion is necessary, a better result will be obtained if the interphalangeal joint retains some motion. Johnson et al. reported that fusing the interphalangeal joint aids in the correction of the metatarsophalangeal joint extension by having the fl exor hallucis longus fl ex the great toe at the metatarsophalangeal joint, rather than at the interphalangeal joint. They found that transferring only half of the extensor hallucis longus is inappropriate, however, because it requires the extensor hallucis longus to perform two actions simultaneously: extension of the interphalangeal joint and adduction of the metatarsophalangeal joint. Both techniques correct the deformity, and both reduce motion at the metatarsophalangeal joint, occasionally severely. The patient must be informed that a correction of deformity may produce a reduction in motion.

Tendon cross-sutured
Tendon holds phalanx in position
Extensor hallucis longus tendon
A B
C
D
Fig. 78-77 A-D, Transfer of extensor hallucis longus (Johnson and Spiegl technique) for correction of hallux varus (see text). (From Johnson KA, Spiegl P: Extensor hallucis longus transfer for hallux varus deformity, J Bone Joint Surg 66A:681, 1984.)
🔪 Surgical Technique 78-26
• Begin an L -shaped incision between the midportions of the fi rst and second metatarsals, extend it distally along the dorsolateral aspect of the great toe, and curve it medially near the insertion of the extensor hallucis longus tendon (Fig. 78-78A).
• Divide the extensor hallucis tendon at its insertion on the base of the distal phalanx. Avoid the dorsal sensory nerve and the nail bed.
• Perform an arthrodesis of the interphalangeal joint after removing the articular surfaces to permit a neutral position in the sagittal and coronal planes (Fig. 78-78B to D). The use of a 4mm cancellous bone screw, advocated by Shives and Johnson, has proved benefi cial.
• Drill a 2-mm diameter hole longitudinally in a retrograde manner at the denuded articular surface of the distal phalanx (Fig. 78-78E). The drill should exit at a point 5 mm plantar to the tip of the nail in the midline of the toe.
• Appose the denuded articular surfaces, insert the drill bit distally at the tip of the phalanx, and, following the previously placed hole, drill into the base of the proximal phalanx and down the center of its medullary canal (Fig. 78-78F and G).
• Overdrill the distal phalanx with a 2.7-mm drill bit, and tap the entire drill path with a 3.5-mm tap.
• Following the drill bit in a proximal direction (Fig. 78-78H), insert the 4-mm cancellous bone screw. The lag effect of this screw produces compression and fi rm fi xation of the arthrodesis (Fig. 78-78I to M).
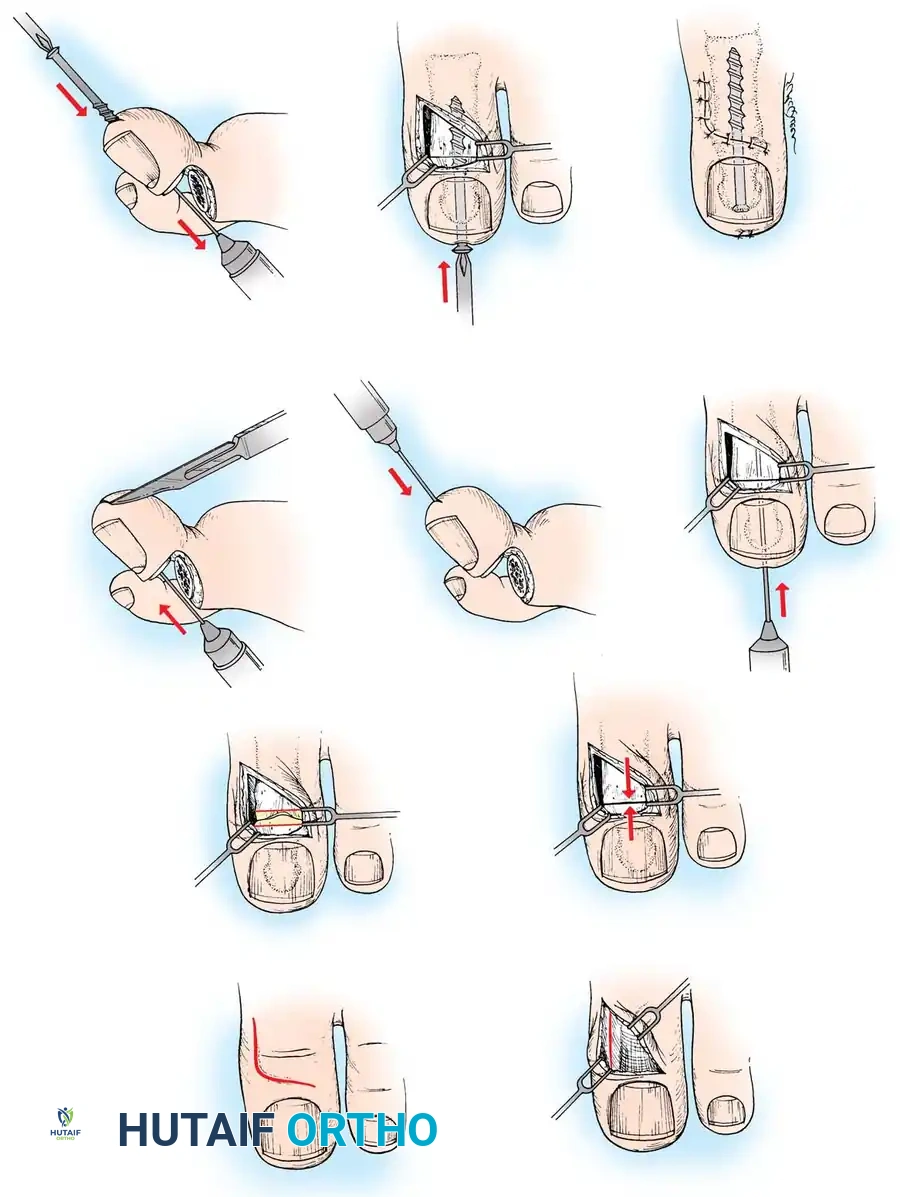
A
C
D
E
F G
H I J
B
Fig. 78-78 Johnson and Spiegl arthrodesis technique for correction of hallux varus. A-C, L shaped skin incision, release of extensor hallucis longus, and preparation of joint for arthrodesis. D-F, Apposition of surfaces to confi rm good bony apposition and retrograde drilling with 2mm bit. G, Antegrade drilling of proximal phalanx. H, Insertion of 4-mm cancellous screw. I, Compression of arthrodesis site as lag effect is created. J, Closure.
🔪 Surgical Technique 78-26
• When the arthrodesis is completed, dissect the extensor hallucis longus free from the extensor mechanism and proximal fascial attachments to 5 to 6 cm proximal to the metatarsophalangeal joint. The tendon should exhibit free excursion with gentle traction and relaxation.
• Pass a nonabsorbable suture back and forth through the distal 1.5 cm of tendon, and lay it aside temporarily.
• Drill a 3.6-mm hole in the dorsoplantar direction in the lateral side of the proximal phalanx (see Fig. 78-77B).
• With a hemostat, grasp the suture in the end of the tendon, and pass it plantar to the deep transverse intermetatarsal ligament (see Fig. 78-77B). The transferred tendon cannot correct the hallux extensus or hallux varus if it is not passed plantar to a pulley that is plantar to the fl exion-extension axis of the fi rst metatarsophalangeal joint. Johnson and Spiegl stated that the earlier formed surgical scar in this region never interfered with use of the ligament as a suitable pulley.
• Pass the tendon through the hole in the phalanx from the plantar to the dorsal direction, and place the hallux in the desired position (a medial capsulotomy and possibly a tibial
AFTERTREATMENT A compression dressing is worn for 2 days, followed by a short leg, non–weight bearing cast, which is worn for 3 weeks. The cast is changed, and weight bearing is allowed in the new cast, which is worn for 3 more weeks. The Kirschner wire is removed, and weight bearing is allowed without a cast (night splinting of the hallux in the desired position for another 10 to 12 weeks should be considered).
Extensor Hallucis Brevis Tenodesis TECHNIQUE 78-27 Myerson and Komenda; Juliano et al.
• Make a dorsal longitudinal incision in the fi rst web space, extending proximally 2 inches.
• Retract the terminal branch of the deep peroneal nerve, and transect the extensor hallucis brevis at the musculotendinous junction (Fig. 78-79A).
• Insert a 4-0 monofi lament suture into the stump of the extensor hallucis brevis tendon, and dissect it free of soft tissues to its distal attachment into the extensor hood. Do not interrupt this attachment.
• Free the proximal end of the extensor hallucis brevis from its attachment to the extensor hallucis longus tendon.
• Perform a dorsal and medial capsulotomy, or capsulectomy if required, to correct the extension deformity at the metatarsophalangeal joint.
• Release the abductor tendon with the medial capsulotomy. Before performing the extensor hallucis brevis tenodesis, completely release the dorsal and medial soft-tissue contractures, and assess the resting position of the hallux after this release. The deformity should now be passively correctable. If not, complete the capsulotomy or capsulectomy from sesamoid to sesamoid.
• Pass the stump of the extensor hallucis brevis tendon plantar to the deep transverse metatarsal ligament from distal to proximal (Fig. 78-79B).
• Apply tension to the extensor hallucis brevis tendon, and assess alignment and rotation of the hallux. Because of the dorsal insertion of this tendon, there is a tendency to supinate (internally rotate) the hallux as the extensor hallucis brevis tendon is proximally redirected. If this occurs, partially release the distal
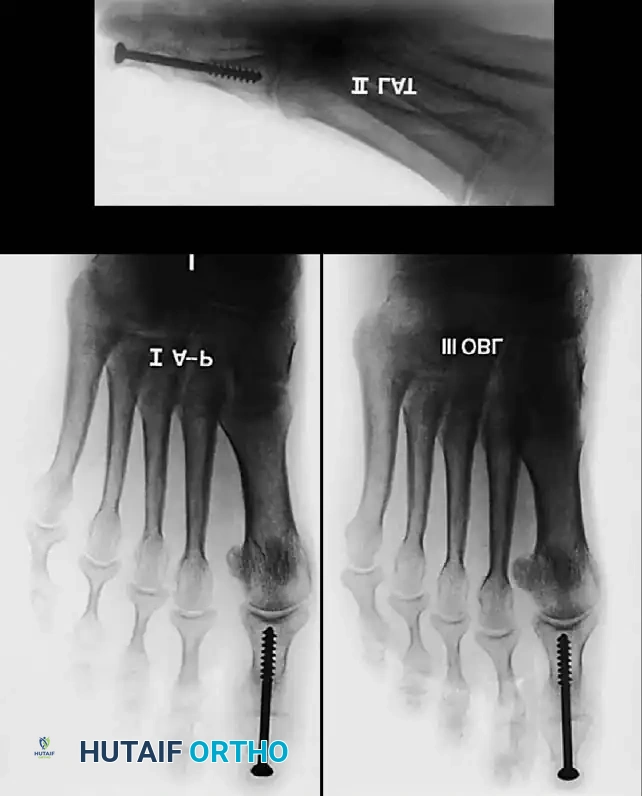
K
M
L
Fig. 78-78, cont’d K-M, Radiographs of interphalangeal joint arthrodesis of great toe. ( A-J redrawn from Shives TC, Johnson KA: Arthrodesis of the interphalangeal joint of the great toe—an improved technique, Foot Ankle 1:26, 1980.) sesamoidectomy may be required before the hallux can be positioned properly).
• Pull the extensor hallucis longus distally, and suture it to itself (see Fig. 78-77C).
• Insert a 0.062-inch Kirschner wire obliquely across the joint, taking care not to impale the tendon and weaken it (see Fig. 78-77D).
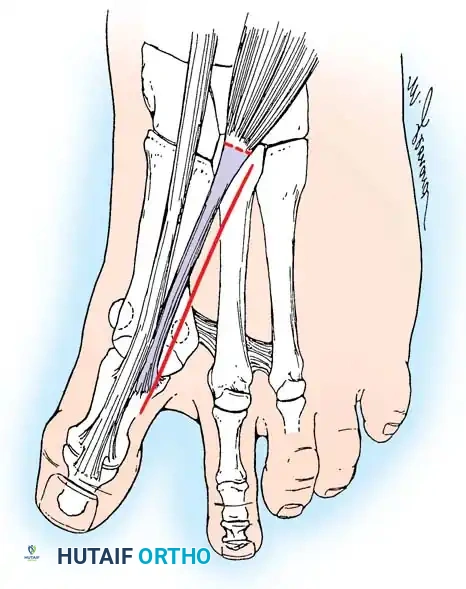
A B
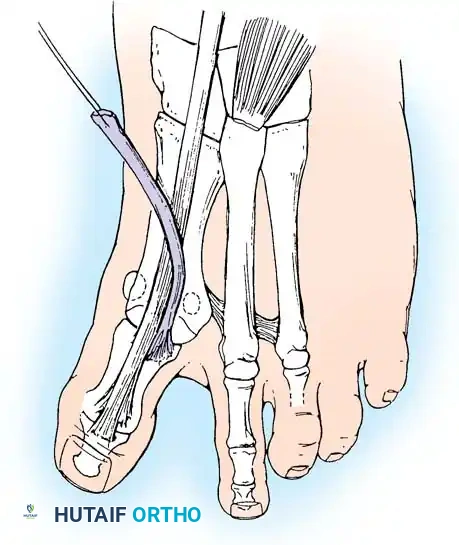
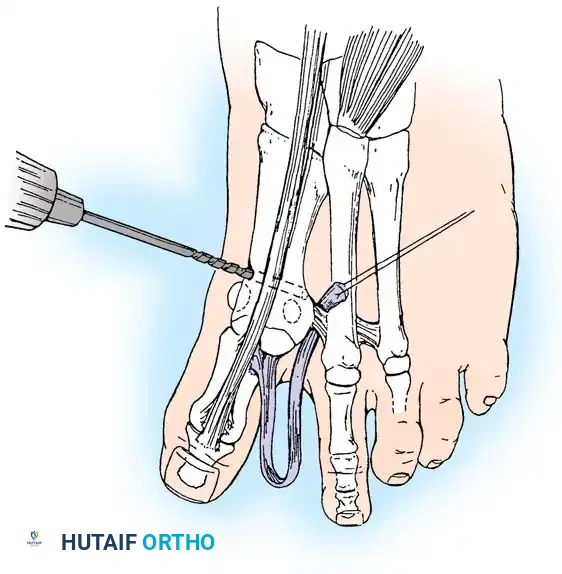
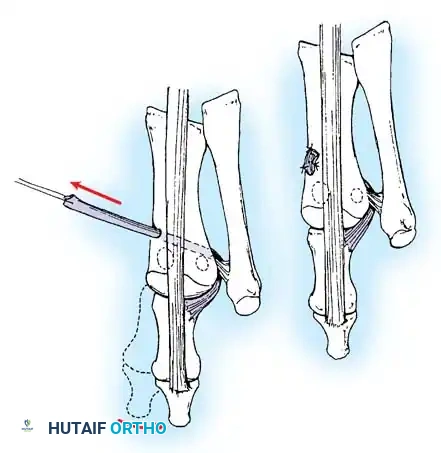
C D
Fig. 78-79 Hallux varus correction using extensor hallucis brevis tenodesis. A, Dorsal incision and transection of extensor hallucis brevis tendon. B, Transected tendon is passed deep to transverse metatarsal ligament from distal to proximal. C, Hole is drilled in dorsomedial fi rst metatarsal. D, Extensor hallucis brevis tendon is pulled through drill hole and secured with sutures to periosteum or bone. (Redrawn from Juliano PJ, Meyerson MS, Cunningham BW: Biomechanical assessment of a new tenodesis for correction of hallux varus, Foot Ankle Int 17:17, 1996.)
Extensor Hallucis Brevis Tenodesis TECHNIQUE 78-27 Myerson and Komenda; Juliano et al.—cont’d insertion of the tendon so that the attachment is not as dorsally located.
• Attach the extensor hallucis brevis tendon to the fi rst metatarsal shaft under tension.
• With the tendon pulled in a proximal direction, assess the range of motion of the hallux metatarsophalangeal joint, and compare with the motion with no tension on the tenodesis. Expect mild loss of passive fl exion. The patient should be made aware of this preoperatively. Because the extensor hallucis brevis transfer is to function as a tenodesis and not as a dynamic tendon transfer, the goal is to apply the maximal tension on the tendon that would interfere the least with range of motion at the metatarsophalangeal joint.
• The desired position of the hallux after correction is 5 degrees of valgus. Secure the extensor hallucis brevis tendon to the fi rst metatarsal through a bone tunnel 1.5 cm proximal to the joint, or use a bone suture anchor (Fig. 78-79C and D). Use temporary pin fi xation across the metatarsophalangeal joint for further stabilization if needed.
AFTERTREATMENT Weight bearing is permitted in a wooden-soled surgical shoe immediately after surgery. The shoe is used for an additional 4 weeks, after which time a comfortable stiff-soled shoe is permitted. The hallux is taped into valgus for 2 months after surgery. At that time, the patient is permitted to pursue any desired activity. Range-of-motion exercises of the hallux metatarsophalangeal joint are encouraged as soon as the wound permits, unless a pin across the metatarsophalangeal joint was required for stability. If used, the pin should be removed in 7 to 10 days and motion begun.
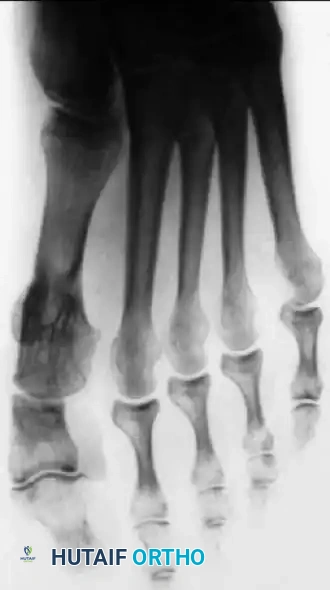

A B
Correction of Dynamic (Multiplanar) Hallux Varus
Treatment of dynamic deformity of the metatarsophalangeal joint is most often either resection arthroplasty (resecting the proximal third of the phalanx) or arthrodesis of the metatarsophalangeal joint (Fig. 78-80). If all components in the axial, coronal, and sagittal planes are correctable passively, however, and passive motion at the metatarsophalangeal joint approaches normal in fl exion and extension, soft-tissue repair of the deformity may be successful. The “hanging toe” procedure (resection of all intrinsic muscle attachments to the base of the proximal phalanx when the proximal third is removed) should include the insertion of two longitudinal, parallel Kirschner wires to maintain the position in 5 to 10 degrees of valgus for 6 weeks. Before placing the Kirschner wires in a retrograde direction through the proximal and distal phalanges and then in an antegrade direction into the metatarsal head, tension on the extensor hallucis longus tendon should be evaluated by holding the foot and ankle in the neutral position and judging if this tendon is causing an extensor posture of the hallux. If so, the tendon should be lengthened no more than 1 cm before fi xation. If a fi xed fl exion contracture of the interphalangeal joint has caused symptomatic dorsal calluses, one of two procedures is recom-
🔪 Surgical Technique 78-28
• Make a midline medial incision, and expose the metatarsal head by incising the capsule 2 to 3 mm plantar to where the skin incision was centered.
• Elevate the capsule from the head of the metatarsal and the base of the proximal phalanx dorsally and plantarward.
• Expose the tibial sesamoid.
• If the deformity is fi xed in extension at the metatarsophalangeal joint, perform a wider resection of the soft tissue to the junction of the neck and shaft of the fi rst metatarsal.
• Manually reduce the hallux into a valgus position, and release the capsule to evaluate the tightness.
• If all components of the deformity were not completely correctable passively, soft-tissue correction alone would be unsuccessful.
• Examine the articular surfaces, and if the head of the fi rst metatarsal shows loss of articular cartilage or unhealthyappearing articular cartilage, presumably from chronic pressure placed against it, perform an arthrodesis.
Fig. 78-80 A and B, Preoperative and postoperative radiographs of middle-aged woman with multiplanar hallux varus deformity (clawed hallux) corrected by resection arthroplasty. mended: (1) an arthrodesis of the interphalangeal joint at the time of resection arthroplasty of the metatarsophalangeal joint or (2) a plantar plate release at the interphalangeal joint with pin fi xation holding the joint in a neutral position. Techniques of arthrodesis of the metatarsophalangeal and interphalangeal joints are described in Techniques 7814 to 78-18. The technique of resection arthroplasty is described in the section on Keller bunionectomy. cult it was to correct the deformity; the more diffi cult the deformity correction, the longer the fi xation should remain.
🔪 Surgical Technique 78-28
• If the articular cartilage appears reasonably normal, and passive motion is full and unimpeded, fi x the hallux in 10 degrees of valgus with a 0.062-inch Kirschner wire placed across the joint obliquely from the base of the proximal phalanx medially to the head and neck junction of the fi rst metatarsal laterally.
• Place the sesamoids beneath the head of the metatarsal.
• Release the interphalangeal joint contracture through a dorsal inverted L –shaped incision with the transverse limb across the dorsum of the interphalangeal joint and the proximal limb extending 2 to 3 cm proximally along the dorsolateral border of the head and neck of the proximal phalanx.
• If the metatarsophalangeal joint requires arthrodesis, correct the interphalangeal joint fl exion contracture by releasing the plantar plate and both collateral ligaments, bringing the interphalangeal joint into a corrected position and holding it with a 0.062-inch Kirschner wire.
• If the metatarsophalangeal joint does not require arthrodesis, remove the articular surfaces of the interphalangeal joint in preparation for an arthrodesis. This serves two purposes: It corrects a dynamic deformity of the interphalangeal joint, or if the deformity is static, it allows relative shortening of the extensor and fl exor hallucis longus muscle-tendon units, decreasing their deforming forces.
• Fix the interphalangeal joint arthrodesis with crossed Kirschner wires or a small intramedullary fragment screw. The technique of Johnson is recommended if a screw is used. Drill a hole into the distal phalanx from the articular surface through the tip of the hallux just beneath the nail, and reverse the drill bit into the proximal phalanx. Use a 4-mm partially threaded, cancellous, small fragment screw (40 to 50 mm) or Kirschner wires.
• Remove the tourniquet.
• Fix the hallux in 10 to 15 degrees of valgus with the interphalangeal joint arthrodesed in neutral position, and close the skin with simple, interrupted, small sutures. Place the stitches close to the skin edge because bringing the hallux from a varus to a valgus posture places the skin under tension. Some wound necrosis medially frequently occurs after hallux varus repair, and the patient should be advised of this. Apply a forefoot dressing.
AFTERTREATMENT The patient is encouraged to rest and elevate the foot above heart level for several days. For the fi rst 3 weeks after surgery, only non–weight bearing or touch-down weight bearing ambulation on crutches is allowed. If the patient is allowed to bear weight, a short leg cast that extends past the toes is recommended, and even with this protection only partial weight bearing is allowed. Weight bearing to tolerance in a removable walking boot is allowed for the next 3 weeks. The Kirschner wire is removed at 4 to 6 weeks, depending on how diffi -
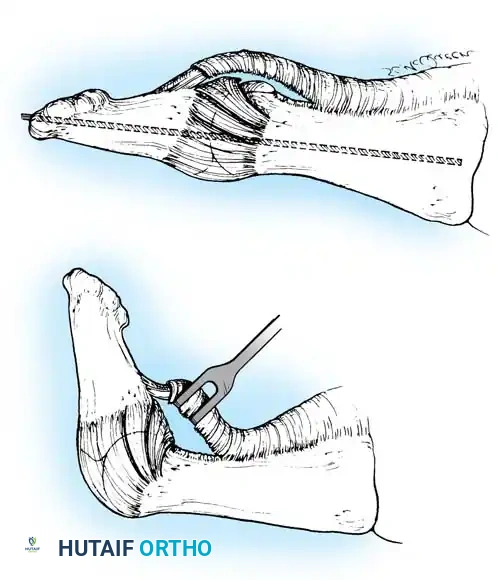
A
B
Fig. 78-81 Plantar plate release. A, Exposure of plantar plate and partial release of fl exor hallucis longus tendon. B, Excision of plantar plate from proximal phalanx. (Intramedullary Kirschner wire is recommended for 4 weeks.)
Plantar Plate Release TECHNIQUE 78-29
• Begin a 3-cm medial incision at the midshaft of the proximal phalanx, and extend it distally to the level of the base of the nail. This incision avoids the sensory branches of the medial proper plantar digital nerve to the pulp of the hallux.
• Locate the sheath of the fl exor hallucis longus, and incise it longitudinally for 1 cm centered over the interphalangeal joint.
• Using a small-bladed knife, remove 2 to 3 mm of the insertion of the tendon onto the base of the distal phalanx. The insertion is broad and tenacious, and this much release does not disrupt the tendon attachment (Fig. 78-81A).
• Gently fl exing and extending the joint even a few degrees helps locate the plantar plate insertion on the neck of the proximal phalanx. Using a small-bladed knife, completely incise the plantar plate from the neck of the proximal phalanx, allowing it to slide distally to expose the interphalangeal joint (Fig. 78-81B).
• If this does not allow passive correction of the joint to the neutral position, release of the accessory portion of the collateral ligaments inserting into the plantar plate is necessary. This usually fully corrects the fl exion deformity.
• Hold the interphalangeal joint in the neutral position with one or two 0.062-inch Kirschner wires for 4 to 6 weeks. Leave these wires protruding 2 to 3 mm from the skin, and cover them with a plastic strip or adhesive tape.
Claw Toe (Intrinsic Imbalanced Hallux) In claw toe, the metatarsophalangeal joint is hyperextended, and the interphalangeal joint is fl exed with or without a fi xed contracture of either joint. Hallux extensus frequently is present, resulting in the inability of the patient to place the pulp of the great toe to the fl oor or to the sole of a shoe when standing; the pulp of the great toe misses the ground during the stance phase of gait. The crucial loss is the intrinsic muscle fl exion moment at the metatarsophalangeal joint. This results in hyperextension of the metatarsophalangeal joint by the unopposed extensor hallucis longus and brevis tendons and in the inability of the extensor hallucis longus tendon to extend the interphalangeal joint because of loss of excursion (slackness), which is caused by hyperextension of the fi rst metatarsophalangeal joint. The loss of intrinsic muscle control usually is secondary to bilateral sesamoidectomy or fi bular sesamoidectomy and dorsomedial subluxation of the tibial sesamoid after medial capsular imbrication (Fig. 78-82). Arthrodesis of the interphalangeal joint, transfer of the extensor hallucis longus tendon into the neck of the metatarsal, and dorsal capsulotomy of the metatarsophalangeal joint (Jones procedure; see Chapter 83) constitute the treatment of choice to preserve metatarsophalangeal joint motion. Simple arthrodesis of the interphalangeal joint does not correct hyperextension of the metatarsophalangeal joint. In effect, the dorsal capsulotomy also lengthens the extensor hallucis brevis tendon when it heals with scar tissue in continuity. A Kirschner wire should be inserted to hold the metatarsophalangeal joint in the neutral position for 4 weeks. If degenerative articular changes are apparent radiographically, an arthrodesis of the fi rst metatarsophalangeal joint is indicated.
Limitation of Metatarsophalangeal Joint Motion An essential part of any soft-tissue procedure for hallux valgus is imbrication, or “reefi ng,” of the medial capsule to correct the deformity without osteotomy or resection arthroplasty. Whether this capsulorrhaphy is performed coronally in the plane of the fi rst metatarsophalangeal joint or longitudinally (sagittally) in the long axis of the fi rst ray, the fi nal outcome is soft-tissue plication around a mobile articulation. To maintain correction of the valgus, the capsulorrhaphy must be snug, which decreases metatarsophalangeal joint motion. Hansen reported that of 139 feet treated by McBride bunionectomies, 55 exhibited limited active fl exion of the metatarsophalangeal joint. In our experience, even without intrinsic imbalance, loss of full fl exion of the metatarsophalangeal joint is common after medial capsular plication, but is seldom of clinical signifi cance. Before any type of bunion surgery, patients should be informed that some loss of motion of the metatarsophalangeal joint may occur, but that it should not decrease function or, in itself, produce symptoms. Wrapping the hallux during the postoperative period to hold the metatarsophalangeal joint in a neutral position or in 5 degrees of fl exion is benefi cial.
Hallux Extensus Hallux extensus as an isolated deformity (i.e., without being a part of the hallux varus complex or a clawed hallux) is rare. One cause of such a deformity is laceration of the fl exor hallucis longus tendon during sesamoidectomy or Keller resection arthroplasty. Consequently, the surgeon must ensure that the fl exor hallucis longus tendon is intact by inspection and passive excursion after the sesamoid has been removed.
Neuroma and Hematoma Neuroma and hematoma, inherent in any procedure on the foot, are largely avoidable with attention to anatomical detail and release of the tourniquet (if used), followed by meticulous hemostasis before wound closure. Because a neuroma of the foot may be a debilitating problem, illustrations of these cutaneous nerves are shown in Figure 78-83.
Stress Fractures of the Lesser Metatarsal Stress fractures occasionally occur in the second, third, or, in rare cases, fourth metatarsal, most often in postmenopausal women. Attempting to reduce weight on the fi rst ray may overload the lesser metatarsals and cause a stress fracture. Protected weight bearing or use of a wooden-soled shoe usually relieves symptoms within 3 to 4 weeks. Occasionally, a stress fracture of the second or third metatarsal angulates apex plantar, however, resulting in dorsifl exion of the
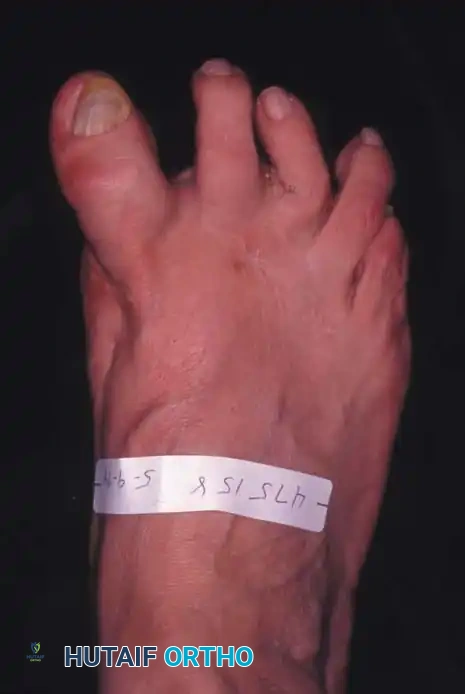
Fig. 78-82 Dorsomedial subluxation of hallux after fi bular sesamoidectomy, medial capsular imbrication, and displacement of tibial sesamoid medially.
been embraced widely by orthopaedists, but it may have some merit in select patients. Cracchiolo et al., reporting the risks and benefi ts of resection arthroplasty, recommended it for patients with rheumatoid arthritis and severe destruction of the joints.
Cock-Up Hallux Complications of the Keller procedure are related to the intrinsic muscle attachments to the phalangeal base. Without the intrinsic muscles fl exing the hallux, an extension deformity or contracture may develop at the fi rst metatarsophalangeal joint with a concomitant fl exion deformity at the interphalangeal joint. A callus that develops at the dorsum of the interphalangeal joint of the hallux is best treated by arthrodesis of the joint. Machacek et al. reported the results of arthrodesis and of motion-preserving procedures as salvage operations after failed Keller arthroplasties. Of the 28 patients (29 feet) with arthrodesis, 23 were satisfi ed with their result; repeat arthrodesis was required in fi ve feet because of malposition or pseudarthrosis. Of the 18 patients (21 feet) with repeat Keller procedures or isolated soft-tissue releases, only six were completely satisfi ed, and 11 were dissatisfi ed; valgus deviation and cock-up deformity had recurred in most of these feet at an average follow-up of 74 months. If the cock-up deformity of the hallux is severe, and more than one third of the proximal phalanx has been excised (Fig. 78-84), an interposition corticocancellous bone graft may be necessary to correct the deformity at the metatarsophalangeal joint. This restores some length to the hallux and stabilizes the fi rst metatarsophalangeal joint. This is a tedious procedure with a long recuperative period, however, and the arthrodesis commonly fails to unite. Myerson et al. described the use of bone grafting to restore length of the fi rst ray in 24 patients who had bone loss after a variety of surgeries for the correction of hallux valgus (Silastic arthroplasty, bunionectomy and distal metatarsal osteotomy, Keller resection arthroplasty, and total joint replacement). Nine patients had osteonecrosis of the fi rst metatarsal, and seven had osteomyelitis. Autografts (iliac crest or distal tibia) were used in 16 patients, and femoral head allografts were used in eight. Fusion was obtained in 19 (79%) of the 24 patients at an average of 13 weeks, and the fi rst ray was lengthened an average of 13 mm. Of the fi ve nonunions, two were asymptomatic, and three united after revision; four of the fi ve nonunions occurred in patients with failed silicone arthroplasties. The authors cautioned that this procedure is technically demanding, and a simpler procedure should be chosen for patients with lesser degrees of bone shortening.
Metatarsalgia Metatarsalgia present before surgery may be exacerbated by the Keller procedure. Because of unloading of the medial column by extreme varus of the fi rst metatarsal, painful callosities often develop beneath one or more metatarsal heads. Realigning the fi rst ray (bringing
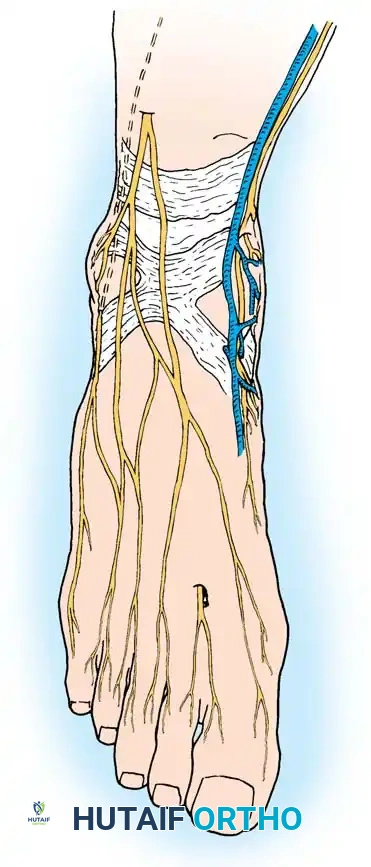
A
D C
B
Fig. 78-83 Two main branches of superfi cial peroneal nerve: medial (intermediate) branch to medial side of hallux and second and third dorsal web spaces and lateral branch to third and fourth dorsal web spaces (A). Deep peroneal nerve courses between fi rst and second metatarsals to innervate skin of fi rst web space dorsally (B). Saphenous nerve courses anterior to medial malleolus and innervates skin over dorsomedial aspect of hindfoot and midfoot (C). Sural nerve passes posterior to lateral malleolus and divides near calcaneocuboid joint into dorsal branch (which innervates fourth web space dorsally) and main trunk (which continues distally to supply skin of lateral side of fi fth toe) (D). In practice, however, branch of superfi cial peroneal nerve to dorsomedial aspect of hallux is most vulnerable to injury. metatarsal head. This malunion shifts weight to the adjacent metatarsal heads, producing painful calluses. In osteoporotic patients when no callus is seen on radiographs, protection of a suspected fracture in a short leg walking boot or wooden (rigid) sole shoe is indicated to avoid this complication.
Complications of Resection Arthroplasty of the First Metatarsophalangeal Joint (Keller) Resection arthroplasty, described by Keller in 1904, continues to be recommended in certain patients with hallux valgus, especially elderly individuals with limited physical demands on their feet and some degree of osteoarthritis of the fi rst metatarsophalangeal joint. The procedure has not great toe. Although he did not call it hallux rigidus, in 1887 Davies-Colley reported the fi rst resection of the base of the proximal phalanx for this disorder, which he called hallux fl exus because of the fl exion posture of the metatarsophalangeal joint with the foot plantigrade and the limited extension of the joint (Fig. 78-85). Although understanding of the condition has advanced through radiographic and histological techniques, the pathogenesis of hallux rigidus is still not clearly defi ned, but its unrelenting destructive course is well appreciated. Cartilage damage is believed to initiate the synovitis, which leads to further cartilage destruction, osteophyte proliferation, and subchondral bone destruction. The process may begin in adolescence when a single traumatic event at the metatarsophalangeal joint damages the dorsal articular surface of the metatarsal head. Repeated microtrauma also may cause articular cartilage damage. Other suggested causes include osteochondritis dissecans of the fi rst metatarsal head secondary to an osteochondral fracture over the dorsal convexity of the joint surface, hyperextension of the fi rst metatarsal, an abnormally long fi rst metatarsal, and severe pronation of the foot. According to Thompson et al., adult hallux rigidus most often is caused by degenerative arthritis of the fi rst metatarsophalangeal joint, whereas in adolescents, hallux rigidus usually results from localized cartilage damage to the fi rst metatarsal head. Coughlin and Shurnas modifi ed an earlier system for grading the severity of hallux rigidus (Table 78-1) that uses passive range-of-motion, clinical, and radiographic examinations to assign a grade from 0 to 4. They reported that the classifi cation system reliably predicted the outcome of operative treatment of hallux rigidus in 110 patients. Although metatarsus primus elevatus (dorsal position of the fi rst metatarsal on a weight bearing lateral radiograph) has been suggested as a primary causative factor in the pathogenesis of hallux rigidus, this has not been clearly proven. Glasoe, Allen, and Saltzman compared dorsal mobility in 14 patients with hallux valgus with that in 14 patients without deformity and found that mobility of the fi rst ray was increased in patients with hallux valgus; they suggested that a large intermetatarsal angle may be an indicator of increased dorsal mobility. Horton, Park, and Myerson reviewed 264 lateral weight bearing radiographs from 81 patients with hallux rigidus, 64 patients with Morton neuromas, and 50 asymptomatic volunteers. They found little or no difference in elevation of the fi rst ray between the control group and paients with mild or moderate hallux rigidus and only slightly more elevation in patients with advanced hallux rigidus. In their review of 110 patients with hallux rigidus, Coughlin and Shurnas found that hallux rigidus was not associated with primus elevatus, fi rst ray hypermobility, a long fi rst metatarsal, Achilles or gastrocnemius tendon tightness, abnormal foot posture, symptomatic hallux valgus, adolescent onset, shoes,
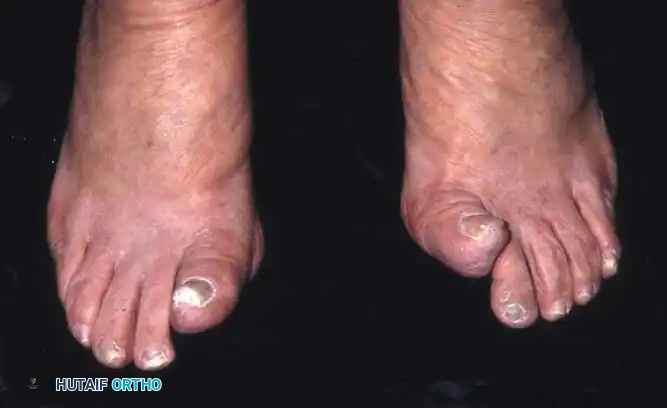
Fig. 78-84 Hallux extensus on right foot and hallux extensus and recurrent valgus on left foot. These complications should be preventable when suggested techniques are used. (From Richardson EG, Graves SC: Keller bunionectomy. In Myerson M, ed: Current therapy in foot and ankle surgery , St Louis, 1993, Mosby.)
the fi rst metatarsal closer to the second metatarsal) reduces the lesser metatarsal load and the likelihood of painful callosities beneath the second and third metatarsals. Patients should be instructed that the pain beneath the lesser metatarsal heads may not improve after the Keller procedure and possibly could worsen and require a pad relief inside the shoe.
Complications after Arthrodesis of the First Metatarsophalangeal Joint The primary complications of arthrodesis of the fi rst metatarsophalangeal joint are nonunion, malunion, and degenerative arthritis of the interphalangeal joint of the hallux. Accurate positioning of the hallux at the time of surgery is essential, and repositioning may be necessary after temporary fi xation. The plane of the nail of the hallux should be in the plane of the lesser toes. In reconstruction of a rheumatoid forefoot, the lesser metatarsophalangeal joints must be corrected before fi nal positioning of the hallux. Mann et al. stated that the proper position of the hallux is 15 degrees of dorsifl exion at the metatarsophalangeal joint relative to the plantar surface of the foot and 25 to 30 degrees of dorsifl exion relative to the inclination angle of the fi rst metatarsal. In addition, they recommended 15 degrees of valgus to reduce the risk of degenerative changes in the interphalangeal joint and callus formation over the interphalangeal and metatarsophalangeal joints. Nonunion occurs in less than 10% of patients and according to McKeever usually is not painful.
You Might Also Like