Ankle Arthroscopy: Surgical Anatomy, Indications, & Advanced Principles
Key Takeaway
Ankle arthroscopy is a minimally invasive procedure addressing various ankle pathologies. Key principles involve a thorough understanding of surgical anatomy, including critical neurovascular structures, precise portal placement, and biomechanics. It's indicated for conditions like anterior/posterior impingement and osteochondral lesions of the talus, offering advantages like reduced pain and faster recovery over open procedures.
Essential Principles of Ankle Arthroscopy: A Comprehensive Guide
Introduction & Epidemiology
Ankle arthroscopy has evolved significantly since its inception, transforming from a diagnostic tool to a highly effective therapeutic modality for a spectrum of ankle pathologies. Its minimally invasive nature offers advantages over open procedures, including reduced soft tissue dissection, decreased post-operative pain, shorter recovery periods, and improved cosmesis. Initially hindered by technical challenges associated with the joint's tight confines and critical neurovascular anatomy, advancements in instrumentation, optics, and surgical techniques have made ankle arthroscopy a standard practice in orthopedic surgery.
The incidence of ankle pathologies amenable to arthroscopic intervention is substantial. Ankle sprains are among the most common musculoskeletal injuries, often leading to chronic pain, synovitis, and impingement syndromes that can be effectively addressed arthroscopically. Osteochondral lesions of the talus (OCLTs) are frequently encountered, with arthroscopic debridement and marrow stimulation techniques representing first-line treatments. Posterior ankle impingement, often due to an os trigonum or soft tissue hypertrophy, is also increasingly managed arthroscopically. The continuous refinement of techniques and expansion of indications underscore the importance of a thorough understanding of the principles guiding safe and effective ankle arthroscopy.
Surgical Anatomy & Biomechanics
A profound understanding of ankle anatomy and biomechanics is paramount for safe and effective arthroscopic intervention. The tibiotalar joint is a hinge joint, primarily facilitating dorsiflexion and plantarflexion. Its constrained nature, especially anteriorly, necessitates precise portal placement to avoid iatrogenic injury to neurovascular structures.
Bony Anatomy
The ankle joint is formed by the distal tibia, fibula, and the talus. The tibial plafond and medial malleolus articulate with the superior and medial aspects of the talus, respectively. The lateral malleolus articulates with the lateral aspect of the talus. Key bony landmarks for portal placement include the tips of the malleoli, the anterior joint line, and the extensor tendons.
Capsular and Synovial Anatomy
The ankle capsule is relatively thin anteriorly and posteriorly, thickening medially (deltoid ligament complex) and laterally (lateral collateral ligament complex). The synovium lines the non-articular surfaces of the joint, and synovial hypertrophy or plicae can contribute to impingement.
Critical Neurovascular Structures
Portal placement must meticulously avoid vital neurovascular structures.
*
Anterior Ankle:
*
Superficial Peroneal Nerve (SPN):
This nerve lies anterior to the fibula, dividing into intermediate and medial dorsal cutaneous branches approximately 10-15 cm proximal to the tip of the lateral malleolus. It is highly vulnerable during anterolateral portal placement.
*
Deep Peroneal Nerve (DPN):
Situated between the tibialis anterior and extensor hallucis longus tendons, adjacent to the anterior tibial artery and veins. It is at risk with anteromedial and anterocentral portals, particularly if deviating too far medially.
*
Saphenous Nerve and Vein:
Medial to the tibialis anterior tendon, vulnerable with anteromedial portal creation.
*
Anterior Tibial Artery and Veins:
Located centrally, deep to the extensor retinaculum.
*

Depiction of anterior ankle neurovascular anatomy relevant to portal placement.
*

Illustrative view of common anterior arthroscopic portals in relation to critical structures.
*
Posterior Ankle:
*
Sural Nerve:
Courses posterior to the lateral malleolus, superficial to the Achilles tendon. Vulnerable with posterolateral portal placement.
*
Posterior Tibial Neurovascular Bundle:
Comprising the posterior tibial artery, posterior tibial veins, and tibial nerve, located medial to the flexor hallucis longus (FHL) tendon. At risk with posteromedial portal placement, requiring careful dissection.
*

Anatomical illustration of the posterior ankle, highlighting neurovascular structures.
Biomechanics and Pathology
Understanding ankle kinematics helps identify areas of impingement and chondral wear. Repetitive microtrauma or acute macrotrauma can lead to:
*
Anterior Impingement:
Often due to osteophytes on the distal tibia or talar neck (osseous impingement) or hypertrophic synovium/scar tissue (soft tissue impingement).
*
Posterior Impingement:
Associated with an os trigonum, prominent posterior talar process, or FHL tenosynovitis.
*
Osteochondral Lesions (OCLs):
Most commonly on the talus, frequently on the superior-medial and superior-lateral aspects. These can result from acute trauma or chronic microtrauma.
*
Synovitis and Arthrofibrosis:
Chronic inflammation or post-traumatic scarring can lead to pain and restricted motion.
Indications & Contraindications
Patient selection is critical for optimizing outcomes in ankle arthroscopy. A thorough clinical evaluation, combined with appropriate imaging, is essential.
Indications for Ankle Arthroscopy
Ankle arthroscopy is indicated for a variety of intra-articular and peri-articular pathologies, often after failed conservative management.
Operative Indications:
*
Anterior Ankle Impingement:
*
Osseous Impingement:
Resection of anterior tibial and/or talar neck osteophytes.
*
Soft Tissue Impingement:
Debridement of hypertrophic synovium, scar tissue, or plicae.
*
Osteochondral Lesions of the Talus (OCLTs):
* Debridement of unstable cartilage flaps.
* Marrow stimulation techniques (e.g., microfracture, abrasion arthroplasty) for contained lesions.
* Excision of loose osteochondral fragments.
*
Synovitis:
Diagnostic evaluation and synovectomy for chronic inflammatory or infectious conditions.
*
Loose Bodies:
Identification and removal of intra-articular loose bodies.
*
Arthrofibrosis/Adhesions:
Lysis of adhesions to restore range of motion.
*
Ankle Instability:
Arthroscopic-assisted ligament repair or reconstruction (e.g., Broström-Gould variants, internal bracing).
*
Chondral Defects:
Treatment of isolated chondral lesions (e.g., debridement, microfracture, cartilage restoration techniques).
*
Posterior Ankle Impingement:
* Excision of os trigonum or prominent posterior talar process.
* Debridement for posterior soft tissue impingement.
* Flexor Hallucis Longus (FHL) tenosynovectomy or release.
*
Subtalar Joint Pathology:
* Diagnostic arthroscopy for pain.
* Debridement of synovitis or impingement.
* Removal of loose bodies.
*
Ankle Arthrodesis:
Arthroscopic-assisted fusion for selected cases of end-stage ankle arthritis.
*
Fracture Management:
Arthroscopic assessment and/or reduction assistance for intra-articular fractures (e.g., pilon fractures, talar neck fractures).
Contraindications for Ankle Arthroscopy
While minimally invasive, there are situations where arthroscopy is relatively or absolutely contraindicated.
Absolute Contraindications:
*
Active Infection:
Cellulitis, osteomyelitis, or septic arthritis in the surgical field.
*
Severe Peripheral Vascular Disease:
Compromised healing potential.
*
Uncontrolled Coagulopathy:
Significant bleeding risk.
Relative Contraindications:
*
Severe Osteoarthritis:
Extensive cartilage loss, significant joint space narrowing, and diffuse osteophyte formation may be better managed with open procedures or arthroplasty/arthrodesis. Arthroscopy may offer temporary relief but often has limited long-term efficacy.
*
Extensive Soft Tissue Compromise:
Prior scarring, skin grafts, or open wounds that preclude safe portal placement.
*
Severe Joint Effusion or Edema:
Can obscure visualization and increase fluid extravasation risk.
*
Inexperience of Surgeon:
Complex cases should be approached by experienced arthroscopists.
Table 1: Operative vs. Non-Operative Indications for Ankle Arthroscopy
| Indication Type | Operative Management (Arthroscopy Indicated) | Non-Operative Management (Initial Treatment) |
|---|---|---|
| Impingement | Anterior osseous/soft tissue impingement unresponsive to conservative care | Activity modification, NSAIDs, physical therapy, corticosteroid injections |
| OCLTs | Unstable lesions, failed conservative treatment, lesions > 1.5 cm diameter | Activity modification, protected weight-bearing, physical therapy, corticosteroid injections (controversial) |
| Synovitis | Chronic synovitis, persistent pain/swelling, failure of medical management | RICE, NSAIDs, physical therapy, systemic anti-inflammatory agents |
| Loose Bodies | Symptomatic loose bodies causing locking, catching, or pain | Observation (if asymptomatic and small) |
| Arthrofibrosis | Significant ROM limitation due to adhesions after injury/surgery | Aggressive physical therapy, stretching, mobilization |
| Instability | Chronic instability refractory to PT, specific ligamentous repair/reconstruction | Physical therapy, bracing, proprioceptive training |
| Chondral | Symptomatic contained defects, failed conservative measures | Activity modification, physical therapy |
| Posterior | Symptomatic os trigonum, FHL pathology, posterior impingement refractory to PT | Activity modification, physical therapy, corticosteroid injections |
| Subtalar | Symptomatic subtalar synovitis, impingement, loose bodies refractory to PT | RICE, NSAIDs, physical therapy |
| Arthritis | Early-stage arthritis with localized symptoms, debridement of synovitis/osteophytes | NSAIDs, physical therapy, activity modification, injections, bracing |
Pre-Operative Planning & Patient Positioning
Meticulous pre-operative planning and appropriate patient positioning are crucial for successful and safe ankle arthroscopy.
Pre-Operative Planning
- Clinical Assessment: Thorough history and physical examination to identify primary pathology, previous surgeries, and neurovascular status.
-
Imaging Review:
- Radiographs: Weight-bearing anteroposterior, lateral, and mortise views are standard to assess joint space, osteophytes, and gross bony pathology.
- MRI: Essential for evaluating soft tissue pathology, synovitis, cartilage integrity, and osteochondral lesions.
- CT Scan: Useful for complex bony impingement, large OCLs, or fracture management, providing detailed 3D bony architecture.
- Anesthesia Consultation: Typically general anesthesia or regional block (e.g., spinal, popliteal block). The surgeon should discuss anesthetic preferences with the anesthesiologist.
- Informed Consent: Comprehensive discussion with the patient regarding the procedure, potential benefits, risks (including specific neurovascular injuries, infection, DVT), and alternatives.
- Tourniquet Placement: A pneumatic tourniquet is routinely applied high on the thigh to ensure a bloodless field, typically inflated to 250-300 mmHg or 100 mmHg above systolic pressure.
- Pre-operative Antibiotics: Administered intravenously within 60 minutes of incision.
Patient Positioning
Patient positioning depends on the region of the ankle being addressed.
Anterior Ankle Arthroscopy
- Supine Position: The patient is positioned supine on the operating table.
- Leg Holder: A thigh-high leg holder is often utilized to stabilize the operative limb.
-
Distraction:
- Non-invasive Distraction: Most commonly employed. A strap or traction boot is applied to the foot, and an ankle distractor device is used to apply longitudinal traction (typically 25-50 lbs) to open the joint space. This can be attached to the leg holder or directly to the operating table. Care must be taken to pad all bony prominences.
- Invasive Distraction (Mini-Distractor): Less frequently used but can be beneficial in very tight ankles or for specific procedures. This involves placing a Schanz pin in the distal tibia and another in the talus or calcaneus, then connecting them with an external fixator to apply distraction. The pins must be placed carefully to avoid neurovascular structures.
-

Illustration of non-invasive ankle distraction setup for anterior arthroscopy.
- Foot Position: The foot is typically positioned in slight plantarflexion, which opens the anterior joint space.
- Prepping and Draping: The limb is prepped and draped in a sterile fashion, allowing access from the toes to the proximal calf. The distractor is draped to maintain sterility.
Posterior Ankle Arthroscopy
- Prone Position: The patient is positioned prone on the operating table. This offers optimal access to the posterior ankle. Padding should be placed under the chest and shins to prevent pressure sores.
- Lateral Decubitus Position: An alternative where the patient lies on their side with the operative leg uppermost, often with a pillow between the legs. This can be useful if simultaneous anterior work is planned or if prone positioning is contraindicated.
- No Distraction: Distraction is generally not required for posterior ankle arthroscopy.
- Prepping and Draping: Similar to anterior arthroscopy, ensuring broad sterile field.
Detailed Surgical Approach / Technique
A systematic approach to ankle arthroscopy minimizes complications and ensures comprehensive evaluation and treatment.
General Principles
- Tourniquet: Applied and inflated as discussed above.
- Fluid Management: Gravity inflow from 3-L saline bags is our preference for fluid management, as it typically provides adequate joint distension and minimizes fluid extravasation compared to pump systems in the confined ankle space. An arthroscopic pump can be used if higher pressure or flow is required, but vigilance for compartment syndrome is increased. The outflow can be through a second portal or a dedicated outflow cannula.
- Joint Distension: Initial joint distension with 20-30 mL of saline via a needle placed in the anteromedial portal site helps create working space and protects articular cartilage during initial portal creation.
Instrumentation
Specialized instruments are crucial for safe and effective ankle arthroscopy due to the joint's tight confines.
*
Scopes:
* The
2.7-mm scope
is most frequently used and is our preference. It is ideal for the ankle, allowing comprehensive anterior ankle arthroscopy and intra-articular evaluation. Furthermore, the 2.7-mm scope can be safely used for posterior ankle arthroscopy, subtalar arthroscopy, and tendoscopy.
* Occasionally, the
1.9-mm scope
is used in exceptionally tight ankles or pediatric cases where larger scopes risk iatrogenic damage.
* Some advocate the use of the
4.0-mm scope
, which can be useful in anterior ankle arthroscopy for enhanced visualization and instrument passage, but can pose a challenge for intra-articular evaluation and maneuvering in the smaller posterior or subtalar compartments.
*
Optics:
* The
30-degree scope
is adequate in most situations, providing excellent visualization straight ahead and with slight rotation.
* A
70-degree scope
is useful for viewing the posterior joint structures from anterior portals or for looking around corners within the joint.
*
Arthroscopy Tower:
A standard arthroscopy tower is required, including:
*
Monitor:
High-resolution monitor for clear visualization.
*
Light Source:
Powerful light source (e.g., LED or Xenon) for optimal illumination.
*
Shaver Motor:
For motorized debridement.
*
Printer/Recorder:
For documenting findings and procedures.
*
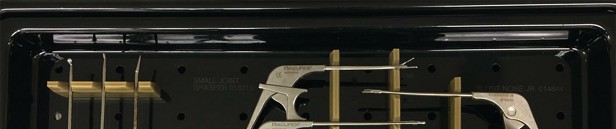
Intra-articular Instruments (Fig. 61-1):
Commercially available sets designed specifically for ankle arthroscopy incorporate smaller instruments to facilitate safe intra-articular work. These sets generally include the following:
*
Probes:
Essential for palpating structures, assessing cartilage integrity, and guiding other instruments.
*
Basket Forceps:
In a variety of sizes and angles (e.g., 90-degree, straight). Useful for creating a “leading edge” in thickened soft tissue or scar tissue that can then be debrided with a motorized shaver. Also useful for the debridement of loose cartilage flaps or meniscoid lesions.
*
Graspers:
For removal of loose bodies or tissue fragments.
*
Motorized Shavers and Burrs:
Small diameter (2.9-mm to 3.5-mm) shavers with various tip configurations (full radius, aggressive) and burrs for bony resection or microfracture.
*
Curettes:
Small, angled curettes for debridement or debridement of OCLs.
*
Radiofrequency Ablation Devices:
For precise tissue shrinkage, hemostasis, and debridement.
*

Fig. 61-1: Typical array of small-joint arthroscopic instruments for ankle procedures, including probes, basket forceps, and graspers.
Anterior Ankle Arthroscopy: Portals and Procedure
Portal Placement (Fig. X-X - assuming a general portal image is implied by this sequence)
Safe portal placement is achieved by palpating bony landmarks and identifying neurovascular structures. The "triangle of safety" between the anterior tibial tendon (ATT), extensor hallucis longus (EHL), and extensor digitorum longus (EDL) tendons defines the safe zones.
-
Anteromedial Portal:
- Location: Approximately 1 cm medial to the tibialis anterior tendon and 1 cm proximal to the anterior joint line.
- Structures at risk: Saphenous nerve and vein. These are typically superficial and can often be retracted.
- Purpose: Primary viewing or working portal.
-

Pre-operative marking for anteromedial portal placement, demonstrating palpation of key tendons.
-
Anterolateral Portal:
- Location: Approximately 1 cm lateral to the peroneus tertius tendon (or the most lateral slip of the extensor digitorum longus) and 1 cm proximal to the anterior joint line.
- Structures at risk: Superficial peroneal nerve (SPN). Careful blunt dissection through soft tissues is critical to avoid SPN injury.
- Purpose: Primary viewing or working portal, often used for outflow.
-

Anterolateral portal marking in relation to the superficial peroneal nerve branches.
-
Anterocentral Portal (Accessory):
- Location: Midway between the anteromedial and anterolateral portals, proximal to the joint line.
- Structures at risk: Deep peroneal nerve and anterior tibial artery. This portal carries a higher risk and is used less frequently, often reserved for specific pathologies.
- Purpose: Provides a direct central view or access for instruments.
-

Consideration for an anterocentral portal, emphasizing careful soft tissue dissection.
-
Percutaneous "Viewing" Portals:
Sometimes used for viewing the medial gutter or specific lesions.
-

Percutaneous viewing portal placement for enhanced visualization of the medial gutter.
-
Step-by-Step Technique
- Initial Joint Distension: After sterile prep and drape, inject 20-30 mL of normal saline into the ankle joint using an 18-gauge needle, located at the anteromedial portal site, just medial to the tibialis anterior tendon. This creates a safe working space.
- Anteromedial Portal Creation: Make a small skin incision (approximately 5-7 mm). Use a blunt trocar and cannula, directing it parallel to the talar dome, into the joint. A "plop" sensation indicates entry. Confirm intra-articular position by observing fluid outflow.
- Scope Insertion: Insert the 2.7-mm 30-degree arthroscope into the anteromedial cannula.
-
Systematic Evaluation:
Begin a systematic diagnostic arthroscopy.
- Medial Gutter: Inspect for synovitis, osteophytes, and loose bodies.
- Anterior Joint: Assess the anterior plafond and talar neck for impingement osteophytes, synovitis, and capsular hypertrophy.
- Talar Dome: Thoroughly examine the entire talar dome for osteochondral lesions, chondral defects, or loose cartilage flaps. Use a probe for palpation and stability assessment.
- Lateral Gutter: Inspect for synovitis, meniscoid lesions (e.g., anterior talofibular ligament impingement), and osteophytes.
- Anterolateral Working Portal Creation: Under direct arthroscopic visualization from the anteromedial portal, bring the camera to the lateral side of the joint. Identify the intended anterolateral portal site. Make a skin incision. Insert a blunt trocar and cannula, guiding it into the joint under direct vision to ensure no iatrogenic damage to articular cartilage or neurovascular structures. The SPN should be carefully swept laterally or medially.
-
Switching Stick Technique:
A "switching stick" can be used to alternate the scope and instruments between portals for better visualization and access to different areas.
-

Illustration of the switching stick technique to exchange scope and instrument portals.
-
-
Surgical Procedures:
- Debridement/Synovectomy: Use a motorized shaver to remove hypertrophic synovium, scar tissue, or fibrinous strands.
-
Osteophyte Resection:
For anterior impingement, use a motorized burr to resect osteophytes from the distal tibia and talar neck. Ensure smooth contours.
-

Arthroscopic view of anterior tibial osteophyte requiring resection. -

Post-resection arthroscopic view demonstrating removal of impingement-causing osteophytes.
-
-
OCLT Management:
- Debridement of unstable flaps using basket forceps or shaver.
- Microfracture: For contained OCLs, create multiple perforations into the subchondral bone using an awl or burr to stimulate fibrocartilage formation.
-

Arthroscopic image of an osteochondral lesion of the talus. -

Microfracture technique being performed on an OCL using an awl.
- Loose Body Removal: Grasp and remove loose bodies using specialized grasping forceps.
-
Completion:
Thoroughly irrigate the joint to remove debris. Remove instruments and cannulas. Close portals with sterile strips or a single suture. Apply a sterile dressing.
-

Final arthroscopic view after successful debridement and management of intra-articular pathology.
-
Posterior Ankle Arthroscopy: Portals and Procedure
Portal Placement (Fig. X-X - assuming a general portal image is implied by this sequence)
-
Posterolateral Portal:
- Location: Approximately 1 cm medial to the Achilles tendon and 1 cm proximal to the superior border of the calcaneus, just lateral to the FHL tendon.
- Structures at risk: Sural nerve. This portal is generally considered the primary viewing portal and is safer.
-

Pre-operative marking for posterolateral portal placement.
-
Posteromedial Portal:
- Location: Approximately 1 cm lateral to the Achilles tendon and 1 cm proximal to the superior border of the calcaneus, just medial to the FHL tendon.
- Structures at risk: Posterior tibial neurovascular bundle (tibial nerve, posterior tibial artery, posterior tibial veins). This portal carries a higher risk and requires careful technique.
-

Marking for posteromedial portal placement, noting proximity to the neurovascular bundle.
Step-by-Step Technique
- Patient Positioning: Prone position is preferred.
- Initial Joint Distension: Not always necessary, but can be performed by injecting saline through the posterolateral portal site.
- Posterolateral Portal Creation: Make a small skin incision. A hemostat or blunt trocar is advanced through the subcutaneous tissue, carefully creating a path to the posterior joint capsule. Once the capsule is reached, a blunt trocar and cannula are inserted into the posterior joint space.
- Scope Insertion: Insert the 2.7-mm 30-degree arthroscope.
-
Systematic Evaluation:
- FHL Tendon: Identify the FHL tendon and its sheath.
- Posterior Talus and Tibia: Evaluate for impingement, osteophytes, os trigonum, or posterior OCLs.
- Posterior Capsule: Assess for synovitis or scar tissue.
- Posteromedial Working Portal Creation: Under direct arthroscopic visualization from the posterolateral portal, identify the neurovascular bundle by transillumination (if possible) or by palpation from outside. Make a skin incision. Insert a blunt trocar and cannula, aiming laterally towards the center of the joint, away from the neurovascular bundle, under direct vision .
-
Surgical Procedures:
-
Os Trigonum Excision:
Use a shaver and/or burr to resect the os trigonum or prominent posterior talar process.
-

Arthroscopic view of an os trigonum causing posterior impingement. -

Resection of the os trigonum using a motorized burr.
-
- FHL Release/Tenosynovectomy: Debride inflamed synovium around the FHL tendon or release a constricted sheath.
-
Posterior Impingement Debridement:
Remove soft tissue or fibrous bands causing impingement.
-

Clearing of posterior soft tissue impingement.
-
-
Os Trigonum Excision:
Use a shaver and/or burr to resect the os trigonum or prominent posterior talar process.
- Completion: Irrigate, remove instruments, close portals, and apply dressing.
Subtalar Arthroscopy
Access to the subtalar joint is typically achieved via anterolateral and posterolateral portals, similar in principle to ankle arthroscopy but aiming for the subtalar space. Careful consideration of the peroneal and sural nerves is crucial. Indications include subtalar synovitis, impingement, and loose bodies.
Complications & Management
Complications in ankle arthroscopy, while generally low, can be significant. Awareness and meticulous technique are essential for prevention and effective management.
Common Complications
-
Neurovascular Injury:
- Incidence: Varies, but the superficial peroneal nerve (SPN) is the most commonly injured (up to 15% transient paresthesia, <1% permanent neurological deficit). Sural nerve (posterior approach) and saphenous nerve (medial approach) are also at risk. Deep peroneal nerve and anterior tibial artery injuries are rarer but more severe.
- Prevention: Precise portal placement using anatomical landmarks, initial joint distension, blunt dissection for portal creation, direct visualization of cannula entry, use of smaller instruments.
- Management: Most nerve injuries are neurapraxias and resolve spontaneously. Persistent symptoms (>3-6 months) may warrant nerve conduction studies/EMG, followed by exploration and neurolysis or repair if indicated.
-
Infection:
- Incidence: Very low (0.01% - 0.5%).
- Prevention: Sterile technique, pre-operative antibiotics, minimal skin incisions.
- Management: Broad-spectrum intravenous antibiotics, possible arthroscopic lavage and debridement, consideration of open debridement in severe cases.
-
Fluid Extravasation/Compartment Syndrome:
- Incidence: Rare for compartment syndrome (0.01%). Fluid extravasation into soft tissues is more common but usually benign.
- Prevention: Careful monitoring of fluid input/output, limiting operative time, using gravity inflow or low-pressure pumps, avoiding excessive distraction.
- Management: Immediate cessation of fluid infusion and surgery. Close monitoring of compartment pressures. Urgent fasciotomy if compartment syndrome is confirmed.
-
Articular Cartilage Damage (Iatrogenic):
- Incidence: Can occur during portal creation or instrument manipulation.
- Prevention: Blunt trocars, direct visualization of instrument entry, maintaining adequate joint distension, careful instrument handling.
- Management: Small defects may be debrided; larger defects may require microfracture or other cartilage restoration techniques.
-
DVT/Pulmonary Embolism (PE):
- Incidence: Low, comparable to other minor orthopedic procedures.
- Prevention: Early mobilization, mechanical prophylaxis (compression stockings, SCDs), chemical prophylaxis in high-risk patients.
- Management: Standard DVT/PE protocols (anticoagulation).
-
Instrument Breakage:
- Incidence: Rare.
- Prevention: Inspect instruments pre-operatively, avoid excessive force.
- Management: Attempt arthroscopic retrieval. If unsuccessful, open arthrotomy for retrieval is necessary to prevent persistent synovitis or joint damage.
-
CRPS (Complex Regional Pain Syndrome):
- Incidence: Rare but debilitating.
- Prevention: Minimize tissue trauma, good pain control, early mobilization.
- Management: Multidisciplinary approach, including pain management specialists, physical therapy, sympathetic blocks.
Table 2: Common Complications in Ankle Arthroscopy
| Complication | Incidence | Salvage / Management Strategies |
|---|---|---|
| Neurovascular Injury | SPN: up to 15% transient, <1% permanent; Sural/Saphenous: <1% | Observation for neurapraxia, nerve conduction studies, surgical exploration/neurolysis/repair if persistent |
| Infection (Septic Arthritis) | 0.01% - 0.5% | IV antibiotics, arthroscopic irrigation & debridement, open debridement if severe |
| Fluid Extravasation | Common, usually benign | Cease infusion, monitor. Fasciotomy if compartment syndrome develops. |
| Compartment Syndrome | Extremely rare (<0.01%) | Immediate fasciotomy. |
| Articular Cartilage Damage | Varies, often iatrogenic | Debridement, microfracture, cartilage repair techniques if significant |
| DVT/Pulmonary Embolism (PE) | Low (<0.5%) | Anticoagulation, pulmonary support for PE. |
| Instrument Breakage | Rare | Arthroscopic retrieval, open arthrotomy if necessary. |
| Complex Regional Pain Syndrome | <1% | Multidisciplinary pain management, physical therapy, sympathetic blocks |
| Persistent Pain/Stiffness | Variable, depending on pathology | Aggressive physical therapy, secondary arthroscopy, alternative surgical approaches |
Post-Operative Rehabilitation Protocols
Post-operative rehabilitation is tailored to the specific procedure performed and the underlying pathology. General principles aim to reduce pain and swelling, restore range of motion, and regain strength and function.
General Post-Operative Management
- Weight-Bearing: Non-weight-bearing (NWB) or touch-down weight-bearing (TDWB) with crutches for 1-2 weeks is common, especially if chondral procedures (e.g., microfracture) were performed. Simple debridement or impingement procedures may allow early protected weight-bearing.
- Immobilization: A compressive dressing, plaster splint, or CAM boot is often used for initial comfort and protection, usually for 1-2 weeks. Prolonged immobilization is generally avoided to prevent stiffness.
- Pain Management: Oral analgesics, NSAIDs, and ice application (cryotherapy) are prescribed.
- Swelling Reduction: Elevation of the extremity, compression dressings, and cryotherapy are crucial in the initial post-operative period.
Phased Rehabilitation Approach
Phase 1: Acute Inflammatory Phase (Weeks 0-2)
- Goals: Protect the surgical site, control pain and swelling, maintain joint mobility without stress to healing tissues.
- Weight-Bearing: NWB to TDWB, as per surgeon's protocol.
-
Range of Motion (ROM):
- Active and passive ankle dorsiflexion/plantarflexion (within pain-free limits).
- Gentle ankle circles.
- Avoid eversion/inversion initially if lateral ligamentous structures were involved.
- Therapeutic Exercises: Isometric exercises for calf and ankle musculature (e.g., quad sets, glute sets). Toe curls/spreads.
- Manual Therapy: Gentle soft tissue mobilization to reduce swelling.
- Modalities: Cryotherapy, elevation.
Phase 2: Repair and Early Remodeling Phase (Weeks 2-6)
- Goals: Restore full pain-free ROM, initiate strengthening, progress weight-bearing.
- Weight-Bearing: Progress from TDWB to full weight-bearing (FWB) as tolerated, often in a walking boot initially, then transitioning to supportive shoes.
- Range of Motion: Continue active and passive ROM exercises. Incorporate stretching (gastroc/soleus).
-
Strengthening:
- Resisted ankle dorsiflexion, plantarflexion, inversion, eversion (theraband).
- Calf raises (bilateral, then unilateral).
- Initiate balance and proprioception exercises (e.g., single leg stance, wobble board, if appropriate).
- Manual Therapy: Continued soft tissue mobilization, gentle joint mobilizations if stiffness persists.
Phase 3: Advanced Strengthening and Proprioception (Weeks 6-12)
- Goals: Maximize strength, endurance, and proprioception; prepare for return to activity.
- Weight-Bearing: FWB, transitioning to normal footwear.
-
Strengthening:
- Progressive resistive exercises.
- Plyometric drills (e.g., hopping, jumping) for athletic individuals.
- Functional exercises: lunges, squats, step-ups.
- Proprioception: Advanced balance exercises (e.g., dynamic balance on unstable surfaces, sport-specific drills).
- Cardiovascular: Stationary cycling, swimming, elliptical trainer.
Phase 4: Return to Sport/Activity (Weeks 12+)
- Goals: Gradual, safe return to pre-injury activity level or sport.
- Criteria for Return: Full pain-free ROM, symmetrical strength (isokinetic testing often used), excellent balance and proprioception, completion of sport-specific drills.
- Progression: Gradual increase in intensity and duration of activity. Close monitoring for any recurrence of symptoms.
Specific Considerations for OCLT Repair: Microfracture protocols typically require extended periods of NWB (4-6 weeks) to protect the forming fibrocartilage. Continuous passive motion (CPM) may be utilized to aid cartilage healing.
Summary of Key Literature / Guidelines
Ankle arthroscopy has a robust foundation in published literature, demonstrating its efficacy for various pathologies.
- Anterior Ankle Impingement: Numerous studies support arthroscopic debridement of soft tissue and osseous impingement. Martin et al. (2014) reported good to excellent results in 85-95% of patients following arthroscopic anterior ankle debridement for impingement, with significant improvements in pain and function. Long-term outcomes generally show sustained benefit, although some patients may require further intervention, particularly if underlying arthritic changes progress.
- Osteochondral Lesions of the Talus (OCLTs): Arthroscopic debridement and marrow stimulation (e.g., microfracture) are well-established first-line treatments for OCLs, particularly for smaller, contained lesions (<1.5 cm diameter). Meta-analyses, such as those by Zengerink et al. (2012) and Choi et al. (2012), indicate favorable outcomes with microfracture, especially in younger patients with smaller lesions, though the resulting fibrocartilage is biomechanically inferior to hyaline cartilage. Newer techniques like autologous matrix-induced chondrogenesis (AMIC) or osteochondral autograft transplantation (OAT) procedures show promise for larger lesions, often performed arthroscopically or arthroscopically-assisted.
- Posterior Ankle Impingement: Arthroscopic excision of an os trigonum or posterior talar process, as well as debridement of FHL pathology, has become the preferred method over open approaches due to reduced morbidity. Marumoto et al. (2009) and van Dijk et al. (2000) have demonstrated high rates of success (80-90%) in returning dancers and athletes to full activity after posterior ankle arthroscopy.
- Ankle Instability: While traditional open Broström-Gould procedures remain the gold standard, arthroscopic and arthroscopically-assisted techniques for lateral ankle ligament repair and internal bracing have gained traction. Guelfi et al. (2019) reviewed the evidence, suggesting comparable clinical outcomes to open repair but with potential benefits of reduced pain and faster recovery, particularly in early series. The ability to address concomitant intra-articular pathology arthroscopically is a significant advantage.
- Complications: Comprehensive reviews, such as those by Ferkel et al. (2011) and Baker et al. (2017), detail the incidence and types of complications. While nerve injury, especially to the superficial peroneal nerve, remains the most frequent complication, rates of persistent neurological deficit are low. Advances in portal placement strategies and instrument miniaturization continue to reduce these risks.
- Overall Efficacy: The shift towards arthroscopic management for a broader range of ankle pathologies is supported by a growing body of evidence highlighting its safety, efficacy, and patient-reported outcomes. Current guidelines often recommend arthroscopy after a failed trial of conservative management, reflecting its role as a key treatment option in the management algorithm for many ankle conditions.

Flowchart summarizing decision-making in ankle pathology management, often placing arthroscopy after conservative failure.
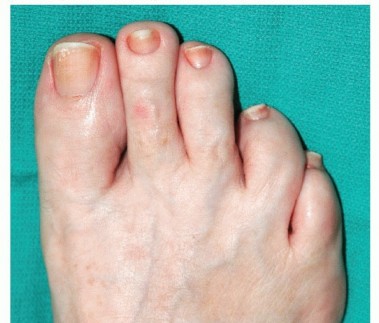
Clinical & Radiographic Imaging

You Might Also Like