Optimizing Acetabular Component Cementation for Superior Outcomes
Key Takeaway
For anyone wondering about Optimizing Acetabular Component Cementation for Superior Outcomes, Acetabular component cementation is a technique in total hip arthroplasty relying on mechanical interlock between the implant, cement, and prepared bone bed. Meticulous bone bed preparation, accurate component positioning, and minimizing bleeding at the bone-cement interface, often via hypotensive anesthesia, are paramount for successful mechanical integration and optimal long-term outcomes.
Introduction
Cemented acetabular fixation for total hip arthroplasty (THA) is a successful procedure with excellent long-term results. Though decreasing in popularity in the United States, it remains popular in the UK and Scandinavia. Numerous studies have demonstrated excellent longterm results, and discussion of this procedure for acetabular component fixation in THA is warranted.1-21
Adherence to proper technique is of the utmost importance when utilizing cemented fixation, for both femoral and acetabular components. Of paramount importance is the meticulous bone bed preparation and accurate component positioning. Cementation relies on the mechanical interlock between component, cement, and the bone bed. Thus, proper preparation and technique is essential to achieve optimal clinical outcomes.3,22-27
Technique
PREOPERATIVE PLANNING/ANESTHESIA
Thorough and complete review of preoperative radiographs is imperative prior to proceeding with surgery. For cementation of the acetabular component, particular attention should be paid to rim and central osteophytes, as well as the presence of medial wall deficiencies and protrusio. (see "Special Considerations" section below). In complex or dysplastic cases, a preoperative CT scan may be warranted to further elucidate the bony pelvic anatomy.
Preoperative discussion with anesthesia providers to determine optimal technique can also contribute to improved cementation results. The authors prefer hypotensive spinal anesthesia. Numerous studies have extolled the benefits of this modality in THA.23,28 As discussed above, proper bone bed preparation is essential for success in cemented THA.29-32 A low systolic blood pressure at the time of cementation is considered critical as this minimizes bleeding at the bone-cement interface, thereby optimizing the ability for mechanical integration and interdigitation of cement at this interface.
OPERATIVE STEPS
Excellent circumferential exposure of the acetabulum is critical, and can be achieved via a variety of standard approaches. After adequate exposure, the surgeon must once again assess the bony acetabular anatomy. In conjunction with radiographic review, it is important to note the presence of rim and central osteophytes, as well as the identification of the true medial wall of the acetabulum.

Total Hip Arthroplasty
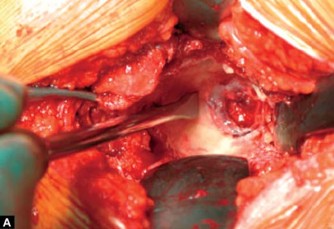
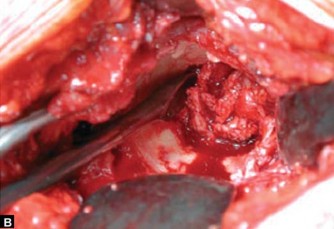
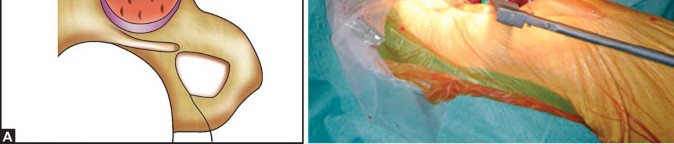
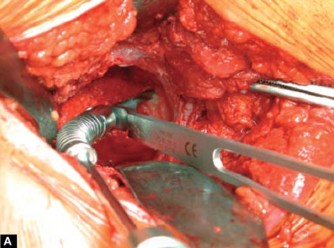
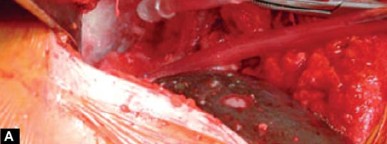
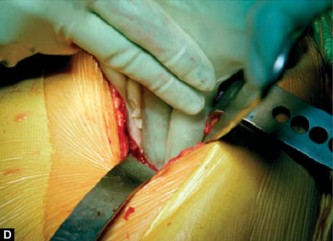
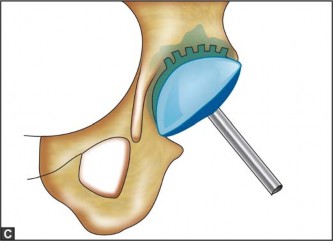
Figures 11.1A to C: Adequate exposure of the socket is mandatory and is ensured by the placement of three retractors. The central osteophyte and ligamentum teres are resected prior to reaming using an osteotome (A) and a sharp curette (B). All soft tissue and bone can be easily removed thus exposing the true floor-a step is then visible between the floor and the facies lunata (C) osteotome on acetabular floor after removal of ligamentum teres and central osteophyte
It is recommended to identify and preserve the transverse acetabular ligament (TAL). Leaving this structure intact assists with component referencing/positioning, as well as inferior cement containment. Rim osteophytes should also be left intact through cementation in order to facilitate cement containment. However, in some cases, large rim osteophytes may have to be partially removed in order to facilitate access to the socket.
Following circumferential exposure and identification of the TAL and rim osteophytes, it is next necessary to identify the true inner floor or medial wall of the acetabulum. Preoperative review of X-rays is critical in determining the presence of a central or medial osteophyte. When present, it is critical to remove this excess bone in order to identify the true medial wall of the acetabulum. This is best achieved using a combination of osteotomes and curettes to clear all tissues lateral to the base of the codyloid notch down to the level of the facies lunata or true medial wall (Figs 11.1A to C).
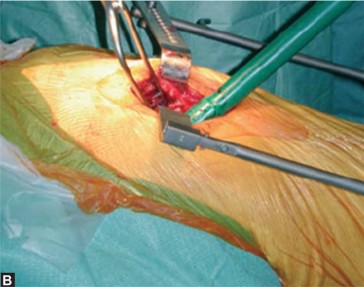
Once the medial wall has been properly identified and cleared, reaming may commence. It is necessary to completely contain the acetabular component under the acetabular roof when utilizing cemented technique. Therefore, medialization and deepening of the acetabular socket are essential. The first reamer should be directed medially, with the intent of making the cancellous bone of the facies lunata flush with the cortical surface of the medial wall/ inner floor (Figs 11.2A and B). This landmark corresponds to the lateral aspect of the teardrop on an AP pelvis view. During this initial stage of preparation, the reamer should be directed straight medially, and kept inferior in close contact with the TAL. Note that, if immediate upward reaming is done a superior and lateral cup placement with inadequate containment and a higher hip center will result (Figs 11.3A to D). Inadequate medialization will similarly lead to an incorrect positioning of the cup (Figs 11.4A and B).
Acetabular Component Cementation
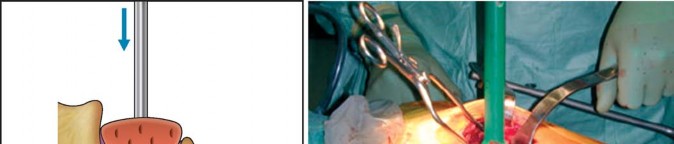
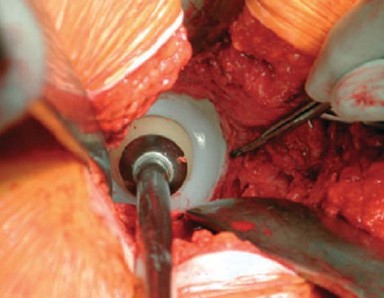
Figures 11.2A and B: The first reamer is directed transversely to reach to the inner floor (A), before the cavity is enlarged and the superior sclerosis is addressed to expose bleeding cancellous bone. Intraoperative photographs to emphasise the direction of reaming. Initially the direction is at 90° until the inner floor has been reached. (B) Then the reamer is angulated up to 45° to prepare the acetabular roof sclerosis. Note that when using a short incision the inferior retractor is temporarily removed from the acetabular notch
Figures 11.3A to D: (A) A too lateral cup placement is simulated due to inadequate medial deepening. Note: Failure to remove central osteophyte lateral to tear drop (true inner floor of pelvis) (B) If immediate upwards reaming is done superior and lateral cup placement with inadequate containment will result
(C) Common mistake of concentric deepening with reamers kept at 45° thus raising the anatomical center of rotation (D) Correct transverse deepening keeps anatomical center of rotation, but not infrequently renders socket cavity eccentric, which makes cement containment and pressurization more difficult. TDL = tear drop line, dR = direction of reamer
Total Hip Arthroplasty
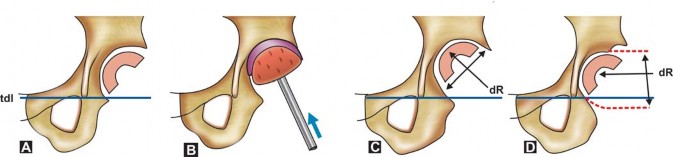
Figures 11.4A and B: This postoperative radiograph (left) shows 2 cardinal mistakes. Firstly the transverse deepening was not carried out sufficiently and due to reaming only in 45° direction the hip center is significantly raised (note relation to tear drop figure). Secondly, the cup was not inserted medially first, but pushed superiorly, which has led to a too thin cement mantle in DeLee and Charnley Zone I. On the right (B), the correct cup position is superimposed
Once adequate medialization has been achieved, the socket must be enlarged, and the roof prepared for cementation. The overlying principle is to maximize access to cancellous bone without sacrificing structural support or containment integrity. Cement cannot bond to smooth cortical bone, and can only maintain long-term function when interdigitated within the framework of cancellous bone. Initially, curettes can be used to scrape away and remove any remaining cartilage. Sequentially larger reamers are then guided superiorly to enlarge the cavity. It is important to preserve the subchondral plate superiorly, as over-reaming or destruction of this structure can lead to loss of socket support/integrity. It is also important to note the anterior-posterior dimensions of the acetabulum, and care must be taken to leave the anterior and posterior walls intact. If maximal A-P reaming has been achieved, but superior sclerosis still exists, a smaller reamer can be used in a burr-like manner to preferentially roughen the roof surface, again taking care not to violate the subchondral bone of the superior plate.
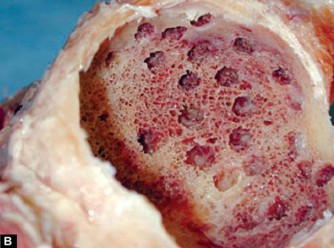
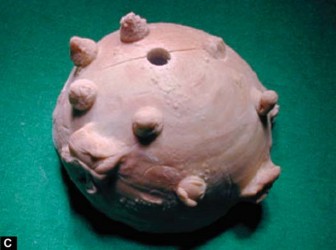
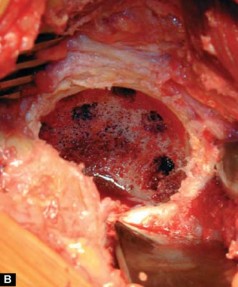
At this point, multiple 6 to 10 mm anchoring holes of approximately 10 mm depth are made in the roof using a flexible drill (Figs 11.5A to C). Inferior holes and subsequent cement pegs are not necessary as the cup is loaded in compression and therefore fixed to the roof (and not inferiorly). Inferior cement pegs are loaded in tension with weight bearing, and therefore commonly debond from the bone, resulting in unnecessary bone loss. In some cases, subchondral cysts may be exposed during the reaming process. It is best to use a curette to clear these cavities of soft tissues and membranes (Figs 11.6A and B). Once curettage is complete, smaller defects can be ignored until cementation, while larger defects may require cancellous bone graft filling prior to cementation.
Pulsatile lavage is now used to thoroughly and copiously irrigate the acetabular bone bed. This important step aids in the excision of any residual soft tissue, and also functions to help remove blood and marrow elements from the cancellous bone interstices. This is critical for cement-bone interdigitation and must be completed in a thorough and meticulous manner. The authors recommend the use of at least 2 liters of sterile saline run through a modern pulsatile lavage system. Furthermore, we recommend that a H2O2 sponge be packed in the socket prior to the final wash in order to further limited bleeding at the cancellous bone
Figures 11.5A to C: (A) A flexible drill with drill guide allows the most accurate placement of the anchoring holes. Partial preservation of subchondral plate is considered beneficial in cases with significant sclerosis (B) Multiple small drill holes are shown for better clarity in a cadaver specimen. Please note exposed cancellous bone despite partial preservation of bone plate. (C) Inadequate roughening of the sclerosis carries the risk of radiolucent lines and early failure, despite multiple drill holes


Acetabular Component Cementation
Figures 11.6A and B: Multiple anchoring holes have been made and a large roof cysts has been revealed. A sharp thin walled gauge is best suited to remove the pericystic sclerotic wall. Failure to do so will result in cement pegs with no interdigitation into cancellous bone. Larger cysts should always be bone grafted
Total Hip Arthroplasty
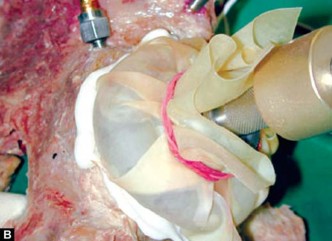
Figures 11.7A and B:
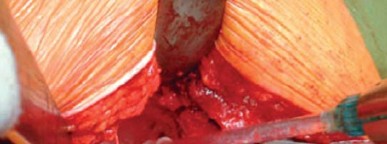
(A) Prior to cement application, repeat copious lavage is used and the acetabulum is packed with 3-5% H2O2 soaked ribbon gauge (B) Immediately prior to cement application the socket is irrigated again thoroughly and packed with dry swabs
surface.14,22,23,29,33 After the final wash, multiple dry sponges are placed into the cavity to completely dry the bony surfaces in anticipation of cementation (Figs 11.7A and B).
Once adequate preparation of the bone bed has been completed, cementation can commence. Most sockets require approximately one 40 g batch of bone cement, though larger sockets (when a reamer great than 54 mm has been utilized) will often need 60 to 80 g of cement to guarantee effective pressurization and enough matrix to adequately fix the acetabular component. Timing is critical, and the bone bed should be as clean and dry as possible prior to insertion of cement. Unlike femoral cementation, acetabular cementation is completed en bloc so that immediate pressurization can be implemented. This requires the cement to be at a higher viscosity than that which is utilized for femoral cementation. The authors prefer the use of Palacos cement, and generally apply the cement 3.5 to 4 minutes after mixing to ensure appropriate viscosity.
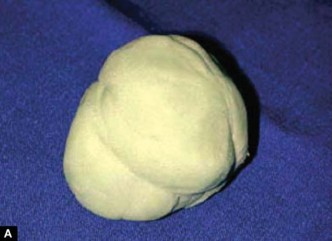
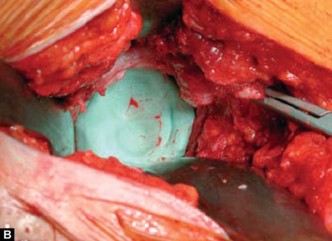
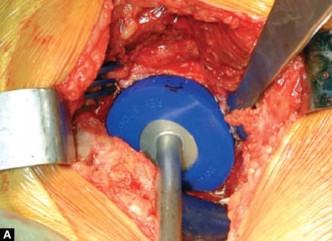
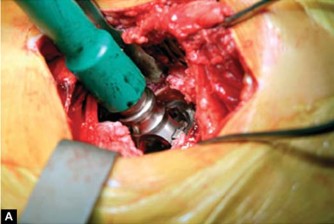
Once the cement has reached appropriate viscosity, a large ball is formed and inserted into the acetabular cavity immediately after removing the packed sponges used for drying. The cement is then immediately pressurized manually by using a sterile glove filled with a padded sponge (Figs 11.8A to D).
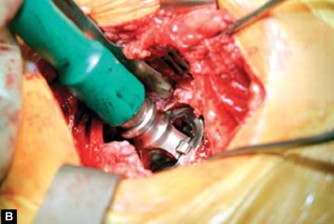
After one minute of manual pressurization, a mechanical pressurizer is placed and positioned so that it touches the acetabular inferior floor and seals the entire rim of the acetabulum. It is important to maintain sustained pressurization until the cement has sufficiently penetrated and reached a high enough viscosity so that it cannot be displaced by interossious bleeding pressure.14,34-38 This usually takes between 1 to 2 minutes, depending on the cement type, timing of cement application, and cement viscosity (Figs 11.9A to C). Any excess cement is then removed inferiorly (Fig. 11.10).
At this point, cup implantation should commence. The cup size should be at least 4 mm smaller in diameter than the largest reamer used in order to insure a circumferential cement mantle of at least 2 mm (Fig. 11.11). The acetabular component is inserted using the same principle used during acetabular reaming-medial first, followed by gradual angulation (Figs 11.12A and B).
Once appropriate position has been achieved, a pressurizer with a ball is used to maintain pressure without moving or rocking the component. Great care should be exercised in order
Acetabular Component Cementation
Figures 11.8A to D: After further lavage and drying, typically the cement is applied at 3.5 to 4 minutes (for Palacos) as a lump en bloc. For the large socket two mixes may be necessary. For the socket cement in a state of higher viscosity is preferred compared to the femur. Immediate manual cement pressurization is commenced using a padded sterile glove before the acetabular pressurizer is positioned
to maintain the component in appropriate alignment and orientation, as socket malposition, even with excellent cement technique, can lead to instability and early failure.16,39,40-48
The acetabular component is held in place with the pressurizer until the cement has sufficiently hardened. At his point, the pressurizer can be removed, and excess/remnant cement is excised using an osteotome. All remaining acetabular rim osteophytes that are proud to the component are now removed using an osteotome until they are flush with the component in order to reduce the risk of anterior and posterior impingement.
SPECIAL CONSIDERATIONS
Cemented acetabular components require complete coverage/containment under the roof of the acetabulum (Fig. 11.13). Therefore, adequate medialization of the component is required, and special attention is warranted in cases of lateral femoral head subluxation. This may occur in a variety of scenarios, including the presence of a large medial osteophyte, as well acetabular dysplasia (Fig. 11.14). When a large central osteophyte is present, it is crucial to remove it and find to the true medial wall of the acetabulum prior to reaming. In some cases (e.g. DDH) the acetabular roof may be deficient and acetabular roof graft may be necessary for adequate coverage, even after appropriate medialization (Figs 11.15A and B).
Total Hip Arthroplasty
Figures 11.9A to C:
Cement is then more effectively pressurized with a well designed pressurizer for a minimum period of 60 to 120 seconds depending on the cement type, the timing of cement application and the cement viscosity.
Note:
Care has to be taken not to bottom the pressurizer to avoid insufficient pressurization and cement mantle defects
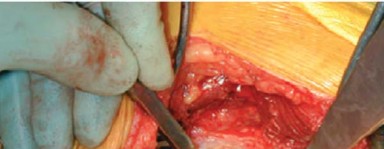
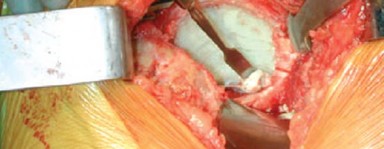
Figure 11.10: After successful and adequate pressurization the pressurizer is removed and at approx. 6 to 7 minutes no further bleeding will occur. Excess inferior cement is removed from the acetabular floor and notch with a McDonalds dissector to prevent inferior cement escape during cup insertion
Acetabular Component Cementation
Figure 11.11: An acetabular component with a minimum PE thickness of 8 mm is used. The implant should be downsized at least 4 mm from the last reamer (e.g. 48 mm cup and 52 mm reamer) to guarantee a minimal circumferential cement mantle thickness of
2 mm. Depending on the cup/reamer relation a minimum cement mantle of 2 mm should be visible. This prevents thin cement mantles in Gruen Zone 1. The component orientation can be assessed by rotation of the ball headed introducer, using the introducer rods as orientation in space. Alternatively, a cup inserter with orientation guides can be used initially
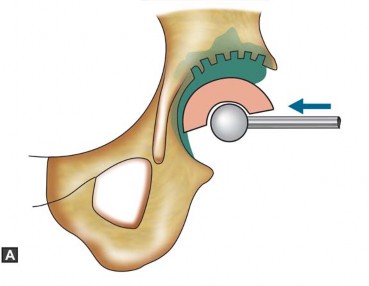
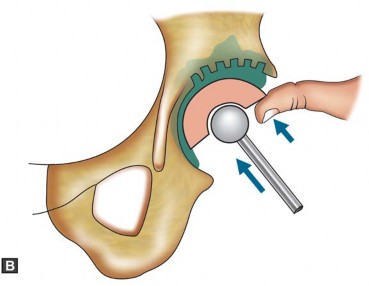
Figures 11.12A and B: Schematic drawing of cup implantation. With reference to the transverse ligament the component is inserted horizontally and pushed fully medially first, and then gradually angulated to the desired inclination of 45°. Pressurization is maintained using the ball-headed introducer
Total Hip Arthroplasty
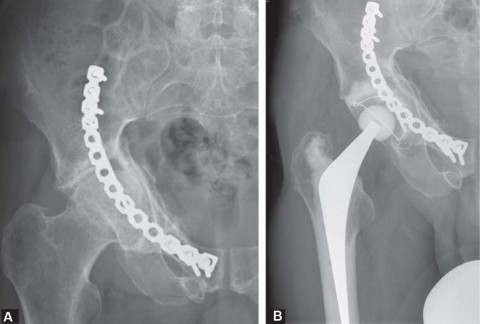
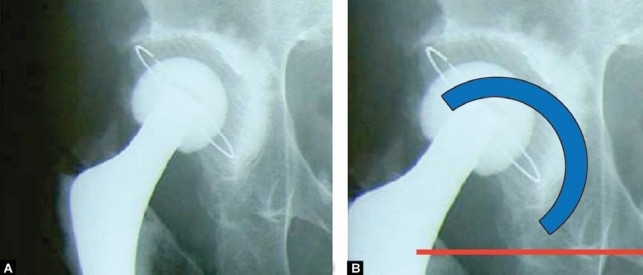
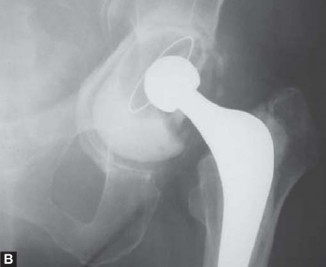
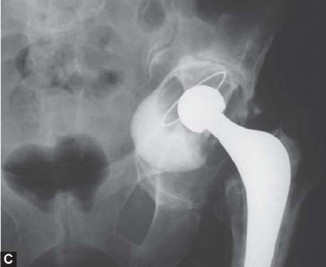
Figure 11.13: Postoperative radiograph with correctly implanted acetabular component. Note the absence of lucent lines and the adequate degree of cement interdigitation
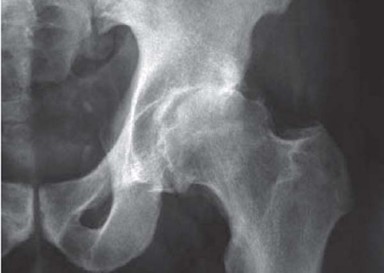
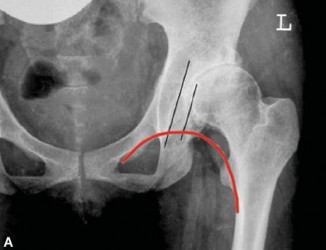
Figure 11.14: Lateral subluxation and large central osteophyte in osteoproliferative OA
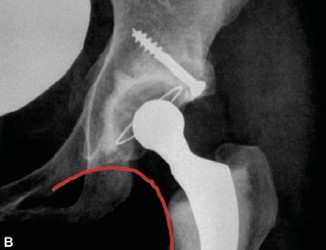
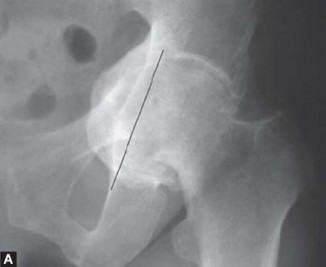
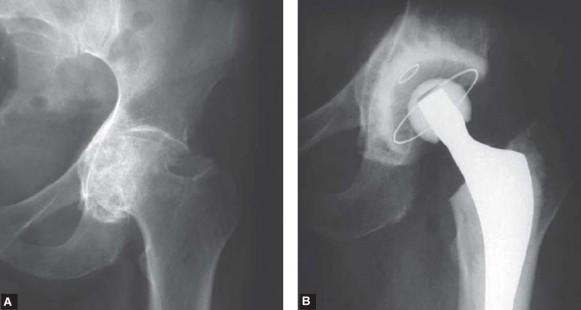
Figures 11.15A and B: (A) Acetabular dysplasia with lateral-superior subluxation and bony (distance between two parallel lines) obliteration of the acetabular fossa. The preoperative radiograph provides a good guide for the true depth of the fossa. Note subluxation using the Menard-Shenton line as reference (B) Postoperative radiograph shows autogenous roof graft and inferior cup placement in correct anatomical position with restoration of the Menard-Shenton line. In contrast to Figure 11.2 adequate medial deepening reaming ensured correct anatomical cup position. This technique will reveal more clearly a roof graft required to achieve full containment
It is also important to recognize cases of medial wall deficiency and protrusio (Figs 11.16A to C). In these cases, no central osteophyte is present, and the step of transverse deepening as described above should be avoided in order to prevent perforation of the thin medial wall. In many of these cases, floor graft from the resected femoral head must be utilized to bolster the medial wall and subsequently lateralized the acetabular component, restoring normal anatomy and offset (Figs 11.17 to 11.19).
Acetabular Component Cementation
Figures 11.16A to C: (A) Protrusio acetabuli. Note medial head migration well beyond tear drop line. No central osteophyte is present and a floor graft is necessary to lateralize the cup to restore the anatomical center of rotation and prevent early failure (B) Immediate postoperative situation with failure to address the pathology. Note the absence of a floor graft and a very poor cementing technique. (C) Early failure with central and superior en-block migration after 18 months
Figures 11.17A and B: (A) Protrusio acetabuli with central migration of the femoral head. Note femoral head is medial to tear drop line (B) The postoperative radiograph shows restoration of anatomy with the use of autogenous floor graft from femoral head. Morcellized bone is impacted onto the sclerosed lamina interna, followd by a structural bone size
Total Hip Arthroplasty
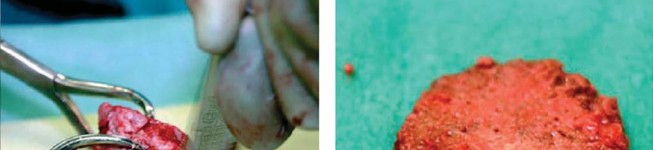
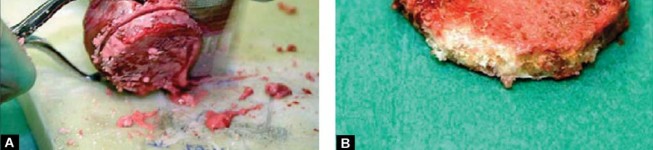
Figures 11.18A and B: Structural autograft taken from femoral head
Figures 11.19A and B: Depth of reamer before (A) Floor graft in protrusion acetabuli and after (B) Impaction of morcellized and structural graft confirms adequate intraoperative lateralization. Cave: In protrusio the first reamer is not medialized to avoid perforation of the (thinned) sclerotic lamina interna
GRADING OF CEMENT MANTLE
Grading of the cement mantle for acetabular implants requires an assessment of the association of the implant edge in relation to the entire cement mantle. Grading of the cement mantle is defined as concentric or eccentric based on the thickness of the mantle in all three of the DeLee and Charnley49 zones. Oh et al50,51 and Sanders et al52 expanded on by Sandhu et al53 defined a difference of 2 mm between adjacent zones as the upper limit for cement mantle concentricity.
Results
Although the use of cemented implants in THA is declining worldwide, the results of cemented hip arthroplasties show superior survivorship to cementless implants for many patient groups. The results of cemented arthroplasties have been shown to be affected by the
Acetabular Component Cementation
experience of the surgeon and even the type of the cement used.54.55 National registries document the overall results of these implants, and give an account of results that can be expected for the population at large. The National Joint Registry of England and Wales reveals that a cemented total hip (both components cemented) has the lowest revision rate of any type of fixation with just 2 percent needing revision for any reason at 5 years.56 The NJREW results of the hybrid total hip, with an uncemented acetabular implant and a cemented femoral implant, are slightly less favorable at five years. The fixation of the acetabular implant is the only variable between these groups, and thus accounts for this survivorship difference. Australian Registry data is similar to the NJREW. The revision rate for a cemented total hip (both components) is lower than for a hybrid total hip in patients over 75 years of age.57 Swedish Hip Arthroplasty register data also supports the durability of the cemented acetabular component. Superior survivorship is found when the acetabular implant is cemented with both all cemented and reverse hybrid (cemented acetabulum and uncemented femur) total hips.58 Meta-analysis results also support the use of all cemented constructs at a population based level.59
Conclusion
Cemented acetabular fixation remains a highly successful procedure with excellent long term results. Adherence to proper technique is of the utmost importance to obtain optimal results. Meticulous bony bed preparation, pressurization of cement, and accurate component positioning will lead to improved outcomes, and a decreased risk of failure/revision.
Illustrative Case
-
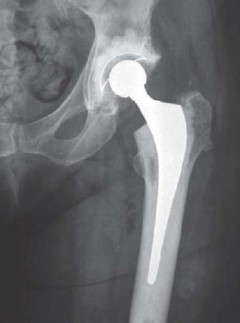
ray demonstrating a cemented all polyethylene acetabular component at 5-year follow-up with outstanding cement technique and component position. Metal beads throughout have been placed for radiostereometric (RSA) analysis (Fig. 11.20).
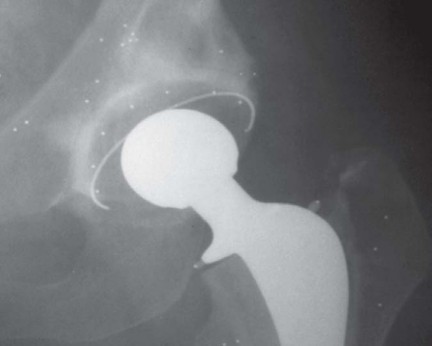
Figure 11.20
Scientific References
Scientific References
- <a class="medical-citation-link" href="https://pubmed.ncbi.nlm.nih.gov/?term=Oh%20I.%20A%20comprehensive%20analysis%20of%20the%20factors%20affecting%20Acetabular%20cup%20fixation%20and%20design%20in%20total%20hip%20replacement%20arthroplasty.%20The%20Hip%20Society%20Award%20Papers%3B%201983." target="_blank" rel="noopener noreferrer" target="Oh I. A comprehensive analysis of the factors affecting Acetabular cup fixation and design in total hip replacement arthroplasty. The Hip Society Award Papers; 1983.</a>
You Might Also Like