
INTRODUCTION TO ADVANCED TENDON RECONSTRUCTION
In the realm of reconstructive orthopedic and hand surgery, the restoration of biomechanical function following trauma, neuromuscular pathology, or congenital deformity relies heavily on precise tendon manipulation. Two of the most critical techniques in the surgeon’s armamentarium are the End-to-Side Tendon Repair and the Tendon-to-Bone Attachment.
End-to-side tenorrhaphy is predominantly indicated in complex tendon transfers where a single, robust motor unit is harnessed to drive multiple recipient tendons—a scenario frequently encountered in radial nerve palsy reconstructions or complex flexor tendon rehabilitations. Conversely, tendon-to-bone fixation is paramount when restoring the anatomical insertion of an avulsed tendon (such as a mallet finger or Jersey finger) or when anchoring a tendon graft to a distal phalanx.
This comprehensive guide delineates the biomechanical principles, precise surgical techniques, and postoperative protocols required to execute these procedures with master-level proficiency.
END-TO-SIDE REPAIR
The end-to-side repair is a workhorse technique in tendon transfer surgery. Its primary biomechanical advantage lies in its ability to distribute the force of one motor tendon across several recipient tendons without compromising the structural integrity of the recipients.
Indications and Biomechanics
End-to-side anastomoses are indicated when:
* A single donor muscle (e.g., Flexor Carpi Ulnaris) is transferred to activate multiple digits (e.g., Extensor Digitorum Communis).
* Preservation of the recipient tendon's proximal continuity is desired, allowing for potential spontaneous recovery of the original motor unit.
* Tendon grafting requires a proximal juncture that minimizes bulk while maximizing tensile strength.
Surgical Warning: The angle of approach is critical. The transferred tendon must approach the recipient tendon at an acute angle relative to its line of pull. A perpendicular or obtuse angle will result in biomechanical inefficiency, vector loss, and eventual attenuation or rupture of the transfer.
The Roll Stitch Technique
The roll stitch is a specialized suturing method highly effective for repairing or transferring extensor tendons, particularly over or adjacent to the metacarpophalangeal (MCP) joints where the tendon is flat and broad.
- Suture Material: Utilize a 4-0 monofilament wire or 4-0 monofilament nylon threaded on a small, curved cutting needle. Monofilament is preferred to reduce tissue drag and minimize the risk of harboring bacteria.
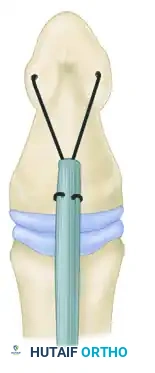
Surgical Technique: End-to-Side Anastomosis
The following steps detail the creation of a robust end-to-side tendon transfer. Meticulous handling of the epitenon and core tendon fibers is essential to prevent adhesion formation.
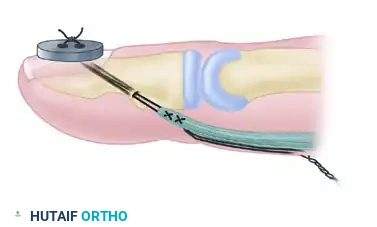
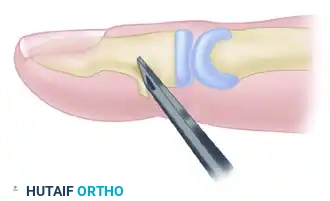
Step 1: Preparation of the Recipient Tendon
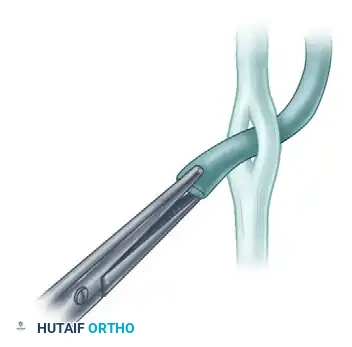
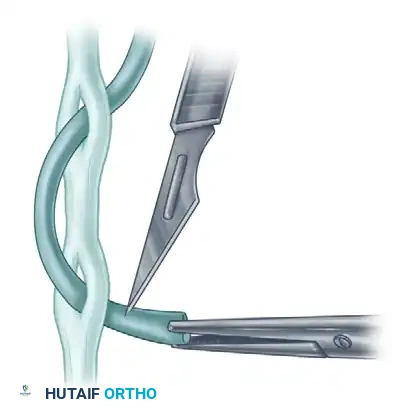
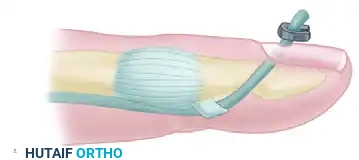
Identify the recipient tendon and clear the surrounding paratenon carefully to preserve the vascular supply. Using a #11 or #15 blade, create a longitudinal slit through the center of the recipient tendon.
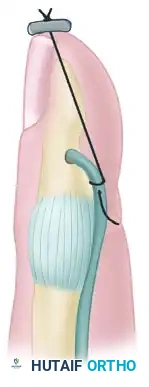
Step 2: Passing the Transferred Tendon
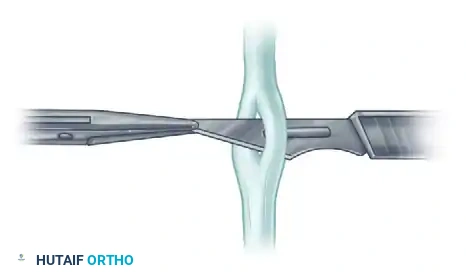
Introduce a fine curved hemostat through the created slit. Withdraw the scalpel blade, carrying the hemostat with it. With the hemostat, gently grasp the cleanly cut end of the donor (transferred) tendon.
Bring the donor tendon through the slit. It is imperative that the slit is placed so that the transferred tendon approaches the recipient at an acute angle, aligning with the physiological line of pull.
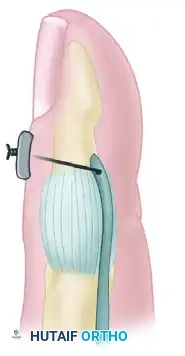
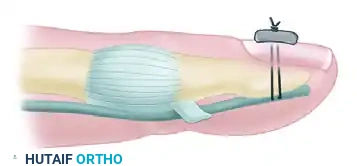
Step 3: Tensioning and Suturing
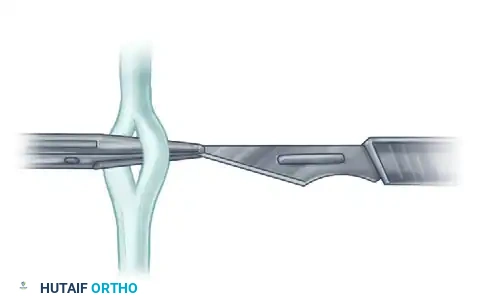
Repeat this weaving technique with any adjacent recipient tendons if a multi-tendon transfer is being performed. Set the tension of the transfer according to the specific cascade of the hand and the excursion of the donor muscle.
Suture the tendon at each passage point using a vertical mattress stitch to secure the core fibers without strangulating the microcirculation.
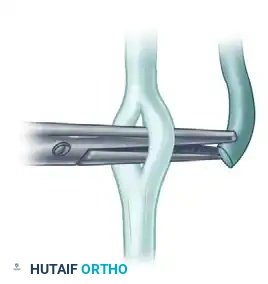
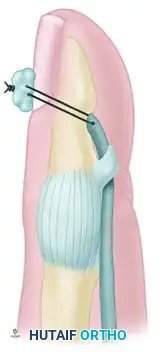
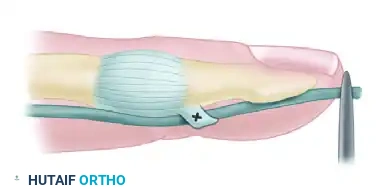
Step 4: Burying the Tendon End
To minimize postoperative adhesions and create a smooth gliding surface, the terminal end of the transferred tendon must be buried within the substance of the last pierced recipient tendon.

Tendon-to-Tendon Suture Variations
In scenarios requiring side-by-side or interlacing tendon-to-tendon repairs, specific suture routing is required to ensure the knot is buried and the repair is streamlined.
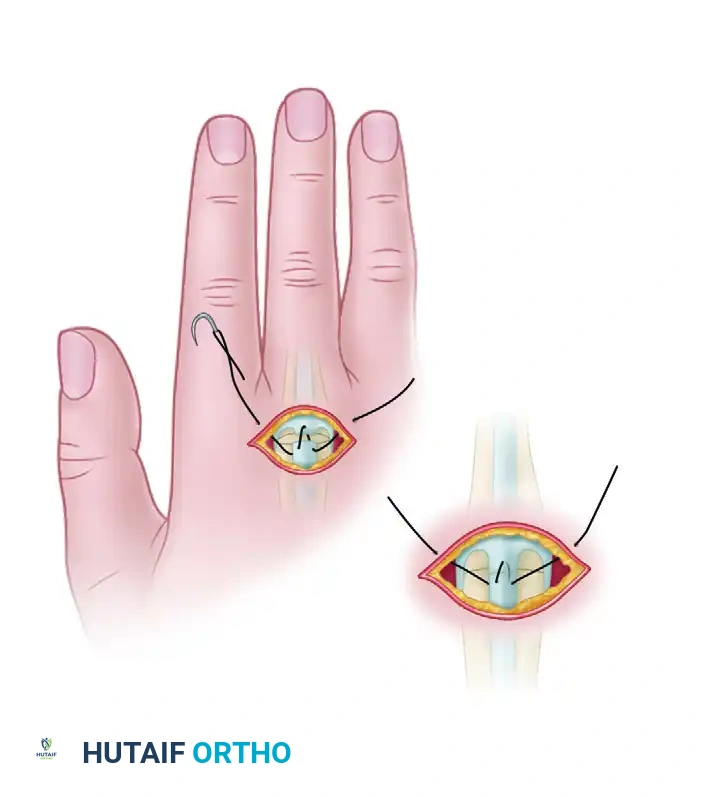
- Pass the suture through the skin just medial or lateral to the divided tendon.
- Drive the needle through the proximal segment of the tendon near its margin, moving from superficial to deep.
- Continue through the deep surface of the distal segment to emerge on its superficial surface.
- Pass it proximally and through the opposite margin of the proximal segment, bringing it out through the skin on the opposite side of the tendon from which it was introduced.
Clinical Pearl: Ensure that the suture slides easily within both the skin and the tendon substance. If excessive friction is noted, the suture may be caught on the epitenon, which can complicate removal. At approximately 4 weeks postoperatively, this type of pull-out suture can be removed by applying steady, gentle traction to one of its external ends.
TENDON-TO-BONE ATTACHMENT
The secure attachment of a tendon to bone—most frequently the distal phalanx in hand surgery—is a demanding procedure. The goal is to achieve rigid fixation that withstands early mobilization while facilitating the biological integration of Sharpey's fibers into the osseous footprint.
Indications and Pediatric Considerations
Tendon-to-bone repairs are primarily indicated for:
* Avulsion injuries (e.g., Flexor Digitorum Profundus avulsions).
* Distal insertions of tendon grafts.
* Ligamentous reconstructions requiring osseous anchoring.
Pediatric Pitfall: In skeletally immature patients, drilling through the distal phalanx or placing transosseous sutures carries a high risk of iatrogenic physeal injury, potentially leading to growth arrest or angular deformity. In children, tendon-to-tendon repair of grafts (looping the graft through the remaining distal tendon stump) is highly preferable to direct tendon-to-bone techniques.
Evolution of Tendon-to-Bone Techniques
Historically, numerous methods have been described to optimize the tendon-bone interface. Understanding these variations provides the surgeon with a versatile toolkit for complex reconstructions.

Techniques described by Koch (1944), Pulvertaft (1965), Bunnell (1940), Eyre-Brook, Tubiana, and Sood & Elliot (1999) all focus on maximizing the surface area of contact between the tendon and the decorticated bone.
Furthermore, specialized techniques involving tendon attachment through a finger flap have been detailed by Pulvertaft (1965) and Snow & Littler (1971), which are particularly useful when soft tissue coverage is tenuous.

Core Suture Selection
For modern tendon-to-bone repairs utilizing a pull-out technique, the core suture must provide exceptional tensile strength. The techniques used most often include:
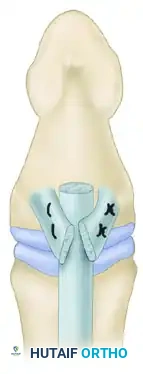
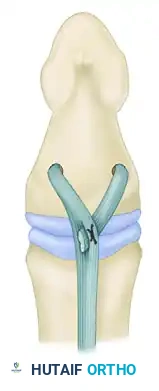
1. The Kessler Suture: Provides excellent grasping of the longitudinal tendon fibers.
2. Modified Bunnell Crisscross Suture: Highly effective for pull-out wire techniques.
In the modified Bunnell technique, the pull-out wire is looped over a straight needle that is passed transversely through the tendon approximately 10 mm from the cut end. This configuration leaves the pull-out wire attached to a loop of the suture proximally within the tendon, allowing the main suture tails to be passed into the bone distally.
Surgical Technique: The Pull-Out Wire Method
This technique ensures that the tendon is drawn tightly into a prepared osseous bed, promoting rapid biological fixation.
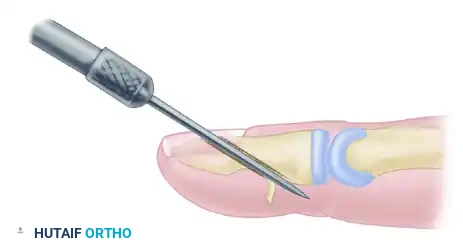
Step 1: Preparation of the Osseous Bed
Expose the anatomical footprint of the tendon insertion on the distal phalanx. Using a fine osteotome or a high-speed burr, raise a small area of the volar cortex to expose the underlying cancellous bone. This bleeding bone bed is essential for osteointegration.
Step 2: Drilling the Transosseous Tunnel
Using a Kirschner wire (K-wire) mounted on a power drill, create a hole through the distal phalanx. The drill path should originate at the prepared cortical window and exit through the dorsal cortex and the sterile matrix of the nail bed (or just distal to it, depending on the exact anatomy).

Step 3: Suture Placement and Passage
Place a Bunnell crisscross stitch (or a modified Kessler) into the distal end of the tendon using a robust, non-absorbable suture or wire. Ensure the proximal pull-out loop is correctly positioned.
Thread the two distal ends of the wire/suture onto straight Keith needles. Pass these needles through the drilled transosseous hole, drawing the suture through the bone and out the dorsal aspect of the digit.
Step 4: Securing the Tendon
Apply steady traction to the dorsal suture ends. This will draw the cut end of the tendon directly into the prepared cancellous bone bed.
Once the tendon is firmly seated, tie the suture ends over a sterile external button resting on the dorsal skin/nail. The button distributes the pressure, preventing localized skin necrosis.
POSTOPERATIVE PROTOCOLS AND REHABILITATION
The success of both end-to-side tendon transfers and tendon-to-bone attachments relies as much on meticulous postoperative rehabilitation as it does on surgical execution.
Phase 1: Immobilization and Protection (Weeks 0-4)
- Splinting: The limb is placed in a custom orthosis that removes tension from the repair. For extensor transfers, the wrist and MCP joints are typically splinted in extension. For flexor tendon-to-bone repairs, a dorsal blocking splint is utilized.
- Edema Control: Strict elevation and compressive dressings are maintained to minimize swelling, which can exacerbate stiffness and compromise microvascular perfusion.
- Suture Removal: For pull-out wire techniques, the external button and transosseous wire are typically removed at 4 weeks postoperatively in the clinic. This is achieved by cutting the button free and applying steady traction to the proximal pull-out loop.
Phase 2: Early Active Motion (Weeks 4-8)
- Once the pull-out wire is removed and early clinical healing is established, supervised active range of motion (AROM) is initiated.
- The goal is to promote tendon gliding and prevent restrictive peritendinous adhesions.
- Passive stretching or forceful manipulation is strictly contraindicated during this phase, as the tensile strength of the repair is still maturing.
Phase 3: Strengthening and Conditioning (Weeks 8-12+)
- Progressive resistance exercises are introduced.
- Dynamic splinting may be employed if joint contractures are present.
- Full unrestricted activity and heavy lifting are generally withheld until 10 to 12 weeks postoperatively, allowing the Sharpey's fibers to fully mature at the tendon-bone interface.
COMPLICATIONS AND PITFALLS
Even in experienced hands, tendon surgery carries inherent risks. Anticipating these complications is the hallmark of a master surgeon.
- Repair Rupture: Usually occurs due to patient non-compliance or overly aggressive early rehabilitation. Immediate surgical revision is required.
- Adhesion Formation: The most common complication. Meticulous atraumatic tissue handling, burying of tendon ends (as shown in the end-to-side technique), and early controlled motion protocols are the best preventative measures.
- Button Necrosis: In tendon-to-bone pull-out repairs, tying the suture too tightly over the dorsal button can cause ischemia and necrosis of the underlying skin or nail matrix. The button should be secure but not strangulating, and adequate padding should be placed beneath it.
- Infection: Pin tract infections can occur along the pull-out wire. Prophylactic oral antibiotics and meticulous pin site care are recommended until the wire is removed.
By adhering to these rigorous biomechanical principles and precise surgical steps, orthopedic surgeons can achieve reliable, high-functioning outcomes in complex tendon reconstructions.
📚 Medical References
- tendon repair techniques, Clin Orthop Relat Res 375:267, 2000.
- Howard RF, Ondrovic L, Greenwald DP: Biomechanical analysis of four-strand extensor tendon repair techniques, J Hand Surg 22A:838, 1997.
- Ion LE, Sykes PJ, Cassell OCS, et al: Comparative biomechanical analysis of a new circumferential fl exor tendon repair and a modifi ed Kessler repair, Br J Plast Surg 50:236, 1997.
- Ip WY, Chow SP: Results of dynamic splintage following extensor tendon repair, J Hand Surg 22B:283, 1997.
- Kessler I: The “grasping” technique for tendon repair, Hand 5:253, 1973.
- Ketchum LD: Suture materials and suture techniques used in tendon repair, Hand Clin 1:43, 1985.
- Kleinert HE, Verdan C: Report of the Committee on Tendon Injuries (International Federation of Societies for Surgery of the Hand), J Hand Surg 8A:794, 1983.
- Komanduri M, Phillips CS, Mass DP: Tensile strength of fl exor tendon repairs in a dynamic cadaver model, J Hand Surg 21A:605, 1996.
- Labana N, Messer T, Lautenschlager E, et al: A biomechanical analysis of the modifi ed Tsuge suture technique for repair of fl exor tendon lacerations, J Hand Surg 26B:297, 2001.
- Lawrence TM, Davis TR: A biomechanical analysis of suture materials and their infl uence on a four-strand fl exor tendon repair, J Hand Surg 30A:836, 2005.
- Lawrence TM, Woodruff MJ, Aladin A, et al: An assessment of the tensile properties and technical diffi culties of twoand four-strand fl exor tendon repairs, J Hand Surg 30B:294, 2005.
- Lin GT, An KN, Amadio PC, et al: Biomechanical studies of running suture for fl exor tendon repair in dogs, J Hand Surg 13A:553, 1988.
- May EJ, Silfverskiöld KL, Sollerman CJ: Controlled mobilization after fl exor tendon repair in zone II: a prospective comparison of three methods, J Hand Surg 17A:942, 1992.
- May EJ, Silfverskiöld KL, Sollerman CJ: The correlation between controlled range of motion with dynamic traction and results after fl exor tendon repair in zone II, J Hand Surg 17A:1133, 1992.
- McDowell CL, Snyder DM: Tendon healing: an experimental model in the dog, J Hand Surg 2A:122, 1977.
- McLarney E, Hoffman H, Wolfe SW: Biomechanical analysis of the cruciate four-strand fl exor tendon repair, J Hand Surg 24A:295, 1999.
- Menderes A, Mola F, Tayfur V, et al: Prevention of peritendinous adhesions following fl exor tendon injury with seprafi lm, Ann Plast Surg 43:560, 2004.
- Merrell GA, Wolfe SW, Kacena WJ, et al: The effect of increased peripheral suture purchase on the strength of fl exor tendon repairs, J Hand Surg 28A:464, 2003.
- Messina A, Messina JC: Double armed reinsertion sutures (DARS) of the profundus fl exor tendon with immediate active mobilization of the fi nger: 63 cases, Ann Chir Main Memb Super 16:245, 1997.
- Mishra V, Kuiper JH, Kelly CP: Infl uence of core suture material and peripheral repair technique on the strength of Kessler fl exor tendon repair, J Hand Surg 28B:357, 2003.
- Momose T, Amadio PC, Zhao C, et al: The effect of knot location, suture material, and suture size on the gliding resistance of fl exor tendons, J Biomed Mater Res 53:806, 2000.
- Momose T, Amadio PC, Zhao C, et al: Suture techniques with high breaking strength and low gliding resistance: experiments in the dog fl exor digitorum profundus tendon, Acta Orthop Scand 72:635, 2001.
- Moneim MS, Firoozbakhsh K, Mustapha A-A, et al: Flexor tendon repair using shape memory ally suture: a biomechanical evaluation, Clin Orthop Relat Res 402:251, 2002.
- Newport ML, Pollack GR, Williams CD: Biomechanical characteristics of suture techniques in extensor zone IV, J Hand Surg 20A:650, 1995.
- Newport ML, Williams CD: Biomechanical characteristics of extensor tendon suture techniques, J Hand Surg 17A:1117, 1992.
- O’Brioin ES, Earley MJ, Smyth H, et al: Absorbable sutures in tendon repair: a comparison of PDS with Prolene in rabbit tendon repair, J Hand Surg 20B:505, 1993.
- Olivier LC, Assenmacher S, Kendoff D, et al: Results of fl exor tendon repair of the hand by the motion-stable wire suture by Towfi gh, Arch Orthop Trauma Surg 121:212, 2001.
- Papandrea R, Seitz WH, Shapiro P, et al: Biomechanical and clinical evaluation of the epitenon-fi rst technique of fl exor tendon repair, J Hand Surg 20A:261, 1995.
- Pruitt DL, Aoki M, Manske PR: Effect of suture knot location on tensile strength after fl exor tendon repair, J Hand Surg 21A:969, 1996.
- Saldana MJ, Chow JA, Gerbino P, et al: Further experience in rehabilitation of zone II fl exor tendon repair with dynamic traction splinting, Plast Reconstr Surg 87:543, 1991.
- Sanders DW, Milne AD, Johnson JA, et al: The effect of fl exor tendon repair bulk on tendon gliding during simulated active motion: an in vitro comparison of two-strand and six-strand techniques, J Hand Surg 26A:833, 2001.
- Sanders DW, Milne AD, Dobravec A, et al: Cyclic testing of fl exor tendon repairs: an in vitro biomechanical study, J Hand Surg 22A:1004, 1997.
- Silfverskiöld KL, Andersson CH: Two new methods of tendon repair: an in vitro evaluation of tensile strength and gap formation, J Hand Surg 18A:58, 1993.
- Silfverskiöld KL, May EJ: Flexor tendon repair in zone II with a new suture technique and an early mobilization program combining passive and active fl exion, J Hand Surg 19A:53, 1994.
- Silfverskiöld KL, May EJ, Oden A: Factors affecting results after fl exor tendon repair in zone II: a multivariate prospective analysis, J Hand Surg 18A:654, 1992.
- Silfverskiöld KL, May EJ, Törnvall AH: Flexor digitorum profundus tendon excursions during controlled motion after fl exor tendon repair in zone II: a prospective clinical study, J Hand Surg 17A:122, 1992.
- Silfverskiöld KL, May EJ, Törnvall AH: Gap formation during controlled motion after fl exor tendon repair in zone II: a prospective clinical study, J Hand Surg 17A:539, 1992.
- Silva MJ, Brodt MD, Boyer MI, et al: Effects of increased in vivo excursion on digital range of motion and tendon strength following fl exor tendon repair, J Orthop Res 17:777, 1999.
- Smith AM, Evans DM: Biomechanical assessment of a new type of fl exor tendon repair, J Hand Surg 26B:217, 2001.
- Soejima O, Diao E, Lotz JC, et al: Comparative mechanical analysis of dorsal versus palmar placement of core suture for fl exor tendon repairs, J Hand Surg 20A:801, 1995.
- Strickland JW: Delayed treatment of fl exor tendon injuries including grafting, Hand Clin 21:219, 2005.
- Su BW, Protopsaltis TS, Koff MF, et al: The biomechanical analysis of a tendon fi xation device for fl exor tendon repair, J Hand Surg 30A:237, 2005.
- Su BW, Solomons M, Barrow A, et al: Device for zone II fl exor tendon repair: a multicenter, randomized, blinded, clinical trial, J Bone Joint Surg 87A:923, 2005.
- Tajima T: History, current status, and aspects of hand surgery in Japan, Clin Orthop Relat Res 184:41, 1984.
- Tanaka H, Manske PR, Pruitt DL, et al: Effect of cyclic tension on lacerated fl exor tendons in vitro, J Hand Surg 20A:467, 1995.
- Tang JB: Clinical outcomes associated with fl exor tendon repair, Hand Clin 21:199, 2005.
- Tang JB, Gu YT, Rice K, et al: Evaluation of four methods of fl exor tendon repair for postoperative active mobilization, Plast Reconstr Surg 107:742, 2001.
- Tang JB, Wang B, Chen F, et al: Biomechanical evaluation of fl exor tendon repair techniques, Clin Orthop Relat Res 386:252, 2001.
- Taras JS, Raphael JS, Marczyk SC, et al: Evaluation of suture caliber in fl exor tendon repair, J Hand Surg 26A:1100, 2001.
- Urbaniak JR, Cahill JD, Mortenson RA: Tendon suturing methods: analysis of tensile strengths. In American Academy of Orthopaedic Surgeons: Symposium on tendon surgery in the hand, St Louis, 1975, Mosby. Veitch A, Firoozbakhsh K, Pribyl CR, et al: In vitro biomechanical evaluation of the double loop suture for fl exor tendon repair, Clin Orthop Relat Res 377:228, 2000.
- Viinikainen A, Goransson H, Huovinen K, et al: A comparative analysis of the biomechanical behaviour of fi ve fl exor tendon core sutures, J Hand Surg 29B:536, 2004.
- Wada A, Kubota H, Akiyama T, et al: Effect of absorbable polydioxanone fl exor tendon repair and restricted active mobilization in a canine model, J Hand Surg 26A:398, 2001.
- Wada A, Kubota H, Hatanaka H, et al: Comparison of mechanical properties of polyvinylidene fl uoride and polypropylene monofi lament sutures used for fl exor tendon repair, J Hand Surg 26:212, 2001.
- Wada A, Kubota H, Taketa M, et al: Comparison of the mechanical properties of polyglycolide-trimethylene carbonate (Maxon) and polydioxanone sutures (PDS2) used for fl exor tendon repair and active mobilization, J Hand Surg 27B:329, 2002.
- Wade PJF, Wetherell RG, Amis AA: Flexor tendon repair: signifi cant gain in strength from the Halsted peripheral suture technique, J Hand Surg 14B:232, 1989.
- Williams RJN, Amis AA: A new type of fl exor tendon repair: biomechanical evaluation by cyclic loading, ultimate strength and assessment of pulley friction in vitro, J Hand Surg 20B:578, 1995.
- Winters SC, Seiler JG, Woo SLY, et al: Suture methods for fl exor tendon repair: a biomechanical analysis during the fi rst six weeks following repair, Ann Chir Main Memb Super 16:229, 1997.
- Wray RC, Weeks PM: Experimental comparison of techniques of tendon repair, J Hand Surg 5A:144, 1980.
- Xie RG, Zhang S, Tang JB, et al: Biomechanical studies of 3 different 6-strand fl exor tendon repair techniques, J Hand Surg 27A:621, 2002.
- Young RES, Harmon JM: Repair of tendon injuries of the hand, Ann Surg 151:562, 1960.
- Zhao C, Amadio PC, Tanaka T, et al: Effect of gap size on sliding resistance after fl exor tendon repair, J Bone Joint Surg 86A:2482, 2004.
- Zobitz ME, Zhao C, Erhard L, et al: Tensile properties of suture methods for repair of partially lacerated human fl exor tendon in vitro, J Hand Surg 26A:821, 2001.
- Secondary Repair, Reconstruction, and Tendon Grafts Adams BD: Staging extensor tendon reconstruction in the fi nger, J Hand Surg 22A:833, 1997.
- Asencio G, Abihaidar G, Leonardi C: Human composite fl exor tendon allografts: a report of two cases, J Hand Surg 21B:84, 1996.
- Aulicino PL, Ainsworth SR, Parker M: The independent long extensor tendon of the fi fth toe as a source of tendon grafts for the hand, J Hand Surg 14B:236, 1989.
- Beredjiklian PK: Biologic aspects of fl exor tendon laceration and repair, J Bone Joint Surg 85A:539, 2003.
- Beris AE, Darlis NA, Korompilias AV, et al: Two-stage fl exor tendon reconstruction in zone II using a silicone rod and a pedicled intrasynovial graft, J Hand Surg 28A:652, 2003.
- Bora FW, Osterman AL, Thomas VJ, et al: The treatment of ruptures of multiple extensor tendons at wrist level by a free tendon graft in the rheumatoid patient, J Hand Surg 12A:1038, 1987.
- Boyes JH: Evaluation of results of digital fl exor tendon grafts, Am J Surg 89:1116, 1955.
- Boyes JH, Stark HH: Flexor-tendon grafts in the fi ngers and thumb: a study of factors infl uencing results in 1000 cases, J Bone Joint Surg 53A:1332, 1971.
- Bradley TM, Brown RE: Reconstruction of a sagittal band and extensor tendon centralization using a palmaris longus tendon graft, Plast Reconstr Surg 99:1176, 1996.
- Brunelli G, Brunelli F: Conventional tendon grafts: result. In Hunter JM, Schneider LH, Mackin E, eds: Tendon surgery in the hand, St Louis, 1987, Mosby. Cautilli D, Schneider LH: Extensor tendon grafting on the dorsum of the hand in massive tendon loss, Hand Clin 11:423, 1995.
- Chuinard RG, Dabezies EJ, Mathews RE: Two-stage superfi cialis tendon reconstruction in severely damaged fi ngers, J Hand Surg 5A:135, 1980.
- Coyle MP Jr, Leddy TP, Leddy JP: Staged fl exor tendon reconstruction fi ngertip to palm, J Hand Surg 27A:581, 2002.
- Farkas L, Lindsay WK: Functional return of tendon graft protected entirely by pseudosheath—experimental study, Plast Reconstr Surg 65:188, 1980.
- Gelb RI: Tendon transfer for rupture of the extensor pollicis longus, Hand Clin 11:411, 1995.
- Goldner JL, Coonrad RW: Tendon grafting of the fl exor profundus in the presence of a completely or partially intact fl exor sublimis, J Bone Joint Surg 51A:527, 1969.
- Honnor R, Meares A: A review of 100 fl exor tendon reconstructions with prosthesis, Hand 9:226, 1977.
- Hunter JM, Salisbury RE: Flexor-tendon reconstruction in severely damaged hands: a two-stage procedure using a silicone-Dacron reinforced gliding prosthesis prior to tendon grafting, J Bone Joint Surg 53A:829, 1971.
- Khan K, Riaz M, Murison MSC, et al: Early active mobilization after second stage fl exor tendon grafts, J Hand Surg 22B:372, 1997.
- Liu TK, Yang R-S:
Detailed Chapters & Topics
Dive deeper into specialized chapters regarding end-to-side-repair