Surgical Management of Old Unreduced Elbow Dislocations

Key Takeaway
Old unreduced posterior elbow dislocations present a profound reconstructive challenge characterized by severe soft-tissue contracture, myositis ossificans, and joint space obliteration. Successful management requires meticulous open reduction, extensive capsuloligamentous release, triceps lengthening, and ulnar nerve decompression. Postoperative stability is frequently augmented using a dynamic hinged external fixator to maintain concentric reduction while permitting early active range of motion, thereby optimizing functional outcomes and preventing recurrent stiffness.
Introduction to Old Unreduced Elbow Dislocations
Old unreduced dislocations of the elbow are relatively rare in modern orthopedic practice within developed nations, primarily due to advanced imaging and immediate access to emergency trauma care. However, they remain a significant clinical entity in developing countries and rural settings. Operative treatment for these neglected injuries has been extensively documented by surgeons practicing in the Near and Far East, where delayed presentations are more frequent.
Posterior dislocations constitute the vast majority of these cases. Clinically, the patient presents with a profoundly stiff elbow, generally fixed in extension or very slight flexion, with a severely restricted arc of motion. Forearm rotation is also compromised; pronation is typically more limited than supination. This specific rotational deficit occurs because the biceps brachii is placed under significant tension as it angulates around the displaced humeral condyles, biomechanically tethering the forearm into a supinated posture.
Pathoanatomy and Biomechanical Alterations
The chronicity of an unreduced elbow dislocation leads to a cascade of severe soft-tissue and osseous adaptations that render delayed closed reduction impossible and open reduction highly complex.
Silva extensively described the pathological findings associated with old unreduced elbow dislocations. The hallmark features include:
* Extensive Myositis Ossificans: Heterotopic bone formation is rampant around the joint, particularly infiltrating the brachialis and triceps brachii muscle bellies.
* Myotendinous Contracture: There is marked shortening and fibrosis of the triceps muscle, as well as the medial and lateral collateral ligamentous complexes.
* Neurological Tethering: The ulnar nerve becomes encased in scar tissue and is subjected to severe tightening and traction during any attempt at elbow flexion.
* Capsular Obliteration: The joint capsule undergoes dense fibrous thickening or frank ossification.
* Fossa Filling: Extensive, dense fibrous tissue completely obliterates the olecranon and coronoid fossae, as well as the anatomical space between the distal humerus and the proximal radius and ulna.
Furthermore, Allende and Freytes identified a pathognomonic radiographic and anatomical feature known as the "radial humeral horn," which was present in 100% of their 35 reported cases.
Fig. 58-23 Anteroposterior radiograph showing lateral dislocation and the characteristic horn of ossification. (From Bruce C, Laing P, Dorgan J, et al: Unreduced dislocation of the elbow: case report and review of the literature, J Trauma 35:962, 1993.)
This "horn" is the direct result of the ossification of a fracture hematoma trapped between the stripped periosteum and the joint capsule near the radial head. Recognizing this structure preoperatively is critical, as it must be surgically excised to achieve concentric reduction.
Treatment Algorithms and Indications
The treatment options for old unreduced posterior dislocations of the elbow include:
1. Closed reduction
2. Open reduction (with or without hinged external fixation)
3. Excision arthroplasty
4. Interposition or replacement arthroplasty (Total Elbow Arthroplasty)
5. Arthrodesis
The Fallacy of Late Closed Reduction
Most authorities agree that closed reduction of the elbow is virtually impossible—and strictly contraindicated—after 3 weeks from the initial injury. By this timeline, profound soft-tissue contracture and localized periarticular osteoporosis have developed. Attempting forceful closed manipulation is highly hazardous and frequently results in iatrogenic fractures of the osteopenic distal humerus or severe shearing damage to the articular cartilage.
Surgical Warning: Even during the early subacute period (1 to 3 weeks), manipulation must be performed with extreme caution under general anesthesia with complete neuromuscular blockade to ensure absolute muscle relaxation.
Principles of Open Reduction
The likelihood of restoring useful, pain-free function through open reduction alone is inversely proportional to the length of time elapsed from injury to surgery. While historical series (such as Silva's) noted that patients with delays of 19 to 24 months fared better with arthroplasty, more recent data suggest that open reduction can yield good results if performed within 3 months of injury.
Interestingly, pediatric patients exhibit remarkable adaptive remodeling. Fowles et al. emphasized that open reduction in children is always worth attempting, regardless of the delay. Children treated as late as 1 to 3 years post-injury have demonstrated the ability to regain functional arcs of motion.
To achieve a successful open reduction, the surgeon must systematically address the pathoanatomy:
1. Triceps Lengthening: The shortened triceps must be lengthened (typically via a V-Y advancement).
2. Ligamentous Release: The contracted medial and lateral collateral ligaments must be released or excised.
3. Fossa Debridement: All fibrous tissue and heterotopic bone must be cleared from the olecranon and coronoid fossae.
4. Excision of Ossification: The radial humeral horn must be divided and removed.
5. Ulnar Nerve Management: The ulnar nerve must be meticulously inspected, decompressed, and frequently transposed anteriorly to prevent traction neuritis during postoperative mobilization.
Extensile exposure is required to identify and protect neurovascular structures while navigating distorted anatomical planes.
Surgical Technique: Open Reduction and V-Y Lengthening of the Triceps (Speed)
The Speed technique remains the gold standard for addressing the severe triceps contracture associated with neglected posterior dislocations.
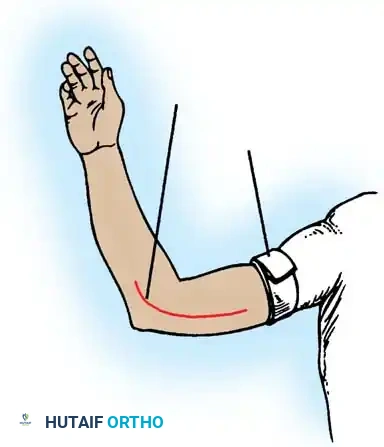
Patient Positioning and Exposure
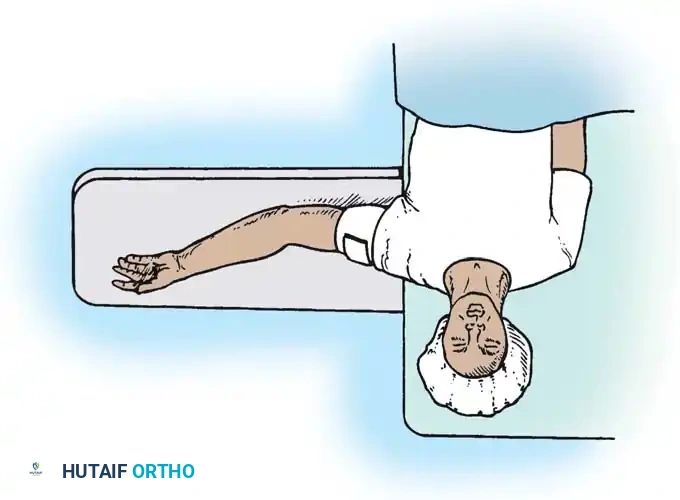
The patient is placed in the lateral decubitus position with the arm draped over a sterile bolster, or prone, allowing full access to the posterior elbow. A pneumatic tourniquet is applied high on the arm.
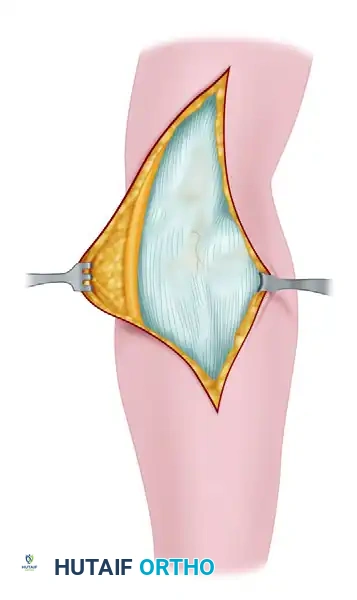
Make a generous posterior incision beginning in the midline 10 cm proximal to the olecranon. Continue distally to just proximal to the tip of the olecranon, curve slightly laterally over the lateral humeral condyle and radial head, and extend 5 cm distally onto the forearm. Undermine and retract the full-thickness fasciocutaneous flaps to expose the tendinous insertion and aponeurosis of the triceps muscle.
Ulnar Nerve Neurolysis
Before any deep dissection, locate the ulnar nerve proximally. Dissect it meticulously from its bed along the postcondylar groove of the medial epicondyle.
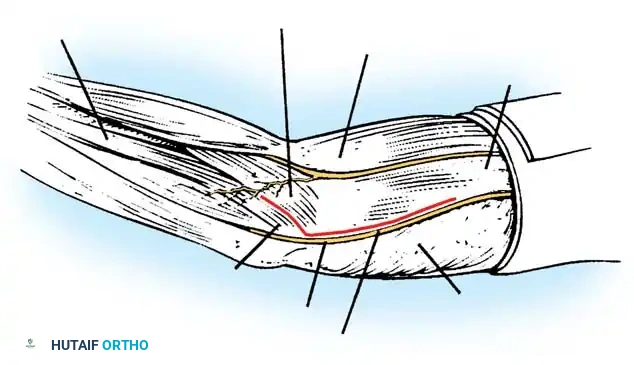
Careful isolation and vessel-loop control of the ulnar nerve are mandatory before addressing the medial joint capsule.
Triceps Flap and Subperiosteal Stripping
Beginning proximally, use sharp dissection to reflect the aponeurosis of the triceps distally, forming a robust tongue-like flap of tissue that remains attached to the olecranon.
Starting 7.5 cm proximal to the joint, make a midline incision through the underlying muscle fibers of the triceps down to the olecranon. Curve this deep incision around the lateral edge of the olecranon.
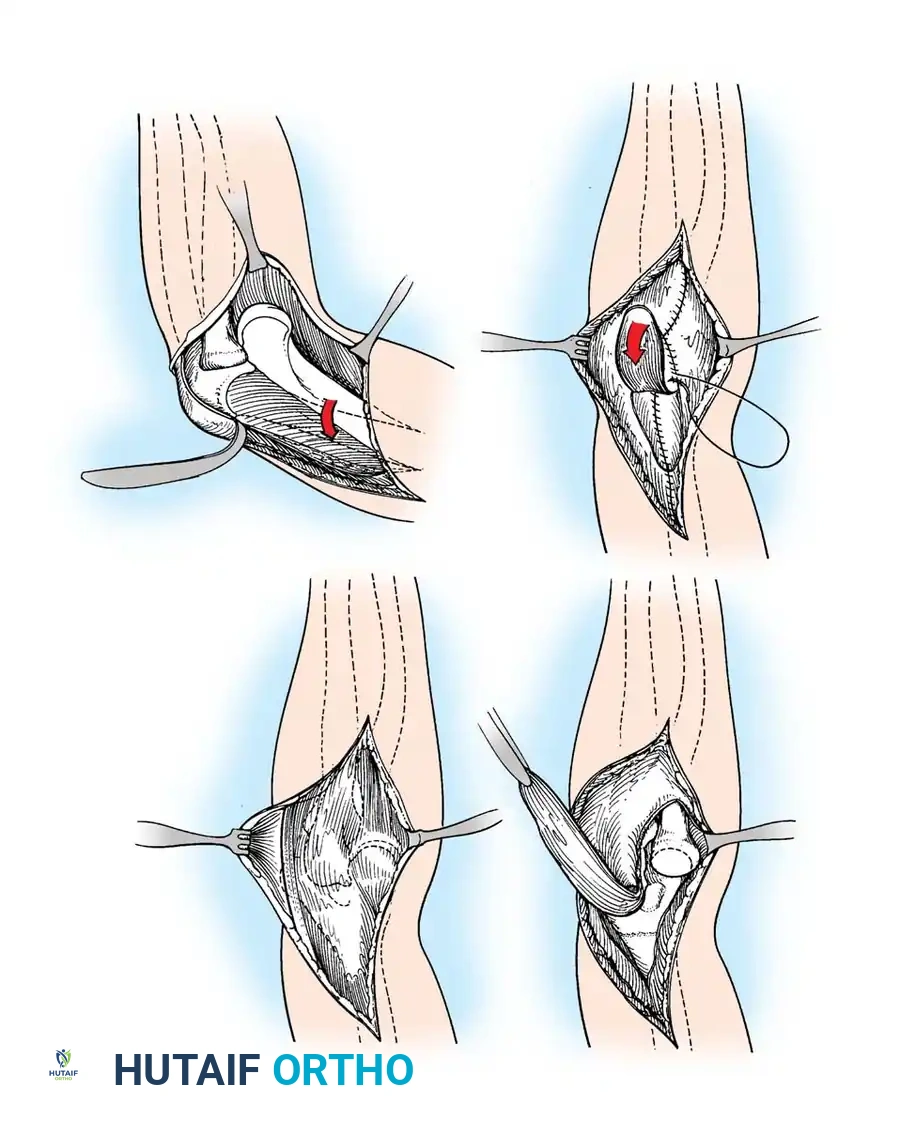
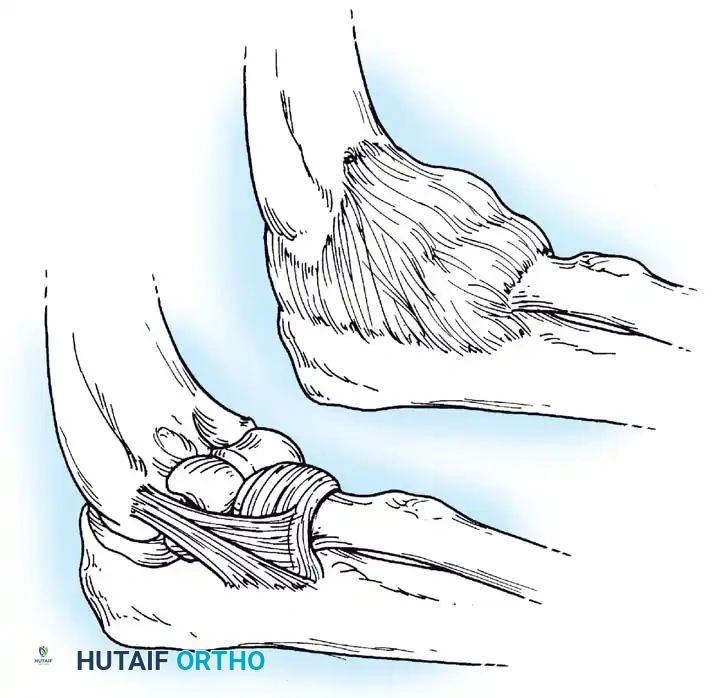
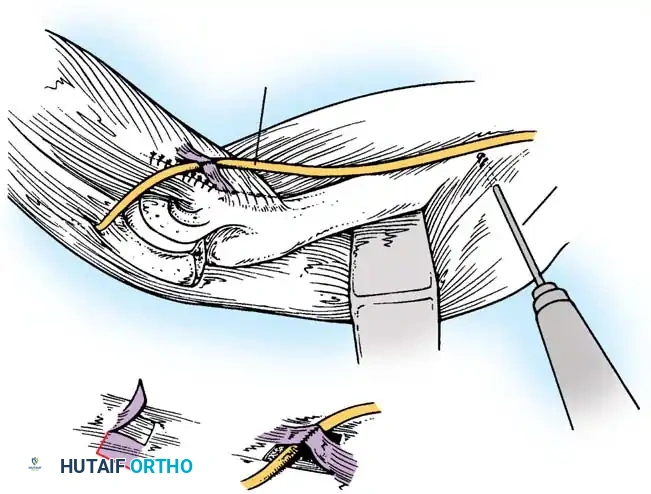
Fig. 58-26 Speed technique of open reduction. A, Incision and ulnar nerve isolation. B, Triceps aponeurosis reflected distally; subperiosteal stripping of muscles. C, Lateral view showing extent of mobilization. D, V-Y closure.
Subperiosteally free all muscle attachments from the distal humerus, both anteriorly and posteriorly.
Aggressive subperiosteal elevation is required to mobilize the distal humerus completely.
Release the attachments of the joint capsule and collateral ligaments around the humeral condyles. Mobilizing the tissues around the medial condyle and anterior humerus can be exceptionally difficult due to scarring, but complete mobilization of the distal humerus is non-negotiable for reduction.
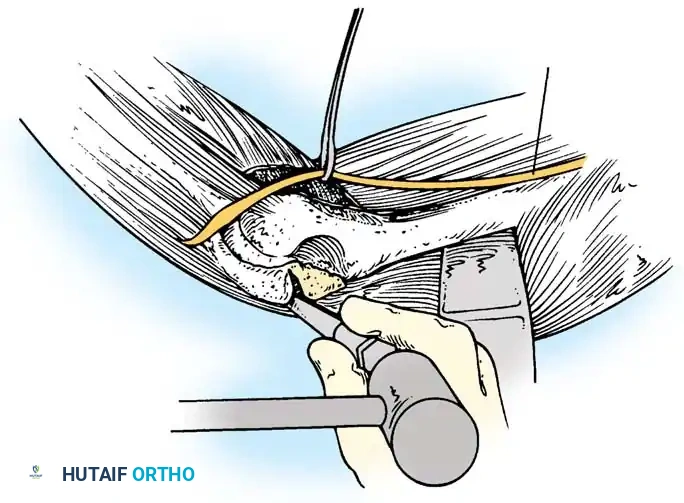
Joint Debridement and Reduction
Extensive callus and heterotopic ossification are typically found on the posterior humerus and within the olecranon fossa.
Use a rongeur and high-speed burr to meticulously clear the olecranon and coronoid fossae of all fibrous tissue and callus.
Once the distal humerus is free, expose the radial head and clear the trochlear notch of the ulna. To reduce the joint, apply gentle traction, rotate the forearm, and press on the anterior surface of the capitellum to lever the radial head anteriorly into position. If resistance is met, do not use excessive force; instead, widen the soft-tissue release to prevent iatrogenic cartilage damage. Once the radial head is reduced, slip the coronoid process distally and anteriorly over the trochlea.
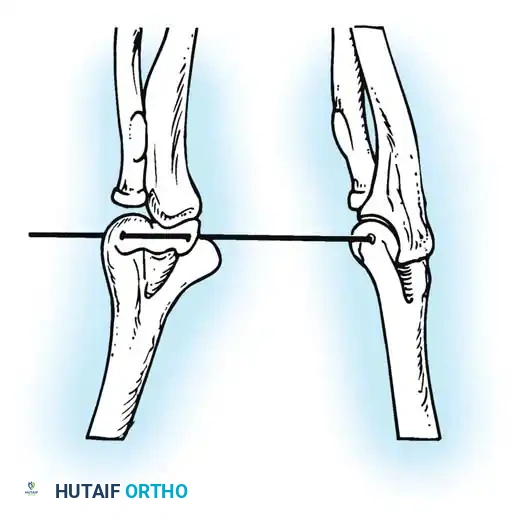
Stabilization and Closure
Carry the joint through a full range of motion. Because the collateral ligaments have been released, the elbow is frequently grossly unstable.
If highly unstable, transfix the olecranon to the humerus with one or two smooth Steinmann pins with the elbow at 90 degrees of flexion.
Suture the periosteum and deep triceps fibers over the posterior humerus. Advance the V-Y tongue of the triceps aponeurosis and suture it into its normal position, or slightly more distally to accommodate the lengthened state. Decompress the wound with a closed suction drain and close the skin in layers.
Advanced Joint Stabilization Techniques
While static pinning (as described above) is a historical standard, modern orthopedics favors dynamic stabilization to permit early motion and prevent recurrent stiffness.
Intraarticular Cruciate Ligament Reconstruction
Arafiles described the creation of an intraarticular "cruciate" ligament using tendon grafts to stabilize the joint while allowing flexion-extension exercises as early as 6 days postoperatively.
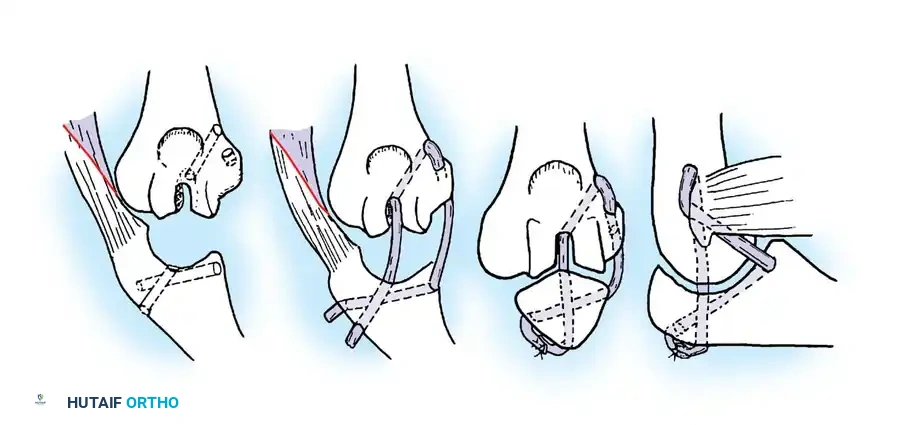
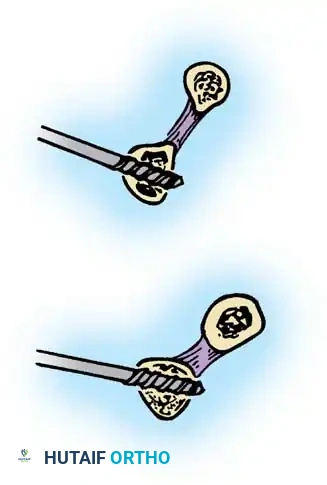
Fig. 58-24 A and B, Slot in trochlea and drill holes showing the course of the tendon graft. C and D, Completed repair acting as an intraarticular cruciate ligament. (From Arafiles RP: Neglected posterior dislocation of the elbow, J Bone Joint Surg 69B:199, 1987.)
Hinged External Fixation
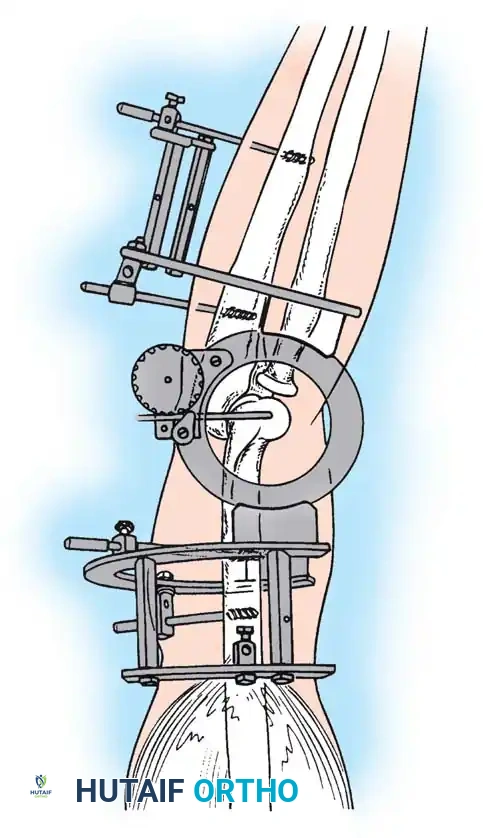
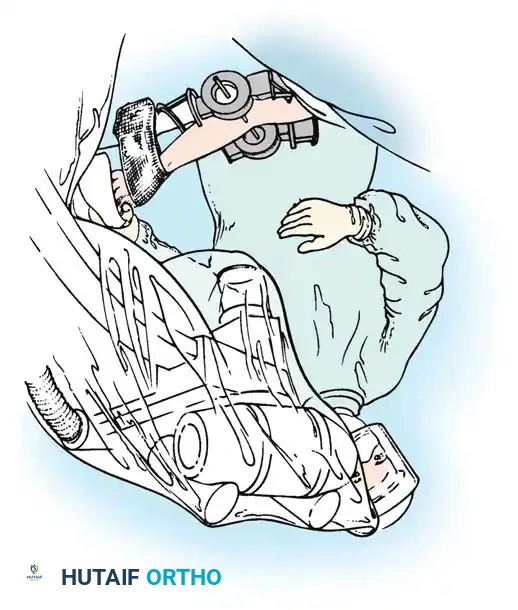
The current gold standard for managing instability following extensive open reduction is the application of a hinged elbow external fixator. Jupiter, Ring, and Hotchkiss have demonstrated excellent results using hinged fixators to maintain concentric joint reduction, permit early active/passive motion, and enhance muscle-tendon stretching.
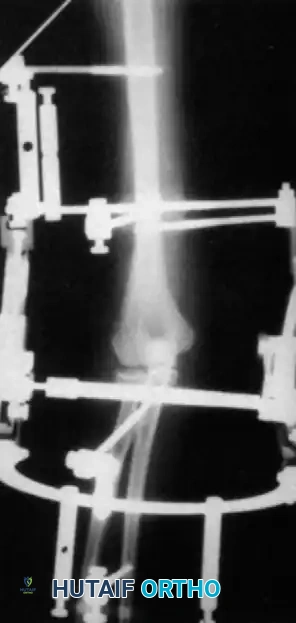
Fig. 58-25 Late-discovered medial elbow dislocation managed with open reduction and hinged external fixation without primary ligament repair. (From Hotchkiss RN: Fractures and dislocations of the elbow, 1996.)
Surgical Technique: Compass Hinged Elbow External Fixator (Hotchkiss)
The ulnohumeral articulation is a highly constrained hinge joint. Because only slight movement of the instant center of rotation occurs during flexion and extension, locating the exact rotational axis is the most critical step in applying a dynamic fixator.
Assembly of the Hinge Block
The Compass hinge utilizes a precision worm gear to provide controlled displacement for stretching through extremes of motion.
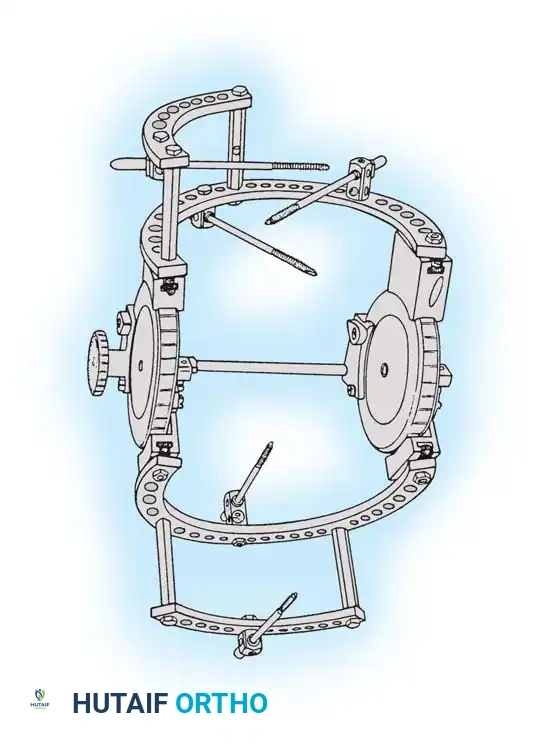
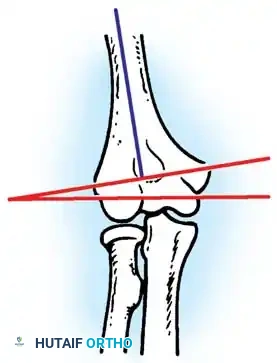
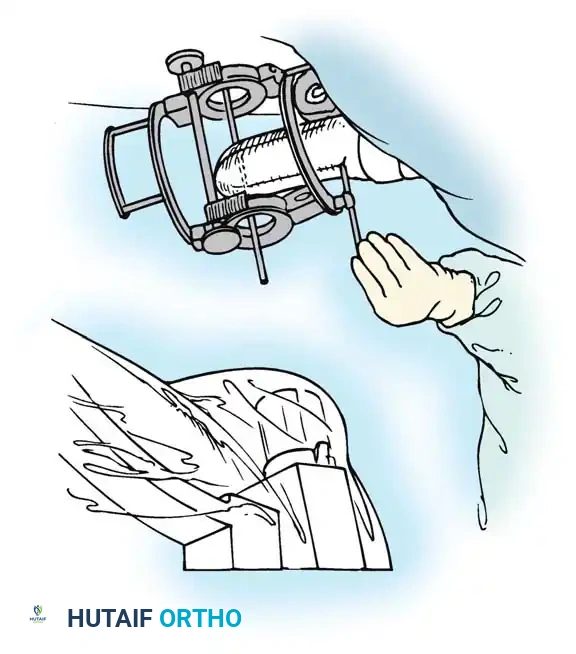
Fig. 58-27 Design features of the hinged elbow external fixator, noting the built-in 7 degrees of valgus to approximate the distal humerus anatomy.
Preoperative assembly is vital. The hinge block must be configured so the large block sits medially. The differential block height accommodates the average 7 degrees of distal humeral valgus, ensuring the upper ring remains perpendicular to the humerus while the axis of rotation is perfectly aligned.
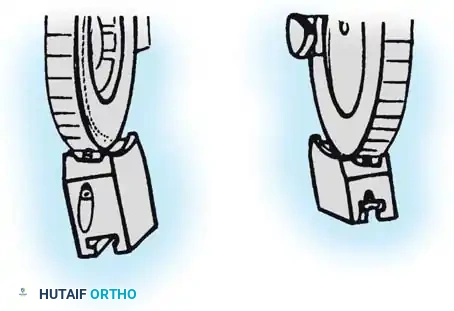
The Compass hinge arrives assembled for a right arm.
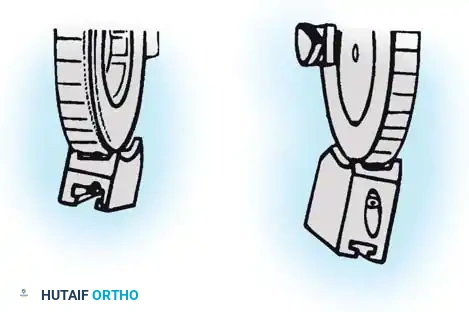
Fig. 58-28A The Compass hinge in its default right arm configuration.
To convert it for a left arm, remove the proximal 5/8-inch ring by loosening the T-bolts. Remove the proximal blocks using a 9/64-inch hex wrench.
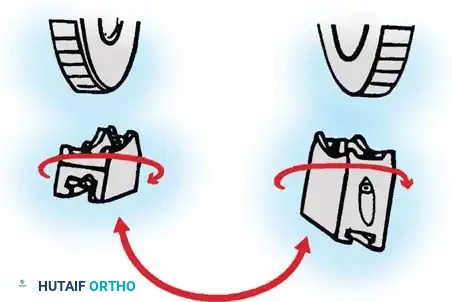
Fig. 58-28B Switch the blocks to the opposite wheel, rotating each block 180 degrees so the tilt is reversed.
Resecure the blocks tightly and replace the proximal ring.

You Might Also Like