Volar Plate Fixation of Distal Radius Fractures
Key Takeaway
Volar plate fixation has become the gold standard for managing unstable, displaced distal radius fractures. Utilizing the flexor carpi radialis (FCR) approach, surgeons can achieve anatomic reduction and rigid internal fixation while minimizing dorsal tendon complications. This comprehensive guide details the step-by-step surgical technique, including pronator quadratus elevation, precise plate positioning, fluoroscopic evaluation, and postoperative rehabilitation protocols essential for optimal patient outcomes and restoration of wrist kinematics.
INTRODUCTION AND BIOMECHANICAL RATIONALE
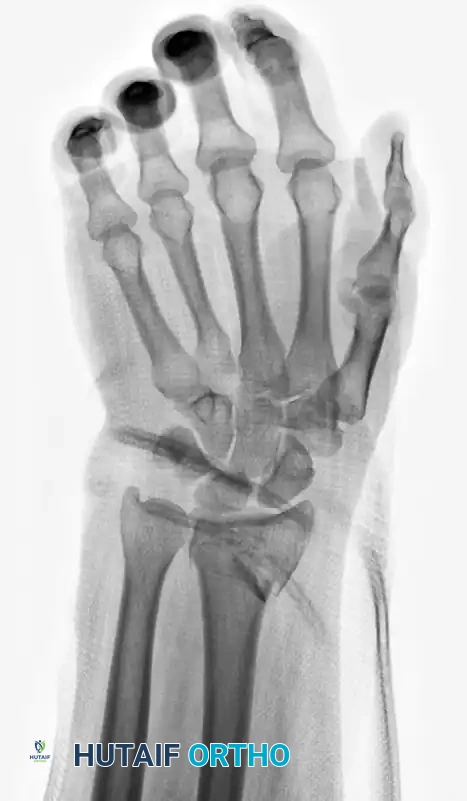
Fractures of the distal radius are among the most common orthopedic injuries, frequently presenting with apex-volar angulation and dorsal cortical comminution. Historically, first-generation dorsal plate designs were utilized to buttress the dorsal cortex; however, these were fraught with unacceptable complication rates, primarily secondary to extensor tendon irritation, tenosynovitis, and delayed rupture.
The advent of fixed-angle volar plating techniques, driven by the development of angle-stable locking screws, revolutionized the management of these fractures. Volar locking plates act as an internal fixator, providing subchondral support to the articular surface even in the presence of severe dorsal comminution and osteoporotic bone. By utilizing the flexor carpi radialis (FCR) approach, surgeons can exploit the relatively flat volar topography of the radius, allowing for thick soft-tissue coverage (via the pronator quadratus) that shields the flexor tendons from hardware prominence.
While dorsal plating retains a niche role—particularly with newer, low-profile designs for specific dorsal shear fractures—volar plate fixation remains the undisputed workhorse for the vast majority of displaced distal radius fractures.
INDICATIONS AND PREOPERATIVE PLANNING
Indications for Volar Plating
- Unstable extra-articular fractures (loss of volar tilt, radial shortening >3 mm, dorsal angulation >10 degrees).
- Displaced intra-articular fractures (articular step-off >2 mm).
- Fractures with significant metaphyseal comminution precluding closed reduction and casting.
- Bilateral distal radius fractures or polytrauma patients requiring early upper extremity weight-bearing.
Preoperative Imaging
Standard posteroanterior (PA), lateral, and oblique radiographs are mandatory. Key radiographic parameters to assess include:
* Radial Height: Normal is 11–12 mm.
* Radial Inclination: Normal is 22–24 degrees.
* Volar Tilt: Normal is 11 degrees.
* Ulnar Variance: Assessment of the distal radioulnar joint (DRUJ).
* Computed Tomography (CT): Highly recommended for intra-articular fractures to map articular fragments, identify central die-punch fragments, and plan screw trajectory.
SURGICAL ANATOMY: THE FCR APPROACH
The modified Henry approach via the FCR sheath provides safe, extensile access to the volar distal radius.
* Internervous Plane: The approach utilizes the plane between the radial artery (laterally) and the FCR tendon/median nerve (medially).
* Pronator Quadratus (PQ): This muscle originates on the distal ulna and inserts on the distal volar radius. Elevating the PQ is the critical final step to exposing the fracture site.
💡 Clinical Pearl: The Brachioradialis Deforming Force
In displaced radial styloid fractures, the brachioradialis muscle exerts a powerful deforming force, pulling the styloid fragment proximally and radially. Releasing or fractionally lengthening the brachioradialis tendon from its insertion on the first dorsal compartment is often essential to achieve and maintain anatomic reduction.
SURGICAL TECHNIQUE: VOLAR PLATE FIXATION
Step 1: Patient Positioning and Incision
- Position the patient supine with the operative arm extended on a radiolucent hand table. Apply a well-padded proximal arm tourniquet.
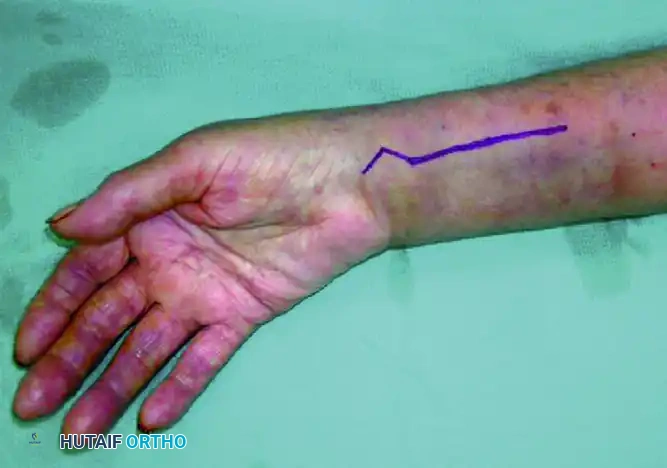
- Make an 8-cm longitudinal incision over the volar forearm, centered between the radial artery and the flexor carpi radialis (FCR) tendon.
- Incision Modification: Extending the incision distally at the wrist crease in a V-shape can provide wider exposure of the fracture and help prevent postoperative scar contracture. The distal incision does not need to cross the wrist crease into the palm.
Step 2: Deep Dissection and Exposure
- Carry the dissection down to the sheath of the FCR. Open the sheath longitudinally and retract the FCR tendon ulnarly.
- Incise the deep fascial floor of the FCR sheath to expose the underlying flexor pollicis longus (FPL) muscle belly.
- Place an index finger into the wound and gently sweep the FPL ulnarly, protecting the median nerve.
- Partially detach the FPL muscle belly from the radial shaft to gain full, unobstructed exposure of the pronator quadratus (PQ).
Step 3: Pronator Quadratus Elevation
- Make an L-shaped incision over the radial styloid along the extreme radial border of the radius.
- Using a Freer elevator or a periosteal elevator, carefully lift the PQ from the radius, reflecting it ulnarly.
- The entire fracture line across the volar metaphysis of the distal radius is now fully exposed.
Step 4: Fracture Disimpaction and Reduction
- Insert a Freer elevator or a small osteotome directly into the fracture line. Use this instrument as a lever to disimpact the fracture.
- Advance the elevator across the fracture line all the way to the dorsal cortex. This allows for complete disimpaction and mobilization of the distal fragment.
- Apply direct manual finger pressure to the dorsal cortex to reduce the dorsally displaced fragments.
- Brachioradialis Release: If a displaced radial styloid fracture resists reduction, transect or step-cut the brachioradialis tendon near its insertion to neutralize its deforming pull.
- Provisional Fixation: If necessary, use a 0.045-inch Kirschner wire (K-wire) to temporarily pin the distal fragment to the proximal shaft. However, this is often unnecessary, as sustained longitudinal distal traction (capsuloligamentotaxis) applied by an assistant through the fingers will typically maintain reduction during plate application.
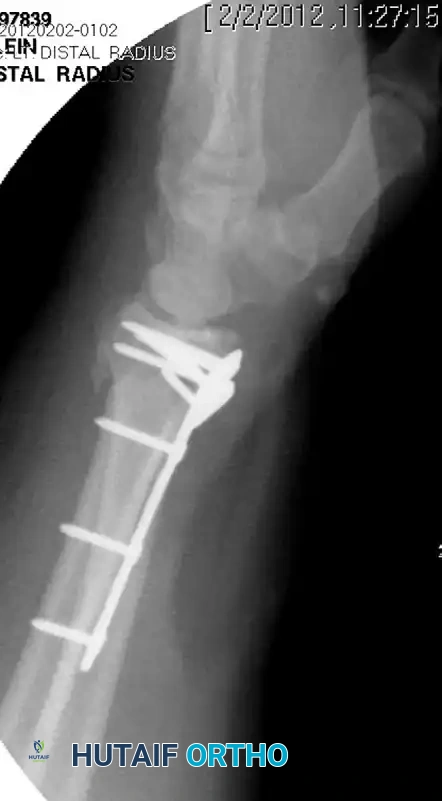
Step 5: Plate Application and Proximal Fixation
- After achieving satisfactory fracture reduction, position the volar locking plate on the bone under fluoroscopic guidance.
- Insert the first screw into the proximal oblong (gliding) hole. This allows for fine-tuned proximal-distal adjustment of the plate.
- Use a 2.5-mm drill bit to drill into the center of the oblong hole, and insert a self-tapping 3.5-mm cortical screw.
- Confirm proper placement of the volar plate with mini-C-arm fluoroscopy. The plate should sit proximal to the watershed line to prevent flexor tendon irritation. Shift the plate proximally or distally as needed to optimize the trajectory of the distal locking screws.
Step 6: Distal Articular Fixation
- Once plate position is finalized, use a 2.0-mm drill bit through the distal locking guides to drill the subchondral holes.
- Measure the holes for screw length.
- Critical Step: Insert smooth or threaded locking screws that are exactly 2 mm shorter than the measured length. This intentional undersizing prevents prominent distal screws from perforating the dorsal cortex and causing delayed extensor tendon rupture. Typically, 20- to 22-mm screws are optimal, though screws directed into the radial styloid will be significantly shorter.
- Screw Selection: Threaded pegs/screws gain better purchase in good dorsal bone; however, smooth pegs may be sufficient when bone quality is poor or when subchondral support is the primary goal.
- Once the first distal row screw is inserted, distal traction on the fingers can be released, as the fixed-angle construct now holds the reduction.

🚨 Surgical Warning: Intra-articular Penetration
Because of the fixed-angle design, screws may inadvertently perforate into the radiocarpal joint if the plate is positioned too far distally or if the fracture is severely collapsed. Standard PA and lateral fluoroscopy will NOT reliably show this. You must obtain tangential views (e.g., 20-degree elevated lateral) to the subchondral bone in both coronal and sagittal planes to definitively rule out intra-articular penetration. Adjust the plate or swap for shorter screws immediately if penetration is suspected.
Step 7: Final Fixation and Closure
- After confirming perfect placement of the distal screws, drill and fill the remaining proximal shaft holes with 3.5-mm screws.
- Thoroughly irrigate the wound.
- Pronator Quadratus Repair: Reattach the PQ over the plate using braided absorbable sutures. The PQ often cannot cover the entire plate due to post-traumatic swelling and muscle retraction; prioritize covering the distal portion of the plate to minimize flexor tendon-plate contact. For better purchase, the PQ can be sutured directly to the fascial edge of the brachioradialis.
- Close the subcutaneous tissue and skin in layers. Apply a sterile dressing and a volar splint.
MANAGEMENT OF THE DISTAL RADIOULNAR JOINT (DRUJ)
Following rigid fixation of the radius, the DRUJ must be assessed for stability throughout forearm rotation.
* If the ulnar styloid is fractured and displaced, and the DRUJ remains grossly unstable, surgical intervention is warranted.
* Fix the ulnar styloid base with one or two percutaneous K-wires or a tension band construct. A limited volar or ulnar approach may be helpful to obtain direct reduction.
* Alternatively, if the styloid fragment is small or comminuted, it can be excised, and the peripheral rim of the triangular fibrocartilage complex (TFCC) can be anchored directly to the ulnar fovea using nonabsorbable braided sutures through transosseous drill holes or a suture anchor.
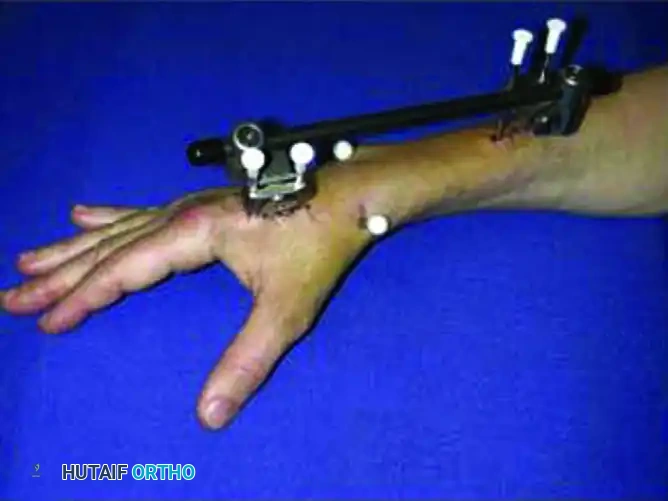
ADJUNCTIVE TECHNIQUE: AUGMENTED EXTERNAL FIXATION
While volar plating is the standard, highly comminuted extra-articular fractures or cases with severe soft-tissue compromise may necessitate external fixation. Modern external fixation is rarely used in isolation; it is almost always augmented with percutaneous pinning to provide additional support to individual fracture fragments.
Surgical Technique for Augmented External Fixation
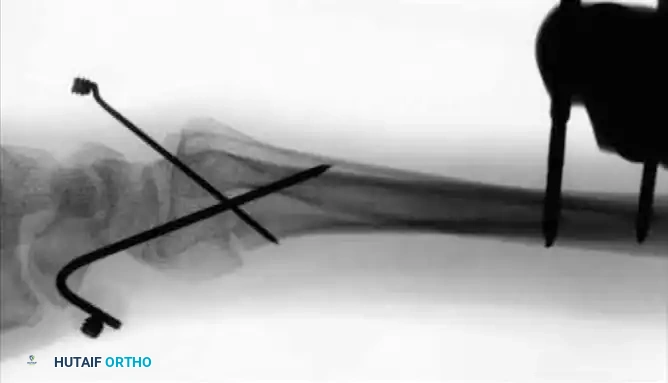
- Percutaneous Pinning: For unstable fractures without severely depressed central articular fragments, introduce 0.045-inch or 0.0625-inch K-wires into the fracture fragments. A crossed-pin configuration significantly increases torsional and bending stability.
- Drive one or two pins through the radial styloid fragment, and one through the dorsal ulnar fragment, directing them proximally into the intact radial shaft.
- Cortical Purchase: Pins should pierce the ulnar cortex of the proximal radius to achieve bicortical purchase, but must not penetrate across the interosseous space into the ulnar shaft, which would block forearm rotation.
- Cut the pins approximately 1 cm external to the skin margin and bend them at an acute angle to prevent migration.
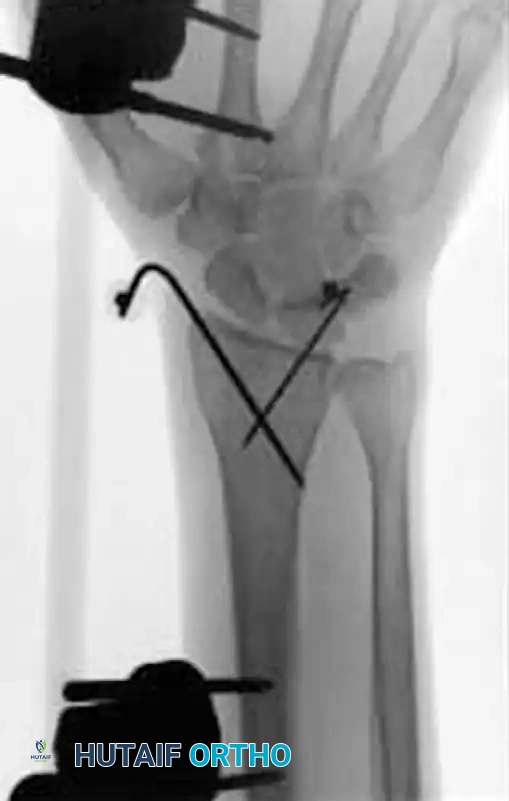
- Frame Application: Apply the external fixator according to the manufacturer’s instructions, utilizing the distal pins as "joysticks" to restore volar tilt and radial length before locking the frame. Some modern fixators feature specialized clamps designed to directly accommodate and integrate the augmenting K-wires into the frame construct.

POSTOPERATIVE CARE AND REHABILITATION
Volar Plate Fixation Protocol
- 0–1 Week: The wrist is immobilized in a bulky dressing and a volar resting splint. Immediate active range of motion (ROM) of the fingers, elbow, and shoulder is highly encouraged to prevent stiffness and reduce edema.
- 1 Week: Sutures are removed. If the surgeon is confident in the rigid stability of the fracture fixation, active wrist motion is initiated.
- 1–6 Weeks: The patient is transitioned to a custom-molded, removable Orthoplast splint, worn between exercise sessions and at night.
- Therapy: Most patients succeed with an independent home exercise program. However, elderly patients, or those exhibiting early signs of complex regional pain syndrome (CRPS) or severe stiffness, require supervised hand therapy twice a week.
External Fixation Protocol
- 0–10 Days: The wrist remains immobilized in a supinated position with a sugar-tong splint until acute pain and swelling subside. This position promotes stability of the DRUJ and facilitates the eventual resumption of full supination.
- 10 Days–6 Weeks: Active and passive finger motion is mandatory the entire time the frame is in place. Supination and pronation of the forearm are initiated at the first postoperative visit.
- Hardware Removal: The external fixator frame is typically removed in the clinic at 6 weeks postoperatively. Any supplemental K-wires are kept in place for an additional 2 weeks and removed at 8 weeks. Supervised hand therapy is strongly recommended following frame removal to restore terminal wrist flexion and extension.
You Might Also Like