Volar Osteotomy for Distal Radius Malunion: A Comprehensive Surgical Guide
Key Takeaway
Volar osteotomy is a highly effective surgical intervention for correcting distal radius malunions. By utilizing a volar approach, surgeons can restore anatomic volar tilt, radial inclination, and radioulnar congruity. This procedure involves precise preoperative templating, structural corticocancellous bone grafting, and rigid internal fixation. Successful outcomes depend on meticulous soft tissue handling, accurate restoration of the distal radioulnar joint kinematics, and adherence to structured postoperative rehabilitation protocols.
INTRODUCTION AND BIOMECHANICAL RATIONALE
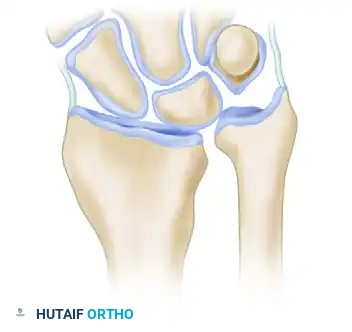
Distal radius malunion is a complex clinical entity that frequently results from the nonoperative management of displaced fractures or the secondary loss of reduction following initial stabilization. The resulting deformity—typically characterized by dorsal tilt, radial shortening, and loss of radial inclination—profoundly alters the biomechanics of the radiocarpal and distal radioulnar joints (DRUJ).
A volar osteotomy is the gold standard surgical intervention designed to correct these multiplanar deformities. By restoring the anatomic alignment of the distal radius, the surgeon re-establishes normal load transmission across the carpus, mitigates ulnocarpal impaction, and restores the congruent kinematics of the DRUJ.
💡 Biomechanical Pearl
A dorsal tilt of the distal radius exceeding 20 degrees shifts the axial load transmission from the normal 80% radius / 20% ulna distribution to approximately 50% radius / 50% ulna. This exponential increase in ulnar load is the primary driver of ulnar-sided wrist pain and secondary triangular fibrocartilage complex (TFCC) pathology in malunited fractures.
The primary goals of a volar osteotomy are to:
* Restore the articular alignment of the distal radius to within 5 degrees of the contralateral (normal) side in both the frontal and sagittal planes.
* Restore radial length to decompress the ulnocarpal joint.
* Re-establish the articular congruity and stability of the DRUJ.
* Correct any rotational malalignment (typically a pronation deformity of the distal fragment).
PREOPERATIVE EVALUATION AND PLANNING
Meticulous preoperative planning is the cornerstone of a successful volar osteotomy. The deformity is rarely uniplanar; it typically involves a combination of angular, rotational, and translational deviations.
Radiographic Analysis
- Bilateral Imaging: Obtain high-quality, standardized zero-rotation posteroanterior (PA) and true lateral radiographs of both the involved and the contralateral (normal) wrist.
- Parameter Measurement: Quantify the normal degrees of radial inclination, volar tilt, and ulnar variance on the uninjured side. These measurements serve as the exact reconstructive targets.
- Advanced Imaging: A computed tomography (CT) scan with 3D reconstructions is highly recommended to assess intra-articular step-offs, occult DRUJ subluxation, and the exact apex of the extra-articular deformity.
Osteotomy Templating
Plan the osteotomy trajectory so that it is transverse in the frontal plane and oblique in the sagittal plane. The osteotomy cut must be located as close as possible to the apex of the deformity (typically the site of the original fracture).
To achieve the desired correction, a structural corticocancellous autograft is required. The geometric planning of this graft is critical:
* Frontal Plane: The graft must be trapezoidal, wider on the radial side, to restore radial length and inclination.
* Sagittal Plane: The graft must be triangular, with the apex placed dorsally, to restore volar tilt.
SURGICAL ANATOMY AND PATIENT POSITIONING
Positioning and Anesthesia
- Anesthesia: General endotracheal anesthesia or a robust regional brachial plexus block is induced.
- Positioning: Place the patient supine with the affected extremity extended on a radiolucent hand table.
- Preparation: Prepare and drape the involved arm up to the axilla. Concurrently, prepare and drape the contralateral iliac crest for structural bone graft harvesting.
- Hemostasis: Apply a well-padded pneumatic tourniquet to the proximal arm to ensure a bloodless surgical field.
The Volar (Henry) Approach
The distal extent of the classic Henry approach is utilized. This approach exploits the internervous plane between the flexor carpi radialis (FCR) (median nerve) and the brachioradialis (radial nerve).
STEP-BY-STEP SURGICAL TECHNIQUE
1. Exposure and Soft Tissue Dissection
Make a longitudinal incision over the course of the FCR tendon, extending proximally from the wrist crease. Incise the FCR sheath and retract the tendon ulnarly to protect the median nerve. Identify and carefully retract the radial artery radially.
Deepen the dissection to expose the pronator quadratus (PQ) muscle. Incise the PQ along its radial and distal borders, elevating it as a continuous full-thickness flap from radial to ulnar. Protect the surrounding neurovascular and tendinous structures with small Hohmann retractors placed subperiosteally.
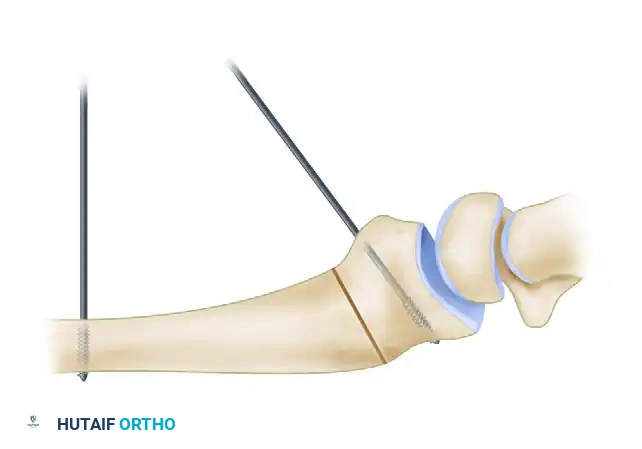
2. Placement of Reference Kirschner Wires
Before creating the osteotomy, establish a mechanical reference for the planned correction.
* Drill a smooth 0.062-inch or 0.045-inch Kirschner wire (K-wire) into the radial diaphysis, proximal to the planned osteotomy site, strictly perpendicular to the long axis of the radius.
* Drill a second 0.062-inch K-wire into the distal articular fragment at the predetermined angle of the deformity in the sagittal plane.
🔪 Surgical Warning
The placement of these reference wires is critical. Once the osteotomy is completed and the distal fragment is mobilized, these wires will be manipulated until they are parallel, visually confirming that the exact degree of planned sagittal correction has been achieved.
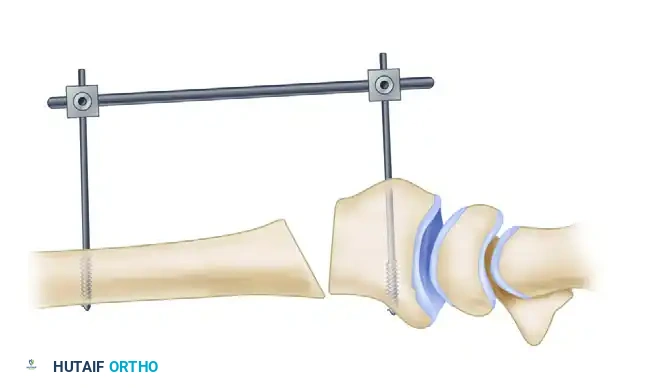
3. Application of the External Fixator
To maintain the corrected alignment and provide stability during graft insertion and plate application, utilize a small external fixator frame. Place one pin in the radial diaphysis and another in the distal fragment (or the metacarpals, depending on the frame design). This acts as a temporary distraction device.
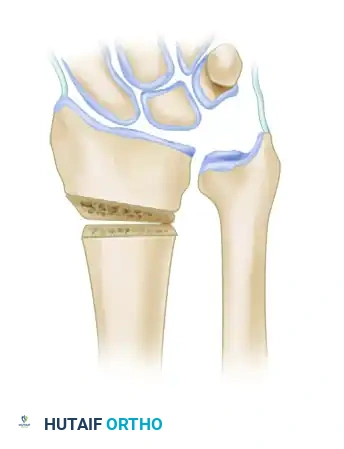
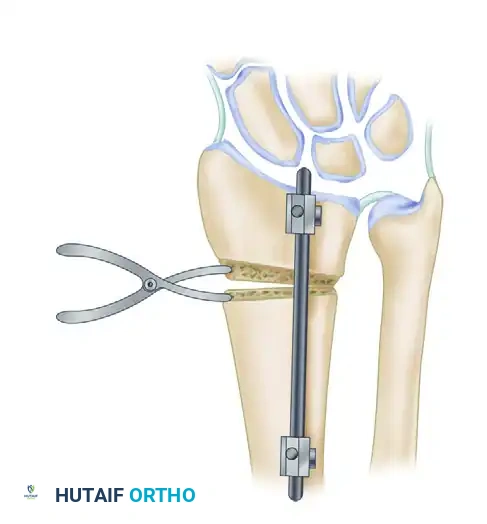
4. Executing the Osteotomy
Using a fine sagittal saw under continuous saline irrigation to prevent thermal necrosis, create the osteotomy at the planned site (preferably the original fracture line).
Once the cortex is breached, insert a small lamina spreader clamp into the osteotomy gap. Gently and progressively wedge the osteotomy open.
Crucial Step: Preserve the dorsal periosteum whenever possible. An intact dorsal periosteal hinge acts as a tension band, significantly increasing the stability of the construct and providing a vascularized bed for bone healing. A standard opening wedge osteotomy with an intact dorsal hinge can safely correct up to 10 mm of radial shortening.
🚨 Management of Severe Shortening (>10 mm)
If preoperative planning dictates that more than 10 mm of lengthening is required, the dorsal periosteum will restrict mobilization. In this scenario:
1. Perform a Z-lengthening of the brachioradialis tendon to remove its deforming force.
2. Transect the dorsal periosteal sleeve.
Note: This renders the construct highly unstable. The required bone graft must be perfectly trapezoidal in both the frontal and sagittal planes to provide structural support, and rigid internal fixation is absolutely mandatory.
5. Bone Graft Harvesting and Insertion
Based on the defect created by the lamina spreader and the preoperative template, harvest a corticocancellous block from the contralateral iliac crest. Contour the graft meticulously.

Insert the contoured graft into the osteotomy defect. Ensure that the cortical face of the graft is positioned volarly to provide structural buttressing against compressive forces.
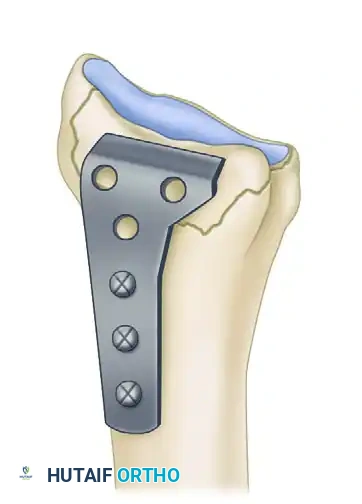
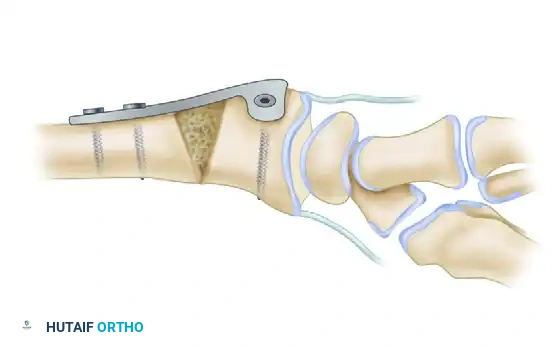
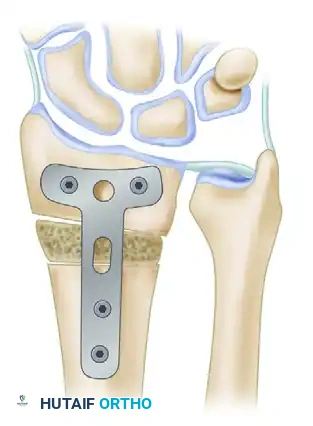
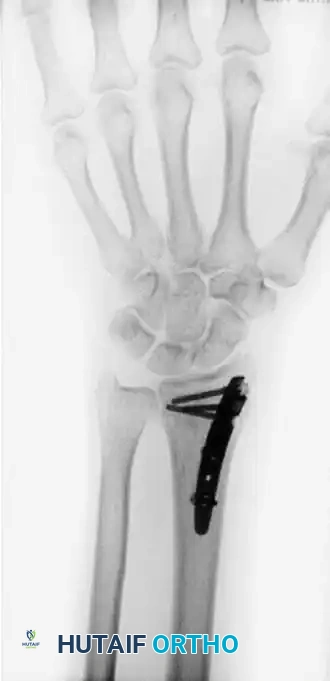
6. Internal Fixation
Stabilize the osteotomy and the intercalary graft using a robust volar plate. Historically, a 3.5-mm angled T-shaped plate was utilized, though modern anatomically contoured volar locking plates are now frequently employed.
💡 Clinical Pearl: Correcting Pronation Deformity
Distal radius malunions frequently feature a supination deformity of the shaft relative to a pronated distal articular fragment. When the flat surface of a rigid volar plate is applied and compressed to the volar aspect of the radius, it inherently acts to derotate the distal fragment, effectively correcting the pronation deformity.
7. Distal Radioulnar Joint (DRUJ) Assessment
Following rigid fixation of the radius, the tourniquet is deflated, and hemostasis is achieved. The DRUJ must now be dynamically assessed through a full range of pronation and supination.
If normal ulnar variance cannot be fully restored through the radial osteotomy alone, or if the DRUJ remains tight and incongruent, a concomitant ulnar shortening osteotomy must be performed to decompress the ulnocarpal joint and restore DRUJ kinematics.
Alternative Fixation: Intramedullary Nailing
While volar plating remains the standard of care, advancements in implant technology have introduced intramedullary (IM) nail implants for the management of distal radius fractures and malunions (as described by Ilyas et al.).
IM nails offer a load-sharing construct with minimal soft-tissue disruption. However, their use in malunion correction requires precise reaming and is generally reserved for extra-articular deformities where the distal fragment is of sufficient size to accommodate the locking screws of the nail.
POSTOPERATIVE CARE AND REHABILITATION
The success of a volar osteotomy relies heavily on a structured, phased rehabilitation protocol.
- Phase 1: Immediate Postoperative (0-2 Weeks)
- The wrist is immobilized in a well-padded volar plaster splint in a neutral position.
- Strict elevation is maintained to minimize edema.
- Immediate active range of motion (ROM) of the digits, elbow, and shoulder is encouraged to prevent stiffness and promote venous return.
- Phase 2: Early Mobilization (2-6 Weeks)
- At 2 weeks, sutures are removed.
- The splint is transitioned to a removable thermoplastic orthosis.
- Under the direct supervision of a certified hand therapist, gentle active and active-assisted ROM exercises for the wrist and forearm are initiated.
- Passive stretching and forceful manipulation are strictly contraindicated to protect the healing osteotomy and graft.
- Phase 3: Strengthening and Return to Function (6+ Weeks)
- Radiographs are obtained at 6 weeks to assess graft incorporation and osteotomy healing.
- Once clinical and radiographic signs of union are present, progressive resistance and strengthening exercises are introduced.
- Work Restrictions: No heavy lifting, impact activities, or manual labor is permitted until the osteotomy has achieved complete radiographic consolidation, which typically occurs between 10 to 12 weeks postoperatively.
COMPLICATIONS AND PITFALLS
While highly effective, volar osteotomy is a technically demanding procedure with potential complications:
- Nonunion or Delayed Union: Often resulting from inadequate graft contouring, thermal necrosis during the saw cut, or insufficient rigid fixation. The use of structural autograft rather than allograft minimizes this risk.
- Hardware Prominence and Tendon Irritation: Volar plates placed distal to the watershed line can irritate the flexor pollicis longus (FPL) or flexor digitorum profundus (FDP) tendons, potentially leading to attritional rupture. Meticulous plate positioning and repair of the pronator quadratus over the hardware are essential protective steps.
- Loss of Correction: Can occur if the dorsal periosteal hinge is violated without adequate structural grafting, or if patients are non-compliant with postoperative lifting restrictions.
- Persistent DRUJ Instability: Failure to recognize and address concomitant TFCC tears or residual ulnar positive variance will result in persistent ulnar-sided wrist pain despite a healed radial osteotomy.
By adhering to strict preoperative templating, respecting the soft tissue envelope, and achieving rigid internal fixation, the orthopedic surgeon can reliably restore wrist biomechanics and significantly improve patient outcomes following distal radius malunion.
You Might Also Like