Clamshell Osteotomy for Complex Diaphyseal Malunions: A Comprehensive Surgical Guide
Key Takeaway
The clamshell osteotomy is a powerful surgical technique designed to correct complex diaphyseal malunions of the tibia. By creating proximal and distal transverse osteotomies combined with a longitudinal splitting osteotomy, surgeons can anatomically realign the diaphysis over an intramedullary nail. This comprehensive guide details the indications, biomechanical principles, step-by-step surgical approach, and postoperative protocols necessary to achieve optimal deformity correction and restore lower extremity alignment.
Introduction to the Clamshell Osteotomy
The management of complex diaphyseal malunions of the tibia presents a formidable challenge to the orthopedic surgeon. Traditional corrective osteotomies, such as closing wedge, opening wedge, or dome osteotomies, often fall short when addressing multiplanar deformities that include significant shortening, translation, and rotational malalignment. To address these complex three-dimensional deformities, Russell et al. described the clamshell osteotomy.
This highly specialized technique involves transecting the malunited segment perpendicular to the normal diaphysis both proximally and distally. The intercalary malunited segment is then split longitudinally and wedged open—much like a clamshell—allowing an intramedullary (IM) rod to pass through. This anatomically aligns the proximal and distal segments of the diaphysis while utilizing the expanded intercalary segment as a biological sleeve. The technique provides robust mechanical stability, restores length and alignment, and leverages the osteogenic potential of intramedullary reamings.
Indications and Patient Selection
The clamshell osteotomy is specifically indicated for complex, multiplanar diaphyseal malunions of the tibia where standard osteotomies would result in unacceptable shortening, instability, or failure to correct translational deformities.
Primary Indications
- Multiplanar Diaphyseal Malunions: Deformities involving a combination of angular (varus/valgus, procurvatum/recurvatum), rotational, and translational malalignment.
- Malunions with Shortening: Cases requiring restoration of limb length (up to 3 cm) in conjunction with angular correction.
- Failed Previous Osteotomies: Diaphyseal nonunions or malunions refractory to standard plating or external fixation techniques.
Contraindications
Careful patient selection is paramount. The clamshell osteotomy is technically demanding and relies heavily on the integrity of the surrounding soft tissue envelope and intramedullary canal.
- Unsuitable Soft Tissue Sleeve: Severe scarring, previous free flaps with poor mobility, or active soft tissue infection precluding safe open exposure.
- Metaphyseal Malunions: The technique relies on diaphyseal intramedullary fixation; metaphyseal deformities are better addressed with periarticular osteotomies and plating.
- Intramedullary Osteomyelitis: Active or latent intramedullary infection is an absolute contraindication to IM nailing.
- Absent Medullary Canal: Severe sclerosis obliterating the canal that cannot be safely recanalized.
- Morbid Obesity: May preclude adequate fluoroscopic visualization and exceed the biomechanical limits of the IM nail during the healing phase.
- Open Physes: Skeletally immature patients are not candidates due to the risk of physeal arrest from IM nailing.
- Excessive Lengthening Requirements: Lengthening of the tibia by more than 3 cm acutely stretches the neurovascular structures beyond their physiological tolerance, risking neurapraxia or vascular compromise.
⚠️ Surgical Warning: Soft Tissue Integrity
The anterior tibial soft tissue envelope is notoriously unforgiving. Do not attempt a clamshell osteotomy if the anterolateral soft tissue sleeve cannot tolerate an extensile exposure or if there is a high baseline risk for wound dehiscence.
Preoperative Planning and Radiographic Evaluation
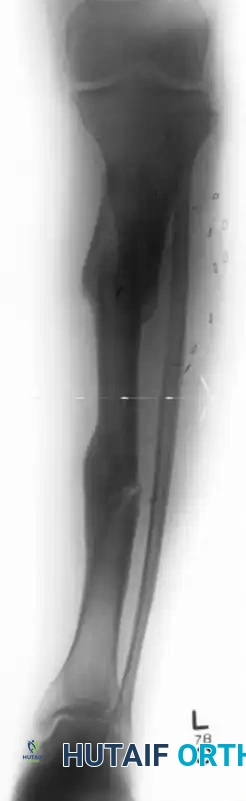
Meticulous preoperative planning is the cornerstone of a successful clamshell osteotomy. Full-length, weight-bearing anteroposterior (AP) and lateral radiographs of both lower extremities are mandatory to assess the mechanical axis deviation (MAD), center of rotation of angulation (CORA), and leg length discrepancy.
Figure A: Anteroposterior standing radiograph of the lower extremity, demonstrating a shortened tibia with a medially translated distal tibial segment and a varus malunion at the inferior end of the intercalary segment.
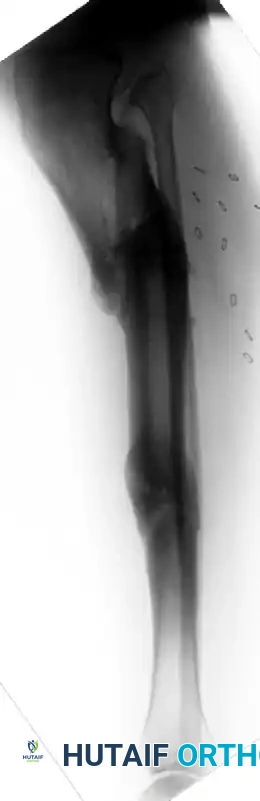
Figure B: Lateral radiograph demonstrating marked deformity of the tibia, highlighted by significant posterior translation and apex posterior angulation at the superior end of the intercalary segment.
Templating Steps
- Identify the CORA: Determine the apex of the deformity in both the coronal and sagittal planes.
- Determine Osteotomy Levels: Plan the proximal and distal transverse osteotomies perpendicular to the anatomical axis of the respective normal diaphyseal segments.
- Calculate Lengthening: Assess the required distraction to restore equal limb length, ensuring it does not exceed the 3 cm safety threshold.
- Select Implant Size: Estimate the required intramedullary nail diameter and length, accounting for the planned distraction.
Step-by-Step Surgical Technique
Phase 1: Patient Positioning and Fibular Osteotomy
- Positioning: Place the patient supine on a radiolucent operating table. Both lower extremities must be prepped and draped into the sterile field to allow for intraoperative clinical comparison of length, alignment, and rotation.
- Tourniquet: A tourniquet is not used. This allows for continuous assessment of limb perfusion and prevents ischemic compounding of the soft tissues during acute deformity correction.
- Fibular Osteotomy: Make a lateral incision along the fibular shaft at the planned level of the proximal transverse component of the tibial osteotomy. Perform an oblique fibular osteotomy.
- Biomechanical Rationale: An oblique cut increases the surface area for healing and ensures complete freedom to reposition, translate, and lengthen the tibia without the fibula acting as a tethering strut.
Phase 2: Tibial Nailing Preparation
- Incision and Entry Point: Utilize a transpatellar or medial parapatellar tendon approach to access the previously defined safe zone for the tibial rod starting point.
- Guidewire Placement: Take extreme care to ensure an appropriate entrance angle into the proximal tibial segment. The trajectory must align perfectly with the anatomical axis of the proximal fragment.
- Opening the Canal: Open the proximal tibial segment with a threaded guidewire, over which an opening reamer is passed.
- Crucial Step: No attempt is made to ream the proximal tibia at this time. Premature reaming can compromise the subsequent osteotomy steps and deplete valuable autogenous bone graft.
Phase 3: Tibial Exposure and Osteotomy Execution
- Anterior Exposure: To expose the osteotomy site, make a longitudinal incision over the anterior compartment, exactly one fingerbreadth lateral to the tibial crest, extending along the proposed longitudinal osteotomy site.
- Extraperiosteal Dissection: Translate the anterior compartment musculature posteriorly. This allows for an extraperiosteal exposure of the lateral aspect of the malunited segment. Only the anterolateral portion of the tibia is exposed. Preserving the medial and posterior periosteum is critical for maintaining the blood supply to the clamshell fragments.
- Transverse Osteotomies: Under strict fluoroscopic guidance, localize the planned positions of the proximal and distal transverse osteotomies. Place a Kirschner wire (K-wire) perpendicular to the anatomical axis to guide the cuts. Use a sagittal saw to create the transverse proximal and distal osteotomies.

Figure D: Surgical exposure for the tibial osteotomy. The anterolateral muscular envelope is retracted posteriorly. Transverse osteotomies are denoted by the planned transverse lines, and the circles represent the drill holes for the longitudinal cut.
- The Clamshell Longitudinal Cut: Create the clamshell component of the osteotomy parallel to the medial tibial face. Begin just posterior to the anterolateral subcutaneous prominence of the tibia and aim in a posteromedial direction.
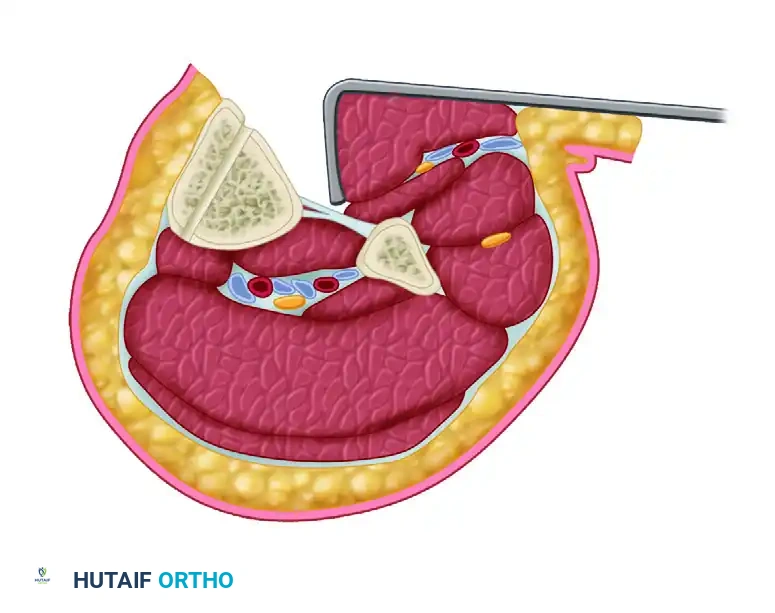
Figure C: Cross-sectional diagram of the tibial clamshell osteotomy with soft tissues included. The anterolateral muscular sleeve is retracted posteriorly, exposing the lateral aspect of the tibia. The osteotomy is initiated 3 to 5 cm posterior to the anterolateral tibial prominence, angled posteromedially, and parallel to the subcutaneous surface of the tibia.
- Creating Stress Risers: Use a 3.5-mm drill bit to create the path for the longitudinal osteotomy. The goal is to create a bicortical, uniform plane of stress risers.
- Splitting the Cortex: Using the drill holes as a guide, complete the osteotomy of the near cortex with an osteotome.
- Opening the Clamshell: Split the far cortex of the osteotomized segment parallel to the medial face using an osteotome and a laminar spreader. Separate the longitudinal osteotomy of the intercalary segment with the laminar spreader.
- Biomechanical Pearl: The posterior cortex must hinge on the intact periosteal sleeve. If the posteromedial cortex does not open easily, carefully use an osteotome to weaken the posteromedial cortex before reapplying the laminar spreader.
Phase 4: Intramedullary Reaming and Autografting
- Guidewire Passage: Place the limb over a radiolucent triangle. Under fluoroscopic guidance, pass the ball-tipped guidewire from the proximal tibial segment, through the opened clamshell osteotomized segment, and into the distal segment.
- Verification: Measure the length of the guidewire. Confirm on both AP and lateral fluoroscopic images that the entrance angle and the ending point in the distal segment are perfectly centered in the medullary canal.
- Biological Reaming: Before commencing reaming, allow the anterior muscular compartment to drape naturally over the lateral cortex.
- Biological Pearl: Draping the muscle creates a contained environment. As you ream, the generated bone fragments are deposited directly into the osteotomy gap sites, acting as a highly osteogenic autograft.
- Reaming Technique: Ream the proximal and distal segments until cortical chatter is noted.
- CRITICAL SAFETY STEP: When passing the reamer through the open clamshell segment, push the reamer manually without power. This protects the posterior neurovascular structures from being caught in the spinning flutes and prevents binding against the mobile osteotomized fragments.
- Nail Selection: Continue reaming in 0.5-mm increments until uniform cortical chatter is obtained. Select a tibial rod measuring exactly 1 mm less in diameter than the final reamer used.
Phase 5: Deformity Correction and Interlocking
- Nail Insertion: Pass the selected intramedullary rod and accomplish proximal interlocking.
- Positioning for Correction: Remove the targeting jig from the proximal aspect of the tibial nail. Remove the limb from the radiolucent triangle and place it flat on the operating table. At this stage, the sagittal and coronal plane corrections are intrinsically achieved by the straight IM nail passing through the realigned segments.
- Length and Rotation: Only length and rotation remain to be corrected. Have an assistant apply manual traction, or utilize a femoral distractor/external fixator to dial in the exact length and rotation. Compare clinically with the contralateral draped limb.
- Distal Interlocking: Once perfect length and rotation are achieved, place the distal interlocking bolts using a freehand fluoroscopic technique.
Phase 6: Grafting and Closure
- Site Inspection: Retract the anterior compartment posteriorly from the lateral part of the tibia to inspect the osteotomy site.
- Bone Grafting: Ensure the gaps are filled with the bone fragments left from the reaming process. For structural gaps exceeding 1 cm, supplement with demineralized bone matrix (DBM) or autogenous cancellous bone graft (e.g., from the iliac crest or proximal tibia). Ensure no dead space remains between the osteotomy fragments and the intact proximal/distal tibial segments.
- Fascial Management: Loosely approximate the fascia over the anterior compartment.
> ### 🚨 Surgical Pitfall: Compartment Syndrome
> Acute correction of complex deformities significantly alters the volume-to-compartment ratio. If there is any concern that excessive swelling may precipitate acute compartment syndrome, do not close the anterior compartment fascia. - Skin Closure: Close the extensile skin approach using the Allgöwer modification of the Donati technique. This specialized suture technique minimizes tension on the epidermal edges and preserves the fragile dermal blood supply of the anterior tibia. Handle all soft tissues with extreme care.
Postoperative Care and Rehabilitation Protocol
The postoperative phase requires vigilant monitoring and a structured rehabilitation timeline to ensure both soft tissue survival and bony union.
Immediate Postoperative Phase (Days 0-7)
- Compartment Syndrome Monitoring: The patient must be monitored continuously for signs of acute compartment syndrome (pain out of proportion, pain with passive stretch, tense compartments).
- Antibiotic Prophylaxis: Intravenous cefazolin (or appropriate alternative) is administered for 24 hours postoperatively.
- DVT Prophylaxis: Prophylactic heparin (or low-molecular-weight heparin) is initiated and continued until the patient is discharged from the hospital, or longer based on patient-specific risk factors.
- Weight Bearing: The patient may begin touch-toe weight bearing (TTWB) on the first postoperative day using crutches or a walker.
Intermediate Phase (Weeks 2-12)
- Physical Therapy: Aggressive gait-training, active and passive range-of-motion (ROM) of the knee and ankle, and isometric strengthening exercises are begun immediately.
- Weight Bearing Progression: Partial weight bearing is allowed and progressed as tolerated, guided by the appearance of callus formation visible on serial AP and lateral radiographs.
- Orthotic Support: A functional fracture brace may be utilized depending on the surgeon's assessment of the intrinsic stability of the clamshell construct.
Late Phase (Weeks 12-16 and Beyond)
- Full Weight Bearing: By 12 weeks, weight bearing is typically advanced to full, provided there is radiographic evidence of bridging callus.
- Return to Activity: At the end of 16 weeks, if the tibial osteotomy appears clinically and radiographically healed, any bracing is discontinued. Activities of daily living and full, unrestricted weight bearing are encouraged.
- Long-Term Follow-Up: The patient is examined clinically and radiographically every 6 months for a minimum of 2 years to monitor for late complications, hardware failure, or loss of correction.
- Hardware Removal: The intramedullary plate/nail may be removed if requested by the patient due to symptomatic hardware prominence, but this should never be performed before 12 months after the index surgery to prevent refracture.
Conclusion
The clamshell osteotomy is a master-level technique that offers a highly effective solution for complex, multiplanar diaphyseal malunions of the tibia. By combining the principles of transverse realignment with a longitudinal biological hinge, surgeons can achieve powerful deformity correction, restore limb length, and provide rigid intramedullary stability. Strict adherence to preoperative templating, meticulous soft tissue handling, and precise execution of the osteotomy cuts are imperative to minimize complications and achieve excellent long-term functional outcomes.
You Might Also Like

