Cavovarus Foot Reconstruction: Combined Osteotomies and Tendon Transfers
Key Takeaway
The Ward technique for cavovarus foot deformity in Charcot-Marie-Tooth disease involves a comprehensive, multi-level approach to correct rigid plantarflexion of the first ray and hindfoot varus. This surgical strategy combines a plantar fasciotomy, peroneus longus to brevis transfer, proximal first metatarsal dorsal closing wedge osteotomy, and tibialis anterior transfer to the lateral cuneiform. A Jones procedure may be added for residual hallux clawing.
INTRODUCTION AND BIOMECHANICAL RATIONALE
The cavovarus foot deformity, particularly when secondary to hereditary sensorimotor neuropathies such as Charcot-Marie-Tooth (CMT) disease, presents one of the most complex reconstructive challenges in orthopedic surgery. The deformity is fundamentally driven by predictable, progressive muscle imbalances. Specifically, the peroneus longus (PL) overpowers a weakening tibialis anterior (TA), driving the first ray into rigid plantarflexion. Simultaneously, the tibialis posterior (TP) overpowers the weakening peroneus brevis (PB), driving the hindfoot into varus.
The rigid, plantarflexed first ray acts as a "kickstand" during the stance phase of gait. As the medial column strikes the ground prematurely, it forces the hindfoot into a compensatory varus position. Over time, this flexible, forefoot-driven hindfoot varus becomes a rigid structural deformity due to contractures of the plantar fascia and joint capsules.
Ward et al. popularized a comprehensive, multi-level surgical algorithm to address the specific deforming forces in the CMT cavovarus foot. This combined approach includes a plantar fasciotomy, transfer of the peroneus longus to the peroneus brevis, a proximal first metatarsal dorsal closing wedge osteotomy, and transfer of the tibialis anterior to the lateral cuneiform. When necessary, a Jones procedure (extensor hallucis longus transfer to the first metatarsal neck) is added to address residual clawing of the hallux and provide dynamic elevation of the first ray.
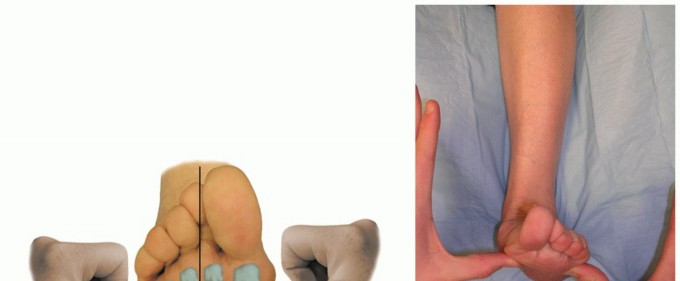
💡 Clinical Pearl: The Coleman Block Test
Before committing to this forefoot-centric reconstructive algorithm, a Coleman block test is mandatory. If the hindfoot corrects to neutral or valgus when the first ray is allowed to drop off the block, the hindfoot varus is flexible and forefoot-driven, making this combined procedure highly effective. If the hindfoot remains in varus, a concomitant lateralizing calcaneal osteotomy (e.g., Dwyer or sliding osteotomy) must be added to the surgical plan.
PREOPERATIVE EVALUATION AND INDICATIONS
Clinical Assessment
A meticulous neurological and musculoskeletal examination is required. Muscle strength must be graded individually. The Ward technique specifically relies on assessing the strength of the tibialis anterior. If the TA retains Grade 4 or 5 strength, transferring it to the lateral cuneiform removes its supinating force and converts it into a pure dorsiflexor. If the TA is weak, the transfer acts as a tenodesis to negate residual varus deforming forces.
Radiographic Evaluation
Standard weight-bearing anteroposterior, lateral, and axial sesamoid radiographs are essential.
* Meary’s Angle: An intersection of the talar and first metatarsal axes; an angle >4 degrees convex dorsally indicates a cavus deformity.
* Hibbs Angle: The intersection of the calcaneal axis and the first metatarsal axis; approaches 90 degrees in severe cavus.
* Calcaneal Pitch: Typically elevated (>30 degrees) in true cavus feet.
Indications
- Symptomatic, progressive cavovarus deformity secondary to CMT or other neuromuscular etiologies.
- Flexible hindfoot varus driven by a rigid plantarflexed first ray.
- Failure of conservative management (custom orthotics, AFOs, physical therapy).
SURGICAL TECHNIQUE: STEP-BY-STEP MASTERCLASS
The Ward et al. technique is performed in a sequential manner, addressing soft tissue contractures first, followed by dynamic tendon balancing, and concluding with rigid osseous correction.
Phase 1: Plantar Fasciotomy
The plantar fascia is the primary static restraint maintaining the longitudinal arch. In a cavus foot, it becomes severely contracted and must be released to allow unfolding of the arch.
- Positioning: The patient is positioned supine with a bump under the ipsilateral hip to internally rotate the leg to a neutral position. A thigh tourniquet is applied.
- Incision: Make a 1-cm longitudinal incision on the medial aspect of the midfoot, directly over the palpable medial band of the plantar fascia.
- Dissection: Utilize a hemostat to bluntly dissect the subcutaneous tissues, creating a plane both superficial and deep to the plantar fascia.
- Protection: Insert small to medium right-angle retractors to protect the overlying skin and the underlying neurovascular bundle (lateral plantar nerve and artery).
- Release: Divide the plantar fascia completely using a No. 11 scalpel blade. Palpate the deep spaces to ensure all tight fascial bands, including the abductor hallucis fascia, are released.
⚠️ Surgical Warning: Neurovascular Injury
The lateral plantar nerve lies immediately deep to the deep fascia of the abductor hallucis and the medial band of the plantar fascia. Aggressive blind cutting can result in catastrophic nerve injury. Always maintain direct visualization or strict retractor protection deep to the fascia.
Phase 2: Peroneus Longus to Peroneus Brevis Tendon Transfer
This transfer serves a dual biomechanical purpose: it eliminates the primary deforming force driving the first ray into plantarflexion (the PL), and it augments the weak primary evertor of the foot (the PB).
- Incision: Make a curvilinear incision laterally over the peroneal tendon sheath, extending from 2 cm proximal to the distal tip of the fibular malleolus to 2 cm distal to it.
- Nerve Protection: Carefully identify, mobilize, and gently retract the sural nerve, which typically crosses the surgical field in the distal portion of the incision.
- Tendon Identification: Incise the superior and inferior peroneal retinacula. Open the common sheath of the peroneus longus and brevis tendons. The brevis is anterior and medial (closer to the fibula); the longus is posterior and lateral.
- Transection: Trace the peroneus longus tendon as distally as possible to its entrance into the cuboid groove. Transect the PL tendon at this level.
- Tendon Weave: Prepare the PL tendon for transfer. Hold the ankle in neutral dorsiflexion and the foot in slight valgus.
- Fixation: Weave the proximal stump of the peroneus longus through the substance of the peroneus brevis tendon using a classic Pulvertaft weave technique. Secure the weave with multiple interrupted No. 0 or 2-0 braided synthetic absorbable sutures (e.g., Vicryl) under moderate tension.
Phase 3: Proximal First Metatarsal Osteotomy
With the soft tissues released and the dynamic plantarflexion force removed, the structural osseous deformity of the first ray is addressed.
- Incision: Make a longitudinal dorsal incision over the first ray, starting 2 cm proximal to the first metatarsophalangeal (MTP) joint and extending to 1 cm proximal to the first tarsometatarsal (TMT) joint.
- Exposure: Retract the extensor hallucis longus (EHL) laterally. Perform subperiosteal dissection to expose the proximal third of the first metatarsal shaft.
- Osteotomy Design: Create a dorsal closing wedge osteotomy in the proximal metaphyseal-diaphyseal junction. The wedge is typically 3 to 5 mm at its dorsal base, tapering to an intact plantar hinge.
- Execution: Use an oscillating microsaw to make the cuts. Remove more bone dorsally if necessary to adequately "level the tread"—meaning the first metatarsal head should be elevated to lie in the exact same transverse plane as the adjacent second and third metatarsal heads.
- Closure and Fixation: Close the osteotomy by dorsiflexing the distal fragment. Temporarily stabilize the osteotomy with a small Steinmann pin or Kirschner wire. Permanent fixation can be achieved with a dorsal compression staple, a low-profile titanium plate, or crossed K-wires, depending on surgeon preference and bone quality.
💡 Clinical Pearl: The Plantar Hinge
Maintaining an intact plantar cortical hinge is critical. It provides inherent stability to the osteotomy and acts as a fulcrum for the dorsal closing wedge. If the hinge breaks, the osteotomy becomes highly unstable and requires rigid plate fixation to prevent dorsal malunion or nonunion.
Phase 4: The Jones Procedure (Adjunct)
If the preceding three procedures fail to fully correct the heel varus, or if there is persistent, rigid clawing of the hallux (cock-up deformity), the Jones procedure is added to the surgical algorithm.
- Incision Extension: Extend the previous dorsal first ray incision distally to the neck of the proximal phalanx of the hallux.
- Tendon Transection: Identify the EHL tendon and divide it near its insertion at the base of the distal phalanx.
- Metatarsal Preparation: Drill a transverse hole through the neck of the first metatarsal from medial to lateral. Use serial-sized drill bits to gradually enlarge the hole, minimizing the risk of creating a stress riser and fracturing the metatarsal neck.
- Tendon Routing: Pass the proximal stump of the EHL tendon through the osseous tunnel from medial to lateral.
- Tensioning and Fixation: Loop the EHL tendon back onto itself. While holding the ankle in neutral, the first ray elevated, and placing tension on the basilar osteotomy, suture the EHL to itself using heavy absorbable sutures.
- IP Joint Management: Note for the advanced surgeon: A classic Jones procedure almost always necessitates a concomitant arthrodesis of the hallux interphalangeal (IP) joint to prevent a "floppy toe" or progressive flexion deformity of the IP joint.
Phase 5: Transfer of the Tibialis Anterior
The final step addresses the varus/supination force exerted by the tibialis anterior. By moving its insertion from the medial cuneiform/first metatarsal base to the lateral cuneiform, its pull is centralized.
- Incision and Harvest: Make a dorsomedial incision over the insertion of the TA tendon on the medial cuneiform and base of the first metatarsal. Dissect distally to maximize tendon length. Divide the tendon sharply at its insertion.
- Tendon Preparation: Whipstitch the distal 2 to 3 cm of the TA tendon stump using a No. 2 nonabsorbable suture (e.g., FiberWire or Ethibond) in a Bunnell or Krackow fashion.
- Recipient Site Exposure: Under fluoroscopic guidance, make a 2-cm longitudinal incision over the dorsum of the lateral cuneiform. Retract the extensor digitorum longus tendons laterally.
- Bone Tunnel Creation: Pass an 8-mm or 9-mm cannulated drill bit through both cortices of the lateral cuneiform, directing the drill from dorsal to plantar.
- Tendon Passage: Pass the suture ends through the bone tunnel. This can be facilitated using straight Keith needles passed through the plantar aspect of the foot, or by using a suture passing loop.
- Fixation:
- Option A (Button): Pass the Keith needles through the plantar skin. Hold the hindfoot in neutral varus/valgus and the ankle in neutral (90 degrees) dorsiflexion. Tie the sutures tightly over a heavily padded button on the plantar aspect of the foot.
- Option B (Interference Screw/Anchor): Alternatively, secure the tendon directly within the lateral cuneiform tunnel using a biotenodesis interference screw or a robust suture anchor. This avoids plantar skin complications associated with buttons.
- Tensioning Rule: Regardless of the fixation method, the tendon transfer must be tensioned to hold the ankle in neutral to 5 degrees of dorsiflexion.
⚠️ Pitfall: Over-tensioning the TA Transfer
While adequate tension is required to prevent a foot drop, severe over-tensioning of the TA transfer to the lateral cuneiform can result in a rigid, iatrogenic calcaneovalgus deformity. Ensure the foot rests naturally at 90 degrees to the leg prior to final fixation.
POSTOPERATIVE CARE AND REHABILITATION PROTOCOL
The success of this complex, multi-level reconstruction relies heavily on strict adherence to postoperative immobilization and weight-bearing restrictions.
Phase I: Maximum Protection (Weeks 0-6)
- Immobilization: In the operating room, a well-padded, short-leg bivalved cast or a rigid posterior splint with a bulky Jones dressing is applied. The ankle is locked in neutral dorsiflexion.
- Weight-Bearing: Strictly non-weight-bearing (NWB) on the operative extremity.
- Edema Control: Strict elevation of the limb above heart level for the first 72 to 96 hours to mitigate swelling and promote wound healing.
- Follow-up: At 2 weeks, sutures are removed. If a plantar button was used for the TA transfer, the padding is inspected. A new, well-molded short-leg fiberglass cast is applied.
Phase II: Transition and Maturation (Weeks 6-10)
- Hardware Management: At 6 weeks postoperatively, radiographs are obtained to assess the healing of the first metatarsal osteotomy. If a plantar button and pull-out sutures were utilized for the TA transfer, they are removed in the clinic at this time.
- Immobilization: The patient is transitioned to a short-leg walking cast or a rigid controlled ankle motion (CAM) boot.
- Weight-Bearing: Progressive weight-bearing as tolerated (WBAT) is initiated.
- Physical Therapy: Gentle active range of motion (AROM) of the toes is encouraged.
Phase III: Rehabilitation (Weeks 10+)
- Immobilization: The cast or boot is discontinued once radiographic union of the osteotomy is confirmed and the patient can ambulate without pain.
- Orthotics: Patients are often transitioned into a supportive athletic shoe, occasionally requiring a custom orthotic to support the newly reconstructed arch and accommodate any residual minor deformities.
- Physical Therapy: Formal physical therapy focuses on gait retraining, proprioception, and strengthening of the transferred tendons (biofeedback is often required to train the TA and PL in their new biomechanical roles).
COMPLICATIONS AND MANAGEMENT
- Nonunion/Delayed Union of the First Metatarsal: Occurs in 2-5% of cases, often due to violation of the plantar hinge or inadequate fixation. Managed with prolonged immobilization or revision with bone grafting and rigid plate fixation.
- Plantar Skin Necrosis: A known complication of the pull-out button technique for the TA transfer. Can be avoided by using modern biotenodesis screws or ensuring massive padding beneath the button.
- Sural Nerve Neuroma: Can occur during the PL to PB transfer. Meticulous dissection and gentle retraction are paramount.
- Under-correction: Failure to recognize a rigid hindfoot varus preoperatively (ignoring the Coleman block test) will result in persistent varus, necessitating a secondary calcaneal osteotomy.
CONCLUSION
The combined proximal first metatarsal osteotomy, plantar fasciotomy, and transfer of the tibialis anterior (with or without the Jones procedure) represents a powerful, anatomically sound approach to the flexible hindfoot cavovarus deformity. By systematically neutralizing deforming muscle forces and correcting structural osseous abnormalities, the orthopedic surgeon can successfully restore a plantigrade, stable, and functional foot for patients suffering from Charcot-Marie-Tooth disease.
You Might Also Like