Calcaneal Fracture ORIF: Medial and Lateral Approaches
Key Takeaway
The combined medial and lateral approach for calcaneal fracture open reduction and internal fixation (ORIF) provides unparalleled visualization for complex, comminuted fracture patterns. This technique is particularly advantageous for restoring the posterior facet, correcting varus malalignment of the tuberosity, and managing patients with compromised soft tissue envelopes. Meticulous dissection, preservation of the sural nerve, and rigid fixation are paramount for optimal functional outcomes and minimizing postoperative complications.
INTRODUCTION AND RATIONALE
The operative management of displaced intra-articular calcaneal fractures remains one of the most challenging endeavors in orthopedic trauma. While the extensile lateral approach has historically been the workhorse for calcaneal open reduction and internal fixation (ORIF), the combined medial and lateral approach offers distinct biomechanical and biological advantages in specific clinical scenarios.
Utilizing two separate incisions—one medial and one lateral—provides direct visualization of both the medial wall (sustentacular fragment) and the lateral wall (posterior facet and calcaneocuboid joint). This dual-window technique is particularly indicated for patients with severe comminution, profound varus malalignment of the tuberosity, or a significantly compromised soft tissue envelope where a large extensile lateral flap poses an unacceptable risk of necrosis.
Clinical Pearl: The dual-incision technique is highly favored in patients with a significant smoking history or delayed presentation. By avoiding the massive subperiosteal flap required in the extensile lateral approach, the vascularity of the lateral skin is better preserved, drastically reducing the incidence of catastrophic wound breakdown.
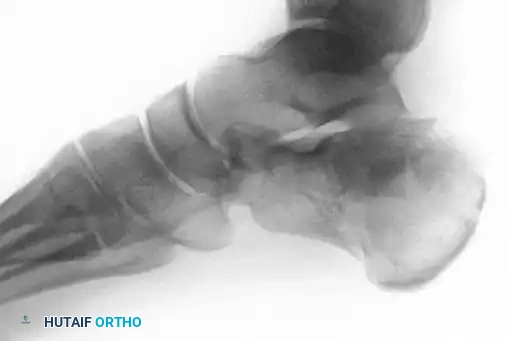
Figure 88-11A: Preoperative radiograph demonstrating a displaced intra-articular calcaneal fracture. Medial and lateral incisions were chosen in this patient due to a significant smoking history and compromised soft tissue envelope.
PREOPERATIVE PLANNING AND POSITIONING
Meticulous preoperative planning relies on high-quality orthogonal radiographs and fine-cut computed tomography (CT) scans to delineate the primary fracture line (shear) and secondary fracture lines (compression). The surgeon must conceptualize the spatial relationship between the anteromedial sustentacular fragment (the "constant" fragment) and the displaced tuberosity and posterior facet fragments.
Operating Room Setup
- Patient Positioning: Place the patient in a lateral decubitus or a mildly inclined Trendelenburg position. Place a sandbag beneath the ipsilateral buttock to allow rotational access to both the medial and lateral aspects of the hindfoot.
- Limb Support: Rest the foot on sterile towels or folded sheets. This allows the foot to hang freely without support when the towels are moved proximal to the ankle joint during dynamic reduction maneuvers.
- Tourniquet: Apply a well-padded thigh tourniquet to ensure a bloodless surgical field, which is critical for identifying small articular fragments and neurovascular structures.
- Instrumentation: Ensure the availability of a small fragment screw set (3.5 mm cortical and 4.0 mm cancellous screws), a variety of threaded and non-threaded Steinmann pins and Kirschner wires (K-wires), and small, malleable reconstruction plates (e.g., 1/3 tubular plates, Wave plates) or staples.
SURGICAL TECHNIQUE: STEP-BY-STEP
1. The Lateral Exposure
The lateral incision provides access to the posterior facet, the anterior process, and the calcaneocuboid joint.
Figure 88-11B: The lateral incision, extending from the calcaneocuboid joint to just anterior to the Achilles tendon.
- Incision: With the foot held at 90 degrees to the ankle, make the lateral incision starting from the anterolateral corner of the calcaneocuboid joint. Extend it posteriorly in an almost straight line, terminating 1 to 2 cm anterior to the Achilles tendon.
- Sural Nerve Dissection: Identify the sural nerve in the posterior portion of the incision. It typically lies in a small fat pad just anterior to the small saphenous vein, overlying the combined sheath of the peroneal tendons. Dissect the nerve distally.
- Nerve Management: Attempt to preserve both main branches of the sural nerve. However, if exposure of the lateral aspect of the sinus tarsi and calcaneocuboid joint is severely restricted, the medial branch (which usually anastomoses with the lateralmost branch of the superficial peroneal nerve) can be sacrificed. This generally does not cause significant functional numbness at the fourth web space.
- Deep Dissection: Retract the sural nerve and small saphenous vein. Open the inferior peroneal retinaculum at its anterior border where it meets the stem of the inferior extensor retinaculum. This exposes the anterolateral ridge of the anterior third of the calcaneus (the lateral border of the sinus tarsi).
- Extensor Digitorum Brevis (EDB): Reflect the origin of the EDB distally just enough to expose the calcaneocuboid joint.
- Ligamentous Preservation: Leave the cervical ligament intact. Lift off the sinus tarsi only as much of the lateral arm of the inferior extensor retinaculum as necessary to expose the anterior aspect of the posterior talocalcaneal facet.
Surgical Pitfall: Over-dissection of the sinus tarsi can lead to destabilization of the subtalar joint and devascularization of small articular fragments. Expose only what is necessary for visualization.
2. Lateral Wall and Joint Inspection
- Lateral Wall Exposure: Expose the lateral wall of the calcaneus using sharp dissection, a thin osteotome, or a periosteal elevator. Place a small Hohmann retractor under the peroneal tendons to retract them posteriorly. This creates a "door" to the anterior two-thirds of the lateral calcaneal surface.
- Hematoma Evacuation: Maintain the foot in valgus and equinus. The lateral wall is often paper-thin and highly comminuted. Follow the dark fracture hematoma into the fracture planes between the lateral wall blowout and the intact calcaneal body. Suction and manually clear all hematoma to allow precise articular inspection.
- Posterior Facet Visualization: If visualization of the posterior facet is difficult, insert an Inge retractor into the depths of the sinus tarsi. Press up against the talar neck and down on the calcaneus to distract the subtalar joint.
- Fracture Mapping: Form a clear mental image of the fracture lines. Identify the sagittal split through the posterior facet and the transverse fracture across the junction of the posterior facet and the proximal sinus tarsi. Ensure a secondary medial sagittal fracture through the posterior facet is not overlooked.
3. The Medial Exposure
Once the lateral side is prepared and the fracture pattern is understood, transition to the medial side to mobilize the tuberosity and restore the medial column.
Figure 88-11C: The medial incision, crossing the sustentaculum tali and protecting the neurovascular bundle.
- Repositioning: Tilt the operating table laterally, flex the knee, and abduct the hip. Dorsiflex the foot to 90 degrees.
- Incision: Palpate the subcutaneous edge of the tarsal navicular. Begin the incision 1 cm anterior to this landmark, extending straight posteriorly across the sustentaculum tali, and ending 1.5 to 2.0 cm anterior to the Achilles tendon. If swelling obscures the sustentaculum, center the incision 2 cm distal to the tip of the medial malleolus.
- Flexor Retinaculum: Identify and open the entire length of the flexor retinaculum (laciniate ligament) and the continuous superficial fascia. Dissect the retinaculum anteriorly and plantarward to the upper border of the abductor hallucis.
- Neurovascular Bundle Management: Identify the posterior tibial neurovascular bundle at the proximal edge of the flexor retinaculum. Bluntly delineate its posterior aspect, ensuring the lateral plantar artery, vein, and nerve are protected. Pass a Penrose drain around the bundle and gently retract it anteriorly.
- Medial Wall Exposure: Retract the neurovascular bundle anteriorly (medial calcaneal branches may need posterior retraction or cauterization). Elevate the abductor hallucis and flexor accessorius muscles off the calcaneus with a periosteal elevator to expose the medial surface from the sustentaculum to the medial tuberosity ridge.
4. Fracture Reduction Sequence
Reduction must follow a logical, stepwise progression to restore the three-dimensional anatomy of the hindfoot.
- Tuberosity Disimpaction: Through the medial wound, pass an instrument or finger over the tuberosity fragment to communicate with the lateral wound. Pull down on the tuberosity fragment, disimpacting and dorsiflexing it while holding the ankle in equinus.
- Correcting Deformity: The tuberosity is typically displaced laterally, distally, and in varus. Using a large, threaded Steinmann pin placed into the posterior tuberosity (inserted from the lateral side), pull the fragment posteriorly to restore length, translate it medially, and rotate it out of varus.
- Posterior Facet Elevation: Return to the lateral incision. Gently tap a 5 to 6-mm osteotome deep to the depressed posterior facet fragment. Holding the foot in varus for better exposure, lift the posterior facet into its anatomic position against the talus.
- Provisional Pinning: Once the posterior facet is reduced, pin it to the intact sustentacular fragment using two 0.062-inch K-wires. Place these wires just below the articular surface in the subchondral bone for optimal purchase. Drive the wires from lateral to medial, directing them distally 10 to 20 degrees, until they can be palpated on the medial cortex.
Surgical Pearl: Reducing the posterior facet often leaves a significant void in the underlying cancellous bone. While structural integrity is primarily maintained by rigid internal fixation, bone grafting (autograft or allograft) of this defect remains an optional adjunct to support the articular surface.
5. Definitive Internal Fixation
Fixation begins medially to secure the restored calcaneal length and alignment, followed by lateral fixation of the articular segments.
Medial Fixation
- Sustentacular Targeting: Through the medial incision, locate the flexor hallucis longus tendon beneath the sustentaculum tali. Starting 3 to 5 mm plantar to this tendon, place two 0.062-inch K-wires from anteromedial to posterolateral (angled approximately 30 degrees to the longitudinal axis).
- Alternative Pinning: Alternatively, direct one or two 3/32-inch pins from the posterolateral aspect of the tuberosity (just lateral to the Achilles) upward and medially to engage the sustentacular fragment. This trajectory facilitates easy hardware removal if necessary.
- Definitive Medial Hardware: Once the tuber-joint angle is restored and provisional wires are confirmed, secure the medial wall. Use 3.5-mm cortical screws or 4.0-mm cancellous screws utilizing a lag technique. A small two-hole plate or staple can also be utilized, provided the temporary K-wires do not obstruct optimal plate placement.
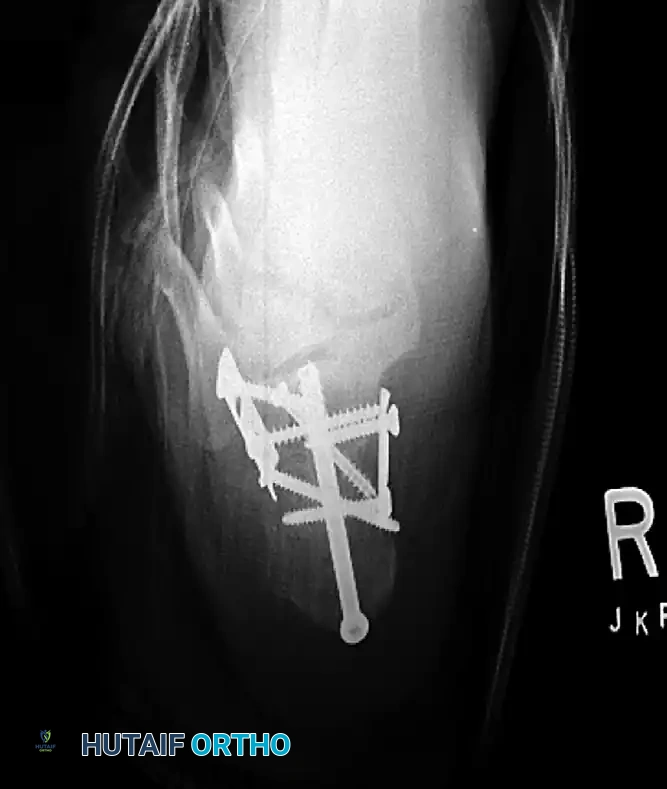
Figure 88-12: Radiographic demonstration of definitive fixation utilizing both medial and lateral plates to buttress the reconstructed calcaneus.
Lateral Fixation
- Posterior Facet: Return to the lateral incision. Replace the provisional K-wires across the posterior facet with definitive lag screws, securing the facet to the sustentacular fragment.
- Lateral Wall: The lateral wall is often too thin and comminuted for lag screw fixation. Apply a small 1/3 tubular plate or a low-profile Wave plate (Tornier, Inc., Edina, MN) to buttress the lateral wall. Screws can be inserted subcutaneously to minimize hardware prominence.
- Calcaneocuboid Joint: If a sagittal fracture extends into the calcaneocuboid joint, clear the hematoma and reduce the joint. A single lag screw is usually sufficient for fixation.
- Alternative Axial Fixation: For highly comminuted patterns, a 3/32-inch or 1/8-inch Steinmann pin can be driven through the depth of the fourth intermetatarsal space posteriorly, crossing the calcaneocuboid joint, traversing the fracture, and anchoring into the tuberosity fragment. Cut the pin beneath the skin.
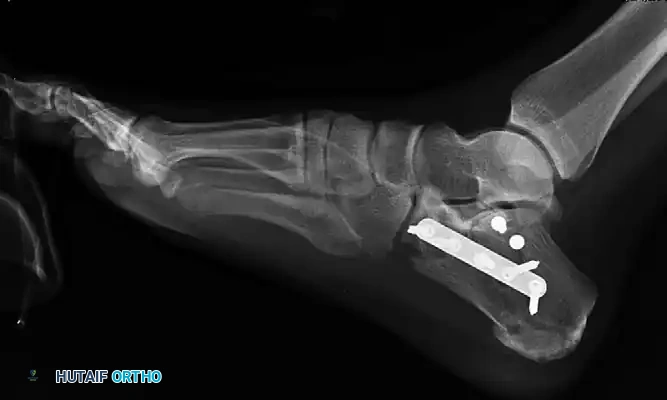
Figure 88-13: Fixation of the lateral wall utilizing a 1/3 tubular plate and percutaneous screws, providing a low-profile buttress to the comminuted lateral cortex.
SPECIAL CONSIDERATIONS
Tongue-Type Fractures
While the dual-incision technique is highly effective for joint depression fractures, tongue-type fractures present a unique biomechanical challenge. Occasionally, a tongue-type fracture does not involve significant widening of the lateral wall or secondary comminution. In these specific cases, the fracture can be managed via the axial pin fixation technique originally described by Gissane and popularized by Essex-Lopresti. This percutaneous or mini-open approach can yield excellent outcomes while minimizing soft tissue dissection.
Soft Tissue Compromise
A critical subset of patients is highly prone to posterior skin breakdown over the displaced tuberosity fragment. Risk factors include:
- Non-fall mechanisms of injury (e.g., direct crush).
- Active tobacco use.
- Severe fracture displacement (though necrosis can occur with minimal displacement).
- Delayed clinical presentation.
If threatened soft tissue (blanching or skin tenting) is recognized, prompt surgical intervention is mandatory. Failure to urgently reduce the tuberosity fragment relieves the pressure on the posterior skin can lead to full-thickness necrosis, requiring complex soft tissue coverage (free flaps) or, in severe cases, amputation.
CLOSURE AND POSTOPERATIVE PROTOCOL
Intraoperative Imaging and Closure
Before closure, obtain strict axial, lateral, and Broden's views using fluoroscopy to confirm anatomic reduction of the posterior facet, restoration of Bohler's and Gissane's angles, and appropriate hardware placement without intra-articular penetration.
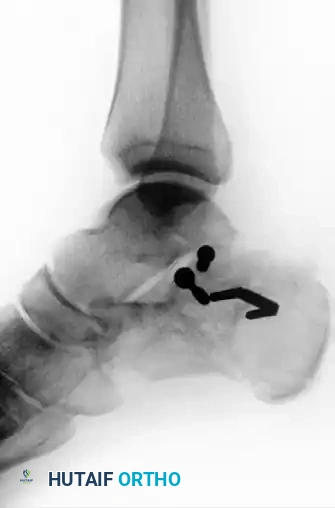
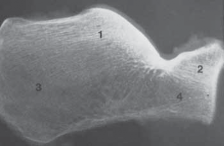
Figure 88-11D: Postoperative axial radiograph confirming restoration of heel width and correction of varus malalignment.
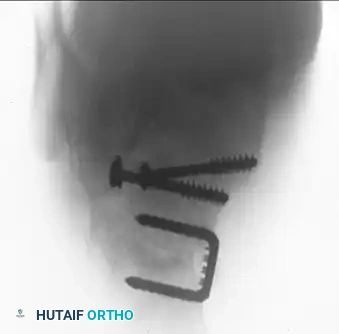
Figure 88-11E: Postoperative lateral radiograph demonstrating restoration of Bohler's angle and anatomic reduction of the posterior facet.
Lavage both wounds copiously with sterile saline. Deflate the tourniquet and achieve meticulous hemostasis. Close the wounds in layers, ensuring a tension-free skin closure. A closed suction drain may be left under the lateral flap to prevent hematoma accumulation, which can compromise wound healing.
Postoperative Care
- Immobilization: Apply a well-padded, bulky Jones dressing from the toes to the tibial tuberosity, reinforced with a short-leg splint or cast in neutral dorsiflexion.
- Elevation: Strict limb elevation above the level of the heart is mandatory for the first 72 hours to mitigate edema and protect the incisions.
- Wound Management: Sutures are typically removed at 3 weeks postoperatively, provided the incisions are fully epithelialized.
- Rehabilitation: Once the wounds are healed, initiate gentle active and active-assisted range of motion (ROM) exercises for the ankle and subtalar joints.
- Weight-Bearing: Strict non-weight-bearing (NWB) status is maintained for 8 to 12 weeks postoperatively. The exact duration depends on the severity of the initial comminution, the patient's bone quality, and the radiographic evidence of clinical union. Progressive weight-bearing in a CAM boot is initiated only after bridging trabeculae are visualized on follow-up radiographs.
You Might Also Like