Mastering Open Reduction and Internal Fixation of Calcaneal Fractures
Key Takeaway
Open reduction and internal fixation (ORIF) of calcaneal fractures via the extensile lateral approach is the gold standard for displaced intra-articular patterns. This technique, popularized by Benirschke and Sangeorzan, utilizes a full-thickness subperiosteal flap to preserve the lateral soft tissue envelope. Precise anatomical reduction of the posterior facet, restoration of calcaneal height, width, and alignment, followed by rigid plate fixation, are critical to optimizing functional outcomes and minimizing post-traumatic subtalar arthrosis.
INTRODUCTION TO CALCANEAL FRACTURE MANAGEMENT
Intra-articular fractures of the calcaneus represent one of the most challenging injuries in orthopedic trauma. Historically fraught with high complication rates, the management of these fractures was revolutionized by the advent of the extensile lateral approach and the principles of rigid internal fixation popularized by Benirschke and Sangeorzan. The primary goals of operative intervention are the anatomical restoration of the posterior facet of the subtalar joint, the reconstitution of calcaneal height and width, the correction of varus malalignment of the tuberosity, and the decompression of the subfibular space to prevent peroneal tendon impingement.
This comprehensive guide details the surgical technique for the Open Reduction and Internal Fixation (ORIF) of calcaneal fractures, providing a step-by-step academic framework for orthopedic surgeons, fellows, and residents.
PREOPERATIVE CONSIDERATIONS AND TIMING
The timing of surgical intervention is arguably the most critical factor in preventing devastating soft tissue complications, such as flap necrosis and deep infection. Surgery must be delayed until the initial soft tissue swelling has subsided.
Clinical Pearl: The Wrinkle Test
Never proceed with an extensile lateral approach until the "wrinkle test" is positive. The return of normal skin creases on the lateral aspect of the hindfoot indicates that the interstitial edema has resolved sufficiently to allow for safe surgical incision and subsequent closure without undue tension. This typically requires 10 to 21 days post-injury.
Imaging and Templating
Standard preoperative imaging must include:
* Radiographs: Lateral, axial (Harris), and anteroposterior (AP) views of the foot, alongside Broden’s views to assess the posterior facet.
* Computed Tomography (CT): Fine-cut (1-2 mm) axial, coronal, and sagittal reconstructions are mandatory. CT imaging allows for the classification of the fracture (e.g., Sanders Classification) and the precise mapping of the fracture lines, particularly the primary fracture line dividing the sustentacular (constant) fragment from the tuberosity.
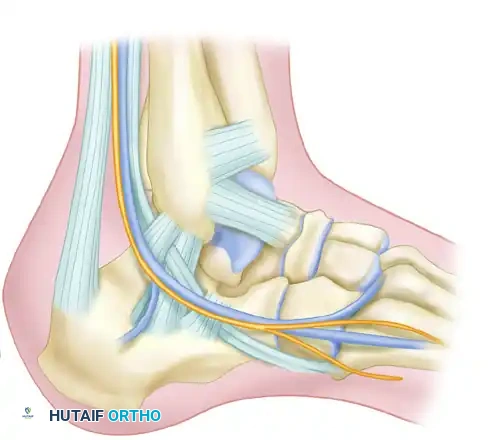
SURGICAL ANATOMY AND BIOMECHANICS
Understanding the vascular anatomy of the lateral hindfoot is paramount. The lateral calcaneal artery, a terminal branch of the peroneal artery, supplies the lateral skin flap. The extensile lateral approach is designed as a full-thickness, subperiosteal flap to protect this delicate angiosome.
The sural nerve courses along the lateral aspect of the hindfoot and is at risk during both the proximal and distal extensions of the incision. The peroneal tendons (brevis and longus) lie within the surgical field and must be elevated en bloc within the soft tissue flap to prevent iatrogenic injury or postoperative subluxation.
Biomechanically, the calcaneus functions as the posterior pillar of the longitudinal arch. Loss of calcaneal height (decreased Böhler’s angle) and widening of the heel lead to a shortened Achilles lever arm, resulting in profound push-off weakness and altered gait mechanics.
SURGICAL TECHNIQUE: THE EXTENSILE LATERAL APPROACH
Patient Positioning and Preparation
- Administer prophylactic intravenous antibiotics prior to tourniquet inflation.
- Place the patient in a true lateral decubitus position on a radiolucent table. A bean bag is highly effective for maintaining this position.
- Pad all bony prominences, particularly the contralateral peroneal nerve.
- Apply a well-padded thigh tourniquet.
- Prepare and drape the limb to allow free manipulation of the knee, ankle, and foot.
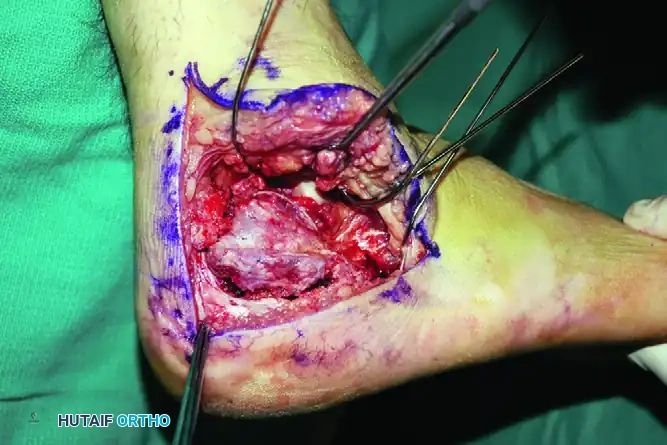
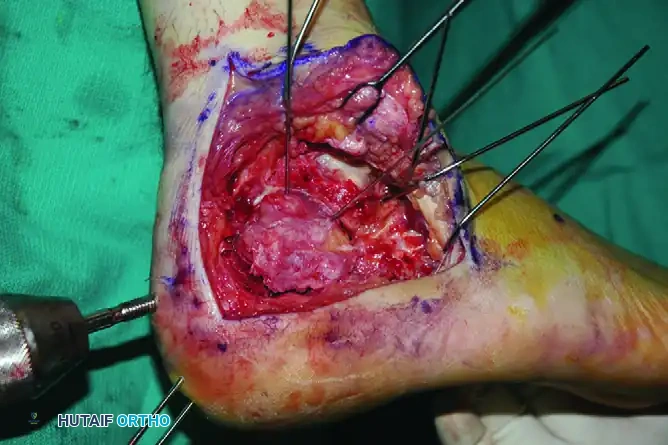
Incision and Flap Elevation
The extensile lateral approach provides unparalleled access to the lateral wall, posterior facet, and calcaneocuboid joint.
- Incision Design: Outline the anatomical landmarks. The vertical limb of the incision is placed just anterior to the lateral border of the Achilles tendon. The horizontal limb is placed in the glabrous skin junction, parallel to the plantar surface of the foot.
- Execution: Carry the incision directly down to the periosteum of the lateral calcaneal wall in a single, decisive stroke.
- Sural Nerve Protection: Crucial Step. Do not perform blunt soft tissue dissection in the midportion of the wound. The sural nerve crosses the incision at its proximal and distal ends; meticulous, sharp soft tissue dissection should be reserved strictly for these terminal areas to identify and protect the nerve.
The "No-Touch" Retraction Technique
Gently retract the corner of the flap while initiating subperiosteal dissection along the lateral wall.
Surgical Warning: Flap Viability
It is essential to follow the contours of the blown-out lateral wall. Do not stray into the subcutaneous soft tissues, as this will damage the peroneal tendons and compromise the vascularity of the flap. The peroneal tendons and the sural nerve must remain contained within the full-thickness flap.
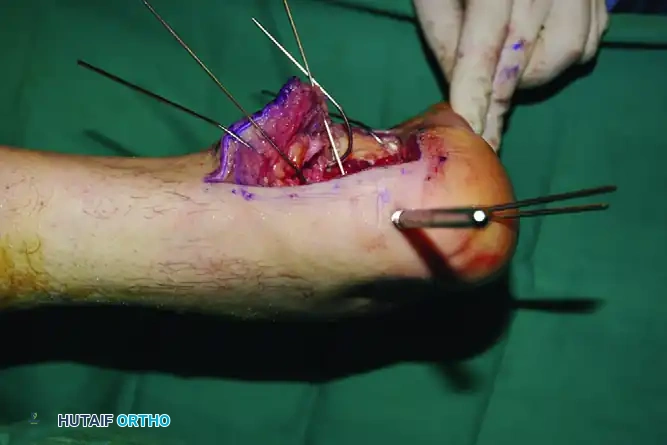
Elevate the entire flap en bloc. To maintain exposure without causing crush injury to the flap edges (which occurs with self-retaining retractors), utilize the "no-touch" Kirschner wire (K-wire) retraction technique.
- Place stout K-wires (1.6 mm or 2.0 mm) longitudinally into the fibula, the lateral aspect of the talus neck, and the cuboid.
- Bend these wires backward to act as a scaffold, gently holding the full-thickness flap out of the surgical field. Once secured, the flap does not need to be touched again for the remainder of the procedure, drastically reducing the risk of marginal necrosis.
- Expose the entire lateral wall of the calcaneus distally to the calcaneocuboid joint. If necessary, carry the dissection above and below the peroneal tendons at the level of the calcaneocuboid joint to ensure complete visualization.
FRACTURE REDUCTION SEQUENCE
The reduction of a calcaneal fracture is a sequential, three-dimensional puzzle. The medial sustentacular fragment remains firmly attached to the talus via the deltoid and talocalcaneal ligaments; it is the "constant fragment" to which the rest of the calcaneus must be reduced.
Step 1: Lateral Wall Mobilization
Once exposure is complete, the blown-out lateral wall fragment will block direct observation of the depressed posterior facet.
* Carefully osteotomize or mobilize the lateral wall.
* Remove it from the surgical field and place it in a secure location on the back table (e.g., wrapped in a moist saline sponge) for later replacement.
* Do not attempt to reduce the posterior facet immediately. Room must first be created by disimpacting the tuberosity.
Step 2: Reduction of the Anterior Process
If a fracture line separates the anterior process from the sustentacular fragment, this must be addressed early.
- Reduce the anterior process to the sustentacular fragment. This maneuver restores the longitudinal axis of the calcaneus and allows for better exposure of the relationship between the medial sustentacular complex and the lateral structures (posterior facet and tuberosity).
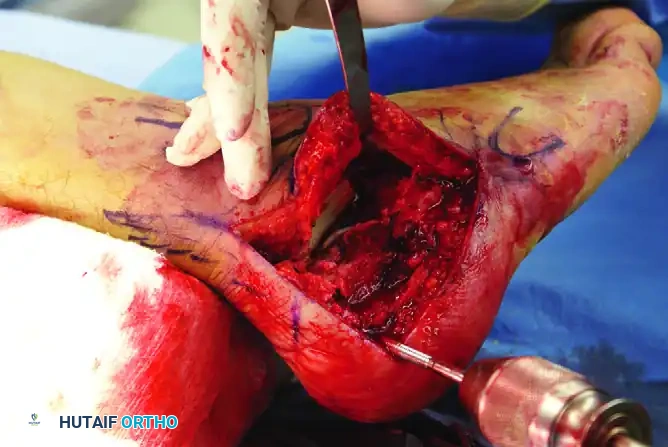
Step 3: Tuberosity Disimpaction and Alignment
The tuberosity is typically displaced superiorly, anteriorly, and into varus. Reduction is achieved indirectly.
- Insert a large, threaded Steinmann pin (or a 5.0 mm Schanz pin) transversely into the posteroinferior aspect of the tuberosity fragment, driving it from lateral to medial.
- Use this pin as a "joystick" to manipulate the tuberosity. Apply axial traction to restore length, plantarflex the fragment to restore height (Böhler’s angle), and translate it laterally to correct the varus deformity.
- Once the tuberosity is reduced to the constant sustentacular fragment, secure it with provisional fixation using axially directed K-wires introduced from the non-weight-bearing portion of the heel directly into the sustentacular fragment.
Step 4: Posterior Facet Reduction
With the calcaneus now out to length and the varus corrected, turn your attention to the intra-articular depression of the posterior facet.
- Elevate the depressed articular fragments of the posterior facet.
- Reduce them anatomically to the intact medial piece (sustentaculum tali).
- Hold the articular reduction with provisional subchondral K-wires.
- Radiographic Verification: Obtain intraoperative fluoroscopic views (Broden’s views, lateral, and axial) to assess the overall reduction, ensuring no articular step-off remains and that the hardware does not penetrate the subtalar joint.
Step 5: Defect Management
Elevating the severely impacted posterior facet often leaves a large void in the cancellous bone of the calcaneal body (the neutral triangle).
* If excellent stability of the fracture and secure internal fixation are achieved, this defect may be accepted and left empty, as it will fill with hematoma and eventually consolidate.
* Alternatively, structural autograft (iliac crest), allograft, or osteoconductive bone cement (calcium phosphate) can be utilized to fill the void and provide subchondral support, particularly in highly comminuted fractures or osteoporotic bone.
INTERNAL FIXATION STRATEGY
Following provisional K-wire fixation, definitive rigid internal fixation is applied.
Sustentacular Lag Screw Fixation
The cornerstone of calcaneal fixation is securing the lateral fragments to the intact medial sustentacular fragment.
* Insert small cortical lag screws (3.5 mm) from lateral to medial, directed into the sustentacular fragment.
* Trajectory: The screws should be aimed slightly plantar and anterior, targeting the medial malleolus, to ensure they capture the dense bone of the sustentaculum without breaching the medial cortex and endangering the flexor hallucis longus (FHL) tendon or the neurovascular bundle.
Lateral Plate Application
Replace the lateral wall along the outer edge of the posterior facet. Fixation should take advantage of the known anatomy, specifically the thickened bone in the thalamic portion supporting the posterior facet.
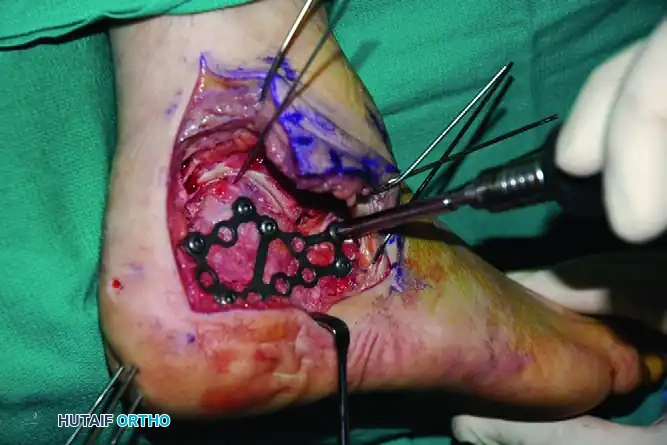
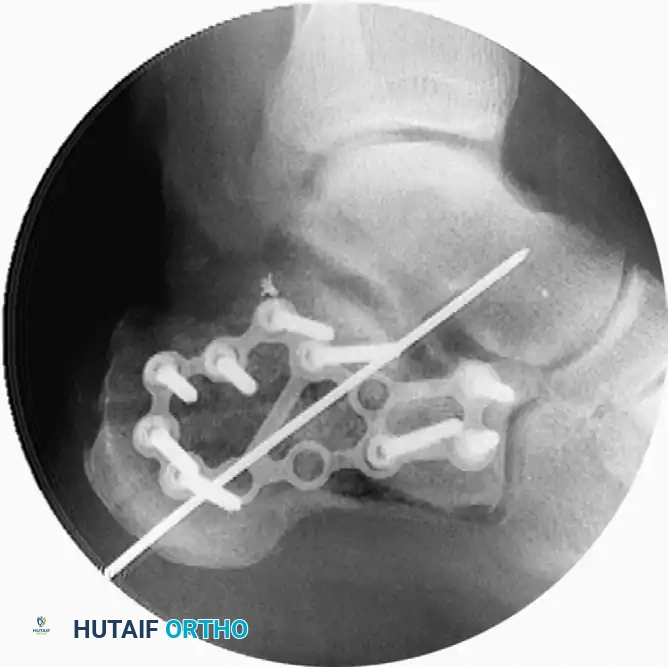
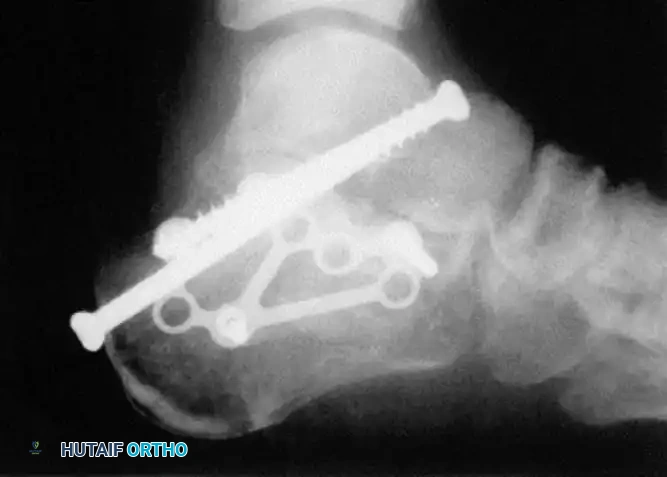
- Apply a low-profile, anatomically contoured lateral calcaneal plate. The plate should extend from the anterior process of the calcaneus into the most posterior aspect of the tuberosity.
- The plate functions as a neutralization device to maintain the neutral alignment of the calcaneus.
Pitfall: Iatrogenic Varus
When contouring the plate, be extremely careful not to fix the heel in varus. An intraoperative axial (Harris) view must be obtained to confirm neutral or slight valgus alignment before final application of the plate.
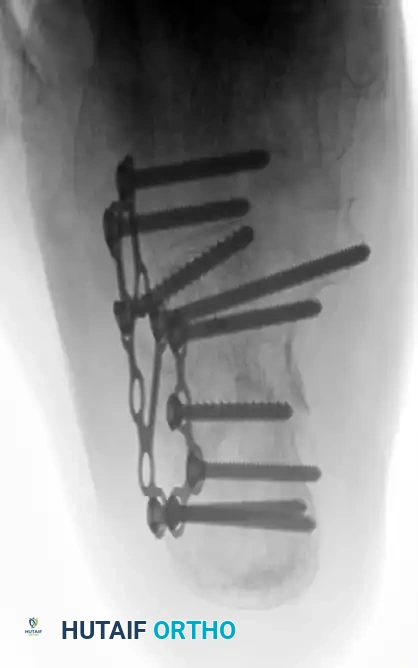
- Screw Placement:
- Whenever possible, direct screws through the plate into the sustentacular fragment for maximal pull-out strength.
- Place the most anterior screws into the subchondral bone supporting the calcaneocuboid articular surface.
- Place the most posterior screws into the thickened cortical bone at the posterior aspect of the calcaneal tuberosity.
- Contour the plate into a “frown” shape (concave plantarly) to match the lateral wall anatomy, and fill the remaining holes to ensure a rigid construct.
Primary Subtalar Arthrodesis (Sanders IV)
In cases of severe, highly comminuted intra-articular fractures (Sanders Type IV) where anatomical reconstruction of the posterior facet is impossible, primary subtalar arthrodesis may be the most appropriate treatment.
- Even in primary arthrodesis, the calcaneus must be brought out to length, height, and neutral alignment using the techniques described above.
- The articular cartilage of the posterior facet and the inferior talus is denuded, bone graft is applied, and large cannulated screws (6.5 mm or 7.3 mm) are passed from the calcaneal tuberosity into the body of the talus to achieve rigid compression.
CLOSURE AND POSTOPERATIVE PROTOCOL
Meticulous closure is as critical as the bony reduction to prevent catastrophic wound breakdown.
Wound Closure
- Deflate the tourniquet prior to closure to achieve meticulous hemostasis.
- Place a closed suction drain deep to the flap, exiting proximally.
- Perform a layered closure. The periosteum and subcutaneous tissues are closed with absorbable sutures (e.g., 2-0 Vicryl) using an inverted technique.
- The skin is closed with non-absorbable nylon using a modified Donati (Allgöwer-Donati) vertical mattress technique to minimize tension on the epidermal edges.
- Apply a bulky, sterile, non-adherent dressing and a well-padded short-leg splint in neutral dorsiflexion.
Postoperative Care and Rehabilitation
- Immediate Post-op: The closed suction drain is maintained for 24 to 48 hours. Strict icing and elevation protocols (toes above the level of the nose) must be maintained to minimize swelling, pain, and blistering.
- 2 Weeks: At the second postoperative week, the splint and sutures are removed. If the flap demonstrates uncomplicated healing and the wound is completely sealed, active range of motion (ROM) of the ankle and subtalar joint is instituted.
- Rehabilitation Pearl: Instruct patients to "draw the alphabet" with the hallux of their injured limb or make progressively larger circles with their feet to prevent subtalar stiffness.
- Weight-Bearing Status: Strict non-weight-bearing (NWB) is enforced for a minimum of 10 to 12 weeks to prevent hardware failure and loss of reduction. Protection is provided by a removable posterior splint or a controlled ankle motion (CAM) boot.
- 10 to 12 Weeks: Progressive weight-bearing is instituted based on radiographic evidence of clinical union. Extensive physical therapy is initiated to maximize gait mechanics and peroneal strength.
- Hardware Removal: Routine hardware removal is not indicated. However, if the lateral plate becomes symptomatic (e.g., peroneal tendon irritation or prominent screws), hardware can be safely removed after 1 year, provided complete bony consolidation has occurred.
You Might Also Like

