Knee Disarticulation: Comprehensive Surgical Techniques and Protocols
Key Takeaway
Knee disarticulation provides an excellent end-bearing stump with a long lever arm, ideal for specific pediatric, traumatic, and non-ambulatory patients. This guide details the standard anterior-posterior flap approach, the Mazet and Hennessy condylar remodeling technique for improved prosthetic cosmesis, and the Kjøble medial-lateral flap modification designed to optimize wound healing in ischemic limbs.
INTRODUCTION TO KNEE DISARTICULATION
Knee disarticulation is a highly specialized level of lower extremity amputation that, when executed correctly, results in an exceptionally durable, end-bearing stump. Historically, this procedure was met with resistance due to the cosmetic challenges of fitting a prosthesis over the bulbous femoral condyles and the lack of sophisticated prosthetic knee joints. However, the advent of newer socket designs and advanced polycentric prosthetic knee mechanisms that provide dynamic swing-phase control have largely eliminated these historical complaints.
Today, knee disarticulation is recognized as a highly functional amputation level. As originally articulated by Rogers, the biomechanical and anatomical advantages of this procedure are threefold:
1. The large, naturally contoured end-bearing surfaces of the distal femur are preserved and covered by soft tissues inherently suited for weight-bearing.
2. The preservation of the entire femoral length creates a powerful, long lever arm controlled by intact, strong pelvic and thigh musculature.
3. The resulting stump provides exceptional rotational stability within the prosthetic socket due to the asymmetrical, bulbous nature of the femoral condyles.
Despite these advantages, the application of knee disarticulation requires meticulous patient selection. While its benefits in pediatric and young adult populations are unequivocal, its use in elderly patients—particularly those with severe peripheral ischemia—has been historically limited. The traditional technique requires long fasciocutaneous flaps that are highly susceptible to necrosis in the dysvascular limb. Furthermore, in cases of severe high-energy trauma, the lack of viable musculature in the zone of injury can compromise the soft-tissue envelope, making a shorter transtibial or transfemoral amputation more reliable.
Clinical Pearl: Pinzur and Bowker highlighted that knee disarticulation is the ideal amputation level for non-ambulating patients. The preserved femoral length provides superior sitting balance and support, while simultaneously eliminating the risk of knee flexion contractures and distal stump ulcerations that frequently plague short transtibial amputees.
PREOPERATIVE PLANNING AND BIOMECHANICS
Biomechanical Advantages
The biomechanics of a knee disarticulation stump are vastly superior to those of a transfemoral amputation. Because the adductor magnus insertion at the adductor tubercle is preserved, the normal anatomical axis of the femur is maintained. This prevents the characteristic abduction drift often seen in transfemoral amputees, thereby optimizing the biomechanics of the abductor mechanism during the stance phase of gait. Furthermore, the intact distal femoral epiphysis in pediatric patients ensures continued longitudinal growth of the femur, preventing the complication of terminal bony overgrowth common in transosseous amputations.
Patient Selection and Vascular Considerations
In patients with peripheral vascular disease, the decision to perform a knee disarticulation versus a transfemoral amputation hinges on vascular perfusion. Transcutaneous oxygen tension (TcPO2) mapping and ankle-brachial indices (ABI) are critical. If the anterior skin perfusion is inadequate to support the long anterior flap required for the standard technique, surgeons must pivot to modified approaches, such as the Kjøble medial-lateral flap technique, which relies on the more robust collateral genicular circulation.
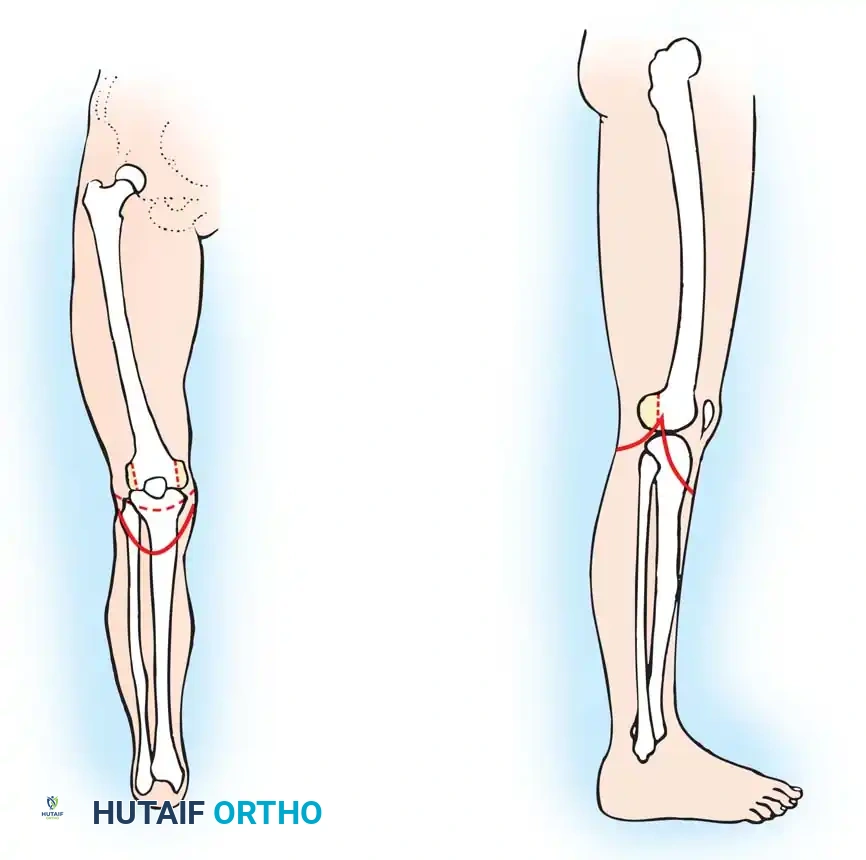
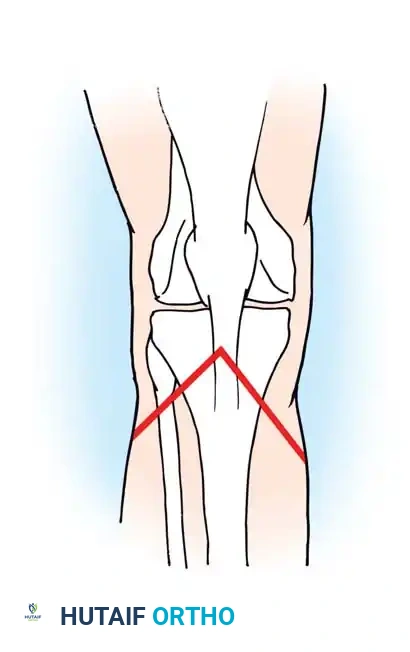
SURGICAL TECHNIQUE 11-3: THE STANDARD ANTERIOR-POSTERIOR FLAP
The standard knee disarticulation utilizes a long anterior flap and a short posterior flap. This approach places the surgical scar posteriorly, away from the primary distal weight-bearing surface.
Flap Design and Incision
- Anterior Flap: Measure from the inferior pole of the patella. Fashion a long, broad anterior flap with a length approximately equal to the anteroposterior diameter of the knee.
- Posterior Flap: Measure from the level of the popliteal crease. Fashion a short posterior flap equal in length to one-half the diameter of the knee. Ensure the medial and lateral apices of the flaps meet precisely at the level of the medial and lateral tibial condyles.
Deep Dissection and Joint Exposure
- Deepen the anterior incision directly through the deep fascia down to the bone.
- Dissect the anterior flap proximally, elevating it from the tibia and adjacent musculature. It is critical to include the insertion of the patellar tendon and the pes anserinus within this anterior flap to preserve the extensor mechanism and medial stabilizers.
- Expose the knee joint by sharply dissecting the capsule from the anterior and lateral margins of the tibia.
- Divide the anterior and posterior cruciate ligaments at their tibial insertions. Proceed to dissect the posterior capsule away from the posterior proximal tibia.
Neurovascular Management
- Tibial and Common Peroneal Nerves: Identify the tibial nerve and the common peroneal nerve in the popliteal fossa. Apply gentle distal traction, ligate them sharply, and allow them to retract deep into the proximal thigh musculature, well away from the distal weight-bearing surface and the prosthetic socket interface.
- Popliteal Vessels: Meticulously isolate the popliteal artery and vein. Doubly ligate them with heavy non-absorbable suture and divide them.
Surgical Warning: Inadequate retraction of the tibial or peroneal nerves is a primary cause of debilitating stump neuromas. Ensure the nerves are transected under tension so they retract at least 5 to 7 cm proximal to the joint line.
Amputation and Closure
- Free the biceps femoris tendon from its insertion on the fibular head. Complete the amputation posteriorly by dividing the remaining gastrocnemius origins and soft tissues, and remove the leg.
- Cartilage Preservation: Do not excise the patella or attempt to arthrodese it to the femoral condyles. The articular cartilage of the femoral condyles and the patella must remain undisturbed to serve as a smooth, natural weight-bearing surface. Perform a synovectomy only if there is a specific pathological indication (e.g., inflammatory arthritis).
- Myodesis/Tenodesis: Suture the patellar tendon directly to the remnants of the cruciate ligaments. Suture the remnants of the gastrocnemius muscle to the soft tissue in the intercondylar notch to provide a robust distal soft-tissue pad.
- Place a through-and-through Penrose or closed-suction drain deep in the wound.
- Close the deep fascia and subcutaneous tissues with interrupted absorbable sutures. Close the skin edges with interrupted non-absorbable sutures or surgical staples.
Pitfall Management: If there is insufficient skin for a tension-free closure, do not risk ischemic necrosis of the flaps. Instead, resect the posterior projecting portions of the femoral condyles to reduce bony bulk. If the wound fails to heal primarily, conservative management is often successful; the wound typically granulates and heals without the need for proximal reamputation.
SURGICAL TECHNIQUE 11-4: MAZET AND HENNESSY CONDYLAR REMODELING
While the standard knee disarticulation preserves the bulbous condyles for suspension, this anatomy can create significant cosmetic challenges, particularly in female patients or those desiring a highly streamlined prosthesis. Mazet, Hennessy, and others developed techniques to reduce the bony bulk of the distal femur while retaining the weight-bearing and rotational control features of the stump.
By remodeling the condyles, prosthetic tolerances within the socket are increased, greater adduction of the stump is permitted during prosthetic alignment, and the decreased bulk facilitates easier application and removal of the prosthesis.
Incision and Exposure
- Fashion a standard "fish-mouth" skin incision. Make the anterior flap longer, extending approximately 10 cm distal to the level of the knee joint. Make the posterior flap shorter, extending only about 2.5 cm distal to the joint line.
- Reflect the skin and deep fascial flaps well proximal to the femoral condyles to expose the entire distal femoral articulation.
- Divide the patellar tendon midway between the inferior pole of the patella and the tibial tuberosity.
- Flex the knee to 90 degrees. Section the medial and lateral collateral ligaments, followed by the anterior and posterior cruciate ligaments.
Neurovascular and Soft Tissue Release
- With the knee maintained in 90 degrees of flexion, identify, isolate, and doubly ligate the popliteal vessels.
- Isolate the tibial and common peroneal nerves, apply traction, and divide them sharply to allow proximal retraction.
- Detach the hamstring muscles (semimembranosus, semitendinosus, biceps femoris) from their tibial and fibular insertions. Remove the amputated leg.
- Carefully dissect the patella from the extensor mechanism and discard it. The patella is not retained in the Mazet technique.
Condylar Remodeling (Osteotomies)
- Medial Condyle: Drive a wide, sharp osteotome vertically in a proximal direction through the medial femoral condyle, aiming to emerge at the level of the adductor tubercle. Start this osteotomy along a line extending from the medial articular margin anteriorly to the midpoint of the distal articular surface posteriorly (accounting for the wider posterior dimension of the condyle). Discard the medial half of the condyle.
- Lateral Condyle: Resect the lateral portion of the lateral femoral condyle in a similar vertical fashion. Start the cut at the junction of the medial two-thirds and lateral one-third of the distal articular surface.
- Posterior Condyles: Direct attention to the posterior aspect of both remaining condylar segments. Resect the posterior projecting bone via a vertical osteotomy in the frontal (coronal) plane. Start this cut at the exact point where the condyles begin to curve sharply superiorly and posteriorly.
- Contouring: Using a heavy rasp, smoothly round all sharp bony prominences and osteotomy edges. Crucially, do not disturb the remaining articular cartilage on the distal weight-bearing surface. The resulting construct provides a broad weight-bearing area, while the lateral, medial, and posterior projections have been eliminated.
Closure
- Draw the patellar tendon down and suture it securely to the hamstring tendons within the intercondylar notch under slight tension. This creates a stable myodesis over the distal femur.
- Insert closed-suction drains at the medial and lateral extents of the wound.
- Close the deep fascia and the skin in separate, meticulous layers to ensure a watertight seal.
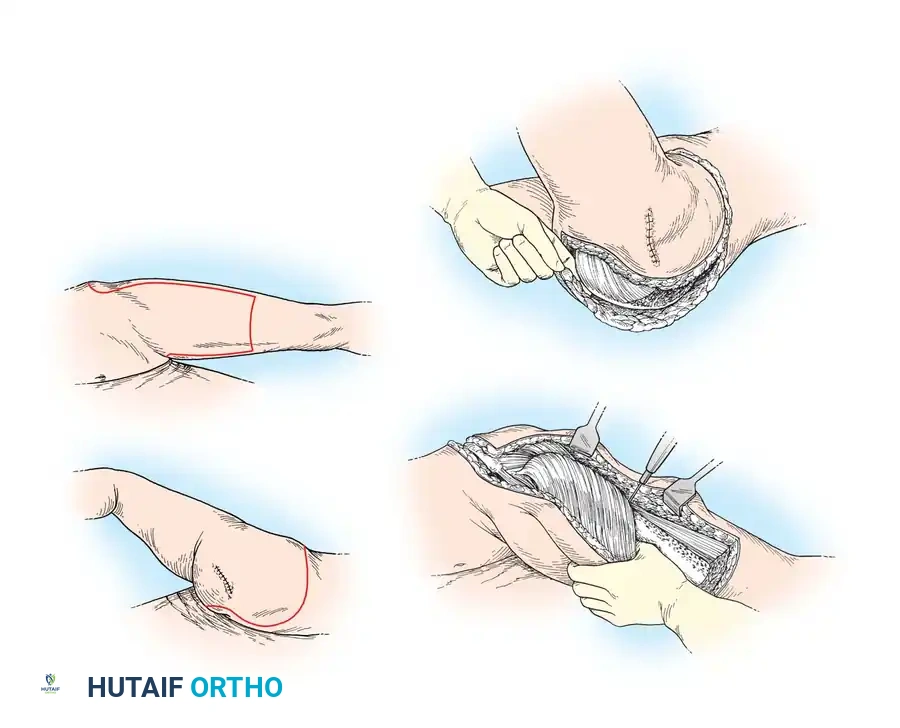
SURGICAL TECHNIQUE 11-5: THE KJØBLE MEDIAL AND LATERAL FLAP TECHNIQUE
In patients with severe peripheral vascular disease or ischemia, the long anterior flap of the standard technique is highly prone to distal tip necrosis. Kjøble, along with Jensen and Paulsen, described a modified approach utilizing sagittal (medial and lateral) skin flaps. Because the vascular supply to the medial and lateral aspects of the knee (via the genicular collateral circulation) is often superior to the anterior cutaneous supply, this technique significantly improves primary healing rates in ischemic limbs.
Positioning and Flap Design
- Positioning: Place the patient in the prone position on the operating table. This provides unparalleled access to the popliteal fossa for vascular control and facilitates the creation of the posterior junction of the flaps.
- Flap Outline: Outline a lateral flap that is equal in length to one-half the anteroposterior diameter of the knee. Outline a medial flap that is 2 to 3 cm longer than the lateral flap. This asymmetry is critical to allow adequate, tension-free coverage over the larger, more prominent medial femoral condyle.
- Incision: Begin the incision anteriorly, just distal to the lower pole of the patella. Extend it distally to the tibial tuberosity. From the tuberosity, curve the incision medially to form the medial flap, and laterally to form the lateral flap.
- Carry both incisions posteriorly, curving them proximally to meet in the posterior midline of the limb at a point exactly 2.5 cm proximal to the joint line.
Dissection and Amputation
- Deepen the incisions directly through the subcutaneous tissue and deep fascia down to the bone. Elevate the full-thickness fasciocutaneous flaps.
- Divide the patellar tendon at its insertion on the tibial tuberosity. Release the medial hamstring tendons (pes anserinus) and the lateral hamstring tendon (biceps femoris) at their respective insertions.
- Divide the medial and lateral collateral ligaments, followed by the anterior and posterior cruciate ligaments.
- Divide the posterior joint capsule. Expose the popliteal fossa. Doubly ligate and divide the popliteal artery and vein.
- Identify the tibial and common peroneal nerves. Apply traction and sharply transect them so their cut ends retract well proximal to the distal end of the stump.
- Release the medial and lateral heads of the gastrocnemius from their origins on the posterior distal femur. Divide any remaining soft-tissue tethers and remove the leg.
Reconstruction and Closure
- Draw the patellar tendon and the hamstring tendons into the intercondylar notch. Suture them to each other and to the robust remnants of the cruciate ligaments to establish a secure distal soft-tissue envelope.
- Approximate the medial and lateral skin edges. Because the flaps are sagittal, the resulting scar will run longitudinally across the distal end of the stump, resting securely in the intercondylar notch where it is protected from direct end-bearing pressure.
- Close the skin with interrupted non-absorbable sutures or staples, ensuring absolute minimal tension on the ischemic skin edges.
POSTOPERATIVE PROTOCOL AND REHABILITATION
The postoperative management of a knee disarticulation is critical for shaping the stump and preparing the patient for prosthetic ambulation.
Dressings and Immediate Care
If a conventional approach is desired, a sterile soft dressing combined with a compressive elastic wrap may be applied. However, the preferable, evidence-based treatment is the application of a rigid dressing or an immediate postoperative prosthesis (IPOP) cast.
A rigid dressing consists of a properly padded fiberglass or plaster cast extending proximally to the groin. It must be securely suspended by compressive contouring of the cast in the supracondylar area, utilizing the natural bulbous shape of the condyles. Alternatively, a waist belt or suspension strap can be utilized. Rigid dressings significantly reduce postoperative edema, protect the wound from trauma, and prevent knee flexion contractures in the event that a short transfemoral amputation was performed instead.
Weight-Bearing and Prosthetic Fitting
If early weight-bearing ambulation is pursued, the prosthetic cast must be applied by a certified prosthetist in the operating room.
Because the knee disarticulation stump is composed primarily of bone and tendinous tissue rather than large muscle bellies, postoperative stump shrinkage is minimal compared to transfemoral or transtibial amputations. Consequently, once the surgical wound has healed primarily—typically within 3 to 4 weeks—the patient can often be casted for a definitive, permanent prosthesis much earlier, usually between 6 to 8 weeks postoperatively.
Rehabilitation focuses on core strengthening, maximizing the range of motion of the ipsilateral hip, and gait training utilizing the long femoral lever arm to control the prosthetic knee mechanism.
📚 Medical References
- Knee disarticulation, Clin Orthop Relat Res 361:23, 1999.
- Pinzur MS, Bowker JH, Smith DG, et al: Amputation surgery in peripheral vascular disease, Instr Course Lect 48:687, 1999.
- Pinzur MS, Garla PGN, Pluth T, et al: Continuous postoperative infusion of a regional anesthetic after an amputation of the lower extremity, J Bone Joint Surg 78A:1501, 1996.
- Pinzur MS, Gold J, Schwartz D, et al: Energy demands for walking in dysvascular amputees as related to the level of amputation, Orthopedics 15:1033, 1992.
- Pinzur MS, Sage R, Stuck R, et al: Transcutaneous oxygen as a predictor of wound healing in amputations of the foot and ankle, Foot Ankle 13:271, 1992.
- Pinzur MS, Smith D, Osterman H: Salvage of infected or failed below-knee amputations with total contact casting and continued weight bearing, Orthopedics 11:437, 1988.
- Provost N, Bonaldi VM, Saraazin L, et al: Amputation stump neuroma: ultrasound features, J Clin Ultrasound 25:85, 1997.
- Quigley MJ: Prosthetic management: overview, methods, and materials. In Bowker JH, Michael JW, eds: Atlas of limb prosthetics: surgical, prosthetic, and rehabilitation principles , 2nd ed, St Louis, 1992, Mosby. Quirke TE, Sharma PK, Boss WK, et al: Are type IIIC lower extremity injuries an indication for primary amputation? J Trauma 40:992, 1996.
- Rees RS, Nanney LB, Fleming P, et al: Tissue expansion: its role in traumatic below-knee amputations, Plast Reconstr Surg 77:133, 1986.
- Refaat Y, Gunnoe J, Hornicek F, et al: Comparison of quality of life after amputation or limb salvage, Clin Orthop Relat Res 397:298, 2002.
- Romo HD: Specialized prostheses for activities: an update, Clin Orthop Relat Res 361:63, 1999.
- Rosenberg GA, Patterson BM: Limb salvage versus amputation for severe open fractures of the tibia, Orthopedics 21:343, 1998.
- Rougraff BT, Simon MA, Kneisl JS, et al: Limb salvage compared with amputation for osteosarcoma of the distal end of the femur: a long-term oncological, functional, and qualityof-life study, J Bone Joint Surg 76A:649, 1994.
- Russell WL, Sailors DM, Whittle TB, et al: Limb salvage versus traumatic amputation: a decision based on a seven-part predictive
You Might Also Like