Oblique Tibial Osteotomy: Surgical Technique & Protocol
Key Takeaway
The oblique tibial osteotomy is a powerful surgical technique for correcting complex multiplanar tibial malunions. By utilizing a femoral distractor and precise Schanz pin placement parallel to the proximal and distal articular surfaces, surgeons can achieve simultaneous angular correction and axial lengthening. This comprehensive guide details the preoperative planning, step-by-step surgical execution, and postoperative rehabilitation protocols essential for optimal patient outcomes.
INTRODUCTION TO OBLIQUE TIBIAL OSTEOTOMY
Tibial malunions present a complex reconstructive challenge, frequently involving multiplanar deformities—varus or valgus angulation, procurvatum or recurvatum, rotational malalignment, and axial shortening. The oblique tibial osteotomy, popularized by Sanders et al., is an elegant, highly effective, and biomechanically sound surgical technique designed to address these concurrent deformities through a single osteotomy site.
By utilizing a femoral distractor applied to strategically placed Schanz pins, the surgeon can achieve simultaneous angular correction and axial lengthening. The fundamental principle relies on the geometric relationship between the osteotomy plane and the axis of distraction, allowing the bone segments to slide along the osteotomy cut while maintaining cortical contact, thereby facilitating primary bone healing and immediate structural stability.
This masterclass provides an exhaustive, step-by-step guide to the oblique tibial osteotomy, detailing preoperative planning, precise surgical execution, and evidence-based postoperative protocols.
PREOPERATIVE PLANNING AND BIOMECHANICS
Successful execution of an oblique tibial osteotomy requires meticulous preoperative templating. The surgeon must quantify the exact degree of angular deformity in the coronal and sagittal planes, the rotational profile, and the leg length discrepancy (LLD).
Deformity Analysis
- Mechanical Axis Evaluation: Full-length, standing anteroposterior (AP) and lateral radiographs of both lower extremities are mandatory. The Center of Rotation of Angulation (CORA) must be identified.
- Osteotomy Angle Calculation: The angle of the osteotomy in the coronal plane dictates the ratio of angular correction to axial lengthening.
- Templating: Using angle templates, the exact trajectory of the saw cut is mapped. If pure angular correction is required without lengthening, an angle of 30 to 45 degrees in the coronal plane is optimal to provide sufficient surface area for interfragmentary lag screw fixation. If axial lengthening is required, the angle between the osteotomy and the tibial axis must be decreased to allow the segments to slide apart lengthwise while remaining in contact.
Clinical Pearl: Cuts made at angles of less than 20 degrees to the coronal axis are technically impossible to perform with standard oscillating saws and fail to provide adequate cortical contact for stable fixation.
PATIENT POSITIONING AND PREPARATION
Optimal positioning and neuromonitoring are critical, particularly when axial lengthening is planned, as stretching of the peroneal and tibial nerves poses a significant risk.
- Neuromonitoring: If axial lengthening is planned, place electrodes for the continuous measurement of somatosensory evoked potentials (SSEPs) prior to prepping.
- Positioning: Place the patient supine on a radiolucent operating table.
- Tourniquet Application: Place a pneumatic tourniquet on the proximal part of the thigh.
- Draping: Prepare and drape both legs entirely free. This allows for real-time intraoperative clinical comparison of length, alignment, and rotation after the correction is achieved.
SURGICAL TECHNIQUE: STEP-BY-STEP EXECUTION
1. Schanz Pin Placement
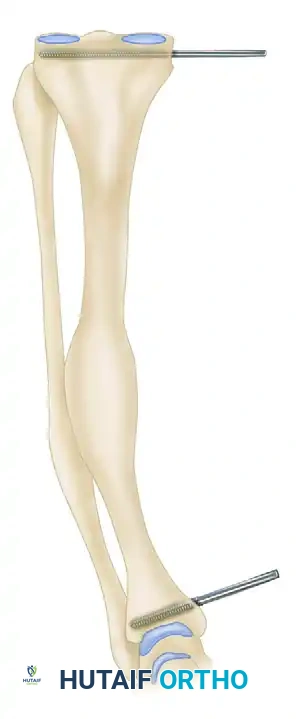
The entire geometry of the correction relies on the precise placement of the proximal and distal Schanz pins. These pins act as the reference axes for the femoral distractor.
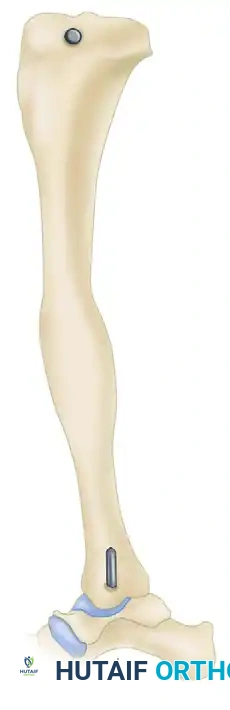
- Under strict fluoroscopic control, insert a 6-mm Schanz pin into the proximal tibial metaphysis. This pin must be absolutely parallel to the proximal tibial articular surface in the coronal plane.
- Similarly, place a second 6-mm Schanz pin into the distal tibial metaphysis. This pin must be absolutely parallel to the tibial plafond.
2. Fibular Osteotomy
The intact fibula acts as a lateral tether, preventing both angular correction and axial lengthening.
- If lengthening is planned, or if the fibula interferes with the correction of the tibia, perform an oblique fibular osteotomy.
- Ideally, this should be executed at the exact level of the proposed site of the tibial osteotomy to allow harmonious translation.
3. Surgical Exposure of the Tibia
- Exsanguinate the operative leg with an Esmarch or pressure bandage.
- Inflate the proximal thigh tourniquet to 300 mm Hg (39.99 kPa) and remove the pressure bandage.
- Make a standard anterior extensile incision over the tibial crest to expose the diaphysis.
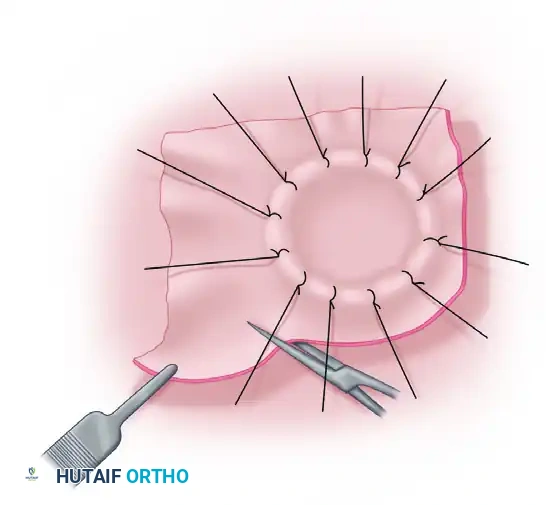
- Identify the area of malunion. Perform a meticulous subperiosteal dissection to elevate all soft tissues from the area.
- Place Hohmann retractors medially and laterally to protect the neurovascular structures during the saw cut.
4. Callus Resection and Bone Graft Harvesting
- While the tibia is still structurally intact, sculpt the bone to remove excess malunion callus.
- Crucial Step: Save all removed bone. This autologous bone will be used later as a local graft to pack around the osteotomy site, enhancing osteogenesis.
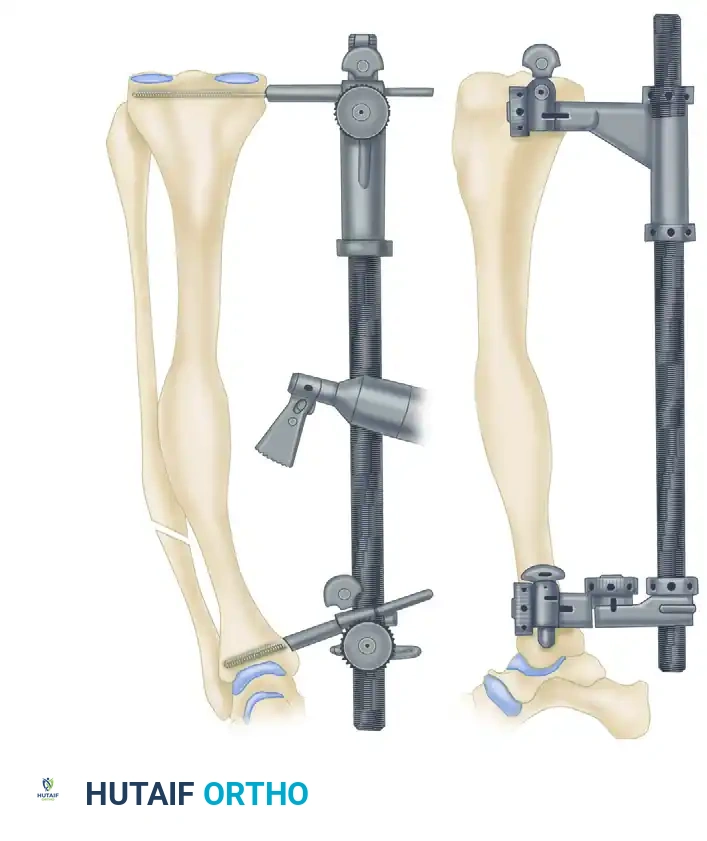
5. Application of the Femoral Distractor
- Apply a femoral distractor (e.g., Synthes USA, Paoli, PA) over the previously placed 6-mm Schanz pins.
- Distractor Configuration: Lock the universal joint of the distractor, but leave the rotational joint open. This specific configuration is the biomechanical key to the procedure, allowing translation and rotation during distraction.
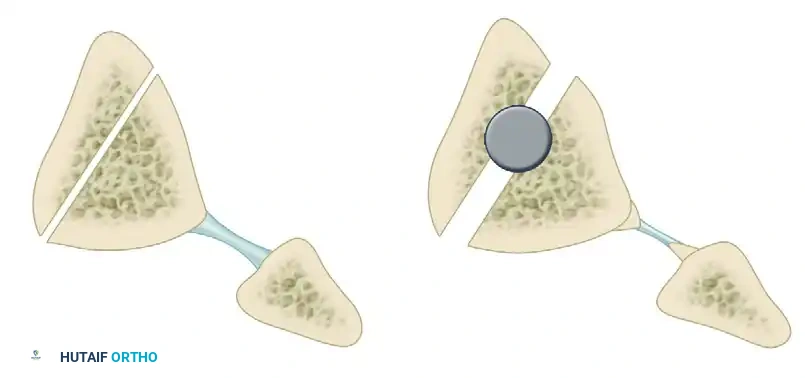
6. The Oblique Tibial Osteotomy
- Make the tibial osteotomy with a single, clean cut perpendicular to the plane of maximal deformity.
- If lengthening is NOT needed: Hold the oscillating saw at an angle of 30 to 45 degrees in the coronal plane. This ensures enough bone on either side of the cut to overlap and be lagged together securely.
- If lengthening IS needed: The exact amount of axial lengthening (in millimeters) must have been determined preoperatively. Obtain this length by decreasing the angle between the osteotomy and the axis of the tibia in the coronal plane. This allows the bones to slide apart lengthwise at the cut while remaining in intimate contact.
- Mark the preoperatively determined angle on the bone using a sterile marking pen and angle templates from an angled blade plate instrument set. Rotate the saw to this exact angle in the coronal plane and execute the cut.
Surgical Warning: Copious saline irrigation must be used during the saw cut to prevent thermal necrosis of the bone, which can lead to nonunion.
7. Deformity Correction via Distraction
- Begin lengthening the femoral distractor. Because the rotational joint is left open, the axial lengthening mechanically translates into angular correction.
- This setup allows simultaneous correction of the multiplanar deformity by rotating the two tibial segments around an axis perpendicular to the cut surface.
- Continue this gradual correction until the proximal and distal Schanz pins are perfectly parallel to each other.
- Inspect the osteotomy surfaces. If the cut is not perfectly flush, use a high-speed burr or saw to shave additional bone from the cut surfaces to ensure perfect cortical apposition and alignment.
8. Axial Lengthening (If Indicated)
If axial lengthening is required beyond the angular correction:
- Use a bone reduction forceps with pointed tips (Weber clamp) to hold the two cut surfaces together.
- Lock the rotational joint of the distractor.
- Additional lengthening of the distractor will now lengthen the tibia purely in the axial plane.
- Gently loosen the bone clamp just enough to allow sliding in the axial plane, while maintaining enough tension to prevent translation and loss of the achieved angular correction.
Surgical Pitfall - Neurologic Compromise: Monitor the SSEPs continuously during axial lengthening. If the somatosensory evoked potentials change or drop from baseline, immediately stop the lengthening process and reverse the distractor until the potentials return to normal. Nerve ischemia from acute stretching is a devastating complication.
9. Radiographic Verification
- Once the desired lengthening and angular correction are completed, tighten the bone clamp and lock all distractor joints.
- Obtain orthogonal AP and lateral fluoroscopic images or radiographs.
- Superimpose these images on the preoperative templating drawings and compare them clinically and radiographically to the normal contralateral leg. Make micro-adjustments as needed.
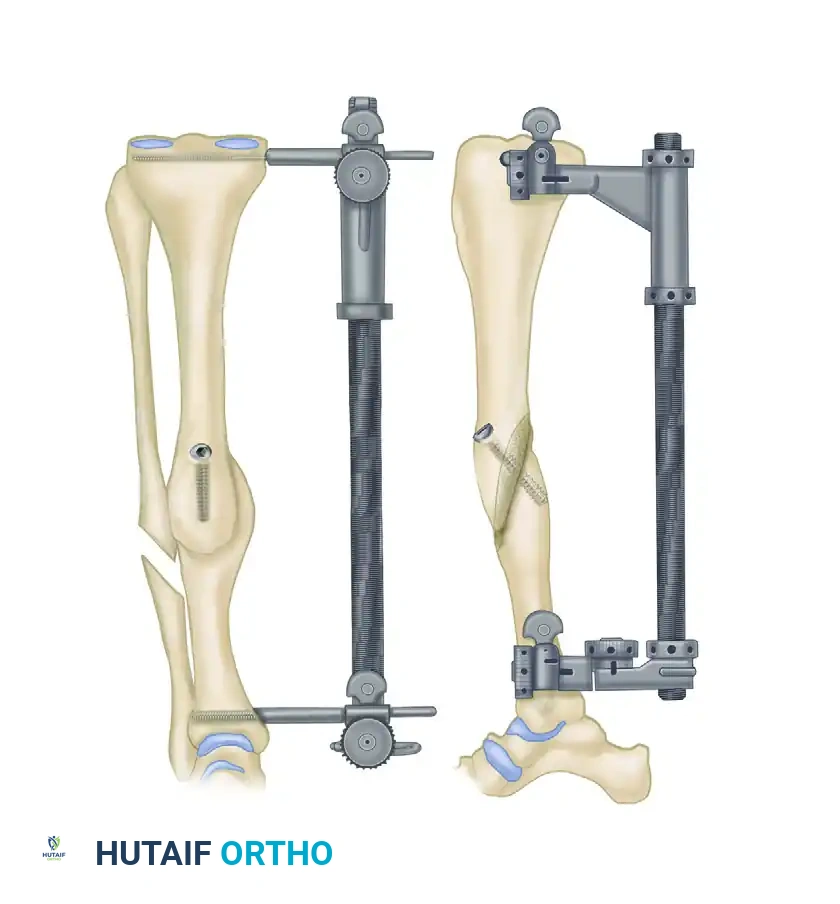
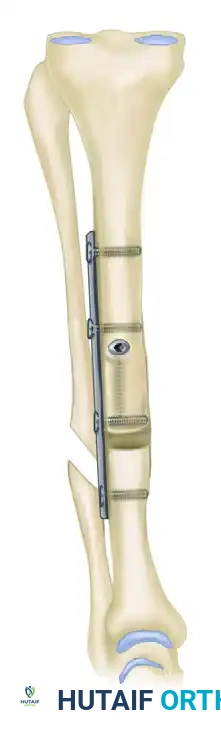
10. Internal Fixation
- When alignment, rotation, and length are deemed satisfactory, place a 4.5-mm cortical lag screw perpendicularly across the osteotomy site to achieve absolute stability and interfragmentary compression.
- Contour a narrow 4.5-mm dynamic compression plate (DCP) or locking compression plate (LCP) to the surface of the tibia.
- Apply the plate in a neutralization mode to protect the lag screw from torsional, bending, and shear forces.
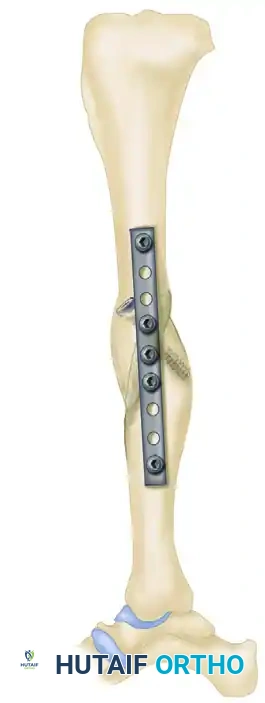
11. Grafting and Soft Tissue Balancing
- Take the bone shavings and callus resected earlier in the procedure and pack them meticulously around the osteotomy site as an autologous bone graft.
- Assess ankle dorsiflexion. If an equinus contracture has developed secondary to the axial lengthening of the bone (stretching the gastrocnemius-soleus complex), perform a formal Z-lengthening of the Achilles tendon.
12. Closure
- Remove the femoral distractor and the Schanz pins.
- Deflate the tourniquet and achieve meticulous hemostasis.
- Insert a closed suction drain.
- Close the periosteum, subcutaneous tissue, and skin in layers.
- Apply a bulky Robert Jones dressing reinforced with a below-knee posterior splint to control the foot and ankle.
POSTOPERATIVE CARE AND REHABILITATION
The postoperative protocol is designed to balance the need for early joint mobilization with the protection of the osteotomy fixation.
Immediate Postoperative Phase (Days 0-3)
- Mobilization: Range of motion (ROM) of the knee and ankle (0 to 90 degrees) is initiated immediately after surgery using a continuous passive motion (CPM) machine.
- Weight Bearing: The patient is allowed out of bed on the first postoperative day, strictly non-weight-bearing (NWB) on the operative extremity.
- Drain Management: The closed suction drain is removed when output is less than 10 mL in an 8-hour period, which typically occurs by postoperative day 2.
- Wound Care: The bulky Robert Jones dressing is removed on day 3. If the surgical wound appears clean, dry, and satisfactory, a below-knee fiberglass cast is applied.
Short-Term Rehabilitation (Weeks 1-12)
- Weight Bearing Status: Once the cast is applied, the patient is transitioned to touch-down weight bearing (TDWB) with crutches or a walker.
- Discharge: The patient is discharged from the hospital once they are medically stable, pain is controlled, and they can ambulate independently with assistive devices.
- Suture Removal: At 10 to 14 days postoperatively, the cast is bi-valved, sutures or staples are removed, and a new, well-molded below-knee cast is applied.
- Clinical Follow-up: Serial radiographs are obtained at 4, 8, and 12 weeks to monitor callus formation and maintenance of alignment.
Long-Term Rehabilitation (Months 3+)
- Bracing: At 10 to 12 weeks, provided there is radiographic evidence of bridging trabeculae across the osteotomy site, the cast is removed. The patient is fitted with a custom removable functional tibial brace.
- Progressive Weight Bearing: Weight bearing is progressively advanced based on radiographic healing. Full weight bearing is typically achieved between 3 to 4 months postoperatively.
- Physical Therapy: Aggressive physical therapy is initiated to restore full lower extremity strength, proprioception, and normal gait mechanics.
ALTERNATIVE TECHNIQUES: THE CLAMSHELL OSTEOTOMY
While the oblique tibial osteotomy is highly effective for specific multiplanar deformities, other techniques may be indicated depending on the location and nature of the malunion.
For complex diaphyseal deformities where an oblique cut may not provide adequate correction or stability, the Clamshell Osteotomy, as described by Russell et al., serves as a powerful alternative. This technique involves an intra-medullary approach combined with longitudinal and transverse osteotomies to "open" the bone, correct the deformity over an intramedullary nail, and utilize the bone's own cortical shell as an autograft.

The plane of the longitudinal portion of the clamshell osteotomy for the tibia is typically made approximately parallel to the medial face of the tibia, allowing for multi-directional correction while maintaining the periosteal hinge.
CONCLUSION
The oblique tibial osteotomy remains a cornerstone technique in the armamentarium of the reconstructive orthopedic surgeon. By adhering strictly to the biomechanical principles of Schanz pin placement, utilizing the femoral distractor for controlled multiplanar correction, and applying rigid internal fixation with a lag screw and neutralization plate, surgeons can reliably restore mechanical alignment, correct leg length discrepancies, and achieve excellent functional outcomes for patients suffering from complex tibial malunions. Meticulous preoperative planning and vigilant postoperative care are paramount to avoiding complications and ensuring successful bone union.
📚 Medical References
- Oblique tibial osteotomy for Blount’s disease (tibia vara), J Pediatr Orthop 8:715, 1988.
- Raney EM, Topoleski TA, Yaghoubian R, et al: Orthotic treatment of infantile tibia vara, J Pediatr Orthop 18:670, 1998.
- Richards BS, Katz DE, Sims JB: Effectiveness of brace treatment in early infantile Blount’s disease, J Pediatr Orthop 18:374, 1998.
- Rozbruch SR, Blyakher A, Haas SB, et al: Correction of large bilateral tibia vara with the Ilizarov method, J Knee Surg 16:34, 2003.
- Salenius P, Vankka E: The development of the tibiofemoral angle in children, J Bone Joint Surg 57A:259, 1975.
- Sasaki T, Yagi T, Monji J, et al: Transepiphyseal plate osteotomy for severe tibia vara in children: follow-up study of four cases, J Pediatr Orthop 6:61, 1986.
- Schoenecker PL, Johnston R, Rich MM, et al: Elevation of the medial plateau of the tibia in the treatment of Blount disease, J Bone Joint Surg 74A:351, 1992.
- Schoenecker PL, Meade WC, Pierron RL, et al: Blount’s disease: a retrospective review and recommendations for treatment, J Pediatr Orthop 5:181, 1985.
- Shinohara Y, Kamegaya M, Kuniyoshi K, et al: Natural history of infantile tibia vara, J Bone Joint Surg 84B:263, 2002.
- Siffert RS: Intraepiphyseal osteotomy for progressive tibia vara: case report and rationale of management, J Pediatr Orthop 2:81, 1982.
- Siffert RS, Katz JF: The intraarticular deformity in osteochondrosis deformans tibiae, J Bone Joint Surg 52A:800, 1970.
- Smith SL, Beckish ML, Winters SC, et al: Treatment of lateonset tibia vara using Afghan percutaneous osteotomy and Orthofi x external fi xation, J Pediatr Orthop 20:606, 2000.
- Snyder M, Vera J, Harcke HT, et al: Magnetic resonance imaging of the growth plate in late-onset tibia vara, Int Orthop 27:217, 2003.
- Stanitski DF, Dahl M, Louie K, et al: Management of late-onset tibia vara in the obese patient by using circular external fi xation, J Pediatr Orthop 17:691, 1997.
- Stanitski DF, Srivastava P, Stanitski CL: Correction of proximal tibial deformities in adolescents with T-Garches external fi xator, J Pediatr Orthop 18:512, 1998.
- Steel HH, Sandrow RE, Sullivan PD: Complications of tibial osteotomy in children for genu varum or valgum: evidence that neurological changes are due to ischemia, J Bone Joint Surg 53A:1629, 1971.
- Støren H: Operative elevation of the medial tibial joint surface in Blount’s disease, Acta Orthop Scand 40:788, 1970.
- Thompson GH, Carter JR: Late-onset tibia vara (Blount’s disease): current concepts, Clin Orthop Relat Res 255:24, 1990.
- Thompson GH, Carter JR, Smith CW: Late-onset tibia vara: a comparative analysis, J Pediatr Orthop 4:185, 1984 Vankka E, Salenius P: Spontaneous correction of severe tibiofemoral deformity in growing children, Acta Orthop Scand 53:567, 1982.
- Volk AG, Kling TF Jr, Dias L, et al: Blount’s disease: follow-up to maturity, Orthop Trans 13:246, 1989.
- Wenger DR, Mickelson M, Maynard JA: The evolution and histopathology of adolescent tibia vara, J Pediatr Orthop 4:78, 1984.
- Westberry DE, Davids JR, Pugh LI, et al: Tibia vara: results of hemiepiphyseodesis, J Pediatr Orthop 13:374, 2004.
- Zayer M: Hemicondylar tibial osteotomy in Blount’s disease: a report of two cases, Acta Orthop Scand 63:350, 1992.
- Zayer M: Tibia vara in focal fi brocartilaginous dysplasia: a report of two cases, Acta Orthop Scand 63:353, 1992.
- Zionts LE, Shean CJ: Brace treatment of early infantile tibia vara, J Pediatr Orthop 18:102, 1998.
- Osteogenesis Imperfecta Albright JA: Management overview of osteogenesis imperfecta, Clin Orthop Relat Res 159:80, 1981.
- Albright JA: Systemic treatment of osteogenesis imperfecta, Clin Orthop Relat Res 159:88, 1981.
- Bailey RW: Further clinical experience with the extensible nail, Clin Orthop Relat Res 159:171, 1981.
- Bailey RW, Dubow HI: Experimental and clinical studies of longitudinal bone growth: utilizing a new method of internal fi xation crossing the epiphyseal plate, J Bone Joint Surg 47A:1669, 1965.
- Bailey RW, Dubow HI: Evolution of the concept of an extensible nail accommodating to normal longitudinal bone growth: clinical considerations and implications, Clin Orthop Relat Res 159:157, 1981.
- Beighton P, Spranger J, Versveld G: Skeletal complications in osteogenesis imperfecta: a review of 153 South African patients, S Afr Med J 64:565, 1983.
- Chotigavanichaya C, Jadhav A, Bernstein RM, et al: Rod diameter prediction in patients with osteogenesis imperfecta undergoing primary osteotomy, J Pediatr Orthop 21:515, 2001.
- Daly K, Wisbeach A, Sanpera I Jr, et al: The prognosis for walking in osteogenesis imperfecta, J Bone Joint Surg 78B:477, 1996.
- DeBastiani G, Aldegheri R, Renzi Brivio L, et al: Limb lengthening by distraction of the epiphyseal plate: a comparison of two techniques in the rabbit, J Bone Joint Surg 68B:545, 1986.
- DeBastiani G, Aldegheri R, Renzi Brivio L, et al: Chondrodiastasis—controlled symmetrical distraction of the epiphyseal plate: limb lengthening in children, J Bone Joint Surg 68B:550, 1986.
- DeBastiani G, Aldegheri R, Renzi Brivio L, et al: Limb lengthening by callus distraction (callotasis), J Pediatr Orthop 7:129, 1987.
- Eyre DR: Concepts in collagen biochemistry: evidence that collagenopathies underlie osteogenesis imperfecta, Clin Orthop Relat Res 159: 97, 1981.
- Falvo KA, Root L, Bullough PG: Osteogenesis imperfecta: clinical evaluation and management, J Bone Joint Surg 56A:783, 1974.
- Gamble JG, Strudwick J, Rinsky LA, et al: Complications of intramedullary rods in osteogenesis imperfecta: Bailey-Dubow rods versus nonelongating rods, J Pediatr Orthop 8:645, 1988.
- Gargan MF, Wisbeach A, Fixsen JA: Humeral rodding in osteogenesis imperfecta, J Pediatr Orthop 16:719, 1996.
- Gerber LH, Binder H, Weintrob J, et al: Rehabilitation of children and infants with osteogenesis imperfecta: a program for ambulation, Clin Orthop Relat Res 251:254, 1990.
- Gertner JM, Root L: Osteogenesis imperfecta, Orthop Clin North Am 21:151, 1990.
- Ilizarov G: The principles of the Ilizarov method, Bull Hosp Jt Dis 48:1, 1988.
- Janus GJ, Vanpaemel LA, Engelbert RH, et al: Complications of the Bailey-Dubow elongating nail in osteogenesis imperfecta: 34 children with 110 nails, J Pediatr Orthop 8B:203, 1999.
- Karbowski A, Schwitalle J, Brenner R, et al: Experience with Bailey-Dubow rodding in children with osteogenesis imperfecta, Eur J Pediatr Surg 10:119, 2000.
- Khoshhal KI, Ellis RD: Functional outcome of Sofi eld procedure in the upper limb osteogenesis imperfecta, J Pediatr Orthop 21:236, 2001.
- King JD, Bobechko WP: Osteogenesis imperfecta: an orthopedic description and surgical review, J Bone Joint Surg 53B:72, 1971.
- Laidlaw AT, Loder RT, Hensinger RN: Telescoping intramedullary rodding with Bailey-Dubow nails for recurrent pathologic fractures in children without osteogenesis imperfecta, J Pediatr Orthop 18:4, 1998.
- Levin LS: The dentition in the osteogenesis imperfecta syndromes, Clin Orthop Relat Res 159:64, 1981.
- Li YH, Chow W, Leong JCY: The Sofi eld-Millar operation in osteogenesis imperfecta, J Bone Joint Surg 82B:11, 2000.
- Luhmann SJ, Sheridan JJ, Capelli AM, et al: Management of lower extremity deformities in osteogenesis imperfecta with extensible intramedullary rod technique: a 20-year experience, J Pediatr Orthop 18:88, 1998.
- Marafi oti RL, Westin GW: Elongating intramedullary rods in the treatment of osteogenesis imperfecta, J Bone Joint Surg 59A:467, 1977.
- Middleton RWD: Closed intramedullary rodding for osteogenesis imperfecta, J Bone Joint Surg 66B:652, 1984.
- Millar EA: Observations on the surgical management of osteogenesis imperfecta, Clin Orthop Relat Res 159:154, 1981.
- Nicholas RW, James P: Telescoping intramedullary stabilization of the lower extremities for severe OI, J Pediatr Orthop 10:219, 1990.
- Papagelopoulos PJ, Morrey BF: Hip and knee replacement in osteogenesis imperfecta, J Bone Joint Surg 75A:572, 1993.
- Paterson CR, McAllion S, Miller R: Osteogenesis imperfecta with dominant inheritance and normal sclerae, J Bone Joint Surg 65B:35, 1983.
- Peterson LRA: Little people. In Morrey BF, ed: Joint replacement arthroplasty, New York, 1991, Churchill Livingstone. Porat S, Heller E, Seidman DS, et al: Functional results of operations in OI: elongating and nonelongating rods, J Pediatr Orthop 11:200, 1991.
- Rauch F, Glorieux FH: Osteogenesis imperfecta, Lancet 363:1377, 2004.
- Ring D, Jupiter JB, Labropoulos PK, et al: Treatment of deformity of the lower limb in adults who have osteogenesis imperfecta, J Bone Joint Surg 78A:220, 1996.
- Rodriguez RP, Bailey RW: Internal fi xation of the femur in patients with osteogenesis imperfecta, Clin Orthop Relat Res 159:126, 1981.
- Russell TA, Taylor JC, LaVelle DG: Russell-Taylor interlocking intramedullary nails, Memphis, Tenn, 1985, Richards Manufacturing. Ryöppy S, Alberty A, Kaitila I: Early semiclosed intramedullary stabilization in osteogenesis imperfecta, J Pediatr Orthop 7:139, 1987.
- Shapiro F: Consequences of an osteogenesis imperfecta diagnosis for survival and ambulation, J Pediatr Orthop 5:456, 1985.
- Sillence D: Osteogenesis imperfecta: an expanding panorama of variants, Clin Orthop Relat Res 159:11, 1981.
- Sillence DO, Senn A, Danks DM: Genetic heterogeneity in osteogenesis imperfecta, J Med Genet 16:101, 1979.
- Sofi eld HA, Millar EA: Fragmentation, realignment, and intramedullary rod fi xation of deformities of the long bones in children: a 10-year appraisal, J Bone Joint Surg 41A:1371, 1959.
- Tiley F, Albright JA: Osteogenesis imperfecta: treatment by multiple osteotomy and intramedullary rod insertion, J Bone Joint Surg 55A:701, 1973.
- Villanueva AR, Frost HM: Bone formation in human osteogenesis imperfecta, measured by tetracycline bone labeling, Acta Orthop Scand 41:531, 1970.
- Weil UH: Osteogenesis imperfecta: historical background, Clin Orthop Relat Res 159:6, 1981.
- Werner P, Metz L, Dubowski F: Nursing care of an osteogenesis imperfecta infant and child, Clin Orthop Relat Res 159:108, 1981.
- Widmann RF, Bitan FD, Laplaza FJ, et al: Spinal deformity, pulmonary compromise, and quality of life in osteogenesis imperfecta, Spine 15:1673, 1999.
- Wilkinson JM, Scott BW, Clarke AM, et al: Surgical stabilisation of the lower limb in osteogenesis imperfecta using the Sheffi eld Telescopic Intramedullary Rod System, J Bone Joint Surg 80B:999, 1998.
- Williams PF, Cole WHJ, Bailey RW, et al: Current aspects of the surgical treatment of osteogenesis imperfecta, Clin Orthop Relat Res 96:288, 1973.
- Zeitlin L, Fassier F, Glorieux FH: Modern approach to children with osteogenesis imperfecta, J Pediatr Orthop 10B:77, 2003.
- Zionts LE, Ebramzadeh E, Stott NS: Complications in the use of the Bailey-Dubow extensible nail, Clin Orthop Relat Res 348:186, 1998.
- Dwarfi sm Abe M, Shirai H, Okamoto M, et al: Lengthening of the forearm by callus distraction, J Hand Surg 21B:151, 1996.
- Aldegheri R: Distraction osteogenesis for lengthening of the tibia in patients who have
You Might Also Like