Approach to the Lumbar Spine: Mastering Techniques & Anatomy
Key Takeaway
In this comprehensive guide, we discuss everything you need to know about Approach to the Lumbar Spine: Mastering Techniques & Anatomy. The approach to the lumbar spine utilizes both anterior and posterior surgical techniques to treat various pathologies. Posterior approaches, including minimally invasive methods, are frequently used to access posterior spinal elements, the spinal cord, and intervertebral discs. Anterior approaches, such as transperitoneal and retroperitoneal, target conditions like vertebral body infection, fracture, or tumors affecting the spine's anterior elements.
Approaches to the spine
Six
The Spine
--- ** ** ** ** ** ** ** **
Cervical Spine ** ** ** ** **
The anatomy of the spine varies from region to region. The cervical spine is light, small, and flexible; the thoracic spine is larger and relatively immobile because of its associated ribs. The lumbar spine, especially the lower part, has more mobility than the thoracic spine, but less than the cervical spine. Pathology is seen most commonly in the cervical and lumbar spines, which are the most mobile portions of the axial skeleton; they require surgery most frequently.
It is important to be able to reach the spine surgically through either an anterior or a posterior approach to treat pathology of its anterior and posterior elements. Pathologies such as vertebral body infection, fracture, and tumor often require anterior approaches. There are many anterior approaches to the spinal column; we present the basic ones that allow access to all the anterior parts of the spine.
Posterior approaches are used more often. The midline posterior approaches are the most common, permitting access to all the posterior spinal elements, as well as to the spinal cord and intervertebral discs.
Frequently, portions of the spine must be fused. The ilium is the best site from which to obtain bone graft material, and details of these surgical approaches can be found in the pelvic chapter. (See pages 364.)
Posterior Approach to the Lumbar Spine
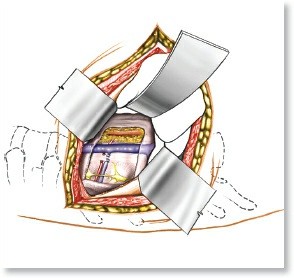
The posterior approach is the most common approach to the lumbar spine. Besides providing access to the cauda equina and the intervertebral discs, it can expose the posterior elements of the spine: The spinous processes, laminae, facet joints, and pedicles. The approach is through the midline, and it may be extended proximally and distally.
The uses of the posterior approach include the following:
3. 3
4.
Position of the Patient
The posterior approach can be undertaken with the patient in either of two positions:
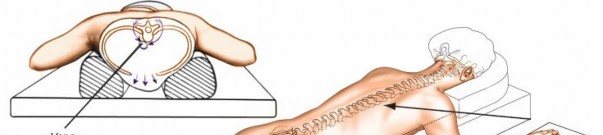
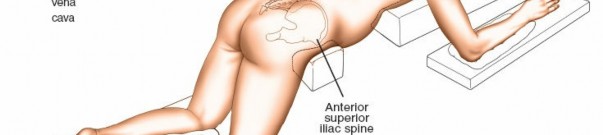
1. Logroll the patient into a prone position. Be sure that bolsters are placed longitudinally under the patient’s sides to allow the abdomen to be entirely free, reducing venous plexus filling around the spinal cord by permitting the venous plexus to drain directly into the inferior vena cava. The shoulders should be placed at no more than 90 degrees of abduction and should be slightly flexed forward to relax the brachial plexus. Careful padding of the ulnar nerve at the elbow and median nerve at the wrist must be assured. Position the head and neck in a relaxed, neutral position and be sure that no pressure is applied to the eyes. Avoid having the head lower than the rest of the body to reduce the risk of postoperative blindness (due to high hydrostatic pressure in the eyes leading to reduced blood perfusion).
Pad the lower extremities carefully at the knees and feet. If the approach is to be used for decompression, flex the hips to create an increase in interlaminar or interspinous distance. Place the hips in neutral
or slight extension for lumbar fusions to restore normal lordosis. Flex the knees and check that there is no pressure on the proximal fibula/common peroneal nerve region (Fig. 6-1A).
2. 6-1B).
For both positions, use a cold-light headlamp to illuminate the deepest layers of the dissection.
Landmarks and Incision
#### Landmarks
Palpate the
spinous processes
. Note that a line drawn between the highest points on the
iliac crest
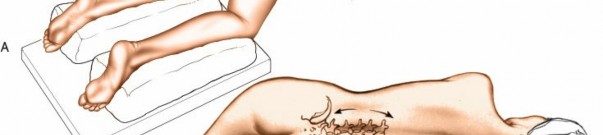
is in the L4-5 interspace. The line is only a rough guide, however; the best means of determining the exact level is either to insert a small needle into the spinous process and obtain a radiograph or to carry the dissection distally and identify the sacrum.
Incision
Fig. 6-2).
!6-3). Dissect down the spinous process and along the lamina to the facet joint. In a young patient, the tip
of the spinous process is a cartilaginous apophysis; it can be split in the midline, making subperiosteal muscle removal easier (Fig. 6-4).
6-4).
Deep Surgical Dissection
6-5 6-8).
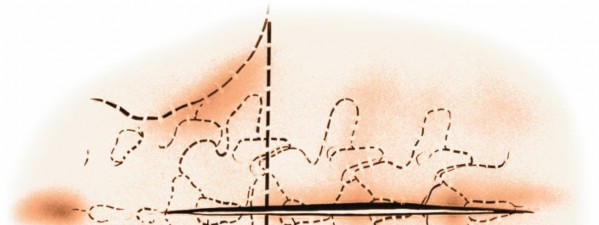
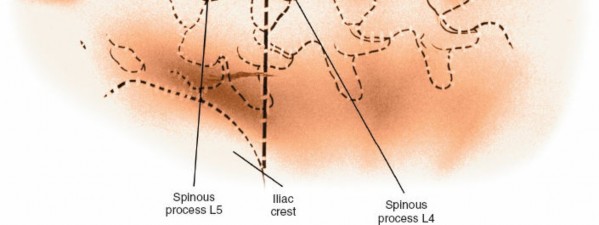 Figure 6-2 Make a longitudinal incision over the spinous processes, extending
from the spinous process above to the spinous process below the level of pathology. A line drawn across the highest point of the iliac crest is in the L4-5 interspace.
Figure 6-2 Make a longitudinal incision over the spinous processes, extending
from the spinous process above to the spinous process below the level of pathology. A line drawn across the highest point of the iliac crest is in the L4-5 interspace.
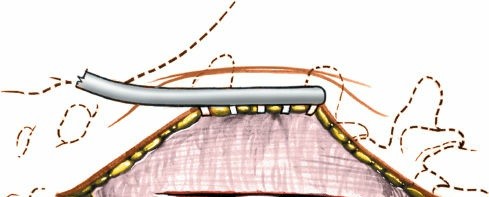
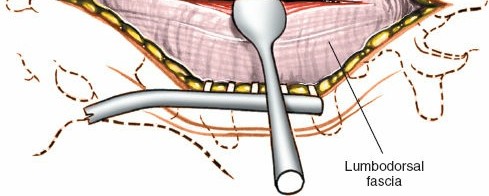 Figure 6-3 Deepen the incision through the fat and fascia in line with the skin incision until the spinous process itself is reached. Detach the paraspinal muscles subperiosteally.
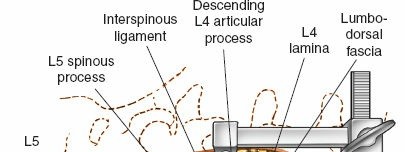
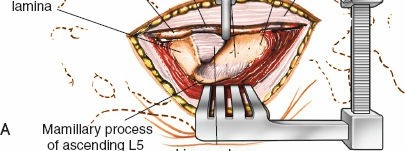
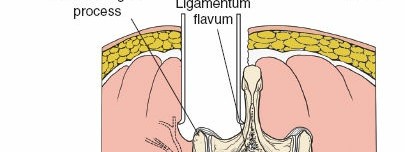
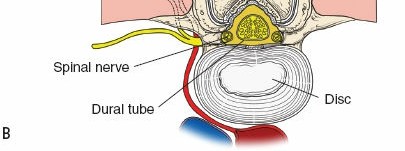 Figure 6-4A: Dissect the paraspinal muscles from the spinous process and lamina to the facet joint. Remove the paraspinal muscles subperiosteally as one unit from the bone. B: Continue dissecting laterally, stripping the joint capsule from the descending and ascending facets. Note the branches of the lumbar vessels that bleed during stripping of the muscles.
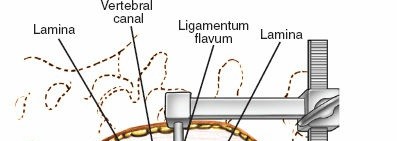
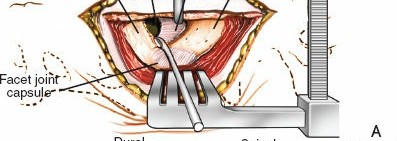
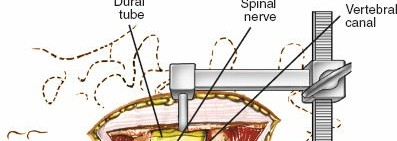
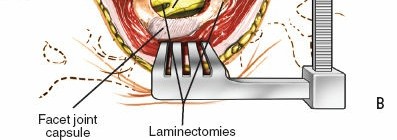 Figure 6-5A: Remove the ligamentum flavum by cutting its attachment to the superior or leading edge of the inferior lamina. B: Immediately beneath the ligamentum flavum and epidural fat is the blue-white dura. Identify the spinal nerve. Note the overlying epidural veins. ### Dang
Vessels
The vessels supplying the paraspinal muscles on a segmental basis are close to the facet joints, in the area between the transverse processes. These branches of the lumbar vessels frequently bleed as the dissection is carried out laterally. Vigorous cauterization of these vessels may be necessary to stop the bleeding. Note that the posterior primary rami of the lumbar nerves, which also supply the paraspinal muscles segmentally, run with these vessels and will be damaged by cautery. Fortunately, loss of
some of these nerves does not totally denervate the paraspinal muscles, because they are innervated segmentally (see Fig. 6-4).
The
venous plexus
n thrombin. Bipolar Malis cautery also may be used, although it must be done with great care because of the proximity of the nerve roots.
Nerves
Each spinal nerve must be identified individually and protected. The more lateral the surgical field, the easier it is to identify the nerve and retract it so the disc space can be seen. If a larger exposure is needed, incise part of the lamina on the distal portion of the involved vertebra.
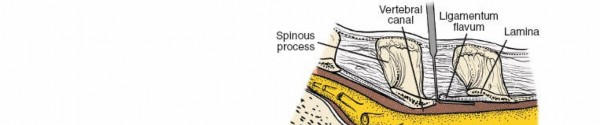
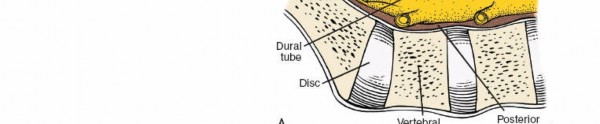
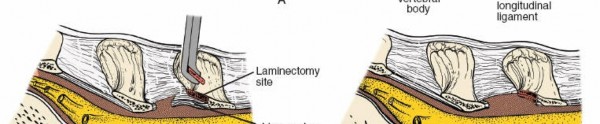
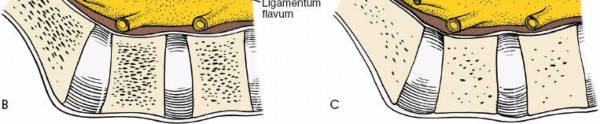 Figure 6-6A: Insert a blunt dissector under the cut edge of the ligamentum flavum. B: Use a Kerrison rongeur to remove the distal end of the lamina. Note that the ligamentum flavum attaches halfway up the undersurface of the lamina.
C:
Remove additional lamina and the remaining portion of the ligamentum flavum at its attachment to the undersurface of the lamina.
How to Enlarge the Approach
#### Local Measures
Figure 6-6A: Insert a blunt dissector under the cut edge of the ligamentum flavum. B: Use a Kerrison rongeur to remove the distal end of the lamina. Note that the ligamentum flavum attaches halfway up the undersurface of the lamina.
C:
Remove additional lamina and the remaining portion of the ligamentum flavum at its attachment to the undersurface of the lamina.
How to Enlarge the Approach
#### Local Measures
1. To gain better exposure of the dura, nerve root, and disc, remove additional portions of the lamina, both from the leading edge of the lamina below and from the caudal edge of the lamina above. A portion of the facet joint itself even can be removed. Remember that it is safer to remove bone than to retract nerve roots or dura excessively. If the wound is tight, dissect the paraspinal muscles off the posterior spinal elements above and below the exposed level to make the muscles easier to retract.
2. To gain access to other parts of the posterior aspect of the spine, carry the dissection as far laterally as possible, onto the transverse processes. Complete lateral dissection exposes the facet joints and transverse processes, permitting facet joint fusion and transverse process fusion, if necessary (see Fig. 6-4).
Extensile Measures
To extend the approach, merely extend the skin incision proximally or distally and detach the posterior spinal musculature from the posterior spinal elements. The approach can be extended from C1 down to the sacrum.
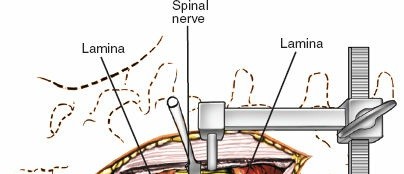
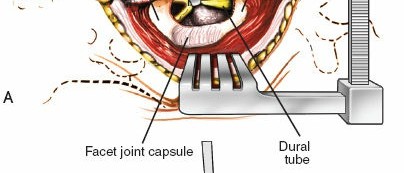
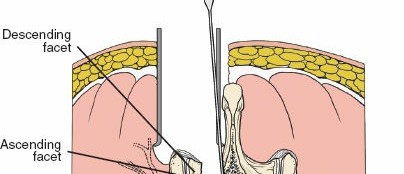
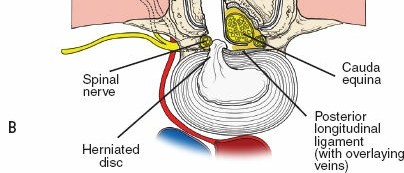 Figure 6-7A: Using blunt dissection, carefully continue down the lateral side of the dura to the floor of the spinal canal; retract the dura and its nerve root medially. Reveal the posterior aspect of the disc. B: Cross section revealing the retraction of the dural tube and a herniated nucleus pulposus impinging on a nerve root. ## Minimally Invasive—Posterior Approach to the Lumbar Spine
Improved imaging techniques have allowed surgeons to accurately localize pathology and the need for exploration has largely disappeared. The main indications for this approach are:
1. Excision of intervertebral disc8
2. Decompression of spinal nerve root
Position of Patient
Place the patient in the prone position on a radiolucent table, with the abdomen free and the extremities padded.
Landmarks and Incision
Palpate the spinous processes to identify the midline. Use fluoroscopy to determine the disc level to be explored.
Incision
Make a 3-cm longitudinal incision 1 cm from the midline at the level of the disc to be approached.


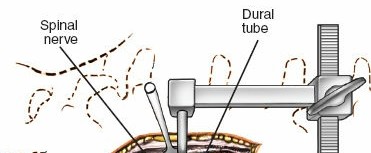
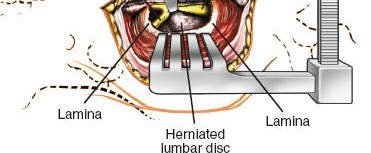 Figure 6-8 With the use of a microscope and retractor, a 3-cm incision can be used to expose the disc at a single level.
Internervous Plane
Because the approach splits the fibers of the erector spinae muscle group that are innervated segmentally no significant denervation occurs.
Superficial Surgical Dissection
Deepen the approach through subcutaneous adipose tissue, and the fascia covering erector spinae fascia using a knife.
Deep Surgical Dissection
Two alternative techniques are available.
Figure 6-8 With the use of a microscope and retractor, a 3-cm incision can be used to expose the disc at a single level.
Internervous Plane
Because the approach splits the fibers of the erector spinae muscle group that are innervated segmentally no significant denervation occurs.
Superficial Surgical Dissection
Deepen the approach through subcutaneous adipose tissue, and the fascia covering erector spinae fascia using a knife.
Deep Surgical Dissection
Two alternative techniques are available.
Transmuscular Technique.9 Remove all but the largest of the dilating tubes and staying within this tube resect the distal lamina and ligamentum flavum on the affected side to expose the nerve root over the disc. This can be done with a burr or a curette and sharp dissection. Use of an operating microscope is desirable and meticulous hemostasis is essential. Some of the medial facet can be resected to decompress the lateral recess. Retract the nerve root medially to expose the pathologic disc (Fig. 6-9)._Subperiosteal Technique.6-9E).
Dang
Meticulous positioning of the retractors must be done with landmarks and fluoroscopy because a very small incision is made. Any deviation from the planned course may make it difficult to find the pathology. If using the transmuscular approach take care not to place the entry point of the needle too far medial as the spinous processes may impede the proper positioning of the retracting tube. A tube that is angled excessively will make it difficult to work and target the microscope. This can be mitigated by using a tilting operating table. Meticulous hemostasis is important, as the small access port can be obscured easily by excessive bleeding.
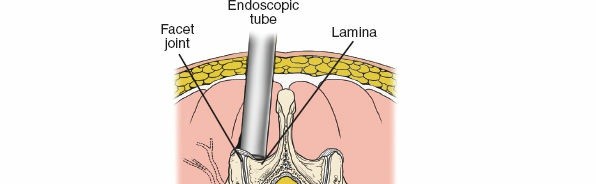
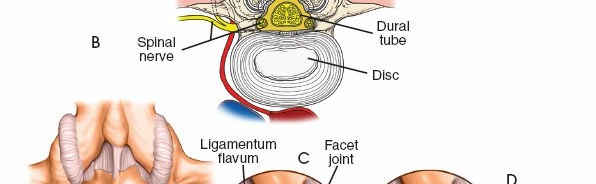

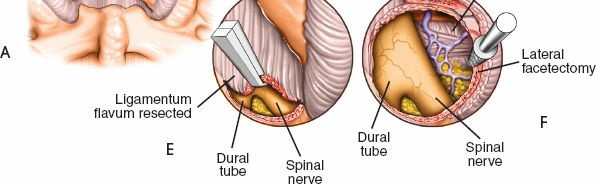 Figure 6-9A: Localization of the level is performed with fluoroscopy. The starting point is 2 cm from the midline directly above the involved disc. B: A 1- to 2-cm incision is made longitudinally. The fascia is incised. The erector muscles are split bluntly with dilating tubes. The retracting tube is positioned at the intersecting point of the lamina above the facet laterally and the ligamentum flavum medially and distally. C: The proximal and distal laminae are thinned with a high-speed burr. D: The ligamentum flavum can be retracted medially or simply resected with a Kerrison rongeur used to resect the caudad aspect of the lamina. E: The ligamentum flavum can be retracted medially or simply resected with a Kerrison rongeur, exposing the dura.
F:
The nerve root is exposed with the affected disc directly ventral to it.
How to Enlarge the Approach
The tube/retractor can be repositioned or angled differently to address pathologies in different locations, for example, to access a sequestered disc, a far lateral disc, or to decompress a contralateral spinal stenosis. Larger tubes are available if more exposure is required. In the lordotic spine, a small change in the angle of the tube can permit access to an adjacent level.
Figure 6-9A: Localization of the level is performed with fluoroscopy. The starting point is 2 cm from the midline directly above the involved disc. B: A 1- to 2-cm incision is made longitudinally. The fascia is incised. The erector muscles are split bluntly with dilating tubes. The retracting tube is positioned at the intersecting point of the lamina above the facet laterally and the ligamentum flavum medially and distally. C: The proximal and distal laminae are thinned with a high-speed burr. D: The ligamentum flavum can be retracted medially or simply resected with a Kerrison rongeur used to resect the caudad aspect of the lamina. E: The ligamentum flavum can be retracted medially or simply resected with a Kerrison rongeur, exposing the dura.
F:
The nerve root is exposed with the affected disc directly ventral to it.
How to Enlarge the Approach
The tube/retractor can be repositioned or angled differently to address pathologies in different locations, for example, to access a sequestered disc, a far lateral disc, or to decompress a contralateral spinal stenosis. Larger tubes are available if more exposure is required. In the lordotic spine, a small change in the angle of the tube can permit access to an adjacent level.
Applied Surgical Anatomy of the Posterior Approach to the Lumbar Spine Overview
This arrangement is not apparent during surgery, because the approach involves detaching all these muscles in a single mass.
Landmarks and Incision
#### Landmarks
Spinous Processes. The spinous processes in the lumbar area are thick. The distal end of the tip of the spinous process is bulbous and extends slightly caudally. Each process separates the paraspinal muscles on each side. In a growing patient, the processes are capped by cartilaginous
apophyses, which, when split, make it easier to remove the paraspinal muscles subperiosteally.


!6-11)._
Incision
The midline incision follows the course of the spinous processes. It tends to heal with a fine, thin scar, because it is not under tension after suturing and is attached firmly to underlying fascia. No major cutaneous nerves cross the midline.
Superficial Surgical Dissection and Its Dangers
The dorsal lumbar fascia and the supraspinous (supraspinal) ligaments lie between the skin and the spinous processes. The fascia is a broad, relatively thick, white sheet of tissue that forms a sheath for the sacrospinalis muscles and attaches to the spinous processes (see Fig. 6-10). It extends to the cervical spine, where it becomes continuous with the nuchal fascia of the neck. Medially, it is attached to the spinous processes of the vertebrae, the supraspinous ligaments, and the medial crest of the sacrum. Inferiorly, it is attached to the iliac crests. Laterally, it is continuous with the origin of the aponeurosis of the transversus abdominis and latissimus dorsi muscles.
The supraspinous ligaments extend from vertebra to vertebra, connecting the spinous processes. They blend intimately with the attachment of the dorsal lumbar fascia to the spinous processes (Fig. 6-10). Further dissection consists of detaching the two layers of muscle from bone. Because these muscles are detached in a single mass, their critical feature, in regard to their surgical anatomy, lies in their blood supply and not in their structure. The segmental lumbar vessels arise directly from the aorta. They wrap around the waist of each vertebral body and then ascend close to the pedicle, where they divide into two branches. One supplies the spinal cord; the other, larger branch then comes directly posteriorly to supply the paraspinal musculature. During the approach, these vessels appear between the transverse processes, close to the facet joints (see Fig. 6-12). They often bleed as dissection is carried out. In addition, the arteries branch within the muscle bodies, frequently creating a very vascular field. For this reason, the dissection should be kept as close to the midline as possible; no major vessels cross the midline, and the plane is safe for use
Fig. 6-12).


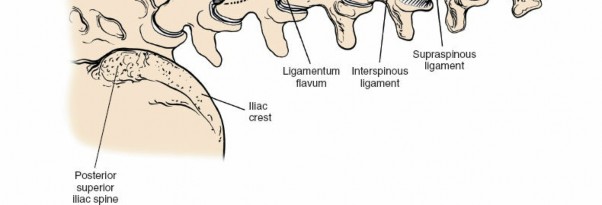 Figure 6-11 The bony anatomy of the lumbosacral spine and the posterosuperior aspect of the pelvis. The facet joint capsules, ligamentum flavum, and interspinous ligaments are shown. A line drawn across the crest of the ilium intersects the L4-5 interspinous space. A line crossing the posterior superior iliac spine intersects the second part of the sacrum.
Deep Surgical Dissection and Its Dangers
The ligamentum flavum is the most important structure in the deep layer. Consisting of yellow elastic tissue, the ligament takes origin from the leading edge of the lower lamina and inserts into the anterior surface of the lamina above, about halfway up onto a small ridge (
Figure 6-11 The bony anatomy of the lumbosacral spine and the posterosuperior aspect of the pelvis. The facet joint capsules, ligamentum flavum, and interspinous ligaments are shown. A line drawn across the crest of the ilium intersects the L4-5 interspinous space. A line crossing the posterior superior iliac spine intersects the second part of the sacrum.
Deep Surgical Dissection and Its Dangers
The ligamentum flavum is the most important structure in the deep layer. Consisting of yellow elastic tissue, the ligament takes origin from the leading edge of the lower lamina and inserts into the anterior surface of the lamina above, about halfway up onto a small ridge (
The major danger in the deep dissection involves damage to the dura. Once the ligamentum flavum is entered, a thin spatula should be placed beneath it to protect the underlying dura from being torn (see Fig. 6-6A). The cord itself and the nerve roots often are difficult to see as a result of
bleeding from epidural veins. The veins, which are thin-walled and easy to rupture, even with blunt dissection, can be controlled by direct pressure using a pattie or by bipolar cautery.


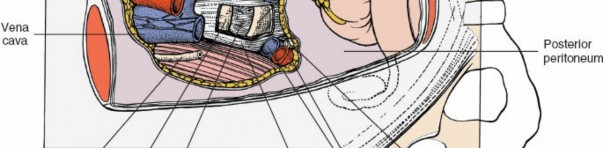
 Figure 6-12 Cross section at the L3-4 disc space, looking distally. The segmental lumbar vessels branch directly from the aorta. They wrap around the waist of each individual vertebral body and then ascend close to the pedicle, where they divide into two branches. One branch supplies the cord; the other, larger branch proceeds directly posterior to supply the paraspinal musculature. During the surgical approach, these vessels appear between the transverse processes, close to the facet joints. Note that the posterior primary rami and the posterior branches of the lumbar vessels appear between the transverse processes close to the pedicle and descending facet.
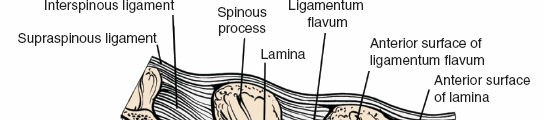
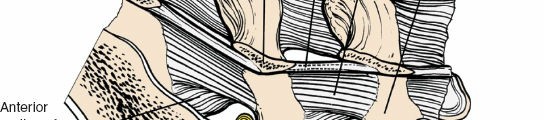


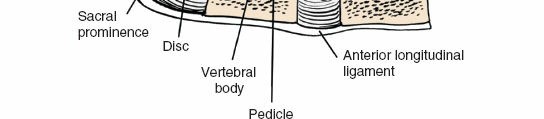 Figure 6-13 A sagittal section through the lamina of a lumbar vertebra. Note the origin and insertion of the ligamentum flavum as well as the supraspinous and interspinous ligaments. The nerves exit at the inferior aspect of the pedicle. ## Anterior (Transperitoneal and Retroperitoneal) Approach to the Lumbar Spine
8
The approach can also be used for the treatment of spinal tuberculosis and the insertion of disc prostheses. Endoscopic transperitoneal approaches have been described but these are beyond the scope of this
book.
Position of the Patient
6-14). Make sure that two areas remain bare for incision if the approach is used for spinal fusion; one for the abdominal incision, and one for harvesting an anterior iliac crest bone graft. Insert a urinary catheter to keep the bladder empty. Use of mechanical calf compression and/or chemical prophylaxis is recommended to decrease the risk of thromboembolism.
Landmarks and Incision
#### Landmarks
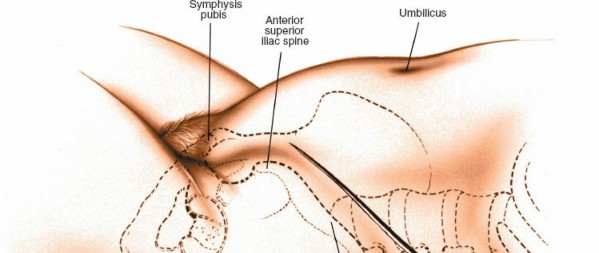
The
umbilicus
normally is opposite the L3-4 disc space, but varies in level depending on how heavy the patient is.
Palpate the
pubic symphysis
at the lower end of the abdomen through the fatty mons pubis. The pubic tubercle, on the upper border of the pubis just lateral to the midline, may be easier to palpate than the superior surface of the symphysis itself.
Incision
6-15).
Internervous Plane
The midline plane lies between the abdominal muscles on each side, segmentally supplied by branches from the seventh to the 12th intercostal nerves. Therefore, this incision can be extended from the xiphisternum to the pubic symphysis.
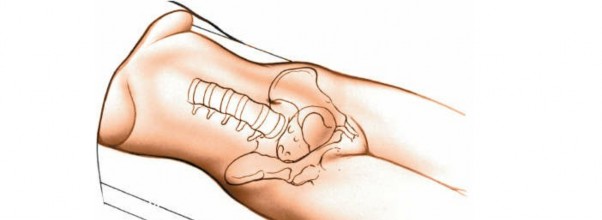
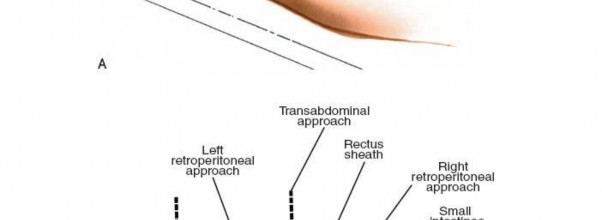


 Figure 6-14
With the patient in the supine position (
A
)
,
the anterior lumbar spine can be approached by a transperitoneal, left retroperitoneal, or right retroperitoneal
Figure 6-14
With the patient in the supine position (
A
)
,
the anterior lumbar spine can be approached by a transperitoneal, left retroperitoneal, or right retroperitoneal
path (
B
).
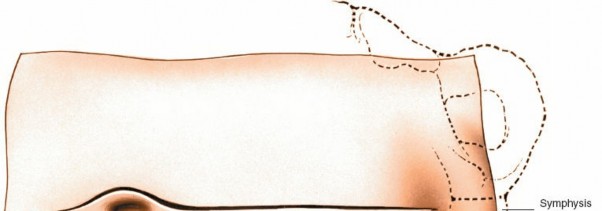
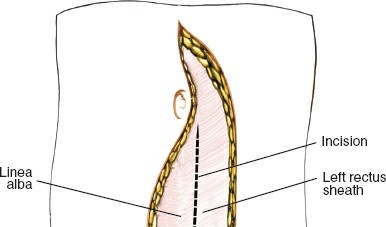
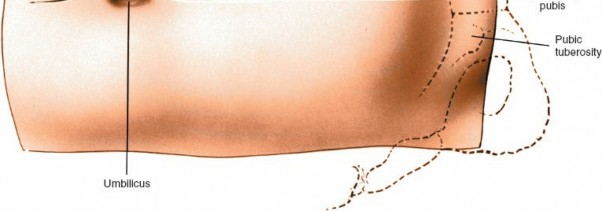 Figure 6-15 Make a longitudinal midline incision from just below the umbilicus to just above the pubic symphysis. Extend it superiorly, to the left of the umbilicus.
Superficial Surgical Dissection
Deepen the wound in line with the skin incision by cutting through the fat to reach the fibrous rectus sheath. Incise the sheath longitudinally, beginning in the lower half of the incision, to reveal the two rectus abdominis muscles (over it to prevent loops of bowel from slipping free. It is much safer to keep the bowel within the abdominal cavity, but do not pack it so tightly that vascular compromise is induced. In women, the uterus may be retracted forward with a 0 silk suture placed in its fundus and tied to the Balfour retractor.
Figure 6-15 Make a longitudinal midline incision from just below the umbilicus to just above the pubic symphysis. Extend it superiorly, to the left of the umbilicus.
Superficial Surgical Dissection
Deepen the wound in line with the skin incision by cutting through the fat to reach the fibrous rectus sheath. Incise the sheath longitudinally, beginning in the lower half of the incision, to reveal the two rectus abdominis muscles (over it to prevent loops of bowel from slipping free. It is much safer to keep the bowel within the abdominal cavity, but do not pack it so tightly that vascular compromise is induced. In women, the uterus may be retracted forward with a 0 silk suture placed in its fundus and tied to the Balfour retractor.
Infiltrate the tissue over the anterior surface of the sacral promontory with a few milliliters of saline solution to make dissection easier and to allow identification of the presacral parasympathetic nerves that run down through this area. For the L5-S1 disc space, incise the posterior peritoneum in the midline over the sacral promontory. The sacral artery runs down along the anterior surface of the sacrum and must be ligated or clipped. The ureters should be well lateral to the surgical approach.
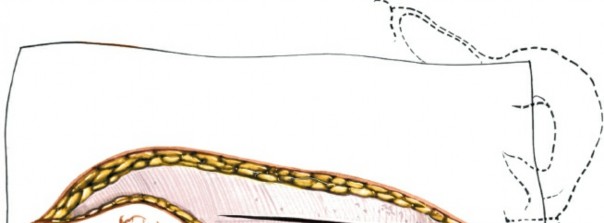
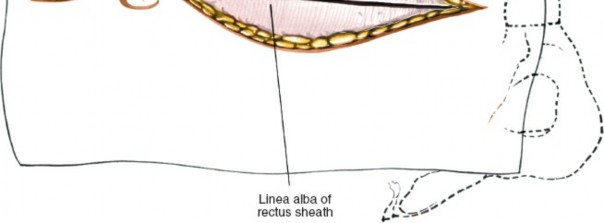 Figure 6-16 Deepen the wound in line with the skin incision by cutting through the fat to reach the fibrous rectus sheath. Incise the sheath longitudinally.
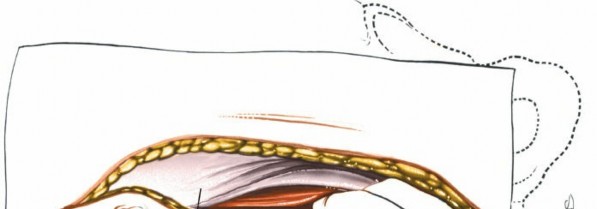
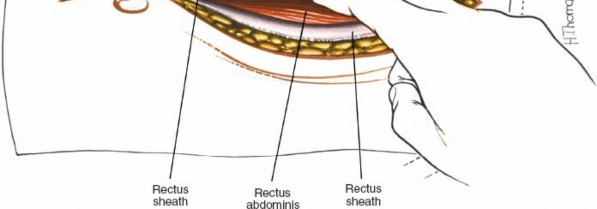 Figure 6-17 With your fingers, separate the rectus abdominis muscles in the midline to expose the peritoneum.
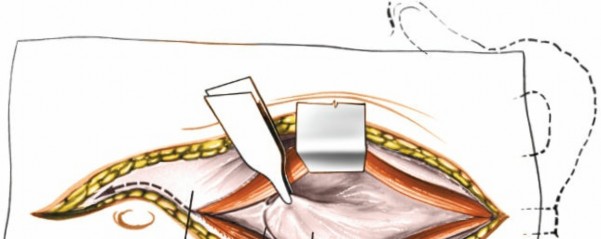
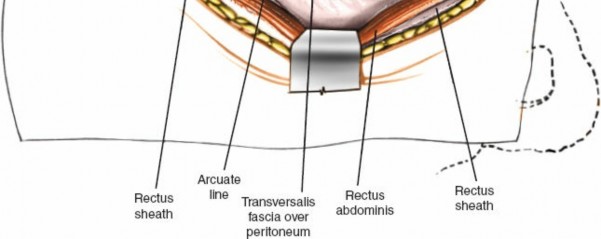 Figure 6-18 Pick up the peritoneum with forceps and incise it.
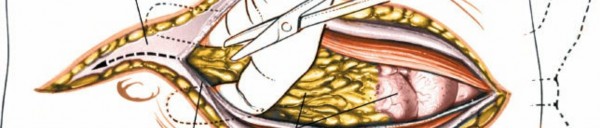
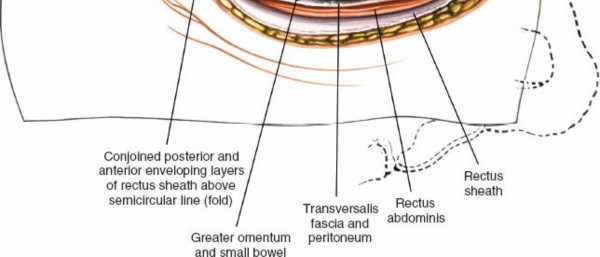 Figure 6-19 With one hand inside the abdominal cavity to protect the viscera, carefully deepen the upper half of the incision, staying in the midline and cutting through the linea alba.
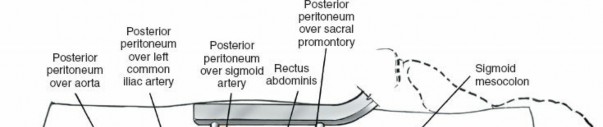
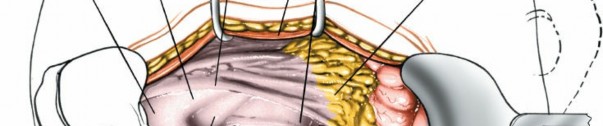
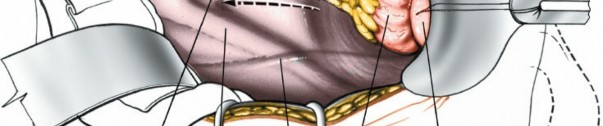
 Figure 6-20 Use a self-retaining retractor to retract the rectus abdominis muscles laterally and the bladder distally. Carefully mobilize and retract the bowel in a cephalad position, keeping it inside the abdominal cavity. Observe the posterior peritoneum overlying the bifurcation of the great vessels and the promontory of the sacrum. Incise the peritoneum longitudinally. Preserve any small nerve fibers that are found. Identify the L5-S1 disc space either by palpating its sharp angle or by inserting a metallic marker and taking a radiograph. The L5-S1 disc space lies below the bifurcation of the aorta; it should be possible to expose it fully without mobilizing any of the great vessels (Figs. 6-21 and 6-22).
Operating on the L4-5 disc space requires a larger exposure; mobilizing the great vessels is necessary, unless the vascular bifurcation occurs much higher. Carefully incise the peritoneum at the base of the sigmoid colon and mobilize the colon upward and to the right to expose the bifurcation of the aorta, the left common iliac artery and vein, and the left ureter. Identify the aorta just above its bifurcation and gently begin blunt dissection on its left side. Identify and ligate the fourth and fifth left
lumbar vessels, then divide them. Now, the aorta, vena cava, and left common iliac vessels can be moved to the right, exposing the L4-5 disc space. This exposure is difficult to achieve; a high incidence of venous thrombosis has been reported with anterior surgery at this level. Take care not to injure the left ureter, which crosses the left common iliac vessels roughly over the sacroiliac joint. The ureter may have to be moved laterally, but mobilize it only as much as necessary to reduce the risk of postoperative ischemic stricture formation.
An alternative method is to approach the L4-5 disc space from below, working upward into the apex of the vascular bifurcation. Isolate the left and right common iliac artery, placing umbilicus loops around them. Retract the two arteries cephalad and laterally to expose the common iliac veins. Dissect into the confluence of the veins and isolate the left common iliac vein with a loop. Gently retract the venous structures to expose the disc space. Use only minimal retraction to avoid injuring the intima, which may lead to venous thrombosis (see Fig. 6-22).
Dang
Nerves
The
superior hypogastric plexus
6-21 11


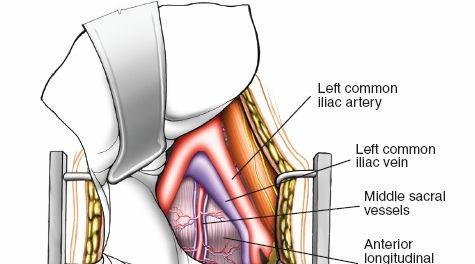
 Figure 6-21 Retract the posterior peritoneum to reveal the bifurcation of the aorta and vena cava. Ligate the middle sacral artery. Identify the superior hypogastric parasympathetic plexus overlying the aorta and the sacral promontory. #### Arteries and Veins
The
middle sacral artery
can be a troublesome bleeder in the region of the L5-S1 disc space and must be tied off (see Fig. 6-21).
The
aorta
and
inferior vena cava
are tethered to the anterior surface of the lumbar vertebrae by the lumbar vessels. These smaller vessels must be ligated and cut to allow the great vessels to be lifted forward off the lumbar vertebrae, exposing the L4-5 disc space (see Fig. 6-12). It is important to dissect these vessels out carefully without cutting them flush with the aorta. If the vessels are cut flush, there will be, in effect, a hole in the aorta, and the bleeding may be extremely difficult to control. Mobilization of the venous structures should be undertaken very carefully, because they are fairly fragile and easily traumatized. Damage to these vessels may result in thrombosis; mobilization and retraction should be kept to a minimum.
Special Structures
The
ureter
must be mobilized laterally, particularly for exposure of the
L4-5 disc space. It can be identified easily by gently pinching it with a pair of nontoothed forceps to induce peristalsis (see Fig. 6-34).
How to Enlarge the Approach
#### Local Measures
6-22).
Extensile Measures
In theory, this exposure can be extended to the xiphisternum, but the exposure of higher discs almost always is performed better through a retroperitoneal approach.


 Figure 6-22 Mobilize the great vessels as needed for additional exposure. Expose the L5-S1 disc space subperiosteally. ## Anterior Retroperitoneal Approach to the
Lumbar Spine
This approach is used mainly for procedures on the L5/S1 disc space. These include fusion operations for degenerative disease, debridement and fusion of spinal tuberculosis, and insertion of disc prostheses. Although the approach can be used at higher levels the anterolateral retroperitoneal approach may be preferred in such cases.
Position of the Patient
Position the patient lying flat and supine on a radiolucent table.
Landmarks and Incisions
The landmarks on the anterior abdominal wall used for surgery vary dependant on the disc level or levels to be approached. The landmark for access to the L5-S1 disc is usually distal to the midway mark between the umbilicus and symphysis. This is not directly over the disc space being distal to it. A more distal incision is required for the L5-S1 disc because of its downward orientation. The anterior landmark for the L4-5 disc is generally located a few centimeters from the umbilicus, and the L3-4 landmark is a few centimeters proximal to the umbilicus. The final localization should be done by fluoroscopy prior to the incision as the disc level may vary.
Figure 6-22 Mobilize the great vessels as needed for additional exposure. Expose the L5-S1 disc space subperiosteally. ## Anterior Retroperitoneal Approach to the
Lumbar Spine
This approach is used mainly for procedures on the L5/S1 disc space. These include fusion operations for degenerative disease, debridement and fusion of spinal tuberculosis, and insertion of disc prostheses. Although the approach can be used at higher levels the anterolateral retroperitoneal approach may be preferred in such cases.
Position of the Patient
Position the patient lying flat and supine on a radiolucent table.
Landmarks and Incisions
The landmarks on the anterior abdominal wall used for surgery vary dependant on the disc level or levels to be approached. The landmark for access to the L5-S1 disc is usually distal to the midway mark between the umbilicus and symphysis. This is not directly over the disc space being distal to it. A more distal incision is required for the L5-S1 disc because of its downward orientation. The anterior landmark for the L4-5 disc is generally located a few centimeters from the umbilicus, and the L3-4 landmark is a few centimeters proximal to the umbilicus. The final localization should be done by fluoroscopy prior to the incision as the disc level may vary.
Fig. 6-23
Internervous Plane
An interval just medial to the rectus abdominis and under the rectus is developed. The rectus is innervated segmentally.
Superficial Surgical Dissection
6-246-26). Identify and preserve the inferior epigastric vessels. Use blunt dissection to
Fig. 6-27).
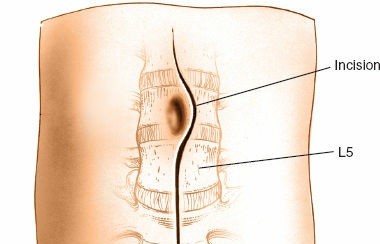
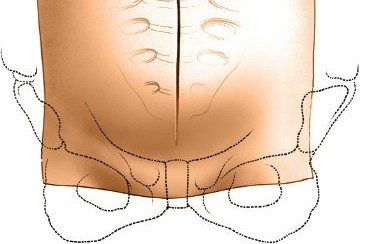 Figure 6-23 The landmarks for an anterior minimally invasive retroperitoneal approach are shown. The final localization should be done radiographically prior to the incision as the disc level may vary. The incisions can be transverse, longitudinal, or slightly oblique. The incisions for L3-4 and L4-5 are generally performed directly over the disc level, whereas the L5-S1 disc must be approached through a more distal incision given the downward orientation of the disc.
!6-286-29). The veins require clipping, cauterizing, and ligating to divide them and mobilize the left iliac vein.
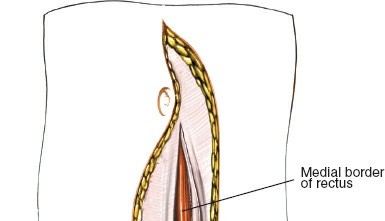
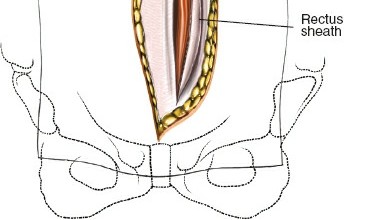 Figure 6-25 The rectus fascia is cut longitudinally on the medial edge of the muscle.
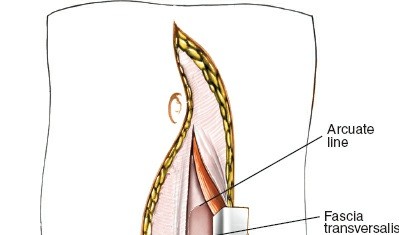
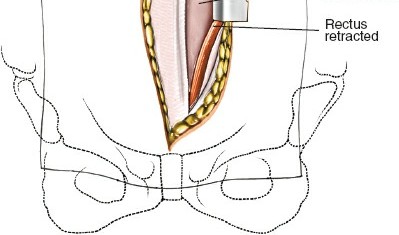 Figure 6-26 The medial edge is identified and the rectus is lifted up and retracted to expose the dorsal fascia and the arcuate line.
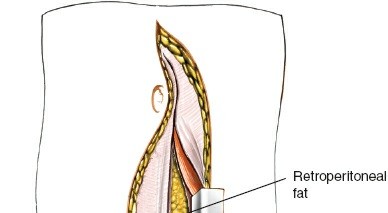
 Figure 6-27 The epigastric vessels are identified and preserved. Blunt dissection is used to develop a plane dorsal to the rectus abdominis and toward the lower quadrant. If exposing proximal to L5, the fascia of the arcuate line is divided.
!
Dang
Nerves
The presacral plexus of nerves is critically important to sexual function. Dissection should be gentle and blunt with all the soft tissues anterior to the disc moved as a unit with the retroperitoneum. Bipolar cautery should be used selectively.
The sympathetic chain can be found medial and deep to the psoas on the lateral vertebral body particularly when exposing proximal to L5.
Arteries and Veins
The middle sacral artery can be a troublesome bleeder in the region of the L5-S1 disc space and must be tied off (see Fig. 6-21).
The aorta and inferior vena cava are tethered to the anterior surface of the lumbar vertebrae by the lumbar vessels. These smaller vessels must be ligated and cut to allow the great vessels to be lifted forward off the lumbar vertebrae, exposing the L4-5 disc space (see Fig. 6-12). It is important to dissect these vessels carefully, without cutting them flush with the aorta. If the vessels are cut flush, there will be, in effect, a hole in the aorta, and the bleeding may be extremely difficult to control. Mobilization of the venous structures should be undertaken very carefully, because they are fairly fragile and easily traumatized. Damage to these vessels may result in thrombosis; mobilization and retraction should be kept to a minimum.
Special Structures
The ureter can be mobilized lateral or medial with the retroperitoneal approach. It is generally easier to let the ureter be moved medially with the rest of the retroperitoneum. It can be identified by inducing peristalsis by gently pinching it with a pair of nontoothed forceps.
How to Enlarge the Approach
The retroperitoneal approach can expose from the distal aspect of T11 to S1. Exposing more proximal discs requires control and division of the segmental vessels to mobilize the aorta and vena cava.
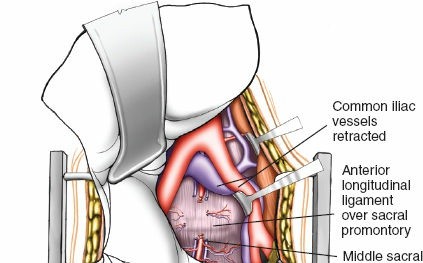
 Figure 6-29 The soft tissues in front of the L5-S1 disc and sacral promontory are bluntly pushed laterally to expose the middle sacral vein(s). ## Applied Surgical Anatomy of the Anterior Approach to the Lumbar Spine
Overview
The anterior approach to the lumbar spine involves three stages of dissection. The superficial stage consists of cutting the skin and subcutaneous tissues down to the peritoneum. Below the skin lies the linea alba, a fibrous structure in the midline that is identified most easily in the upper abdomen. Cutting the linea alba in the lower half of the abdomen exposes the rectus muscle, which can be separated by finger pressure. Beneath it is the posterior rectus sheath and peritoneum.
Figure 6-29 The soft tissues in front of the L5-S1 disc and sacral promontory are bluntly pushed laterally to expose the middle sacral vein(s). ## Applied Surgical Anatomy of the Anterior Approach to the Lumbar Spine
Overview
The anterior approach to the lumbar spine involves three stages of dissection. The superficial stage consists of cutting the skin and subcutaneous tissues down to the peritoneum. Below the skin lies the linea alba, a fibrous structure in the midline that is identified most easily in the upper abdomen. Cutting the linea alba in the lower half of the abdomen exposes the rectus muscle, which can be separated by finger pressure. Beneath it is the posterior rectus sheath and peritoneum.
The anatomy of the intermediate stage, which involves packing away the bowel, is the anatomy of the abdominal cavity and is not included in this book.
The deep stage of dissection consists of mobilizing the retroperitoneal structures that lie anterior to the L4-5 and L5-S1 disc spaces. These structures include the aorta, vena cava, common iliac vessels, lumbar vessels, ureter, and presacral plexus.
Landmarks and Incision
#### Landmarks
The
umbilicus
lies superficial to the linea alba. It usually is about halfway between the pubic symphysis and the infrasternal notch, although it may be pulled lower in obese patients.
The
linea alba
is marked externally by a groove in the midline of the abdomen. It divides one side of the rectus abdominis muscle from the other. In the upper abdomen, it actually separates the two muscles; cutting through it leads directly down to the peritoneum, with neither muscle being exposed. Below the umbilicus, the linea alba is less distinct; it does not separate the two rectus muscles.
The _pubic symphysis_Fig. 6-30).
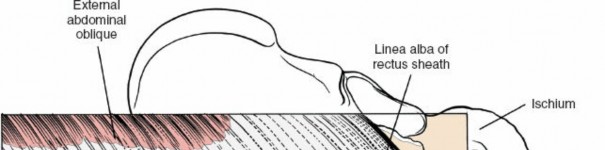


 Figure 6-30 Superficial aspect of the distal rectus sheath. Note that the fibers of the external oblique appear laterally. #### Incision
The midline longitudinal incision arches around the umbilicus. Because the skin is mobile and loosely attached to the tissues immediately beneath it, it heals with a thin scar. The cleavage or tension lines below the umbilicus appear in a chevron pattern, with the apex of the V in the midline.
The skin of the anterior abdominal wall is supplied segmentally from T7 in the region of the xiphoid to T12 just above the inguinal ligament. These segmental nerves do not cross the midline. Therefore, midline incisions do not cut any major cutaneous nerves.
Superficial Surgical Dissection and Its Dangers
6-31 and 6-32).
6-336-32).
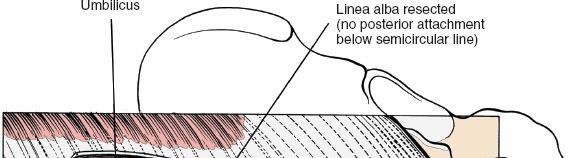


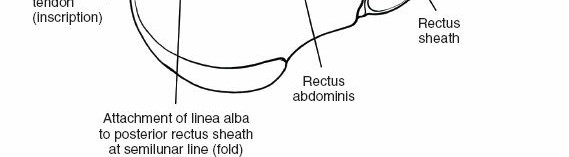 Figure 6-31 The anterior portion of the rectus sheath is resected, revealing the fibers of the rectus abdominis muscle. Distal to the semicircular line, the linea alba (which is shown elevated by sutures) overlies the muscle fibers of the rectus abdominis but does not separate them. Proximal to the semicircular line, the linea alba separates the rectus abdominis muscles by attaching to the posterior rectus sheath, which begins at the semicircular line.
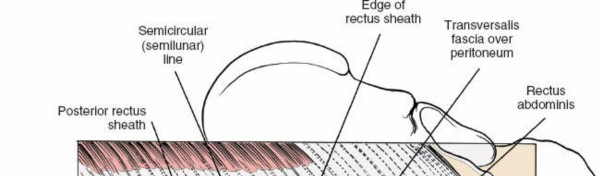


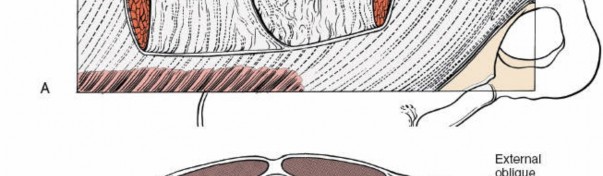
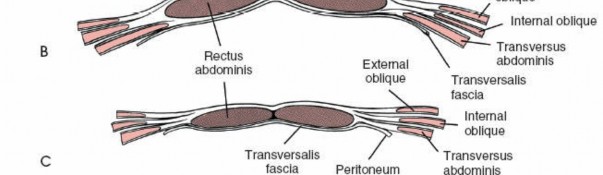 Figure 6-32A: The rectus abdominis muscle has been resected. The posterior aspect of the rectus sheath ends just distal to the umbilicus. Its distal edge is called the semicircular line. The linea alba attaches to the posterior rectus sheath, thus separating the rectus abdominis muscles proximal to the semicircular line. B: Cross section above the semicircular line. Note that the rectus abdominis muscles are enveloped by the posterior and anterior rectus sheaths and separated from each other by the linea alba. C: Cross section below the semicircular line. The rectus sheath exists only anteriorly. Posteriorly is the transversalis fascia and peritoneum.
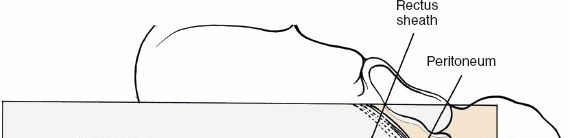


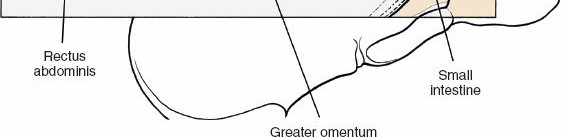 Figure 6-33 The posterior rectus sheath has been removed to reveal the peritoneum and the abdominal viscera. The inferior epigastric artery supplies blood to the lower half of the rectus abdominis muscle. The artery lies between the muscle and the posterior part of the rectus sheath. If the surgical plane remains in the midline, this vessel should escape injury. If the artery is damaged when the rectus muscle is mobilized, it can be tied with impunity.
Deep Surgical Dissection and Its Dangers
Deep surgical dissection consists of freeing the distal ends of the aorta and the vena cava from the vertebrae in the L4-5 vertebral area. The aorta divides on the anterior surface of the L4 vertebra into the two common iliac arteries. Just below this bifurcation, the common iliac vessels divide in turn at about the S1 level into the internal and external iliac vessels. The
Figure 6-33 The posterior rectus sheath has been removed to reveal the peritoneum and the abdominal viscera. The inferior epigastric artery supplies blood to the lower half of the rectus abdominis muscle. The artery lies between the muscle and the posterior part of the rectus sheath. If the surgical plane remains in the midline, this vessel should escape injury. If the artery is damaged when the rectus muscle is mobilized, it can be tied with impunity.
Deep Surgical Dissection and Its Dangers
Deep surgical dissection consists of freeing the distal ends of the aorta and the vena cava from the vertebrae in the L4-5 vertebral area. The aorta divides on the anterior surface of the L4 vertebra into the two common iliac arteries. Just below this bifurcation, the common iliac vessels divide in turn at about the S1 level into the internal and external iliac vessels. The
internal iliac is the more medial of the two (Fig. 6-34).
The aorta and vena cava are held firmly onto the anterior parts of the lower lumbar vertebrae by the lumbar vessels. These segmental vessels must be mobilized to permit the aorta and vena cava to be moved (see Fig. 6-12). Because the arterial structures are easier to dissect and more muscular than are the thin-walled venous structures, the preferred approach to the L4-5 disc space is from the left, the more arterial side. The median sacral artery originates from the aorta at its bifurcation at L4 and runs in the midline, over the sacral promontory and down into the hollow of the sacrum (see Fig. 6-35). The lumbosacral disc usually lies in the V that is formed by the two common iliac vessels. Nevertheless, the level at which the vessels bifurcate may vary; on rare occasions, they may have to be mobilized to expose the L5-S1 disc space.
Note that the left common iliac vein lies below the left common iliac artery, whereas the right common iliac artery lies below and medial to the right common iliac vein. Therefore, special care must be taken when mobilizing the left side of the vascular V, because the vessel closest to the surgery is the thin-walled vein, not the artery (Fig. 6-35; see Fig. 6-34).
6-34 6-35
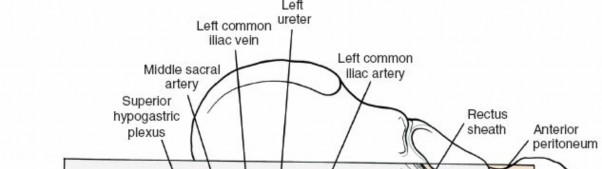


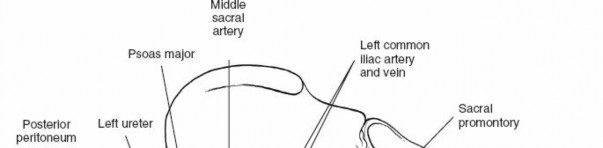
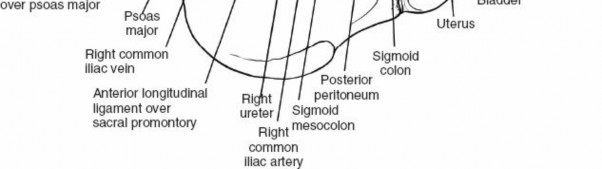 Figure 6-34 The abdominal viscera have been retracted proximally, and the retroperitoneum has been resected to reveal the great vessels at their bifurcation, the ureters, and the presacral (superior hypogastric) plexus.
!6-36; see Fig. 6-35).
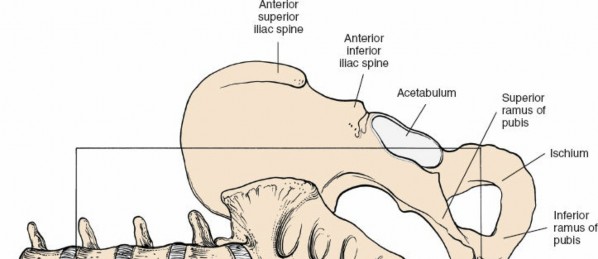
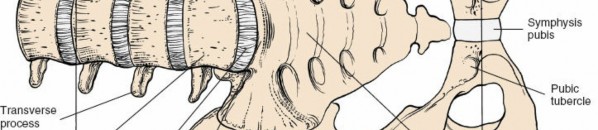
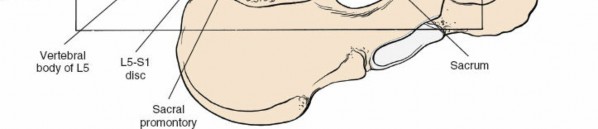 Figure 6-36 Osteology of the anterior aspect of the pelvis and lumbosacral spine. ## Anterolateral (Retroperitoneal) Approach to the Lumbar Spine
The retroperitoneal approach to the anterior part of the lumbar spine has several advantages over the transperitoneal approach. First, it provides access to all vertebrae from L1 to the sacrum, whereas the transperitoneal approach is very difficult to use above the level of L4. Second, it allows drainage of an infection, such as a psoas abscess, without the risk of contaminating the peritoneal cavity and causing a postoperative ileitis. Because of the arrangement of the vascular anatomy of the retroperitoneal space, however, it is slightly more difficult to reach the L5-S1 disc space using this retroperitoneal approach.
The uses of this approach include the following:
1. Spinal fusion
2. Drainage of psoas abscess and curettage of infected vertebral body
3. Resection of all or part of a vertebral body and/or intervertebral disc and associated bone grafting
4. Biopsy of a vertebral body when a needle biopsy is either not possible or hazardous
5. Insertion of disc prosthesis
Position of the Patient
Place the patient on a radiolucent operating table in the semilateral position. The patient’s body should be at about a 45- to 90-degree angle to the horizontal, facing away from the surgeon. Keep the patient in this position throughout the surgery by placing sandbags under the hips and shoulders or by using a kidney rest brace to hold the patient. The angle allows the peritoneal contents to fall away from the incision. Alternatively, place the patient supine on the operating table and tilt the table at 45 degrees to the horizontal away from the surgeon. This position has the advantage of not putting the psoas muscle on stretch (Fig. 6-37). Ensure that you can obtain adequate radiographs of the area of the spine to be approached before prepping and draping.

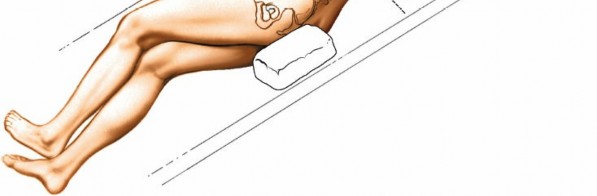 Figure 6-37 Place the patient in the semilateral position for the anterolateral (retroperitoneal) approach to the lumbar spine. The approach can be done with the left or right side up depending on whether the surgeon prefers to work on the “aortic side” or the “caval side.”
Landmarks and Incision
#### Landmarks
Figure 6-37 Place the patient in the semilateral position for the anterolateral (retroperitoneal) approach to the lumbar spine. The approach can be done with the left or right side up depending on whether the surgeon prefers to work on the “aortic side” or the “caval side.”
Landmarks and Incision
#### Landmarks
Palpate the
12th rib
in the affected flank and the
pubic symphysis
in the lower part of the abdomen. Palpate the lateral border of the
rectus abdominis muscle
about 5 cm lateral to the midline.
Incision
Fig. 6-38).
Internervous Plane
6-39).
Superficial Surgical Dissection
6-40).
6-41). Under the internal oblique muscle lies the transversus abdominis muscle. Divide this in line
Figs. 6-426-436-476-48).
!6-44). Gently mobilize the peritoneal cavity and its contents and retract them medially (Fig. 6-45). Carry out this dissection from either the left lower quadrant or the right upper quadrant, depending on the side that needs to be exposed.
Place a Deaver-type retractor over the peritoneal contents and retract them to the right upper quadrant. The ureter, which is attached loosely to the peritoneum, is carried forward with it.
Deep Surgical Dissection
Identify the psoas fascia, but do not enter the muscle. Any existing psoas abscess is easily palpable at this point. If one is found, it should be entered from its lateral side with finger dissection. Follow the abscess cavity with a finger directly to the infected disc space or spaces. If there is no psoas abscess, follow the surface of the psoas muscle medially to reach the anterior lateral surface of the vertebral bodies.
The aorta and vena cava effectively are tied to the waist of the vertebral bodies by the lumbar arteries and veins. These smaller vessels must be located individually on the involved vertebrae and tied so that the aorta and vena cava can be mobilized and the anterior part of the vertebral body reached. Make sure that the lumbar vessels are not cut flush with the aorta; a slipped tie then would prove hard to deal with (Figs. 6-46 and 6-49).
Place a needle into the involved lumbar vertebra or disc, and take a radiograph to identify the exact location.
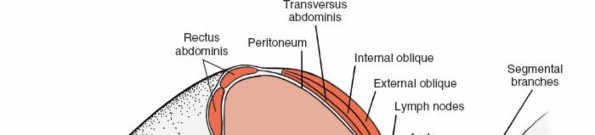
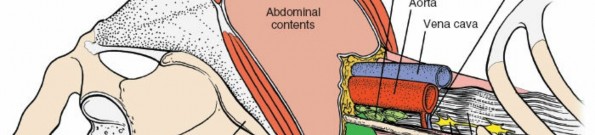
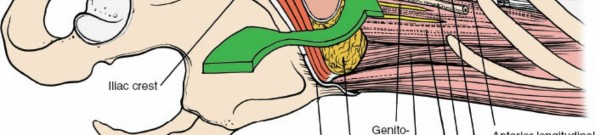
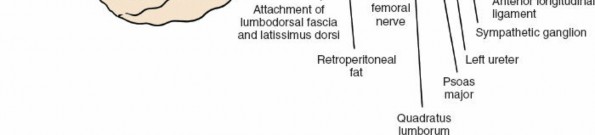 Figure 6-39
The anterior abdominal musculature and viscera have been transected and removed at the level of the iliac crest. The
arrow
indicates the route of surgery between the peritoneum anteriorly and the retroperitoneal structures posteriorly.
Figure 6-39
The anterior abdominal musculature and viscera have been transected and removed at the level of the iliac crest. The
arrow
indicates the route of surgery between the peritoneum anteriorly and the retroperitoneal structures posteriorly.
Dang
Nerves
The
sympathetic chain
lies on the lateral aspect of the vertebral body and on the most medial aspect of the psoas muscle. It is easy to identify as the tissue is cleared from the front of the vertebrae.
The
genitofemoral nerve
Figs. 6-45 and 6-49).
Vessels
The
segmental lumbar arteries and veins
Fig. 6-46).
The
vena cava
may be injured if the peritoneal contents are retracted vigorously when the approach is made from the right side. The aorta is a much tougher structure that is more resistant to injury.
The
aorta
is easy to identify. Its pulsating length can be palpated (see Fig. 6-49).
Ureter
The
ureters
6-49).
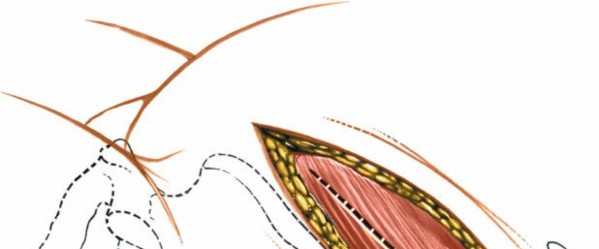
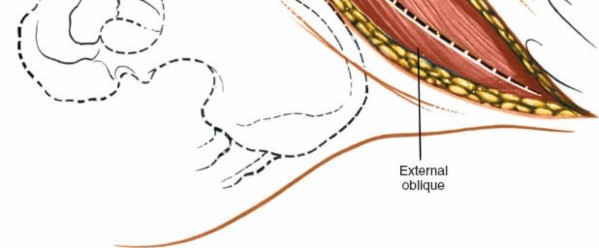 Figure 6-40 Incise the external oblique muscle and aponeurosis in line with its fibers and in line with the skin incision.
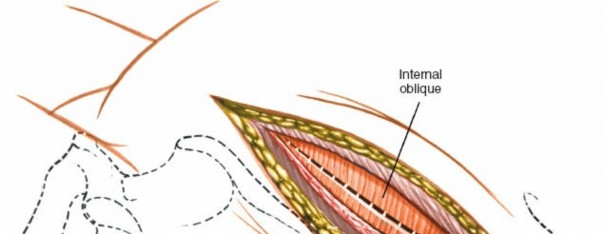
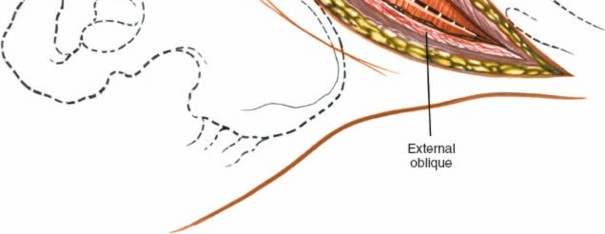 Figure 6-41 Divide the internal oblique in line with the skin incision and perpendicular to the line of its muscular fibers.
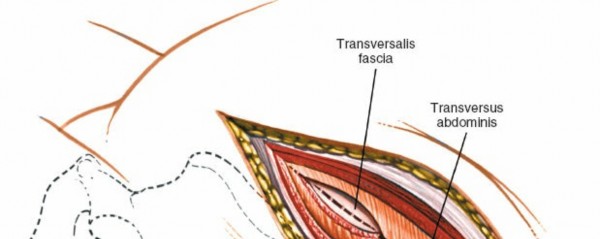
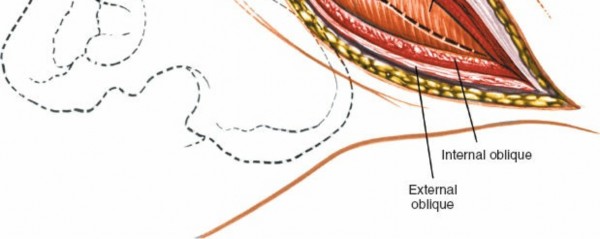 Figure 6-42 Divide the underlying transversus abdominis muscle in line with the skin incision.
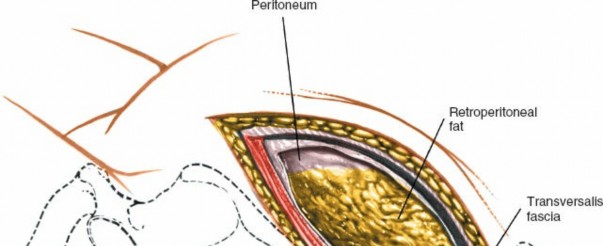
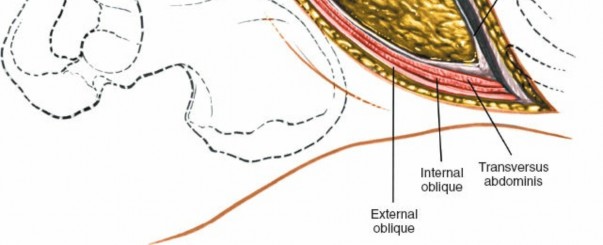 Figure 6-43 In the anterior part of the wound, identify the peritoneum and its contents. Posteriorly, identify the retroperitoneal fat.
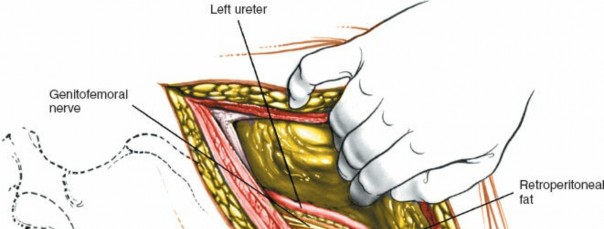
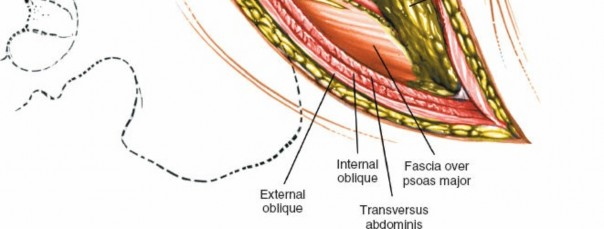 Figure 6-44 Using blunt finger dissection, develop the plane between the retroperitoneal fat and fascia that overlie the psoas muscle.
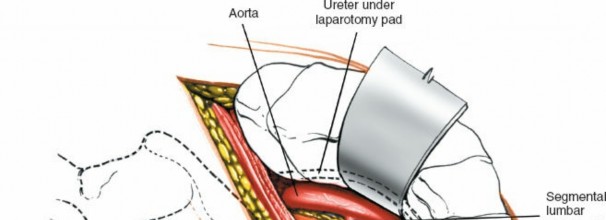
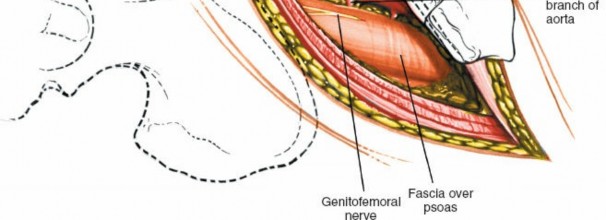 Figure 6-45 Mobilize the peritoneal cavity and its contents, and retract them medially.
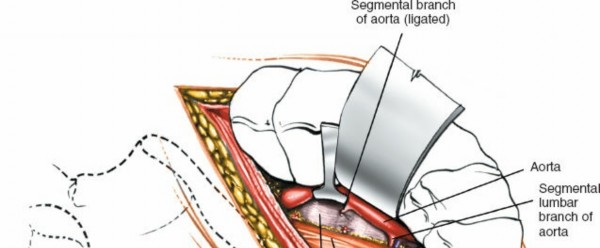
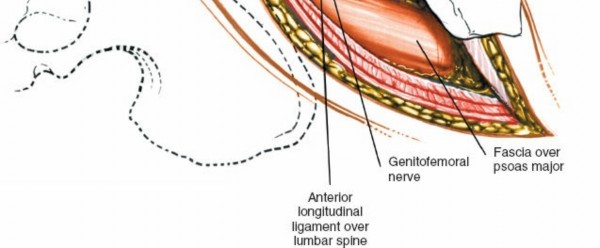 Figure 6-46 Ligate the lumbar vessels (segmental branches of the aorta). Mobilize the aorta and vena cava to reach the anterior part of the vertebral body.
How to Enlarge the Approach
#### Local Measures
Figure 6-46 Ligate the lumbar vessels (segmental branches of the aorta). Mobilize the aorta and vena cava to reach the anterior part of the vertebral body.
How to Enlarge the Approach
#### Local Measures
Chest wound retractors are the key to providing good visibility. They are self-retaining and offer excellent cephalad and caudad exposure. If the incision does not comfortably expose the involved vertebra, continue dissecting more posteriorly, taking additional fibers of the latissimus dorsi, and even possibly the quadratus lumborum, to allow more posterior exposure.
Extensile Measures
This incision generally is limited to the lower lumbar vertebrae. Parallel incisions may be made at higher levels for access to the upper lumbar vertebrae, but they involve rib resection and potentially are hazardous because of the proximity of the pleura and the kidney. They should be performed in conjunction with a general surgeon unless the orthopedic
surgeon has considerable experience in this area.


 Figure 6-47 The external and internal oblique have been resected to reveal their relationship to each other and to the transversus abdominis muscle.
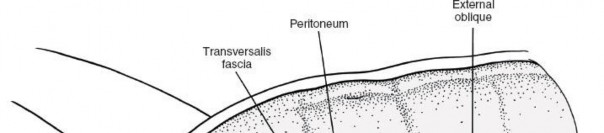


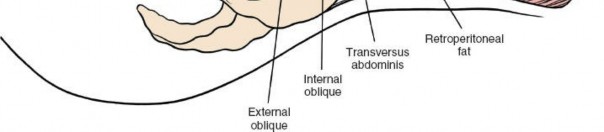 Figure 6-48 The transversus abdominis muscle is resected to reveal the peritoneum and the retroperitoneal fat.
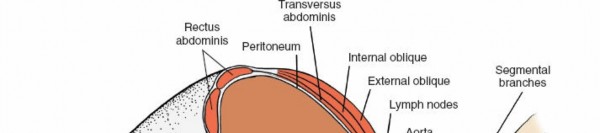
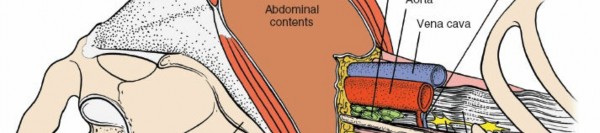
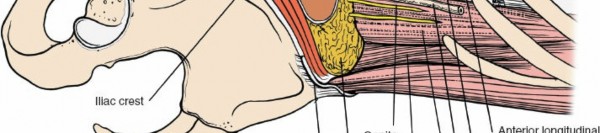
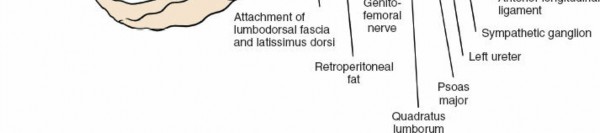 Figure 6-49 The abdominal muscles and viscera have been removed proximal to the level of the iliac crest to reveal retroperitoneal structures. Note the interval between the psoas muscle and the aorta. This interval provides access to the sympathetic chain and the anterior portion of the vertebral bodies. ## Posterior Approach to the Subaxial Cervical Spine
The midline posterior approach is the most commonly used approach to the cervical spine, allowing quick and safe access to the posterior elements of the entire cervical spine. It is used for the following:
2. Enlargement of spinal canal (laminectomy or laminoplasty)
3. Treatment of tumors
4. 18
5. Nerve root exploration
6. Excision of some herniated discs
7. Open reduction and internal fixation of cervical spine fractures/dislocations
Position of the Patient
6-50).
Alternatively, the patient may be seated upright, with the head held in a special brace. This position has the advantage of decreasing venous bleeding, but it has been implicated as a cause of air emboli.
Illumination is important; a cold-light headlamp or microscope use adds significant clarity to the operative field.
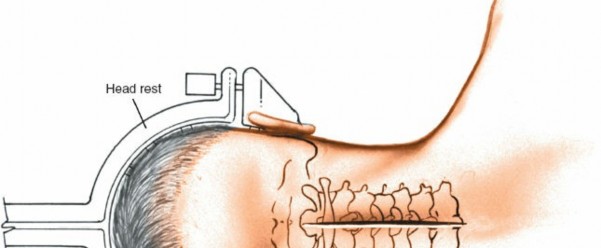
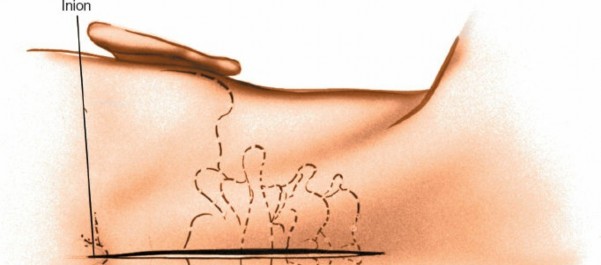
 Figure 6-50 The position of the patient for the posterior approach to the cervical spine. Landmarks and Incision #### Landmarks
The
spinous processes
are the most prominent landmarks in the vertebral arch. The C2 spinous process is one of the largest cervical spinous processes, as are C7 and T1. All three are quite palpable along the midline. Because it sometimes is difficult to distinguish between C7 and T1 during surgery, place a radiopaque marker (such as a needle) into the spinous process at the level of the pathology before making the incision, so that the exact location of the process can be identified. Sometimes placing a second marker into C7 may be helpful. Because the distance between the various cervical facet joints and interspaces is tiny, a significant portion of the neck may be dissected unnecessarily unless the vertebra being treated is identified, with the help of an x-ray film.
Incision
6-51). Use the needle that has been inserted into the spinous process as a guide to and center point of the incision. Note that the skin of the posterior cervical spine is thicker and less mobile than the skin of the anterior neck, and that the resultant scar usually is broader; however, hair usually covers most of the scar.
Internervous Plane
The internervous plane is in the midline, between the left and right paracervical muscles (which are supplied segmentally by the left and right posterior rami of the cervical nerves).
Superficial Surgical Dissection
Figs. 6-52 6-53).
6-546-55 6-56). If necessary, cauterize the segmental arterial vessel that runs between the facets.
This dissection is quite safe. If the original muscular incision is not in the midline and cuts into muscles, however, notable bleeding can occur that will require immediate cauterization. If the patient has significant spina bifida, it is possible to enter the spinal canal, injuring neural tissue.
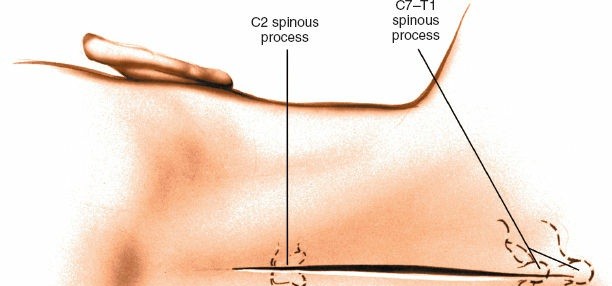
 Figure 6-51 Make a straight incision in the midline of the neck, centering the incision over the area of pathology.
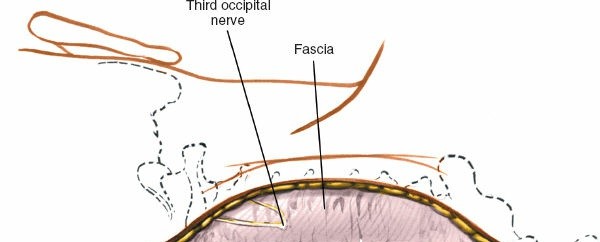
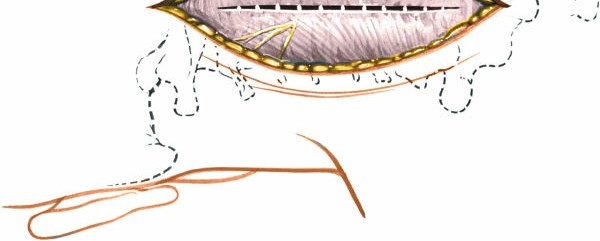 Figure 6-52 Retract the skin flaps and incise the fascia in the midline. Note the position of the third occipital nerve.
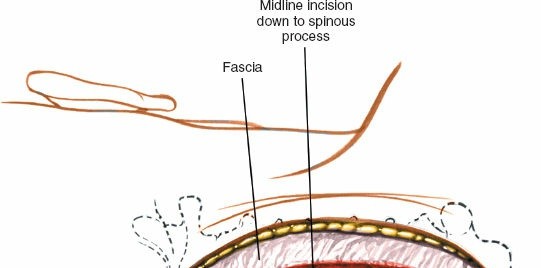
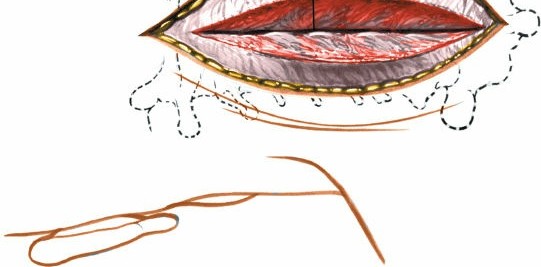 Figure 6-53 Continue the dissection down to the spinous processes through the nuchal ligament.


 Figure 6-54 Remove the paraspinal muscles subperiosteally from the posterior aspect of the cervical spine either unilaterally or bilaterally, depending on the exposure needed. Note that the vertebral artery is considerably anterior to the posterior facet joints.
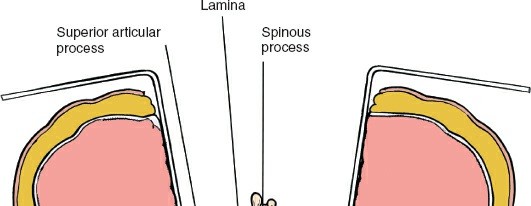
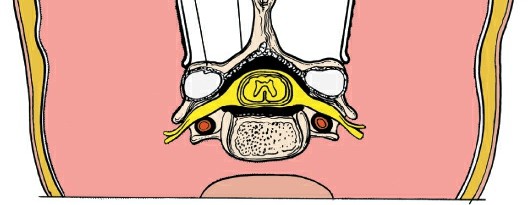 Figure 6-55 Bilateral exposure of the posterior cervical spine.
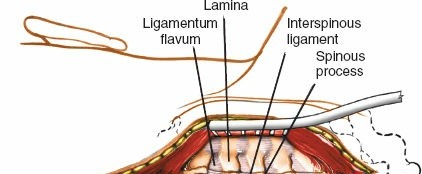
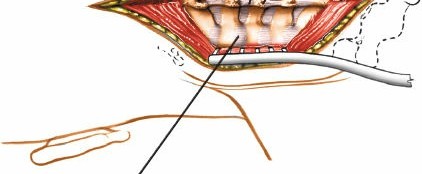
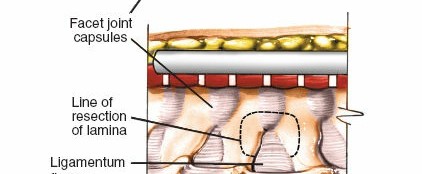
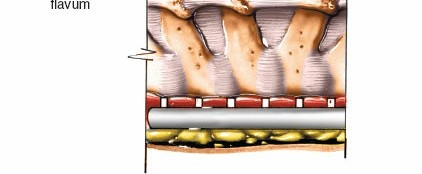 Figure 6-56 With a high-speed tool, then a small Kerrison rongeur, the caudal aspect of the lamina above, the rostral aspect of the lamina below, and the medial facet are removed. Deep Surgical Dissection Identify the ligamentum flavum that runs between the laminae. With a sharp blade, remove it from the leading edge of the lamina of the inferior vertebra. Place a flat, spatula-shaped instrument in the midline in the space between the two ligaments and cut down on the ligamentum flavum, with
d may bleed significantly. The veins can bleed anywhere; they are hardest to control between the anterior aspect of the cord and the posterior part of the vertebral body.
Dang
Nerves
Take care never to retract the exposed
spinal cord and its nerve root
overzealously. If enough bone is removed during the laminectomy, both medially and laterally, the exposure should be large enough to minimize the need for cord retraction. The nerve roots themselves should be retracted gently to prevent unnecessary tethering from postoperative adhesions. Occasionally, the facet joint must be removed partially to expose the nerve root.
The
posterior primary rami
of the cervical nerves supply the paraspinal muscles and sensation to the overlying skin; they rarely are in danger. Even if a posterior ramus must be cauterized, the nerve supply to the paracervical muscles and skin is so rich that the denervation has no clinical effect.
Vessels
The
venous plexus in the cervical canal
is plentiful and thin-walled; when it is retracted, it may bleed profusely. Frequently, bipolar (or Malis) cauterization is the best way to control the venous bleeding.
The
segmental blood supply
to the paracervical muscles may be cut or stretched as the muscles are stripped past the facet joints. The muscles often contract, stopping the small amount of hemorrhage; however, if the torn vessels can be seen, they should be cauterized. The blood supply to the posterior cervical muscles is generous. Cauterization causes no problem and allows for a dry surgical field. Occasionally, a nutrient foramen of the spinous processes or lamina may bleed. This can be controlled easily with a dab of bone wax or cautery placed directly against the foramen.

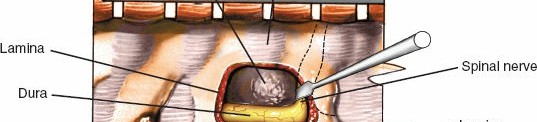
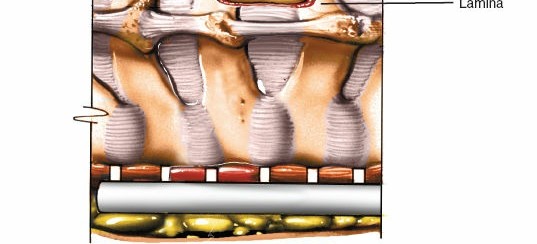 Figure 6-57 Perform a laminectomy, partial or complete, removing as much lamina as needed. Gently retract the nerve root medially to identify the posterior portion of the vertebral body.
!6-62).
How to Enlarge the Approach
#### Local Measures
To enlarge the exposure, lengthen the skin incision. In addition, an extra vertebra may have to be dissected out proximally or distally. The exposure may be expanded laterally by drawing the muscles well out and past the facet joints and onto the transverse processes without causing damage, except at C1 and C2. On occasion, the laminae even may be exposed bilaterally and the laminectomy extended both proximally and distally to improve exposure to the spinal cord and nerves.
Extensile Measures
The cervical midline incision is very extensile. It may be extended proximally (staying in the midline plane) as high as the occiput of the skull and as far distally as the coccyx via subperiosteal removal of the paraspinal muscles.
Applied Surgical Anatomy of the Posterior Approach to the Subaxial Cervical Spine Overview The muscles covering the posterior aspect of the cervical spine run longitudinally and are supplied segmentally. Although it is not critical to know the various individual posterior muscles of the cervical spine, being aware of these muscles and their layers is helpful. Because the approach itself is in the midline, it disturbs no vital structures and is relatively safe. Landmarks and Incision #### Landmarks
The spinous processes of the cervical spine, from C2 to C6, are bifid. C2 is the largest proximal cervical spinous process; the spinous processes of C3, C4, and C5 are relatively small. C7 is thicker, is not bifid, and has a tubercle at its end. Because it is the largest distal cervical spinous process, it is easy to palpate (see Fig. 6-63A).
All the spinous processes (except C7) are directed caudad and posteriorly, serving as points of attachment for the cervical muscles.
Incision
The skin on the back of the neck is thicker and less mobile than is the skin on the throat; it is attached directly to the underlying fascia. The incision runs perpendicular to the tension line of the skin, causing thicker scarring. Nevertheless, the wound usually heals well, and, because the nape of the neck is covered with hair, cosmetic concerns seldom are a problem.
Superficial Surgical Dissection
The ligamentum nuchae is a fibroelastic septum that takes origin from the occiput and inserts into the C7 spinous processes, sending septa down to each of the cervical spinous processes and dividing the more lateral paracervical muscles. The septum, which is almost vestigial in humans, is well developed in quadrupeds, because it helps the muscles support the head. It is the homologue of the supraspinous ligament in the rest of the spine. Dissection through it is safe, as long as it remains in the midline (see Fig. 6-63B).
The paracervical muscles in the cervical spine run in three layers. The most
superficial layer_6-59).
The _intermediate layer_6-60).
The _deep layer
is subdivided into three portions: Superficial, middle, and deep. The superficial portion consists of the semispinalis capitis, a relatively large muscle that lies immediately beneath the splenius. The semispinalis capitis takes its origin from the transverse processes of the
6-61).
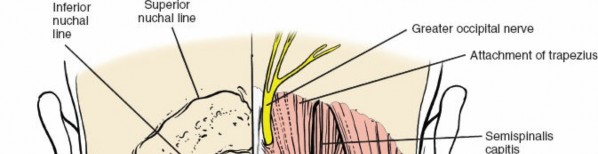
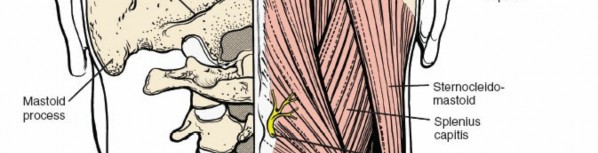
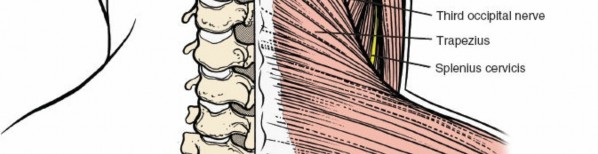
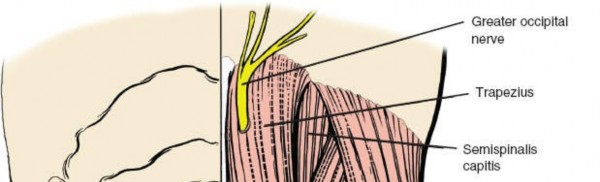
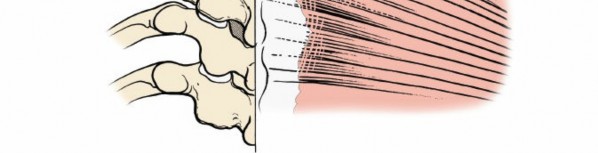 Figure 6-59 The superficial musculature of the cervical spine consists of the trapezius and the sternocleidomastoid muscles. Between these and deeper levels lies the intermediate layer, the splenius capitis.


!6-63B and 6-64).
Unless the patient has a large spina bifida, the spinal canal is safe
during this phase of the dissection. A wide, flat instrument (such as a Cobb dissector) held transverse to the lamina helps to protect the canal (see Fig. 6-54).
Deep Surgical Dissection and Its Dangers
As it does elsewhere in the spine, the ligamentum flavum connects the lamina on one vertebra to the adjacent vertebra, filling the space between the two. The ligaments are paired, one on each side, and may be separated in the midline by a tiny space. They take origin from the leading edge of the lower lamina and insert proximally into small ridges on the anterior surface of the higher vertebra, about one-third up the anterior surface.
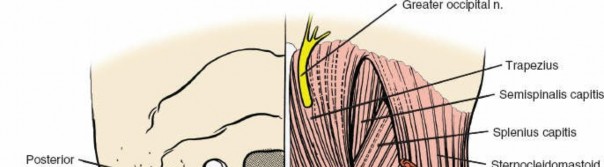


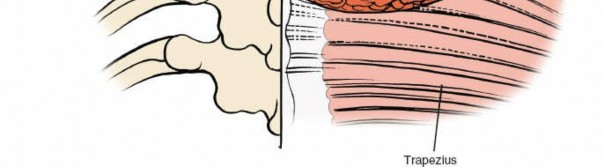 Figure 6-61 The semispinalis capitis has been resected to reveal the deepest layer, the semispinalis cervicis, and the multifidi muscles. Each ligamentum flavum extends from the midline laterally to the joint capsule. The spinal cord is directly beneath the ligamentum flavum. Therefore, the ligament must be removed carefully, so that the coverings of the cord (the outer dura, the middle arachnoid, the inner pia) do not tear. The posterior longitudinal ligament lies on the posterior surface of the cervical vertebral bodies, within the vertebral canal, and extends down through the entire spinal canal. The ligament attaches to each vertebra and disc; it is broadest in the cervical region. Over the ligament, on the floor of
the canal, lie large vertebral veins, comprising a nonvalvular venous plexus. These may bleed and require cauterization.
6-64).
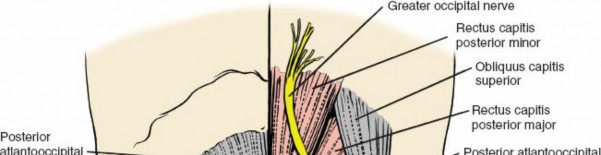


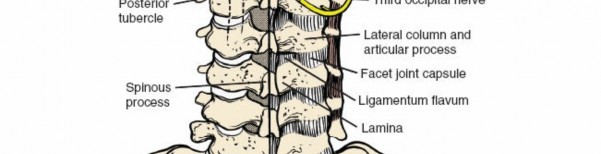
 Figure 6-62 The muscles of the suboccipital triangle of the neck consist of the rectus capitis posterior minor and major, and the obliquus capitis superior and inferior. Note the course of the vertebral artery on the superior border of the arch of C1. It is lateral to the midline. The course of the vertebral artery in the transverse foramen distal to C1 is anterior to the facet joints.
Rectus Capitis Posterior Major.
Origin. Tendinous, from spinous process of axis. Insertion. Into lateral part of the area below the inferior nuchal line of occipital bone. Action. Extends head and rotates it to same side. Nerve supply. Nerve branch of posterior primary ramus of C1.
Rectus Capitis Posterior Minor.
Origin. Tendinous, from tubercle of posterior arch of atlas. Insertion. Into medial part of nuchal line of occipital bone and surface beneath it, and foramen magnum (only muscle to take origin from posterior arch of C1). Action. Extends head. Nerve supply. A branch of posterior primary ramus of C1.
Obliquus Capitis Inferior.
Origin. From apex of spinous process of axis. Insertion. Into inferoposterior part of transverse process of atlas. Action. Rotates atlas; turns head toward same side. Nerve supply. Branches of posterior primary ramusof C1.
Obliquus Capitis Superior.
Origin. From tendinous fibers from upper surface of transverse process of atlas. Insertion. Into occipital bone between superior inferior nuchal lines; lateral to the semispinalis capitis. Action. Extends head and bends it laterally. Nerve supply. A branch of posterior primary division of first cervical nerve._
Figure 6-62 The muscles of the suboccipital triangle of the neck consist of the rectus capitis posterior minor and major, and the obliquus capitis superior and inferior. Note the course of the vertebral artery on the superior border of the arch of C1. It is lateral to the midline. The course of the vertebral artery in the transverse foramen distal to C1 is anterior to the facet joints.
Rectus Capitis Posterior Major.
Origin. Tendinous, from spinous process of axis. Insertion. Into lateral part of the area below the inferior nuchal line of occipital bone. Action. Extends head and rotates it to same side. Nerve supply. Nerve branch of posterior primary ramus of C1.
Rectus Capitis Posterior Minor.
Origin. Tendinous, from tubercle of posterior arch of atlas. Insertion. Into medial part of nuchal line of occipital bone and surface beneath it, and foramen magnum (only muscle to take origin from posterior arch of C1). Action. Extends head. Nerve supply. A branch of posterior primary ramus of C1.
Obliquus Capitis Inferior.
Origin. From apex of spinous process of axis. Insertion. Into inferoposterior part of transverse process of atlas. Action. Rotates atlas; turns head toward same side. Nerve supply. Branches of posterior primary ramusof C1.
Obliquus Capitis Superior.
Origin. From tendinous fibers from upper surface of transverse process of atlas. Insertion. Into occipital bone between superior inferior nuchal lines; lateral to the semispinalis capitis. Action. Extends head and bends it laterally. Nerve supply. A branch of posterior primary division of first cervical nerve._
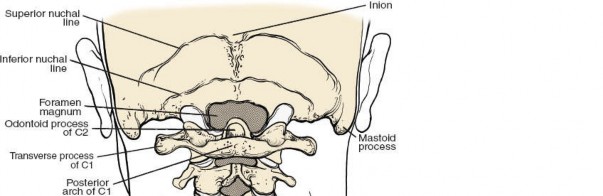
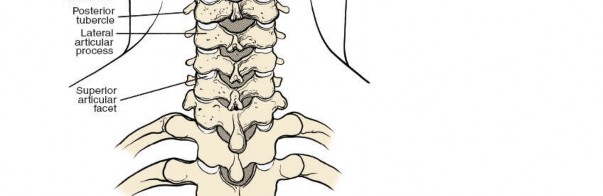
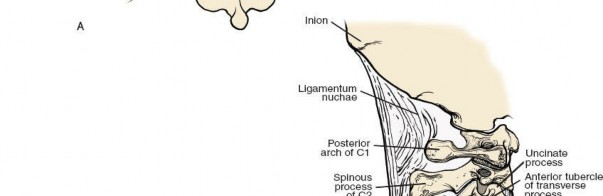
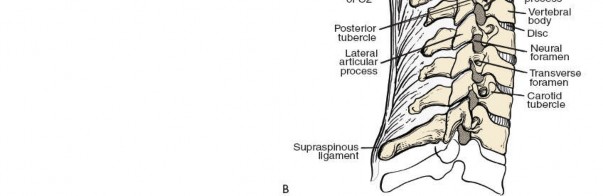 Figure 6-63
Osteology of the cervical spine in posterior (
A
) and lateral (
B
) views.
Figure 6-63
Osteology of the cervical spine in posterior (
A
) and lateral (
B
) views.


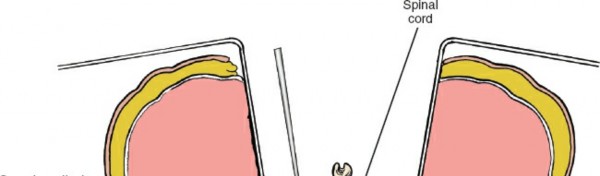
 Figure 6-64 Cross section of the cervical spine. Note that the vertebral artery is anterior to the nerve. ## Posterior Approach to the C1-2 Vertebral Space
The posterior approach to the specialized cervical vertebrae C1 and C2, the atlas and the axis, is similar to that for the rest of the cervical spine. Because the two vertebrae differ slightly in their anatomy and function, however, they are discussed separately. The uses for this approach are the following:
2. Decompression laminectomy
3. Treatment of tumors
4. Stabilization of fractures of C1 or C2
Position of the Patient
Place the patient prone, with the head and neck flexed to separate the occiput and the ring of the atlas (C1; see Fig. 6-50).
Landmarks and Incision
#### Landmarks
Palpate the
external occipital protuberance
high in the midline of the skull at the midpoint of the superior nuchal line. Although the
spinous process of C2
is the largest spinous process in the proximal part of the cervical spine, it is hard to palpate except as a resistance. C1 has no spinous process at all and is not palpable.
Incision
Fig. 6-65).
Internervous Plane
The midline plane lies between paracervical muscles supplied by branches of the left and right posterior primary rami of the proximal cervical nerve roots. The plane is internervous and extensile.
!6-666-67). Extend this fascial incision distally onto the spinous process of C3 and then proximally onto the tubercle of C1. Continue proximally, cutting down onto the external occipital protuberance.
6-68). Use a wide dissecting instrument (such as a Cobb elevator) to avoid inadvertently breaching the spinal canal. Note that the facet joints between C1 and C2 are about an inch further anterior than are those between C2 and C3. Carry the dissection up to the base of the occiput, if necessary, to expose the superior margin of the ring of C1 (see
Fig. 6-68).
Deep Surgical Dissection
6-69). This rarely is necessary. Usually, separating these membranes from bone is all that is needed to pass a wire underneath the arch of C1 so that the area can retain bone graft. Once these posterior ligaments have been removed, the dura of the cervical portion of the spinal cord is uncovered.
Dang
Nerves
In nontumorous conditions, a considerable gap exists between the dura and the bony ring at the level of C1-2, and the cord rarely has to be retracted. Retracting the cord is extremely hazardous, because overzealous retraction can cause death from respiratory paralysis; in principle, it simply should not be retracted.
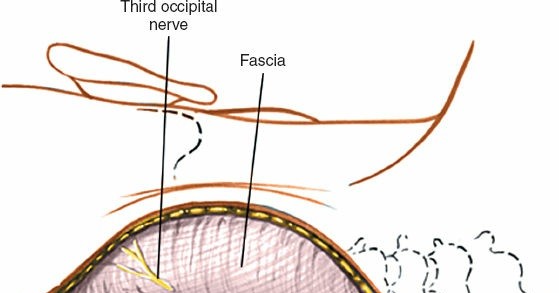
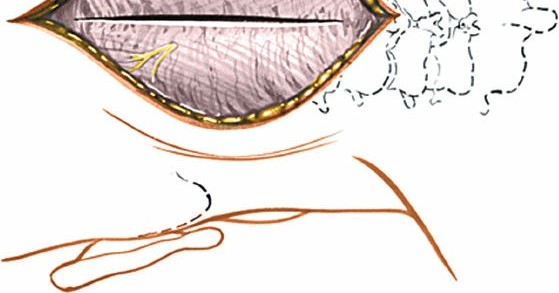 Figure 6-66Deepen the wound in line with the skin incision by incising the fascia and nuchal ligament in the midline of the neck. Two large cutaneous nerves,
the greater occipital nerve (C2)
and the **third occipital nerve (C3),
cross the operative field (see Figs. 6-59 and 6-62). These nerves, which are branches from the posterior rami, supply a large area of skin at the back of the scalp. They run upward from a lateral position, and midline dissection does not damage them. Take care when dissecting laterally to stay on bone and avoid damaging these nerves.
Figure 6-66Deepen the wound in line with the skin incision by incising the fascia and nuchal ligament in the midline of the neck. Two large cutaneous nerves,
the greater occipital nerve (C2)
and the **third occipital nerve (C3),
cross the operative field (see Figs. 6-59 and 6-62). These nerves, which are branches from the posterior rami, supply a large area of skin at the back of the scalp. They run upward from a lateral position, and midline dissection does not damage them. Take care when dissecting laterally to stay on bone and avoid damaging these nerves.
Vessels
The
vertebral artery
crosses the operative field. It passes from the transverse foramen of the atlas, immediately behind the atlantooccipital joint, and pierces the lateral angle of the posterior atlantooccipital membrane. It is vulnerable at that point during the approach (see
62).
How to Enlarge the Approach
#### Local Measures
Extend the skin incision proximally and dissect the paracervical muscles from their attachments to the skull. Extend the incision distally and strip the muscles off the posterior bony elements of C3.
Extensile Measures
Extend the incision distally. Then continue the midline approach to the spinous processes of the remaining cervical vertebrae. Theoretically, the approach can be extended down to the coccyx.
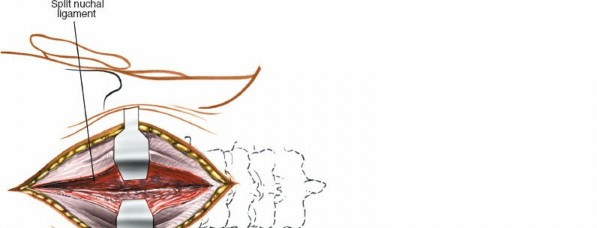
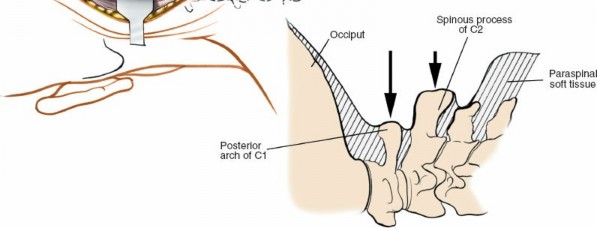 Figure 6-67
Incise the nuchal ligament down onto the large spinous processes of C2. Lateral view (
inset
). Note that the ring of C1 is further anterior than the spinous process of C2.
Figure 6-67
Incise the nuchal ligament down onto the large spinous processes of C2. Lateral view (
inset
). Note that the ring of C1 is further anterior than the spinous process of C2.
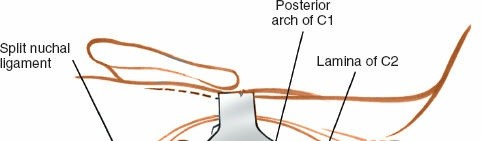
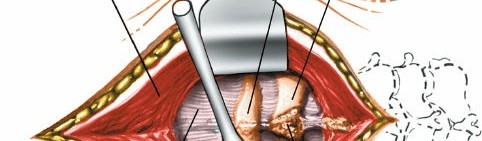
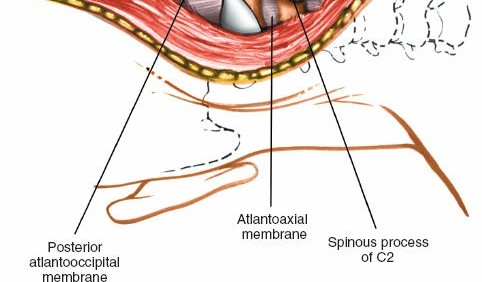 Figure 6-68 Remove the paracervical muscles from the posterior elements of C1 and C2. Carry the dissection up to the base of the occiput.
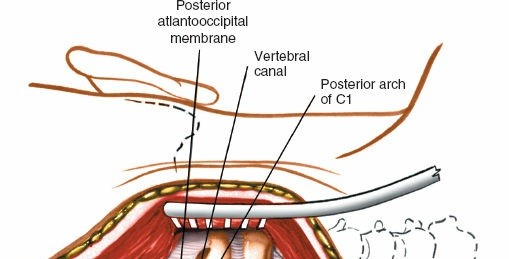
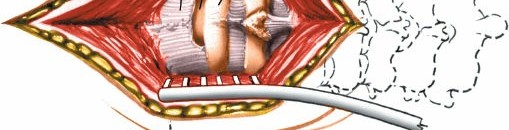
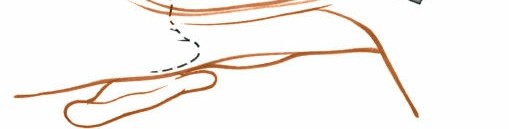 Figure 6-69 Remove the posterior atlantooccipital membrane from between C1 and the occiput, if necessary. ## Applied Surgical Anatomy of the Posterior Approach to the C1-2 Vertebral Space
Overview
C1 and C2 are specialized to permit the extreme motion of the upper cervical spine. As in other parts of the spine, the muscles covering C1 and C2 lie in three layers. The outer layer consists of the trapezius, a muscle of the upper limb. The intermediate layer is made up of the paraspinal muscles, in this case, the splenius capitis and the semispinalis capitis.
Figure 6-69 Remove the posterior atlantooccipital membrane from between C1 and the occiput, if necessary. ## Applied Surgical Anatomy of the Posterior Approach to the C1-2 Vertebral Space
Overview
C1 and C2 are specialized to permit the extreme motion of the upper cervical spine. As in other parts of the spine, the muscles covering C1 and C2 lie in three layers. The outer layer consists of the trapezius, a muscle of the upper limb. The intermediate layer is made up of the paraspinal muscles, in this case, the splenius capitis and the semispinalis capitis.
The anatomy of the area is unique in its deepest layer; there are four
pairs of small muscles that drive the unusual movements that these joints are capable of. The riskiest part of surgery in the area occurs in the deepest plane. The vertebral artery, which runs through the foramen transversarium (still deeper) never should be seen during dissection, but its position always must be kept in mind.
Landmarks and Incision
#### Landmarks
The spinous process of C2 is large, bulbous, and bifid, accommodating the insertions of the semispinalis cervicis and multifidus, deep muscles that attach to it and stop, leaving the atlas with almost no muscle attachment. The posterior vertebral arch of C2 and its lamina, which ascends to the spinous processes, are massive enough to support the larger spinous process.
The
external occipital protuberance,
or inion, a large boss of bone in the center of the occiput, divides the superior nuchal line, which extends from it to each side. The superior nuchal line separates the scalp above from the area of insertion of the nuchal muscles (see Fig. 6-63).
Incisions
Skin incisions heal well because of the area’s rich blood supply. Because the incisions run along the midline, they suffer minimal tension. Cosmetically, they are difficult to see because of the hairline.
Superficial Surgical Dissection
The ligamentum nuchae, the midline fibrous membrane, extends from the external occipital protuberance to the spinous process of the seventh cervical vertebra. A septum extends from its anterior border; it attaches to the posterior tubercle of the atlas and all the remaining spinous processes of the cervical spine (see Fig. 6-63B).
The muscles of the superficial and intermediate layers consist of the trapezius (in the superficial layer) and the splenius capitis, which covers the semispinalis capitis and the longissimus capitis (see Figs. 6-59 and 6-60).
The splenius capitis arises from the thoracic spinous processes before inserting into the base of the skull. Deep to it lies the semispinalis cervicis, which inserts onto the axis.
Detaching these muscles uncovers the four unique muscles of the
suboccipital triangle, the rectus capitis posterior major and minor, and the oblique capitis inferior and superior (see Fig. 6-62).
Deep Surgical Dissection
Because C1 has no spinous process, finding its bony ring posteriorly requires an especially deep dissection (see Fig. 6-63B).
The posterior atlantoaxial and atlantooccipital membranes, which form the remaining posterior coverings of the cord, are homologues of the original ligamentum flavum. The spinal canal at C1-2 is particularly spacious, allowing extensive motion.
Two important cutaneous nerves intrude into the lateral aspect of the suboccipital triangle: The greater occipital nerve (the posterior primary ramus of C2) and the third occipital nerve (the posterior primary ramus of C3; see Figs. 6-59 and 6-62). The most important structure in the suboccipital triangle is the
vertebral artery.
This key blood supply to the hindbrain ascends in the neck through a series of foramina in the transverse processes. At the level of the atlas, it pierces the foramen transversarium of the atlas and then turns medially behind the atlantooccipital joint. To enter the spinal canal, it pierces the posterior atlantooccipital membrane at its lateral angle; therefore, it is extremely vulnerable during dissection of the posterior atlantooccipital membrane (see Fig. 6-62). Running with the artery is the posterior primary ramus of C1—the suboccipital nerve. This nerve supplies the four small specialized muscles that control movement at the atlantoaxial and atlantooccipital joints—rectus capitis posterior major, obliquus capitis inferior, obliquus capitis superior, and rectus capitis posterior minor.
Anterior Approach to the Cervical Spine
The anterior approach to the cervical spine exposes the anterior vertebral bodies from C3 to T1. It also allows direct access to the disc spaces and uncinate processes in the region. It is used for the following:
2. Interbody fusion (see the section regarding the anterior approach to the iliac crest for bone graft)
3. Removal of osteophytes from the uncinate processes and from either the
anterior or the posterior lip of the vertebral bodies
4. Excision of tumors and associated bone grafting
5. Treatment of osteomyelitis
6. Biopsy of vertebral bodies and disc spaces
7. Drainage of abscesses
8. Open reduction and internal fixation of fractures
The recurrent laryngeal nerve is the most important structure at risk during the anterior approach to the cervical spine. The left recurrent laryngeal nerve ascends in the neck between the trachea and the esophagus, having branched off from its parent nerve, the vagus, at the level of the arch of the aorta. The right recurrent laryngeal nerve runs alongside the trachea in the neck after hooking around the right subclavian artery. In the lower part of the neck, it crosses from lateral to medial to reach the midline trachea; therefore, it is slightly more vulnerable during the exposure than is the left recurrent laryngeal nerve. This is why some surgeons prefer left-sided approaches, whereas others simply approach from the side of pathology.
Position of the Patient
6-70). Some cases may require application of halter traction so that it can be used later if distraction is required. Elevate the table 30 degrees to reduce venous bleeding and make the neck more accessible. Place the patient’s arm at his or her side after careful padding.
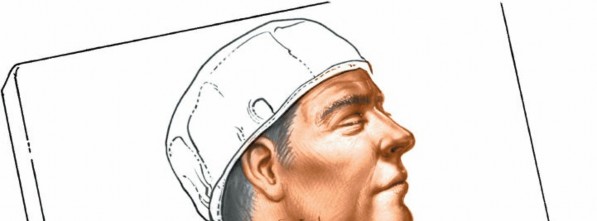
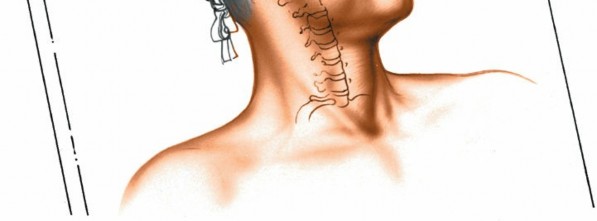 Figure 6-70 Place the patient supine on the operating table with a small sandbag between the shoulder blades to ensure an extended position of the neck. Turn the patient’s head away from the planned incision.
Landmarks and Incision
#### Landmarks
Figure 6-70 Place the patient supine on the operating table with a small sandbag between the shoulder blades to ensure an extended position of the neck. Turn the patient’s head away from the planned incision.
Landmarks and Incision
#### Landmarks
Several palpable or visible anterior structures in the midline help identify the vertebral level in the neck.
1. Hard palate—arch of the atlas
2. Lower border of the mandible—C2-3
3. Hyoid bone—C3
4. Thyroid cartilage—C4-5
5. Cricoid cartilage—C6
6. Carotid tubercle—C6
These landmarks make it possible to determine the approximate level of the incision (and this should be confirmed radiologically.
Sternocleidomastoid Muscle. The sternocleidomastoid, an oblique
muscle, runs from the mastoid process to the sternum, just lateral to the midline of the neck. To make it more prominent, turn the head away from the muscle in question, into the operating position.
Carotid Artery. Place a finger over the leading edge of the sternocleidomastoid and press posteriorly and laterally to feel the carotid pulse._Carotid Tubercle (Chassaignac Tubercle).
Incision
6-71).
Internervous Plane
No internervous plane is available superficially, but incising or dividing the platysma muscle causes no significant problems; the muscle is supplied high up in the neck by branches of the facial (seventh cranial) nerve.
More deeply, the plane lies between the sternocleidomastoid muscle (which is supplied by the spinal accessory nerve) and the strap muscles of the neck (which receive segmental innervation from C1, C2, and C3; see Fig. 6-74,
cross section
).
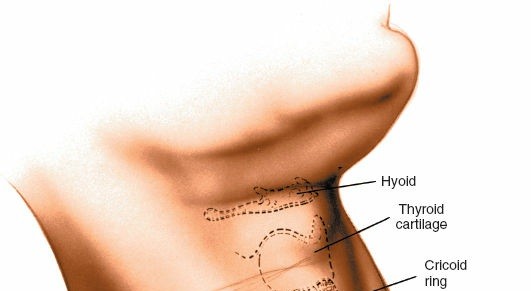
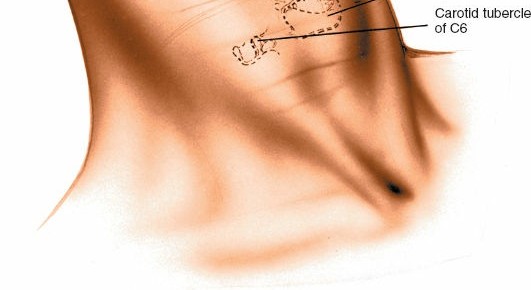 Figure 6-71 Make an oblique incision in the skin crease of the neck at the appropriate level of the vertebral pathology.
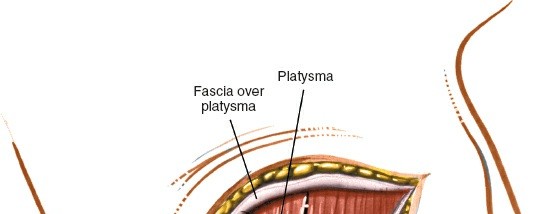
!Fig. 6-76,
cross section
).
Superficial Surgical Dissection
The skin and the platysma muscle are very vascular. For this reason, some surgeons inject the area with a dilute solution of epinephrine (Adrenalin) before incising the skin.
Incise the fascial sheath over the platysma in line with the skin wound (medially.
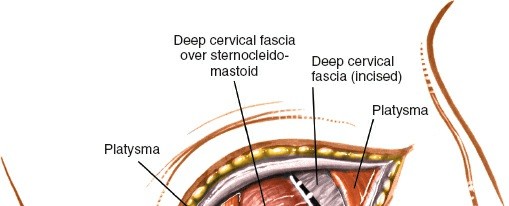
!Fig. 6-74).
6-75).
Two arteries connect the carotid sheath with the midline structures. These two vessels, the superior and inferior thyroid arteries, may limit the extent to which this plane can be opened up above C3-4. Occasionally, either or both of them may have to be ligated and divided to open the plane.
Now, develop a plane deep to the cut pretracheal fascia by blunt dissection, proceeding carefully in a medial direction behind the esophagus, which is retracted from the midline.
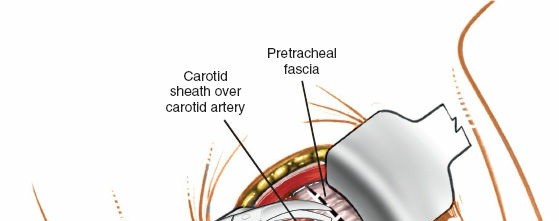
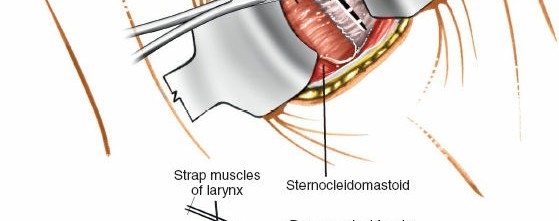


 Figure 6-74 Retract the sternocleidomastoid laterally, and the strap muscles and thyroid structures medially. Cut through the exposed pretracheal fascia on the medial side of the carotid sheath. The cervical spine C3 through C5 (
cross section
). Retract the sternocleidomastoid laterally and the strap muscles medially, and incise the pretracheal fascia immediately medial to the carotid sheath.
Figure 6-74 Retract the sternocleidomastoid laterally, and the strap muscles and thyroid structures medially. Cut through the exposed pretracheal fascia on the medial side of the carotid sheath. The cervical spine C3 through C5 (
cross section
). Retract the sternocleidomastoid laterally and the strap muscles medially, and incise the pretracheal fascia immediately medial to the carotid sheath.
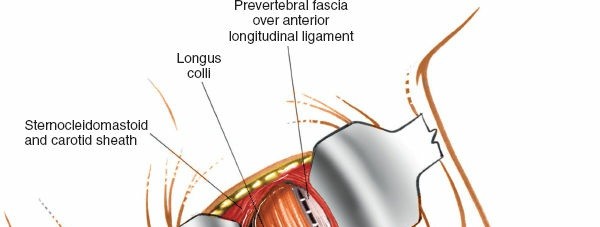
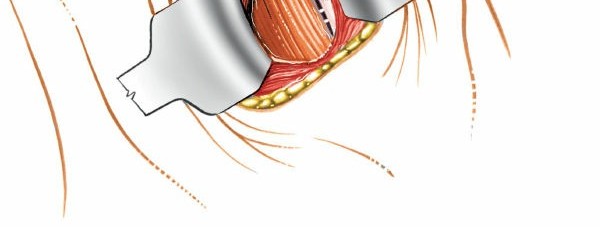


 Figure 6-75 Retract the sternocleidomastoid and the carotid sheath laterally, and
the strap muscles, trachea, and esophagus medially to expose the longus colli muscle and prevertebral fascia. Retract the sternocleidomastoid muscle and carotid sheath laterally, and the strap muscles and thyroid structures medially, then split the longus colli muscle longitudinally in the midline (
cross section
).
Figure 6-75 Retract the sternocleidomastoid and the carotid sheath laterally, and
the strap muscles, trachea, and esophagus medially to expose the longus colli muscle and prevertebral fascia. Retract the sternocleidomastoid muscle and carotid sheath laterally, and the strap muscles and thyroid structures medially, then split the longus colli muscle longitudinally in the midline (
cross section
).
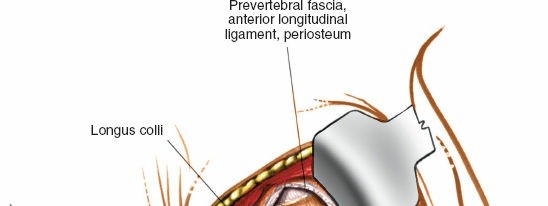
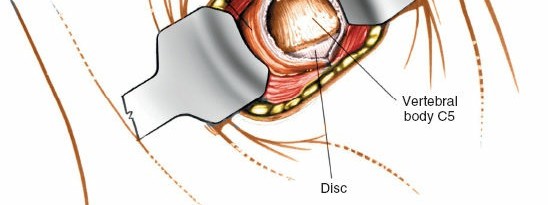


 Figure 6-76
Dissect the longus colli muscle subperiosteally from the anterior portion of the vertebral body and retract each portion laterally to expose the anterior surface of the vertebral body. The longus colli muscles are retracted to the left and right of the midline to expose the anterior surface of the vertebral body (
cross section
).
Figure 6-76
Dissect the longus colli muscle subperiosteally from the anterior portion of the vertebral body and retract each portion laterally to expose the anterior surface of the vertebral body. The longus colli muscles are retracted to the left and right of the midline to expose the anterior surface of the vertebral body (
cross section
).
The cervical vertebrae should be visible now, covered by the longus colli muscle and the prevertebral fascia. The anterior longitudinal ligament in the midline can be seen as a gleaming white structure. The sympathetic chain lies on the longus colli, just lateral to the vertebral bodies (see
Deep Surgical Dissection
Using cautery, split the longus colli muscle longitudinally over the midline of the vertebral bodies that need to be exposed (see to expose the anterior surface of the vertebral body (](content://com.xodo.pdf.reader.pdftron.fileprovider/external)Fig. 6-76). Obtain a lateral radiograph after placing a needle marker in the appropriate vertebral body to identify the level correctly. Make sure that the retractors are placed underneath each of the longus colli muscles, widening the exposure while protecting the recurrent laryngeal nerve, trachea, and esophagus.
Dang
Nerves
The
recurrent laryngeal nerve
may be traumatized during the deepest layer of the approach. Protect it by placing the retractors well under the medial edge of the longus colli muscle (Fig. 6-79).
The
sympathetic nerves and stellate ganglion
may be damaged or irritated, causing Horner syndrome. Protect them by making sure that dissection onto the bone is subperiosteal from the midline.
Avoid dissecting out onto the transverse processes (
6-75).
Vessels
The
carotid sheath and its contents
are protected by the anterior border of the sternocleidomastoid muscle. Do not place self-retaining retractors in
this area, or the sheath will be endangered. If additional retraction is necessary, use hand-held retractors with rounded ends (see Figs. 6-74,
cross section,
and 6-79).
The
vertebral artery,
which lies in the transverse foramen on the lateral portion of the transverse processes, should not be visible during the approach unless the plane of operation strays well away from the midline (Fig. 6-81; see Fig. 6-76,
cross section
).
The inferior thyroid artery may cross the operative field in lower cervical approaches. If it is divided accidentally, it may retract behind the carotid sheath, where it is difficult to retrieve and tie off (see Fig. 6-80).
Special Points
Poorly placed retractors endanger the trachea and esophagus. Unless they are placed underneath the longus colli muscle, the retractors used should be rounded and hand-held (see Fig. 6-76,
cross section
).
How to Enlarge the Approach
#### Local Measures
To enlarge the approach laterally, remove the origins of the longus colli muscle subperiosteally from the vertebral body. Take care not to proceed too far laterally to avoid damaging the sympathetic chain.
Extensile Measures
This approach cannot be extended.
Applied Surgical Anatomy of the Anterior Approach to the Cervical Spine Overview The key to understanding the anatomy of the anterior approach to the cervical spine lies in appreciating the three fascial layers of the neck. The most superficial fascial layer is the investing layer of deep cervical fascia. The fascia surrounds the neck like a collar, but splits around the sternocleidomastoid and trapezius muscles to enclose them. Posteriorly, it joins with the ligamentum nuchae (nuchal ligament). The superficial layer is incised along the anterior border of the sternocleidomastoid muscle.
Dividing the layer of fascia allows the sternocleidomastoid to be retracted laterally and separated from the underlying strap muscles. The only structures that lie superficial to it are the platysma muscle (a remnant of the old panniculus carnosus, or muscle of the skin) and the external jugular vein, which can be divided safely if it intrudes into the operative field (Figs. 6-77 and 6-78).
The next fascial layer is the
pretracheal fascia,
which forms a layer between sliding surfaces. It invests the strap muscles and runs from the hyoid bone down into the chest (see Fig. 6-78). Its key relationship is with the carotid sheath, which encloses the common carotid artery, the internal jugular vein, and the vagus nerve. The pretracheal fascia is continuous with the carotid sheath (see Figs. 6-77 and 6-79Fig. 6-80). The superior laryngeal nerve, however, which runs with the superior thyroid vessels, must be preserved.
The deepest layer of fascia is the _prevertebral fascia,_6-77).
Landmarks and Incision
#### Landmarks
The _carotid tubercle_6-82).


 Figure 6-77 Cross section at the level of C5. Note the deep cervical fascia, the pretracheal fascia, and the prevertebral fascia. Note the relationship of the pretracheal fascia to the carotid sheath. The
cricoid ring
is easily palpable just beneath the thyroid cartilage. The only complete ring of the trachea, it is opposite the C6 vertebral body (see Figs. 6-71 and 6-78).
Figure 6-77 Cross section at the level of C5. Note the deep cervical fascia, the pretracheal fascia, and the prevertebral fascia. Note the relationship of the pretracheal fascia to the carotid sheath. The
cricoid ring
is easily palpable just beneath the thyroid cartilage. The only complete ring of the trachea, it is opposite the C6 vertebral body (see Figs. 6-71 and 6-78).
The
sternocleidomastoid muscle
runs obliquely down the side of the neck from the mastoid process and lateral superior nuchal line to the sternum and clavicle. It is enclosed in fascia, which must be divided on the medial side before the muscle can be retracted laterally. The nerve supply of the sternocleidomastoid comes from the accessory nerve, which innervates the muscle from its posterior and lateral surfaces. There is no danger of neurologic damage as long as the dissection remains on the medial or anteromedial side of the muscle. If it strays to the posterior side, however, the spinal accessory nerve, which supplies not only the sternocleidomastoid, but also the trapezius, can be damaged (see
Incision
Ideally, the skin incision should run parallel to the cleavage lines of the skin of the neck. Inferiorly and anteriorly, these lines run transversely, making the skin crease incision advantageous. The skin on the anterior part of the neck is thinner and more mobile than is the skin on the back of the neck, because of both the loose subcutaneous tissue and the superficial fascia that remains unconnected to the investing fascia of the neck. As a result, skin retraction is easy; the skin incision can be moved to accommodate the needs of the surgery. For extensive exposures, a longitudinal, slightly oblique incision can be made parallel to the medial border of the sternocleidomastoid muscle.
Superficial Surgical Dissection and Its Dangers
The platysma muscle is split in line with its fibers. The muscle is difficult to denervate, because most of its nerve supply comes from the cervical branch of the facial nerve and begins in the region of the mandible. In any case, the muscle is not of great functional importance; sewing it carefully during closure will improve the cosmetic appearance of the scar.


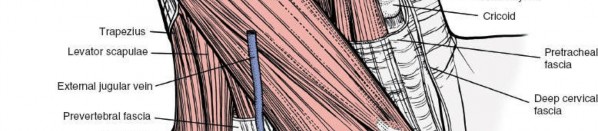
!6-79). After the plane between the carotid sheath and the trachea and esophagus has been entered, it is easy to develop by blunt dissection. The esophagus, however, is a fragile structure that is damaged easily by injudicious retraction.
Deep Surgical Dissection and Its Dangers
The longus colli muscles lie on the anterior surface of the vertebral
6-81 6-80). Thus, left-sided approaches often are preferred. The nerves usually are safe as long as retractors are placed correctly underneath the longus colli muscles. Damage to these nerves is extremely serious and may result in a recurrent laryngeal nerve palsy with alteration in voice, hoarseness and possible breathlessness on exercise.
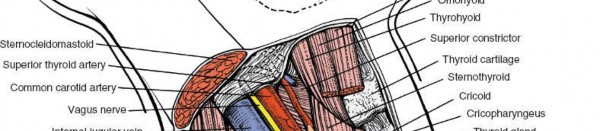


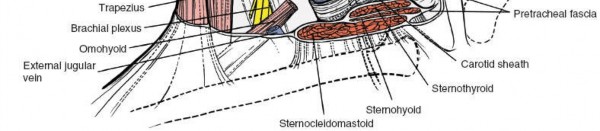 Figure 6-79 The sternocleidomastoid and strap muscles, and the pretracheal fascia have been resected. The carotid sheath and its contents have been exposed. The thyroid gland, cartilage, and trachea are seen. Note the course of the recurrent laryngeal nerve.
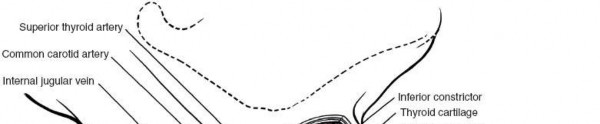
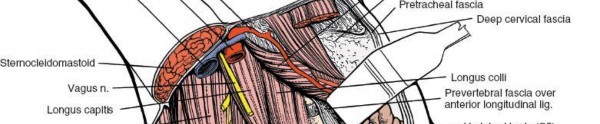


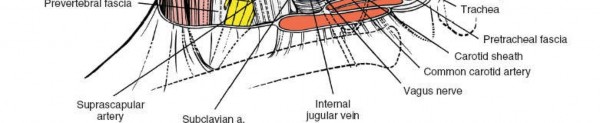 Figure 6-80 The carotid sheath and its contents have been resected. The larynx and its related structures are retracted medially. The longus colli and scalenus muscles with their overriding prevertebral fascia are seen. The sympathetic chain lies on the lateral border of the longus colli muscle. Note the position of the recurrent laryngeal nerve between the trachea and esophagus.
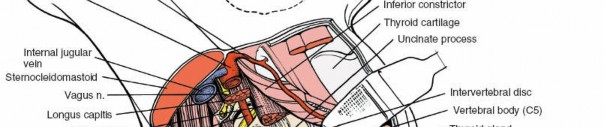


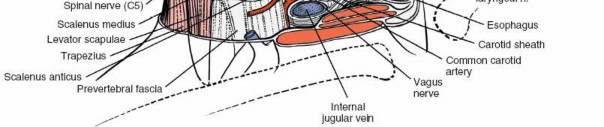 Figure 6-81 The longus colli, the longus capitis, and the scalenus anticus muscles have been resected to reveal the anterior portion of the vertebral bodies and transverse processes. Note the course of the vertebral artery through the transverse processes anterior to the spinal nerve. Note the course of the superior and inferior thyroid vessels.
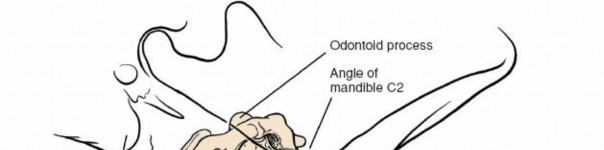

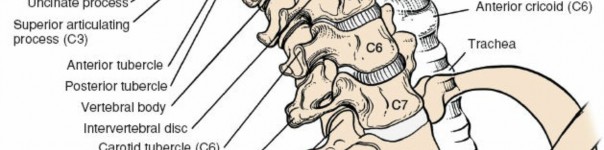
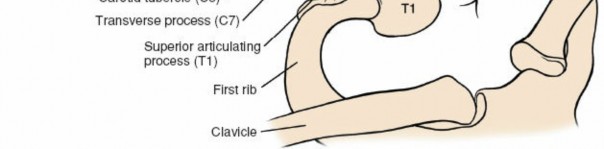 Figure 6-82 Osteology of the cervical spine, anterior view.
## Posterolateral (Costotransversectomy) Approach to the Thoracic Spine
Figure 6-82 Osteology of the cervical spine, anterior view.
## Posterolateral (Costotransversectomy) Approach to the Thoracic Spine
The classic posterolateral approach to the thoracic spine was developed for the drainage of tuberculous abscesses in this part of the spine. Its major advantage is that it does not involve entering the thoracic cavity. However, the approach is less extensive than a formal thoracotomy and offers a poorer exposure. It probably is best for limited exposures in patients who are at high risk. This approach can also be combined with a posterior/posterolateral approach to the spine to decompress the vertebral
canal circumferentially.
Its uses include the following:
1. 23
2. Vertebral body biopsy
3. Partial vertebral body resection
4. Limited anterior spinal fusion
5. Anterolateral decompression of the spinal cord
6. Tumor debulking
Position of the Patient
Place the patient prone on the operating table, with bolsters positioned longitudinally on each side of the rib cage to allow for chest expansion. Drape widely over the rib cage area so that the rib cage can be exposed laterally (see Fig. 6-101).
Landmarks and Incision
#### Landmarks
Palpate the
spinous processes
in the area. If the patient has a gibbous deformity, use it as a landmark for surgery. In any case, a needle should be placed into the spinous process of the vertebra to be exposed so that a lateral x-ray film can pinpoint the position. Remember that the spinous processes of the thoracic area are long and slender, and tend to overlap the vertebrae below. Note that the rib in the area to be exposed often is more prominent.

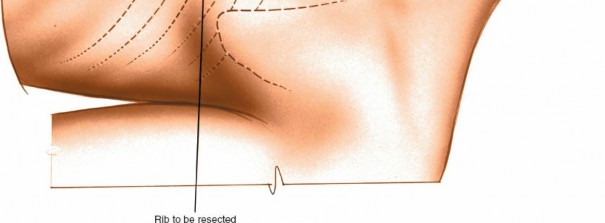 Figure 6-83 Make a curved linear incision lateral to the appropriate spinous process. Center the incision over the rib involved in the pathologic process. #### Incision
Fig. 6-84).
Fig. 6-85).
Deep Surgical Dissection
6-87 and 6-88). At this point, the field may flood with a gush of pus from the opened abscess cavity.
6-88,
cross section
).
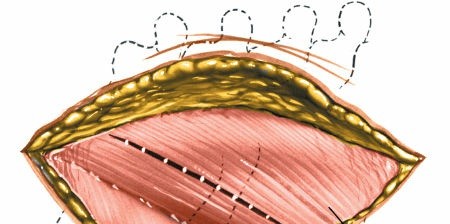
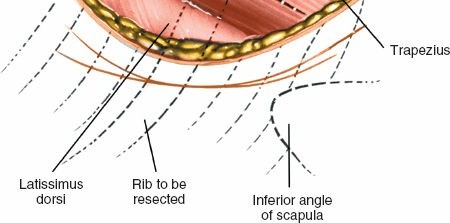 Figure 6-84 Incise the subcutaneous fat and fascia in line with the skin incision. Incise the trapezius muscle parallel with its fibers.
Carefully enter the retropleural space by digital palpation and dissection, removing the parietal pleura from the vertebral body. Note that this plane is safe only if the pleura is thickened by disease. Careful blunt dissection is essential to avoid entering the pleural cavity. At this point, the vertebral body and disc space should have been exposed.
Dang
Nerves
If dissection is extensive around the vertebral body, the central canal can be entered accidentally. If the dura is damaged, it must be closed to prevent spinal fluid leaks.
Vessels
The segmental
intercostal arteries
often are damaged when the ribs are stripped. They lie on the inferior border of the rib and should be ligated if they are cut (see Fig. 6-94).
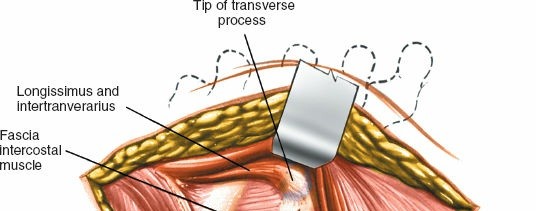
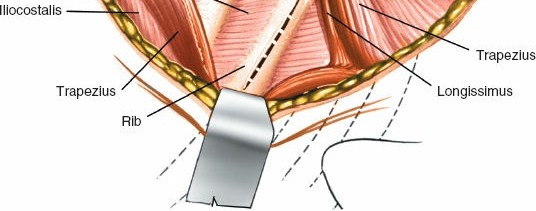 Figure 6-85 Cut down onto the posterior aspect of the rib to be resected. Strip the muscles laterally and medially onto the transverse process. Incise the periosteum over the rib.
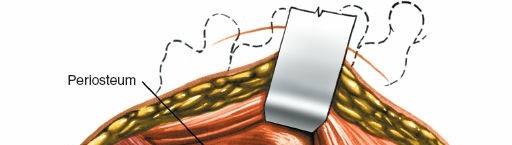
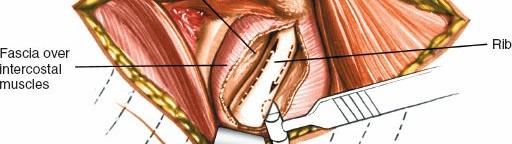
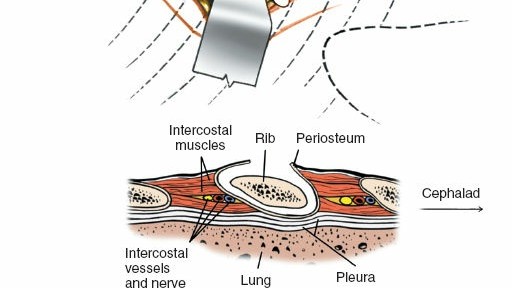 Figure 6-86 Separate all the muscle attachments from the rib, using subperiosteal dissection.
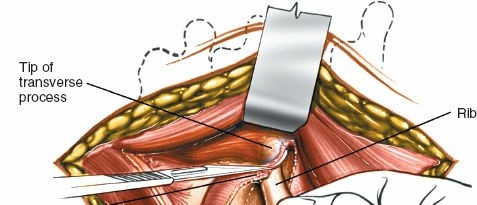
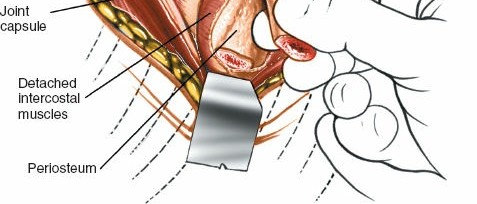 Figure 6-87 Divide the rib about 6 to 8 cm from the midline. Lift it up and carefully cut any remaining muscle attachments and the costotransverse ligament.
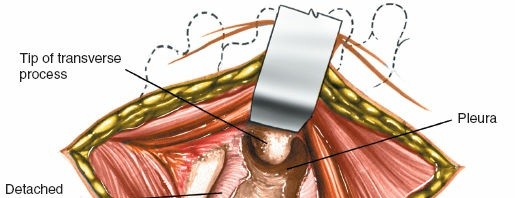
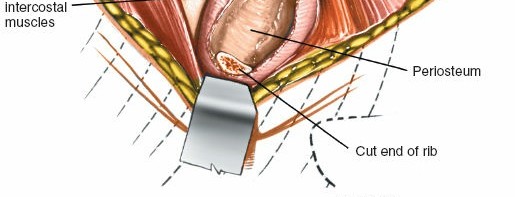


 Figure 6-88
Twist the rib’s medial end to complete the resection and remove the rib. The abscess cavity now is exposed. The abscess cavity may extend along the lateral and anterior borders of the vertebra (
cross section
). Resect the transverse process if greater exposure is necessary.
Figure 6-88
Twist the rib’s medial end to complete the resection and remove the rib. The abscess cavity now is exposed. The abscess cavity may extend along the lateral and anterior borders of the vertebra (
cross section
). Resect the transverse process if greater exposure is necessary.
Lungs
The
pleura
often is thickened by infections of the underlying lung. As dissection proceeds, damage to the pleura can be minimized by using blunt dissection to strip the pleura from the anterolateral surface of the affected vertebral body. The approach can cause a
pneumothorax,
however. If there is a sucking sound or a tear in the pleura, it should be treated by inserting a chest tube after closure.
How to Enlarge the Approach
#### Local Measures
If the musculature is too tight, divide the paraspinal muscles transversely in line with the transverse process to facilitate retraction.
Extensile Measures
The incision cannot be extended, but it can be enlarged to include adjacent ribs and vertebrae either cephalad or caudad.
Anterior (Transthoracic) Approach to the Thoracic Spine
25
The approach is effective in the following situations:
2. Fusion of the vertebral bodies
3. Resection of the vertebral bodies for tumor and reconstruction with bone grafting
4. Correction of scoliosis
5. Correction of kyphosis
6. Osteotomy of the spine
7. Anterior spinal cord decompression
8. Biopsy
Position of the Patient
d compression of the axillary artery and vein. Feel for a radial pulse after positioning; make sure that there is no venous obstruction in the arm. The surgeon can be positioned in front of or behind the patient.
Although the thoracic vertebrae can be approached from either side, approaching from the right side is easier because the aortic arch and aorta can be avoided.
Landmarks and Incision
#### Landmarks
Palpate the
tip of the scapula
with the patient in the lateral position. Remember that the scapula is mobile and the position of the tip will vary from patient to patient. Palpate the
spines of the thoracic vertebrae.
They are long and slender. Observe the
inframammary crease
on the anterior chest wall.
Incision
98 6-99).
The thoracic cavity can be reached either through an intercostal space or by resection of one or more ribs. Rib resection creates a better exposure, and the cut ribs can be used for bone grafting.
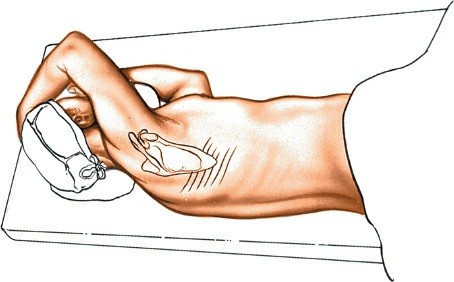
--- Figure 6-89 Place the patient on his or her side for the anterior transthoracic approach to the spine. On the side to be approached, move the patient’s hand and arm above his or her head.
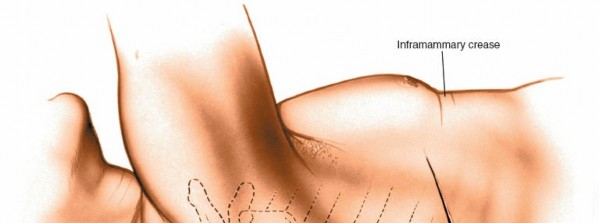
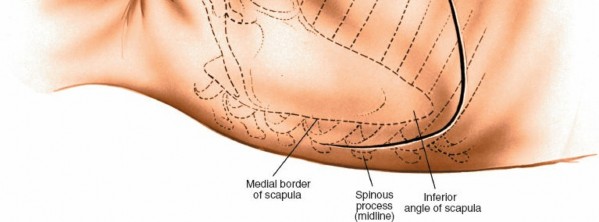 Figure 6-90 Begin the incision two fingerbreadths below the tip of the scapula. Curve the incision forward toward the inframammary crease. Complete the incision by extending it backward and upward toward the thoracic spine. The incision usually overlies the seventh rib. The level at which the chest is entered depends on the location of the pathology to be treated. Unless the vertebrae involved are low (between T10 and T12), use the fifth intercostal space (between the fifth and sixth ribs) for entering the chest, because the scapula easily
overrides the healing site
and will not cause clicking. For pathology at T10 to T12, use the sixth intercostal space, which provides better exposure of the lower vertebral bodies. During its range of motion, however, the scapula may have to jump over the callus formed at the healing site, causing a click.
Figure 6-90 Begin the incision two fingerbreadths below the tip of the scapula. Curve the incision forward toward the inframammary crease. Complete the incision by extending it backward and upward toward the thoracic spine. The incision usually overlies the seventh rib. The level at which the chest is entered depends on the location of the pathology to be treated. Unless the vertebrae involved are low (between T10 and T12), use the fifth intercostal space (between the fifth and sixth ribs) for entering the chest, because the scapula easily
overrides the healing site
and will not cause clicking. For pathology at T10 to T12, use the sixth intercostal space, which provides better exposure of the lower vertebral bodies. During its range of motion, however, the scapula may have to jump over the callus formed at the healing site, causing a click.
6-95).
Insert a rib spreader during either approach to hold the ribs apart; spread the ribs slowly to allow the muscles to adapt. Incising the paraspinal muscles seldom is necessary. Ensure complete hemostasis, especially in the posterior angle, before proceeding.
Deep Surgical Dissection
6-966-97). Tying off more intercostal vessels than is necessary should be avoided, however, because the blood supply to the spinal cord from these vessels varies. Damage from ischemia may occur on rare occasions if more than two sequential intercostal vessels are ligated close to the vertebral bodies. Approaching the vertebral body
from the right side obviates the need to ligate both the left and right segmental intercostal arteries. Approaching the vertebrae from the right side is safer and simpler than is trying to move the aorta itself (

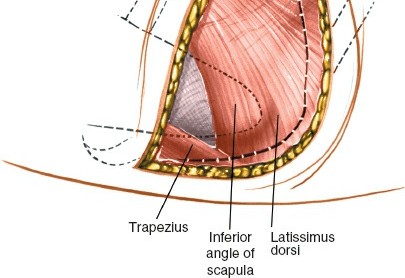 Figure 6-91 Divide the latissimus dorsi posteriorly in line with the skin incision.
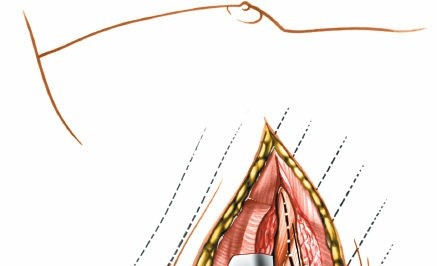
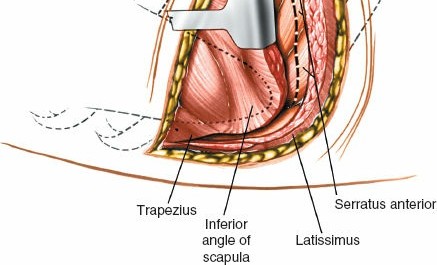 Figure 6-92 Divide the serratus anterior along the line of the skin incision down to the ribs.
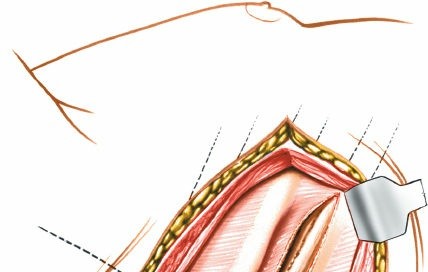
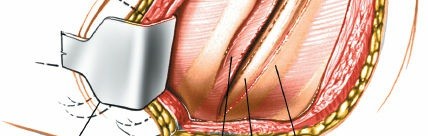
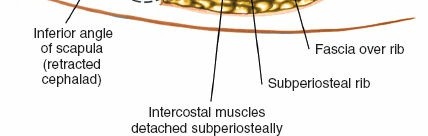 Figure 6-93 Elevate the scapula with the cut attached muscles proximally to expose the underlying ribs. Cut the periosteum on the upper border of the rib. ### Dang
Vessels
The intercostal vessels 6-94 6-100A).
Lungs
About every 30 minutes, ask the anesthesiologist to expand the
lungs
to help prevent microatelectasis postoperatively. Before closing, make sure that the lung is expanded fully.
How to Enlarge the Approach
#### Local Measures
If the intercostal incision is inadequate, dissect the rib below it, resect it, and spread the rib cage further apart.
Extensile Measures
This incision cannot be extended, although it can provide good access to vertebrae from T2 to T12. In the lower part of the incision, part of the diaphragm may need to be resected to enhance the exposure. To accomplish this, remove the arcuate ligament from its origin on the transverse process of L1. Note that the risks of surgery increase in this area, because two major body cavities may be entered. Reattach the diaphragm before closing.
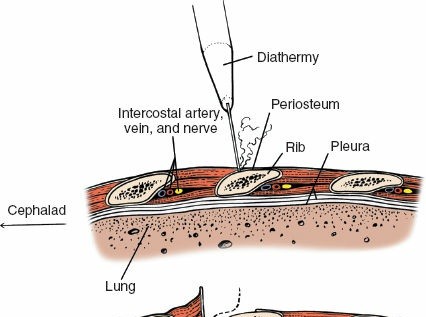
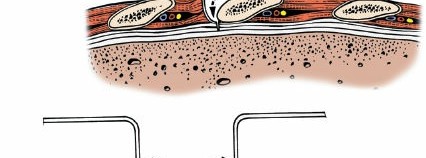
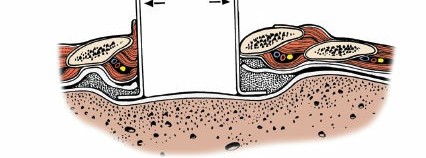 Figure 6-94 Enter the pleura from above the rib to avoid damage to the intercostal nerve and vessels that lie along this lower border. Insert a rib spreader to hold the ribs apart.
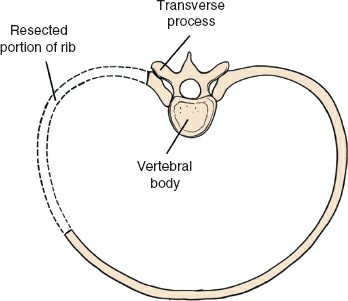
--- Figure 6-95 Resect the posterior three-fourths of the ribs as far posterior as necessary for greater exposure.
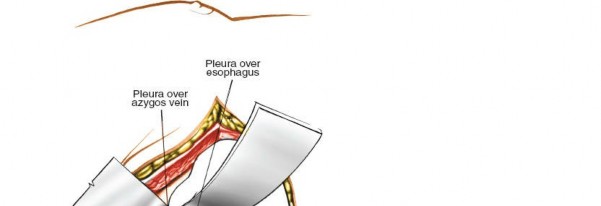
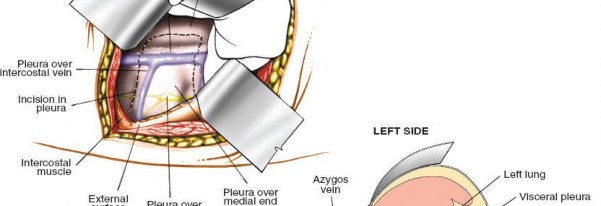
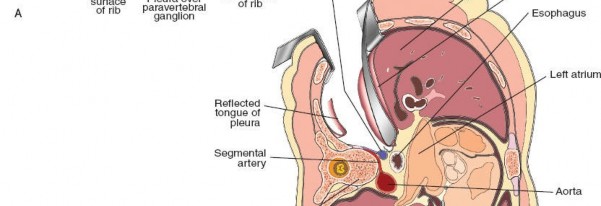
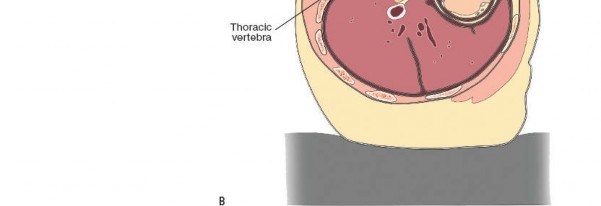 Figure 6-96
Retract the deflated lung anteriorly. Identify the esophagus over the vertebral bodies. Incise the pleura over the lateral side of the esophagus to enable it to be retracted.
A:
View from surgeon standing dorsal to the spine.
B:
Axial view of exposure with patient in the decubitus position.
Figure 6-96
Retract the deflated lung anteriorly. Identify the esophagus over the vertebral bodies. Incise the pleura over the lateral side of the esophagus to enable it to be retracted.
A:
View from surgeon standing dorsal to the spine.
B:
Axial view of exposure with patient in the decubitus position.
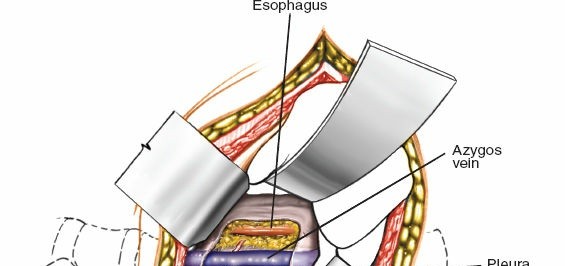

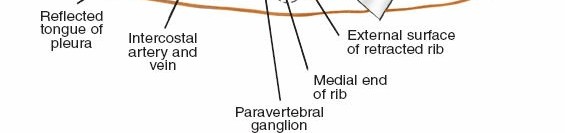 Figure 6-97 Mobilize the esophagus and retract it from the anterior surface of the spine. The intercostal vessels that cross the operative field are ligated.


 Figure 6-98 The superficial muscles of the posterolateral aspect of the thorax.


 Figure 6-99 The superficial muscles of the posterior wall of the thorax (the trapezius, serratus anterior, latissimus dorsi, and teres major) have been resected to reveal the rib cage and the intercostal muscles.
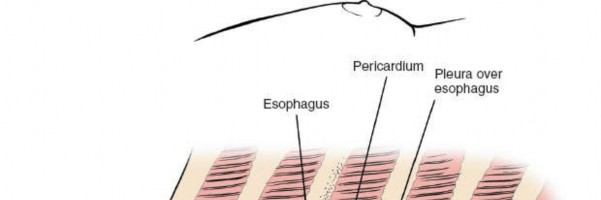


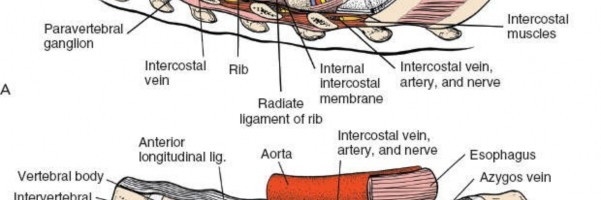

 Figure 6-100A: The ribs and lung have been resected, as well as the posterior pleura, to reveal the esophagus, azygos vein, and intercostal arteries and nerves. Note the position of the sympathetic chain. B: A detailed view of the anterolateral aspect of the thoracic spine. It is surgically significant that the azygos vein and esophagus overlie the vertebral bodies and must be mobilized to expose them. ## Posterior Approach to the Thoracic and Lumbar Spines for Scoliosis
29–33 The approach is safe, avoiding vital structures, and allows direct approach to the posterior aspect of the vertebral bodies in an internervous plane.
This approach is used for the following:
1. Scoliosis surgery (see the section regarding rib resection and the posterior approach to the iliac crest for bone graft)
2. Posterior spine fusions (extensive and limited; see the section regarding the posterior approach to the iliac crest for bone graft)
3. Removal of tumors of the posterior aspect of the vertebrae
4. Open biopsy
5. Stabilization of fractured vertebrae (see the section regarding the posterior approach to the iliac crest for bone graft)
Position of the Patient
6-101).
Landmarks and Incision
#### Landmarks
The
gluteal cleft
and the
C7-T1 spinous processes
mark the midline. The beginning of the gluteal cleft should be draped with a clear plastic drape so that it still can be seen. The spinous processes of C7 and T1 are the largest spinous processes in the lower cervical and upper thoracic spines. They offer a guide to the location and level of the incision if the spinous processes are counted down from C7.
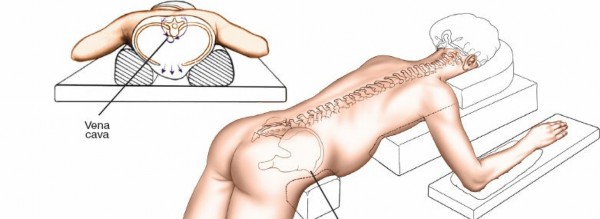
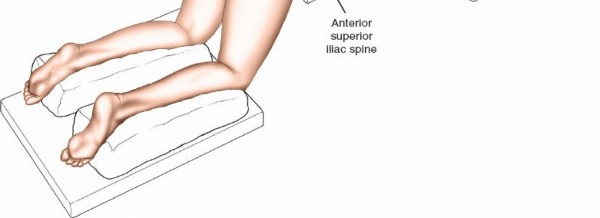 Figure 6-101 The position of the patient on the operating table for the posterior approach to the thoracic and lumbar spines. Place the bolsters so that the anterior abdominal wall clears the table; this allows emptying of the vertebral venous plexus to the vena cava. #### Incision
6-102). (Frequently, the spinous processes are rotated away from the midline in association with scoliosis; nevertheless, for cosmetic reasons, the incision should be placed along the midline.)
Internervous Plane
The paraspinal muscles are innervated segmentally by the posterior primary rami of the individual nerve roots in the thoracic and lumbar spines. Because the incision is in the midline, it is truly internervous; the nerves do not cross the midline.
Superficial Surgical Dissection
6-103).
Deep Surgical Dissection
6-1046-105).
6-107).
Dang
The
posterior primary rami
emerge posteriorly from between the transverse processes, close to the facet joints. Because of the significant overlap of innervation in the paraspinal muscles, loss of an individual posterior primary ramus is not harmful (see Figs. 6-106B and 6-111).
Segmental vessels
coming directly off the aorta appear between the transverse processes and supply the paraspinal muscles. They bleed when muscles are stripped from the transverse processes and must be cauterized. The posterior primary rami are close to these vessels (see Figs. 6-106B and 6-111).
How to Enlarge the Approach
#### Local Measures
To widen the exposure, use self-retaining retractors and carry the dissection out onto the tips of the transverse processes. If the area being
worked in is tight, extend the incision one vertebra higher or lower, whichever is appropriate.

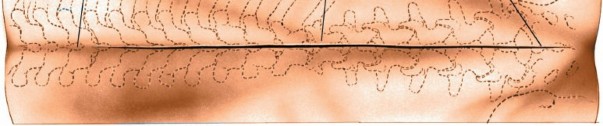 Figure 6-102 Make a straight midline incision over the thoracic and lumbar spines that require surgery.
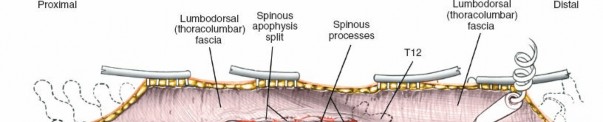
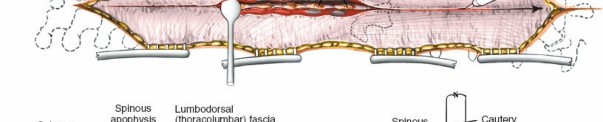
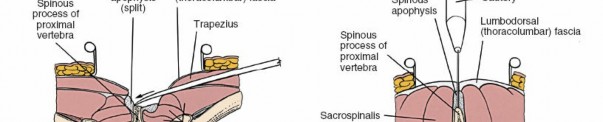
 Figure 6-103 Dissect down onto the middle of the spinous processes. In children, split the spinous apophyses longitudinally and dissect them to either side with a Cobb elevator (
inset
).
Figure 6-103 Dissect down onto the middle of the spinous processes. In children, split the spinous apophyses longitudinally and dissect them to either side with a Cobb elevator (
inset
).
Extensile Measures
This incision can be extended. It may be used to dissect the entire spine, from the cervical area to the coccyx. Because no nerves cross the midline of the body, the nerves that segmentally supply the paraspinal muscles remain safe.
Special Points
To determine a precise anatomic location, identify the 12th (last) rib and dissect one level distal to it to locate the transverse process of L1. Note that the last rib is mobile, a floating rib without sternal attachment, whereas the transverse process of L1 is quite rigid and firm, and does not yield to pressure. The rib also is longer and more tubular than the transverse process (see Fig. 6-100). After the last rib has been found, identify the nearby facet joints. The descending facet joint of T12 is a lumbar facet joint, set in the sagittal plane, whereas the ascending facet joint at the upper end of T12 is a thoracic facet joint, set in a frontal plane (see Fig. 6-110). Identifying the direction of facets, the last rib, and the first lumbar transverse process provides a precise anatomic location. The only alternative is to place markers in the spinous processes in the lumbar area and to obtain a radiograph, or to carry the dissection distally and identify the sacrum.
6-106B).


 Figure 6-104 Remove the paraspinal muscles from the spinous processes and partially from the laminae by subperiosteal dissection.


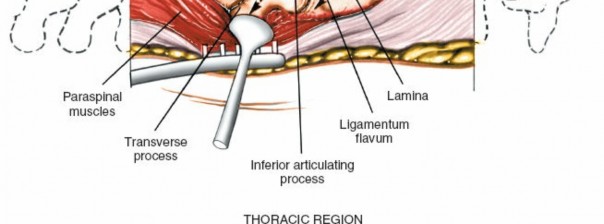 Figure 6-105 In the thoracic area, work from distal to proximal, in the direction of the muscle fibers along the spinous processes. With the use of Cobb elevators, remove the short rotators from the base of the spinous processes to the leading edges of the laminae. Then, strip the muscles from the rest of the laminae laterally onto the transverse processes.


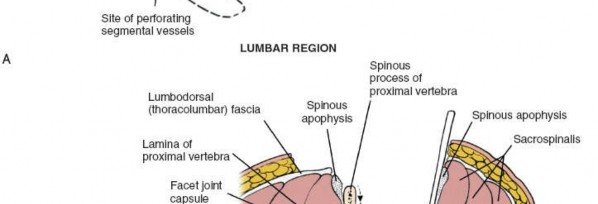
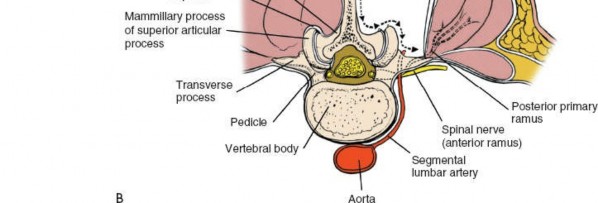 Figure 6-106 A: In the lumbar area, strip the paraspinal muscles from proximal to distal. Remove the joint capsule from medial to lateral. After crossing the mamillary process on the tip of the ascending facet, dissect laterally and caudally onto the transverse process. Be prepared to cauterize the segmental vessels that appear between the transverse processes. B: Note that the transverse process is further anterior and distal than the mamillary process.
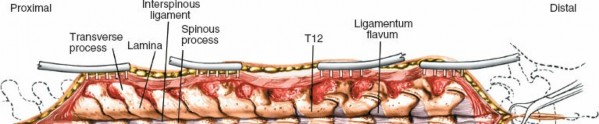
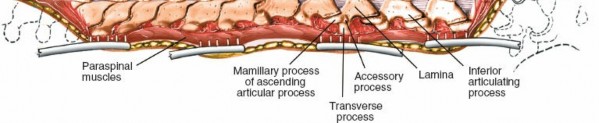 Figure 6-107 After you have stripped the paraspinal muscles from the spinous processes, laminae, and transverse processes, keep the dissection open with self-retaining retractors. ## Applied Surgical Anatomy of the Posterior Approach to the Thoracic and Lumbar Spines
Overview
The posterior muscles of the thoracic and lumbar spines are arranged in three layers:
Figure 6-107 After you have stripped the paraspinal muscles from the spinous processes, laminae, and transverse processes, keep the dissection open with self-retaining retractors. ## Applied Surgical Anatomy of the Posterior Approach to the Thoracic and Lumbar Spines
Overview
The posterior muscles of the thoracic and lumbar spines are arranged in three layers:
1. Superficial layer: The mooring muscles that attach the upper extremity to the spine
2. Intermediate layer: The muscles of accessory respiration
3. Deep layer: The paraspinal muscle system, the intrinsic muscles of the back
These distinct layers are not actually seen during surgical exposure of the spine, but the layering concept clarifies how the anatomy relates to the dissection.
The
superficial layer
of muscles can be subdivided into two layers: The most superficial layer consists of the trapezius and latissimus dorsi; the deeper layer is composed of the rhomboid major and minor.
The
intermediate layer
consists of the serratus posterior superior and
the serratus posterior inferior, which are small, laterally placed muscles that attach to the spine.
The
deep layer
includes the sacrospinalis muscles (erector spinalis) and a deep, obliquely running layer consisting of the semispinalis, multifidus, and rotator muscles.
The muscles of the superficial layer are supplied by the peripheral nerves: The trapezius by the spinal accessory nerve, the rhomboids by the nerve to them from C5, and the latissimus dorsi by the thoracodorsal nerve. They are not affected by a midline dissection.
The muscles of the intermediate layer are supplied by the anterior primary rami; they, too, are unaffected by the dissection.
The muscles of the deep layer are supplied segmentally at each level of the spine by the posterior rami of the thoracic and lumbar nerves. Their nerve supplies usually are safe, but they may be denervated partially by excessive lateral dissection.
Landmarks and Incision
The C7 and T1 spinous processes are the largest processes in the region, with T1 being slightly larger. They point directly posteriorly, with minimal caudal angulation, and are easily palpable. The large L5 spinous process, which also has minimal caudal angulation, can be palpated, but it cannot be differentiated from the other equally large lumbar spinous processes. The gluteal cleft, which runs between the protuberances of the gluteal (cluneal) muscles, is easy to see.
The skin on the posterior aspect of the spine is thicker than that on the anterior chest wall and abdomen. It usually heals with a fine line scar because there is so little tension across the sutured incision. The skin in the lumbar region (which is dissected subcutaneously to leave the iliac crest accessible for a bone graft) and the skin in the thoracic region (which is dissected subcutaneously to reach the ribs) heal well, despite the subcutaneous dissection. Dimpling of the skin over the iliac crest or ribs does not occur as long as the thick, subcutaneous, fatty tissue layer is taken with the skin to prevent it from adhering to the cut bony surfaces.
Superficial Surgical Dissection and Its Dangers
The tips of the spinous processes in the thoracic region are much narrower than are those in the lumbar area, and more muscles attach directly to their tips. As a result, dissection must approach the tips of the spinous processes
6-108 and 6-111).
The deep portion of the deep layer itself has three layers: Superficial, intermediate, and deep groups. The superficial group consists of three muscles. Laterally the iliocostalis muscle runs from the sacrum and inner side of the iliac crest to the angles of the lower six ribs. The muscle continues upward as the costalis muscle and the costocervicalis muscle. The intermediate muscle is the longissimus thoracis and the longissimus cervicis which arise from the sacrum to be inserted into the gutter between the transverse processes and the ribs. The medial muscle of the superficial layer is the weak spinalis muscle which runs alongside the spinous processes.
The intermediate layer also has three muscles in it. The multifidus fibers run from the laminae to the spinous processes; the semispinalis muscles, which span about five segments from origin to insertion run from the transverse processes to the spinous processes; and the levatores costarum muscles which run from the transverse processes to the upper border of the next rib.
6-109 and 6-110). The interspinales join adjacent borders of the spinous processes. The intertransversales join adjacent transverse processes. The most significant muscles in this layer are the rotator muscles which pass in a lateral to medial direction, with the distal end of
6-110).
The transverse processes themselves should be stripped of musculature in a distal to proximal direction. The transverse processes become larger from T12 to T1.
Intermediate surgical dissection avoids the middle layer of back muscles, the muscles of respiration; these are placed more laterally.
The posterior primary rami of the paired thoracic and lumbar nerves may be injured during dissection of the muscles, particularly laterally between the transverse processes where the rami are located. Although the loss of one or two posterior primary rami may denervate the paraspinal muscles partially, the significant overlap of the segmental nerve supply to these muscles prevents total denervation. Excessive lateral retraction and cauterization at each level, however, can cause muscle denervation.
Segmental vessels come directly off the aorta in the lumbar and thoracic areas; they are located between the transverse processes, close to the posterior primary rami. The vessels constitute the main blood supply to the paraspinal muscles. Cauterizing them does not appear to cause significant loss of blood supply to the muscles. If they are cut, they must be cauterized or tied off; they branch directly from the aorta and may cause postoperative bleeding under pressure (Fig. 6-111; see Figs. 6-105 and 6-106B).
Deep Surgical Dissection
The lumbar facet joints and their capsules are much larger than their thoracic counterparts and protrude further posteriorly. Their size is mainly the result of their large articulating processes and large mamillary processes that sit on the posterior aspect of the ascending processes, extending the bone even further posteriorly. The lumbar facet joints lie in the sagittal plane (see Fig. 6-111B). The joint capsules themselves are
6-111A). The facet joints are vulnerable during removal of the joint capsules.
The ligamentum flavum, which originates from the leading edge of the inferior vertebra and extends upward to a ridge under the lamina of the next vertebra, covers the blue-white dura and its layer of epidural fat. The dura must be protected; any epidural tear must be closed off (see Figs. 6-11 and 6-13).


 Figure 6-108 The musculature of the back. The most superficial layer is seen, including the trapezius, the latissimus dorsi, and the lumbodorsal fascia (
left
). The trapezius and latissimus dorsi have been resected to reveal the deep layer, the sacrospinalis muscles, including the spinalis, longissimus, and iliocostalis muscles (
right
). A portion of the rhomboid major muscle of the superficial layer is seen inserting into the medial border of the scapula.
Figure 6-108 The musculature of the back. The most superficial layer is seen, including the trapezius, the latissimus dorsi, and the lumbodorsal fascia (
left
). The trapezius and latissimus dorsi have been resected to reveal the deep layer, the sacrospinalis muscles, including the spinalis, longissimus, and iliocostalis muscles (
right
). A portion of the rhomboid major muscle of the superficial layer is seen inserting into the medial border of the scapula.
Trapezius.
Origin. From all spinous processes of the cervical spine except C1; from all spinous processes of thoracic vertebrae (T1-T12); and from superior nuchal line. Attachment to cervical spine is indirect, via ligamentum nuchae. Insertion. Upper fibers from upper third of muscle, passing laterally and inferiorly to flattened posterior border of lateral third of clavicle and its upper surface. Intermediate muscle fibers pass laterally in a horizontal direction to adjacent part of upper surface of acromion and to associated upper lip of crest of spine of scapula. Lower fibers ascend, passing superiorly and laterally, inserting into tubercle on lower lip of spine of scapula. Action. Stabilizing muscle of shoulder girdle. Nerve supply. Spinal accessory nerve; cranial nerve XI.


 Figure 6-109 The sacrospinalis system has been resected to reveal the deep portion of the deep layer, which consists of the semispinalis and multifidi. Note the intertransversarii muscles and the insertion of the iliocostalis muscles into the borders of the ribs.
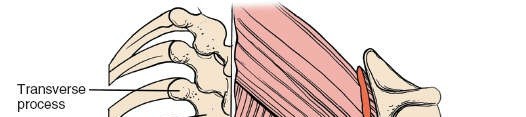
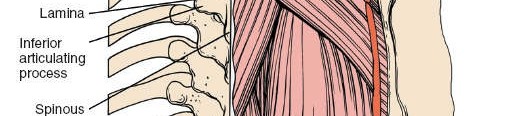
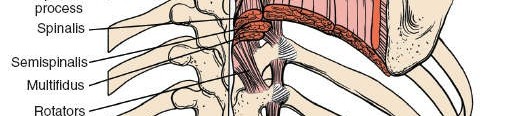
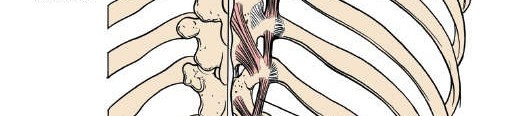
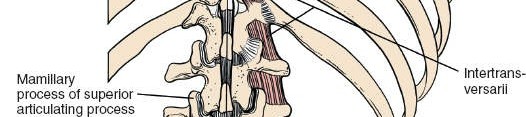
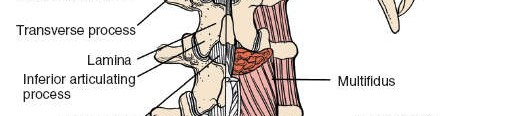
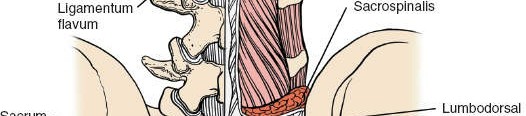
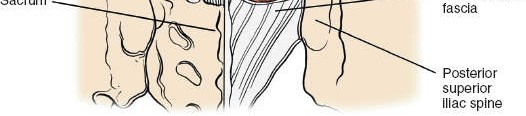 Figure 6-110 The muscles are resected further to reveal the deep muscles of the deep layer (i.e., the rotators as well as the intertransversarii muscles and the interspinous muscles) and the facet joint capsules. The cup-shaped ascending articulating process is closest to the nerve root. Arthritis of the medial end of the ascending facet can cause compression of the nerve in the foramen. The nerve root is safe during the foraminotomy if the anatomic arrangement of the facet joints to the nerve root is appreciated. When the medial portion of the ascending process is being removed take care to protect the nerve root because this is the portion of bone that is closest to it (see Fig. 6-111B).


 Figure 6-111 A: Cross section through the level of a thoracic vertebra. Superficial and deep layers of the thoracic spine are visualized, as well as their nerve and blood supply. B: Cross section through the level of a lumbar vertebra. Note that the individual muscles of the sacrospinalis musculature are one paravertebral mass at this level. Note that the medial end of the cup-shaped ascending articulating process is closest to the lumbar nerve root.
Approach to the Posterior Lateral Thorax for Excision of Ribs
After scoliosis surgery has been completed, portions of the ribs on the posterolateral aspect of the rib cage may have to be resected to flatten out a hump caused by ribs that still protrude.
Position of the Patient
Place the patient prone on the operating table. Position bolsters longitudinally on either side of the patient from the anterior superior iliac spine to the shoulders to allow room for chest expansion (see Fig. 6-101).
Landmarks and Incision
#### Landmarks
The best landmarks are the
prominent ribs,
usually on the right posterior thoracic region. They may be so distorted that they produce a “razorback” deformity.
Incision
The standard incision for scoliosis surgery, the longitudinal midline incision, also is used for the removal of ribs (see Fig. 6-102).
Internervous Plane
The internervous plane lies between the trapezius and latissimus dorsi muscles. The trapezius is innervated by the spinal accessory nerve and the latissimus dorsi is innervated by the long thoracodorsal nerve. The deeper muscle, the iliocostalis portion of the sacrospinalis, is innervated segmentally and, therefore, is not denervated when it is split longitudinally.
Superficial Surgical Dissection
With retractors, lift the skin and its thick subcutaneous tissue. Free them from the underlying fascia and retract them laterally. Center the dissection
6-112).
Deep Surgical Dissection
6-113).
Incise the periosteum along the posterior aspect of the rib in the rib’s own plane. Use an Alexander dissector to push the split periosteum to the upper and lower borders of the rib. With the special end of the dissector, strip the intercostal muscles off the upper end of the rib in a medial to lateral direction in the angle formed by the intersection of the external intercostal muscles and the rib. Then, strip the intercostal muscles from the lower end of the rib in a lateral to medial direction, remaining in the angle formed by the origin of the external intercostal muscle and the rib to discourage bleeding. By keeping the dissection in a subperiosteal location, the neurovascular bundle, which will have been freed from the lower border of the rib with the intercostal muscles, will be avoided (Fig. 6-114). Before continuing, have the anesthesiologist stop the patient’s breathing so that the visceral pleura can fall away from the rib, minimizing the danger to the pleura during anterior dissection. When the ribs have
been uncovered completely, begin to resect them.
Dang
The
neurovascular bundle
6-114,
inset
).
Violating the pleura may result in a
pneumothorax.
If that happens, plan to insert a chest tube immediately after the wound is closed, while the patient is still in the operating room.
Connecting the midline wound with that of the rib resection may cause a
hemothorax
, with blood flowing from the area of the spinal fusion into the lung. If the two areas of dissection are connected, be prepared to insert a chest tube to drain the blood.
The
skin
may adhere to the cut ends of the ribs, causing unsightly dimpling. To prevent this, take a thick subcutaneous layer with the skin and, during closure, suture the fascia of the trapezius muscle to that of the latissimus dorsi muscle.
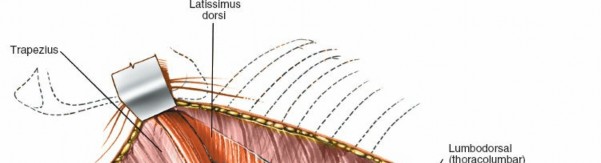
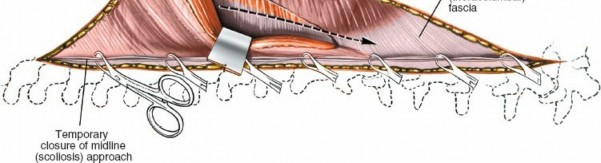 Figure 6-112 Retract the rolled lateral border of the trapezius muscle medially to expose the thin, aponeurotic medial portion of the latissimus dorsi. Incise the aponeurotic medial portion of the latissimus dorsi perpendicular to its fibers.
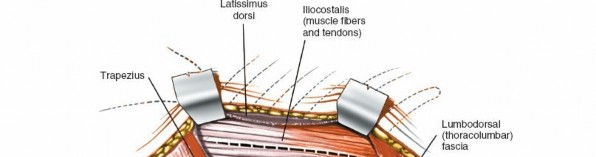
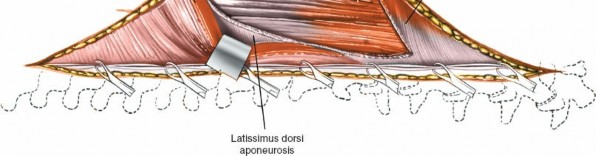 Figure 6-113 Retract the latissimus dorsi laterally and the trapezius medially to expose the underlying iliocostalis muscle. Incise the muscle longitudinally, parallel to its fibers.
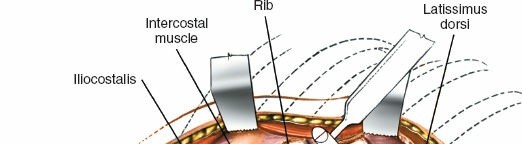
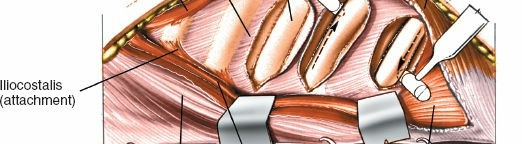
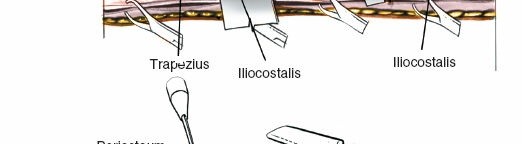
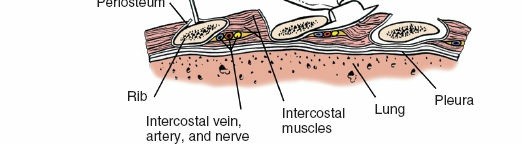 Figure 6-114 Dissect and retract the iliocostalis muscles laterally and medially from their insertion to expose the posterior aspect of the ribs. Incise the periosteum over the rib. Push the split periosteum to the upper and lower borders of the rib. With a special dissector, strip the intercostal muscles off the borders of the rib as well as anteriorly.
How to Enlarge the Approach
#### Local Measures
Figure 6-114 Dissect and retract the iliocostalis muscles laterally and medially from their insertion to expose the posterior aspect of the ribs. Incise the periosteum over the rib. Push the split periosteum to the upper and lower borders of the rib. With a special dissector, strip the intercostal muscles off the borders of the rib as well as anteriorly.
How to Enlarge the Approach
#### Local Measures
Continue subcutaneous dissection further laterally, proximally, and distally to ensure a complete view of the distorted ribs.
Occasionally, in more proximal rib resections, the lower portion of the rhomboid major muscle may have to be dissected to expose the rib area more fully. Distally, the muscular belly of the iliocostalis muscle may have to be split as it splits from the sacrospinalis muscle.
Extensile Measures
This incision cannot be extended; deciding which ribs to remove depends on the size and extent of the rib hump.
Special Points
When removing ribs, resect each one from the point just lateral to its maximum deformity to the most medial end, without removing its head and neck. The lateral portion of the resected rib will drop forward, reducing the rib hump, but the medial portion, held rigidly in place by the costotransverse and costovertebral ligaments, will not move. That is why the rib should be resected as medially as possible. Otherwise, the medial end of the rib will continue to stick out posteriorly, causing continued deformity.
The removal of more than four ribs may cause a sympathetic effusion of a lung field. If this occurs, insert a chest tube to drain the fluid.
Treat the cut ends of the ribs with bone wax to prevent continued oozing of blood. The wax does not prevent the ribs from regenerating.
The resected portions of the ribs can be cut into small, matchstick-sized pieces and used as graft material in a midline spine fusion.
If the vertebral body has rotated up under the rib, resecting the ribs will not produce a significant reduction in the rib hump deformity. **
Scientific References
-
**
- 1. MIXTER WJ, BARR JS: Rupture of the intervertebral disc and involvement of the spinal cord. _N Engl J Med._ 1934;211:210–215.
- 2. SEIMON L: _Low Back Pain: Clinical Diagnosis and Management_. New York, NY: Appleton-Century-Crofts; 1983.
- 3. HIBBS RA: An operation for progressive spinal deformities. _N Y Med J._ 1911;93:1013.
- 4. HIBBS RA: A report of 59 cases of scoliosis treated by fusion operation. _J Bone Joint Surg._ 1924;6:3–34.
- 5. ROTHMAN HR, SIMEONE FA: _The Spine_. Philadelphia, PA: WB Saunders; 1975.
- 6. HOLSCHER EC: Vascular complication of disc surgery. _J Bone Joint Surg Am._ 1948;30:968–970.
- 7. RASOULI MR, RAHIMI-MOVAGHAR V, SHOKRANEH F ET AL: Minimally invasive discectomy versus microdiscectomy/open discectomy for symptomatic lumbar disc herniation. _Cochrane Database Syst Rev._ 2014;9:CD010328.
- 8. FOLEY KT, SMITH MM: Microendoscopic discectomy. _Tech Neurosurg._ 1997;3:301–307.
- 9. SACKS S: Anterior interbody fusion of the lumbar spine: indications and results in 200 cases. _Clin Orthop Relat Res._ 1966;44:163–170.
- 10. MICHELE AA, KRUEGER FJ: Surgical approach to the vertebral body. _J Bone Joint Surg Am._ 1949;31:873–878.
- 11. STEERS WD: Neural pathways and central sites involved in penile erection: neuroanatomy and clinical implications. _Neurosci Biobehav Rev._ 2000;24(5):507–516.
- 12. HERSHLAG A, SCHIFF SF, DECHERNEY AH: Clinical review retrograde ejaculation. _Hum Reprod._ 1991;6(2):255–258.
- 13. BRAU SA: Mini-open approach to the spine for anterior lumbar interbody fusion: description of the procedure, results and complications. _Spine J._ 2002;2:216–223.
- 14. JASANI V, JAFFRAY D: The anatomy of the iliolumbar vein: a cadaver study. _J Bone Joint Surg Br._ 2002;84:1046–1049.
- 15. DE GROAT WC: Anatomy and physiology of the lower urinary tract, spinal cord injury. _Urol Clin North Am._ 1993;20(3):383–401.
- 16. ROGERS WA: Treatment of fracture dislocation of the cervical spine. _J Bone Joint Surg._ 1942;24:245–258.
- 17. HOLDSWORTH FW: Fractures, dislocations and fracture dislocations of the spine. _J Bone Joint Surg Br._ 1963;45:6.
- 18. WILLARD DP, NICHOLSON JT: Dislocations of the first cervical vertebra. _Ann Surg._ 1941;113:464.
- 19. ROBINSON RA, SMITH GW: Anterolateral cervical disc removal and interbody fusion for cervical disc syndrome. _Bull Johns Hopkins Hosp._ 1955;96:223–224.
- 20. HOPPENFELD S: _Physical Examination of the Spine and Extremities_. New York, NY: Appleton-Century-Crofts; 1976:107.
- 21. CAPENER N: The evolution of lateral rhachotomy. _J Bone Joint Surg Br._ 1954;36:173–179.
- 22. WILKINSON MC: Curettage of tuberculous vertebral disease in treatment of spinal caries. _Proc R Soc Med._ 1950;43:114–115.
- 23. BURCH BH, MILLER AC: _Atlas of Pulmonary Resections_. Springfield, Ill: Charles C Thomas; 1965:8.
- 24. COOK WA: Trans-thoracic vertebral surgery. _Ann Thorac Surg._ 1971;12:54–68.
- 25. RICHARD J, ZHANG F, BELLABARBA C ET AL: Treating thoracic-disc herniations: Do we always have to go anteriorly? _Evid Based Spine Care J._ 2010;1(1):21–28.
- 26. HODGSON AR, STOCK FE, FANG HS ET AL: Anterior spinal fusion: the operative approach and pathological findings in 412 patients with Pott’s disease of the spine. _Br J Surg._ 48:172, 1980.
- 27. HOPPENFELD S: _A manual of Concept and Treatment_. Philadelphia, PA: JB Lippincott; 1967:96.
- 28. WINTER RB: _Congenital Deformities of the Spine_. New York, NY: Grune & Stratton; 1983.
- 29. MOE J, WINTER RB, BRADFORD LJ: _Scoliosis and Spinal Deformities_. Philadelphia, PA: WB Saunders; 1978.
- 30. KEIM H: _The Adolescent Spine_. New York, NY: Grune & Stratton; 1976:159.
- 31. HARRINGTON PR: Treatment of scoliosis: correction and internal fixation by spine instrumentation. _J Bone Joint Surg Am._ 1962;44:591–610.
Academic Citations & Sources
You Might Also Like

