Random Pattern Abdominal Pedicle Flap: Comprehensive Surgical Technique
Key Takeaway
The random pattern abdominal pedicle flap remains a reliable workhorse for complex soft tissue reconstruction of the hand and upper extremity. This technique utilizes a subdermal vascular plexus to provide robust, durable coverage for deep defects exposing tendon, bone, or neurovascular structures. Meticulous flap design, precise defatting, and rigid postoperative immobilization are critical to preventing vascular compromise and ensuring successful graft incorporation.
INTRODUCTION TO ABDOMINAL PEDICLE FLAPS
Despite the rapid evolution and widespread adoption of microsurgical free tissue transfer, the random pattern abdominal pedicle flap remains an indispensable technique in the armamentarium of the reconstructive orthopedic and hand surgeon. For massive soft tissue defects of the hand and forearm—particularly those resulting from severe crush injuries, blast trauma, deep thermal or electrical burns, or extensive degloving—local tissue is often inadequate or entirely unavailable.
In these complex scenarios, distant pedicled flaps provide robust, durable, and well-vascularized coverage over exposed bone, denuded tendons, and critical neurovascular bundles. The random pattern abdominal flap relies on the rich, interconnected subdermal vascular plexus rather than a single, named axial vessel. This anatomical characteristic necessitates meticulous surgical planning, precise execution of length-to-width ratios, and rigorous postoperative immobilization to ensure flap viability and successful neovascularization at the recipient site.
ANATOMY AND VASCULAR BIOMECHANICS
Understanding the vascular architecture of the abdominal wall is paramount to the successful elevation and survival of a random pattern flap. Unlike axial pattern flaps (such as the groin flap based on the superficial circumflex iliac artery), random flaps derive their blood supply from the musculocutaneous perforators that arborize into the subdermal and dermal plexuses.
The Subdermal Plexus
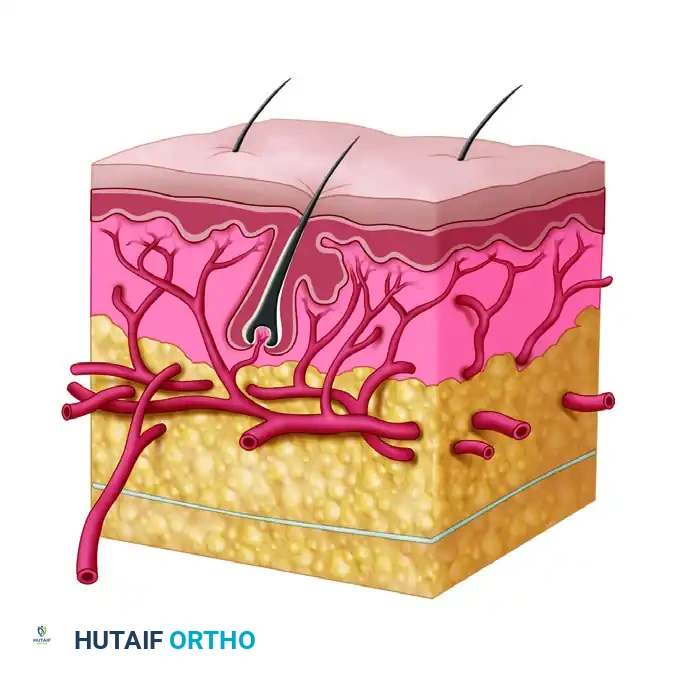
The viability of a random pattern flap is entirely dependent on the perfusion pressure within the subdermal plexus. As the flap is elevated and its deep perforating vessels are divided, the distal aspect of the flap experiences a relative ischemic gradient. The survival of this distal tissue relies on the longitudinal flow through the subdermal network.
FIGURE 65-31: Dissection of skin and subcutaneous fat demonstrating the critical vascular layers. A, Epidermis; B, dermis; C, subdermal plexus of vessels; D, superficial fascia; E, arteries perforating muscularis and deep fascia to join the subdermal plexus of vessels. Preservation of layer C is absolute for flap survival.
Surgical Warning:
Aggressive defatting that violates the subdermal plexus (Layer C in Figure 65-31) will inevitably lead to distal flap necrosis. Defatting must be performed deep to this plexus, leaving a protective layer of adipose tissue to cushion the delicate vascular network.
Flap Geometry and Perfusion
Because the blood supply is random, the geometric design of the flap is strictly governed by the length-to-width ratio. In the abdominal region, a safe length-to-width ratio is traditionally considered to be 1:1, though under optimal conditions and in healthy, non-smoking patients, a ratio of 1.5:1 may be cautiously employed. Exceeding these dimensions dramatically increases the risk of distal ischemia and subsequent necrosis.
PREOPERATIVE PLANNING AND FLAP DESIGN
The success of a distant pedicle flap is determined before the first incision is made. Preoperative templating is a critical step that dictates the orientation, size, and ultimate tension of the flap once inset.
Templating the Defect
- Debridement First: Never design the flap until the recipient site has undergone exhaustive surgical debridement. The true size of the defect is only apparent once all necrotic, non-viable, and marginally viable tissues have been excised back to healthy, bleeding margins.
- Creating the Pattern: Using a piece of sterile paper, Esmarch bandage, or the sterile wrapper from a surgical glove, create an exact two-dimensional template of the recipient defect.
- Transferring the Pattern: Place the template on the selected donor site on the abdomen.
Sizing and Orientation
- Oversizing for Contraction: Outline the flap on the abdomen, making it sufficiently larger than the pattern (typically 15% to 20% larger). This overestimation compensates for the primary contraction of the normal skin once it is incised and released from its resting tension lines.
- The Pedicle Bridge: The design must account for the pedicle "bridge"—the segment of the flap that spans the spatial gap between the abdominal wall and the hand defect. This bridge must be long enough to allow attachment without placing the base of the flap under tension.
- Shape Considerations: As a rule, the flap should be rectangular. Avoid designing a circular outline, as attaching a circular flap to the hand often results in a purse-string effect, leading to central ischemia and suboptimal aesthetic and functional outcomes.
- Incision Principles: Whenever possible, orient the flap to follow the principles of appropriate hand incisions, avoiding crossing tension lines perpendicularly to minimize excessive scarring and future joint contractures.
SURGICAL TECHNIQUE: STEP-BY-STEP
1. Patient Positioning and Preparation
The patient is positioned supine. Both the upper extremity (recipient site) and the entire abdomen (donor site) are prepped and draped in a standard sterile fashion. Ensure that the arm can be freely mobilized to reach the abdomen and that the trunk is accessible for the application of postoperative immobilization casts or binders.
2. Flap Elevation
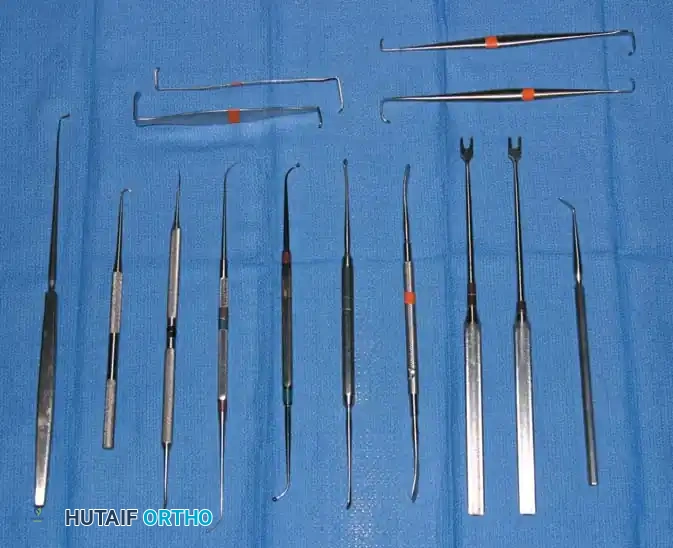
- Incision: Using a #15 or #10 scalpel, make sharp incisions along the pre-marked outlines of the flap.
- Depth of Dissection: Carry the incision down through the epidermis, dermis, and subcutaneous fat, stopping just superficial to the deep fascia of the abdominal musculature.
- Raising the Flap: Using sharp dissection, raise the skin flap of the desired size and thickness.
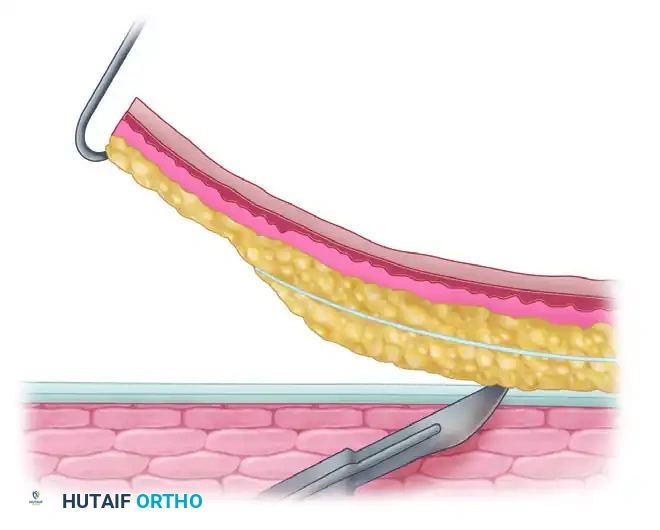
FIGURE 65-32: Cross section of the abdominal pedicle flap being raised. A, Epidermis and dermis; B, superficial fascia of abdomen; C, deep fascia of abdomen; D, muscularis. The dotted line indicates the extent of defatting of the portion of the pedicle to be applied to the hand.
Clinical Pearl: Defatting the Flap
The portion of the flap that will be inset into the hand defect should be carefully defatted to match the contour of the hand and avoid a bulky, cumbersome reconstruction. However, the base or "stem" of the pedicle must retain sufficient fat to maintain its structural shape. This retained fat acts as a mechanical stent, preventing the pedicle from kinking and occluding its own blood supply.
- Tissue Handling: Handle the fat and skin edges with extreme care. Use skin hooks rather than crushing forceps (like Adson-Browns) to manipulate the flap edges, thereby avoiding microvascular trauma and marginal necrosis.
- Hemostasis: Maintain meticulous hemostasis using bipolar electrocautery. Hematoma formation under the flap is a primary cause of flap failure, as it increases pressure, stretches the subdermal plexus, and acts as a nidus for infection.
3. Donor Site Management
Closing the abdominal donor site immediately reduces morbidity and the risk of infection.
- Undermining: Widely undermine the skin margins surrounding the abdominal defect. This mobilization often allows for primary closure of the donor site.
- Closure: Suture the margins together using deep dermal interrupted sutures followed by a subcuticular closure or skin staples.
- Skin Grafting: If the defect is too large for primary closure without excessive tension, apply a split-thickness skin graft (STSG) harvested from the thigh to cover the remaining abdominal defect.
4. Managing the Pedicle Bridge
The undersurface of the pedicle bridge (the portion spanning from the abdomen to the hand) consists of raw, exposed subcutaneous fat.
- Grafting the Bridge: Cover this raw, exposed undersurface with a split-thickness skin graft. This critical step prevents the pedicle from weeping exudate, reduces the inflammatory response, and drastically lowers the risk of infection and subsequent fibrosis.
5. Flap Insetting
- Recipient Site Preparation: Slightly undermine the edges of the defect on the hand to create a healthy, bleeding dermal edge for inset.
- Application: Apply the distal portion of the flap over the entire hand defect.
- Suturing: Suture the edges of the flap to the edges of the hand defect using non-absorbable monofilament sutures (e.g., 4-0 or 5-0 Nylon) in a simple interrupted or vertical mattress fashion. Ensure there is absolutely no tension on the suture line.
- Securing the Graft: Suture the free edge of the split-thickness skin graft (which is covering the pedicle bridge) to the edge of the hand defect nearest to the base of the pedicle. This ensures all raw surfaces are completely closed to the external environment.
6. Dressing and Immobilization
The success of the procedure hinges heavily on the immediate postoperative dressing and rigid immobilization.
- Dressings: Place strips of nonadhering gauze (such as Xeroform or Adaptic) directly over the suture lines. Apply a dry, bulky, and highly absorbent dressing over the flap.
- Positioning the Pedicle: Carefully inspect the pedicle base. Ensure there is no kinking, tension, or rotation. The pedicle must lie in a relaxed, neutral alignment.
- Trunk Immobilization: Using flannel cloth reinforced with plaster of Paris, or wide adhesive tape, apply a robust bandage around the patient's trunk and shoulder, securely supporting the hand in its attached position.
- Accessibility: The immobilization construct must be designed so that the flap is easily accessible for frequent visual and tactile inspection without disturbing the arm's position.
Surgical Pearl: The Steinmann Pin Technique
In cases where marked pronation or supination of the forearm is absolutely necessary to allow the hand to reach the abdomen without placing tension on the flap, external skeletal fixation is highly recommended. Driving a heavy, transverse Steinmann pin through the distal radius and ulna just proximal to the wrist joint effectively locks the forearm in the required degree of rotation, preventing accidental movement that could avulse the flap.
POSTOPERATIVE CARE AND MONITORING
The first 48 hours following flap attachment are the most critical. The flap is entirely dependent on the fragile subdermal plexus, which is highly susceptible to mechanical disruption and pressure-induced ischemia.
Acute Monitoring Protocol
- Hourly Inspections: The flap must be inspected almost hourly during the first 48 hours. Nursing staff and junior residents must be explicitly trained on what to look for.
- Vascular Compromise: Assess for signs of circulatory compromise produced by tension, torsion, or external pressure.
- Arterial Insufficiency: The flap will appear pale, cool to the touch, with delayed or absent capillary refill.
- Venous Congestion: The flap will appear swollen, violaceous (purple/blue), with brisk but dark capillary refill. Venous congestion is more common and often precedes arterial collapse.
- Hematoma Detection: Palpate gently for the development of a hematoma beneath the flap. If a hematoma is suspected, it must be evacuated immediately in the operating room to relieve pressure on the vascular plexus.
- Suture Release: Any sutures that appear to be too tight, causing blanching of the skin edges, should be removed immediately. The localized pressure applied by a tight suture is often sufficient to produce focal ischemia, which can rapidly propagate into wider flap necrosis.
Flap Division and Detachment
The flap relies on the abdominal blood supply until neovascularization (angiogenesis) occurs from the recipient bed into the flap.
- Standard Timeline: Usually, the flap can be detached safely after 3 weeks in healthy adult patients.
- Pediatric Timeline: In children, owing to their robust angiogenic response and higher metabolic rate, the flap usually can be detached safely after 2 weeks.
- Delaying Techniques: If there is doubt regarding the vascular ingrowth from the hand, a "delay" technique can be employed. This involves partially clamping the pedicle with a non-crushing clamp (e.g., a rubber-shod clamp) for increasing intervals over several days to ischemic-precondition the flap and stimulate recipient-site neovascularization before final division.
COMPLICATIONS AND MANAGEMENT
Necrosis
Distal flap necrosis is the most common complication, usually resulting from poor design (exceeding length-to-width ratios), inadequate defatting, or excessive tension.
- Management: If an area becomes definitively necrotic, it must be surgically excised back to healthy, bleeding tissue. The resulting secondary defect should then be covered with a split-thickness skin graft once the bed is clean and granulating.
Infection
Gross infection is a catastrophic complication that usually results in complete flap failure.
- Etiology: Infection is rarely primary; it is almost always secondary to underlying tissue necrosis or an undrained hematoma acting as a culture medium.
- Management: The area must be redressed frequently to avoid offensive odor, manage exudate, and reduce the bacterial bioburden. Aggressive systemic antibiotic therapy, guided by deep tissue cultures, is mandatory. If a hematoma or abscess is present, immediate surgical drainage is required.
AXIAL PATTERN FLAPS: A BRIEF COMPARISON
While the random pattern abdominal flap is highly versatile, axial pattern flaps offer the advantage of a known, robust arterial supply, allowing for much larger length-to-width ratios and immediate, reliable perfusion.
Of the three axial pattern pedicle flaps that have historically been used most often for hand coverage—the deltopectoral flap, the groin flap, and the hypogastric flap—the groin and hypogastric flaps have been found to be the most useful for upper extremity reconstruction due to their proximity, ease of positioning, and hidden donor site morbidity.
Today, many of these axial pattern flaps are frequently transferred as vascularized free flaps utilizing microsurgical techniques, allowing for single-stage reconstruction without the need for prolonged limb-to-trunk immobilization. However, when microsurgery is contraindicated, unavailable, or fails, the pedicled random pattern abdominal flap remains a foundational, reliable, and essential salvage procedure.
You Might Also Like