Comprehensive Guide to Medial Malleolar Osteotomy: Surgical Technique and Clinical Principles
Key Takeaway
The medial malleolar osteotomy is a highly versatile surgical approach providing unparalleled exposure to the medial talar dome. Primarily indicated for complex osteochondral lesions of the talus, this chevron-type transmalleolar technique preserves the deltoid ligament while allowing direct visualization of the articular surface. Precise preoperative planning, meticulous soft tissue handling, and rigid internal fixation are paramount to achieving optimal functional outcomes and minimizing complications such as nonunion or articular step-off.
Introduction to Medial Malleolar Osteotomy
The medial malleolar osteotomy is a foundational, highly specialized surgical approach utilized by orthopedic surgeons to gain unparalleled, direct access to the medial aspect of the talar dome and the ankle mortise. While the advent of advanced ankle arthroscopy has reduced the frequency of open arthrotomies, certain complex pathologies—most notably large, posterior, or cystic osteochondral lesions of the talus (OLTs), as well as complex talar body fractures—demand direct visualization and manipulation that only an open transmalleolar approach can provide.
Pioneered and refined by Cohen et al., the chevron-type transmalleolar osteotomy has become the gold standard technique. Unlike traditional transverse or oblique osteotomies, the chevron configuration provides superior intrinsic biomechanical stability, increases the osseous surface area for healing, and significantly reduces the risk of postoperative malrotation or translation of the malleolar fragment.
This comprehensive guide details the postgraduate-level surgical technique, biomechanical principles, and postoperative protocols required to execute a medial malleolar osteotomy safely and effectively.
Surgical Anatomy and Biomechanics
A profound understanding of the medial ankle anatomy is non-negotiable when performing this procedure. The medial malleolus serves as the primary medial stabilizer of the ankle joint, acting as the origin for the robust deltoid ligament complex.
The Deltoid Ligament Complex
The deltoid ligament is divided into superficial and deep components:
* Superficial Deltoid: Originates from the anterior colliculus and inserts into the navicular, spring ligament, and medial talus. It primarily resists hindfoot eversion.
* Deep Deltoid: Originates from the posterior colliculus and intercollicular groove, inserting directly into the medial surface of the talus. It is the primary restraint against lateral talar excursion and external rotation.
Surgical Pearl: During a medial malleolar osteotomy, the attachments of both the superficial and deep deltoid ligaments to the malleolar fragment must be meticulously preserved. The reflected medial malleolus relies entirely on the vascular supply provided by these ligamentous attachments to prevent avascular necrosis (AVN) of the bone fragment.
Biomechanics of the Chevron Osteotomy
The chevron osteotomy, characterized by its V-shaped cut with the apex directed proximally, offers distinct biomechanical advantages over a simple transverse cut:
1. Rotational Stability: The interdigitating nature of the apex-proximal cut prevents anterior, posterior, and rotational displacement of the fragment during screw compression.
2. Increased Surface Area: The V-shape increases the cancellous bone contact area, promoting higher rates of primary bone healing and reducing the risk of nonunion.
3. Joint Congruency: By directing the osteotomy toward the junction of the medial malleolus and the tibial plafond, the surgeon avoids violating the primary weight-bearing surface of the tibial plafond.
Indications and Contraindications
Primary Indications
- Osteochondral Lesions of the Talus (OLTs): Specifically, large (>1.5 cm), cystic, or posteriorly located medial talar dome lesions (Osteochondritis Dissecans) that are inaccessible via standard anterior or posterior arthroscopic portals.
- Talar Fractures: Complex fractures of the talar body or neck requiring anatomic reduction and rigid internal fixation from a medial approach.
- Osteochondral Autograft Transfer System (OATS): When performing structural grafting for massive medial talar defects.
- Tumor Resection: Excision of benign or malignant neoplasms located within the medial talus.
Contraindications
- Active Infection: Localized soft tissue or intra-articular infection.
- Severe Peripheral Vascular Disease (PVD): Poor vascularity significantly increases the risk of wound breakdown and malleolar nonunion.
- Medial Malleolar Pathology: Pre-existing fractures, severe osteopenia, or cystic degeneration of the medial malleolus itself that would compromise fixation.
Preoperative Planning and Patient Positioning
Imaging
Standard weight-bearing anteroposterior (AP), lateral, and mortise radiographs of the ankle are mandatory. Advanced imaging, specifically Magnetic Resonance Imaging (MRI) or Computed Tomography (CT), is critical for precisely localizing the talar lesion. The exact anterior-to-posterior location of the lesion dictates the necessary degree of plantar flexion or dorsiflexion required to expose the defect once the malleolus is reflected.
Positioning
- The patient is placed in the supine position on a standard radiolucent operating table.
- A bump (sandbag or rolled blanket) is placed under the ipsilateral hip to internally rotate the leg until the medial malleolus is pointing directly toward the ceiling, optimizing the surgeon's view of the medial ankle.
- A well-padded thigh or calf tourniquet is applied to ensure a bloodless surgical field.
- Intraoperative fluoroscopy (C-arm) must be positioned to easily obtain AP and lateral views of the ankle mortise.
Step-by-Step Surgical Technique
1. Incision and Soft Tissue Dissection
The approach begins with a meticulously planned incision to ensure adequate exposure while protecting vital neurovascular structures.
- Make a 6- to 8-cm apex-posterior curved incision centered directly over the medial malleolus. The curve should follow the natural contour of the malleolus, allowing for optimal reflection of the soft tissue flaps.
- Carefully deepen the incision through the subcutaneous tissue. Identify and protect the saphenous vein and nerve, which typically lie anterior to the incision but may have branches crossing the surgical field.
- Identify the flexor retinaculum and the posterior tibial tendon (PTT) sheath.
- Open the posterior tibial tendon sheath precisely at the level of the ankle mortise.
Surgical Warning: The posterior tibial tendon, along with the flexor digitorum longus (FDL) and the posterior tibial neurovascular bundle, lie immediately posterior to the medial malleolus. The posterior tibial tendon must be gently retracted posteriorly and protected with a blunt retractor (such as a Ragnell or Senn) at all times during the osteotomy to prevent iatrogenic laceration.
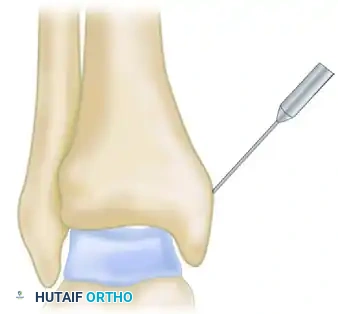
2. Periosteal Management and Pre-drilling
Proper handling of the periosteum and pre-drilling the fixation pathways are the most critical steps for ensuring an anatomic reduction at the conclusion of the procedure.
- Incise the periosteum along the planned lines of the chevron osteotomy, but do not reflect it. Stripping the periosteum from the medial malleolus destroys its tenuous blood supply, drastically increasing the risk of nonunion or avascular necrosis of the fragment.
- Before making any bone cuts, predrill the medial malleolus to prepare for the final fixation.
- Using a 2.5-mm drill bit and a tissue protector, drill two parallel holes from the tip of the medial malleolus, directing them superiorly and laterally into the tibial metaphysis.
- Tap the drill holes for 4.0-mm partially threaded cancellous screws.
Clinical Pearl: The "Drill and Tap Before You Cut" principle is paramount. Attempting to drill these holes after the osteotomy is complete and the fragment is mobile makes it nearly impossible to achieve a perfect, step-free anatomic reduction of the articular surface. Pre-drilling guarantees that when the screws are inserted later, the bone fragment will perfectly key back into its native position.
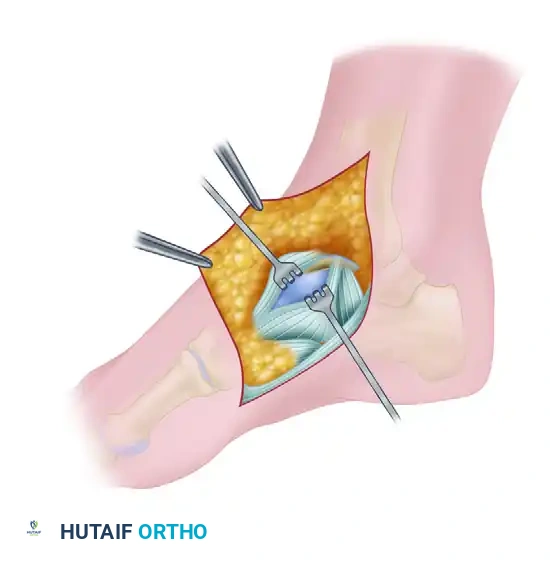
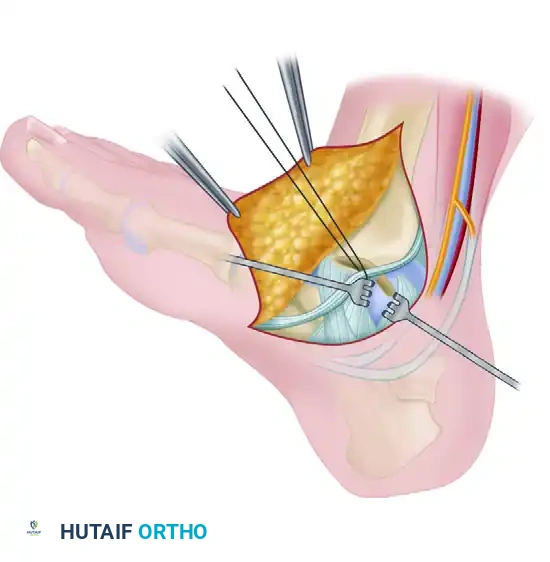
3. Executing the Chevron Osteotomy
The osteotomy must be executed with precision to avoid damaging the weight-bearing tibial plafond.
- Utilize a microsagittal saw equipped with a fine blade to create the chevron-type osteotomy.
- The apex of the chevron must be directed proximally (superiorly).
- In the anteroposterior (AP) plane, carefully angle the osteotomy toward the junction of the medial malleolus and the tibial plafond articular surface.
Surgical Pitfall: It is highly beneficial to obtain a fluoroscopic image at the start of the osteotomy to verify the trajectory of the saw blade. If the angle is too oblique, the saw will enter the horizontal weight-bearing surface of the tibia, creating an iatrogenic articular defect. If the angle is too vertical, the resulting malleolar fragment will be too small, severely limiting visualization of the talus and compromising screw fixation.
- Direct visualization of the saw blade exiting into the joint space can be obtained by looking through the anteromedial gutter.
- Crucial Step: Do not complete the osteotomy entirely with the saw. Stop the saw blade 1 to 2 millimeters short of the articular cartilage.
- Complete the final millimeter of the osteotomy using a fine hand osteotome. Gently lever the osteotome to crack the remaining subchondral bone and articular cartilage. This technique creates a rough, interdigitating cartilaginous fracture line rather than a smooth saw cut, which facilitates a perfect "puzzle-piece" reduction and prevents thermal necrosis of the cartilage.
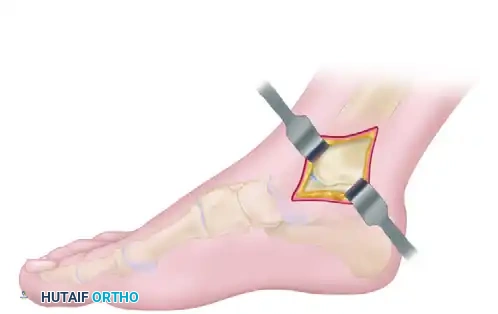
4. Talar Exposure and Pathology Management
Once the osteotomy is complete, the medial malleolus is mobilized to expose the talus.
- Reflect the medial malleolar fragment inferiorly.
- Release the anterior and posterior capsular attachments only as necessary to achieve adequate visualization.
- Strictly maintain the attachments of the superficial and deep deltoid ligaments to the inferior aspect of the malleolar fragment.
-
Depending on the location of the talar pathology, manipulate the foot to bring the lesion into view:
- For anterior or central lesions, place the foot in maximal plantar flexion.
- For posterior lesions, place the foot in maximal dorsiflexion.
-
Address the primary pathology (e.g., debridement and microfracture of an osteochondral defect, OATS procedure, or fracture reduction).
5. Reduction and Internal Fixation
Following the treatment of the talar pathology, the ankle mortise must be meticulously reconstructed.
- Thoroughly irrigate the joint to remove any bone debris or loose cartilage bodies generated during the osteotomy or talar debridement.
- Reduce the medial malleolar fragment back to its anatomic position. The rough cartilaginous fracture line and the chevron shape should allow the fragment to key perfectly into place.
- Hold the reduction with a pointed reduction clamp.
- Insert two 4.0-mm partially threaded cancellous screws into the previously drilled and tapped holes.
- Tighten the screws using a two-finger technique to achieve robust interfragmentary compression without stripping the cancellous bone.
- Verify the anatomic reduction of the articular surface and the extra-articular hardware placement using AP and mortise fluoroscopic views.
- Repair the posterior tibial tendon sheath with a fine absorbable suture (e.g., 3-0 Vicryl) to prevent tendon subluxation.
- Close the subcutaneous tissues and skin in a standard layered fashion.
Postoperative Care and Rehabilitation Protocol
The postoperative protocol must balance the need for rigid bone healing with the prevention of joint stiffness.
Phase 1: Protection and Healing (Weeks 0-2)
- Immediately postoperatively, the patient is placed in a well-padded short-leg plaster splint with the ankle in a neutral (90-degree) position.
- Strict non-weight-bearing (NWB) status is enforced using crutches, a walker, or a knee scooter.
- Elevation and ice are prioritized to manage edema and mitigate wound complications.
- Sutures are typically removed at 10 to 14 days postoperatively, provided the incision is fully healed.
Phase 2: Early Range of Motion (Weeks 2-6)
- The patient is transitioned to a removable controlled ankle motion (CAM) boot.
- Non-weight-bearing status is strictly maintained.
- The patient is instructed to remove the boot multiple times daily to perform active and active-assisted range of motion (ROM) exercises (dorsiflexion and plantar flexion).
- Inversion and eversion should be approached cautiously to avoid excessive stress on the healing osteotomy and deltoid ligament.
Phase 3: Progressive Weight-Bearing (Weeks 6-12)
- At approximately 6 weeks postoperatively, updated radiographs are obtained.
- If radiographs confirm the maintenance of reduction and demonstrate interval signs of bone healing (callus formation, obliteration of the osteotomy line), the patient may begin progressive weight-bearing.
- Weight-bearing is initiated in the CAM boot, advancing from partial to full weight-bearing over a 2- to 4-week period.
- Formal physical therapy is initiated, focusing on proprioception, peroneal and posterior tibial tendon strengthening, and gait mechanics.
- Transition to regular supportive footwear typically occurs between 8 and 10 weeks, depending on clinical and radiographic progress.
Complications and Pitfalls
While highly effective, the medial malleolar osteotomy carries specific risks that the surgeon must actively mitigate:
- Nonunion or Delayed Union: Occurs if the periosteum is excessively stripped, compromising the blood supply, or if fixation is inadequate. Treatment may require revision internal fixation and bone grafting.
- Articular Step-off: Failure to pre-drill or failure to achieve an anatomic reduction can leave a step-off in the tibial plafond, leading to rapid onset post-traumatic osteoarthritis.
- Iatrogenic Cartilage Damage: Entering the weight-bearing dome of the tibia with the saw blade or failing to use an osteotome for the final articular crack can cause permanent joint damage.
- Hardware Prominence: The medial malleolus has minimal subcutaneous fat. Screw heads may become prominent and symptomatic, necessitating hardware removal after complete radiographic union (typically after 6-12 months).
- Nerve Injury: Damage to the saphenous nerve or the posterior tibial nerve due to aggressive retraction can lead to painful neuromas or sensory deficits.
By adhering to the strict biomechanical principles of the chevron osteotomy, utilizing meticulous soft tissue handling, and ensuring rigid anatomic fixation, the orthopedic surgeon can leverage the medial malleolar osteotomy to successfully manage complex intra-articular talar pathology with excellent long-term functional outcomes.
📚 Medical References
- Medial malleolar osteotomy for exposure of complex talar body fractures, J Orthop Trauma 15:513, 2001.
- Midfoot Aitken AP, Poulson D: Dislocations of the tarsometatarsal joint, J Bone Joint Surg 45A:246, 1963.
- Anderson LD: Injuries of the forefoot, Clin Orthop Relat Res 122:118, 1977.
- Arntz CT, Hansen ST Jr: Dislocations and fracture dislocations of the tarsometatarsal joints, Orthop Clin North Am 18:105, 1987.
- Boden BB, Osbahr DC: High-risk stress fractures: evaluation and treatment, J Am Acad Orthop Surg 8:344, 2000.
- Buzzard BM, Briggs PJ: Surgical management of acute tarsometatarsal fracture dislocation in the adult, Clin Orthop Relat Res 353:125, 1998.
- Coss S, Manos RE, Buoncristiani A, et al: Abduction stress and AP weightbearing radiography of purely ligamentous injury in the tarsometatarsal joint, Foot Ankle Int 19:537, 1998.
- Curtis MJ, Myerson M, Szura B: Tarsometatarsal joint injuries in the athletes, Am J Sports Med 21:497, 1993.
- DeLee JC: Fractures and dislocations of the foot. In Mann RA, ed: Surgery of the foot, 5th ed, St Louis, 1986, Mosby. DePalma L, Santucci A, Sabetta SP, et al: Anatomy of the Lisfranc joint complex, Foot Ankle Int 18:356, 1997.
- Fitch KD, Blackwell JB, Gilmour WN: Operation for nonunion of stress fracture of the tarsal navicular, J Bone Joint Surg 71B:105, 1989.
- Goosens M, De Stoop N: Lisfranc’s fracture dislocations: etiology, radiology and results of treatment, Clin Orthop Relat Res 176:154, 1983.
- Hardcastle PH, Reschauer R, Kutscha-Lissberg E, et al: Injuries to the tarsometatarsal joint: incidence, classifi cation and treatment, J Bone Joint Surg 64B:349, 1982.
- Heckman JD: Fractures and dislocations of the foot. In Rockwood CA Jr, Green DP, eds: Fractures in adults, 2nd ed, Philadelphia, 1984, Lippincott. Johnson JE, Johnson KA: Dowel arthrodesis for degenerative arthritis of the tarsometatarsal (Lisfranc) joints, Foot Ankle 5:243, 1986.
- Kavanaugh JH, Brower TD, Mann RV: The Jones fracture revisited, J Bone Joint Surg 60A:776, 1978.
- Komenda GA, Myerson MS, Biddinger KR: Results of arthrodesis of the tarsometatarsal joints after traumatic injury, J Bone Joint Surg 78A:1665, 1996.
- Kuo RS, Tejwani NC, DiGiovanni CW, et al: Outcome after open reduction and internal fi xation of Lisfranc joint injuries, J Bone Joint Surg 82A:1609, 2000.
- Lu J, Ebraheim NA, Skie M, et al: Radiographic and computed tomographic evaluation of Lisfranc dislocation: a cadaver study, Foot Ankle Int 18:351, 1997.
- Mann RA, Prieskorn D, Sobel M: Midtarsal and tarsometatarsal arthrodesis for primary degenerative osteoarthrosis or osteoarthrosis after trauma, J Bone Joint Surg 78A:1376, 1996.
- Monteleone GP Jr: Stress fractures in the athlete, Orthop Clin North Am 26:423, 1995.
- Mulier T, Reynders P, Sioen W, et al: The treatment of Lisfranc injuries, Acta Orthop Belg 63:82, 1997.
- Myerson M: The diagnosis and treatment of injuries to the Lisfranc joint complex, Orthop Clin North Am 20:655, 1989.
- Myerson MS: The diagnosis and treatment of injury to the tarsometatarsal joint complex, J Bone Joint Surg 81B:756, 1999.
- Petje G, Steinböck G, Landsiedl F: Arthrodesis for traumatic fl at foot, Acta Orthop Scand 67:359, 1996.
- Potter HG, Deland JT, Gusmer PB, et al: Magnetic resonance imaging of the Lisfranc ligament of the foot, Foot Ankle Int 19:438, 1998.
- Preidler KW, Brossmann J, Daenen B, et al: MR imaging of the tarsometatarsal joint: analysis of injuries in 11 patients, Am J Radiol 167:1217, 1996.
- Quénu E, Küss G: Étude sur les luxations du metatarse (luxations métatarsotarsiennes) du diastasis entre le 1 er and le 2 e metatarsien, Rev Chir 39:281, 1909.
- Resch S, Stenström A: The treatment of tarsometatarsal injuries, Foot Ankle 11:117, 1990.
- Richter M, Thermann H, Huefner T, et al: Chopart joint fracture-dislocation: initial open reduction provides better outcome than closed reduction, Foot Ankle Int 25:340, 2004.
- Richter M, Wippermann B, Krettek C, et al: Fractures and fracture dislocations of the midfoot: occurrence, causes, and long-term results, Foot Ankle Int 22:392, 2001.
- Ross G, Cronin R, Hauzenblaz J, et al: Plantar ecchymosis sign: a clinical aid to diagnosis of occult Lisfranc tarsometatarsal injuries, J Orthop Trauma 10:119, 1996.
- Sangeorzan BJ, Veith RG, Hansen ST Jr: Salvage of Lisfranc’s tarsometatarsal joint by arthrodesis, Foot Ankle 10:193, 1990.
You Might Also Like
