Two-Incision Technique for Anterior Cruciate Ligament Reconstruction Using Bone-Patellar Tendon-Bone Graft
Key Takeaway
The two-incision technique for anterior cruciate ligament (ACL) reconstruction using a bone-patellar tendon-bone (BTB) graft remains a critical procedure in the orthopedic surgeon's armamentarium. While endoscopic single-incision techniques are standard, the two-incision approach is indispensable for complex revisions, managing posterior wall blowouts, and specific pediatric cases. This technique provides unparalleled access to the lateral femoral cortex, ensuring precise femoral tunnel placement and secure graft fixation.
INTRODUCTION AND HISTORICAL CONTEXT
The evolution of anterior cruciate ligament (ACL) reconstruction has largely transitioned toward single-incision, arthroscopically assisted endoscopic techniques. However, the two-incision technique utilizing a bone-patellar tendon-bone (BTB) autograft remains a foundational pillar of operative sports medicine. Originally popularized in the 1980s and early 1990s, this approach involves a standard anterior incision for graft harvest and tibial tunnel preparation, coupled with a dedicated lateral incision for outside-in femoral tunnel preparation and graft fixation.
While primary, uncomplicated ACL reconstructions are routinely performed via a single-incision approach, the two-incision technique is an indispensable salvage and specialized procedure. It provides the operating surgeon with unparalleled direct visualization of the lateral femoral cortex, allowing for independent, anatomically precise femoral tunnel placement unconstrained by the tibial tunnel trajectory.
INDICATIONS AND PATIENT SELECTION
The two-incision technique is not routinely utilized for primary, uncomplicated ACL reconstructions due to increased surgical morbidity, a second incision, and potentially greater postoperative pain. However, it is the gold standard or highly preferred technique in several complex clinical scenarios:
- Revision ACL Reconstruction: In the revision setting, pre-existing femoral tunnels often compromise the trajectory of a new tunnel drilled via an inside-out (transtibial or anteromedial portal) approach. The two-incision technique allows for an "outside-in" drilling trajectory, enabling the surgeon to bypass widened or malpositioned primary tunnels and establish a new, anatomically correct footprint.
- Posterior Wall Blowout: A catastrophic complication of endoscopic inside-out femoral drilling is the violation or "blowout" of the posterior femoral cortex. When this occurs, standard interference screw fixation is rendered impossible due to a lack of cortical containment. The two-incision technique allows for recovery by providing direct access to the lateral femur, enabling either an over-the-top graft routing or the use of suspensory cortical fixation on the lateral cortex.
- Pediatric and Adolescent Patients: In skeletally immature patients with open physes, standard transphyseal drilling carries a risk of growth arrest, angular deformity, or leg length discrepancy. The two-incision approach facilitates physeal-sparing techniques, such as all-epiphyseal outside-in drilling or over-the-top non-anatomic routing, which avoid violating the distal femoral physis.
- Extreme Hyperlaxity or Vertical Tibial Tunnels: In cases where the tibial tunnel has been drilled too vertically (often a relic of older transtibial techniques), reaching the anatomic femoral footprint via the tibial tunnel is impossible. The lateral incision decouples the femoral tunnel from the tibial tunnel.
💡 Clinical Pearl
When planning a revision ACL reconstruction, always obtain a preoperative computed tomography (CT) scan with 3D reconstructions. This allows for precise mapping of the existing tunnels and helps determine if an outside-in two-incision approach is necessary to achieve anatomic graft placement without tunnel convergence.
BIOMECHANICS OF THE BONE-PATELLAR TENDON-BONE GRAFT
The BTB autograft is often considered the "gold standard" for ACL reconstruction, particularly in high-demand, contact-sport athletes.
- Ultimate Tensile Load: The central third of the patellar tendon (10 mm width) has an ultimate tensile load of approximately 2,977 N, which exceeds the native ACL (approximately 2,160 N).
- Stiffness: The stiffness of the BTB graft (620 N/mm) is significantly higher than that of the native ACL (242 N/mm), providing excellent immediate postoperative stability.
- Healing Profile: The primary biomechanical advantage of the BTB graft in a two-incision technique is the bone-to-bone healing within the osseous tunnels. Unlike soft tissue grafts that rely on Sharpey's fiber integration (which takes 8-12 weeks), bone plugs heal via primary osteogenesis within 6 weeks, allowing for aggressive early rehabilitation.
PREOPERATIVE PLANNING AND POSITIONING
Anesthesia and Setup
The procedure is typically performed under general anesthesia, often supplemented with a regional block (e.g., adductor canal block) for postoperative pain control.
1. Place the patient supine on the operating table.
2. Apply a high-thigh tourniquet.
3. Position the operative leg in a standard arthroscopy leg holder or over a lateral post, allowing for full flexion (at least 120 degrees) and extension.
4. Examine the knee under anesthesia (EUA) to confirm the pivot-shift, Lachman, and anterior drawer tests, and to rule out concurrent ligamentous laxity (e.g., posterolateral corner injury).
SURGICAL TECHNIQUE: STEP-BY-STEP
Phase 1: Diagnostic Arthroscopy and Graft Harvest
The basics for the two-incision technique begin similarly to the endoscopic technique.
1. Establish standard anterolateral and anteromedial portals.
2. Perform a comprehensive diagnostic arthroscopy, addressing any meniscal or chondral pathology.
3. Debride the ruptured ACL stump, meticulously preserving the tibial and femoral footprints to serve as anatomic landmarks.
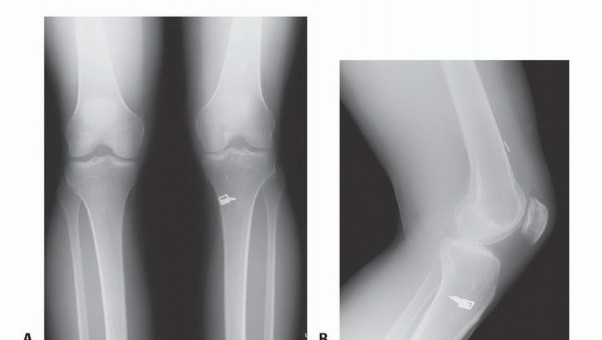
4. Harvest the central third (typically 9-10 mm) of the patellar tendon with its corresponding bone blocks from the patella and tibial tubercle via a standard anterior midline or two transverse incisions.
5. Prepare the graft on the back table, sizing the bone plugs to pass smoothly through the appropriate sizing tubes (usually 9 mm or 10 mm).
Phase 2: The Lateral Exposure
The defining characteristic of the two-incision technique is the lateral exposure of the distal femur. This must be executed with precision to avoid neurovascular injury and minimize muscular trauma.
- Skin Incision: Make a 4-cm longitudinal lateral incision. The starting point is critical: begin exactly 1.5 cm proximal to the flare of the lateral femoral condyle. The incision should be centered directly over the iliotibial (IT) band.
- Subcutaneous Dissection: Carry the dissection sharply down through the subcutaneous fat to the glistening fascia of the iliotibial band. Expose the IT band with wide subcutaneous dissection to allow for adequate mobility of the fascial layers.
- Splitting the Iliotibial Band: Divide the IT band longitudinally in its midline, following the direction of its fibers. Extend this fascial split proximally and distally beyond the limits of the skin incision to maximize deep exposure without excessive skin retraction.
- Identifying the Vastus Lateralis: Deep to the IT band lies the vastus lateralis muscle. Sweep a gloved finger along the lateral intermuscular septum (which separates the anterior and posterior compartments of the thigh). The lower, tendinous edge of the distal portion of the vastus lateralis can be easily palpated here.
- Muscle Elevation: Slide a blunt periosteal elevator (or a Cobb elevator) under the inferior edge of the vastus lateralis. Carefully lift the muscle belly anteriorly and superiorly over the lateral aspect of the femur.
⚠️ Surgical Warning
Extreme care must be taken during the elevation of the vastus lateralis. Do not crush or sharply injure the muscle belly. Iatrogenic trauma to the vastus lateralis in this region can lead to severe postoperative hematoma, prolonged quadriceps inhibition, and the development of heterotopic ossification (myositis ossificans), which can severely restrict postoperative knee flexion.
- Retractor Placement: Once the muscle is elevated, place a Z-retractor (or a right-angle Hohmann retractor) over the anterior aspect of the femur to hold the vastus lateralis superiorly and anteriorly, exposing the lateral femoral cortex.
- Periosteal Incision: Use electrocautery to make a longitudinal incision through the periosteum. Begin just proximal to the flare of the lateral condyle and extend it proximally for approximately 2.5 cm.
- Exposing the "Over-the-Top" Position: Use a periosteal elevator to strip the periosteum anteriorly and posteriorly, exposing the bare lateral femoral cortex. Continue the subperiosteal dissection posteriorly to identify the "over-the-top" spot—the precise anatomic location where the flare of the posterior condyle and the metaphysis of the femur meet.
- Hemostasis: Meticulously identify and coagulate the lateral genicular vessels in this area.
💡 Clinical Pearl: Genicular Vessels
The superior lateral genicular artery consistently courses transversely across the distal femur in the exact region of this exposure, usually resting directly on the periosteum near the metaphyseal flare. Failure to proactively identify and coagulate these vessels prior to drilling will result in a persistent, visually obscuring hemorrhage during the procedure and a massive hemarthrosis postoperatively.
Phase 3: Femoral Tunnel Preparation (Outside-In)
With the lateral cortex exposed, the surgeon can now prepare the femoral tunnel.
- Guide Placement: Introduce a rear-entry (outside-in) femoral aiming guide through the anteromedial portal. Place the intra-articular tip of the guide precisely on the anatomic footprint of the ACL on the medial wall of the lateral femoral condyle (typically at the 10 o'clock position for a right knee, or 2 o'clock for a left knee, low on the wall).
- Pin Insertion: Bring the outrigger of the guide down onto the exposed lateral femoral cortex. Drill a 2.4-mm guide pin from the lateral cortex, through the condyle, and into the joint space.
- Tunnel Reaming: Over-ream the guide pin from outside-in using a cannulated reamer matched to the diameter of the femoral bone plug (e.g., 10 mm). Ream until the intra-articular cortex is breached.
- Managing Posterior Wall Blowout (Salvage): If this technique is being used to salvage a posterior wall blowout from a previous inside-out attempt, the outside-in reamer can be redirected slightly anteriorly to establish a new, intact cortical rim. Alternatively, the graft can be routed "over-the-top" of the posterior condyle, utilizing the exposure gained in Phase 2, bypassing the need for a contained intra-articular tunnel entirely.
Phase 4: Tibial Tunnel Preparation
- Place a standard tibial aiming guide set at 50 to 55 degrees.
- Position the intra-articular tip at the center of the native ACL tibial footprint (posterior to the anterior horn of the lateral meniscus and anterior to the PCL).
- Drill the guide pin from the anteromedial tibia into the joint.
- Over-ream with a cannulated reamer matched to the tibial bone plug diameter.
Phase 5: Graft Passage and Fixation
- Passing the Graft: Pass a Beath pin or passing suture from the lateral femoral incision, through the femoral tunnel, across the joint space, and out through the tibial tunnel. Shuttle the BTB graft from distal to proximal (tibia to femur).
- Femoral Fixation: Because the lateral cortex is directly exposed, femoral fixation is highly reliable. Insert a metallic or bioabsorbable interference screw from the outside-in through the lateral incision. The direct visualization ensures the screw is placed parallel to the bone plug, eliminating the risk of graft laceration or divergent screw placement—a common pitfall of endoscopic inside-out fixation.
- Tibial Fixation: Tension the graft distally with the knee in 20 to 30 degrees of flexion. Fix the tibial bone plug with an interference screw placed from anterior to posterior.
- Closure: Thoroughly irrigate both incisions. Close the IT band fascia meticulously with heavy absorbable sutures to prevent muscle herniation. Close the subcutaneous tissues and skin in a standard layered fashion.
POSTOPERATIVE REHABILITATION PROTOCOL
The rehabilitation following a two-incision BTB ACL reconstruction is aggressive, capitalizing on the rigid bone-to-bone fixation. However, surgeons must account for the morbidity of the lateral incision.
Phase 1: Immediate Postoperative (Weeks 0-2)
- Weight Bearing: Weight-bearing as tolerated (WBAT) with crutches, locked in full extension in a hinged knee brace.
- Range of Motion (ROM): Emphasis on achieving immediate full, symmetric hyperextension. Flexion is progressed as tolerated, aiming for 90 degrees by week 2.
- Muscle Activation: Quadriceps sets, straight leg raises (SLR). Note: Patients may experience increased lateral thigh pain during SLR due to the vastus lateralis elevation; reassure the patient and manage pain pharmacologically.
Phase 2: Early Rehabilitation (Weeks 2-6)
- Weight Bearing: Wean off crutches as quadriceps control normalizes (no extension lag on SLR).
- ROM: Progress to full flexion (130+ degrees). The lateral IT band split may cause transient stiffness; patellar mobilization and IT band stretching are critical.
- Strengthening: Closed kinetic chain exercises (mini-squats, leg presses). Avoid open kinetic chain extension between 0 and 45 degrees to protect the graft from excessive shear forces.
Phase 3: Advanced Strengthening (Weeks 6-12)
- Bone-to-bone healing is generally complete by week 6.
- Initiate proprioceptive training (BAPS board, single-leg balance).
- Begin straight-line jogging at 10-12 weeks if quadriceps strength is at least 70% of the contralateral limb.
Phase 4: Return to Sport (Months 6-9+)
- Progression to cutting, pivoting, and sport-specific drills.
- Return to play is authorized when the patient demonstrates >90% limb symmetry index (LSI) on hop testing and isokinetic strength testing, alongside psychological readiness.
COMPLICATIONS AND PITFALLS
While highly effective, the two-incision technique carries specific risks unique to the lateral exposure:
- Iliotibial Band Friction Syndrome: Inadequate closure of the IT band or prominent lateral femoral hardware (if a suspensory button or staple is used instead of an interference screw) can lead to painful snapping or friction over the lateral epicondyle.
- Vastus Lateralis Denervation/Atrophy: Aggressive retraction or straying too far proximally can injure the descending branches of the lateral femoral circumflex artery or the nerve to the vastus lateralis, leading to localized muscle atrophy.
- Hemarthrosis: As previously emphasized, failure to meticulously cauterize the superior lateral genicular artery during the periosteal elevation will result in significant postoperative bleeding.
- Cosmesis: The addition of a 4-cm lateral thigh incision is cosmetically less appealing than single-incision techniques, a factor that should be discussed with the patient preoperatively.
CONCLUSION
The two-incision technique for ACL reconstruction using a bone-patellar tendon-bone graft is a masterclass in orthopedic surgical anatomy and biomechanics. While the advent of flexible reamers and advanced endoscopic guides has reduced the frequency of its use in primary settings, the ability to execute a safe, precise lateral exposure of the distal femur remains an absolute necessity for the comprehensive knee surgeon. Whether navigating a complex revision, salvaging a blown-out posterior wall, or protecting an open physis, the two-incision technique provides unmatched versatility and rigid, reliable graft fixation.
You Might Also Like