Osteochondral Autograft Transfer & ACL Reconstruction Guide
Key Takeaway
Osteochondral autograft transfer (OATS) is a highly effective surgical technique for treating focal articular cartilage defects. By harvesting cylindrical osteochondral plugs from non-weight-bearing donor sites and transferring them to the recipient defect, surgeons can restore the articular surface with native hyaline cartilage. This comprehensive guide details the precise arthroscopic steps, biomechanical principles, and graft selection criteria essential for optimizing patient outcomes in both cartilage repair and concurrent cruciate ligament reconstruction.
INTRODUCTION TO ARTICULAR CARTILAGE RESTORATION
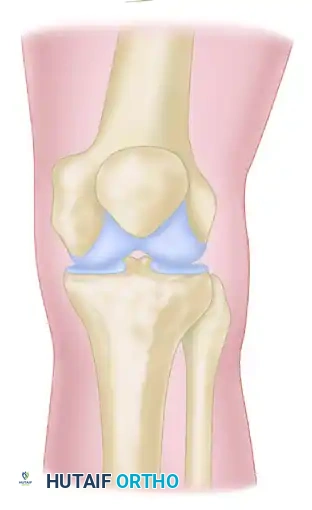
The management of focal articular cartilage defects and osteochondritis dissecans (OCD) remains a formidable challenge in orthopedic surgery. Because hyaline cartilage possesses limited intrinsic healing capacity due to its avascular nature, untreated full-thickness lesions often progress to early-onset osteoarthritis. Osteochondral Autograft Transfer (OATS), also known as mosaicplasty when multiple plugs are utilized, is a premier restorative technique. It involves the harvesting of cylindrical osteochondral cores from relatively non-weight-bearing regions of the knee (such as the superolateral or superomedial trochlea) and transferring them into prepared recipient sockets within the weight-bearing defect.
This technique provides immediate structural fill with mature, autologous hyaline cartilage and viable subchondral bone, allowing for bone-to-bone healing. When combined with advanced arthroscopic techniques for concurrent pathologies—such as Anterior Cruciate Ligament (ACL) reconstruction—surgeons can restore both the biomechanical stability and the tribological properties of the knee joint.
PATIENT SELECTION AND INDICATIONS
Proper patient selection is the cornerstone of successful osteochondral autograft transfer. The clinical algorithm for the treatment of articular cartilage lesions, as described by Sgaglione et al., dictates that overall indications must be satisfied before proceeding with OATS.
Primary Indications for OATS
- Lesion Size: Ideal for symptomatic, unipolar, focal chondral or osteochondral defects measuring between 1.0 cm² and 2.5 cm². Lesions larger than 2.5 cm² are generally better served by autologous chondrocyte implantation (ACI) or osteochondral allograft transplantation.
- Patient Profile: Age younger than 55 years, Body Mass Index (BMI) less than 30.
- Joint Mechanics: Normal mechanical alignment (or corrected concurrently via osteotomy), stable ligamentous status (or reconstructed concurrently), and intact meniscal volume (more than two-thirds of the meniscus intact).
- Pathology: Focal traumatic defects or contained Osteochondritis Dissecans (OCD) lesions.
Surgical Warning: OATS is strictly contraindicated in patients with diffuse degenerative joint disease, inflammatory arthropathies (e.g., rheumatoid arthritis), uncorrected malalignment, or unaddressed ligamentous instability.
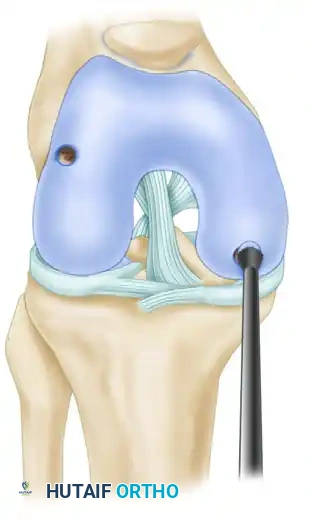
SURGICAL TECHNIQUE: OSTEOCHONDRAL AUTOGRAFT TRANSFER (OATS)
1. Diagnostic Arthroscopy and Defect Preparation
The procedure begins with a comprehensive diagnostic arthroscopy to confirm the size, depth, and containment of the lesion.
- Inspect the osteochondral defect arthroscopically and meticulously debride unstable cartilage margins to create vertical walls of healthy, stable hyaline cartilage.
- Measure the exact size of the lesion. Use a set of OATS sizer/tamps with heads ranging from 5 to 10 mm to determine precisely the diameter of the defect. The color-coded tamps correspond in size with the diameter of the tube harvesters.
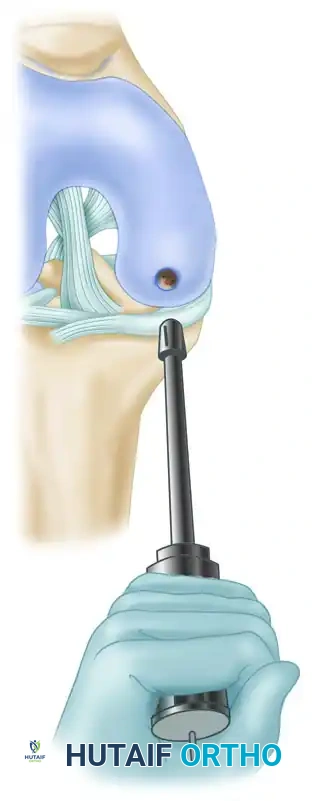
2. Donor Site Harvesting
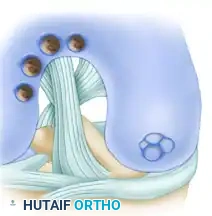
The donor site must be carefully selected to minimize donor-site morbidity. The periphery of the lateral trochlear ridge, proximal to the sulcus terminalis, is the most common harvest site.
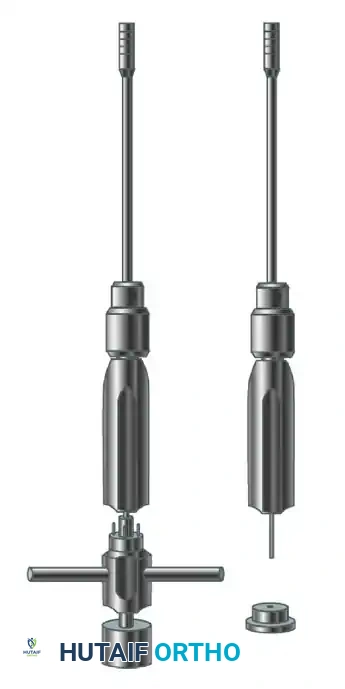
- Assemble the tube harvester driver/extractor.
- Load the donor tube harvester with the collared pin into the base of the driver, and tighten the chuck. Screw a cartilage protector cap onto the back of the driver. When seated, the collared pin protrudes a few millimeters past the sharp cutting tip of the harvester to protect the articular surfaces during initial positioning.
- Position the harvester strictly perpendicular (90 degrees) to the articular surface of the donor site. When an acceptable position is established, drive the donor harvester with a mallet into the subchondral bone to a depth of approximately 15 mm.
Clinical Pearl: Avoid rotating the harvester during impaction. Rotation during the driving phase can shear the delicate hyaline cartilage cap from the underlying subchondral bone plug.
- Remove the harvester and the bone core by axially loading the harvester and rotating the driver 90 degrees clockwise, and then 90 degrees counterclockwise. This motion breaks the cancellous bone at the base of the plug, allowing for clean extraction.
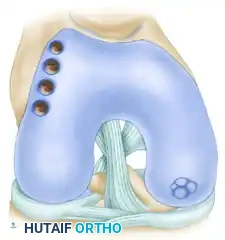
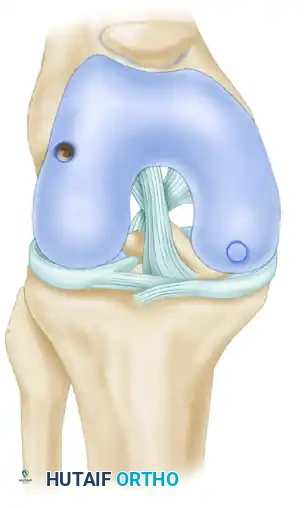
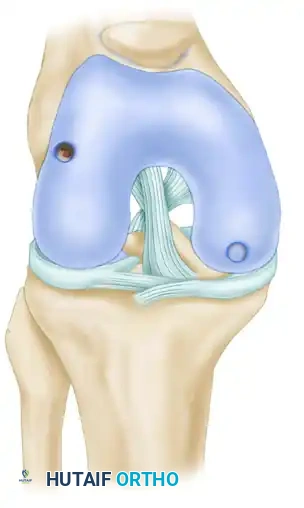
3. Recipient Socket Creation
Creating a precise recipient socket is critical for achieving a flush, stable graft transfer.
- Fully insert the recipient harvester into the driver, and insert the protector caps in a similar fashion. During socket creation, you must maintain a strict 90-degree angle to the articular surface to end up with a flush transfer.
- Rotate the harvester so that the depth markings are clearly visible. Maintain a constant knee flexion angle during harvesting to prevent shifting of the anatomical landmarks.
- After using a mallet to drive the tube harvester into the subchondral bone to a depth of approximately 13 mm (which is intentionally 2 mm less than the length of the donor core to allow for compression and a proud cartilage cap), extract the recipient bone core in the same manner as the donor bone core. Measure and record the depth of the core.

- Use the calibrated OATS alignment stick of the appropriate diameter to measure the recipient socket depth and align the angle of the recipient socket correctly in relation to the position of the insertion portal when using an arthroscopic approach.
4. Autograft Insertion and Fixation
- Reinsert the donor harvester, collared pin, and autograft core into the driver. Unscrew the cap and remove the T-handled midsection. This exposes the end of the collared pin that is used to advance the bone into the recipient socket.
- Insert the pin calibrator over the guide pin, and press it into the open back of the driver. Insert the donor tube harvester’s beveled edge fully into the recipient socket.
- Stabilize the harvester during autograft impaction. Use a mallet to tap the end of the collared pin lightly and drive the bone core into the recipient socket. Maintain a stable knee flexion angle and position of the harvester during this step.
- Carefully advance the collared pin until the end of the pin is flush with the pin calibrator on the back of the driver/extractor. This provides exact mechanical control to ensure proper bone core insertion depth. The predetermined length of the collared pin is designed to advance the bone core so that 1 mm of graft is exposed from the recipient socket when the pin is driven flush.
- Alternative Insertion Method: The core extruder is an option to using the mallet. Place the donor harvester into the chuck of the fully assembled tube harvester driver/extractor. While keeping the donor tube harvester firmly in position, slowly screw the core extruder into the rear of the driver. Advance the core extruder by turning it clockwise, forcing the bone core into the socket. When fully seated, the bone core should remain slightly proud.
- Remove the donor tube harvester, and position a sizer tamp (measuring at least 1 mm in diameter larger than the diameter of the bone core) over the bone core.

- Final seating of the bone core flush with the surrounding native cartilage is achieved by tapping the tamp lightly with the mallet.
5. Multiple Core Transfers (Mosaicplasty)
When treating larger or irregularly shaped defects, multiple cores of various diameters may be harvested and transferred into specific quadrants of the defect.
- Each core transfer should be completed entirely before proceeding with further recipient socket creation. This sequential approach prevents potential recipient tunnel wall fractures and allows subsequent cores to be placed directly adjacent to previously inserted bone cores, minimizing dead space.
BONE GRAFTING FOR OSTEOCHONDRITIS DISSECANS (OCD)
In cases of osteochondritis dissecans with partial detachment or significant subchondral cystic changes, the osseous base must be addressed to ensure graft incorporation and surface congruity.
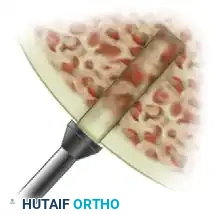
Cancellous bone grafts can be packed into the base of the crater in partially detached lesions before reduction and fixation to obliterate any step-off.
* Harvest Technique: A cancellous graft can be obtained from the proximal tibia using a trephine coring needle or a similar device.
* Application: This graft is placed arthroscopically or via a mini-open technique behind the OCD lesion, packing it to a smooth, congruent surface before definitive fixation with a cannulated compression screw or bioabsorbable dart.
For deep lesions, the depth of bone loss dictates the surgical staging:
* Bone loss < 8 mm: Can often be managed with single-stage OATS or Autologous Chondrocyte Implantation (ACI) if the lesion is contained.
* Bone loss > 8 mm: Requires a staged procedure. The defect should be bone grafted initially to restore the subchondral bed. A definitive cartilage restoration procedure (such as ACI or allograft plug) is then performed 6 to 12 months later once the bone graft has fully incorporated.
CRUCIATE LIGAMENT RECONSTRUCTION PRINCIPLES
Cartilage lesions frequently co-occur with ligamentous instability. Arthroscopic techniques have been advanced and refined to assist in the reconstruction of the anterior and posterior cruciate ligaments concurrently with cartilage restoration.
The arthroscopically aided approach offers profound advantages: smaller skin and capsular incisions, less extensor mechanism trauma, improved viewing of the intercondylar notch for precise anatomical placement of tunnel and attachment sites, less postoperative pain, fewer intra-articular adhesions, and easier, accelerated rehabilitation.
Graft Selection and Biomechanics
The selection of grafts depends on the surgeon’s preference, patient demands, and the tissues available. Each graft type possesses distinct biomechanical profiles regarding ultimate load-to-failure strength and stiffness.
Table: Ultimate Load to Failure and Stiffness of Current Graft Selections
* Native ACL: Strength: 2160 N | Stiffness: 242 N/mm
* Bone-Patellar Tendon-Bone (BPTB): Strength: 2977 N | Stiffness: 455 N/mm
* Quadrupled Hamstring (Semitendinosus/Gracilis): Strength: 4140 N | Stiffness: 807 N/mm
* Quadriceps Tendon: Strength: 2353 N | Stiffness: 326 N/mm
Biomechanical Insight: While quadrupled hamstring grafts exhibit the highest ultimate strength, they are more susceptible to graft creep (stress relaxation over time) compared to BPTB grafts. BPTB grafts offer the advantage of rigid bone-to-bone healing within the tunnels.
Fixation and Incorporation
Fixation strength—encompassing pull-out strength, graft slippage resistance, and promotion of bony ingrowth—is paramount.
* BPTB Fixation: Interference screws provide exceptional aperture fixation. Bone plug incorporation into the osseous tunnel typically occurs rapidly, around 6 weeks.
* Soft Tissue Fixation: Use of bioabsorbable screws (e.g., Bioscrew) or suspensory cortical buttons is standard. Soft tissue grafts require a longer incorporation period, taking 8 to 12 weeks to achieve secure Sharpey-fiber integration into the bone tunnel.
Autograft vs. Allograft Considerations
The use of allografts in primary and revision procedures is increasing.
* Advantages of Allografts: Decreased postoperative morbidity, improved cosmesis, decreased operating time, and preservation of the extensor mechanism (eliminating harvest-site patellar tendinitis or chondromalacia).
* Disadvantages of Allografts: Slower rate of biological incorporation and remodeling. Studies demonstrate failure rates in young, high-demand athletes to be two to four times higher than autografts. There is also a negligible but present risk of disease transmission (HIV transmission risk is approx. 1 in 1.5 million).
We recommend reserving allografts for revision surgery, multiligamentous knee injuries where autograft harvest would cause excessive morbidity, or older, lower-demand patients. For the young athlete, the first attempt at ACL reconstruction should be the best attempt, utilizing an autograft.
Single-Bundle vs. Double-Bundle Reconstruction
Anterior cruciate ligament reconstruction can be performed as a single-bundle or double-bundle procedure. While systematic reviews indicate that double-bundle techniques may provide significantly less rotational laxity (measured via pivot-shift testing), long-term clinical outcome scores rarely show a statistically significant superiority over anatomically placed single-bundle reconstructions. Anatomical single-bundle reconstruction remains the gold standard for the vast majority of orthopedic surgeons.
POSTOPERATIVE REHABILITATION PROTOCOL
Successful OATS and concurrent ligamentous reconstruction rely heavily on strict adherence to a phased postoperative rehabilitation protocol. The primary goal is to protect the healing osteochondral plugs and ligament grafts while preventing arthrofibrosis.
Phase I: Protection and Early Motion (Weeks 0-6)
* Weight-Bearing: Strict Non-Weight-Bearing (NWB) or Toe-Touch Weight-Bearing (TTWB) for 6 weeks to prevent subsidence of the osteochondral plugs.
* Range of Motion (ROM): Continuous Passive Motion (CPM) is initiated immediately postoperatively (e.g., 6-8 hours/day) to promote synovial fluid diffusion and cartilage nutrition. Active-assisted ROM is encouraged, aiming for 90 degrees of flexion by week 4.
* Bracing: Hinged knee brace locked in extension during ambulation and sleep.
Phase II: Weight-Bearing and Strengthening (Weeks 6-12)
* Weight-Bearing: Progressive weight-bearing advanced by 25% body weight every 3-4 days until full weight-bearing is achieved.
* Strengthening: Closed kinetic chain exercises (e.g., mini-squats, leg presses) are initiated. Open kinetic chain extension is avoided if concurrent ACL reconstruction was performed to protect the graft from excessive shear forces.
Phase III: Advanced Strengthening and Proprioception (Months 3-6)
* Progression to unilateral strengthening, balance board training, and stationary cycling with resistance.
* Jogging progression typically begins at 4 to 5 months, contingent upon radiographic evidence of graft incorporation and clinical absence of effusion.
Phase IV: Return to Sport (Months 6-12)
* Sport-specific agility drills, plyometrics, and cutting maneuvers.
* Return to competitive play is generally permitted between 9 and 12 months, provided the patient demonstrates >90% limb symmetry index on functional hop testing and possesses full, painless ROM.
By mastering the precise indications, meticulous arthroscopic techniques, and rigorous postoperative protocols detailed above, the orthopedic surgeon can reliably restore joint congruity, stability, and function in patients suffering from complex osteochondral and ligamentous pathology.
You Might Also Like