Mastering Medial Patellofemoral Ligament Reconstruction and Distal Realignment
Key Takeaway
Medial patellofemoral ligament (MPFL) reconstruction is the gold standard for recurrent patellofemoral instability. This comprehensive surgical guide details the Phillips technique for MPFL reconstruction using a semitendinosus autograft, alongside distal realignment procedures like the modified Elmslie-Trillat osteotomy. Key steps include precise femoral tunnel placement at Schöttle’s point, meticulous graft tensioning to restore native kinematics without overconstraining the joint, and evidence-based postoperative rehabilitation protocols to ensure optimal patient outcomes.
INTRODUCTION TO PATELLOFEMORAL INSTABILITY
Patellofemoral instability is a complex, multifactorial pathology that demands a nuanced understanding of knee biomechanics, soft tissue restraints, and underlying bony morphology. The medial patellofemoral ligament (MPFL) is the primary passive restraint to lateral patellar translation, contributing 50% to 60% of the restraining force from 0 to 30 degrees of knee flexion. In cases of acute or recurrent lateral patellar dislocation, the MPFL is universally torn or attenuated.
While isolated MPFL reconstruction is highly successful in patients with normal bony anatomy, patients with significant malalignment—such as an elevated Tibial Tubercle-Trochlear Groove (TT-TG) distance or patella alta—often require concomitant distal realignment procedures (e.g., Tibial Tubercle Osteotomy) to normalize patellofemoral tracking and protect the reconstructed soft tissues.
Figure 47-14A: Medial patellofemoral ligament detached from the medial femoral epicondyle following an acute patellar dislocation.
MEDIAL PATELLOFEMORAL LIGAMENT RECONSTRUCTION
The following technique, popularized by Phillips, utilizes a doubled semitendinosus autograft to anatomically reconstruct the MPFL. The procedure emphasizes precise femoral tunnel localization, extrasynovial graft passage, and meticulous tensioning to avoid overconstraining the patellofemoral joint.
Preoperative Evaluation and Indications
Indications for MPFL reconstruction include recurrent lateral patellar instability, failure of conservative management, and the presence of a competent medial soft-tissue envelope. Preoperative advanced imaging (MRI and CT) is mandatory to evaluate the status of the native MPFL, assess for osteochondral lesions, and measure the TT-TG distance and patellar height (Caton-Deschamps index).
Surgical Warning: Performing an isolated MPFL reconstruction in a patient with severe bony malalignment (TT-TG > 20 mm) or severe trochlear dysplasia (Dejour Type C or D) significantly increases the risk of graft failure and recurrent instability.
Patient Positioning and Diagnostic Arthroscopy
- Positioning: Place the patient supine on the operating table. Apply a well-padded tourniquet to the proximal thigh. Utilize a lateral post or a leg holder to allow full range of motion and assist with valgus stress during arthroscopic examination.
- Diagnostic Arthroscopy: Following standard sterile preparation and draping, establish standard anterolateral and anteromedial portals.
- Intra-articular Assessment: Systematically evaluate the knee joint. Pay specific attention to patellar tracking during dynamic flexion and extension. Thoroughly inspect the articular surfaces for chondral damage, particularly at the medial patellar facet and lateral trochlea, which are classic sites of impaction injury during dislocation and relocation. Address any loose bodies or unstable chondral flaps before proceeding to the extra-articular reconstruction.
Graft Harvest and Preparation
- Incision: Make a 3-cm longitudinal or oblique incision approximately 3 cm medial to the inferior pole of the tibial tuberosity.
- Harvest: Identify the pes anserinus insertion. Isolate and harvest the semitendinosus tendon using an open-ended tendon stripper in a standard fashion.
- Preparation: Clear the tendon of residual muscle belly. Measure at least 16 cm of the harvested semitendinosus and excise any excess length. Place a running locking whipstitch (e.g., #2 FiberWire or similar non-absorbable suture) in each tail of the graft. Size the doubled graft to determine the appropriate diameter for the femoral tunnel (typically 6 to 8 mm).

Figure 47-15C: Whip stitch placed in each end of the prepared semitendinosus graft.

Figure 47-14B: Medial patellofemoral ligament with the firm edge of the vastus medialis obliquus muscle reinserted to the periosteum of the medial femoral epicondyle, demonstrating an alternative adductor magnus harvest technique.
Surgical Approach and Soft Tissue Dissection
- Incision Options: Depending on patient habitus and surgeon preference, utilize either a single 4-cm longitudinal incision centered between the medial patella and the medial femoral epicondyle, or two smaller incisions (one at the superior medial patella and one at the adductor tubercle).
- Retinacular Exposure: Dissect subcutaneously to expose the proximal medial retinaculum at its insertion into the proximal half of the patella. Make a 1.5-cm vertical incision in the retinaculum.
- Extrasynovial Tunnel Creation: Using blunt dissection (e.g., Metzenbaum scissors or a curved Kelly clamp), carefully develop a plane between Layer 2 (the MPFL) and Layer 3 (the joint capsule). Direct the clamp toward the medial epicondyle. It is critical to stay extrasynovial to prevent intra-articular graft migration and synovial fluid leakage.
- Second Incision (If applicable): If using the two-incision technique, make the second 3-cm incision over the tip of the Kelly clamp, located in the "saddle" area between the adductor tubercle and the medial epicondyle.
Patellar Preparation and Fixation
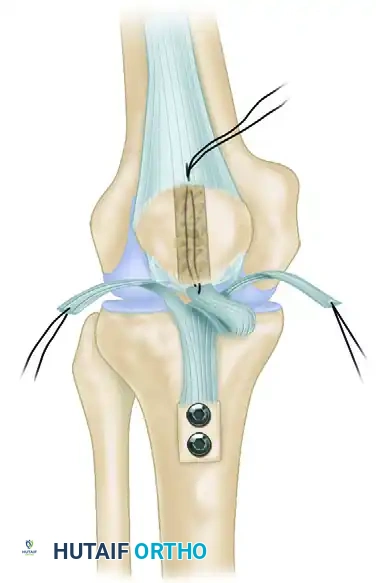
- Trough Creation: Use a rongeur or a high-speed burr to create a superficial bony trough along the medial aspect of the patella, localized to the proximal half. Center this trough precisely between the anterior cortex and the posterior articular surface to avoid chondral penetration or anterior cortical blowout.
- Anchor Placement: Flex the knee to 45 degrees to stabilize the patella against the trochlea. Place two double-loaded suture anchors into the trough. Position the first anchor just proximal to the mid-equator of the patella, and the second anchor just distal to the superior pole. Angle the anchors away from the articular surface, ensuring purchase in dense cancellous bone.
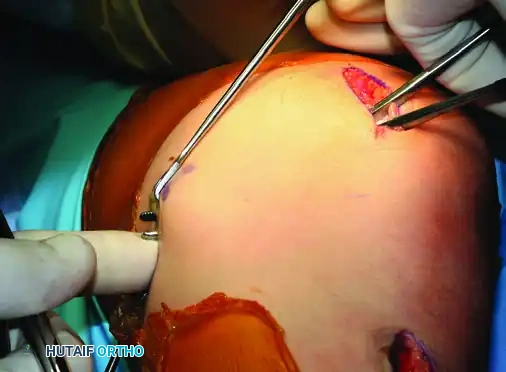
Figure 47-15A: Bony trough centered between the anterior cortex and the articular surface of the medial patella.
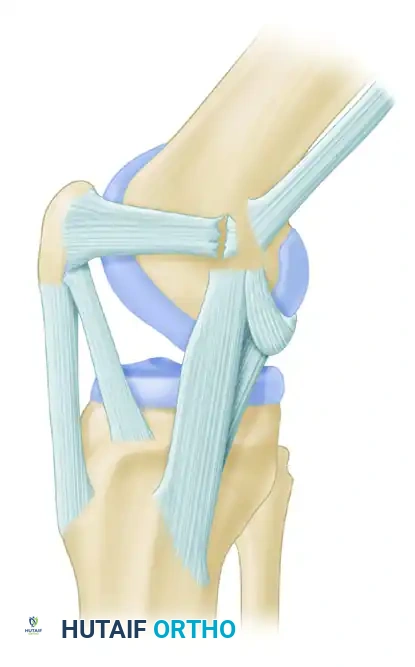
Figure 47-14C: Alternative fixation demonstrating an adductor magnus tendon fixed near the medial border of the patella with retinacular duplication.
Femoral Tunnel Localization and Isometry Testing
Accurate femoral tunnel placement is the most critical step in MPFL reconstruction. Non-anatomic placement leads to graft anisometry, resulting in either loss of flexion or recurrent instability.
- Anatomic Landmarks: Palpate the adductor tubercle and the medial epicondyle. The anatomic femoral footprint of the MPFL lies in the saddle between these two structures—approximately 1 cm distal and 5 mm posterior to the adductor tubercle.
- Radiographic Confirmation (Schöttle’s Point): Place a Beath-tip guidewire at the provisional footprint and confirm with true lateral fluoroscopy. According to Schöttle et al., the anatomic point is found using the following radiographic lines:
- Line 1: A line extending distally along the posterior femoral cortex.
- Line 2: A line perpendicular to Line 1, intersecting the posterior origin of the medial femoral condyle.
- Line 3: A line perpendicular to Line 1, intersecting the most posterior point of Blumensaat's line.
- The correct femoral origin lies between Line 2 and Line 3, just posterior to Line 1.
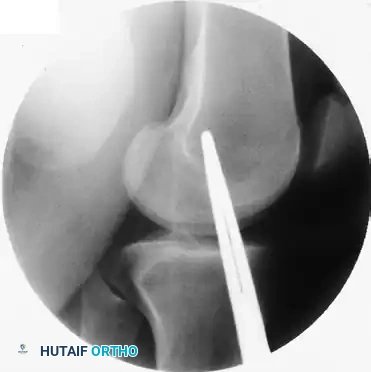
Figure 47-15B: Correct femoral tunnel position confirmed radiographically using Schöttle's landmarks.
- Isometry Testing: Pass two suture tails from the patellar anchors through the extrasynovial soft tissue tunnel to the Beath pin. Wrap the sutures around the pin and mark them. Cycle the knee through a full range of motion.
- Ideal Kinematics: The sutures should exhibit minimal pistoning (motion) between 0 and 70 degrees of flexion, and develop slight laxity beyond 70 degrees.
Clinical Pearl: Troubleshooting Isometry
* If tension increases with knee flexion: The femoral site is too proximal or too anterior.
* If tension increases with knee extension: The femoral site is too distal or too posterior.
* Correct the guidewire position and repeat the evaluation until optimal kinematics are achieved.
Graft Passage, Tensioning, and Fixation
- Patellar Fixation: Place the looped end of the graft into the patellar trough. Secure the graft to the patella using one set of paired sutures from each anchor. Preserve the second set of sutures for later retinacular repair.
- Femoral Reaming: Over-ream the Beath pin with a cannulated reamer matching the measured diameter of the doubled graft (typically 6 to 8 mm, reamed to a depth of 22 to 25 mm).
- Graft Passage: Pass the whipstitched tails of the graft through the extrasynovial soft tissue tunnel to the femoral incision.
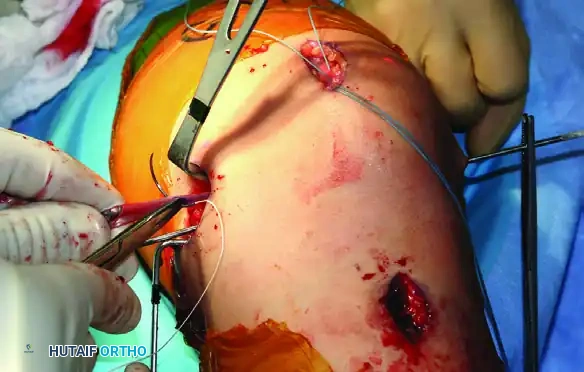
Figure 47-15D: Graft tails passed through the extrasynovial soft tissue tunnel toward the femoral footprint.
- Tensioning: Pull the graft taut into the femoral tunnel. Flex the knee to 30 degrees. Apply a lateral translation force to the patella. The graft should be tensioned to allow one to two quadrants of lateral passive glide.
- Warning: The MPFL is a check-rein, not a continuous tension band. Over-tensioning will cause medial patellofemoral cartilage overload, severe pain, and loss of flexion.
- Femoral Fixation: Once physiological tension is determined, mark the graft at the tunnel aperture. Cut the excess graft 20 mm distal to this mark. Place absorbable whip sutures in the new tails, pass them through the eyelet of a Beath pin, and pull them out the lateral aspect of the thigh. Secure the graft in the femoral tunnel using a biocomposite interference screw that is 1 mm smaller than the tunnel diameter.
- Final Assessment: Cycle the knee through a full range of motion to ensure the graft does not become overly taut in deep flexion and that patellar tracking is centralized.
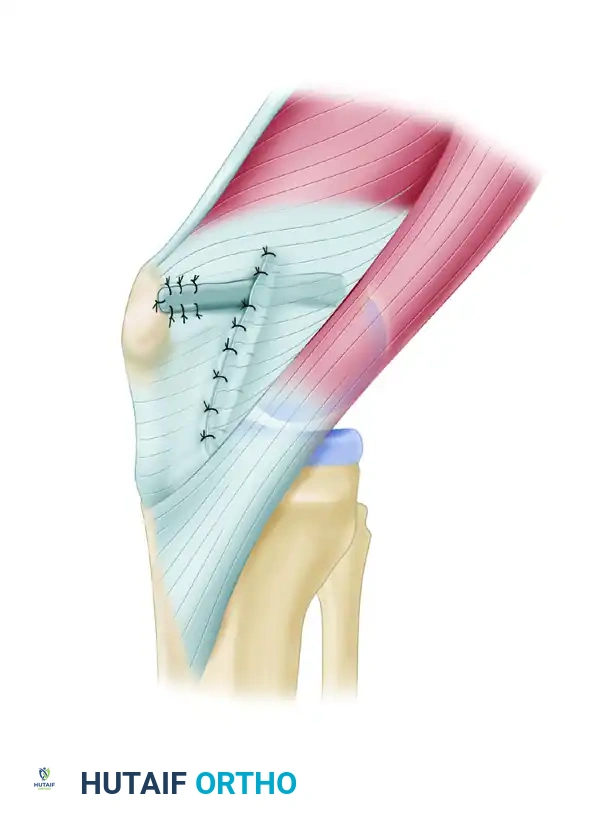
Closure and Postoperative Care
- Closure: Repair the medial retinaculum over the reconstructed MPFL using the reserved sutures from the patellar anchors. Close the subcutaneous layer with 2-0 absorbable sutures (e.g., Vicryl) and the skin with a subcuticular closure (e.g., Monocryl).
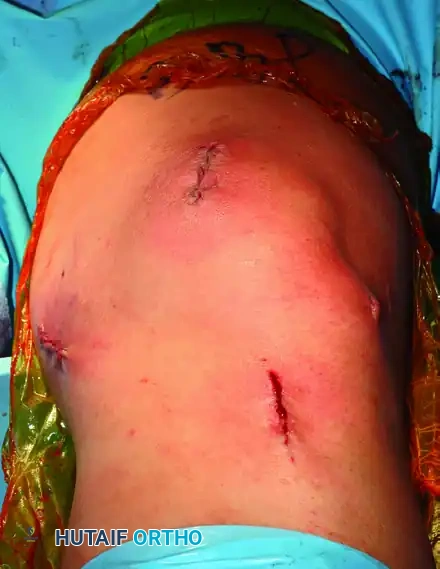
Figure 47-15E: Final subcutaneous and skin closure following MPFL reconstruction.
- Postoperative Protocol:
- Days 0-3: The knee is immobilized in full extension in a hinged knee brace. Weight-bearing as tolerated (WBAT) with crutches is permitted immediately.
- Weeks 1-3: Initiate progressive range-of-motion (ROM) exercises. The goal is to achieve at least 90 degrees of knee flexion by the end of week 3.
- Weeks 3-6: Full weight-bearing is usually achieved. The brace is locked in extension for ambulation to protect the graft from sudden buckling forces, but unlocked for seated ROM.
- Months 3-6: Jogging and straight-line running may commence at 3 months. Return to unrestricted, pivoting sports is typically allowed at 6 months, contingent upon the restoration of quadriceps strength and dynamic neuromuscular control.
DISTAL REALIGNMENT PROCEDURES
While MPFL reconstruction addresses the soft-tissue restraint, underlying bony malalignment must be corrected to prevent graft failure. Distal realignment procedures alter the biomechanical vectors of the extensor mechanism by repositioning the tibial tuberosity.
Indications and Biomechanical Rationale
Distal realignment is indicated in patients with patellar instability secondary to severe malalignment. Key radiographic thresholds include:
* Q-angle: Greater than 20 degrees.
* TT-TG Distance: Greater than 15 to 20 mm (measured on axial CT or MRI).
* Chondromalacia: The presence of inferior and lateral patellar chondromalacia strongly favors an anteromedialization procedure, which unloads the diseased cartilage.
Historical Pitfall: The Hauser procedure, which transferred the tibial tuberosity medially and posteriorly, is obsolete. Posteriorization increases patellofemoral contact stresses, leading to devastating late-onset patellofemoral osteoarthritis. Furthermore, distal realignment is strictly contraindicated in skeletally immature patients with open proximal tibial physes, as it risks recurvatum deformity via premature physeal arrest.
Procedure Selection
- Elmslie-Trillat Procedure: A pure medial transfer of the tibial tuberosity. Ideal for patients with an elevated TT-TG distance but minimal chondral damage (Insall index < 1.2, Grade 2 or less chondromalacia).
- Fulkerson Anteromedialization: An oblique osteotomy that shifts the tuberosity both medially and anteriorly. This is the procedure of choice when maltracking is accompanied by significant lateral or distal patellar chondrosis, as the anterior shift decompresses the patellofemoral joint.
Surgical Technique: Oblique Osteotomy of the Tuberosity
(Modified by Shelbourne, Porter, and Rozzi)
This modification of the Elmslie-Trillat procedure provides excellent exposure, reliable fixation, and reduced morbidity compared to traditional techniques.
- Lateral Release: Make a 6-cm lateral parapatellar incision, positioned approximately 1 cm lateral to the patellar tendon. Perform a thorough lateral retinacular release extending from the tibial tubercle up to the insertion of the vastus lateralis tendon on the proximal patella. The release is deemed adequate when the patellar articular surface can be manually everted 90 degrees laterally.
- Osteotomy Preparation: Through the same incision, identify the medial and lateral borders of the patellar tendon insertion. Using a 2.5-cm flat osteotome or an oscillating saw, raise a flat osteoperiosteal flap. The bony flap should be approximately 6 cm long and 7 mm thick, tapering anteriorly and remaining hinged distally by the intact distal periosteum. Meticulous care must be taken to avoid violating the posterior soft tissues and neurovascular structures.
- Tubercle Transfer: Rotate the bone flap medially (typically 8 to 10 mm, depending on the preoperative TT-TG calculation), gently cracking the distal cortical hinge.
- Provisional Fixation and Tracking Assessment: Hold the transferred tubercle in its new position with a provisional Kirschner wire. Move the knee through a full passive range of motion while observing patellar tracking (often visualized via a superolateral arthroscopic portal). The patella should engage the trochlea centrally without lateral subluxation or excessive medial tilt.
- Definitive Fixation: Once congruent tracking is confirmed and the tubercle sits flush against the underlying cancellous tibial bed, secure it with one or two AO 4.0-mm or 4.5-mm cancellous lag screws.
- Drilling Technique: Use a 2.7-mm or 3.2-mm drill bit. Angle the drill proximally and slightly posteriorly toward the joint line until the posterior tibial cortex is felt.
- Screw Placement: Bicortical fixation is generally avoided to prevent neurovascular injury in the posterior compartment. The screws (usually 40 to 50 mm in length) should engage dense proximal cancellous bone and approach, but not penetrate, the posterior cortex.
Postoperative Care for Distal Realignment
- Weeks 0-6: The patient is placed in a straight-leg splint or locked hinged knee brace for ambulation. Weight-bearing is allowed to tolerance (WBAT) in full extension.
- Week 1: Closed-chain kinetic strengthening exercises (e.g., straight leg raises, quad sets) are initiated early to prevent quadriceps atrophy.
- Week 6: The goal is to achieve 70% of contralateral quadriceps strength. The brace is typically discontinued for ambulation if quad control is adequate.
- Weeks 8-12: A functional progression program is initiated. Return to unrestricted sports is permitted once full strength, range of motion, and dynamic stability are achieved, usually between 3 to 4 months postoperatively.
You Might Also Like