Great Toe Wraparound Flap Transfer: Surgical Technique
Key Takeaway
The great toe wraparound flap transfer is a highly specialized microsurgical technique primarily utilized for thumb reconstruction. By harvesting a customized osteocutaneous flap from the great toe and combining it with an iliac crest bone graft, surgeons can restore thumb length, sensibility, and aesthetic appearance while minimizing donor site morbidity. This guide details the precise neurovascular dissection, bone grafting, and microvascular anastomosis required for optimal functional outcomes.
INTRODUCTION TO THE WRAPAROUND FLAP TRANSFER
The reconstruction of the amputated thumb remains one of the most challenging and rewarding endeavors in reconstructive microsurgery. Because the thumb accounts for approximately 40% to 50% of overall hand function, restoring its length, stability, sensibility, and aesthetic appearance is paramount. The great toe wraparound flap transfer, originally popularized by Morrison et al., represents a monumental leap in reconstructive techniques.
Unlike a traditional whole toe-to-hand transfer, the wraparound flap degloves the great toe—harvesting the nail complex, glabrous skin, and a small portion of the distal phalanx tuft—while preserving the majority of the great toe's skeletal architecture. This composite tissue is then "wrapped around" a sculpted corticocancellous iliac crest bone graft at the recipient site. This technique provides an anatomically and aesthetically superior thumb reconstruction while significantly reducing donor site morbidity in the foot.
Clinical Pearl: The wraparound flap is particularly indicated for thumb amputations distal to the metacarpophalangeal (MCP) joint where the basal joint mechanics remain intact. It provides excellent glabrous skin for pinch and a cosmetically acceptable nail plate.
PREOPERATIVE PLANNING AND BIOMECHANICS
Successful execution of a wraparound flap requires meticulous preoperative planning. The vascular anatomy of the first web space of the foot is notoriously variable. The first dorsal metatarsal artery (FDMA) may run superficial to, within, or deep to the first dorsal interosseous muscle (Gilbert's classification).
Vascular Imaging
Preoperative angiography or high-resolution Computed Tomography Angiography (CTA) of both the donor foot and the recipient hand is mandatory.
* Foot: Confirm the presence, caliber, and course of the FDMA and the plantar metatarsal arteries.
* Hand: Assess the patency of the princeps pollicis artery, the radial artery in the anatomical snuffbox, and the superficial venous system.
The Two-Team Approach
To minimize ischemic time and operative duration, this procedure is strictly performed using a two-team approach:
1. Team A (Donor Site): Responsible for the dissection and harvest of the great toe wraparound flap and subsequent donor site closure via split-thickness skin grafting.
2. Team B (Recipient Site): Responsible for the preparation of the thumb stump, isolation of recipient vessels and nerves, harvest and sculpting of the iliac crest bone graft, and final microvascular anastomosis.
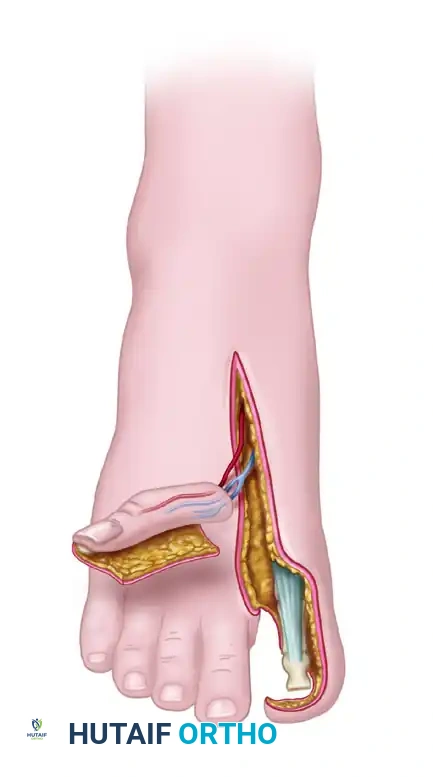
SURGICAL TECHNIQUE: DONOR SITE (GREAT TOE DISSECTION)
Flap Design and Incision
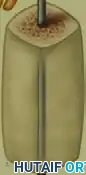
The skin flap is carefully outlined to deglove the entire great toe, with the critical exception of a thin longitudinal strip of skin extending to the lateral corner of the toenail.
The width of this preserved medial strip (usually about 1 cm) is determined by the exact amount of skin required to circumferentially cover the reconstructed thumb. This preserved strip ensures adequate venous and lymphatic drainage for the remaining toe structure.
Venous Dissection
- Begin the dissection dorsally. Identify and dissect the dorsal veins draining the toe flap.
- Trace these veins proximally to the saphenous venous system.
- Cauterize small side branches meticulously to obtain maximum length for the venous pedicle.
Arterial Dissection
- Identify the first dorsal metatarsal artery (FDMA) within the first web space.
- Trace the FDMA distally to its dorsal digital branches supplying the great toe.
- If the FDMA is hypoplastic or absent, the plantar metatarsal artery must be utilized.
Surgical Warning: If the plantar metatarsal artery is used, its deep course often yields a shorter pedicle. Be prepared to harvest an interpositional vein graft if the pedicle length is insufficient to reach the anatomical snuffbox or wrist without tension.
Neural Dissection
- Identify the deep peroneal nerve running lateral to the artery. Follow it into the toe flap and divide it proximally to secure adequate length for coaptation at the recipient site.
- Elevate the plantar surface of the flap. Leave the subcutaneous fat over the plantar surface of the toe intact to protect the underlying structures.
- Identify the lateral plantar neurovascular bundle. Mobilize it and keep it intact with the flap.
- Dissect the lateral plantar digital nerve from the common digital nerve at an appropriate proximal level.
- Identify the medial neurovascular bundle and ensure it remains completely intact with the preserved medial strip of skin.
Bone and Nail Harvest
- Separate the toe flap beneath the nail by gentle, sharp subperiosteal elevation.
Pitfall: Avoid any injury to the germinative layer of the nail matrix. Damage here will result in a deformed or absent nail on the reconstructed thumb.
- Using a fine osteotome or bone cutter, remove approximately 1 cm of the distal tuft of the distal phalanx, keeping it attached to the flap beneath the nail bed. This bone segment provides rigid support for the nail complex.
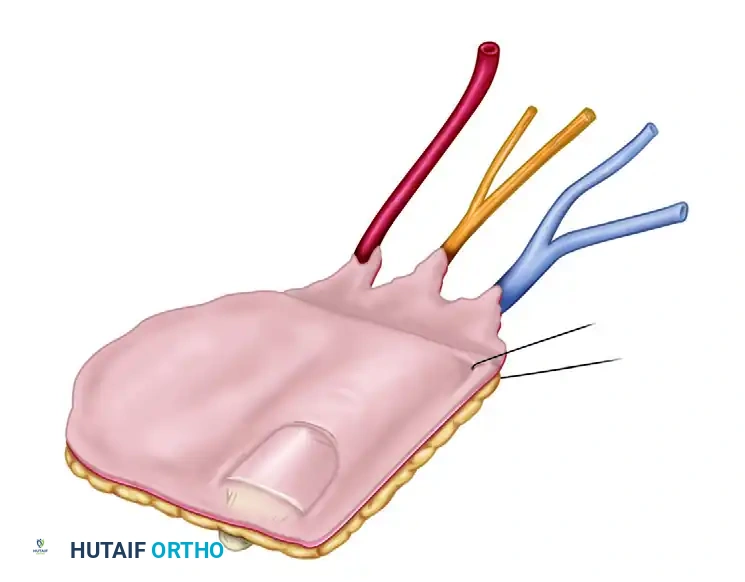
Flap Isolation
At this stage, the flap should be completely free from the toe, tethered only by its neurovascular pedicle (the dorsal digital branches of the FDMA and the saphenous venous tributaries).
Release the tourniquet. Confirm that the flap is adequately perfused by its arteriovenous pedicle.
* Note: It may take 30 to 60 minutes for the flap to turn completely pink due to vasospasm. Bathing the vessels in warm saline and topical lidocaine or papaverine is highly recommended to relieve spasm.
Once perfusion is confirmed and the recipient hand is fully prepared, apply microvascular clips to the vessels. Ligate or apply small hemoclips to the proximal vessels before sectioning them to harvest the flap.
SURGICAL TECHNIQUE: RECIPIENT SITE (HAND PREPARATION)
While Team A harvests the flap, Team B prepares the hand and harvests the necessary bone graft.
Incision and Exposure
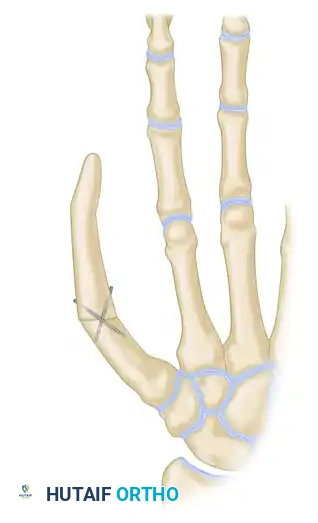
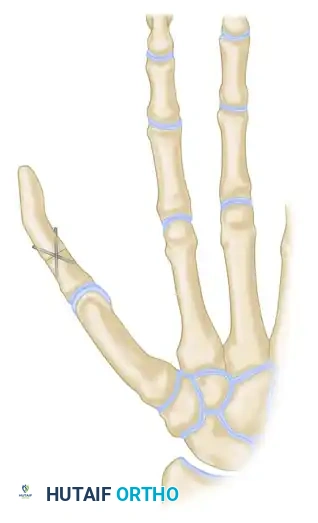
Two primary areas on the hand require preparation: the amputation stump and the dorsoradial aspect of the hand (just distal to the anatomical snuffbox).
- With the pneumatic tourniquet inflated, make a longitudinal incision in the first web space between the first and second metacarpals.
- Dissect the thumb stump through a straight transverse incision across its tip, extending from midradial to midulnar.
- Elevate dorsal and volar subperiosteal flaps for approximately 1 cm to expose the bone end.
Neurovascular Preparation
- Veins: Dissect and mobilize two or more robust dorsal hand veins (cephalic vein tributaries).
- Arteries: Dissect between the first dorsal interosseous and the adductor pollicis muscles to identify and mobilize the princeps pollicis (first palmar metacarpal) artery. Mobilize this arterial pedicle proximally to the level of the proposed anastomosis.
- Nerves: Identify the superficial radial nerve dorsally. Volarly, expose and dissect the ulnar digital neuroma of the thumb. Excise the neuroma back to healthy fascicles just before the flap is ready for attachment.
Bone Graft Harvest and Fixation
A corticocancellous bone graft is harvested from the ipsilateral iliac crest. It must be meticulously sculpted to match the approximate length and thickness of the normal contralateral thumb.
* Sizing: The tip of the reconstructed thumb, when adducted, should reach within approximately 1 cm of the index finger proximal interphalangeal (PIP) joint.
- Excise any scar tissue from the thumb bone stump and freshen the bone end to bleeding cortical bone.
- Create a recess (step-cut or peg-in-hole) in the base of the proximal phalanx or the thumb metacarpal.
- Insert the sculpted iliac crest bone graft into the recess.
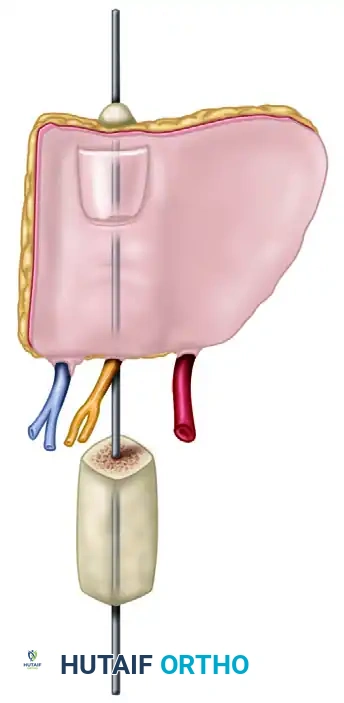
Fix the bone graft rigidly using crossed Kirschner wires (K-wires), intraosseous wiring, or small fragment plates and screws.
Biomechanical Alignment: For amputations at or proximal to the MCP joint, the iliac bone block must be fixed in approximately 30 degrees of flexion and 45 degrees of internal pronation. This precise positioning is critical to allow functional opposition of the reconstructed thumb to the fingers.
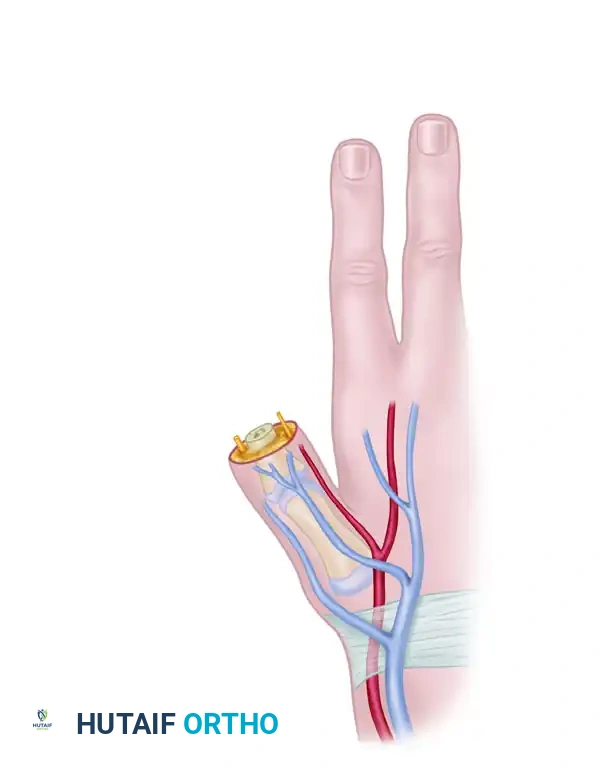
FLAP TRANSFER AND MICROVASCULAR ANASTOMOSIS
With the bone graft rigidly fixed, the harvested wraparound flap is brought to the recipient site.
- Wrapping the Flap: Wrap the soft tissue flap around the iliac bone graft. Ensure the lateral side of the flap is applied to the ulnar side of the bone graft. Trim the bone graft slightly if the soft tissue envelope is too tight; tension on the skin closure will compromise microvascular perfusion.
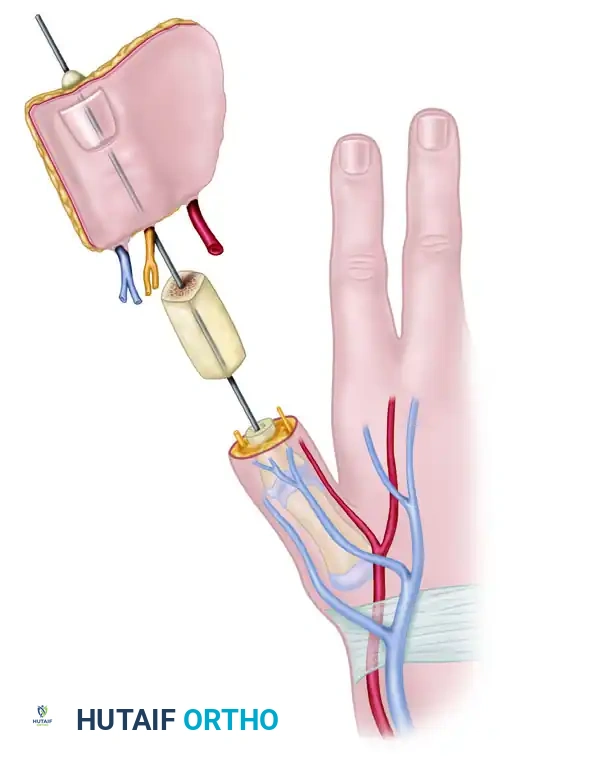
- Positioning: Loosely suture the flap in place, ensuring the nail is oriented dorsally and the neurovascular pedicle sits comfortably in the first web space without kinking or tension.
- Neural Coaptation: Using an operating microscope, suture the ulnar digital nerve of the thumb to the lateral plantar digital nerve of the flap using 9-0 or 10-0 nylon epineurial sutures. Suture the deep peroneal nerve of the flap to the superficial radial nerve branch on the dorsum.
- Arterial Anastomosis: Perform an end-to-end anastomosis between the princeps pollicis artery and the first dorsal metatarsal artery of the flap. If the princeps pollicis is inadequate, the radial artery at the wrist may be used via an end-to-side anastomosis.
- Venous Anastomosis: Establish arterial flow first to identify the most robust venous outflow. Suture the dorsal digital veins/saphenous tributaries of the flap to the cephalic venous system of the hand.
- Closure: Place small silicone drains beneath the flap if necessary, strictly avoiding proximity to the microvascular anastomoses. Close the skin loosely.
DONOR SITE CLOSURE
While the microvascular anastomoses are being performed, Team A closes the great toe donor defect.
1. Ensure the paratenon over the extensor hallucis longus is preserved, as this provides the vascular bed for the skin graft.
2. Because 1 cm of the distal phalanx was removed, the preserved medial skin flap can be rotated over the tip of the toe to provide durable coverage over the bone end.
3. Apply a split-thickness skin graft to the remaining exposed plantar, dorsal, and lateral surfaces of the great toe.
4. Stent the graft with a tie-over bolster dressing to prevent shearing. Cross-toe flaps are rarely required if the skin graft is managed meticulously.
POSTOPERATIVE CARE AND REHABILITATION
The postoperative management of a wraparound flap is as critical as the surgical execution. The primary goal is the prevention of vasospasm and thrombosis.
Inpatient Monitoring
- Environment: The patient's room temperature must be maintained at greater than 24°C (74°F) to prevent peripheral vasoconstriction.
- Positioning: Both the donor foot and the reconstructed hand are kept elevated for the first 5 to 7 days to minimize edema.
- Monitoring: The flap is monitored hourly for the first 48 hours, assessing skin color, turgor, capillary refill, and continuous surface temperature. A temperature drop of >2°C compared to an adjacent normal digit warrants immediate investigation for vascular compromise.
- Medications: Antithrombotic protocols vary by institution, but a standard regimen includes Aspirin (300 mg/day) and Dextran 40 (500 mL/day) for the first 5 to 7 days. Dipyridamole (50 mg twice daily) may also be utilized. Systemic heparin is generally avoided unless a specific thrombotic event occurs intraoperatively.
- Strict Restrictions: Absolute prohibition of smoking or nicotine use by the patient and any visitors. Caffeine should also be restricted.
Rehabilitation Protocol
- Wound Care: Bandages and splints are typically changed after 7 to 10 days under sterile conditions, unless clinical signs dictate earlier inspection.
- Hand Mobilization: Active motion of the thumb basal joint (if intact) and the remaining hand is initiated with protective splinting at 3 weeks postoperatively.
- Sensory Re-education: Because the flap is transferred for the restoration of sensibility, sensory re-education begins once advancing Tinel's signs reach the flap. Crucially, the patient must be educated to protect the insensate thumb from cutting, burning, and blistering until protective sensation returns.
- Foot Mobilization: Once the great toe skin graft has fully incorporated and healed (typically 3-4 weeks), progressive, protected weight-bearing is initiated. Patients gradually increase activity to tolerance. Specialized shoe inserts or orthotics are usually not required, as the preservation of the proximal phalanx and metatarsal head maintains the biomechanical integrity of the first ray during the toe-off phase of gait.
CONCLUSION
The great toe wraparound flap transfer is a sophisticated, highly effective procedure for thumb reconstruction. By combining the structural rigidity of an iliac crest bone graft with the specialized glabrous skin and nail complex of the great toe, surgeons can achieve unparalleled functional and aesthetic results. Strict adherence to microvascular principles, meticulous preoperative planning, and rigorous postoperative monitoring are the cornerstones of success in this demanding operation.
You Might Also Like