First Metatarsophalangeal Joint Arthrodesis: Small Plate Fixation Technique
Key Takeaway
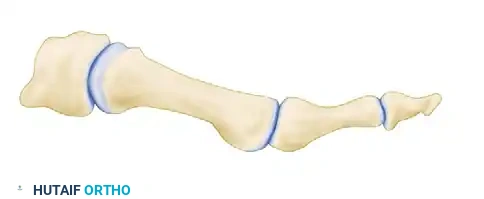
Arthrodesis of the first metatarsophalangeal (MTP) joint with small plate fixation is a highly reliable procedure for end-stage hallux rigidus and severe hallux valgus. The technique involves meticulous joint preparation, precise alignment in 15 degrees of valgus and 15 degrees of dorsiflexion relative to the floor, and rigid internal fixation using a combination of an interfragmentary lag screw and a dorsal neutralization plate to ensure optimal biomechanical stability and high fusion rates.
Introduction and Biomechanical Rationale
Arthrodesis of the first metatarsophalangeal (MTP) joint remains the gold standard surgical intervention for a variety of end-stage pathologies affecting the first ray. Originally popularized by Mankey and Mann, the technique utilizing an interfragmentary lag screw combined with a dorsal neutralization plate provides superior biomechanical stability compared to isolated Kirschner wire (K-wire) or crossed-screw constructs.
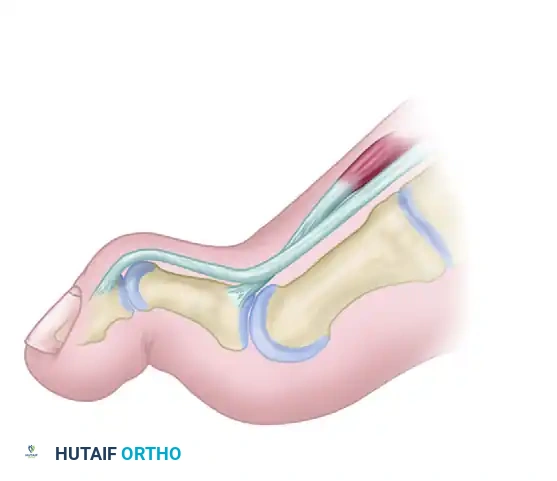
The primary goal of a first MTP arthrodesis is to eliminate pain while restoring the weight-bearing capacity of the medial column during the terminal stance phase of gait. By achieving a solid, well-aligned fusion, the procedure effectively transfers physiological loads through the first ray, preventing transfer metatarsalgia to the lesser metatarsals. The addition of a dorsal small plate (such as a one-quarter tubular AO plate or modern locking equivalent) acts as a tension band against the plantarflexory forces exerted by the windlass mechanism, significantly reducing the risk of nonunion and hardware failure.
Indications and Contraindications
Primary Indications
- End-Stage Hallux Rigidus: Grade 3 or 4 osteoarthritis of the first MTP joint with significant joint space narrowing, dorsal osteophytosis, and severe pain during dorsiflexion.
- Severe Hallux Valgus: Deformities with an intermetatarsal angle exceeding 20 degrees, especially in the presence of degenerative joint changes or hypermobility of the first tarsometatarsal (TMT) joint.
- Rheumatoid Arthritis: Inflammatory arthropathies resulting in severe joint destruction, subluxation, and associated lesser toe deformities.
- Salvage Procedures: Failed prior interventions, including failed Keller resection arthroplasties, failed silastic or metallic implant arthroplasties, or recurrent hallux valgus following distal osteotomies.
- Neuromuscular Disorders: Conditions leading to spasticity or muscle imbalance affecting the first ray (e.g., Charcot-Marie-Tooth disease, cerebral palsy).
Contraindications
- Active local or systemic infection.
- Severe peripheral arterial disease compromising soft tissue healing.
- Degenerative joint disease of the hallux interphalangeal (IP) joint (relative contraindication, as fusion of the MTP joint increases stress on the IP joint).
Preoperative Planning and Patient Positioning
Thorough preoperative clinical and radiographic evaluation is mandatory. Weight-bearing anteroposterior (AP), lateral, and sesamoid axial radiographs should be obtained to assess bone stock, the degree of deformity, and the presence of cystic changes or eburnated bone.
The patient is positioned supine on the operating table. A small bump may be placed under the ipsilateral hip to internally rotate the leg slightly, bringing the foot into a neutral position that facilitates dorsal exposure. A well-padded thigh or calf tourniquet is applied to ensure a bloodless surgical field. Prophylactic intravenous antibiotics are administered prior to tourniquet inflation.
Surgical Technique: Step-by-Step
Incision and Surgical Exposure
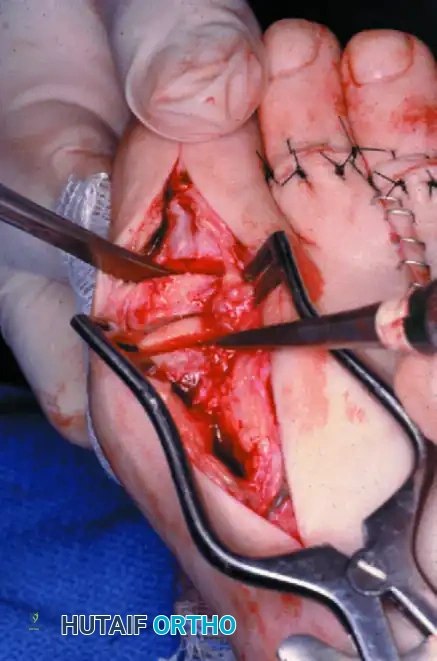
Begin with a dorsal longitudinal incision centered over the first MTP joint. The incision should be placed on the medial edge of the extensor hallucis longus (EHL) tendon, starting a few millimeters proximal to the interphalangeal joint of the hallux and extending proximally for 5 to 6 cm.
Carefully incise the skin and subcutaneous tissues. It is critical to identify and meticulously preserve the proper branch of the superficial peroneal nerve (the dorsomedial cutaneous nerve of the hallux), which typically crosses the surgical field from lateral to medial. Retract the EHL tendon laterally. Carry the incision through the extensor mechanism at the base of the proximal phalanx and incise the periosteum longitudinally over the distal first metatarsal.
Surgical Pearl: Avoid excessive undermining of the skin flaps to preserve the delicate vascular supply to the dorsal skin, minimizing the risk of postoperative wound dehiscence.
Joint Preparation and Osteophyte Resection
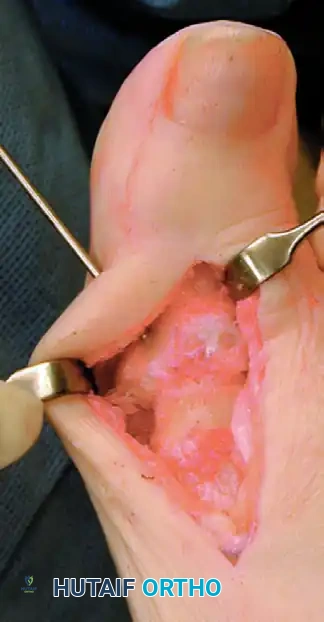
Using sharp dissection, elevate the capsule and periosteum as a single full-thickness flap to expose the first MTP joint dorsally, medially, and laterally. Uncover the medial eminence. Utilize small, right-angle retractors (such as Hohmann retractors) to fully expose three sides of the metatarsophalangeal joint.
Aggressively debride the joint, removing any hypertrophic synovial tissue. Use a rongeur or an oscillating saw to resect all dorsal osteophytes at the base of the proximal phalanx and over the metatarsal head. This step is crucial not only for exposure but also to prevent dorsal impingement postoperatively.
Metatarsal and Phalangeal Osteotomies
The preparation of the articular surfaces must be precise to ensure maximum bony apposition. Using a 9-mm-wide blade on a power oscillating saw, resect the distal articular surface of the first metatarsal. The cut should be made 3 to 4 mm proximal to the articular cartilage and must be strictly perpendicular to the longitudinal shaft of the first metatarsal.
Surgical Warning: Do not resect excessive bone from the metatarsal head. Over-shortening the first ray will inevitably lead to transfer metatarsalgia to the second and third metatarsal heads.
Achieving Optimal Alignment
Proper alignment is the most critical determinant of a successful clinical outcome. The hallux must be positioned to allow for normal rollover during the gait cycle without causing excessive pressure on the IP joint or the distal tip of the toe.
Align the hallux with the first metatarsal in the following parameters:
1. Sagittal Plane (Dorsiflexion): 15 degrees of dorsiflexion relative to the plantar surface of the foot (the floor), which equates to approximately 25 to 30 degrees of dorsiflexion relative to the longitudinal axis (inclination angle) of the first metatarsal.
2. Coronal Plane (Valgus): Approximately 15 degrees of valgus.
3. Axial Plane (Rotation): Neutral rotation, ensuring the toenail faces directly dorsal.
With the hallux held rigidly in this optimal position, use the oscillating saw to remove the base of the proximal phalanx. This cut must be perfectly parallel to the previous cut made on the first metatarsal. It is imperative to leave as much of the metaphyseal flare at the base of the proximal phalanx as possible; this preserves vital bone stock required for subsequent interfragmentary screw fixation.
Surgical Pitfall: Inadequate dorsiflexion (plantarflexion of the fusion) will cause the patient to vault over the hallux during gait, leading to severe IP joint arthritis and ulceration at the tip of the toe. Conversely, excessive dorsiflexion will cause the toe to rub against the toe box of the shoe.
Subchondral Bone Preparation
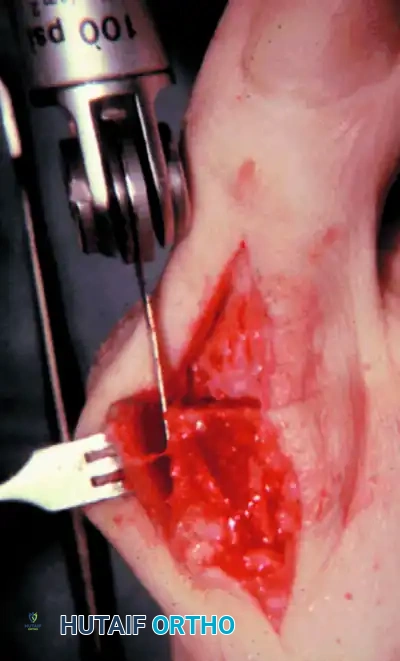
In cases of severe hallux rigidus, the subchondral bone is often highly eburnated and sclerotic. Sclerotic bone lacks the vascularity necessary for osteogenesis. In such instances, aggressively drill multiple small holes (fenestration) into the base of the proximal phalanx and the head of the first metatarsal using a 0.062-inch K-wire. Drill until punctate bleeding is observed. If healthy, bleeding cancellous bone is reached immediately after making the osteotomy cuts, this fenestration step is unnecessary.
Temporary Fixation
Once the flat bony surfaces are perfectly apposed and the clinical alignment is verified (often by simulating weight-bearing with a flat plate pressed against the plantar aspect of the foot), temporarily fix the arthrodesis site.
Drive one or two 0.045-inch K-wires from the dorsal-distal aspect of the proximal phalanx into the proximal-medial aspect of the metatarsal head.
These temporary stabilization wires must be placed in the upper (dorsal) quarter of the phalanx and metatarsal head. This strategic placement leaves the central and plantar portions of the bone free, providing an unobstructed trajectory for the definitive interfragmentary lag screw, which will be placed just plantar to the midline of the proximal phalanx.
Ensure that all soft tissue has been meticulously excised from around the base of the proximal phalanx. No soft tissue should be invaginated within the arthrodesis site. Confirm that the flexor hallucis longus (FHL) tendon remains intact and uncompromised by the K-wires.
Interfragmentary Screw Fixation
The primary mechanical stability and compression of the arthrodesis are achieved via an interfragmentary lag screw.
- Plan the trajectory: The screw should pass from the plantar-medial aspect of the base of the proximal phalanx, directed proximally and laterally into the center of the metatarsal head.
- Using a drill guide, drill a 3.5-mm glide hole through the near cortex of the proximal phalanx. This hole should be positioned at the metaphyseal flare where the bone stock is most robust.
- Insert a 2.0-mm drill sleeve into the glide hole and drill the core hole across the arthrodesis site into the metatarsal head.
- Measure the depth to determine the appropriate screw length.
- Tap the metatarsal head (if using non-self-tapping screws) and insert a 4.0-mm partially threaded cancellous screw.
A countersink is usually not required for the screw head in this location. However, if there is concern that the prominent head of the screw might lever dorsally and fracture the cortical bridge of the phalanx, gentle countersinking is advised.
Crucial Step: Just before the final tightening of the interfragmentary screw, remove the temporary K-wires. This allows the screw to achieve maximum dynamic compression across the flat osteotomy surfaces without being held out to length by the K-wires.
Following screw insertion, use a rongeur or saw to resect the remaining medial eminence flush with the metatarsal shaft, and ensure no prominent osteophytes remain on the lateral side that could impinge on the second toe.
Dorsal Plate Application
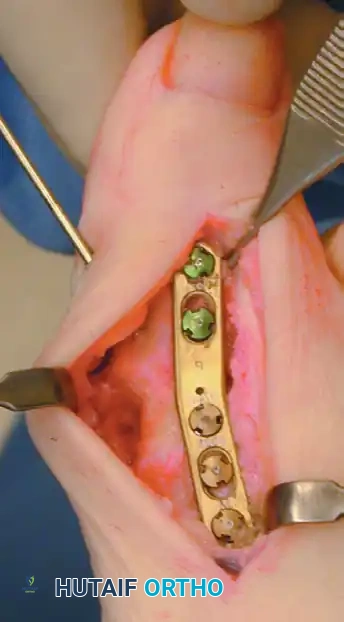
While the interfragmentary screw provides excellent compression, it offers limited resistance to the powerful plantarflexory forces of the FHL and windlass mechanism during gait. Therefore, a dorsal neutralization plate is applied to create a biomechanically superior construct.
Select a one-quarter tubular AO plate (or a modern anatomically contoured low-profile locking plate). Usually, a 5-hole or 6-hole plate is utilized, allowing for three holes over the metatarsal and two over the proximal phalanx. In patients with a longer proximal phalanx, three screws may be placed on each side of the arthrodesis.
- Contour the plate slightly to match the dorsal profile of the fused joint.
- Position the plate centrally over the dorsal midline of the hallux and first metatarsal. Ensure the lateral edge of the proximal phalanx lines up perfectly with the lateral edge of the first metatarsal head.
- Secure the plate proximally first, using a 4.0-mm fully threaded cancellous or cortical screw in the hole closest to the arthrodesis site.
- No lag technique is needed through the plate, as compression has already been achieved. The plate functions purely in a neutralization/tension-band capacity.
- If the patient's bones are exceptionally small, 2.7-mm screws designed for the one-quarter tubular plate may be utilized.
- Before final seating of all screws, perform a final visual and fluoroscopic check of the arthrodesis alignment and hardware position.
- Fill the remaining holes with appropriate length screws (typically two more in the metatarsal and two in the phalanx).
Surgical Pearl: Measure the lengths of the dorsal plate screws accurately. Screws that are excessively long will penetrate the plantar cortex and impinge upon the flexor hallucis longus tendon, leading to postoperative pain and restricted tendon excursion.
Special Considerations: The Rheumatoid Foot
Patients with severe rheumatoid arthritis present a unique biomechanical challenge. As emphasized by Mann, the bone stock in the rheumatoid foot is often profoundly osteopenic and cystic. In these cases, attempting to gain purchase with an interfragmentary lag screw is frequently impossible and may result in iatrogenic fracture of the phalangeal base.
If poor bone stock precludes interfragmentary screw fixation, the surgeon must rely entirely on a robust dorsal plate (preferably a locking plate construct to maximize purchase in osteopenic bone) or utilize crossed intramedullary Steinmann pins to achieve stability.
Bone Grafting and Final Assessment
Inspect the arthrodesis site circumferentially. If there are any small gaps or areas of unapposed bone, utilize the cancellous bone harvested from the resected medial eminence or dorsal osteophytes as a local autograft. Pack this cancellous bone tightly into any defects to promote osteogenesis.
Closure
Thoroughly irrigate the surgical wound. Close the capsular and periosteal layer meticulously over the plate using 2-0 absorbable sutures. During this closure, ensure the extensor hallucis longus tendon is repositioned centrally over the dorsal aspect of the joint.
Close the subcutaneous tissue with fine absorbable sutures and the skin with nonabsorbable sutures (e.g., 3-0 or 4-0 nylon) using a vertical mattress or simple interrupted technique.
Apply a sterile, non-adherent dressing followed by a robust compression dressing. Secure the dressing around the foot and ankle using multiple unfluffed gauze fluffs and a compressive wrap (e.g., Kling and Coban) to minimize postoperative edema and hematoma formation.
Postoperative Protocol and Rehabilitation
The postoperative care regimen is designed to protect the fixation while allowing for early mobilization.
- 0 to 2 Weeks: The patient remains in the initial bulky compression dressing. Strict elevation is encouraged to control swelling. Weight-bearing is generally allowed to tolerance in a rigid-soled postoperative shoe or a controlled ankle motion (CAM) boot, though some surgeons prefer strict non-weight-bearing for the first two weeks depending on bone quality. Assisted walking with crutches or a walker is optional but recommended for balance.
- 2 Weeks: The patient is seen for the first postoperative visit. The bulky dressing is removed, and the wound is inspected. Sutures are removed if the incision is fully healed. A more snug-fitting dressing or light compressive sleeve is applied. The patient continues weight-bearing to tolerance in the rigid postoperative shoe.
- 6 Weeks: Radiographs are obtained to assess early callus formation and hardware integrity. If clinical and radiographic signs of healing are progressing appropriately, the patient may begin transitioning to a stiff-soled, wide toe-box athletic shoe.
- 12 Weeks: Fusion is typically complete by 12 weeks post-surgery. Final radiographs are obtained to confirm solid bony trabeculation across the arthrodesis site. Once clinical union is confirmed, the patient is discharged to wear any comfortable shoes that accommodate the foot, though high heels are permanently contraindicated.
Complications and Pitfalls
While first MTP arthrodesis is highly successful, complications can occur:
- Nonunion: Occurs in approximately 5-10% of cases. Risk factors include smoking, inadequate bone preparation (failure to fenestrate sclerotic bone), poor fixation, and infection. Asymptomatic nonunions may be observed; symptomatic nonunions require revision with bone grafting and hardware exchange.
- Malunion: The most poorly tolerated complication. Excessive plantarflexion leads to IP joint arthritis and distal toe ulceration. Excessive dorsiflexion causes shoe impingement. Excessive valgus can cause impingement on the second toe. Revision osteotomy is required for symptomatic malunions.
- Hardware Prominence: The dorsal plate may become prominent and irritate the skin, especially in thin patients. Hardware removal may be performed after solid fusion is achieved (typically after 6-12 months).
- Transfer Metatarsalgia: Often a result of over-shortening the first ray during the osteotomy cuts or fusing the toe in excessive dorsiflexion, preventing the first ray from accepting its physiological load during terminal stance.
- Interphalangeal Joint Degeneration: A known long-term consequence of first MTP fusion due to increased compensatory motion at the IP joint. Proper sagittal alignment minimizes this risk.
You Might Also Like