Epineurial Neurorrhaphy: Advanced Microsurgical Techniques
Key Takeaway
Epineurial neurorrhaphy is a foundational microsurgical technique for peripheral nerve repair. It involves the precise coaptation of severed nerve ends by placing sutures exclusively through the epineurium. Achieving a tension-free repair, ensuring accurate fascicular alignment via surface landmarks, and utilizing appropriate magnification are critical for optimal axonal regeneration. This guide details epineurial, perineurial, and combined repair techniques for orthopedic and hand surgeons.
INTRODUCTION TO PERIPHERAL NERVE REPAIR
Peripheral nerve injuries present a profound reconstructive challenge to the orthopedic and hand surgeon. The ultimate goal of any nerve repair—termed neurorrhaphy—is to restore motor and sensory function by facilitating the precise, unimpeded regeneration of axons across the zone of injury. Among the various techniques available, epineurial neurorrhaphy remains the gold standard for the primary repair of sharply transected peripheral nerves.
When a nerve is severed, the distal segment undergoes Wallerian degeneration, a process wherein the axons and myelin sheaths degrade, leaving empty endoneurial tubes. The success of a neurorrhaphy depends entirely on the surgeon’s ability to coapt the proximal and distal nerve stumps with meticulous fascicular alignment, minimal surgical trauma, and absolute absence of tension. Failure to adhere to these principles results in axonal escape, neuroma formation, and poor functional recovery.
This comprehensive masterclass details the indications, biomechanics, and step-by-step surgical execution of epineurial, perineurial (fascicular), and combined epineurial-perineurial neurorrhaphy techniques.
SURGICAL ANATOMY AND BIOMECHANICS
To perform a successful neurorrhaphy, the surgeon must possess an intimate understanding of intraneural microanatomy.
Intraneural Architecture
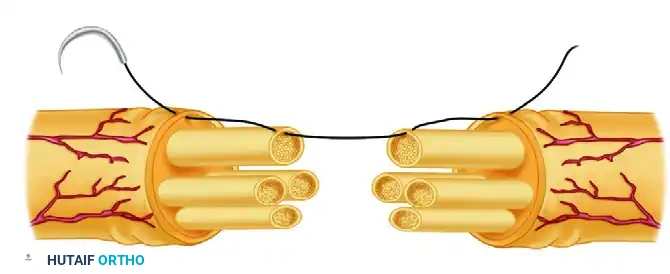
- Epineurium: The outermost layer of the nerve. It is divided into the epifascicular epineurium (the external sheath surrounding the entire nerve) and the interfascicular epineurium (the loose connective tissue separating individual fascicles). The epineurium provides tensile strength and cushions the fascicles.
- Perineurium: A dense, metabolically active layer of connective tissue that surrounds individual fascicles. It maintains the blood-nerve barrier and intrafascicular pressure. Suturing the perineurium provides a highly specific mechanical alignment but risks violating the intraneural environment.
- Endoneurium: The delicate connective tissue matrix surrounding individual axons within a fascicle.
Biomechanics of Nerve Repair
Peripheral nerves are viscoelastic structures. They can accommodate a certain degree of physiological excursion, but they are highly sensitive to longitudinal tension.
Surgical Warning: Tension is the enemy of nerve regeneration. Elongation of a peripheral nerve by just 8% to 15% significantly decreases intraneural microvascular blood flow (vasa nervorum), leading to ischemia, fibroplasia, and scarring at the coaptation site. If a primary repair cannot be achieved without tension, the surgeon must immediately pivot to nerve grafting or conduit interposition.
PREOPERATIVE PLANNING AND SETUP
Indications for Direct Neurorrhaphy
- Sharp, clean transections (e.g., glass or knife lacerations).
- Iatrogenic nerve transections identified intraoperatively.
- Injuries presenting within the acute window (ideally within 48 to 72 hours, before significant retraction and fibrosis occur).
Operating Room Setup
- Magnification: High-quality optical magnification is non-negotiable. Use 3× to 5× magnifying loupes for initial dissection and preparation. An operating microscope (set to 6× to 10× magnification) is strongly recommended for the actual coaptation, particularly for perineurial repairs.
- Instrumentation: A dedicated microsurgical tray is required, including jeweler's forceps, microscissors (straight and curved), a micro-needle holder, and a background contrast material.
- Sutures: 8-0, 9-0, and 10-0 monofilament nylon on spatulated micro-needles.
GENERAL PRINCIPLES OF NERVE PREPARATION
Regardless of the specific neurorrhaphy technique chosen, the preparation of the nerve ends follows strict microsurgical principles.
- Proximal and Distal Dissection: Mobilize the nerve proximally and distally to gain length, but preserve the segmental mesoneurial blood supply. Excessive stripping of the nerve devascularizes the stumps.
- Resection to Healthy Tissue: Using a fresh scalpel blade or specialized nerve-cutting scissors, gently trim the nerve ends. You must resect back to healthy neural tissue. Healthy fascicles will "mushroom" or pout slightly from the cut end.
- Hemostasis: Achieve absolute hemostasis. A hematoma at the repair site will organize into a fibrotic scar, blocking axonal crossing. Use bipolar electrocautery on the lowest effective setting, applied only to the specific bleeding vessel in the epineurium.
- Background Contrast: Place a small piece of sterile blue or green plastic material (or balloon rubber) behind the nerve. This dramatically improves visual contrast, reducing eye fatigue and highlighting the fine intraneural topography.
- Irrigation: Frequent irrigation with heparinized saline prevents the delicate neural tissues from drying out and adhering to the background material.
SURGICAL TECHNIQUE: EPINEURIAL NEURORRHAPHY
Epineurial neurorrhaphy is the most commonly performed nerve repair. It is highly effective for monofascicular or oligofascicular nerves, and for polyfascicular nerves where the fascicular topography is well-defined and easily matched.
Step 1: Debridement and Preparation
Under 3× to 5× magnifying loupes, use fine microsurgical scissors to dissect redundant, loose areolar tissue from the epineurium proximally and distally. This prevents the areolar tissue from being dragged into the repair site, which would impede axonal growth. Gently trim the nerve ends to identify healthy, pouting fascicles.
Step 2: Rotational Alignment
Accurate rotational alignment is the most critical step in epineurial repair. Examine the cross-section of both the proximal and distal stumps.
* Map the internal arrangement of the fascicles.
* Identify longitudinal epineurial blood vessels (vasa nervorum) on the surface of the nerve. Matching these vessels across the laceration is a highly reliable method for ensuring correct rotation.
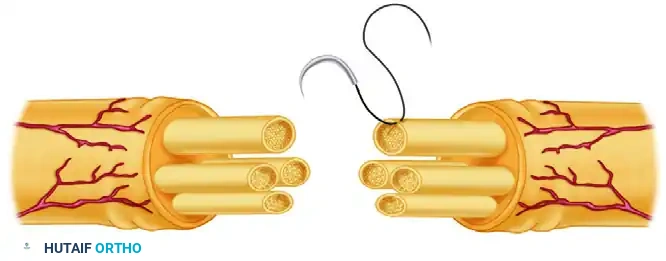
Step 3: The Posterior Suture
Once alignment is determined, introduce the background contrast material. Place the first 9-0 monofilament nylon suture through the epineurium on the posterior (deep) surface of the nerve.
Clinical Pearl: Placing the posterior suture first is a strategic maneuver. If the anterior sutures are placed first, accessing the posterior aspect of the nerve becomes exceedingly difficult without twisting the nerve and risking disruption of the anterior repair.
Tie this posterior stitch, or leave the ends untied and clamped with a micro-clip to act as a traction suture for approximating the nerve ends.
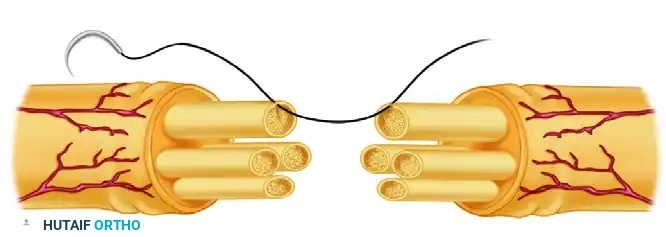
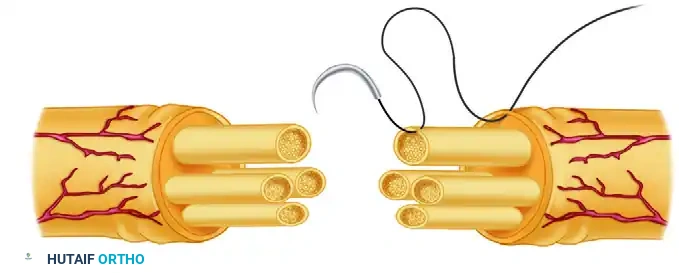
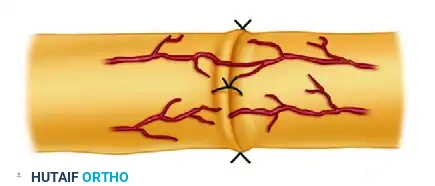
Step 4: Circumferential Coaptation
Proceed to place sutures circumferentially around the cut surface. The needle should pass strictly through the epineurium, taking bites approximately 1 to 2 mm from the cut edge.
* Attempt to align the corresponding fascicles appropriately without passing the needle through the fascicles themselves.
* Usually, 9-0 nylon is required to provide adequate tensile strength for the epineurial repair, although 10-0 nylon can be used to supplement the primary sutures and close minor epineurial gaps.
* Tie the knots with just enough tension to approximate the nerve ends. Strangulation of the epineurium will cause ischemia.
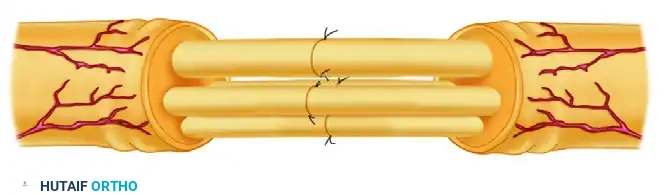
A completely tension-free repair must be achieved. If the nerve ends pull apart when the traction sutures are released, the repair is under excessive tension and will likely fail.
SURGICAL TECHNIQUE 63-5: PERINEURIAL (FASCICULAR) NEURORRHAPHY
Perineurial neurorrhaphy involves the direct suturing of individual fascicles or distinct groups of fascicles. This technique is indicated for nerves with a distinct polyfascicular architecture where motor and sensory fascicles are clearly segregated (e.g., the distal median or ulnar nerve at the wrist).
Step 1: Epineurial Excision
Dissect the nerve proximally and distally using low-power microscopic magnification (6×) or high-power loupes. With microsurgical scissors, remove the redundant areolar tissue.
Carefully excise the epifascicular epineurium from the circumference of the cut ends, exposing the underlying fascicles. Proceed to resect the interfascicular epineurium surrounding the groups of fascicles to allow for independent mobilization.
Step 2: Fascicular Mapping
Further dissection of the fascicles is made significantly easier by utilizing the operating microscope and placing the blue or green contrast material behind the nerve.
Meticulously attempt to match corresponding groups of fascicles proximally and distally based on size, shape, and topographical location.
Step 3: Fascicular Coaptation
After the fascicles have been matched and the obstructing epineurium excised, repair the nerve by suturing the ends of the corresponding fascicles together.
* Use a 10-0 monofilament nylon suture on a fine spatulated needle.
* Pass the needle strictly through the perineurium (the sheath of the fascicle), avoiding the delicate endoneurial contents.
* Place at least two 10-0 sutures through the perineurium at 180 degrees to each other to ensure circumferential alignment of the fascicle.
Pitfall: Over-suturing in perineurial repair introduces excessive foreign body material (nylon) directly into the regenerative pathway, which can stimulate robust intraneural scarring. Use the absolute minimum number of sutures required to maintain coaptation.
SURGICAL TECHNIQUE 63-6: EPINEURIAL-PERINEURIAL NEURORRHAPHY
The combined epineurial-perineurial neurorrhaphy is a highly versatile technique. It is particularly useful in aligning large groups of fascicles in major peripheral nerves (e.g., the sciatic or proximal radial nerve) and is often the technique of choice when nerves have been incompletely transected. This hybrid approach leverages the mechanical strength of epineurial sutures while providing the precise topographical alignment of perineurial sutures.
Step 1: Exposure and Matching
After the nerve has been adequately exposed and redundant tissue excised, examine the cross-section. Match the large groups of fascicles proximally and distally.
Step 2: Central Fascicular Repair
Begin with the central portion of the nerve. Repair the individual deep fascicles or groups of fascicles using 10-0 nylon sutures placed through the perineurium, exactly as described in the perineurial technique.
Step 3: Peripheral Epineurial-Perineurial Repair
Once the central fascicles are coapted, address the fascicles and groups of fascicles that lie near the periphery of the nerve.
* Use a 9-0 nylon suture.
* Pass the needle through the external epineurium, then directly through the edge of the perineurium of the peripheral fascicle.
* Cross the laceration and pass the needle through the matching perineurium on the opposite side, exiting through the epineurium.
This combined stitch securely anchors the peripheral fascicles while simultaneously closing the epineurial sheath, adding substantial biomechanical strength to the repair.
POSTOPERATIVE CARE AND REHABILITATION
The immediate postoperative period is critical for protecting the fragile microvascular and neural anastomoses.
Wound Closure and Dressing
- If hemostasis is a concern, place small Silastic drains, ensuring they are routed far away from the nerve repair site to prevent mechanical interference or accidental disruption during drain removal.
- Close the subcutaneous tissues and skin meticulously.
- Apply a specialized dressing: Use a nonadherent, wide-mesh gauze directly adjacent to the wound to prevent the coagulum from adhering to the dressing. Follow this with layers of soft gauze and abundant cotton padding applied from the distal extremity (e.g., fingers or toes) extending proximally past the adjacent joints.
Immobilization Protocol
- Position of Function: The limb must be immobilized in a custom-molded plaster or fiberglass splint. The joints adjacent to the injury should be positioned to minimize tension on the repair (e.g., slight wrist and elbow flexion for a volar forearm median nerve repair).
- Duration: Absolute immobilization is typically maintained for 3 weeks. This allows the initial fibrin clot to organize and early fibroblastic healing of the epineurium to occur, providing enough tensile strength to withstand gentle movement.
Rehabilitation Phase
- Weeks 3 to 6: The splint is gradually modified to allow progressive, protected active range of motion. The goal is to encourage nerve gliding and prevent extraneural adhesions without stretching the repair site.
- Beyond 6 Weeks: Progressive strengthening and sensory re-education protocols are initiated.
- Monitoring: Clinical recovery is monitored via the advancing Tinel's sign (which progresses at approximately 1 mm per day) and serial electromyography (EMG) starting at 3 months postoperatively to detect early signs of motor unit reinnervation.
CONCLUSION
Mastery of epineurial, perineurial, and combined neurorrhaphy techniques is a fundamental requirement for the reconstructive microsurgeon. By strictly adhering to the principles of tension-free coaptation, precise fascicular alignment, and meticulous tissue handling under appropriate magnification, the surgeon provides the optimal biological environment for axonal regeneration, thereby maximizing the patient's potential for functional recovery following devastating peripheral nerve injuries.
You Might Also Like