Operative Management of Dystrophic Nails and Subungual Lesions
Key Takeaway
Dystrophic nails and subungual lesions, including exostoses, glomus tumors, and periungual fibromas, present unique diagnostic and surgical challenges. Management requires precise clinical evaluation, often supplemented by specialized radiography or advanced imaging. Surgical intervention ranges from chemical matrixectomy using phenol to meticulous microscopic excision of tumors and osteochondromas. This guide details evidence-based operative techniques, biomechanical considerations, and postoperative protocols to optimize patient outcomes and minimize recurrence.
INTRODUCTION TO NAIL APPARATUS PATHOLOGY
The nail apparatus (perionychium) is a highly specialized epidermal appendage that provides structural support, protection, and enhanced tactile sensation to the distal phalanx. Pathologic alterations to the nail unit—whether degenerative, reactive, or neoplastic—can result in profound functional impairment and severe pain. For the practicing orthopedic surgeon, distinguishing between primary dystrophic conditions (such as onychogryposis) and secondary deformities caused by underlying osseous or soft-tissue lesions (such as subungual exostosis or glomus tumors) is paramount. Misdiagnosis frequently leads to inappropriate treatment, prolonged patient morbidity, and high recurrence rates.
DYSTROPHIC NAILS (ONYCHOGRYPOSIS, ONYCHOMYCOSIS)
Dystrophic and deformed nails, particularly in elderly and diabetic populations, represent a significant clinical challenge. These conditions can be difficult to manage at best and catastrophic at worst, especially when associated with an insensitive, neuropathic foot. Onychogryposis, commonly referred to as a "ram’s horn nail," is characterized by asymmetrical hypertrophy of the nail plate, leading to a thick, curved, and opaque deformity.
In diabetic patients with peripheral neuropathy, the hypertrophic nail acts as a rigid lever arm. Normal shoe wear applies pressure to the dorsal aspect of the dystrophic nail, which is transmitted directly to the underlying nail bed. In an insensitive foot, this repetitive microtrauma rapidly progresses to pressure necrosis, subungual ulceration, and contiguous osteomyelitis of the distal phalanx.
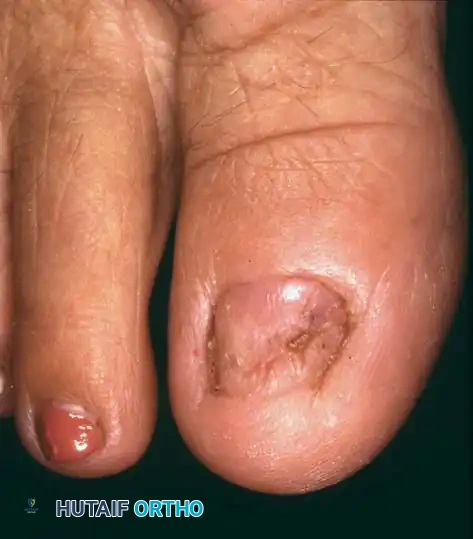
Fig. 84-24A: Onychomycosis and Onychogryposis. Severe "Ram’s horn" nails in a 90-year-old man, demonstrating the extreme hypertrophy that threatens the underlying soft tissue envelope.
Clinical Management and Nail Reduction
Routine conservative management requires specialized instrumentation. Having a small double-action rongeur and a heavy-duty nail splitter-cutter in the outpatient clinic is highly recommended. These hypertrophic nails can be reduced quickly and safely with these instruments, immediately relieving the mechanical pressure on the nail bed.
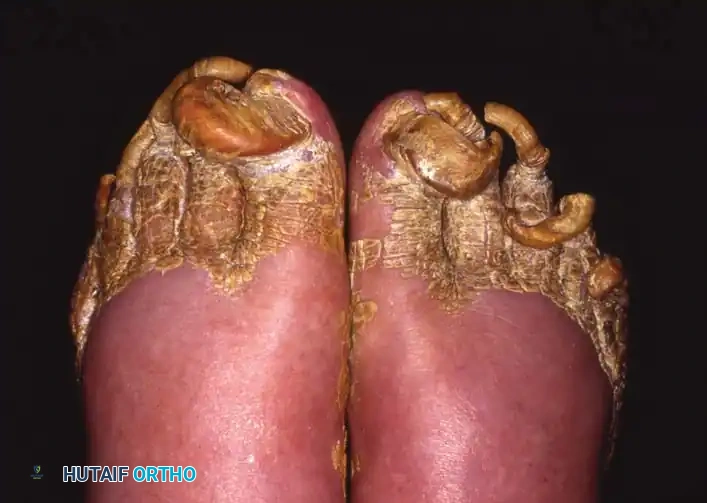
Fig. 84-24B: The clinical appearance of the digits immediately after mechanical nail reduction, alleviating the deforming forces.
Chemical Matrixectomy (Phenol Ablation)
For recurrent or severe cases where mechanical reduction is insufficient, permanent ablation of the nail matrix is indicated. Phenol (carbolic acid) at a concentration of 80% to 89% is the gold standard for chemical matrixectomy. Phenol induces a coagulation necrosis of the matrix cells, preventing future nail plate generation.
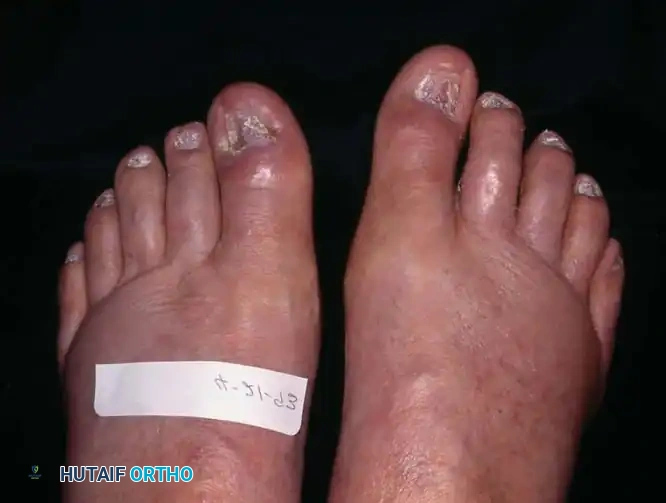
Fig. 84-23: Phenol (80% to 89%) solution utilized for chemical ablation of the nail matrix.
Surgical Warning: Phenol is highly caustic. Meticulous care must be taken to protect the surrounding eponychium and paronychial folds to prevent iatrogenic chemical burns and subsequent full-thickness skin loss.
🔪 Surgical Technique 84-10: Phenol Matrixectomy
- Preparation: Administer a digital block using 1% plain lidocaine or bupivacaine. Apply a sterile digital tourniquet (e.g., a Penrose drain or commercial digital tourniquet) to ensure a bloodless field, as blood will neutralize the phenol and lead to incomplete ablation.
- Avulsion: Perform a total nail avulsion using a Freer elevator and straight hemostat, ensuring the entire nail plate is removed from the proximal germinal matrix.
- Protection: A thin layer of petroleum jelly or sterile gel can be applied around the adjacent skin edges before applying the phenol to prevent chemical irritation.
- Application: Dip a thin-tipped cotton applicator into the 80% to 89% phenol solution. Insert the applicator under the proximal nail fold, directly contacting the germinal matrix.
- Ablation: Rotate the cotton applicator firmly against the matrix for 30 to 40 seconds.
- Neutralization: Lavage the nail edge and matrix thoroughly with 70% isopropyl alcohol. Alcohol acts as a solvent to wash away excess phenol, halting the chemical cauterization process.
- Repetition: Perform this same application and lavage procedure a second time to ensure complete destruction of the matrix.
- Cleanup: Using alcohol, meticulously remove any phenol that has inadvertently reached the adjacent skin edge.
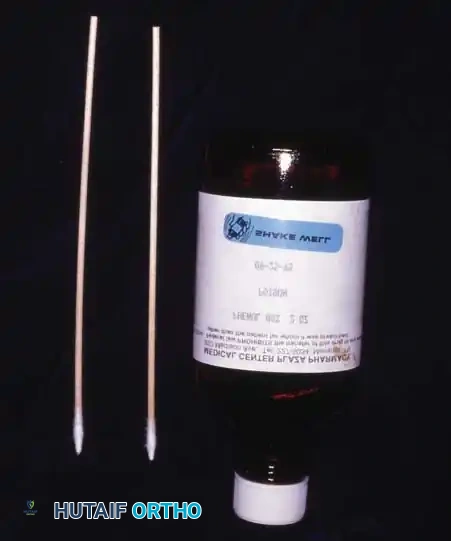
Fig. 84-23 A, Thin-tipped applicators used for precise phenol delivery. B, The nail bed after successful phenol ablation.
Note: The phenol solution should be renewed every 3 to 4 months in the clinic, as it loses its potency over time, which can result in a high recurrence rate of nail spikes.
OTHER LESIONS OF THE NAILS
Subungual Exostosis
Strictly speaking, a subungual exostosis is not a primary nail abnormality; however, it usually presents as a painful, dorsally deviated, and deformed nail. This presentation frequently leaves the examiner perplexed as to the true cause of the pain and deformity, often leading to misdiagnoses of onychocryptosis (ingrown toenail) or chronic paronychia.
Pathologically, particularly in adolescents, this lesion is a sessile osteochondroma of the distal phalanx of the toe. As the cartilaginous cap grows, it erodes dorsally through the nail matrix and frequently penetrates the nail plate itself.
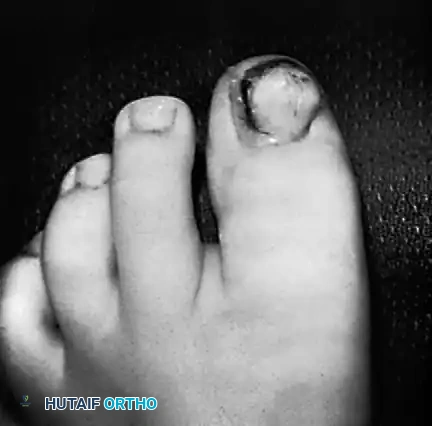
Fig. 84-25: Clinical presentation of a subungual exostosis (sessile osteochondroma) demonstrating dorsal displacement and erosion of the nail plate after a previous failed attempt at excision.
Clinical Pearl: Routine anteroposterior and lateral radiographs of the foot may fail to demonstrate the exostosis because standard techniques do not emphasize the distal phalanx. Radiographs taken at oblique angles, specifically coned-down and magnified on the affected digit, are essential for accurate diagnosis.

Radiographic appearance of a subungual exostosis arising from the dorsal aspect of the distal phalanx.
Surgical excision is the definitive treatment of choice. Two primary techniques are utilized: a nail-preserving approach (Lokiec et al.) and a radical excision approach (Multhopp-Stephens). Lokiec et al. described the excision of subungual exostoses in children and adolescents with no recurrences or complications at 1 to 3.5 years postoperatively. The cited advantages of their procedure include preservation of the nail, rapid recovery, and a normal cosmetic appearance.
🔪 Surgical Technique 84-11: Nail-Preserving Excision (Lokiec et al.)
- Anesthesia & Hemostasis: After the administration of general anesthesia (for young children) or a regional ankle/digital block (for adolescents and adults), apply a toe or ankle tourniquet.
- Exposure: Remove a narrow strip of the nail (less than one-fourth of the total nail width) on the medial or lateral side of the toe overlying the exostosis.
- Nail Elevation: Carefully dislodge part of the remaining nail from its proximal attachments at the larger side of the exostosis. Leave the remainder of the nail in place. This maneuver fully exposes the exostosis abutting and penetrating the nail bed.
- Osteotomy: Make a small osteotomy paralleling the dorsal cortex of the distal phalanx to remove the exostosis in one piece.
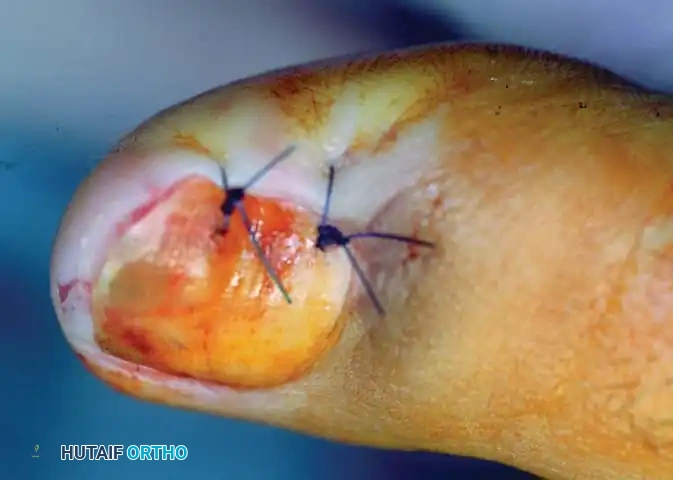
Fig. 84-26B: A small osteotome is directed parallel to the distal phalanx to resect the exostosis at its base.
- Contouring: Use a fine rongeur or a high-speed burr to produce a smooth cortical surface, ensuring the removal of any residual osteochondroma tissue or cartilaginous cap.
- Closure: Irrigate the wound copiously with saline. Relocate the elevated nail plate back over the defect to act as a biologic splint, and suture the nail fold with two small absorbable stitches to cover the raw bone of the phalanx.
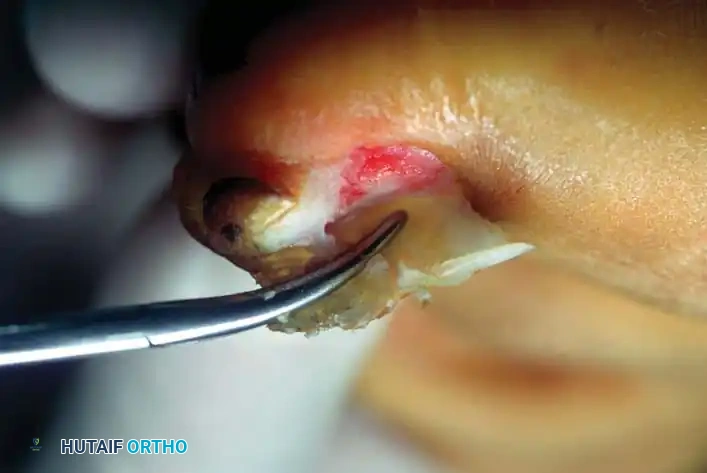
Fig. 84-26C: The nail is relocated to cover the raw phalangeal bone and stitched securely in place.
Aftertreatment: Nonadhesive dressings are changed every 3 days during the first 3 weeks. At 3 weeks, sutures are removed, and a gradual return to normal-width shoes is allowed.
🔪 Surgical Technique 84-12: Radical Excision (Multhopp-Stephens)
For larger lesions where the nail bed is irreparably damaged, a more radical approach is required.
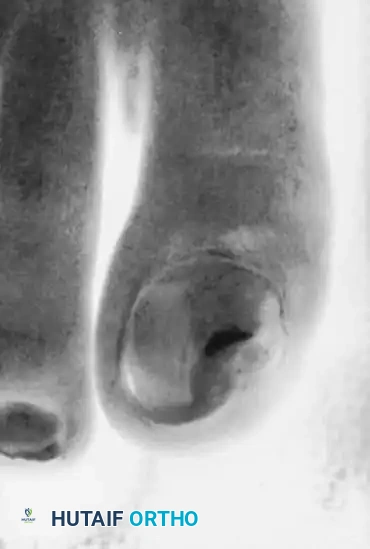
Fig. 84-27A: Clinical appearance of a large lesion with severe erosion of the medial aspect of the nail.
- Exposure: Expose the lesion by removing a portion of the nail, or the entire nail plate if necessary.
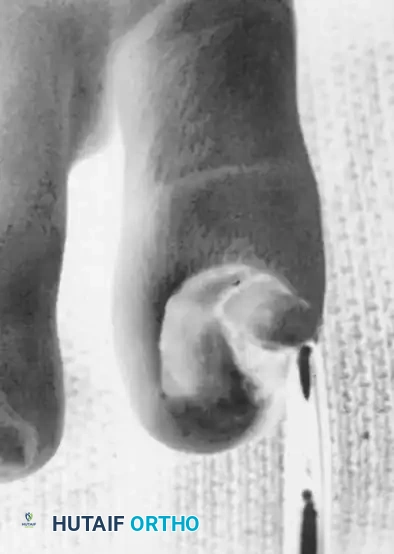
Fig. 84-27B: Appearance of the exostotic lesion immediately after nail removal.
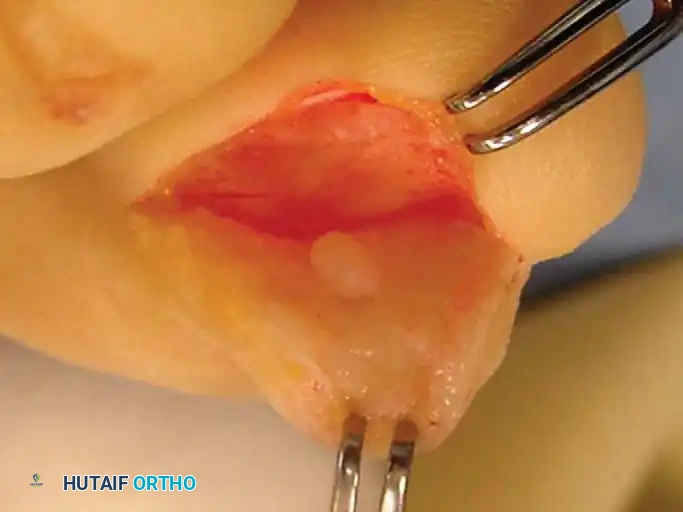
- Dissection: Ellipse the exostosis and carry the sharp dissection down to the phalanx where the stalk or base is attached. Do not attempt to preserve the overlying, severely attenuated nail bed.
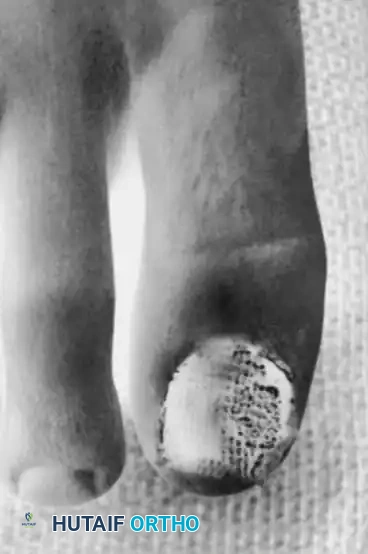
Fig. 84-27C: The exostosis is removed from the underlying phalanx en bloc.
- Resection: Remove the exostosis, ensuring the entire cartilaginous cap and the overlying nail bed at its base are excised from the distal phalanx.
- Bone Preparation: Use a small burr to remove 1 to 2 mm of normal bone at the base of the lesion. This ensures complete eradication of the stalk and smooths the contour of the distal phalanx to prevent pressure points.

Fig. 84-27D: A burr is used to smooth the contour of the phalanx.
- Dressing: Place an Adaptic or similar nonstick dressing beneath the nail fold.
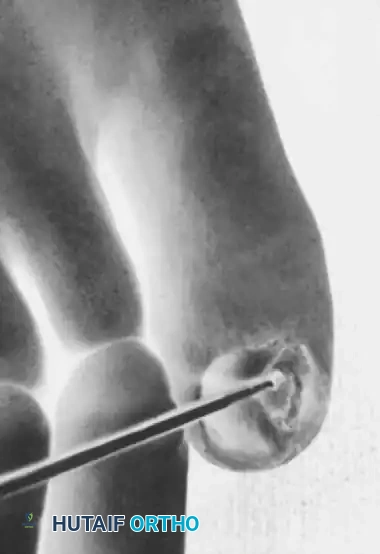
Fig. 84-27E: Nonstick dressing placed beneath the nail fold to allow for secondary healing.
- Healing: Allow the defect to granulate and heal by secondary intention.
Aftertreatment: Patients are placed in a rigid postoperative shoe and allowed to bear weight as tolerated. Permanent deformity of the nail is likely, but recurrence of the exostosis is minimized.
Subungual and Periungual Fibromas
Subungual and periungual fibromas (often termed Koenen tumors when associated with tuberous sclerosis) can be exceedingly difficult to diagnose preoperatively. A history of long-standing symptoms, multiple physician consultations without resolution, highly localized tenderness beneath a specific portion of the nail, and a frustrated patient all reinforce the suspicion of this diagnosis.
If the mass extends beyond the eponychium or hyponychium, the diagnosis becomes visually straightforward.
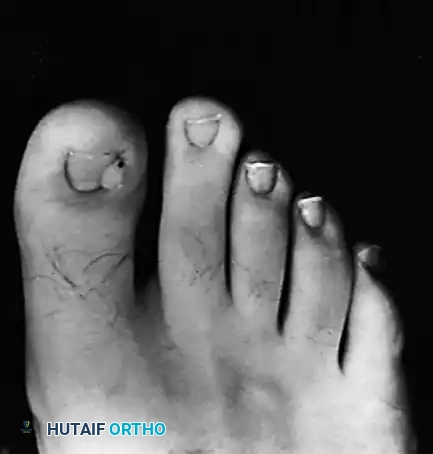
Fig. 84-28: Clinical presentation of a periungual fibroma emerging from the proximal nail fold.
Surgical Management: Excision requires careful dissection of the fibroma from the surrounding normal matrix. The aftertreatment is identical to that of an incomplete matrixectomy. Patients must be counseled that permanent longitudinal ridging or deformity of the nail may occur, though it is generally less severe than the deformity following the removal of a large subungual exostosis.
Glomus Tumor
The glomus tumor is an enigmatic, exquisitely painful neoplasm representing a benign hamartomatous proliferation of the normal neuromyoarterial glomus apparatus (Sucquet-Hoyer canal), which is responsible for thermoregulation.
Patients classically present with a triad of symptoms: severe paroxysmal pain, point tenderness (often localizable with the tip of a paperclip, known as Love's pin test), and cold hypersensitivity. Visually, the nail may appear entirely normal, save for a faint bluish or reddish-blue hue visible through the translucent nail plate.
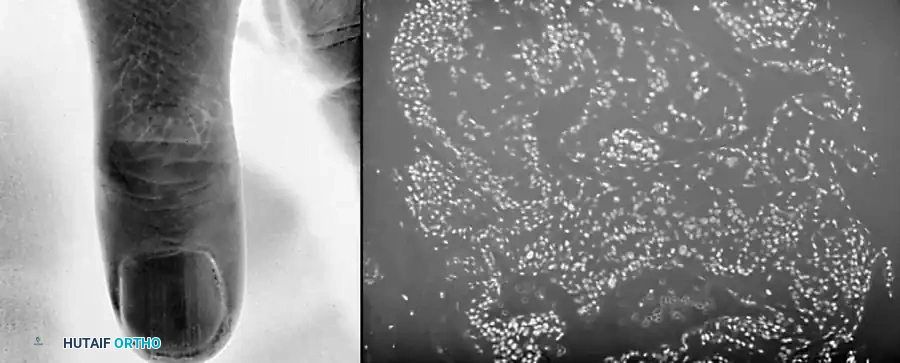
Fig. 84-29: A small, bluish discoloration apparent in the proximal nail bed, highly characteristic of a glomus tumor.
The pathology lies entirely within the subungual space; the nail plate itself is normal. Complete surgical excision is the only definitive treatment. Magnification (loupes or an operating microscope) and high-intensity lighting are mandatory to facilitate the complete excision of these minute masses and to minimize iatrogenic damage to the nail matrix.
🔪 Surgical Technique 84-13: Transungual Excision
- Exposure: If the mass is located centrally beneath the nail, remove only the portion of the nail plate directly overlying the area of tenderness.
- Identification: Under magnification and high-intensity lighting, locate the tumor. It typically presents as a small, pearly whitish or bluish discoloration compared with the surrounding pink matrix.
- Excision: Excise this portion of the matrix down to the periosteum of the phalanx, taking a 1-mm margin of normal-appearing matrix. The tumor often has a distinct, gritty feel when sectioned.
- Pathology: Send all specimens to pathology to confirm the suspected diagnosis.
Surgical Warning: The patient must be warned preoperatively that while the returning nail should have a normal appearance, matrix scarring is unpredictable, and a permanent split or ridge in the nail may result.
🔪 Surgical Technique 84-14: Vascular Skin Flap (Horst and Nunley)
Horst and Nunley described an advanced technique utilizing a full-thickness vascular skin flap to expose the tumor while preserving the nail and nail matrix, significantly reducing the risk of postoperative nail dystrophy.
- Incision: Make an inverted L-shaped incision around the nail. The short leg of the "L" runs parallel to and 5 mm distal to the distal end of the nail. The long leg of the "L" runs 5 mm medial or lateral to the nail, extending proximally past the nail matrix, usually to the level of the distal interphalangeal joint.
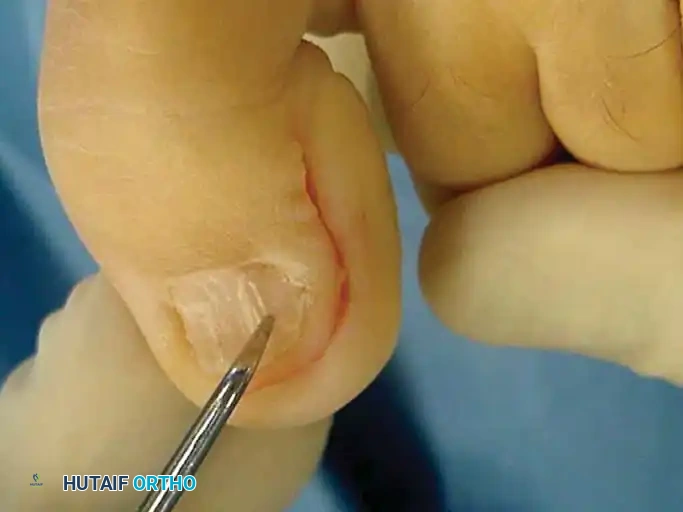
Fig. 84-30A: Design of the inverted L-shaped incision for the vascular skin flap.
- Flap Elevation: Create a full-thickness flap down to the bone. Sharply elevate it off the periosteum without injuring the overlying nail matrix.
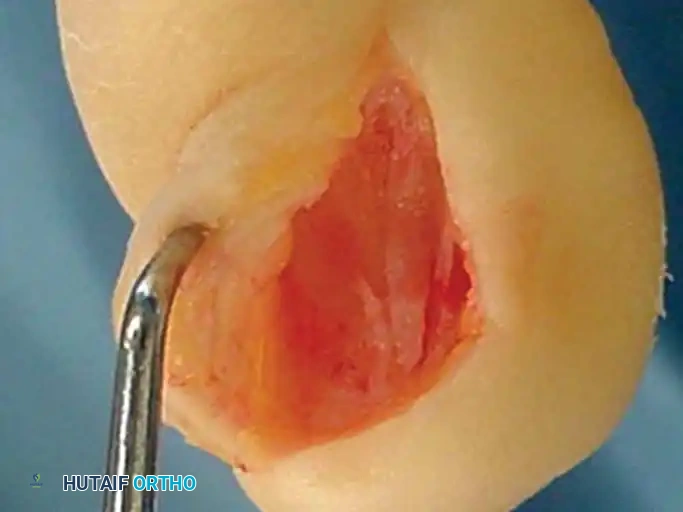
Fig. 84-30B: Elevation of the full-thickness flap, carefully preserving the nail matrix.
- Tumor Identification: Reflect the skin and matrix flap, and inspect the deep (volar/plantar) surface of the matrix. The glomus tumor is usually obvious within the tissue as a ball-shaped or egg-shaped, opaque, semi-elastic structure. Occasionally, the tumor may have caused pressure erosion into the dorsal cortex of the distal phalanx.

You Might Also Like

