Disorders of the Anterior Tibial Tendon and Medial Column Tendinopathies
Key Takeaway
Disorders of the anterior tibial tendon, including tenosynovitis and rupture, present unique clinical challenges. Ruptures typically occur in active elderly patients via attritional degeneration or in young athletes following forced plantarflexion. Management ranges from conservative immobilization to meticulous surgical synovectomy or reconstruction. This guide details the biomechanics, diagnostic criteria, and operative techniques, including the Kidner procedure for accessory navicular excision.
INTRODUCTION TO ANTERIOR TIBIAL TENDON PATHOLOGY
Disorders of the anterior tibial tendon (ATT) represent a relatively uncommon but highly significant spectrum of foot and ankle pathology. While tenosynovitis and frank rupture are the most frequently encountered conditions affecting this structure, clinical problems with the ATT remain rare when compared to the high incidence of peroneal or posterior tibial tendon disorders.
The anterior tibial tendon is the primary dorsiflexor of the ankle joint, responsible for approximately 80% of dorsiflexion power. It plays a critical biomechanical role during the gait cycle: it contracts eccentrically at heel strike to decelerate plantarflexion and prevent "foot slap," and it contracts concentrically during the swing phase to ensure adequate ground clearance of the forefoot. Loss of ATT continuity profoundly disrupts normal gait mechanics.
In general, the anterior tibial tendon loses continuity in two distinct demographic and biomechanical situations:
1. Attritional Rupture in the Elderly: The first and most common scenario involves an older individual—usually a physically active male—who experiences a spontaneous rupture of the tendon while engaging in recreational sports or minor trauma. While perceived as an acute event, this is almost universally the culmination of chronic, attritional loss of tendon continuity due to underlying tendinosis and microvascular ischemia.
2. Acute Traumatic Rupture in the Young: The second situation involves a young, healthy adult who forcefully dorsiflexes an acutely plantarflexed foot against a massive external resistance. This mechanism is classically seen in collision sports such as soccer or American football.
Conversely, distance runners and endurance athletes most often experience inflammatory tenosynovitis rather than structural rupture, driven by repetitive microtrauma and friction within the retinacular sheaths.
ANATOMY AND BIOMECHANICS
A profound understanding of the anterior compartment anatomy is requisite for diagnosing and surgically managing ATT disorders. The tibialis anterior muscle originates from the lateral condyle of the tibia, the proximal two-thirds of the lateral tibial shaft, and the interosseous membrane. As it transitions into a tendinous structure in the distal third of the leg, it passes beneath the superior and inferior extensor retinacula.
The Retinacular Envelope and Watershed Zone
The tendon may rupture at one of two primary anatomical locations, both dictated by local biomechanical stress and vascularity:
1. The Insertion Point: The tendon inserts into the medial and plantar surfaces of the medial cuneiform and the base of the first metatarsal. A highly constant bursa lies directly beneath this insertion site to mitigate friction.
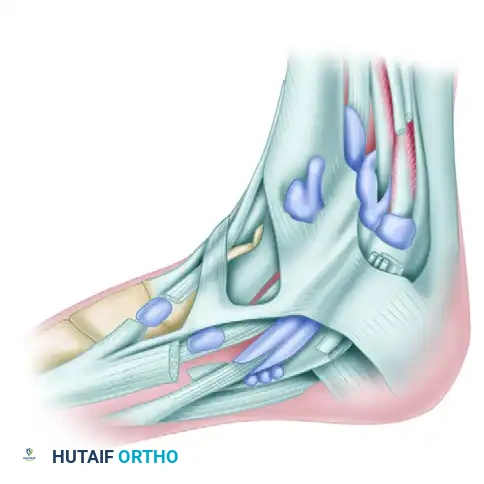
Figure 82-40: Bursa beneath the insertion of the anterior tibial tendon.
- Beneath the Inferior Extensor Retinaculum: The second common site of rupture is beneath the superomedial limb of the inferior extensor retinaculum. As this limb of the retinaculum reaches the anterior tibial tendon from its lateral side, it divides into an anterior and posterior "glove," completely encircling the tendon as it passes toward its insertion on the medial midfoot.
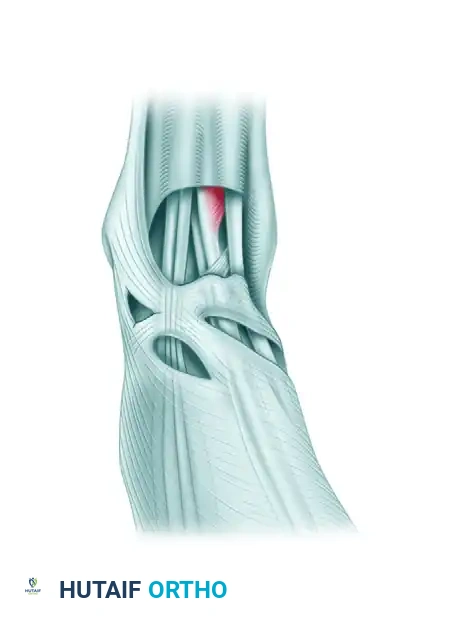
Figure 82-41: Numbers 3 and 4 point to the superior and inferior subdivisions of the superomedial band of the inferior extensor retinaculum. This split envelops the tendon. 1, Stem of inferior extensor retinaculum; 2, anterior tibial tendon; 5, inferior limb of inferior extensor retinaculum.
Clinical Pearl: Synovitis around the ankle joint can severely constrict the ATT within this retinacular envelope. The resulting extrinsic pressure induces localized ischemic changes within the tendon's watershed zone, precipitating attritional rupture.
CLINICAL EVALUATION AND DIAGNOSIS
Patient History and Presentation
The hallmark presenting complaint of an ATT rupture is weakness of ankle dorsiflexion, often described by the patient as a "drop foot" or a tendency to trip over rugs and uneven surfaces. To a lesser degree, patients may report localized pain, swelling, and tenderness over the anterior aspect of the ankle. In cases of florid tenosynovitis, pain is the predominant symptom, exacerbated by active dorsiflexion or passive plantarflexion.
Physical Examination
On physical examination, a careful visual and tactile assessment is mandatory.
* Substitution Patterns: Patients with a ruptured ATT will subconsciously recruit the extensor hallucis longus (EHL) and extensor digitorum longus (EDL) to dorsiflex the foot. This substitution can mask the dorsiflexion deficit if the examiner is not astute. The examiner must isolate the ATT by asking the patient to dorsiflex and invert the foot simultaneously.
* Palpation: There may or may not be a palpable defect in the tendon substance, depending entirely on the chronicity of the rupture. In delayed presentations, the tendon may have healed in a lengthened, non-functional position via a bridge of scar tissue in continuity.
* Crepitus: Palpable or audible crepitance along the tendon sheath is a highly sensitive indicator of florid tenosynovitis.
Imaging Modalities
While the diagnosis is primarily clinical, imaging is invaluable for surgical planning. Weight-bearing radiographs rule out associated osseous pathology. Magnetic Resonance Imaging (MRI) is the gold standard for differentiating between severe tendinosis, partial tears, and complete ruptures, as well as for assessing the degree of tendon retraction and muscle belly fatty infiltration.
CONSERVATIVE MANAGEMENT OF TENOSYNOVITIS
Non-operative management is the first line of treatment for ATT tenosynovitis and is highly successful in the majority of cases, particularly in endurance athletes.
Immobilization Protocol
Tenosynovitis is treated by strict immobilization in a removable or nonremovable short-leg walking cast or controlled ankle motion (CAM) boot.
* Phase 1 (Weeks 0-3): The cast or boot should be worn continuously for 3 weeks. If a prefabricated removable boot is utilized, the patient must be strictly instructed to remove it only for bathing.
* Phase 2 (Weeks 3-6): The immobilization is continued for another 3 weeks, but progressive ambulation and weight-bearing are introduced.
Pharmacologic Intervention
Oral nonsteroidal anti-inflammatory drugs (NSAIDs) are utilized as an adjunct to mechanical offloading.
Surgical Warning: If the disease is highly resistant, a corticosteroid injection may be judiciously placed within the tendon sheath but absolutely not within the tendon substance. Intratendinous injection carries a catastrophic risk of iatrogenic tendon rupture. This should be performed under ultrasound guidance to ensure precise extra-tendinous delivery.
SURGICAL MANAGEMENT: ANTERIOR TIBIAL TENOSYNOVECTOMY
Synovectomy of the anterior tibial tendon is seldom required, except when the condition is recalcitrant to prolonged conservative care or when it is associated with aggressive inflammatory arthritides (e.g., Rheumatoid Arthritis).
Preoperative Considerations
Any surgical scar across the anteromedial aspect of the ankle has a high propensity to hypertrophy due to the lack of subcutaneous fat and constant friction from footwear. Meticulous tissue handling and precise incision placement are critical. If tenosynovectomy is required, the surgical approach must be designed so that the sheath of the anterior tibial tendon is accessed while preserving one or both limbs of the inferior extensor retinaculum to prevent postoperative tendon bowstringing.
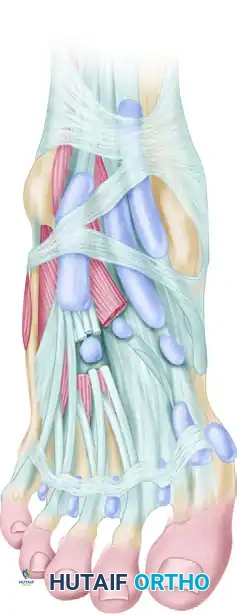
Figure 82-42: 1, Sheath of anterior tibial tendon; 2, sheath of extensor digitorum longus; 3, sheath of extensor hallucis longus; 4, inferior extensor retinaculum; 5, superomedial arm of inferior extensor retinaculum; 6, inferomedial arm of inferior extensor retinaculum.
🔪 Surgical Technique 82-11: Anterior Tibial Tenosynovectomy
Step 1: Incision and Exposure
* Begin the incision just distal to the ankle joint line.
* Carry the incision medial and posterior to the anterior tibial tendon, extending 5 to 6 cm distally.
* It is imperative to stay 2 to 3 mm medial to the tendon, carrying the dissection almost to its insertion on the medial cuneiform. Ensure the incision does not directly cross the anterior crease of the ankle joint at a perpendicular angle to minimize contracture risk.

Figure 82-43: Note that the incision does not cross the ankle joint directly and courses medial to the anterior tibial tendon.
Step 2: Neurovascular Protection
* Carefully isolate the communicating branches of the saphenous vein as they course plantarward. Preserve as many of these venous structures as possible to prevent postoperative edema.
* Identify and protect the terminal branch or branches of the saphenous nerve, which typically lie just deep or adjacent to the saphenous vein.
Step 3: Flap Elevation and Sheath Incision
* Raise the anterior skin and subcutaneous flap no more than is absolutely necessary to expose the tendon. Excessive undermining leads to skin edge necrosis.
* Longitudinally open the tendon sheath.
Step 4: Synovectomy
* Meticulously debride the sheath and the hypertrophic synovium.
* By passively dorsiflexing the ankle and pulling distally on the tendon, the surgeon can deliver the proximal portion of the tendon into the wound. This allows most of the synovium—even the tissue located proximal to the ankle joint line—to be excised without extending the skin incision.
Step 5: Retinacular Management
* If severe constriction is present, incise the superomedial band of the inferior anterior retinaculum.
* Surgical Pearl: Resuturing this specific band is generally unnecessary, technically difficult, and may recreate the ischemic constriction that led to the pathology.
Step 6: Closure
* Obtain meticulous hemostasis following tourniquet deflation.
* Close the skin only, using non-absorbable sutures (e.g., 3-0 or 4-0 nylon) in a tension-free manner.
* Apply a bulky, sterile compression dressing followed immediately by a short-leg walking cast in neutral dorsiflexion.
Postoperative Care Protocol
- Days 1 to 7: The patient utilizes crutches for the first 5 to 7 days. Weight-bearing to tolerance is permitted in the cast. Elevation is critical to manage swelling.
- Days 12 to 16: The initial cast is removed, and skin sutures are extracted. A new, well-molded short-leg walking cast is applied.
- Weeks 2 to 6: The second cast is worn continuously for 4 to 6 weeks.
- Weeks 6 to 12: Following cast removal, the patient transitions to a compressive ankle corset or lace-up brace for an additional 4 to 6 weeks, accompanied by formal physical therapy focusing on eccentric strengthening and proprioception.
ASSOCIATED MEDIAL COLUMN PATHOLOGY: THE ACCESSORY NAVICULAR
When evaluating tendinopathies of the medial midfoot, the surgeon must also consider the posterior tibial tendon (PTT) and its relationship with the navicular. While the ATT inserts on the medial cuneiform and first metatarsal, the adjacent PTT inserts heavily onto the navicular tuberosity. The presence of an accessory navicular (os naviculare) is a frequent source of medial column pain, tenosynovitis, and tendinosis that can clinically mimic or coexist with anterior compartment disorders.
Pathomechanics of the Accessory Navicular
An accessory navicular is a secondary center of ossification that fails to unite with the primary navicular bone. It is present in approximately 10-14% of the population. When symptomatic, the PTT, which often inserts anomalously into this accessory ossicle, exerts a continuous shear force across the synchondrosis during the stance phase of gait. This leads to microfracture, inflammation, and progressive loss of the medial longitudinal arch.
🔪 Surgical Technique: The Kidner Procedure
For patients with recalcitrant medial midfoot pain secondary to a symptomatic accessory navicular and associated PTT tendinosis, the Kidner procedure (excision of the accessory navicular and advancement/rerouting of the PTT) is the gold standard surgical intervention.
Step 1: Incision and Dissection
Make a longitudinal incision over the medial aspect of the midfoot, centered directly over the bony prominence of the accessory navicular.
Figure 82-39A (Inset): Location of the accessory navicular and planned incision.
Step 2: Exposure of the Tendon and Ossicle
Deepen the dissection through the subcutaneous tissue, taking care to protect the medial dorsal cutaneous nerve. Incise the sheath of the posterior tibial tendon longitudinally. Reflect the tendon to expose the underlying accessory navicular and its synchondrosis with the main body of the navicular.
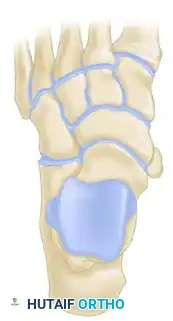
Figure 82-39B: Exposure of the posterior tibial tendon and the accessory navicular.
Step 3: Excision of the Accessory Navicular
Using a scalpel or a small osteotome, sharply dissect the accessory navicular free from its soft tissue attachments, including the anomalous insertion of the PTT. Shell the ossicle out of its bed.
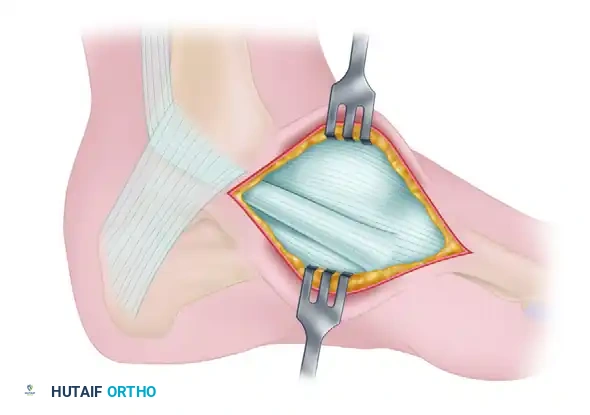
Figure 82-39C: Removal of the accessory navicular.
Step 4: Medial Column Flush Resection
Once the accessory fragment is removed, the remaining medial tuberosity of the primary navicular often remains excessively prominent. Use an osteotome or oscillating saw to resect the medial prominence of the navicular so that it is perfectly flush with the adjacent medial cuneiform and the head of the talus. This prevents postoperative shoe-wear irritation.

Figure 82-39D: Accessory navicular removed and the tuberosity of the navicular cut flush with the adjacent cuneiform and talus.
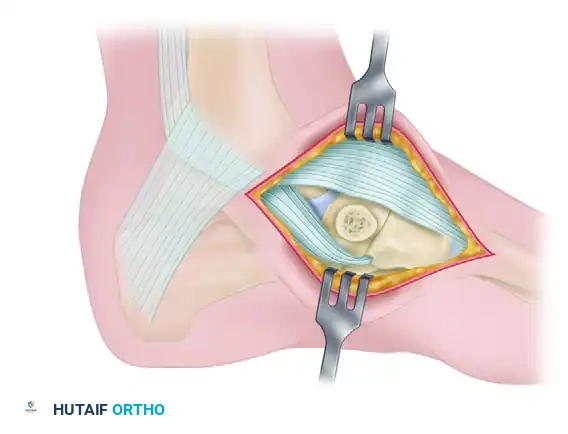
Figure 82-39 (Continued): Final anatomical alignment demonstrating the flush medial column.
Step 5: Tendon Advancement and Closure
The posterior tibial tendon is then advanced and sutured directly to the periosteum and the raw cancellous bone of the navicular to restore its mechanical advantage in supporting the medial longitudinal arch. The wound is closed in layers, and the patient is placed in a non-weight-bearing cast in slight inversion and plantarflexion for 4 to 6 weeks to protect the tendon repair.
CONCLUSION
Disorders of the anterior tibial tendon, while less common than other ankle tendinopathies, demand a high index of suspicion and a thorough understanding of anterior compartment biomechanics. Whether managing an attritional rupture in an elderly patient or performing a meticulous tenosynovectomy for chronic inflammation, the surgeon must respect the delicate retinacular anatomy and the tendon's precarious vascular supply. Furthermore, a comprehensive evaluation of the medial column—including the assessment of the posterior tibial tendon and the potential presence of an accessory navicular—ensures that all contributing factors to medial midfoot pathology are addressed, optimizing patient outcomes and restoring normal gait mechanics.
You Might Also Like
