Masterclass: Composite Rib Grafts & Foot Free Flaps
Key Takeaway
Composite free tissue transfers from the foot and composite rib grafts offer unparalleled versatility for complex reconstructive challenges. This guide details the intricate neurovascular anatomy of the foot, variations in the dorsalis pedis system, and step-by-step surgical techniques for flap elevation. Designed for microsurgeons, it covers indications, biomechanics, and postoperative protocols to optimize graft incorporation and minimize donor site morbidity in advanced orthopedic reconstruction.
ADVANCED COMPOSITE TISSUE TRANSFERS IN ORTHOPAEDIC RECONSTRUCTION
The evolution of microsurgery has dramatically expanded the armamentarium of the reconstructive orthopaedic surgeon. When facing massive composite defects—whether congenital, oncologic, or traumatic—the ability to transfer vascularized bone, muscle, nerve, and skin is paramount. This masterclass details two highly specialized donor sites: the composite rib graft and the highly versatile free tissue transfers harvested from the foot.
COMPOSITE RIB GRAFT HARVEST
Vascularized rib grafts, typically based on the posterior intercostal artery and vein, provide a unique osteocutaneous or osteomyocutaneous reconstructive option. While the vascularized fibula remains the gold standard for straight, load-bearing long bone defects, the rib's natural curvature and membranous bone characteristics make it exceptionally suited for specific anatomical niches.
Indications and Biomechanics
Although composite rib grafts can be utilized to replace congenital or acquired defects in long bones such as the tibia, humerus, radius, and ulna, their biomechanical profile dictates their most appropriate applications. The rib is highly malleable and possesses a natural contour that perfectly mimics the human mandible.
Primary indications include:
* Mandibular Reconstruction: Full replacement of the mandible.
* Composite Oral Reconstruction: Replacement of the mandible and oral mucosa utilizing a rib and pleura composite flap.
* Massive Maxillofacial Defects: Full replacement of the oral lining with pleura, the mandible with rib, and the cheek skin with chest skin in a single chimeric composite graft.
* Pediatric Long Bone Defects: Where the growth potential of an epiphyseal transfer (if harvested with the costochondral junction) is desired.
Surgical Technique: Harvest Completion and Inset
The harvest of a composite rib graft requires meticulous dissection to preserve the delicate posterior intercostal neurovascular bundle. Once the osteocutaneous or osteopleural flap is elevated:
- Donor Site Closure: Close the chest wall in anatomical layers. It is mandatory to insert a chest tube (thoracostomy) to prevent postoperative pneumothorax or hemothorax, ensuring the lung is fully expanded prior to final fascial closure.
- Graft Inset and Fixation: Transfer the graft to the recipient site. Fix the bone securely at its ends. While modern techniques often employ titanium mini-plates, traditional and highly effective fixation can be achieved with heavy wire loops, which provide excellent stability without stripping the delicate periosteal blood supply.
- Microvascular Anastomosis:
- Arterial Anastomosis: Microvascular anastomoses for composite rib grafts are exceptionally demanding. The wall of the posterior intercostal artery is notoriously thin, friable, and inelastic compared with other donor arteries (such as the fibular or radial arteries). Meticulous adventitial stripping and precise suture placement (typically 9-0 or 10-0 nylon) are required to prevent tearing.
- Venous Anastomosis: A single, dominant accompanying vein must be anastomosed with equal care, ensuring no twisting or kinking occurs during the final inset.
Surgical Warning: The inelasticity of the intercostal artery makes it highly susceptible to vasospasm and intimal shear. Avoid excessive traction during vessel preparation, and utilize topical vasodilators (e.g., papaverine or lidocaine) liberally.
Postoperative Care for Rib Grafts
Postoperative management mirrors that of vascularized fibular transplants. However, surgeons must account for the fact that rib transplants may require considerably longer to fully incorporate, heal, and hypertrophy in response to mechanical loading. Strict immobilization of the recipient site is required until radiographic evidence of union is observed at the osteotomy interfaces.
COMPOSITE FREE TISSUE TRANSFERS FROM THE FOOT
The neurovascular supply to the structures of the foot makes it an unusually versatile donor site for a myriad of reconstructive problems, especially those involving the hand, upper extremity, and contralateral foot.
The foot can provide an array of specialized tissues, including:
* Cutaneous and Fascial Flaps: Dorsalis pedis flap.
* Neurovascular Island Flaps: First web space flap.
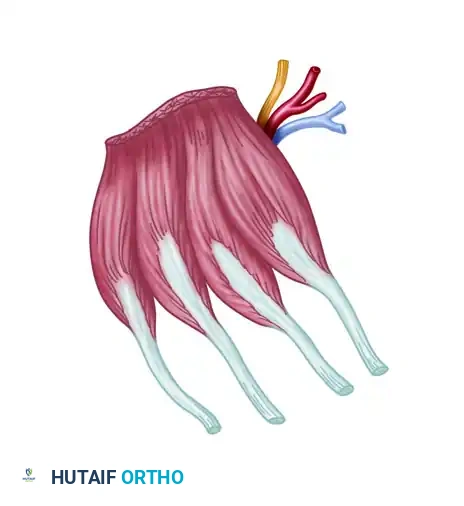
* Muscle Flaps: Extensor digitorum brevis (EDB) muscle flap.
* Composite Bone/Joint Transfers: Vascularized metatarsophalangeal (MTP) joint transfers.
* Digit Transfers: Great toe, second toe, third toe, and "wrap-around" flaps for thumb and digit reconstruction.
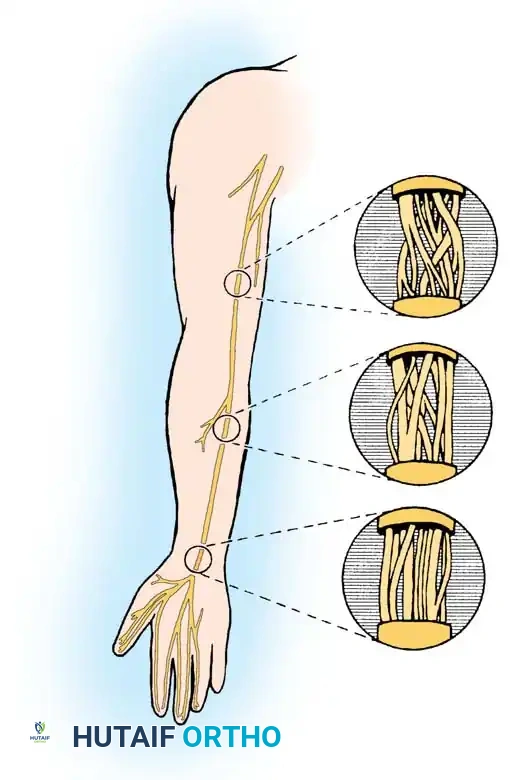
* Nerve Grafts: Sural nerve harvest.
Harvesting of the sural nerve, a workhorse for bridging massive peripheral nerve gaps.
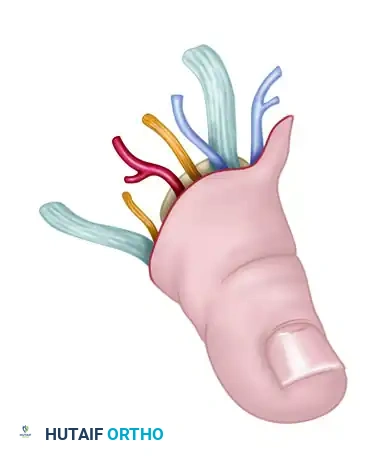
Isolated toe transfer highlighting the delicate neurovascular pedicle required for successful microvascular anastomosis.
Composite toe transfer prepared for thumb reconstruction, demonstrating the inclusion of bone, tendon, and neurovascular structures.
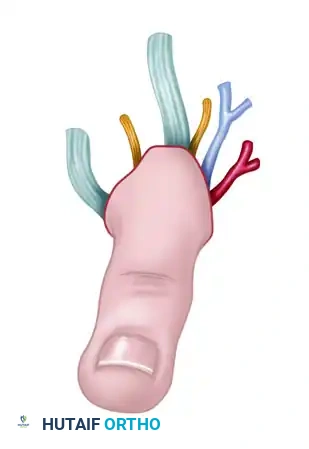
First web space free neurovascular flap, ideal for restoring sensation and soft tissue coverage in the hand.

Detailed view of the first web space flap, highlighting the glabrous skin which provides durable, sensate coverage.
Neurovascular Anatomy of the Foot
A profound understanding of the foot's neurovascular architecture is the cornerstone of successful flap elevation. The anatomy is highly variable, and preoperative mapping is mandatory.
Arterial Supply
Standard anatomical textbooks describe the dorsalis pedis artery (DPA) as the direct continuation of the anterior tibial artery as it passes deep to the inferior extensor retinaculum.
- Course: As the DPA passes anterior to the ankle joint, it lies in a distinct anatomical groove between the tendon of the extensor hallucis longus (EHL) medially and the extensor digitorum longus (EDL) laterally.
- Relations: Single or paired accompanying venae comitantes lie on either side of the artery. The deep peroneal nerve lies immediately lateral to the artery, providing critical innervation to the first web space.
- Branches: Passing over the tarsal bones, the DPA gives off the medial and lateral tarsal arteries. In the region of the bases of the metatarsals, it gives rise to the arcuate artery, which courses laterally. The second, third, and fourth dorsal metatarsal arteries arise from the arcuate artery and descend over the dorsal interosseous muscles.

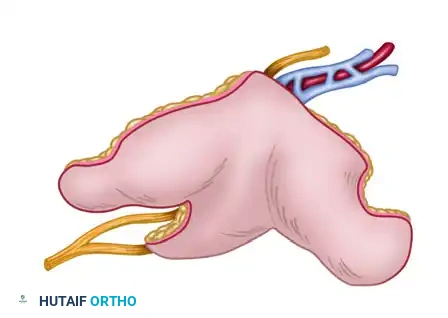
The dorsalis pedis artery and its distal arborization, forming the vascular basis for dorsal foot flaps.
At the proximal first intermetatarsal space, the DPA divides. One branch passes deep to the EHL tendon to supply the medial side of the great toe. The dominant continuation dips plantarward as the deep plantar (communicating) artery. It passes between the two heads of the first dorsal interosseous muscle, communicating with the lateral plantar artery to complete the plantar arterial arch.
The first plantar metatarsal artery is the continuation of the deep plantar artery. It passes distally in the first interosseous space, dividing to supply the adjacent plantar sides of the great and second toes.
Anatomical Variations (The Gilbert Classification)
The vascular anatomy of the first web space is notoriously variable, dictating the feasibility of toe transfers and web space flaps. The position of the First Dorsal Metatarsal Artery (FDMA) relative to the interosseous muscle is critical:
* Type I (Superficial): The FDMA lies superficial to or just within the dorsal fascia of the first dorsal interosseous muscle (78% to 88% of feet). This is the most favorable anatomy for dorsal flap elevation.
* Type II (Intramuscular): The artery courses within the substance of the muscle.
* Type III (Plantar): The artery lies plantar to the first metatarsal (12% to 22% of feet), making dorsal dissection extremely hazardous or impossible.
Clinical Pearl: Always perform preoperative Doppler ultrasonography or MR Angiography. Variations include an FDMA lying entirely plantar, an absent FDMA, or even absent first dorsal and plantar metatarsal arteries. Furthermore, while the normal DPA diameter ranges from 1.8 to 3.0 mm, it may be severely hypoplastic.
Venous Drainage and Innervation
- Venous System: Venous drainage from the dorsum of the toes and foot flows into the dorsal venous arches, which feed the greater (medial) and lesser (lateral) saphenous systems. Additional deep venous drainage occurs through the venae comitantes accompanying the DPA.
- Sensory Innervation: The dorsal surfaces of the foot receive sensory innervation via the superficial peroneal nerve branches. The first web space is uniquely innervated by the terminal sensory branch of the deep peroneal nerve. The plantar surface is supplied by digital branches of the medial plantar nerve. All these nerves can be incorporated to create sensate, innervated free flaps.
THE DORSALIS PEDIS FLAP
The dorsalis pedis flap is a highly versatile fasciocutaneous or osteocutaneous flap. It is particularly useful for coverage problems in the palm, the thumb web space, and the contralateral foot, especially in areas requiring thin, pliable, and protective sensate coverage.
Advantages
- Vascular Pedicle: It possesses a large-caliber arteriovenous pedicle (DPA and saphenous vein).
- Pedicle Length: A remarkably long pedicle can be harvested by dissecting proximally toward the extensor retinaculum.
- Sensory Potential: It can be innervated via the superficial peroneal nerve.
- Physical Characteristics: It is an exceptionally thin, pliable flap, ideal for hand reconstruction where bulky flaps impede function.
- Composite Potential: Vascularized bone (the second metatarsal) or tendon can be included.
- Size: In appropriately selected patients, a large flap (up to 10 × 10 cm) can be obtained.
Disadvantages
- Technical Difficulty: The dissection is tedious and requires meticulous elevation to avoid injuring the paratenon of the extensor tendons.
- Donor Site Morbidity: There is a high risk of delayed healing, painful hypertrophic scarring, and skin graft breakdown over the donor site if the paratenon is violated.
- Size Restrictions: Frequently, the safe harvest size is restricted to 7 × 7 cm or smaller.
- Vascular Dependency: The flap cannot be used if the posterior tibial artery is absent or occluded (as the foot would lose its primary blood supply upon DPA harvest), nor can it be used if the DPA itself is hypoplastic or absent.
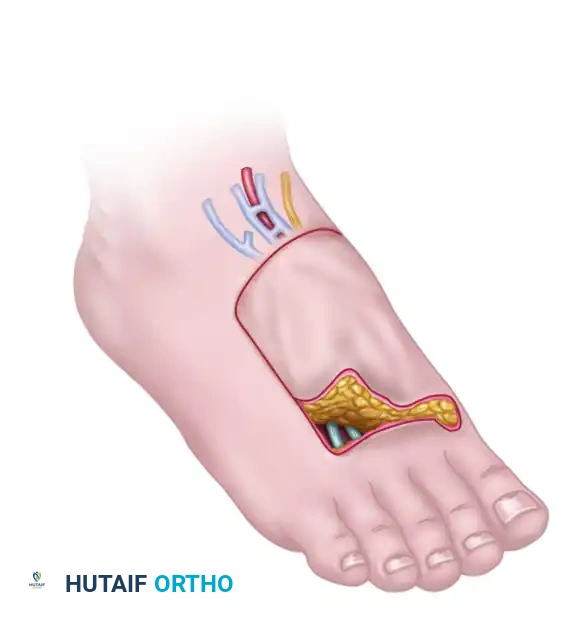
Outline of the dorsalis pedis cutaneous free tissue flap, demonstrating the territory supplied by the dorsalis pedis artery.
🔪 Surgical Technique 63-30: Dorsalis Pedis Flap Elevation
Step 1: Preoperative Marking and Vascular Mapping
* Ensure the patient has a palpable posterior tibial pulse and a normal Allen test of the foot to confirm plantar arch patency.
* With the patient supine, use a handheld Doppler to trace and outline the exact course of the dorsalis pedis artery with a skin-marking pencil.
* Determine the pattern of the superficial dorsal veins by holding the foot in a dependent position or applying a warm compress to allow the veins to engorge. Outline the dominant venous drainage (usually feeding the greater saphenous system) with a skin marker.
* Mark the margins of the flap based on the exact dimensional requirements of the recipient area. Generally, the flap is centered over the DPA, extending from the extensor retinaculum proximally to the web spaces distally.
Step 2: Initial Incision and Venous Dissection
* Exsanguinate the limb by elevation (avoid Esmarch bandages to prevent crushing the microvasculature) and inflate the pneumatic tourniquet.
* Begin the incision at the proximal margin of the flap. Identify the superficial dorsal veins and the superficial peroneal nerve branches. Carefully dissect these structures, maintaining them in continuity with the flap.
* Ligate the distal venous branches, mobilizing the superficial venous system proximally.
Step 3: Arterial Dissection and Flap Elevation
* Incise the lateral and medial borders of the flap.
* CRITICAL STEP: Deepen the incision through the subcutaneous tissue and deep fascia. You must establish a dissection plane strictly superficial to the paratenon of the extensor tendons (EHL and EDL).
* Surgical Pitfall: If the paratenon is stripped from the extensor tendons, the subsequent split-thickness skin graft will fail to take, leaving exposed, desiccated tendons—a catastrophic donor site complication.
* Approach the first intermetatarsal space. Identify the DPA and the deep peroneal nerve.
* Ligate the deep plantar (communicating) artery as it dives between the heads of the first dorsal interosseous muscle, unless a composite toe transfer is being performed.
* Elevate the flap from distal to proximal, meticulously ligating all muscular and tarsal branches.
Step 4: Pedicle Isolation and Harvest
* Trace the DPA and its venae comitantes proximally under the inferior extensor retinaculum. Release the retinaculum if additional pedicle length is required.
* Once the flap is isolated on its neurovascular pedicle, deflate the tourniquet. Observe the flap for robust capillary refill and pulsatile arterial flow. Allow 20 to 30 minutes of perfusion time before pedicle division.
* Ligate and divide the pedicle, and transfer the flap to the recipient site.
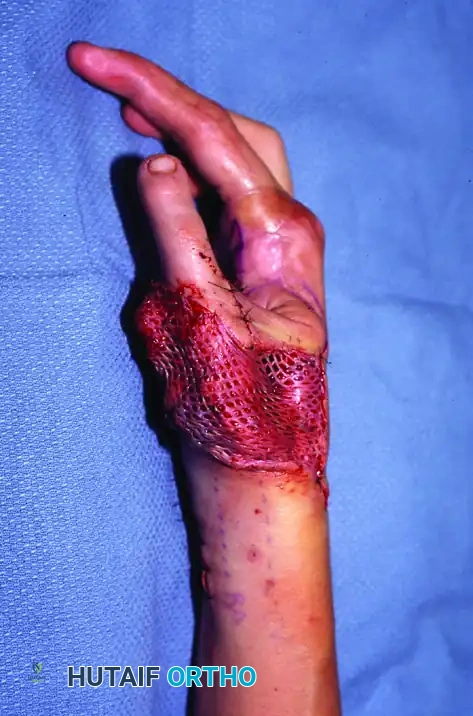
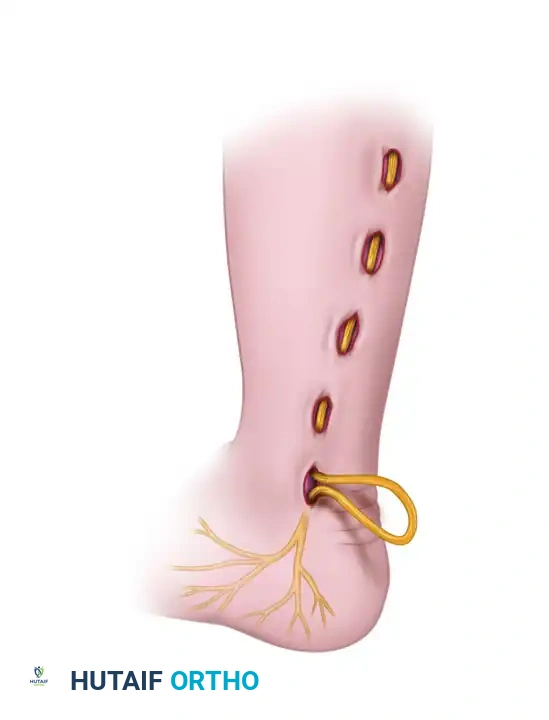
Step 5: Donor Site Closure
* Achieve absolute hemostasis at the donor site.
* Apply a thick, unmeshed split-thickness skin graft (STSG) or a full-thickness skin graft (FTSG) over the preserved paratenon.
* Secure the graft with a compressive bolster dressing or negative pressure wound therapy (NPWT) to prevent hematoma formation and shear forces.
Postoperative Care and Rehabilitation
Postoperative protocols for foot free tissue transfers demand rigorous monitoring.
* Flap Monitoring: The recipient site must be monitored hourly for the first 48 hours using clinical observation (color, capillary refill, temperature) and handheld Doppler or implantable venous Doppler probes.
* Donor Site Management: The foot must be strictly elevated. Weight-bearing is absolutely contraindicated for a minimum of 3 to 4 weeks to ensure complete incorporation of the skin graft over the extensor tendons.
* Mobilization: Once the donor site is fully healed, progressive weight-bearing in a rigid-soled postoperative shoe or controlled ankle motion (CAM) boot is initiated, followed by aggressive physical therapy to restore toe extension and ankle mobility.
You Might Also Like