The Milwaukee Brace: A Comprehensive Orthopedic Guide to Spinal Correction
The Milwaukee Brace, officially known as a Cervico-Thoraco-Lumbo-Sacral Orthosis (CTLSO), represents a foundational chapter in the non-surgical management of spinal deformities, primarily scoliosis. Developed in the 1940s by Dr. Walter Blount and Dr. Albert Schmidt in Milwaukee, Wisconsin, this innovative device revolutionized the approach to treating adolescent idiopathic scoliosis (AIS) and other spinal curvatures. While its use has become less prevalent with the advent of more streamlined designs like the Boston brace, the Milwaukee Brace remains a testament to orthopedic ingenuity, particularly effective for high thoracic or cervicothoracic curves that other braces cannot adequately address.
This exhaustive guide delves into every aspect of the Milwaukee Brace, from its intricate design and biomechanical principles to its clinical applications, fitting protocols, maintenance, and profound impact on patient outcomes. As expert Medical SEO copywriters and orthopedic specialists, we aim to provide an authoritative resource for patients, caregivers, and medical professionals alike.
Deep-Dive into Technical Specifications and Mechanisms
The Milwaukee Brace is a complex, custom-fabricated orthosis designed to apply corrective forces to the spine through a sophisticated three-point pressure system and axial distraction.
Design and Materials
The brace consists of several key components, meticulously crafted to provide targeted correction:
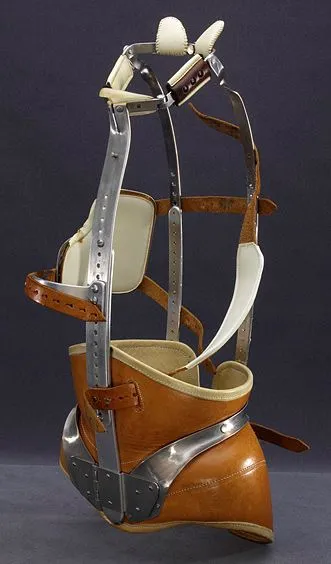
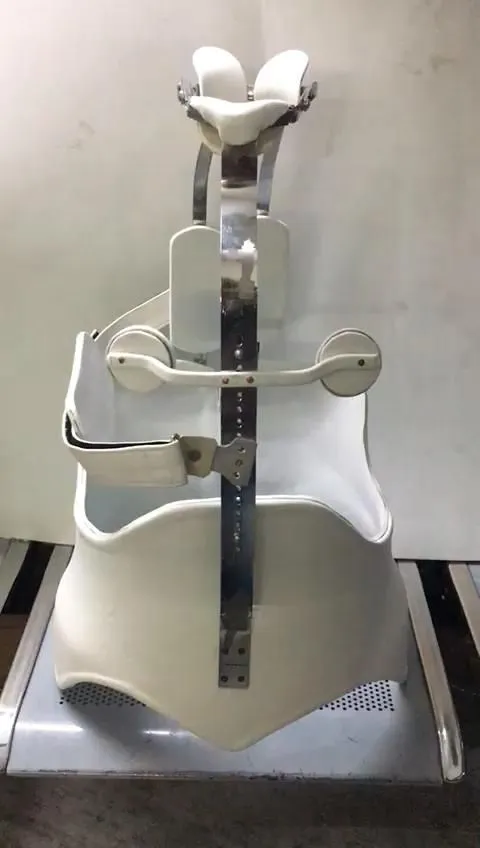
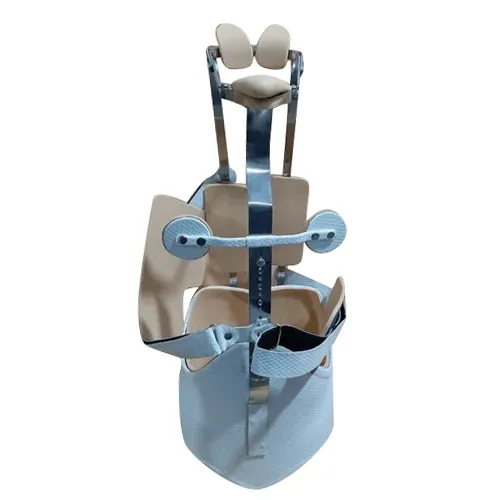
- Pelvic Girdle:
- Design: This is the foundational component, custom-molded to fit snugly around the patient's pelvis, extending from the iliac crests to the sacrum. It provides a stable base from which all other corrective forces originate.
- Materials: Typically fabricated from high-density thermoplastics such as polypropylene or polyethylene, which are rigid, durable, and can be precisely molded.
- Vertical Uprights:
- Design: Three metal uprights (two posterior, one anterior) extend superiorly from the pelvic girdle. These rods provide structural integrity and facilitate axial distraction.
- Materials: Lightweight yet strong aluminum or steel alloy, often coated for durability and patient comfort.
- Neck Ring:
- Design: A metal ring positioned around the patient's neck, supported by the uprights. It features strategically placed pads for the chin (throat mold) and occiput (back of the head).
- Materials: Similar to the uprights, typically aluminum or steel alloy, with padded interfaces.
- Correction Pads:
- Design: These are the primary corrective elements, strategically positioned to apply pressure at the apex of the spinal curve. Common pads include:
- Thoracic Pad: Placed on the convex side of a thoracic curve, typically over the ribs.
- Lumbar Pad: Placed on the convex side of a lumbar curve, often over the paraspinal muscles.
- Throat Mold/Chin Pad: Applies counter-pressure to the chin.
- Occipital Pads: Apply counter-pressure to the back of the head.
- Materials: Made from a combination of rigid plastic shells and soft, comfortable foam or synthetic linings to distribute pressure and prevent skin irritation.
- Design: These are the primary corrective elements, strategically positioned to apply pressure at the apex of the spinal curve. Common pads include:
- Straps and Buckles:
- Design: Adjustable straps and buckles are integrated throughout the brace to secure it firmly and allow for precise adjustments of the corrective pads and overall fit.
- Materials: Durable nylon or synthetic webbing with robust plastic or metal buckles.
- Lining Materials:
- Design: Inner surfaces of the pelvic girdle, neck ring, and pads are lined with soft, breathable, and hypoallergenic materials.
- Materials: Open-cell foam, synthetic fabrics, or medical-grade leather to enhance comfort and prevent skin breakdown.
Biomechanics: How the Milwaukee Brace Works
The effectiveness of the Milwaukee Brace lies in its sophisticated biomechanical principles:
- Three-Point Pressure System: This is the cornerstone of its corrective action. For any given curve, the brace applies a primary corrective force at the apex of the curve, flanked by two counter-pressure points above and below the curve.
- Example: For a right thoracic scoliosis, the thoracic pad pushes on the right side of the rib cage (primary force), while the pelvic girdle and the neck ring/chin pad provide counter-pressure, effectively "squeezing" the spine into a straighter alignment.
- Axial Distraction: The vertical uprights and neck ring provide continuous upward traction, gently elongating the spine. This distraction helps to decompress vertebral bodies and can encourage a more upright posture, reducing the compressive forces that contribute to curve progression.
- De-rotation: While primarily designed for coronal plane correction, the strategic placement and contouring of the corrective pads can also apply rotational forces, addressing the rotational component inherent in scoliotic curves.
- Growth Guidance: For skeletally immature patients, the brace aims to guide the growth of the spine in a more symmetrical and straight direction, capitalizing on the remaining growth potential.
- Muscle Memory and Active Correction: The brace encourages the patient's own musculature to actively participate in maintaining the corrected posture, fostering a degree of muscle memory and strengthening over time.
Extensive Clinical Indications and Usage
The Milwaukee Brace is prescribed for specific spinal conditions and patient profiles, guided by orthopedic assessment.
Primary Clinical Indications
- Adolescent Idiopathic Scoliosis (AIS): This is the most common indication. The brace is typically used for progressive curves with a Cobb angle between 25 and 45 degrees in skeletally immature patients (Risser sign 0-2). Its ability to control high thoracic and cervicothoracic curves makes it particularly valuable when other, lower-profile braces (like the Boston brace) are insufficient.
- Juvenile Idiopathic Scoliosis: Similar to AIS, for younger patients with progressive curves.
- Congenital Scoliosis: In select cases, especially for curves that are not amenable to early surgical intervention, the Milwaukee brace can be used to manage progression.
- Neuromuscular Scoliosis: Less common, but can be used as a supportive measure in some neuromuscular conditions where spinal stability is compromised, though often less effective due to muscle weakness.
- Scheuermann's Kyphosis: While primarily known for scoliosis, modified Milwaukee braces can be effective in treating severe Scheuermann's kyphosis (excessive thoracic kyphosis) by applying corrective extension forces.
- Post-Surgical Stabilization: Rarely used in modern practice, but historically could provide external support after certain spinal fusion procedures.
Patient Selection Criteria
Successful bracing relies heavily on careful patient selection and commitment:
- Skeletal Immaturity: The patient must have significant remaining growth potential, indicated by a low Risser sign (0-2) or open growth plates on X-rays.
- Curve Progression: Evidence of curve progression (an increase of 5 degrees or more over 6 months) is a key indicator.
- Curve Magnitude: Generally, curves between 25-45 degrees are considered suitable for bracing. Curves below 25 degrees are often observed, and those above 45-50 degrees typically warrant surgical consideration.
- Patient Compliance: This is paramount. The patient and their family must be fully committed to the rigorous wearing schedule and follow-up appointments.
- Psychological Readiness: The patient must be emotionally prepared to wear a brace for an extended period, understanding the impact on body image and daily activities.
Fitting and Usage Instructions
The process of fitting and using a Milwaukee Brace is a collaborative effort between the orthopedic surgeon, orthotist, and patient.
1. Initial Fitting by an Orthotist
- Custom Measurement and Casting: The orthotist takes precise measurements and often a plaster mold of the patient's torso to create a custom-fitted pelvic girdle.
- Fabrication and Assembly: The brace components are fabricated and assembled based on the patient's specific spinal curve and body dimensions.
- First Fitting Session: The patient tries on the brace. The orthotist ensures the pelvic girdle fits snugly, uprights are correctly aligned, and corrective pads are positioned precisely at the apex of the curve. Adjustments are made to ensure optimal pressure distribution and comfort.
2. Wearing Schedule
- Duration: The typical wearing schedule for maximal effectiveness is 18-23 hours per day. This allows for removal during hygiene, specific exercises, and limited social activities.
- Gradual Acclimatization: Patients usually begin with a gradual increase in wearing time over several days to weeks to allow the body to adjust.
- Consistency is Key: Adherence to the prescribed wearing schedule is the most critical factor in treatment success.
3. Adjustments and Follow-ups
- Regular Appointments: Patients require regular follow-up appointments with both their orthopedic surgeon and orthotist (typically every 3-6 months).
- Brace Adjustments: As the child grows and the spine changes, the orthotist will adjust the height of the uprights, reposition or modify the corrective pads, and tighten or loosen straps to maintain optimal fit and corrective forces.
- X-ray Monitoring: Periodic X-rays are taken to monitor curve progression and assess the effectiveness of the brace.
4. Donning and Doffing
- Donning:
- Ensure skin is clean, dry, and free of lotions or powders.
- Step into the pelvic girdle, ensuring it is properly seated around the hips.
- Fasten the straps of the pelvic girdle, tightening them securely but comfortably.
- Position the neck ring, ensuring the chin and occiput pads are correctly aligned.
- Adjust corrective pads and all straps to the prescribed tension.
- Doffing:
- Loosen all straps.
- Carefully remove the neck ring.
- Step out of the pelvic girdle.
5. Activity and Exercise
- Encouraged Activity: Patients are generally encouraged to remain active and participate in most sports.
- Modifications: Some high-impact or contact sports may require temporary brace removal or modifications. Specific exercises and stretches prescribed by a physical therapist can help maintain spinal flexibility and muscle strength.
6. Weaning Protocol
- Skeletal Maturity: Once the patient reaches skeletal maturity (Risser sign 4-5) and the curve has stabilized for a period, the brace wearing time is gradually reduced.
- Gradual Reduction: Weaning typically involves reducing wearing hours over several months, ensuring the spine remains stable without the brace.
Maintenance and Hygiene Protocols
Proper maintenance and hygiene are crucial for patient comfort, skin health, and the longevity of the brace.
Daily Care
- Skin Inspection and Care:
- Inspect skin under the brace daily for any redness, irritation, blisters, or pressure sores. Pay close attention to bony prominences and areas under pads.
- Wash the skin under the brace daily with mild soap and water. Rinse thoroughly and dry completely before re-donning the brace.
- Avoid applying lotions, creams, or powders under the brace, as these can trap moisture and increase friction, leading to skin irritation.
- Brace Cleaning:
- Wipe the inside surfaces of the pelvic girdle, neck ring, and pads with a damp cloth and mild soap (e.g., dish soap).
- Rinse with a clean, damp cloth to remove soap residue.
- Dry the brace thoroughly, preferably by air-drying, before putting it back on. Ensure no moisture remains trapped.
Weekly/Periodic Care
- Strap and Buckle Inspection: Check all straps and buckles for signs of wear, fraying, or damage. Ensure they function correctly.
- Pad Inspection: Examine corrective pads for signs of excessive wear, compression, or damage. Worn-out pads can lose their effectiveness and cause discomfort.
- Metal Component Check: Inspect metal uprights and the neck ring for any signs of bending, cracking, or corrosion.
- Deep Cleaning: Occasionally, a more thorough cleaning of the entire brace may be necessary, following the daily cleaning steps but with more attention to crevices and hard-to-reach areas.
Important Considerations
- No "Sterilization": The brace is not a sterile medical device in the surgical sense. The focus is on cleanliness and hygiene to prevent skin infections and maintain comfort.
- Avoid Harsh Chemicals: Do not use harsh detergents, abrasive cleaners, or solvents, as these can damage the brace materials.
- Heat Exposure: Avoid exposing the brace to extreme heat (e.g., direct sunlight, hot car interiors), as this can warp thermoplastic components.
- Orthotist Consultation: Any concerns about brace damage, fit issues, or persistent skin problems should be immediately reported to the orthotist or orthopedic surgeon.
Biomechanics and Patient Outcome Improvements
The ultimate goal of Milwaukee Brace treatment is to achieve positive patient outcomes, primarily by halting curve progression and preventing the need for surgical intervention.
Patient Outcome Improvements
- Halting Curve Progression: The primary and most significant outcome is the prevention of further increase in the Cobb angle. Studies consistently show that compliant brace wear significantly reduces the rate of curve progression compared to observation alone.
- Avoidance of Surgery: For a substantial percentage of patients with AIS, successful bracing can effectively prevent the need for spinal fusion surgery, which carries its own risks and recovery challenges.
- Curve Correction: While primarily designed to prevent progression, some initial curve correction can be observed, particularly in flexible curves and younger patients. The brace acts as a constant reminder and guide for the spine.
- Improved Posture: By encouraging a straighter spinal alignment, the brace can lead to noticeable improvements in overall posture, even after bracing is discontinued.
- Reduced Pain: Although not its primary objective, by stabilizing the spine and improving alignment, the brace can sometimes alleviate associated back pain or discomfort.
- Psychological Empowerment: Actively participating in their treatment plan can empower adolescents, fostering a sense of control and responsibility over their health.
- Quality of Life: By preventing severe scoliosis, the brace contributes to a better long-term quality of life, reducing potential respiratory issues, cosmetic concerns, and functional limitations associated with advanced spinal deformities.
Success Rates
The success rate of Milwaukee Brace treatment (defined as preventing curve progression to a surgical threshold) is highly dependent on patient compliance. Studies often report success rates ranging from 60% to 80% for highly compliant patients, particularly for curves within the optimal range of 25-45 degrees. Non-compliance is the leading cause of treatment failure.
Risks, Side Effects, or Contraindications
While effective, the Milwaukee Brace is not without its potential drawbacks and specific situations where its use is not recommended.
Risks and Side Effects
- Skin Irritation and Breakdown: This is the most common side effect. Pressure from pads, moisture, and friction can lead to redness, rashes, blisters, and even pressure sores. Proper skin care and brace hygiene are essential for prevention.
- Psychological and Social Impact: Adolescents, in particular, may experience significant psychological distress, body image issues, reduced self-esteem, and social isolation due to the brace's visible nature and bulkiness.
- Muscle Atrophy and Weakness: Prolonged external support can sometimes lead to disuse atrophy of the trunk muscles, requiring specific exercises to maintain strength.
- Breathing Difficulties: If the brace is fitted too tightly or improperly, it can restrict chest expansion, leading to minor breathing difficulties, especially during exertion.
- Jaw Problems/TMJ Issues: The chin pad, a distinctive feature of the Milwaukee Brace, can exert pressure on the temporomandibular joint (TMJ), potentially leading to discomfort, jaw pain, or even TMJ dysfunction in some individuals. This has been a significant factor in the decline of its use in favor of TLSO braces.
- Neck Stiffness and Pain: The neck ring and occipital pads can cause neck stiffness, muscle tension, or discomfort, especially during the initial adjustment period.
- Non-Compliance: Failure to adhere to the prescribed wearing schedule is a major risk, directly leading to treatment failure and curve progression.
- Inadequate Correction/Progression: Despite optimal compliance, some curves may continue to progress, necessitating surgical intervention. The brace does not guarantee complete correction but aims to halt progression.
- Cosmetic Concerns: The high profile and visibility of the Milwaukee Brace, extending to the chin and occiput, can be a significant cosmetic concern for many patients, contributing to psychological distress.
Contraindications
- Skeletally Mature Patients: For individuals who have completed spinal growth (Risser sign 4-5), the brace offers minimal to no benefit in preventing progression.
- Very Large Curves: Curves exceeding 45-50 degrees are generally beyond the effective corrective range of a brace and are typically indications for surgical management.
- Severe Respiratory Compromise: Patients with pre-existing severe respiratory issues may not tolerate the brace's potential restriction on chest expansion.
- Poor Patient Compliance or Psychological Intolerance: If a patient is unwilling or unable to wear the brace for the prescribed duration, or if the psychological burden is too great, alternative treatments or non-bracing strategies should be considered.
- Certain Neurological Conditions: In cases where sensory feedback is impaired, or skin integrity is highly compromised, the risk of unnoticed skin breakdown may contraindicate brace use.
Massive FAQ Section: Your Questions About the Milwaukee Brace Answered
Q1: What is the Milwaukee Brace primarily used for?
The Milwaukee Brace is primarily used for the non-surgical management of progressive spinal curvatures, most commonly Adolescent Idiopathic Scoliosis (AIS) and Scheuermann's Kyphosis, especially for high thoracic or cervicothoracic curves.
Q2: How does the Milwaukee Brace work to correct scoliosis?
It works through a three-point pressure system, applying corrective forces at the apex of the curve and counter-pressures above and below. It also provides axial distraction (spinal elongation) and can contribute to de-rotation, guiding spinal growth.
Q3: How many hours a day do I need to wear the Milwaukee Brace?
For maximal effectiveness, the Milwaukee Brace is typically worn for 18-23 hours per day. It is usually removed only for hygiene, specific exercises, and limited social activities.
Q4: Can I play sports or exercise while wearing the Milwaukee Brace?
Yes, most patients are encouraged to remain active. Low-impact activities are often possible with the brace on. For high-impact or contact sports, the brace may need to be temporarily removed, or specific modifications might be required. Always consult your orthopedic surgeon or orthotist.
Q5: What are the main disadvantages or challenges associated with the Milwaukee Brace?
The main disadvantages include its relatively bulky and visible design, potential for skin irritation, psychological impact on body image, and the discomfort or potential TMJ issues caused by the chin pad. Compliance with the wearing schedule is also a significant challenge.
Q6: Is the Milwaukee Brace still used in modern orthopedic practice?
While less commonly used than in the past, particularly compared to lower-profile Thoraco-Lumbo-Sacral Orthoses (TLSOs) like the Boston Brace, the Milwaukee Brace still has a role. It remains effective for high thoracic or cervicothoracic curves that cannot be adequately addressed by TLSO braces.
Q7: How do I clean and maintain my Milwaukee Brace?
Daily, wipe the inside surfaces with a damp cloth and mild soap, rinse, and dry thoroughly. Inspect your skin daily for irritation. Avoid lotions or powders under the brace. Regularly check straps, pads, and metal components for wear or damage.
Q8: What should I do if my skin becomes red or irritated under the brace?
If you notice persistent redness, irritation, or blistering, first ensure your skin and brace are clean and dry. Check if the brace feels too tight. If the irritation persists or worsens, contact your orthotist or orthopedic surgeon immediately, as the brace may need adjustment.
Q9: What is the typical success rate of Milwaukee Brace treatment?
The success rate, defined as preventing curve progression to a surgical threshold, is high for compliant patients, often ranging from 60% to 80%. Patient adherence to the wearing schedule is the most critical factor influencing success.
Q10: When can I stop wearing the Milwaukee Brace?
You can typically stop wearing the brace once you have reached skeletal maturity (indicated by a Risser sign of 4-5) and your spinal curve has shown stability for a sustained period. The process usually involves a gradual weaning period under the guidance of your orthopedic surgeon.
Q11: How often will my Milwaukee Brace need adjustments?
Due to growth and changes in your spinal curve, the brace typically requires adjustments every 3-6 months. These adjustments are performed by your orthotist to ensure optimal fit and continued corrective forces.
Q12: Is wearing the Milwaukee Brace painful?
While there may be initial discomfort and a period of adjustment, the brace should not cause significant or constant pain. If you experience persistent pain, it's crucial to contact your orthotist or doctor, as it may indicate a fitting issue or pressure point.
Q13: Can the Milwaukee Brace completely straighten my spine?
The primary goal of the Milwaukee Brace is to halt the progression of the spinal curve and prevent the need for surgery. While some initial correction can be achieved, particularly in flexible curves, complete straightening is not the typical outcome.
Q14: Will wearing the Milwaukee Brace affect my growth?
No, the Milwaukee Brace is designed to guide spinal growth in a straighter direction and does not inhibit overall growth or height development.
Q15: What is the difference between a Milwaukee Brace and a Boston Brace?
The key difference lies in their design and coverage. The Milwaukee Brace is a CTLSO, extending from the pelvis to the neck (including a chin and occiput support). The Boston Brace is a TLSO, a low-profile brace that extends from the pelvis to just below the armpits, making it less visible and generally more comfortable for lower thoracic and lumbar curves. The Milwaukee Brace is typically reserved for higher curves.