The Definitive Guide to Axillary (Underarm) Crutches: Support, Recovery, and Mobility
1. Comprehensive Introduction & Overview
Axillary, or underarm, crutches are ubiquitous in orthopedic rehabilitation, serving as a critical assistive device for individuals requiring temporary or permanent support during ambulation. Designed to offload weight from an injured or weakened lower extremity, these crutches facilitate mobility, enhance balance, and promote healing by adhering to prescribed weight-bearing restrictions. From acute injuries like sprains and fractures to post-surgical recovery following complex orthopedic procedures, axillary crutches play an indispensable role in allowing patients to regain independence and navigate their daily lives safely.
This exhaustive guide, crafted by an expert Medical SEO Copywriter and Orthopedic Specialist, delves deep into every facet of axillary crutches. We will explore their intricate design, the materials that define their functionality, their precise clinical applications, the biomechanics underpinning their efficacy, crucial fitting and usage instructions, and essential maintenance protocols. Our aim is to provide an authoritative resource for patients, caregivers, and healthcare professionals alike, ensuring optimal utilization and superior patient outcomes.
2. Deep-Dive into Technical Specifications & Mechanisms
Understanding the technical specifications and underlying mechanisms of axillary crutches is paramount for their safe and effective use.
Design & Components
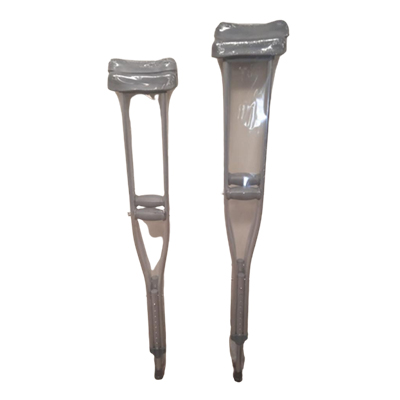
Axillary crutches are typically constructed as a pair, each comprising several key components that work in concert to provide support.
- Axillary Pad (Underarm Rest): Positioned at the top, this padded component rests beneath the armpit. Crucially, it is not intended for primary weight-bearing but rather for lateral stability and occasional balance checks.
- Hand Grip: Located below the axillary pad, the hand grip is the primary weight-bearing component. Proper hand grip placement ensures optimal biomechanics and prevents undue pressure on the axilla.
- Uprights: These are the main shafts connecting the axillary pad, hand grip, and crutch tip. Most modern crutches feature double uprights for enhanced stability.
- Adjustment Mechanisms:
- Height Adjustment: Allows for overall crutch length modification, typically via push-pin mechanisms at the bottom of the uprights.
- Hand Grip Adjustment: Enables precise positioning of the hand grip, often via a series of holes and a spring-loaded pin or screw-collar system.
- Crutch Tip (Ferrule): A non-slip rubber cap at the bottom of the upright, designed to provide traction and stability on various surfaces. These are consumable parts and require regular inspection and replacement.
Materials
The choice of material significantly impacts the crutch's weight, durability, and cost.
| Material Type | Characteristics | Pros | Cons |
|---|---|---|---|
| Aluminum | Most common; lightweight metal alloy | Lightweight, durable, rust-resistant, affordable, widely available | Can dent, may feel less sturdy than wood for heavier individuals |
| Wood | Traditional material; solid hardwood | Very sturdy, durable, classic aesthetic, often preferred for long-term | Heavier, less adjustable, can splinter, less common in modern clinics |
| Carbon Fiber | Advanced composite material; high strength-to-weight | Extremely lightweight, very strong, corrosion-resistant, high-tech look | Expensive, less common, may not be covered by insurance |
Biomechanics of Support
The biomechanics of axillary crutch use revolve around transferring the patient's body weight from the lower extremities to the upper extremities and trunk, while maintaining balance.
- Weight Distribution: The majority of the patient's weight should be borne through the hand grips, engaging the triceps, shoulders (deltoids, rotator cuff), and core muscles. The axillary pads provide secondary support for balance and stability, with minimal weight-bearing to prevent nerve compression.
- Center of Gravity: Crutches effectively widen the patient's base of support, lowering their center of gravity and increasing stability, particularly when navigating uneven surfaces or initiating movement.
- Muscle Engagement:
- Upper Extremities: Triceps brachii (extension), deltoids (shoulder abduction), pectoralis major (adduction/flexion), latissimus dorsi (extension/adduction).
- Core: Abdominal and back muscles are crucial for maintaining trunk stability and balance during gait.
- Lower Extremities (Uninjured Leg): Gluteals and quadriceps for weight acceptance and propulsion.
3. Extensive Clinical Indications & Usage
Axillary crutches are prescribed across a broad spectrum of orthopedic conditions, both surgical and non-surgical, to facilitate safe ambulation and promote healing.
Clinical Indications
- Post-Operative Lower Extremity Surgeries:
- ACL Reconstruction: Often requires non-weight bearing (NWB) or touch-down weight bearing (TDWB) initially.
- Total Hip Arthroplasty (THA) / Total Knee Arthroplasty (TKA): Weight-bearing as tolerated (WBAT) or partial weight bearing (PWB) in early stages.
- Ankle Fusion / Fracture Fixation: Strict NWB for several weeks to months.
- Tendon Repairs (e.g., Achilles Tendon): NWB to protect healing tissue.
- Osteotomies: Controlled weight bearing to allow bone healing.
- Acute Non-Surgical Injuries:
- Fractures (non-displaced): Metatarsal, tibia, fibula, ankle fractures requiring immobilization and NWB/PWB.
- Severe Sprains/Strains: Ankle sprains, knee sprains (MCL/LCL) where pain or instability dictates reduced weight bearing.
- Contusions: Severe muscle contusions causing significant pain with weight bearing.
- Chronic Conditions:
- Arthritis Flare-ups: Temporary support to reduce pain and inflammation during ambulation.
- Diabetic Foot Ulcers: Offloading pressure to promote wound healing.
- Certain Neurological Conditions: When temporary support for balance and gait initiation is needed, provided upper body strength is adequate.
Fitting & Usage Instructions: The Key to Success
Proper fitting and correct usage are paramount to prevent complications and maximize the therapeutic benefits of axillary crutches.
A. Proper Fitting Guidelines
- Axillary Pad Height: With the patient standing upright, shoes on, and crutches placed about 6 inches (15 cm) in front and slightly to the side of the feet, the top of the axillary pad should be 2-3 finger widths (approximately 1.5-2 inches or 4-5 cm) below the armpit. This ensures that weight is not borne directly on the axilla, preventing nerve damage.
- Hand Grip Height: With the axillary pad correctly positioned, the hand grip should be adjusted so that the patient's elbow is flexed at approximately 20-30 degrees when grasping the grip. This angle allows for optimal leverage and weight transfer through the hands and arms.
- Overall Crutch Length: The total length of the crutch should be such that when standing, the axillary pad and hand grip are at their correct respective heights.
B. Usage Instructions & Gait Training
- Standing Up:
- Scoot to the edge of the chair.
- Place both crutches on the injured side, holding the hand grips with the hand on the injured side.
- Push up from the chair with the uninjured hand and the crutches, using the uninjured leg for support.
- Once standing, transfer one crutch to the uninjured side.
- Walking (Gait Patterns):
- Non-Weight Bearing (NWB): Both crutches move forward, then the uninjured leg swings through, keeping the injured foot off the ground.
- Partial Weight Bearing (PWB) / Touch-Down Weight Bearing (TDWB):
- Three-Point Gait: Both crutches and the injured leg move forward simultaneously, then the uninjured leg steps through. The injured leg may bear minimal weight (TDWB) or a prescribed percentage (PWB).
- Four-Point Gait (for stability, not NWB): Right crutch, left foot, left crutch, right foot. Slower but very stable.
- Weight Bearing As Tolerated (WBAT): Progress gradually from PWB, using crutches for balance and support as needed.
- Stairs:
- Going Up: "Up with the good, down with the bad." Lead with the uninjured leg, then bring the crutches and injured leg up to the same step.
- Going Down: Lead with the crutches and injured leg, then bring the uninjured leg down to the same step.
- Sitting Down:
- Back up to the chair until you feel it behind your uninjured leg.
- Place both crutches on the injured side, holding the hand grips with one hand.
- Reach back for the chair with the uninjured hand.
- Slowly lower yourself onto the chair, using the uninjured leg and hands for support.
Maintenance & Sterilization Protocols
Regular maintenance is crucial for the safety and longevity of axillary crutches.
- Daily Inspection:
- Crutch Tips: Check for wear, cracks, or flatness. Worn tips significantly increase fall risk. Replace immediately if compromised.
- Hand Grips & Axillary Pads: Ensure they are securely attached and free from tears, excessive wear, or slippage.
- Adjustment Mechanisms: Verify that adjustment pins are fully engaged and secure, and screws are tightened.
- Uprights: Inspect for bends, cracks, or structural damage.
- Cleaning:
- For personal use, wipe down hand grips and axillary pads with a damp cloth and mild soap regularly.
- For multi-patient use in clinical settings, follow strict disinfection protocols using medical-grade disinfectants to prevent cross-contamination.
- Storage: Store crutches upright in a dry place to prevent damage and maintain their integrity. Avoid leaning them against walls where they can easily fall and become a tripping hazard.
4. Risks, Side Effects, or Contraindications
While highly beneficial, axillary crutches are not without potential risks or contraindications. Awareness of these is vital for patient safety and optimal outcomes.
Common Risks & Side Effects
- Crutch Palsy (Radial Nerve Compression): The most serious risk, caused by prolonged or excessive pressure from the axillary pad directly on the radial nerve in the armpit. Symptoms include numbness, tingling, weakness, or paralysis in the forearm, hand, and fingers. This emphasizes the importance of weight-bearing through the hands, not the armpits.
- Wrist & Hand Pain: Carpal tunnel syndrome, tendonitis, or general discomfort can arise from continuous weight-bearing and repetitive gripping.
- Shoulder Pain: Rotator cuff strain, impingement, or tendinitis can occur due to the increased load and repetitive movements of the shoulders.
- Skin Irritation/Breakdown: Chafing, blistering, or skin breakdown in the axilla or hands if pads/grips are worn or improperly positioned.
- Falls: The most common complication, especially on uneven surfaces, wet floors, or when transitioning. Proper gait training and environmental awareness are critical.
- Fatigue: Using crutches requires significant upper body strength and energy expenditure, leading to general fatigue.
- Muscle Strain: Strains in the back, neck, or uninjured leg from compensating or improper posture.
Contraindications
Axillary crutches may not be suitable for all individuals. Contraindications include:
- Upper Extremity Weakness/Injury: Patients with insufficient upper body strength, unhealed fractures, or severe arthritis in the shoulders, elbows, or wrists may be unable to safely bear weight through their arms.
- Severe Balance Impairment: Individuals with significant vestibular dysfunction or neurological conditions severely affecting balance may be at high risk of falls.
- Cognitive Impairment: Patients unable to understand or follow instructions for safe crutch use.
- Severe Cardiovascular or Pulmonary Conditions: The increased energy expenditure required for crutch ambulation may exacerbate existing conditions.
- Visual Impairment: Significant visual deficits can impede safe navigation with crutches.
In such cases, alternative assistive devices like walkers, wheelchairs, or forearm crutches may be more appropriate and safer.
5. Frequently Asked Questions (FAQ)
Q1: How long will I need to use axillary crutches?
A1: The duration of crutch use varies widely depending on the injury or surgery, your prescribed weight-bearing status, and individual healing progress. Your doctor or physical therapist will provide a specific timeline, which could range from a few days to several months.
Q2: Can I put any weight on my injured leg while using crutches?
A2: This depends entirely on your doctor's instructions. You may be prescribed Non-Weight Bearing (NWB), Touch-Down Weight Bearing (TDWB), Partial Weight Bearing (PWB), or Weight Bearing As Tolerated (WBAT). Always adhere strictly to your specific weight-bearing orders to ensure proper healing.
Q3: My armpits hurt from the crutches. What should I do?
A3: Armpit pain often indicates improper fitting or usage. Your weight should primarily be supported by your hands, not your armpits. Ensure there are 2-3 finger widths between the axillary pad and your armpit. If pain persists, consult your physical therapist for fitting adjustments.
Q4: How do I go up and down stairs safely with crutches?
A4: Remember the rule: "Up with the good, down with the bad." When going up, lead with your uninjured leg, then bring the crutches and injured leg to the same step. When going down, place the crutches and injured leg on the lower step first, then bring your uninjured leg down. Always use a handrail if available.
Q5: How can I prevent falls while using crutches?
A5: Prevent falls by keeping your walking path clear, avoiding rugs and clutter, wearing supportive shoes, ensuring crutch tips are not worn, and taking slow, deliberate steps. Practice with a physical therapist, especially on uneven surfaces.
Q6: Can I drive a car while using crutches?
A6: Generally, it is not recommended to drive while using crutches, especially if your right leg is injured or if your ability to react quickly is impaired. Consult your doctor or physical therapist for specific recommendations, as driving restrictions vary.
Q7: How do I carry things while using crutches?
A7: Carrying items can be challenging as both hands are occupied. Use a backpack, fanny pack, or a bag that can be worn over the shoulder to keep your hands free. Avoid carrying items in your hands or under your armpits, as this compromises stability.
Q8: When should I switch from crutches to a cane, or stop using assistive devices altogether?
A8: Your doctor or physical therapist will guide you through this transition. You'll typically progress from crutches to a cane when you can bear more weight comfortably, have improved balance, and require less support. The goal is to gradually reduce reliance on assistive devices as your strength and stability return.
Q9: Are there alternatives to axillary crutches?
A9: Yes, alternatives include forearm (Lofstrand) crutches, walkers (standard, rolling), knee scooters, and wheelchairs. The best alternative depends on the nature of your injury, weight-bearing status, upper body strength, and overall mobility needs.
Q10: How do I maintain and clean my crutches?
A10: Regularly inspect crutch tips for wear and replace them if needed. Check hand grips and axillary pads for damage. Wipe down the crutches with a damp cloth and mild soap periodically. For clinical use, follow specific disinfection protocols.
Q11: What if my crutch tips become worn out or damaged?
A11: Worn-out crutch tips are a significant safety hazard. They should be replaced immediately. Most medical supply stores or pharmacies carry replacement tips. Ensure they are the correct size for your crutches.
Q12: Can using crutches cause permanent nerve damage?
A12: If used improperly, particularly by bearing excessive weight through the armpits, crutches can cause temporary or, in rare severe cases, permanent damage to the radial nerve (crutch palsy). Proper fitting and technique, emphasizing weight-bearing through the hands, are crucial to prevent this.