Advanced Deformity Correction: Paley Principles for Hardware & Osteotomy Mastery
Key Takeaway
Orthopedic deformity correction involves surgically altering the mechanical axis of a limb to restore native joint kinematics and optimize load bearing. Key principles include mastering mechanical axis deviation (MAD), joint orientation angles, and the Center of Rotation of Angulation (CORA) to precisely plan osteotomies and hardware placement.
Introduction to Deformity Correction Biomechanics
The marriage of hardware and osteotomy is the absolute cornerstone of modern orthopedic deformity correction. For orthopedic surgeons in training, transitioning from basic diaphyseal fracture care to complex, multi planar deformity correction requires a profound paradigm shift. In trauma, the primary goal is often achieving union of disrupted bone ends. In deformity correction, however, you are fundamentally altering the mechanical axis of the lower extremity to restore native joint kinematics, optimize load bearing, and prevent premature osteoarthritis.
This comprehensive guide dives deep into the hardware and osteotomy considerations pioneered by Dr Dror Paley. We will explore the critical nuances of intramedullary nailing, the biological management of osteotomies, the execution of the focal dome osteotomy, and the highly advanced technique of Fixator Assisted Nailing FAN. By mastering these principles, you will transition from merely fixing bones to engineering biomechanically sound lower extremities capable of lifelong function.
Core Paley Principles of Deformity Correction
To execute any lower extremity realignment, the surgeon must first master the universal language of deformity correction established by Dr Dror Paley. This geometric and biomechanical framework allows surgeons to quantify deformities, pinpoint their exact location, and plan corrections with mathematical precision.
Mechanical Axis Deviation and Joint Orientation Angles
The mechanical axis of the lower extremity is defined by a line drawn from the center of the femoral head to the center of the ankle joint. In a normal, well aligned limb, this mechanical axis line should pass slightly medial to the center of the knee joint.
Mechanical Axis Deviation MAD is the quantifiable distance between this mechanical axis line and the actual center of the knee joint. A medial shift of the mechanical axis indicates a varus deformity, while a lateral shift indicates a valgus deformity. Correcting the MAD is the primary macroscopic goal of lower limb realignment.
To achieve a normal MAD, the individual joint orientation angles of the femur and tibia must be restored. These angles define the relationship between the mechanical or anatomic axes of the bones and their respective joint lines.
| Joint Orientation Angle | Abbreviation | Normal Range | Average Value |
|---|---|---|---|
| Mechanical Lateral Distal Femoral Angle | mLDFA | 85 to 90 degrees | 88 degrees |
| Medial Proximal Tibial Angle | MPTA | 85 to 90 degrees | 87 degrees |
| Mechanical Lateral Proximal Femoral Angle | mLPFA | 85 to 95 degrees | 90 degrees |
| Lateral Distal Tibial Angle | LDTA | 86 to 92 degrees | 89 degrees |
| Joint Line Convergence Angle | JLCA | 0 to 2 degrees | 1 degree |
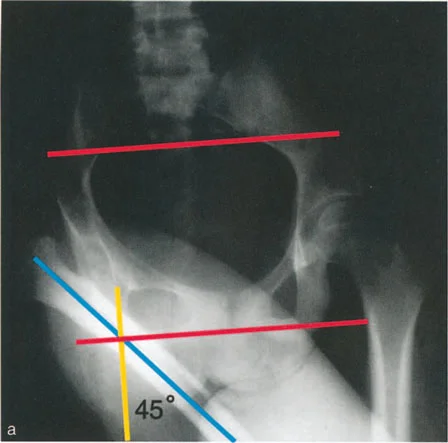
The Center of Rotation of Angulation CORA
The Center of Rotation of Angulation CORA is the most critical concept in deformity planning. It represents the precise point where the proximal mechanical axis line and the distal mechanical axis line intersect.
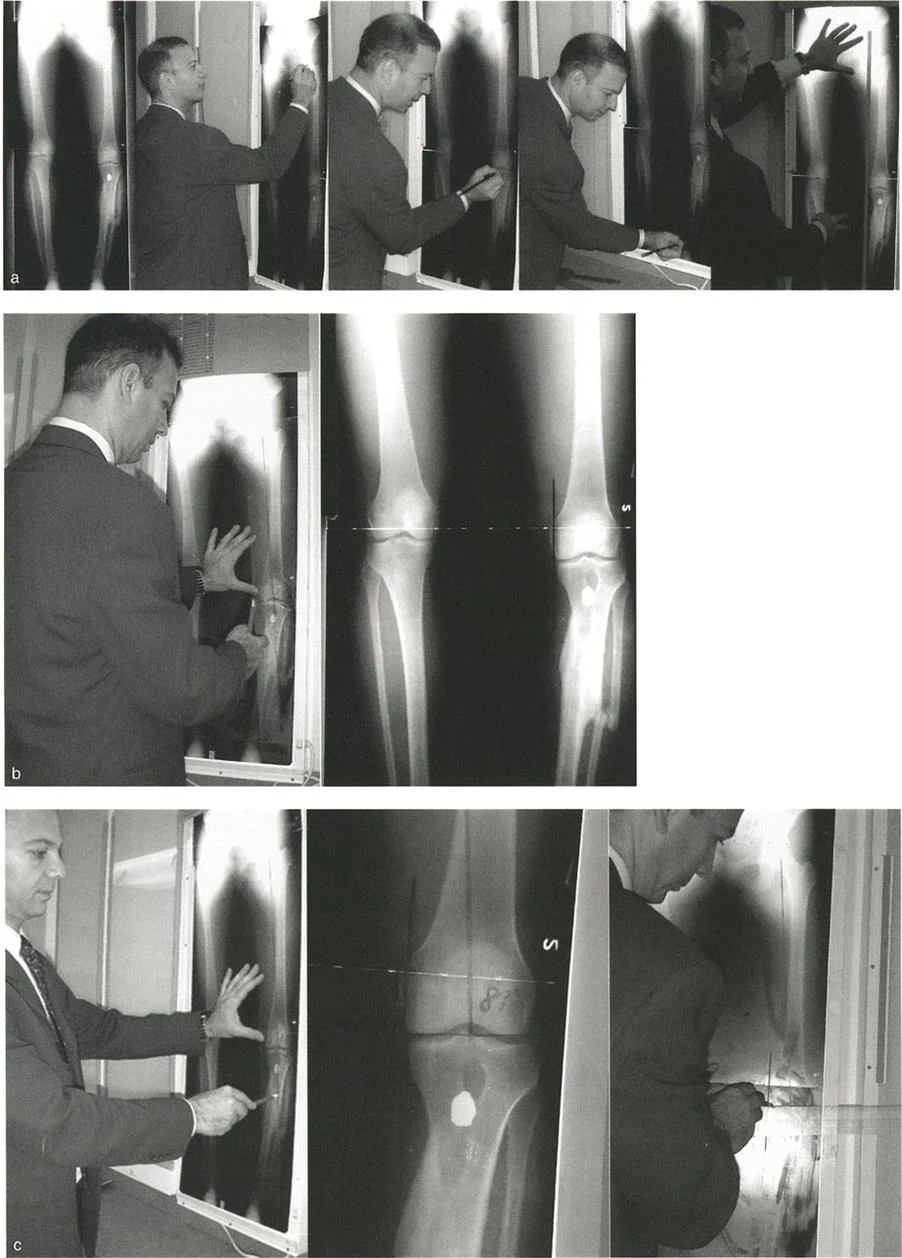
Finding the CORA dictates where the deformity originates and, ideally, where the correction should be performed. A single bone may have a uniapical deformity one CORA or a multiapical deformity multiple CORAs. Identifying the CORA requires meticulous preoperative templating on full length, weight bearing standing radiographs.
The Three Osteotomy Rules
Dr Paley established three fundamental osteotomy rules based on the relationship between the CORA, the osteotomy site, and the hinge point of correction. Mastering these rules allows the surgeon to predict exactly how the bone segments will move in three dimensional space.
- Osteotomy Rule 1 When the osteotomy and the hinge are both located at the CORA, the result is pure angular correction without any translation. The mechanical axis is restored perfectly.
- Osteotomy Rule 2 When the osteotomy is located away from the CORA, but the hinge remains at the CORA, the result is angular correction accompanied by translation at the osteotomy site. The mechanical axis is restored, but the bone ends will be offset.
- Osteotomy Rule 3 When both the osteotomy and the hinge are located away from the CORA, the result is a translation deformity. The mechanical axis will remain deviated, creating a secondary iatrogenic deformity.
Biological and Thermal Management in Hardware Insertion
Before executing any structural correction based on the CORA, a surgeon must deeply respect the biology of the bone. Deformity correction often involves traversing dense, sclerotic bone, particularly in patients with long standing malalignment, prior trauma, non unions, or metabolic bone diseases.
Pathophysiology of Thermal Necrosis
When reaming through sclerotic bone to prepare the medullary canal for an intramedullary nail, the friction generated by the reamer can cause profound thermal injury to the bone and surrounding soft tissues. Sclerotic bone lacks the normal Haversian canal system and vascularity that typically helps dissipate heat.
Bone collagen begins to denature at temperatures exceeding 47 degrees Celsius if sustained for more than one minute. Thermal necrosis leads to a cascade of devastating surgical complications, including bone death, sequestrum formation, delayed union, frank non union at the osteotomy site, and an exponentially increased susceptibility to deep seated intramedullary infections. Furthermore, the heat can radiate outward, compromising the delicate soft tissue envelope, particularly the anterior tibial skin.
The Stop Start Reaming Technique
To mitigate thermal injury, surgeons must completely abandon the continuous push reaming style often utilized in standard, acute trauma cases. Instead, a meticulous stop start reaming technique using exceptionally sharp reamers is mandatory.
Surgical Pearls for Safe Reaming
* Controlled Bursts Advance the reamer in short, controlled bursts of no more than a few seconds at a time.
* Frequent Retraction Retract the reamer slightly after each burst to clear cutting debris from the flutes and allow the metal to cool.
* Copious Irrigation Irrigate the medullary canal frequently if resistance is met.
* External Heat Sinks Apply ice cold, sterile wet compresses directly to the skin overlying the subcutaneous border of the tibia or femur during reaming. This acts as an external heat sink, drawing thermal energy away from the bone and protecting the skin.
Open reaming of the bone ends is usually not required and should be avoided when possible. The closed technique preserves the fracture hematoma and the vital periosteal blood supply. However, open reaming becomes absolutely necessary if the surgical plan dictates a large bone resection or a closing wedge osteotomy where the canal must be directly visualized, cleared, and manually aligned.
Intramedullary Nailing Biomechanics and Starting Points
In intramedullary nailing for deformity correction, the starting point is entirely unforgiving. Unlike a flexible pediatric fracture where the bone can mold around the hardware, a rigid deformity correction relies entirely on the nail's trajectory to maintain the newly established mechanical axis. The nail is a rigid, straight or gently bowed metal rod, and the bone segments must obey the trajectory of this rod.
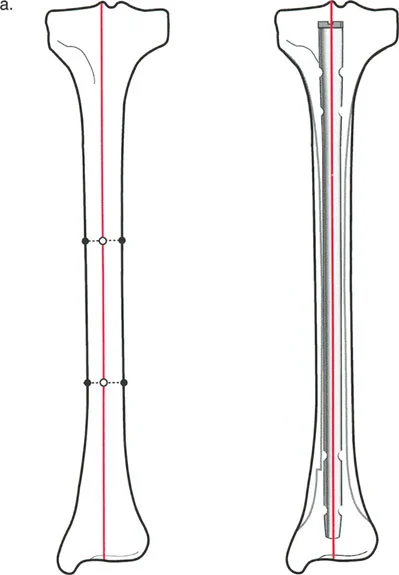
Tibial Nailing Anatomy and Trajectory
In a normal, non deformed tibia, the mid diaphyseal line typically passes directly through the medial tibial spine. Therefore, the anatomically correct starting point for a standard tibial nail is exactly at the medial tibial spine, just adjacent to the lateral border of the medial meniscus.
However, human anatomy is highly variable. In some non deformed tibiae, the mid diaphyseal line passes more laterally, closer to the lateral tibial spine. It is absolutely critical to template the contralateral normal leg or the pre deformity anatomy to know this specific patient's axis before utilizing an awl or starting pin.
Consequences of Incorrect Starting Trajectories
When performing a focal dome osteotomy or any corrective cut, the intramedullary nail acts as the internal splint that dictates the final alignment. If the starting point is incorrect, passing the nail will force the bone segments out of alignment, instantly ruining a perfectly executed osteotomy.
- Lateral Deviation If the starting point is placed too laterally on the tibial plateau, the rigid nail will force the proximal tibial segment into a varus deformity as the nail seeks the distal diaphyseal canal.
- Medial Deviation Conversely, if the starting point is placed too far medially, the nail will drive the proximal segment into a valgus deformity.
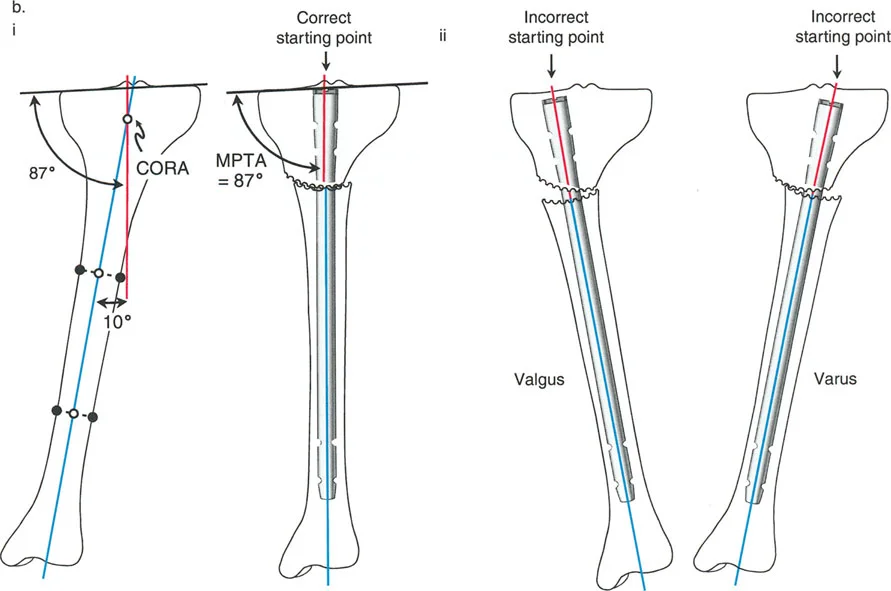
This geometric reality underscores a core Paley principle. The hardware must align perfectly with the planned mechanical axis. A deviation of even a few millimeters at the articular joint line translates to several degrees of malalignment at the osteotomy site, severely compromising the entire surgical procedure and the patient's long term joint health.
Advanced Osteotomy Techniques
Choosing the correct type of osteotomy is just as critical as templating the hardware. The osteotomy must allow for the planned angular correction while maximizing bone contact for healing and respecting the surrounding soft tissue envelope.
Comparing Osteotomy Modalities
Surgeons generally choose between opening wedge, closing wedge, and focal dome osteotomies. Each has specific indications, advantages, and drawbacks.
- Opening Wedge Osteotomy Involves making a single cut and jacking the bone open to correct angulation. While simple to execute, it lengthens the limb, creates a large bony void that requires structural bone grafting, and takes significantly longer to heal due to the lack of native bone contact.
- Closing Wedge Osteotomy Involves removing a wedge of bone to close a deformity. This provides excellent bony contact and inherent stability but inherently shortens the limb, which is often undesirable in patients who already have limb length discrepancies.
- Focal Dome Osteotomy A cylindrical, semi circular cut made around the CORA. This is the workhorse of advanced deformity correction.
Biomechanics of the Focal Dome Osteotomy
The focal dome osteotomy is a highly powerful tool in the deformity surgeon's arsenal. Unlike wedge osteotomies, a dome osteotomy allows for massive angular correction without altering the overall limb length.
Because the cut is spherical, the proximal and distal bone segments rotate along the arc of the cut. This provides immense inherent stability, as the convex and concave surfaces nest together perfectly regardless of the degree of rotation. Furthermore, this technique maximizes the bony contact area, promoting rapid secondary bone healing and allowing for earlier weight bearing.
Executing a focal dome osteotomy requires precision in three dimensional space. The surgeon typically uses a specialized drill guide to create a semi circle of unicortical drill holes, which are then carefully connected using a curved osteotome to complete the cylindrical cut.
Fixator Assisted Nailing FAN Masterclass
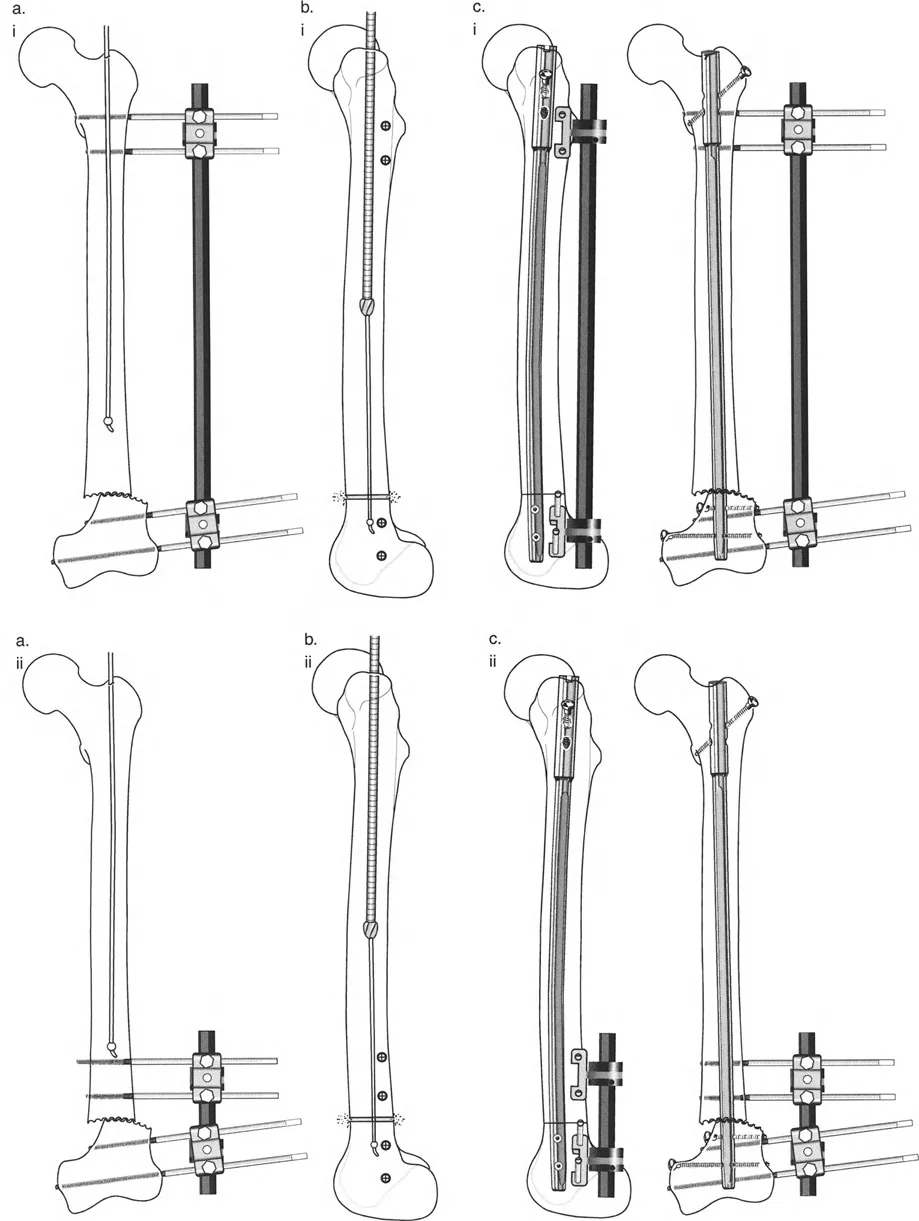
To fully understand the clinical application of these principles, we will walk through a masterclass example utilizing the Fixator Assisted Nailing FAN technique. FAN is a hybrid philosophy that combines the best aspects of external and internal fixation.
It utilizes an external fixator temporarily intraoperatively to achieve and hold a perfect, rigid reduction. Once the mechanical axis is restored via the fixator, an intramedullary nail is passed to permanently secure the correction. The fixator is then removed at the end of the case. This gives the patient the unparalleled precision of an Ilizarov or Taylor Spatial Frame without the psychological, physical, and infectious burdens of wearing an external frame for several months.
Rationale for Fixator Assisted Nailing
Achieving perfect alignment during an acute correction and holding that alignment while simultaneously reaming and passing a nail is technically demanding. Manual traction is often insufficient and prone to shifting. The temporary external fixator acts as a rigid set of robotic hands, locking the limb into the exact templated mechanical axis so the surgeon can focus entirely on perfect hardware insertion.
Step by Step Preoperative Planning for FAN
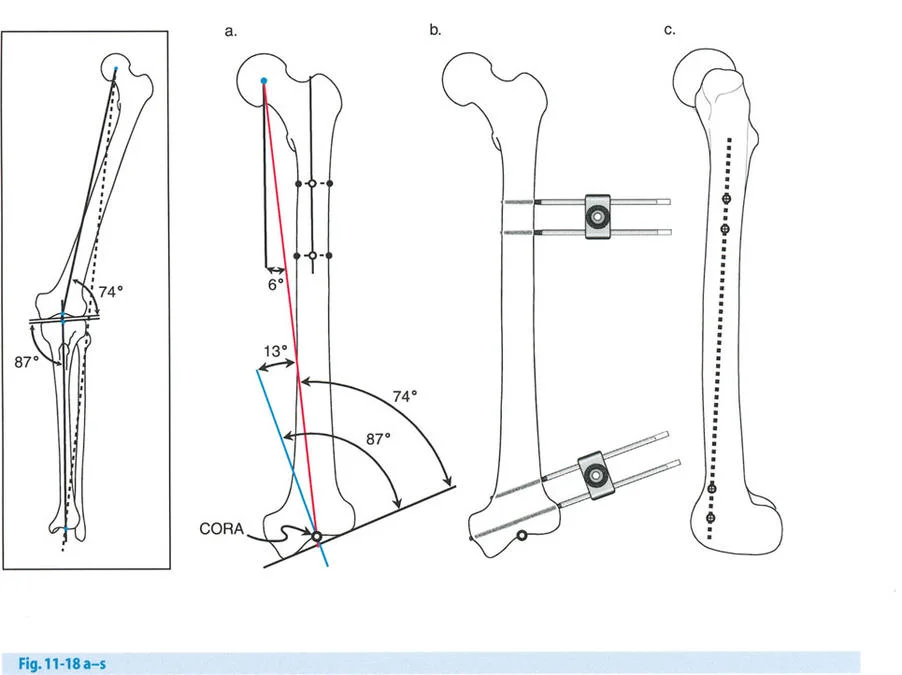
Consider a patient presenting with a severe distal femoral valgus deformity, for example, a 13 degree valgus deformity with a lateralized Mechanical Axis Deviation.
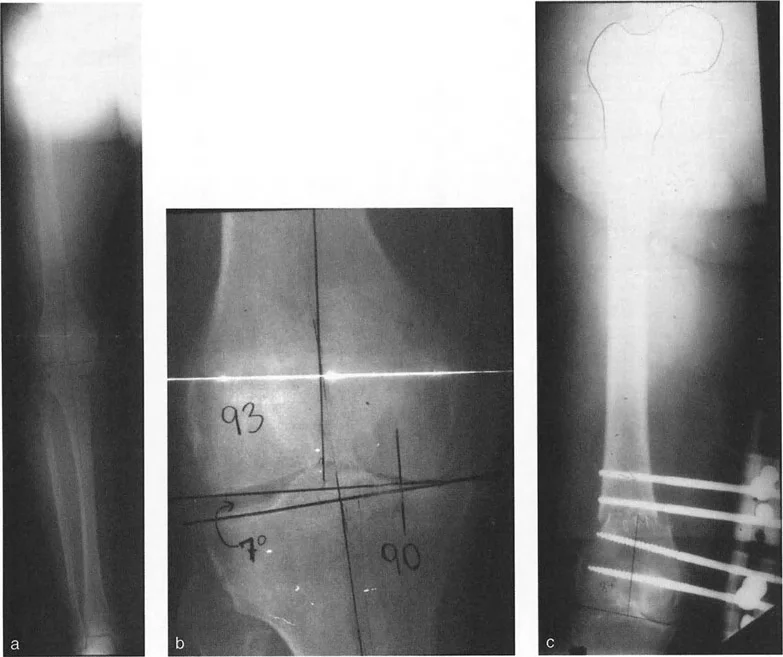
Step 1 Mapping the Deformity
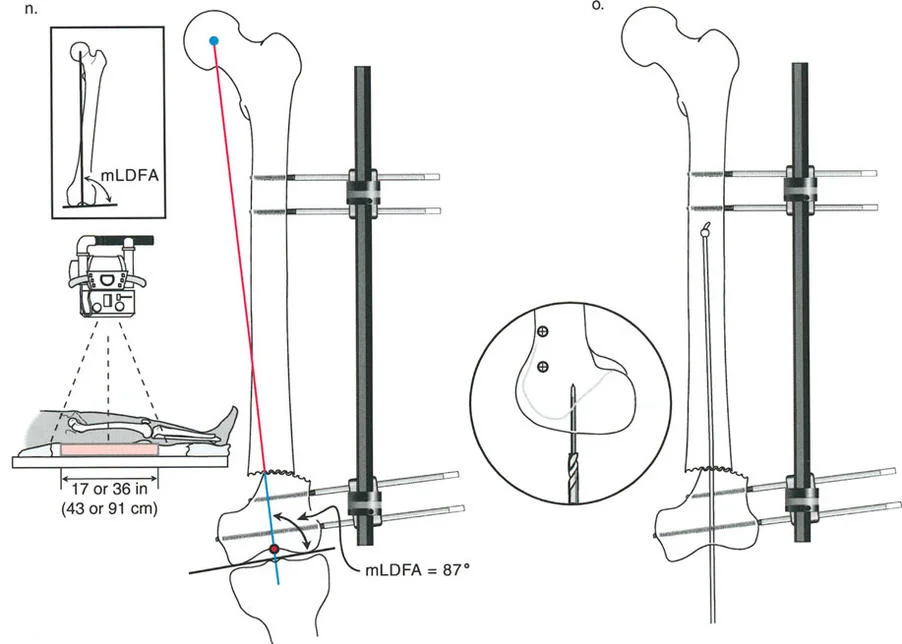
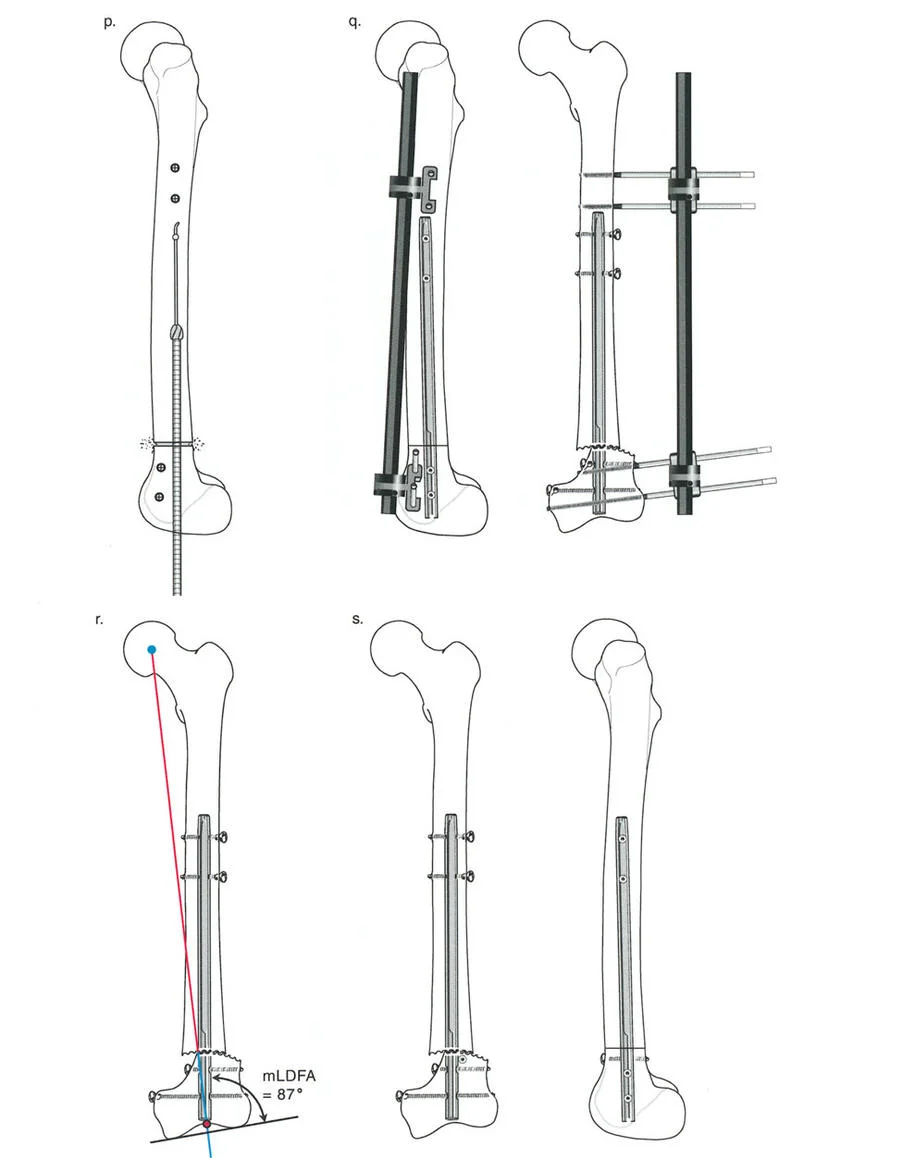
The surgeon obtains full length standing radiographs. The normal mLDFA is 88 degrees. The patient's mLDFA is measured at 75 degrees, confirming a 13 degree valgus deformity originating in the distal femur.
Step 2 Locating the CORA
The proximal mechanical axis line of the femur is drawn. The distal mechanical axis line is drawn retrograde from the knee joint at exactly 88 degrees. The intersection of these two lines identifies the CORA in the distal femoral metaphysis.
Step 3 Planning the Osteotomy
Based on Paley's Osteotomy Rule 1, a focal dome osteotomy is planned exactly at the level of the CORA to ensure pure angular correction without translation.
Surgical Execution of Distal Femoral Valgus Correction
The execution of the FAN technique requires meticulous attention to sequence and detail.
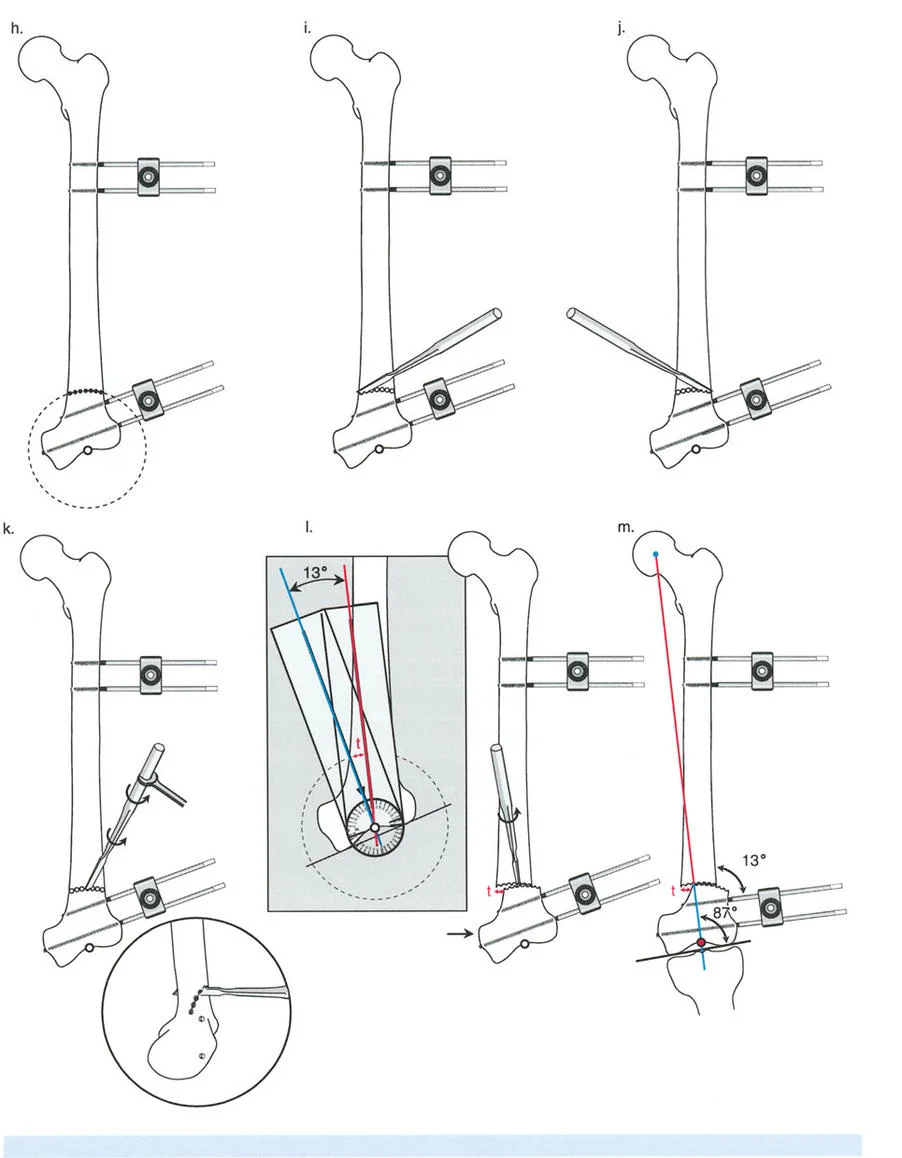
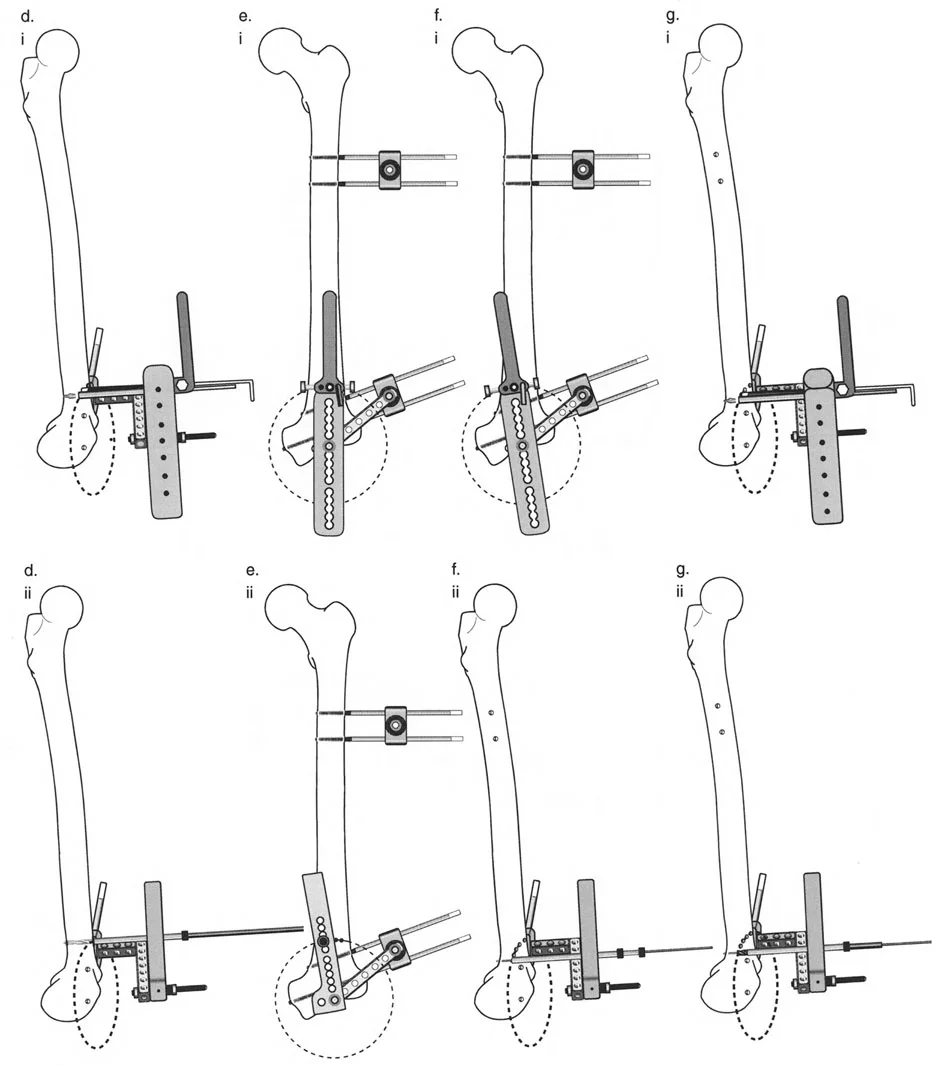
Phase 1 Pin Placement and Joint Orientation
Two half pins are placed in the distal femoral condyles, perfectly parallel to the distal femoral joint line in the coronal plane. Two half pins are then placed in the proximal femoral diaphysis, perfectly perpendicular to the proximal mechanical axis.
Phase 2 The Osteotomy
A small lateral incision is made at the level of the pre templated CORA. Using a multiple drill hole technique and a curved osteotome, the focal dome osteotomy is completed. Care is taken to protect the neurovascular bundle posteriorly.
Phase 3 Acute Correction via Fixator
The external fixator bar is attached to the pins. The surgeon manipulates the fixator to acutely correct the 13 degree valgus deformity. Because the pins were placed relative to the mechanical axes, aligning the fixator bar parallel to the floor perfectly aligns the bone segments. The fixator is rigidly locked. Intraoperative fluoroscopy and an alignment grid confirm that the mechanical axis now passes through the center of the knee.
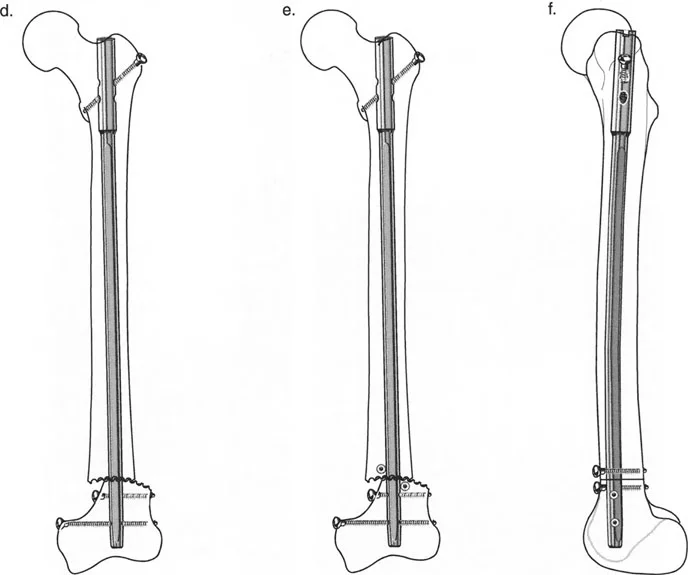
Phase 4 Blocking Screws Poller Pins
To prevent the nail from following the path of least resistance the old, deformed medullary canal, blocking screws, also known as Poller pins, are placed. In a valgus correction, blocking screws are typically placed on the concavity of the deformity to force the nail into the center of the newly aligned canal.
Phase 5 Reaming and Nailing
With the fixator holding the leg in perfect alignment, a guide wire is passed from the piriformis fossa or greater trochanter, across the osteotomy, and into the distal condyles. The stop start reaming technique is utilized to prepare the canal. A retrograde or antegrade intramedullary nail is inserted and locked proximally and distally.
Phase 6 Fixator Removal
Once the intramedullary nail is statically locked, the temporary external fixator has served its purpose. The fixator and half pins are removed. The final fluoroscopic images will demonstrate a perfectly restored mechanical axis, a healed mLDFA of 88 degrees, and a stable internal construct.

Postoperative Management and Hardware Considerations
The success of a deformity correction does not end in the operating room. Postoperative management is critical to ensure the osteotomy heals without hardware failure or loss of correction.
Because the focal dome osteotomy provides high intrinsic stability and the intramedullary nail acts as a load sharing device, patients can often begin early, protected weight bearing. This mechanical stimulation promotes secondary bone healing via callus formation.
Routine radiographic follow up is required at two, six, and twelve weeks to monitor callus formation. Hardware removal is generally not indicated unless the patient experiences symptomatic hardware irritation, typically from prominent interlocking screws, or if a deep infection occurs after the osteotomy has fully united.
Complication Avoidance in Deformity Correction
Mastering Paley's principles minimizes complications, but surgeons must remain vigilant. The most common pitfalls in hardware and osteotomy management include:
- Failure to Template Skipping the preoperative drawing phase guarantees intraoperative confusion and likely malalignment.
- Ignoring the Sagittal Plane Deformities are rarely uni planar. While correcting coronal valgus, the surgeon must ensure they do not inadvertently create a sagittal procurvatum or recurvatum deformity.
- Soft Tissue Tension Acute corrections, particularly large angular changes, can stretch neurovascular structures. For massive deformities, acute correction with FAN may be contraindicated, and gradual correction with a Taylor Spatial Frame may be required to protect the peroneal or tibial nerves.
- Inadequate Fixation Failing to achieve adequate cortical purchase with interlocking screws, or failing to use blocking screws when the medullary canal is wide, will lead to toggle, loss of reduction, and eventual hardware failure.
By strictly adhering to the geometric laws of the CORA, respecting bone biology during reaming, and utilizing advanced techniques like Fixator Assisted Nailing, orthopedic surgeons can reliably master complex deformity corrections and profoundly improve their patients' quality of life.
!!! info "Academic Resource & Medical Review"
This academic resource was prepared and medically reviewed by Prof. Dr. Mohammed Hutaif, Consultant Orthopedic & Spine Surgeon. It is formulated specifically for medical students, orthopedic residents, and surgeons preparing for high-stakes board examinations (AAOS, FRCS Tr & Orth, Arab Board).
!!! warning "Disclaimer"
The surgical techniques, classifications, and clinical guidelines presented herein are for educational and academic review purposes only. They are not intended to replace institutional protocols or independent clinical judgment.
You Might Also Like