Precision Deformity Correction: Paley Principles, Osteotomies & Hardware Biomechanics
Key Takeaway
Deformity correction relies on Paley Principles for precise surgical planning. It involves quantifying mechanical axis deviation, joint orientation angles, and locating the Center of Rotation of Angulation (CORA). This guides osteotomy and hardware placement, ensuring accurate limb realignment, restored biomechanics, and optimal patient outcomes.
Introduction to Deformity Correction Biomechanics
In the realm of complex orthopedic surgery, mastering hardware and osteotomy considerations is what separates a proficient surgeon from a true deformity correction expert. Grounded in the foundational principles established by Dr. Dror Paley, the successful realignment of a limb relies heavily on a deep, mathematical understanding of the mechanical axis deviation, joint orientation angles, and the precise location of the Center of Rotation of Angulation.
An osteotomy is never just a simple bone cut. It is a calculated geometric alteration designed to restore normal biomechanics while respecting the physiological limits of the surrounding soft tissues, neurovascular structures, and the inherent healing capacity of the bone. The choice of osteotomy directly dictates the type of hardware required for stable fixation. Furthermore, the interplay between the osteotomy geometry and the hardware determines the biomechanical environment for bone union.
This masterclass provides an exhaustive, high-yield exploration of hardware and osteotomy considerations, equipping surgeons-in-training with the advanced biomechanical knowledge necessary to execute precise, complication-free deformity corrections. We will move beyond basic principles into the nuanced decision-making required for complex, multiplanar deformities.
Foundational Paley Principles and Joint Orientation Angles
Before a surgeon can correct a deformity, they must be able to quantify it with absolute precision. Dr. Dror Paley revolutionized orthopedic surgery by standardizing the radiographic analysis of the lower extremity. This standardized approach allows surgeons to differentiate between physiological bowing and pathological deformity, pinpoint the exact apex of the deformity, and plan a mathematically sound correction.
Understanding Mechanical Axis Deviation
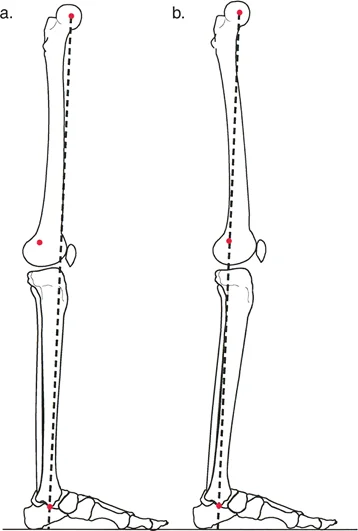
The mechanical axis of the lower extremity is a straight line drawn from the center of the femoral head to the center of the ankle joint (tibial plafond). In a normal, well-aligned lower limb, this line should pass just medial to the center of the knee joint, specifically through the medial tibial spine.
Mechanical Axis Deviation refers to the distance in millimeters that the mechanical axis deviates from the center of the knee. A medial deviation indicates a varus deformity, while a lateral deviation indicates a valgus deformity. Identifying Mechanical Axis Deviation is the first step in the Malalignment Test, serving as the trigger to investigate the specific joint orientation angles of the femur and tibia.
Standard Joint Orientation Angles
Joint orientation angles define the relationship between the anatomical or mechanical axis of a bone and its respective joint line. These angles are measured in the frontal (coronal) and sagittal planes. Mastery of these angles is non-negotiable for anyone performing osteotomies around the knee, hip, or ankle.
Below is a summary of the critical mechanical joint orientation angles in the frontal plane. Deviations from these normative values dictate whether the deformity is femoral, tibial, or a combination of both.
| Angle Acronym | Full Name | Normal Range | Clinical Significance |
|---|---|---|---|
| mLDFA | Mechanical Lateral Distal Femoral Angle | 85 to 90 degrees (Avg 87) | Evaluates distal femur varus or valgus. |
| MPTA | Medial Proximal Tibial Angle | 85 to 90 degrees (Avg 87) | Evaluates proximal tibia varus or valgus. |
| mLPFA | Mechanical Lateral Proximal Femoral Angle | 85 to 95 degrees (Avg 90) | Evaluates femoral neck shaft alignment relative to mechanical axis. |
| LDTA | Lateral Distal Tibial Angle | 86 to 92 degrees (Avg 89) | Evaluates ankle joint orientation in the coronal plane. |
| JLCA | Joint Line Convergence Angle | 0 to 2 degrees | Evaluates intra-articular deformity or ligamentous laxity at the knee. |
Clinical Pearls for Joint Orientation Angles
- Always obtain full-length, weight-bearing standing radiographs (teleoroentgenograms) with the patellae facing strictly forward to accurately measure these angles. Rotation will artificially alter the perceived coronal alignment.
- A JLCA greater than 2 degrees suggests either intra-articular cartilage loss (e.g., medial compartment osteoarthritis) or collateral ligament laxity. This must be factored into the correction, as an extra-articular osteotomy will not correct an intra-articular deformity.
- When both the mLDFA and MPTA are abnormal, the patient has a combined femoral and tibial deformity. Correcting only one bone will result in a joint line that is oblique to the ground, leading to shear forces and premature joint degeneration.
Defining the Center of Rotation of Angulation
The Center of Rotation of Angulation is the cornerstone of Paley's deformity planning. It is the specific point in space where the proximal mechanical axis line intersects with the distal mechanical axis line.
Locating the Center of Rotation of Angulation
To find the Center of Rotation of Angulation, the surgeon must first draw the normal mechanical or anatomical axis of the proximal bone segment. Next, they draw the normal axis of the distal bone segment. Because the bone is deformed, these two lines will not be collinear; instead, they will intersect. This point of intersection is the Center of Rotation of Angulation.
In a uniapical deformity, there is a single Center of Rotation of Angulation. In multiapical deformities, the axes of the proximal, middle, and distal segments will intersect at multiple points, creating multiple Centers of Rotation of Angulation. Accurately identifying this point dictates where the osteotomy should be performed and where the hinge of the correction must be placed.
The Three Paley Osteotomy Rules
To understand how bone segments behave during realignment, one must deeply internalize Paley's Osteotomy Rules. These rules dictate the geometric behavior of bone segments when cut and manipulated around a specific axis. The relationship between the osteotomy cut, the hinge (axis of correction), and the Center of Rotation of Angulation determines the final anatomical result.
Osteotomy Rule One Pure Angulation
When the osteotomy and the hinge (axis of correction) are placed exactly at the level of the Center of Rotation of Angulation, pure angulation occurs. The mechanical axis lines of the proximal and distal segments will perfectly realign without any secondary translation.
This is the ideal scenario for simple metaphyseal deformities. Because the bone ends do not translate, there is excellent cortical apposition, leading to predictable healing and high intrinsic stability. This rule is frequently applied in standard high tibial osteotomies and distal femoral osteotomies where the deformity apex is near the joint.
Osteotomy Rule Two Angulation and Translation
When the osteotomy is performed at a level different from the Center of Rotation of Angulation, but the hinge (axis of correction) remains at the Center of Rotation of Angulation, the mechanical axis lines will still perfectly realign. However, the bone ends at the osteotomy site will undergo both angulation and translation.
This rule is vital when the apex of the deformity is in a location unsuitable for an osteotomy. By moving the cut but keeping the hinge at the apex, the surgeon achieves perfect mechanical alignment at the cost of anatomical translation at the osteotomy site.
Osteotomy Rule Three Secondary Translation Deformity
When the osteotomy and the hinge are both placed at a level different from the Center of Rotation of Angulation, a secondary translation deformity will be induced. The mechanical axis lines will remain parallel but will not be collinear, resulting in a persistent Mechanical Axis Deviation.
This is generally considered a planning error or a surgical complication. If a surgeon cuts the bone away from the apex and simply hinges the bone at the cut site without translating it, the overall limb alignment remains abnormal. This persistent deviation will continue to place asymmetric load on the adjacent joints.
The Angulation Translation Osteotomy
The angulation translation osteotomy is the direct clinical application of Osteotomy Rule Two. It can be performed as either a closing or opening wedge procedure, but its defining feature is the intentional translation of the bone segments to achieve collinearity of the mechanical axis.
If performing an osteotomy at the Center of Rotation of Angulation yields pure angulation with perfect bone apposition, why would a surgeon intentionally choose to perform an angulation translation osteotomy at a different level?
Strategic Advantages of Shifting the Osteotomy Level
- Improving Bone Contact and Intrinsic Stability By performing the cut away from the apex and allowing the bone ends to translate, the surgeon can manipulate the fragments so that the cortical corner of one segment impacts directly into the medullary canal of the other segment. This interlocking effect drastically increases intrinsic stability and bone-to-bone contact area. It often negates the need for structural bone grafting, as the bone itself acts as a load-sharing structural column.
- Soft Tissue Preservation and Wound Healing The apex of the deformity may be located in an area with poor soft tissue coverage, such as the distal third of the tibia, or directly adjacent to critical neurovascular structures. Moving the osteotomy to a safer, more muscular diaphyseal or metaphyseal zone mitigates wound breakdown and infection risks.
- Hardware Accommodation The apex might be too close to a joint line, as seen in severe juxta-articular deformities. This leaves insufficient room for proximal or distal hardware fixation. Moving the osteotomy allows for adequate bone stock to accommodate locking plates, multiple screws, or the proper entry point for intramedullary nails.
- Bone Quality Considerations In cases of prior trauma, osteomyelitis, or metabolic bone disease, the bone at the apex may be sclerotic, avascular, or structurally compromised. Shifting the osteotomy to healthy, well-vascularized bone ensures reliable union.
Clinical Pearls for Angulation Translation Osteotomies
- Always template the translation preoperatively. Excessive translation can compromise the medullary canal, making intramedullary nailing impossible and necessitating plate or external fixation.
- Translation alters the local soft tissue tension. Ensure that the direction of translation does not tether critical neurovascular bundles over the sharp cortical edge of the osteotomy.
- If an osteotomy is performed at a level different from the apex but the surgeon fails to translate the bone ends, treating it like a Rule One correction, a secondary translation deformity will inevitably result. This leads to premature joint degeneration despite the apparent correction of the angular deformity.
Opening Wedge Versus Closing Wedge Osteotomies
The decision to utilize an opening wedge versus a closing wedge osteotomy is a critical preoperative step heavily influenced by the magnitude of the deformity, the location of neurovascular structures, and the desired final limb length.
Soft Tissue Stretch and Neurovascular Risk
Opening wedge corrections inherently lengthen the bone segment. While beneficial for patients with a concomitant limb length discrepancy, this lengthening places significant stretch on the surrounding soft tissue envelope, including muscles, fascia, nerves, and blood vessels. For example, a large medial opening wedge high tibial osteotomy can stretch the common peroneal nerve laterally, increasing the risk of neuropraxia or permanent palsy.
Conversely, closing wedge corrections slightly shorten the bone, thereby relaxing the soft tissue envelope and decreasing tension on critical structures. A lateral closing wedge high tibial osteotomy is inherently safer for the peroneal nerve, though it requires a fibular osteotomy or proximal tibiofibular joint disruption to allow for the correction.
Limb Length Discrepancy Considerations
The impact on overall limb length must be calculated during the preoperative planning phase.
- Opening Wedge Adds length. Ideal for a patient with a varus deformity and a shortened limb.
- Closing Wedge Subtracts length. Ideal for a patient with a valgus deformity who can tolerate slight shortening, or when the deformed limb is already longer than the contralateral side.
- Neutral Wedge A combination of opening and closing wedges designed to maintain the exact preoperative limb length.
Bone Healing and Grafting Requirements
The biomechanical environment for bone healing differs significantly between the two techniques.
Closing wedge osteotomies offer superior intrinsic stability. Because two flat cortical surfaces are brought into direct compression, the bone shares the physiological load with the hardware. This allows for the use of standard compression plates or staples and generally results in rapid, predictable union without the need for bone graft.
Opening wedge osteotomies create a void that must be managed. The hardware bears the entirety of the physiological load until the bone heals. This necessitates the use of rigid, angle-stable locking plates. Furthermore, depending on the size of the gap, the surgeon must decide whether to leave the defect empty to fill with hematoma and eventually woven bone, or to fill it with autograft, allograft, or synthetic bone substitutes to provide a structural scaffold.
Advanced Osteotomy Geometries
While wedge osteotomies are the most common, complex multiplanar deformities often require advanced geometric cuts to achieve correction without massive translation or limb length alteration.
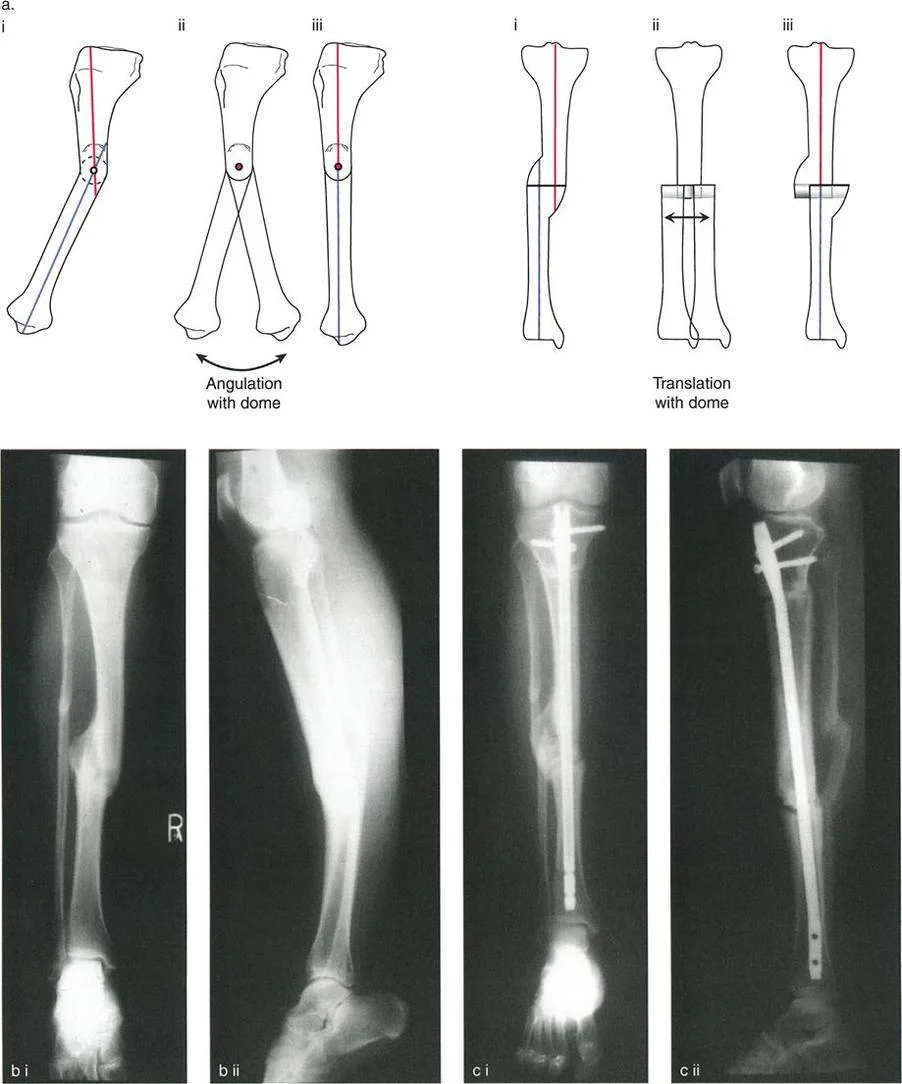
The Focal Dome Osteotomy
A focal dome osteotomy is a semicircular cut made around the Center of Rotation of Angulation. The radius of the dome is centered exactly on the apex of the deformity.
The primary biomechanical advantage of a dome osteotomy is that it allows for massive angular correction without any translation or length change. Because the bone ends rotate along a congruent spherical path, there is excellent, uninterrupted bone-to-bone contact regardless of the magnitude of the correction. This provides immense intrinsic stability and rapid healing. Dome osteotomies are technically demanding, requiring specialized cylindrical saw blades or a meticulously planned drill-hole technique, but they are unparalleled for severe juxta-articular deformities.
The Oblique Plane Osteotomy
Many deformities are not purely coronal or purely sagittal but exist in an oblique plane. For example, a tibia may be simultaneously varus and procurvatum. Rather than performing two separate wedge cuts, a single osteotomy can be made perpendicular to the true oblique plane of the deformity. By rotating the bone segments around this single oblique axis, both the coronal and sagittal deformities are corrected simultaneously.
Hardware Biomechanics and Fixation Strategies
The success of any osteotomy relies on selecting the appropriate hardware to maintain the correction while providing an optimized mechanical environment for osteogenesis. The choice between plates, intramedullary nails, and external fixators is dictated by the osteotomy type, soft tissue condition, and patient compliance.
Plate Osteosynthesis Biomechanics
Plates can function in several biomechanical modes depending on their application.
- Compression Mode Used in closing wedge osteotomies. Eccentric drilling in the plate holes generates dynamic compression across the osteotomy site, maximizing primary bone healing.
- Neutralization Mode Used when the osteotomy has intrinsic stability, such as a well-interlocked angulation translation osteotomy. The plate simply protects the site from torsional and bending forces.
- Bridging Mode Used in opening wedge osteotomies. The plate spans the gap, acting as a load-bearing internal fixator. This requires locking head screws to create fixed-angle constructs that resist cantilever bending forces. The "working length" of the plate—the distance between the innermost screws on either side of the osteotomy—must be carefully planned to allow for micromotion, which stimulates secondary bone healing via callus formation.
Intramedullary Nailing and Poller Screws
Intramedullary nails offer superior biomechanical advantages due to their load-sharing nature and central placement within the mechanical axis. They are ideal for diaphyseal deformities. However, using nails for metaphyseal deformity correction presents significant challenges due to the wide medullary canal, which fails to provide a tight fit for the nail, leading to the "bell-clapper" effect and loss of correction.
To overcome this, surgeons utilize blocking screws, also known as Poller screws. These screws are placed outside the nail but inside the medullary canal, effectively narrowing the canal and forcing the nail into the desired trajectory. Poller screws act as artificial cortices, providing three-point bending stability and preventing the bone from sliding back into deformity along the smooth surface of the nail.
External Fixation and the Tensioned Wire Construct
External fixation, particularly circular frames like the Ilizarov apparatus or hexapod systems like the Taylor Spatial Frame, remains the ultimate tool for complex, multiplanar, or infected deformities.
Circular frames utilize tensioned fine wires (typically 1.5 mm to 1.8 mm) that cross through the bone and attach to external rings. When tensioned to 100-130 kilograms, these wires become incredibly rigid in bending and torsion but allow for axial micromotion during weight-bearing. This axial dynamization is the optimal mechanical stimulus for osteogenesis.
Hexapod frames combine this tensioned wire biomechanics with a computer-assisted strut system. By inputting the exact preoperative joint orientation angles, the Center of Rotation of Angulation, and the mounting parameters into software, the surgeon generates a daily prescription. The patient adjusts the struts daily, allowing for the gradual, simultaneous correction of angulation, translation, rotation, and length. This gradual correction takes advantage of distraction histiogenesis, allowing soft tissues to adapt slowly and minimizing neurovascular risk.
Step by Step Preoperative Planning Guide
Executing a flawless deformity correction requires meticulous preoperative planning. Surgeons should follow a standardized, reproducible protocol for every case.
Step One The Malalignment Test
- Obtain a standing, weight-bearing, full-length anteroposterior radiograph with the patellae facing forward.
- Draw the mechanical axis line from the center of the femoral head to the center of the tibial plafond.
- Measure the Mechanical Axis Deviation from the center of the knee joint.
- If the deviation is outside the normal physiological range, proceed to the Malorientation Test.
Step Two The Malorientation Test
- Identify the mechanical axis of the femur and the mechanical axis of the tibia.
- Measure the mechanical Lateral Distal Femoral Angle and the Medial Proximal Tibial Angle.
- Compare these measurements to normative values to determine if the deformity is isolated to the femur, isolated to the tibia, or combined.
- Evaluate the Joint Line Convergence Angle to rule out intra-articular deformity or ligamentous laxity.
Step Three Determining the Apex
- Draw the proximal mechanical axis line and the distal mechanical axis line of the deformed bone.
- Locate the intersection point of these two lines. This is the Center of Rotation of Angulation.
- Evaluate the bone quality and soft tissue envelope at this specific level to determine if an osteotomy here is safe and viable.
Step Four Selecting the Osteotomy Rule
- If the apex is in a safe, metaphyseal location, plan a Rule One osteotomy for pure angulation.
- If the apex is in a dangerous or mechanically unfavorable location, plan a Rule Two angulation translation osteotomy at a different level, ensuring you calculate the required translation to maintain mechanical axis collinearity.
- Decide between an opening wedge, closing wedge, or focal dome based on limb length requirements and intrinsic stability needs.
Step Five Hardware Selection and Templating
- Overlay digital templates of plates or intramedullary nails onto the planned postoperative radiograph.
- Ensure adequate bone stock exists for screw purchase in the proximal and distal segments.
- If using an intramedullary nail in the metaphysis, template the exact location of required Poller screws to maintain the correction.
- If utilizing an external fixator, plan the ring sizes, wire trajectories, and safe corridors to avoid neurovascular penetration.
By adhering strictly to these Paley principles, orthopedic surgeons can approach even the most daunting limb deformities with mathematical confidence. The transition from a simple bone-cutter to a master of deformity correction requires a relentless commitment to understanding the biomechanical interplay between the osteotomy cut, the axis of correction, and the hardware applied.
!!! info "Academic Resource & Medical Review"
This academic resource was prepared and medically reviewed by Prof. Dr. Mohammed Hutaif, Consultant Orthopedic & Spine Surgeon. It is formulated specifically for medical students, orthopedic residents, and surgeons preparing for high-stakes board examinations (AAOS, FRCS Tr & Orth, Arab Board).
!!! warning "Disclaimer"
The surgical techniques, classifications, and clinical guidelines presented herein are for educational and academic review purposes only. They are not intended to replace institutional protocols or independent clinical judgment.
You Might Also Like