The Paley Method: Mastering Sagittal Plane Deformity Correction for Orthopedic Surgeons
Key Takeaway
The Paley Method guides orthopedic surgeons in precise sagittal plane deformity correction. It addresses procurvatum and recurvatum using principles like CORA and specific joint angles. This approach restores biomechanical alignment, prevents osteoarthritis, and improves gait mechanics, ensuring optimal limb function.
Introduction to Sagittal Plane Deformities in Orthopedics
While coronal plane deformities such as varus and valgus often dominate the clinical conversation regarding lower extremity malalignment, sagittal plane deformities are equally detrimental to joint longevity and gait mechanics. Manifesting as procurvatum with an anterior apex and recurvatum with a posterior apex, these deformities present unique challenges in orthopedic surgery. A missed or poorly planned sagittal deformity can lead to devastating biomechanical consequences, including accelerated osteoarthritis, profound gait abnormalities like the quadriceps avoidance gait, and debilitating joint instability.
This comprehensive guide translates Dr Dror Paley’s foundational principles of deformity correction into an exhaustive and high yield resource for orthopedic surgeons, residents, and fellows. We will meticulously deconstruct the sagittal Malorientation Test, the step by step anatomic axis planning for both the tibia and femur, the determination of the Joint Edge Reference, and the strict application of the Paley osteotomy rules.
By mastering these advanced concepts, orthopedic surgeons will be equipped to execute precise and biomechanically sound corrections. Whether utilizing acute osteotomies with internal fixation or gradual correction via circular external fixators like the Taylor Spatial Frame or Ilizarov apparatus, understanding the sagittal plane is non negotiable for comprehensive limb reconstruction.
The Biomechanical Impact of Sagittal Malalignment
Before executing complex geometric planning, it is critical to understand the underlying biomechanics of the lower extremity. The leg operates as a highly sophisticated linkage system during the gait cycle. Any deviation in the sagittal plane disrupts the transfer of ground reaction forces, leading to pathological stress concentrations.
Knee Biomechanics and Pathologic Stresses
In the sagittal plane, the knee must achieve full extension for a stable stance phase and adequate flexion for swing phase clearance. Alterations in the osseous anatomy proximal or distal to the knee joint profoundly impact these phases.
Procurvatum deformities feature an anterior apex of the distal femur or proximal tibia, shifting the mechanical axis anteriorly. This anatomic alteration forces the knee into a persistently flexed posture during the stance phase. Consequently, the quadriceps mechanism must fire continuously to prevent knee buckling, drastically increasing the patellofemoral joint reaction forces. Over time, this exhausts the extensor mechanism and accelerates patellofemoral osteoarthritis.
Recurvatum deformities feature a posterior apex, forcing the knee into pathologic hyperextension. This alignment stretches the posterior capsule and places excessive, chronic strain on the cruciate ligaments, particularly the anterior cruciate ligament. Patients often present with severe anterior knee pain due to impingement of the anterior tibial spine against the intercondylar notch, alongside a feeling of profound instability during weight bearing.
Ankle Biomechanics and Tibiotalar Contact
The ankle joint relies on a precise orthogonal relationship with the tibial shaft to distribute weight bearing forces evenly across the talar dome. The sagittal alignment of the distal tibia dictates the functional range of motion of the tibiotalar joint.
An abnormal Anterior Distal Tibial Angle alters the tibiotalar contact area significantly. An increased angle indicates a procurvatum deformity, which mimics an equinus contracture. This drives the talus anteriorly within the mortise, overloading the anterior cartilage and restricting plantarflexion. Conversely, a decreased angle indicates a recurvatum deformity, which overloads the posterior talar dome and severely limits dorsiflexion. This restriction disrupts the terminal stance phase of gait, preventing normal heel off and forward propulsion.
Foundational Paley Principles for Sagittal Deformities
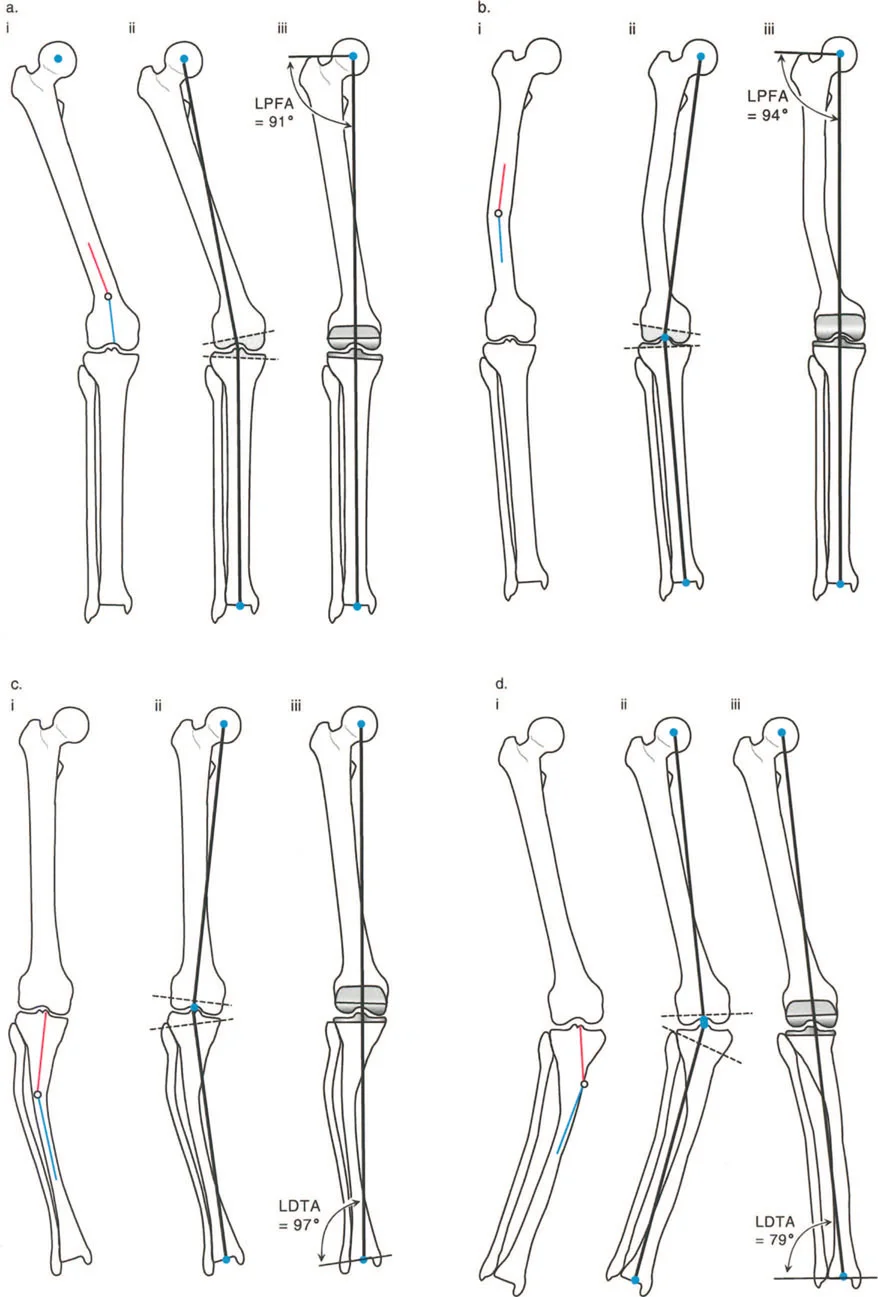
To correct deformities with mathematical precision, Dr Dror Paley established a universal language of deformity correction. While often taught first in the coronal plane using angles like the Mechanical Lateral Distal Femoral Angle and Medial Proximal Tibial Angle, these principles apply equally to the sagittal plane.
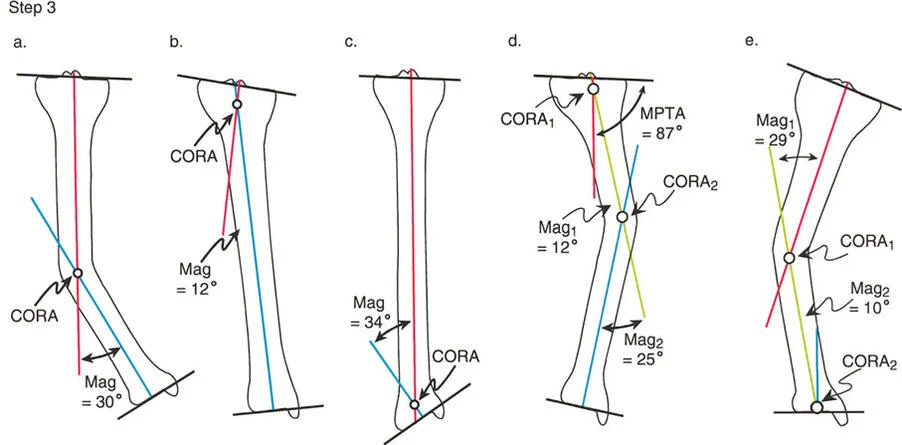
Center of Rotation of Angulation CORA
The Center of Rotation of Angulation is the foundational concept in Paley deformity planning. The CORA represents the exact intersection point of the proximal and distal mechanical or anatomic axes of a deformed bone. Identifying the CORA is the primary goal of preoperative planning, as it dictates the optimal level for the osteotomy and the placement of the hinge in external fixation. A bone may have a single CORA or multiple CORAs depending on the complexity of the deformity.

Mechanical Axis Deviation MAD in the Sagittal Plane
While Mechanical Axis Deviation is typically measured on a standing full length anteroposterior radiograph, sagittal Mechanical Axis Deviation is equally critical. In the sagittal plane, the mechanical axis is assessed by dropping a plumb line from the center of gravity. A sagittal plane deformity shifts the weight bearing axis anterior or posterior to the center of the knee and ankle joints, creating massive lever arms that magnify joint reaction forces. Correcting the CORA restores the mechanical axis to the center of the joint, neutralizing these destructive lever arms.
Essential Sagittal Joint Orientation Angles
To quantify sagittal plane deformities, orthopedic surgeons rely on established normal joint orientation angles. These angles are measured relative to the anatomic axis, which is the mid diaphyseal line of the respective bone segments on a true lateral radiograph.
Below is a high yield summary of the critical sagittal plane angles required for preoperative planning.
| Joint Orientation Angle | Abbreviation | Normal Range | Population Average | Clinical Significance |
|---|---|---|---|---|
| Proximal Posterior Tibial Angle | PPTA | 77° to 84° | 81° | Dictates proximal tibial sagittal alignment and posterior tibial slope. |
| Anterior Distal Tibial Angle | ADTA | 78° to 84° | 80° | Dictates distal tibial sagittal alignment and tibiotalar contact area. |
| Posterior Distal Femoral Angle | PDFA | 79° to 87° | 83° | Dictates distal femoral sagittal alignment and knee extension mechanics. |
Proximal Posterior Tibial Angle PPTA
The Proximal Posterior Tibial Angle is measured between the anatomic axis of the tibia and the knee joint orientation line in the sagittal plane. The joint orientation line is drawn connecting the anterior and posterior margins of the medial tibial plateau. A normal Proximal Posterior Tibial Angle averages 81 degrees, which corresponds to a normal posterior tibial slope of approximately 9 degrees. Deviations in this angle directly impact cruciate ligament tension and knee kinematics.
Anterior Distal Tibial Angle ADTA
The Anterior Distal Tibial Angle is measured between the anatomic axis of the tibia and the ankle joint orientation line. The ankle joint orientation line connects the anterior and posterior margins of the tibial plafond. Averaging 80 degrees, this angle is paramount for maintaining the functional arc of motion of the ankle.
Posterior Distal Femoral Angle PDFA
The Posterior Distal Femoral Angle is measured between the anatomic axis of the femur and the distal femoral joint line in the sagittal plane. The distal femoral joint line connects the most distal points of the femoral condyles on a lateral radiograph. Averaging 83 degrees, maintaining this angle prevents iatrogenic procurvatum or recurvatum of the femur during distal femoral osteotomies or fracture fixation.
The Malorientation Test and Joint Edge Reference
Identifying a deformity requires a systematic approach known as the Malorientation Test. This test determines whether the joint lines are in a normal orthogonal relationship with the diaphyseal bone segments.
Executing the Sagittal Malorientation Test
The Malorientation Test involves drawing the anatomic axis of the bone segment and measuring its angle relative to the joint line. If the measured angle falls outside the normal range, the test is positive, indicating that a deformity exists either within the metaphysis or at the joint level. A positive Malorientation Test mandates the drawing of a new reference line to locate the Center of Rotation of Angulation.

Determining the Joint Edge Reference JER
When a joint orientation angle is abnormal, the surgeon must reconstruct where the anatomic axis should normally intersect the joint line. This is achieved using the Joint Edge Reference.
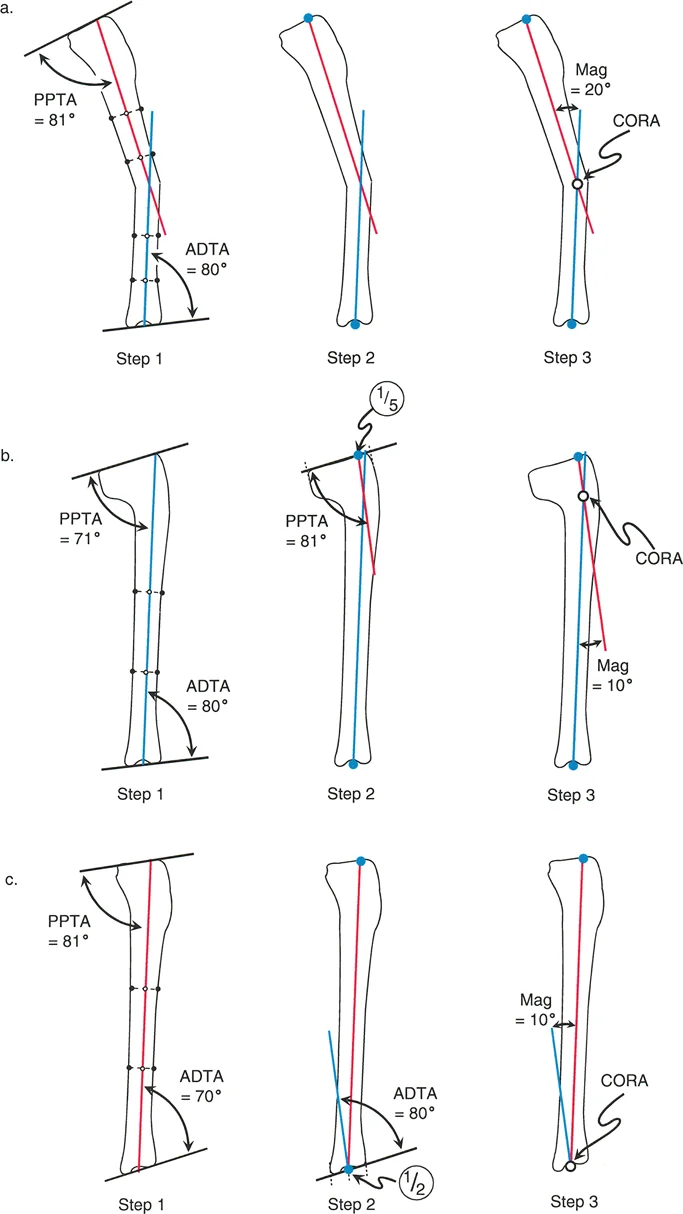
For the proximal tibia, the normal anatomic axis intersects the joint line at a specific point. If the contralateral normal side is available, the surgeon measures the distance from the anterior edge of the tibial plateau to the anatomic axis. If the contralateral side is unavailable, Paley principles dictate using a Joint Edge Reference of one fifth from the anterior edge of the tibial plateau.
For the distal tibia, the normal anatomic axis intersects the tibial plafond at its exact midpoint. Therefore, the distal Joint Edge Reference is one half the distance from the anterior to the posterior margin of the plafond.
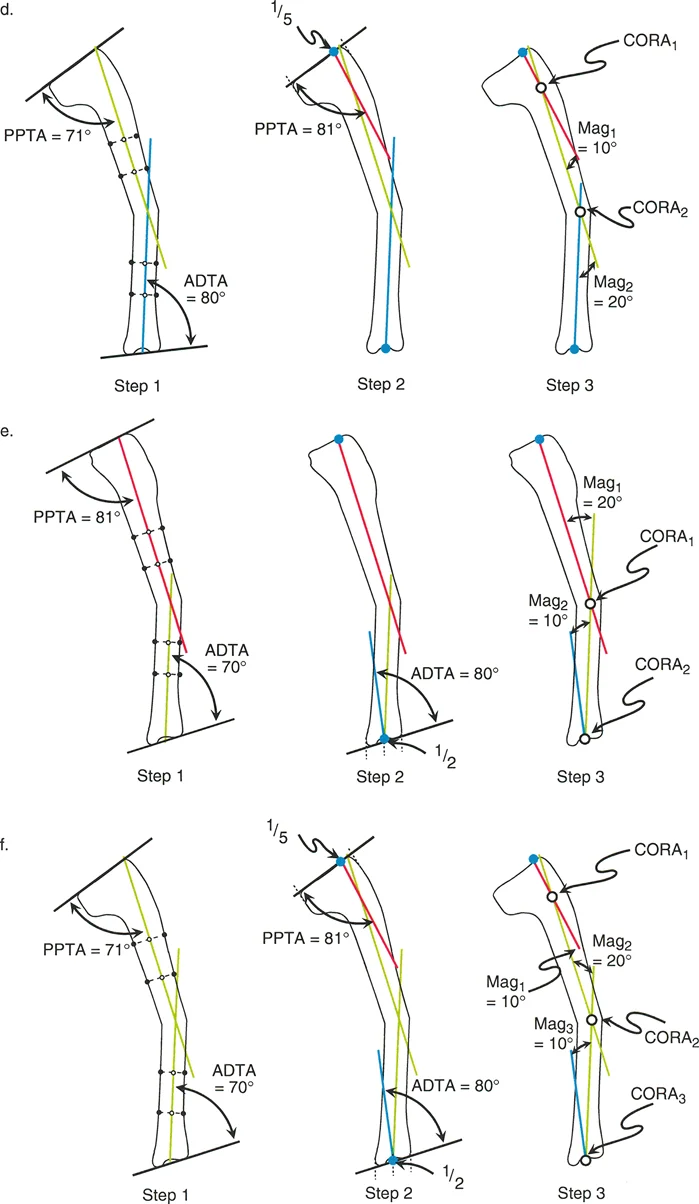
Step by Step Preoperative Planning for Tibial Deformities
Correcting a tibial deformity in the sagittal plane requires a rigid, step by step geometric planning process. This ensures the CORA is accurately mapped and the magnitude of the deformity is quantified.
Drawing the Diaphyseal Lines
Begin by obtaining a high quality, true lateral radiograph of the entire tibia, including the knee and ankle joints. Draw the mid diaphyseal lines to represent the diaphysis of the tibia. Because the tibia may have multiple areas of bowing, draw separate mid diaphyseal lines for the proximal and distal segments adjacent to the suspected deformity. Each mid diaphyseal line segment acts as the anatomic axis line for that specific portion of the bone.
Evaluating Proximal and Distal Joint Orientation
Perform the Malorientation Test between the proximal mid diaphyseal line and the knee joint line to evaluate the Proximal Posterior Tibial Angle.
If the angle is normal at approximately 81 degrees, there is no proximal intra articular or metaphyseal deformity. The diaphyseal line accurately represents the proximal segment.
If the angle is abnormal, you must draw a new proximal anatomic axis line. Start at the Joint Edge Reference of one fifth from the anterior tibial plateau. From this point, draw a line distally at an angle of 81 degrees to the knee joint line.
Next, evaluate the distal tibia. Measure the Anterior Distal Tibial Angle using the distal most tibial mid diaphyseal line and the ankle joint line.
If the angle is normal at approximately 80 degrees, there is no distal deformity.
If the angle is abnormal, draw a new distal anatomic axis line. Start at the midpoint of the tibial plafond. From this point, draw a line proximally at an angle of 80 degrees to the ankle joint line.
Mapping the CORA
Extend the proximal anatomic axis line distally and the distal anatomic axis line proximally until they intersect. The point of intersection is the Center of Rotation of Angulation. The angle formed between these two lines is the true magnitude of the sagittal plane deformity. This intersection point dictates the mechanical apex of the deformity and serves as the foundation for applying the osteotomy rules.
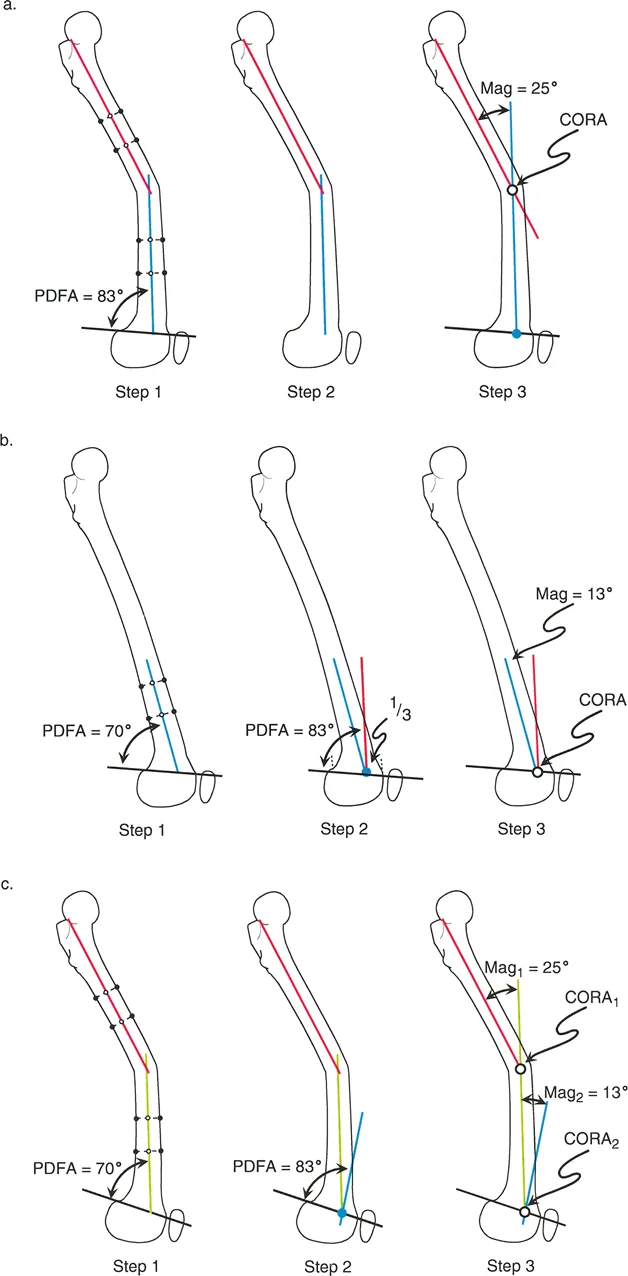
Step by Step Preoperative Planning for Femoral Deformities
Planning for the femur in the sagittal plane presents unique challenges due to the natural anterior bow of the femoral diaphysis. Unlike the tibia, the femoral anatomic axis is not a single straight line from proximal to distal.
Identifying Femoral Diaphyseal Lines
Because of the anterior bow, the surgeon must draw multiple short mid diaphyseal lines along the length of the femur. For distal third deformities, focus on the diaphyseal segment immediately proximal to the deformity. Draw a straight line through the center of the medullary canal in this specific segment. Proximal femoral deformity is generally not considered at this stage of planning because anatomic axis lines can be used up to and including the femoral neck. The relationship of the femoral head orientation to the neck is a highly specialized topic requiring distinct geometric considerations.
Evaluating Distal Femoral Joint Orientation
Measure the Posterior Distal Femoral Angle between the distal femoral joint line and the distal diaphyseal line. If the angle falls outside the normal range of 79 to 87 degrees, a deformity is present. To find the CORA, establish the distal Joint Edge Reference. The normal anatomic axis of the femur intersects the distal joint line at the junction of the anterior one third and posterior two thirds of the femoral condyles. From this reference point, draw a line proximally at an angle of 83 degrees to the joint line. The intersection of this reconstructed line with the proximal diaphyseal line identifies the femoral CORA.
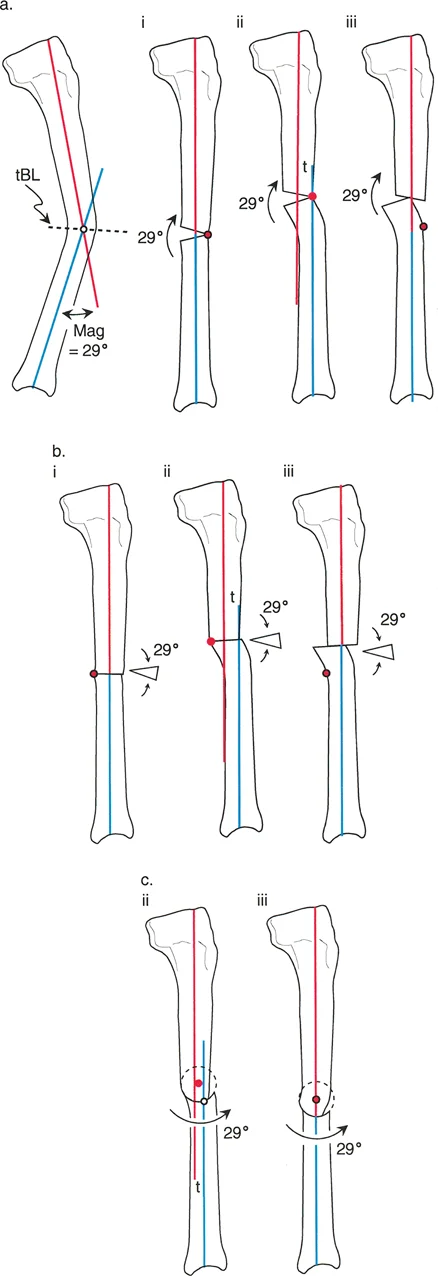
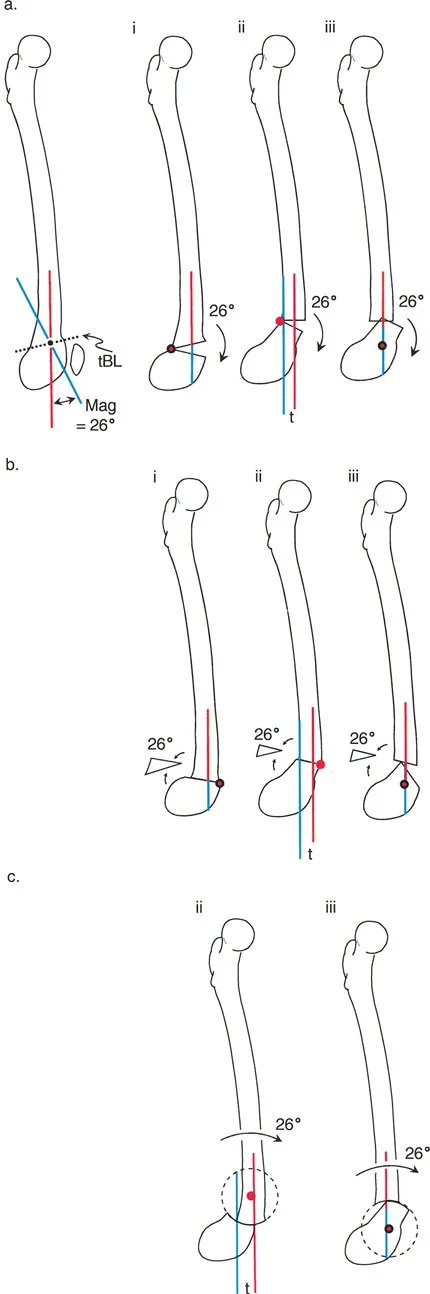
The Three Rules of Osteotomy Applied to Sagittal Deformities
Identifying the CORA is only the first half of the Paley method. The second half is executing the bone cut and correction according to the three rules of osteotomy. These rules dictate the relationship between the CORA, the osteotomy site, and the mechanical hinge or axis of correction.
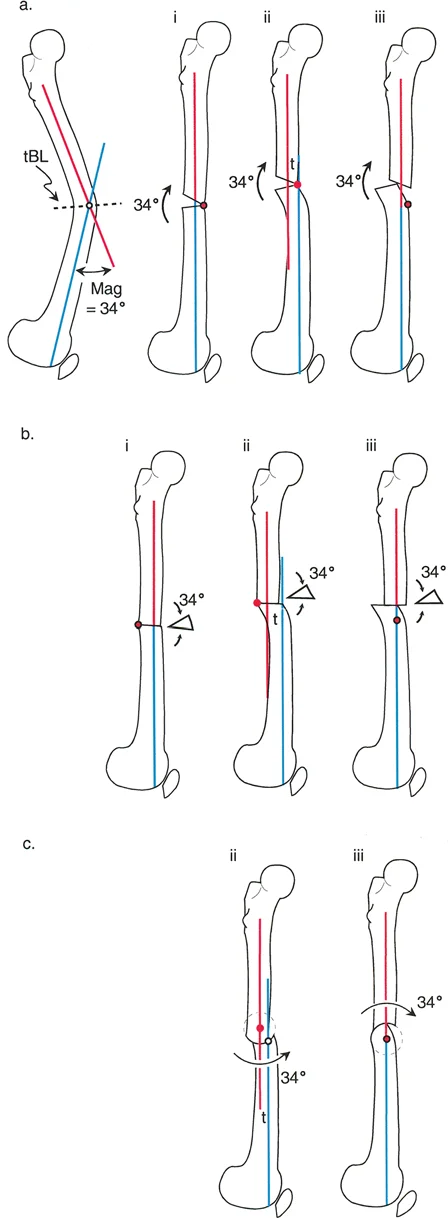
Osteotomy Rule One
Rule One states that if the osteotomy and the axis of correction both pass through the CORA, the bone ends will angulate without translation. This results in a pure angular correction that perfectly realigns the proximal and distal anatomic axes into a single collinear line.
In the sagittal plane, an opening wedge or closing wedge osteotomy performed exactly at the apex of the procurvatum or recurvatum deformity fulfills Rule One. This is the most biomechanically stable and anatomically accurate method of correction, provided the soft tissue envelope allows for the bone cut at that specific level.
Osteotomy Rule Two
Rule Two states that if the axis of correction passes through the CORA, but the actual osteotomy is performed at a different level outside the CORA, the bone ends will undergo both angulation and translation.
This rule is highly relevant in clinical practice. Often, the CORA is located very close to the joint line where poor bone stock or intra articular extension prevents a safe osteotomy. By placing the osteotomy in the healthy diaphyseal bone but keeping the mechanical hinge at the CORA, the surgeon achieves perfect axis realignment. The resulting translation at the osteotomy site is a necessary and mathematically predicted consequence that restores the overall mechanical axis of the limb.
Osteotomy Rule Three
Rule Three states that if the osteotomy and the axis of correction are both located outside the CORA, the bone will undergo pure translation or a combination of translation and angulation that fails to realign the anatomic axes. This results in a persistent parallel shift of the mechanical axis.
Rule Three is generally considered a planning failure or a salvage technique. It creates a secondary deformity known as a translation deformity. In the sagittal plane, a Rule Three error will leave the patient with a persistent shift in their center of gravity, continuing to place abnormal stresses on the knee and ankle joints.
Surgical Execution and Fixation Strategies
Once the planning is complete and the osteotomy rules are applied, the surgeon must choose the appropriate fixation strategy to stabilize the corrected bone segments. The choice depends on the magnitude of the deformity, soft tissue compliance, and patient specific factors.
Acute Correction with Internal Fixation
For mild to moderate sagittal deformities, acute correction followed by internal fixation is often preferred. This involves performing a closing wedge or opening wedge osteotomy at the planned site.
For a procurvatum deformity of the proximal tibia, an anterior closing wedge osteotomy or a posterior opening wedge osteotomy can be performed. Rigid fixation is achieved using anatomically contoured locking plates. The surgeon must carefully monitor the tension on the posterior neurovascular structures during acute recurvatum corrections, as sudden lengthening of the posterior compartment can precipitate compartment syndrome or nerve palsy.
Gradual Correction with Circular External Fixators
For severe deformities, multiplanar deformities, or cases with compromised soft tissues, gradual correction using circular external fixators is the gold standard. Devices like the Ilizarov apparatus or the hexapod based Taylor Spatial Frame allow for precise, millimeter by millimeter correction over several weeks.
When using a traditional Ilizarov frame, the physical hinges must be placed exactly on the axis of correction corresponding to the CORA to satisfy Osteotomy Rule One or Rule Two.
When utilizing a Taylor Spatial Frame, the physical frame can be mounted independently of the deformity apex. The surgeon inputs the exact geometric parameters, including the CORA location and the magnitude of the sagittal deformity, into the software. The software then creates a virtual hinge in space, driving the six struts to gradually manipulate the bone segments into perfect alignment. This eliminates the need for complex physical hinge construction and allows for simultaneous correction of procurvatum, varus, and rotational deformities.
Clinical Pearls for Avoiding Common Pitfalls
Mastering sagittal plane deformity correction requires attention to detail and an awareness of common surgical pitfalls. Below are high yield clinical pearls for the orthopedic surgeon.
- Account for Magnification: Always use a radiopaque calibration marker when obtaining lateral radiographs. Digital planning software relies on accurate scaling to calculate the true magnitude of translation required for Rule Two osteotomies.
- Beware the Fibula: In tibial deformity correction, the fibula acts as a rigid strut. Failure to perform a concomitant fibular osteotomy will tether the correction, leading to undercorrection of the sagittal deformity or catastrophic failure of the tibial fixation.
- Monitor the Equinus Compensatory Mechanism: Patients with severe recurvatum deformities often develop a compensatory equinus contracture at the ankle to keep their foot flat on the floor. Correcting the tibial recurvatum will unmask this equinus, potentially requiring a simultaneous Achilles tendon lengthening or gastrocnemius recession.
- Respect the Anterior Bow of the Femur: Never attempt to draw a single straight anatomic axis line down the entire femur. Always segment the femur and use the diaphyseal line immediately adjacent to the deformity to prevent mapping an artificial CORA.
- Check the Contralateral Limb: Whenever possible, use the patient's normal contralateral limb to establish baseline Joint Orientation Angles and Joint Edge References. Population averages are useful, but individual anatomy varies significantly.
By adhering strictly to Dr Dror Paley’s principles of deformity correction, orthopedic surgeons can reliably diagnose, plan, and execute flawless corrections of sagittal plane deformities, ultimately restoring normal biomechanics and preserving joint function for their patients.
!!! info "Academic Resource & Medical Review"
This academic resource was prepared and medically reviewed by Prof. Dr. Mohammed Hutaif, Consultant Orthopedic & Spine Surgeon. It is formulated specifically for medical students, orthopedic residents, and surgeons preparing for high-stakes board examinations (AAOS, FRCS Tr & Orth, Arab Board).
!!! warning "Disclaimer"
The surgical techniques, classifications, and clinical guidelines presented herein are for educational and academic review purposes only. They are not intended to replace institutional protocols or independent clinical judgment.
You Might Also Like