Paley's Osteotomy Rules: Mastering Dome Osteotomy for Deformity Correction

Key Takeaway
Paley's Osteotomy Rules guide precise limb deformity correction by coordinating CORA, ACA, and osteotomy level. Dome osteotomies, cylindrical bone cuts, offer adjustability, bone contact, and stability, crucial for restoring normal mechanical axis and preventing secondary deformities.
Introduction to Advanced Deformity Correction
In the realm of orthopedic limb reconstruction, mastering the geometric principles of deformity correction is what separates a proficient surgeon from a master surgeon. The principles popularized by Dr. Dror Paley have become the universal language of deformity analysis and correction worldwide. Understanding the complex interplay between the Center of Rotation of Angulation (CORA), the Angulation Correction Axis (ACA), and the physical level of the bone cut (the osteotomy) is paramount for achieving reproducible, excellent clinical outcomes.
When these three critical variables are perfectly coordinated, a deformed limb is restored to a normal mechanical axis with joint lines parallel to the ground. When they are mismatched—either by accident, poor preoperative planning, or calculated clinical necessity—secondary deformities, such as translation or Mechanical Axis Deviation (MAD), inevitably occur. The ability to predict, control, and manipulate these variables forms the foundation of modern orthopedic deformity correction.
This comprehensive guide transforms the fundamental concepts of cylindrical bone cuts and Paley osteotomy rules into a high-yield, clinically applicable resource for orthopedic surgeons, residents, and fellows. We will dissect the biomechanics of the dome osteotomy, analyze the classic Maquet procedure, exhaustively review the geometric sequences of deformity correction, and provide actionable surgical strategies for the operating room.
Foundational Principles of Limb Alignment
Before delving into surgical cuts and correction axes, the surgeon must possess a flawless understanding of normal lower extremity alignment. Deformity correction is essentially the process of reverse-engineering a pathologic limb back to these standard anatomic and mechanical parameters.
Understanding Mechanical Axis Deviation
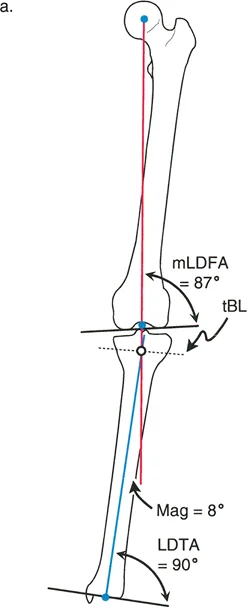
The mechanical axis of the lower extremity is defined by a line drawn from the center of the femoral head to the center of the ankle joint (the center of the tibial plafond). In a normally aligned limb, this mechanical axis line should pass directly through the center of the knee joint, or slightly medial to the tibial spines.
Mechanical Axis Deviation (MAD) occurs when this line falls outside the normal central zone of the knee. A medial shift of the mechanical axis indicates a varus deformity, leading to medial compartment overload and subsequent osteoarthritis. A lateral shift indicates a valgus deformity, overloading the lateral compartment. Quantifying the MAD in millimeters is the first essential step in deformity analysis, as it dictates the magnitude of correction required to restore normal joint biomechanics.
Standard Joint Orientation Angles
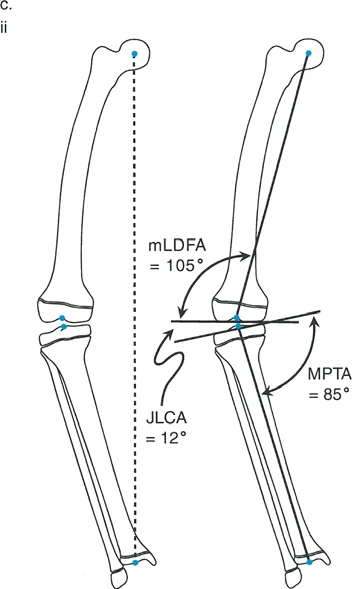
Joint orientation angles define the relationship between the mechanical or anatomic axes of the long bones and their respective joint lines. Dr. Paley standardized these measurements, providing a universal framework for identifying whether a deformity is femoral, tibial, or intra-articular in origin.
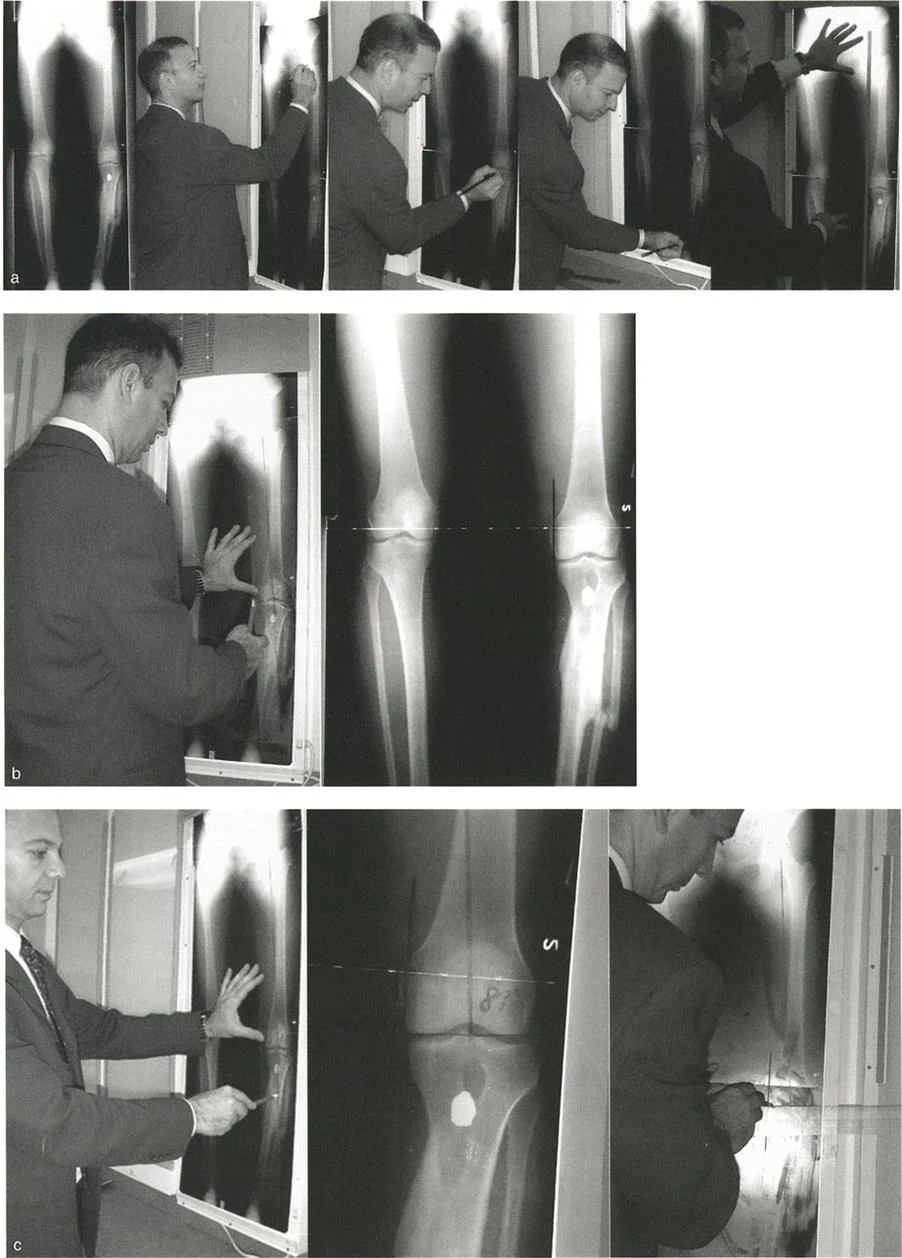
To accurately plan a dome osteotomy or any realignment procedure, the surgeon must measure these angles on a standing full-length anteroposterior radiograph.
| Alignment Parameter | Definition | Normal Range | Average Value |
|---|---|---|---|
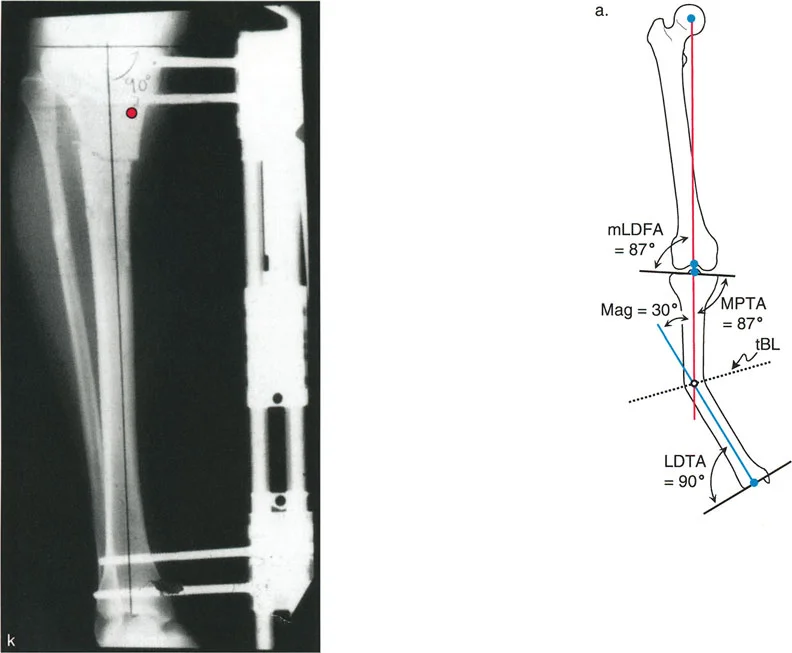
| mLDFA | Mechanical Lateral Distal Femoral Angle | 85° - 90° | 87° |
| MPTA | Mechanical Proximal Tibial Angle | 85° - 90° | 87° |
| mLDTA | Mechanical Lateral Distal Tibial Angle | 86° - 92° | 89° |
| JLCA | Joint Line Convergence Angle | 0° - 2° | 0° - 1° |
| LPFA | Mechanical Lateral Proximal Femoral Angle | 85° - 95° | 90° |
When the mLDFA or MPTA falls outside these normal ranges, the surgeon has localized the source of the Mechanical Axis Deviation and can begin plotting the CORA.
Center of Rotation of Angulation and Angulation Correction Axis
The Center of Rotation of Angulation (CORA) is the cornerstone of Paley deformity analysis. It is defined as the point where the proximal mid-diaphyseal axis and the distal mid-diaphyseal axis of a deformed bone intersect. The CORA represents the geometric apex of the deformity.
The Angulation Correction Axis (ACA) is the hinge point around which the surgeon physically rotates the distal bone segment to correct the deformity. The relationship between the anatomical CORA, the surgical ACA, and the actual physical bone cut dictates the final alignment of the limb.
Paley Osteotomy Rules Explained
Dr. Paley distilled the complex geometry of bone realignment into three fundamental rules. Mastering these rules allows the surgeon to anticipate exactly how a bone will behave when cut and manipulated.
Paley Osteotomy Rule One
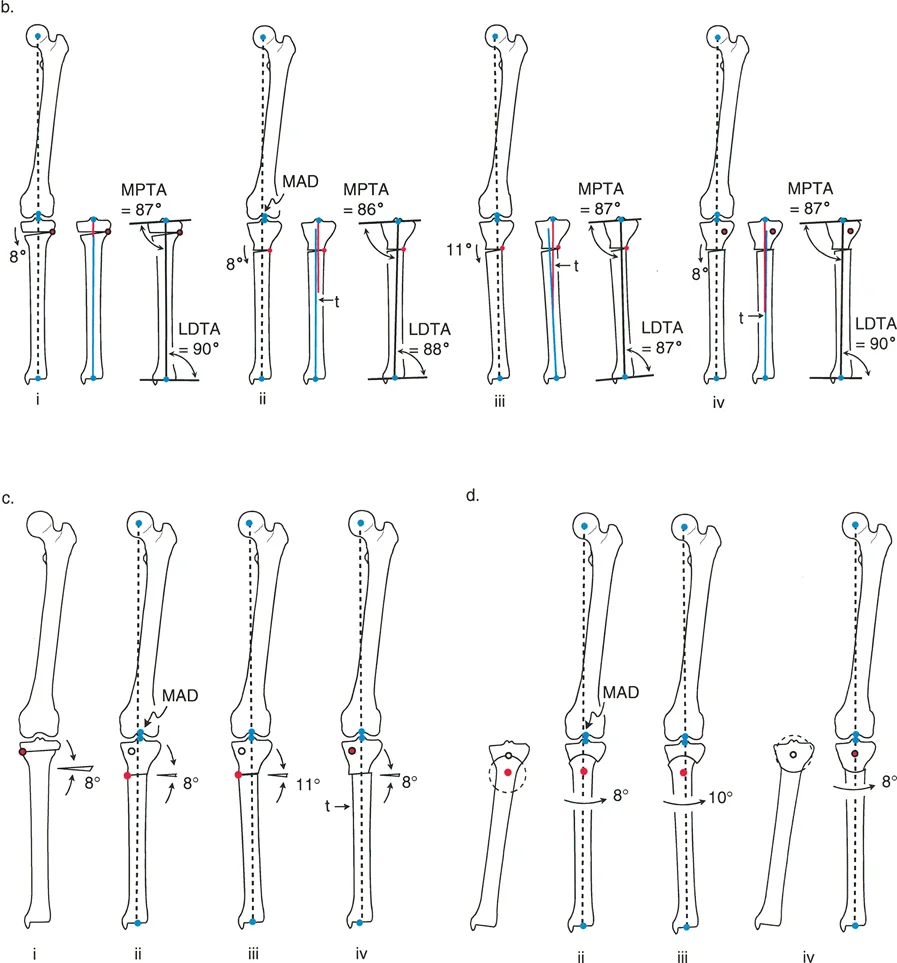
Rule One states that when the osteotomy and the Angulation Correction Axis (ACA) both pass directly through the Center of Rotation of Angulation (CORA), the result is pure angular correction.
In this scenario, the proximal and distal mechanical axes will perfectly realign without any displacement or translation at the osteotomy site. The bone ends simply hinge open or closed. This is the most geometrically straightforward correction, often utilized in simple opening-wedge or closing-wedge osteotomies at the metaphyseal-diaphyseal junction.
Paley Osteotomy Rule Two
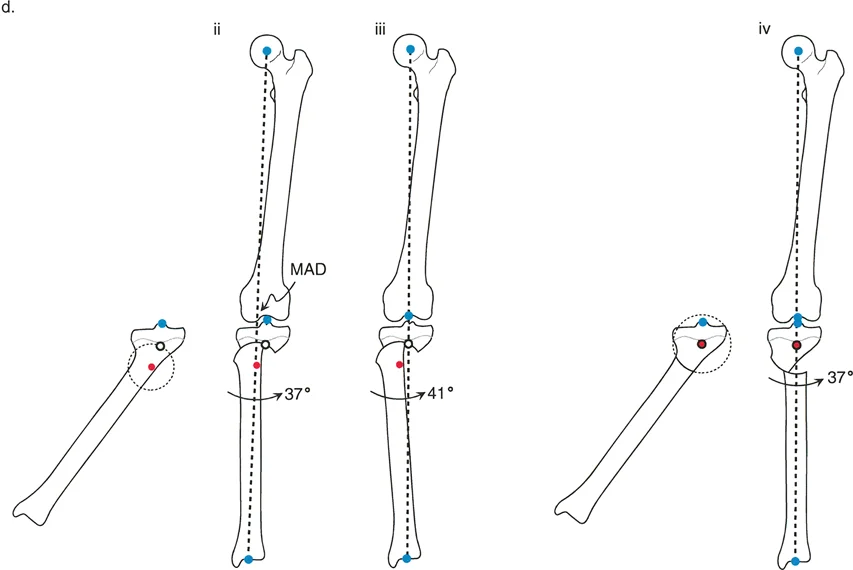
Rule Two states that when the ACA passes through the CORA, but the actual osteotomy cut is performed at a different level, the mechanical axes will still perfectly realign, but the bone ends will translate relative to each other at the osteotomy site.
This rule is the governing principle behind the Focal Dome Osteotomy. Often, the CORA is located in the dense diaphyseal bone or too close to the joint line to safely perform an osteotomy. By placing the ACA at the CORA but making the cut in the safer, well-vascularized metaphyseal bone, the surgeon achieves perfect axis realignment. The necessary translation at the cut site is accommodated by the sliding cylindrical surfaces of the dome osteotomy.
Paley Osteotomy Rule Three
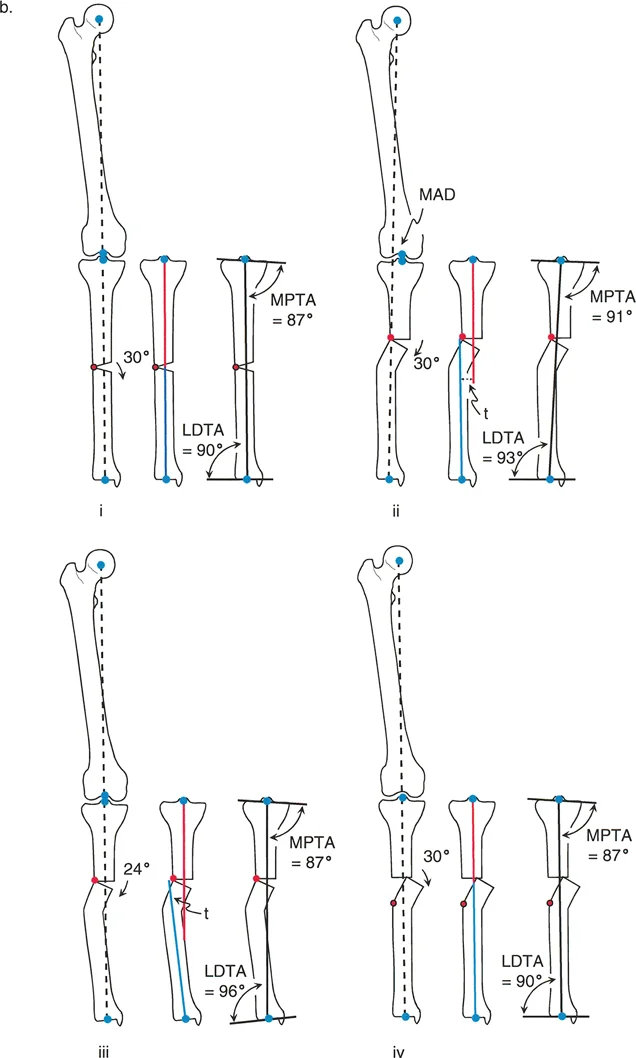
Rule Three warns of geometric mismatch. It states that if the osteotomy and the ACA are placed at a level separate from the CORA, the mechanical axis will not realign. Instead, a secondary translation deformity is created.
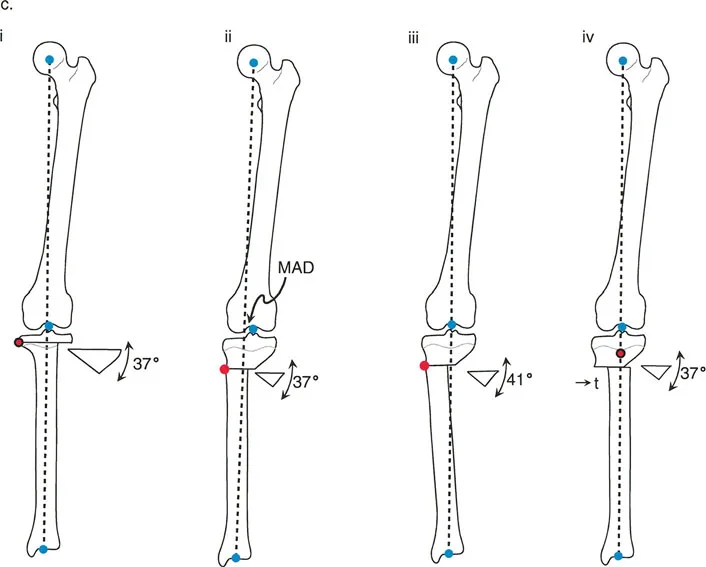
When the ACA is separated from the CORA, correcting the angular deformity induces a translation of the mechanical axis, creating a new Mechanical Axis Deviation (MAD). This is generally considered a surgical error unless intentionally planned to correct a pre-existing translational deformity. Understanding Rule Three is critical for avoiding the pitfalls of historical procedures, such as the classic Maquet osteotomy.
Biomechanics of the Dome Osteotomy
An alternative to the traditional straight-cut transverse or oblique osteotomy is the circular-shaped dome osteotomy. While in general geometry a dome refers to a spherical surface, in orthopedic surgery, the term dome osteotomy specifically refers to a cylindrical-shaped cut in three dimensions.
Although cylindrical osteotomy would be a more anatomically and geometrically accurate descriptor, dome osteotomy remains the universally accepted nomenclature within the orthopedic community. The biomechanical brilliance of this cut lies in its ability to allow rotation around a central axis without creating bone voids.
Advantages of Cylindrical Bone Cuts
The dome osteotomy offers several distinct biomechanical and biological advantages over traditional wedge osteotomies.
- Infinite Adjustability The cylindrical cut allows the bone ends to slide smoothly along an arc. This permits precise, dial-in intraoperative adjustments in the coronal or sagittal planes without needing to recut the bone.
- Maximal Bone to Bone Contact Unlike opening wedge osteotomies that create a void requiring structural bone grafting, or closing wedge osteotomies that inherently shorten the limb, a dome osteotomy maintains high surface area contact throughout the correction. This promotes rapid primary bone healing and reduces the risk of nonunion.
- Inherent Stability The congruent cylindrical surfaces provide excellent intrinsic stability against translation. Once the angular correction is achieved, the nested bone ends resist shear forces, making the application of hardware such as external fixators, intramedullary nails, or locking plates significantly more reliable.
- Preservation of Limb Length The dome osteotomy can achieve the exact angular effects of a closing wedge osteotomy without the actual resection and removal of a bone wedge. This preserves overall limb length, which is critical in patients who cannot tolerate further shortening.
Disadvantages and Limitations
Despite its elegance, the dome osteotomy presents unique challenges that the surgeon must carefully consider during preoperative planning.
- High Technical Difficulty Creating a perfect cylindrical cut requires meticulous surgical technique. It cannot be performed with a single pass of a straight saw blade. It requires a series of parallel drill holes connected by a curved osteotome, or the use of specialized, radius-specific circular saw blades.
- Incompatibility with Rotational Correction Because the cut is cylindrical in nature, attempting to rotate the distal segment axially in the transverse plane to correct torsion will cause the congruent surfaces to mismatch. The peaks of the cylinder will ride up on each other, leading to gapping, instability, and a massive loss of bone contact.
- Diminishing Contact with Large Radii As the radius of the circular osteotomy increases, the arc becomes progressively flatter. With large angular corrections, a large radius leads to diminished bone contact at the edges. Therefore, dome osteotomies are most practical in the metaphyseal regions where the bone diameter is widest, allowing for a tighter, more acute radius.
The Focal Dome Osteotomy Technique
The angular correction with a dome osteotomy occurs as two matching cylindrical-shaped bone ends slide on each other, rotating seamlessly around the central axis of the cylinder. The Angulation Correction Axis (ACA) of a dome osteotomy is inherently the central axis of this cylindrical cut.
Two-dimensionally, the cylindrical dome osteotomy appears as an arc of a circle on a radiograph, and its central axis acts as the center of that circle.
The Golden Rule of the Focal Dome dictates that if the ACA of the dome osteotomy is perfectly centered on the CORA of the deformity, complete realignment of the proximal and distal bone axes is achieved. This highly specific geometric configuration is called a Focal Dome Osteotomy.
Because the dome osteotomy cut itself does not pass through the CORA, the cut is simply an arc around the CORA. Consequently, the bone ends at the osteotomy line must angulate and translate relative to each other to achieve axis realignment. This is a classic, intentional application of Paley Osteotomy Rule Two. The bone ends translate, but they maintain maximum bone contact due to their congruent cylindrical shape, resulting in a perfectly aligned limb with excellent healing potential.
The Maquet Osteotomy Pitfall
To truly understand the power of Paley principles, one must examine historical procedures that failed to account for them. The best-known historical dome osteotomy is the high tibial osteotomy popularized by Maquet in 1976. This procedure utilizes a concave-distal osteotomy proximal to the tibial tuberosity. For decades, it was widely used for varus and valgus tibial deformities where the CORA is located near the level of the joint line.
However, the classic Maquet osteotomy contains a critical geometric flaw when analyzed through modern deformity principles.
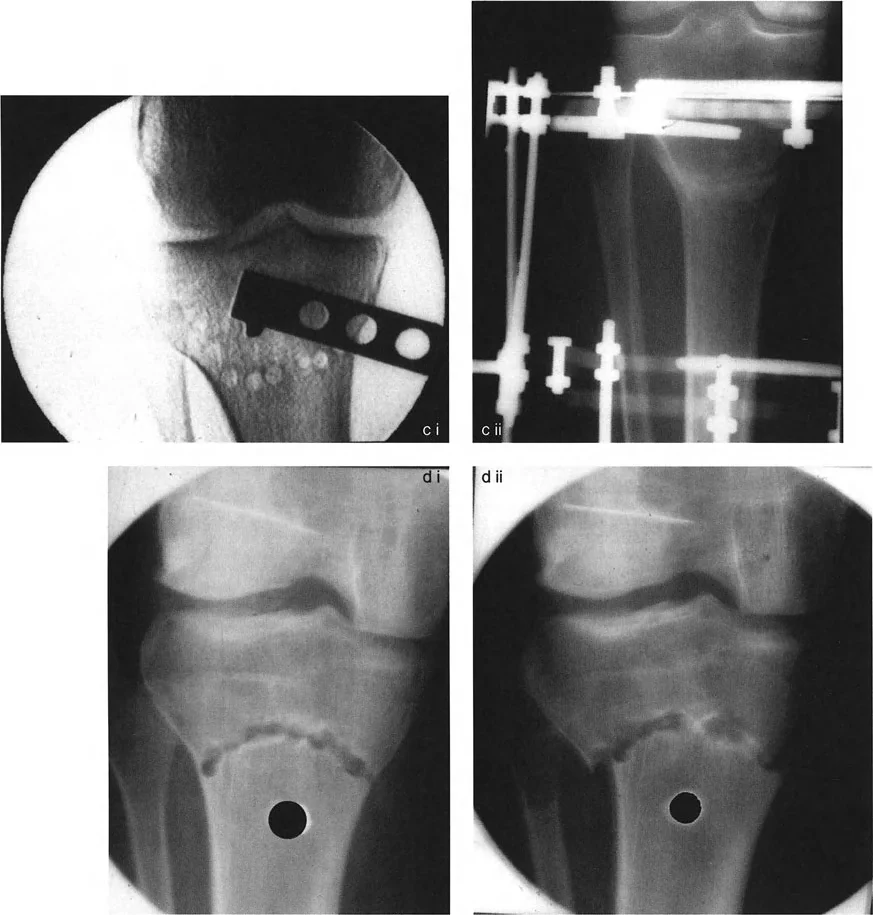
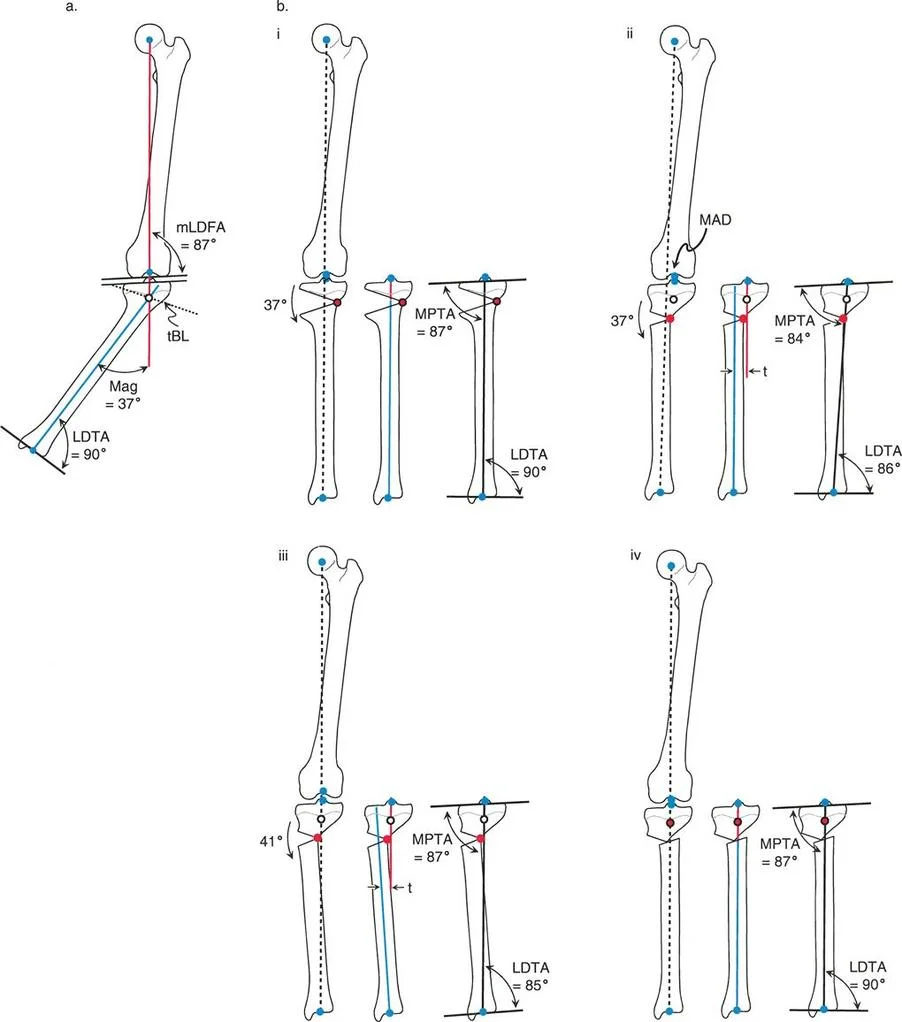
In a traditional Maquet dome osteotomy for a varus tibia, the apex of the dome osteotomy cut may pass through the CORA, but the geometric center of that circular cut, which dictates the ACA, is located far distal to the CORA. Because the central axis of the circular bone cut does not correspond to the true anatomical CORA of the angular deformity, translation of the proximal and distal bone axes will inevitably result.
Consequences of Rule Three Violations
When the surgeon corrects the angular deformity using the Maquet technique, the mechanical axis does not perfectly realign. Instead, a secondary translation deformity is created, which is a direct violation of Paley Osteotomy Rule Three.
To fully correct the Mechanical Axis Deviation (MAD) caused by this unintended translation, the surgeon is often forced to intentionally overcorrect the angular deformity. This compensatory overcorrection leads to an abnormal joint orientation angle, effectively inducing a valgus deformity at the ankle or knee to compensate for the translational shift. This creates abnormal shear stresses across the articular cartilage, leading to early joint degeneration.
Modern Solutions for Proximal Tibial Deformities
Understanding the geometric failure of the Maquet procedure allows modern surgeons to execute proximal tibial dome osteotomies correctly.
To utilize a dome osteotomy in the proximal tibia without inducing translation, the surgeon must ensure the ACA matches the CORA. If the CORA is at the joint line, the center of the dome cut must be at the joint line. This requires planning the radius of the dome cut so that its center perfectly overlays the CORA.
If this is anatomically impossible due to the location of the patellar tendon or other vital structures, the surgeon must plan for a Rule Three correction. This involves calculating the exact amount of translation required at the osteotomy site to offset the induced MAD, utilizing an external fixator or specialized internal plating techniques to hold the translated, angulated segments rigidly in place.
Preoperative Planning Step by Step
Flawless execution of a dome osteotomy begins long before the patient enters the operating room. The reverse planning method is essential for determining the exact radius and location of the cylindrical cut.
Step One Radiographic Analysis
Obtain high-quality, standing, full-length anteroposterior and lateral radiographs of both lower extremities. Ensure the patellae are facing forward to control for rotation.
Step Two Axis and Angle Measurement
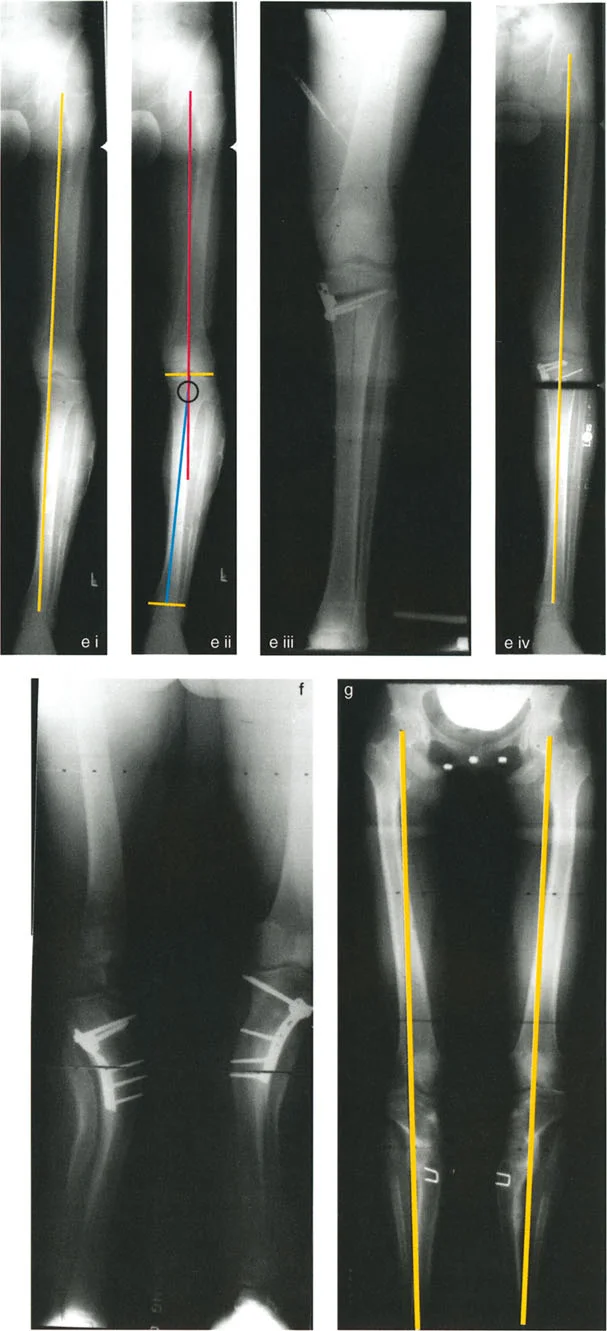
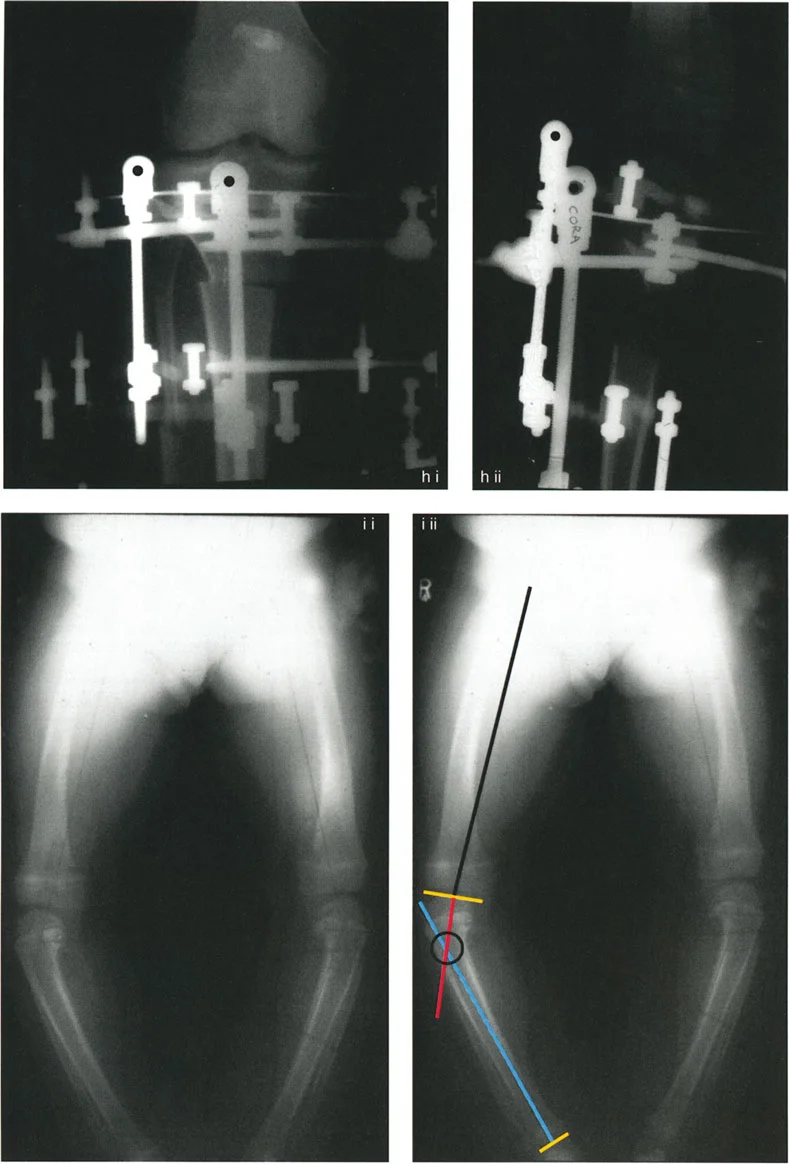
Draw the mechanical axis of the normal and deformed limbs. Calculate the Mechanical Axis Deviation (MAD). Measure the mLDFA, MPTA, and JLCA to localize the deformity to the femur, tibia, or joint space.
Step Three Locating the CORA
Draw the proximal mid-diaphyseal axis and the distal mid-diaphyseal axis. The point where these two lines intersect is the Center of Rotation of Angulation (CORA).
Step Four Planning the Osteotomy Level
Select the optimal level for the bone cut. For a dome osteotomy, this should be in the wide metaphyseal bone to maximize surface area contact.
Step Five Designing the Dome Radius
Set your compass point at the CORA. Draw an arc that passes through your chosen osteotomy level. The distance from the CORA to the osteotomy level is the radius of your dome cut. By definition, because the compass point is at the CORA, the ACA is now perfectly aligned with the CORA, satisfying Paley Osteotomy Rule Two.
Surgical Execution and Clinical Pearls
Translating a two-dimensional preoperative plan into a three-dimensional cylindrical cut requires patience, precision, and respect for soft tissue envelopes.
Creating the Cylindrical Cut
Do not attempt to freehand a dome osteotomy with a standard oscillating saw. The most reproducible method involves using a specialized drill guide or creating a template based on your preoperative planning.
1. Expose the bone subperiosteally to protect surrounding neurovascular structures.
2. Mark the arc of the planned osteotomy on the bone surface using a sterile marker or electrocautery.
3. Use a 2.0mm or 2.5mm drill bit to create multiple parallel drill holes along the marked arc. The holes should penetrate both the near and far cortices.
4. Use a curved osteotome that matches the radius of your planned cut to connect the drill holes.
5. Complete the osteotomy gently to avoid fracturing the metaphyseal bone spikes.
Surgical Pearls for Success
- Control the Periosteum Carefully elevate and preserve the periosteum. The robust osteogenic potential of the periosteum will accelerate the healing of the congruent dome surfaces.
- Manage the Soft Tissues Remember that as the bone ends slide along the cylindrical path, the soft tissue tension will change. Ensure the peroneal nerve is protected and released if a large valgus producing correction is planned in the proximal tibia.
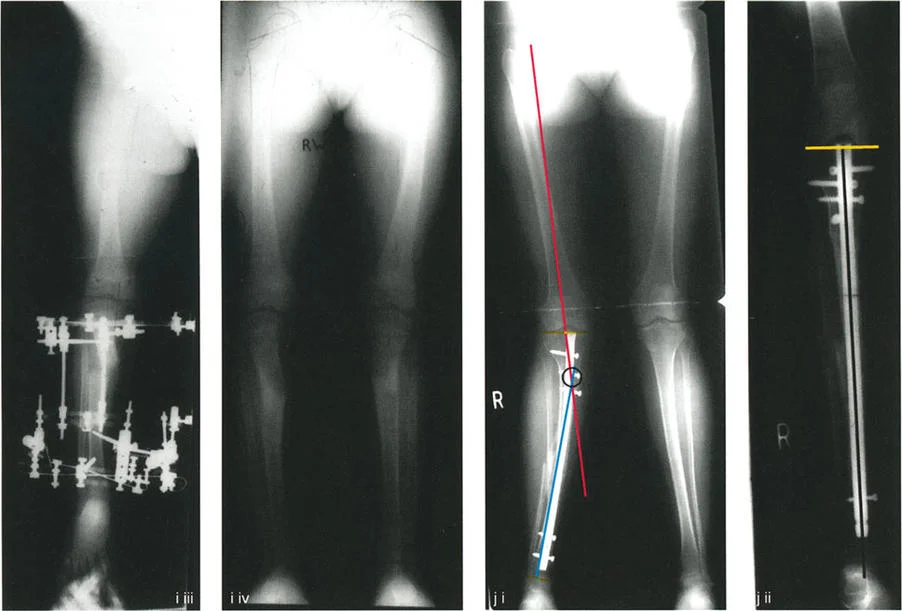
- Provisional Fixation Once the deformity is corrected and the mechanical axis is restored (verified via intraoperative fluoroscopy with a cautery cord or alignment rod), use smooth Kirschner wires to provisionally hold the dome osteotomy.
- Definitive Fixation Because the dome osteotomy is inherently stable against translation, it is highly amenable to fixation with a circular hexapod external fixator, which allows for gradual postoperative fine-tuning. Alternatively, rigid internal fixation with locking plates can be used if perfect intraoperative alignment is confirmed.
Conclusion
Mastering Paley osteotomy rules elevates deformity correction from a game of surgical estimation to an exact, reproducible science. The dome osteotomy, when executed according to the geometric principles of the Focal Dome (Rule Two), is a powerful tool in the orthopedic surgeon's armamentarium. It provides infinite adjustability, maximizes bone healing potential, and preserves limb length.
By deeply understanding the relationship between the CORA, the ACA, and the osteotomy level, surgeons can avoid the historical pitfalls of procedures like the Maquet osteotomy. Through meticulous preoperative planning and precise surgical execution, complex multi-planar deformities can be reliably corrected, restoring mechanical alignment, preserving joint health, and dramatically improving patient outcomes.
!!! info "Academic Resource & Medical Review"
This academic resource was prepared and medically reviewed by Prof. Dr. Mohammed Hutaif, Consultant Orthopedic & Spine Surgeon. It is formulated specifically for medical students, orthopedic residents, and surgeons preparing for high-stakes board examinations (AAOS, FRCS Tr & Orth, Arab Board).
!!! warning "Disclaimer"
The surgical techniques, classifications, and clinical guidelines presented herein are for educational and academic review purposes only. They are not intended to replace institutional protocols or independent clinical judgment.
You Might Also Like