Surgical Approach to the Axillary Nerve: Anterior, Posterior, and Grafting Techniques
Key Takeaway
The surgical approach to the axillary nerve requires meticulous dissection through either an anterior or posterior trajectory, depending on the lesion's location. For extensive injuries within the quadrangular space, a combined approach is necessary. Interfascicular nerve grafting remains the gold standard for bridging defects, allowing for early postoperative mobilization compared to extensive brachial plexus mobilization or clavicular osteotomy.
INTRODUCTION TO AXILLARY NERVE SURGERY
The axillary nerve is highly susceptible to injury due to its tethered anatomical course around the proximal humerus and its intimate relationship with the inferior glenohumeral joint capsule. Injuries most commonly arise from high-energy anterior shoulder dislocations, proximal humerus fractures, direct penetrating trauma, or iatrogenic causes (such as during Latarjet procedures, inferior capsular shifts, or shoulder arthroplasty).
When conservative management fails and clinical or electromyographic (EMG) evidence indicates a lack of spontaneous recovery by 3 to 6 months, surgical exploration is mandated. The surgical approach to the axillary nerve is dictated by the anatomical zone of injury. Lesions proximal to the quadrangular space require an anterior approach, whereas lesions distal to or at the exit of the quadrangular space necessitate a posterior approach. Extensive traction injuries or neuromas-in-continuity spanning the quadrangular space demand a combined anterior and posterior exposure.
This masterclass details the definitive surgical techniques for exposing the axillary nerve, managing nerve gaps, and executing interfascicular nerve grafting, adhering to the highest standards of microsurgical reconstruction.
PREOPERATIVE PLANNING AND PATIENT POSITIONING
Optimal patient positioning is the cornerstone of a successful axillary nerve exploration, as the surgeon must be prepared to access both the anterior brachial plexus and the posterior shoulder, while simultaneously harvesting an autologous nerve graft.
The Lateral Decubitus Position
The patient should be placed in the lateral decubitus position (typically the "floppy lateral" or semi-lateral position).
- Dual Access: This orientation allows unhindered access to both the anterior deltopectoral interval and the posterior shoulder without the need to intraoperatively reposition and re-drape the patient.
- Arm Manipulation: The operative arm is draped free, allowing the surgeon to dynamically internally and externally rotate, abduct, and adduct the shoulder. This mobility is critical for relaxing neurovascular structures and bringing the quadrangular space into view.
- Graft Harvesting: The lateral position provides excellent, simultaneous access to the posterior and lateral aspect of the lower leg for harvesting the sural nerve, which is the gold standard for interfascicular nerve grafting.
Surgical Pearl: Ensure all pressure points (peroneal nerve at the fibular head, greater trochanter) are meticulously padded. An axillary roll must be placed under the contralateral axilla to protect the dependent brachial plexus.
SURGICAL ANATOMY AND BIOMECHANICS
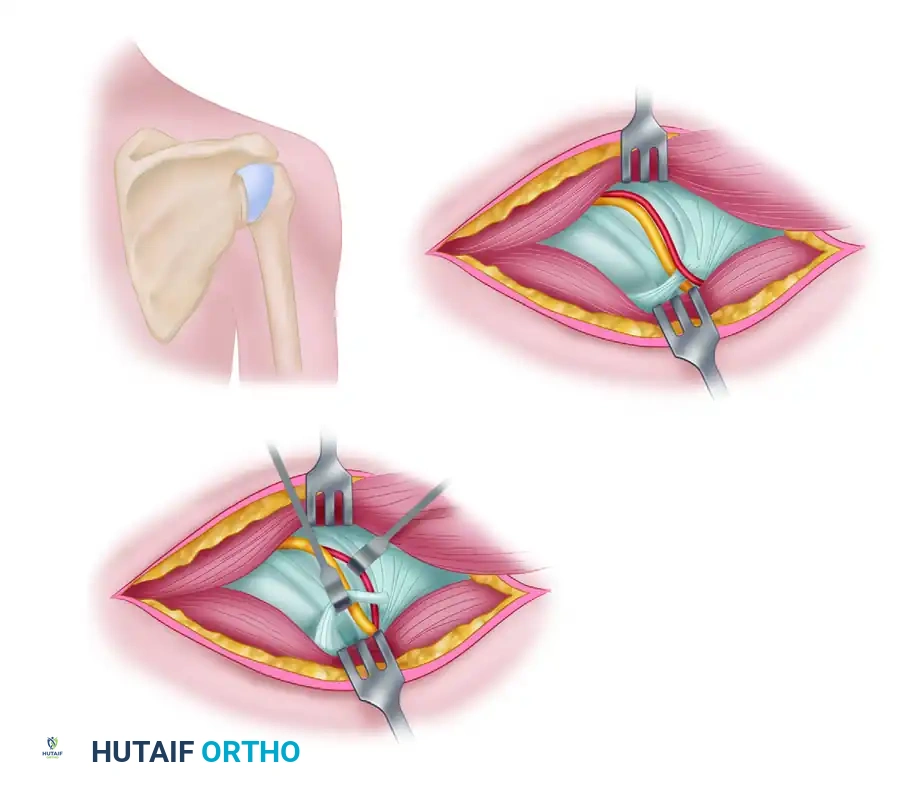
A profound understanding of the axillary nerve's course is non-negotiable. Arising from the posterior cord of the brachial plexus (C5, C6 nerve roots), the axillary nerve courses anterior to the subscapularis muscle and posterior to the axillary artery.
It exits the axilla posteriorly through the quadrangular space, whose boundaries are:
* Superior: Teres minor (and inferior capsule of the glenohumeral joint).
* Inferior: Teres major.
* Medial: Long head of the triceps brachii.
* Lateral: Surgical neck of the humerus.
As it traverses this space alongside the posterior circumflex humeral artery (PCHA), it divides into two main trunks:
1. Anterior Branch: Winds around the surgical neck of the humerus to supply the anterior and middle deltoid.
2. Posterior Branch: Supplies the teres minor and posterior deltoid, terminating as the superior lateral cutaneous nerve of the arm.
Surgical Warning: The branch to the teres minor often arises proximal to the main bifurcation, sometimes even before the nerve fully exits the quadrangular space. Meticulous dissection is required to avoid inadvertently transecting this branch during posterior exposure.
THE ANTERIOR APPROACH TO THE AXILLARY NERVE
The anterior approach is indicated for lesions involving the posterior cord or the proximal segment of the axillary nerve before it enters the quadrangular space.
Step-by-Step Surgical Technique
-
Incision and Superficial Dissection:
- Utilize an extensile deltopectoral incision, identical to that used for exploring the distal parts of the brachial plexus.
- Identify the cephalic vein and retract it laterally with the deltoid or medially with the pectoralis major, depending on the venous tributary anatomy.
- Develop the deltopectoral interval to expose the clavipectoral fascia.
-
Deep Exposure and Muscle Release:
- While it is occasionally possible to expose the nerve in the axilla without detaching the pectoralis major, dividing the insertion of the pectoralis major tendon greatly increases exposure and is highly recommended for complex reconstructions. Leave a 1-cm cuff of tendon on the humerus for later repair.
- Identify the coracoid process. To achieve adequate visualization of the underlying neurovascular bundle, release the conjoint tendon (coracobrachialis and short head of the biceps) and the pectoralis minor off the coracoid. Alternatively, a coracoid osteotomy can be performed and later repaired with a cortical screw.
-
Identifying the Neurovascular Bundle:
- Retract the released coracoid musculature inferiorly and medially.
- Identify the axillary artery and vein. The posterior cord lies posterior to the axillary artery.
- Trace the posterior cord distally to its bifurcation into the radial and axillary nerves.
-
Tracing the Axillary Nerve:
- Follow the axillary nerve as it courses laterally and posteriorly across the anterior surface of the subscapularis muscle.
- Dynamic Maneuver: Externally rotate the arm. This maneuver relaxes the surrounding tissues and allows the nerve to be followed directly into the entrance of the quadrangular space.
THE POSTERIOR APPROACH TO THE AXILLARY NERVE
The posterior approach is utilized for lesions located at the exit of the quadrangular space or within the substance of the deltoid muscle.
Step-by-Step Surgical Technique
-
Incision:
- Begin the incision approximately 5 cm proximal to the posterior axillary fold.
- Extend the incision distally, running parallel to the posterior border of the deltoid muscle.
- End the incision at a point posterior to the deltoid tuberosity of the humerus.
-
Developing the Interval:
- Incise the deep fascia and identify the posterior border of the deltoid.
- Carefully separate the posterior border of the deltoid muscle from the underlying musculature: the infraspinatus, teres minor, teres major, and the long and lateral heads of the triceps brachii.
- Retract the deltoid superiorly and laterally to expose the quadrangular space.
-
Isolating the Nerve:
- Locate the axillary nerve and the accompanying posterior circumflex humeral vessels as they emerge from the quadrangular space.
- At varying distances—sometimes up to 2.5 cm after emerging from the space—the axillary nerve divides into its anterior and posterior branches.
- Identify and protect the branch to the teres minor, which often arises proximal to the main bifurcation point.
Pitfall: The posterior circumflex humeral artery is intimately associated with the nerve in this region. Brisk bleeding from this vessel can obscure the surgical field and lead to iatrogenic nerve injury during blind attempts at hemostasis. Always isolate and ligate/bipolar the vascular branches meticulously.
THE COMBINED APPROACH
If the axillary nerve is injured directly within the quadrangular space, or if a long gap must be closed that spans from the anterior axilla to the posterior shoulder, a combined anterior and posterior approach is mandatory.
The patient's lateral decubitus positioning allows the surgeon to seamlessly transition between the anterior deltopectoral exposure and the posterior deltoid-splitting/retracting exposure. A Penrose drain or vessel loop can be passed through the quadrangular space to aid in identifying the anatomical trajectory and shuttling nerve grafts from anterior to posterior.
METHODS OF CLOSING NERVE GAPS
Following the excision of a neuroma-in-continuity or the debridement of scarred nerve ends (Wallerian degeneration), a gap inevitably remains. The fundamental principle of peripheral nerve surgery is that neurorrhaphy must be entirely tension-free. Tension across a nerve repair causes ischemia, leading to profound intraneural fibrosis and failure of axonal regeneration.
1. Nerve Mobilization (For Small Gaps)
Historically, gaps of 4 to 5 cm were closed by aggressively mobilizing the nerve.
* Technique: The axillary nerve and the posterior cord of the brachial plexus are mobilized proximally up to the level of the clavicle.
* Internal Neurolysis: The axillary nerve fascicles can be stripped (internally neurolysed) up the posterior cord for 3 to 4 cm, separating them from the radial nerve fascicles to gain length.
* Bone Resection: Rarely, procedures such as resecting a portion of the clavicle (clavicular osteotomy) may be indicated to shorten the skeletal distance and gain more relative nerve length.
2. Interfascicular Nerve Grafting (The Gold Standard)
Modern microsurgery dictates that interfascicular nerve grafting is the preferred method for bridging gaps in the axillary nerve. It is vastly superior to extensive brachial plexus mobilization or clavicular osteotomy.
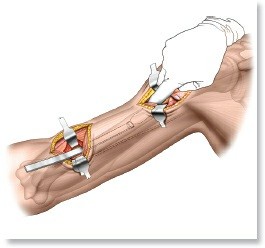
- Sural Nerve Harvest: The sural nerve is harvested from the lower extremity using a minimally invasive stripping technique or open step-ladder incisions. It provides up to 30-40 cm of expendable sensory nerve graft.
- Preparation: The proximal and distal stumps of the axillary nerve are serially sectioned ("bread-loafed") under the operating microscope until healthy, pouting fascicles are visualized.
- Cable Grafting: The sural nerve is cut into appropriate lengths to form "cables." These cables are interposed between the proximal and distal stumps to match the cross-sectional area of the axillary nerve.
- Microsurgical Repair: The grafts are secured using 8-0 or 9-0 non-absorbable monofilament sutures (e.g., nylon) placed through the epineurium and perineurium. Fibrin glue may be used to augment the repair and reduce the number of sutures required, thereby minimizing foreign body reaction.
Clinical Pearl: Because interfascicular nerve grafting places minimal to zero tension on the nerve repair site, it allows for early postoperative motion. This is a massive clinical advantage over primary repair under tension, which requires prolonged immobilization and leads to severe shoulder stiffness.
POSTOPERATIVE PROTOCOL AND REHABILITATION
The postoperative rehabilitation protocol is heavily influenced by the method of gap closure.
Following Interfascicular Nerve Grafting
Because the graft is tension-free, early passive motion is permissible and encouraged to prevent glenohumeral adhesive capsulitis.
* Phase 1 (0-4 Weeks): The shoulder is supported in a standard sling for comfort. Passive range of motion (PROM) exercises are initiated immediately, focusing on forward elevation and external rotation.
* Phase 2 (4-8 Weeks): Active-assisted range of motion (AAROM) is introduced. The sling is discontinued.
* Phase 3 (8-12 Weeks): Active range of motion (AROM) begins.
* Phase 4 (>12 Weeks): Strengthening exercises for the rotator cuff and periscapular stabilizers are initiated. Deltoid strengthening is delayed until clinical or EMG evidence of reinnervation is present.
Following Primary Repair with Mobilization
If a primary repair was achieved through extensive mobilization (a historical or rare approach today), the shoulder must be immobilized in adduction and internal rotation to remove all tension from the posterior cord and axillary nerve.
* Immobilization: Strict immobilization in a custom orthosis for 4 to 6 weeks.
* Gradual Mobilization: After 6 weeks, the shoulder is gradually mobilized, often requiring serial splinting or a highly supervised, slow progression of PROM to prevent rupturing the repair site.
Monitoring Nerve Regeneration
Axonal regeneration occurs at a rate of approximately 1 mm per day. Given the distance from the brachial plexus to the deltoid motor endplates, clinical signs of recovery (muscle flicker, advancing Tinel's sign) may take 4 to 6 months to manifest. Baseline and serial EMGs at 3, 6, and 9 months postoperatively are critical for objectively tracking reinnervation. If no reinnervation is noted by 9-12 months, secondary reconstructive options, such as regional muscle transfers (e.g., latissimus dorsi or pectoralis major transfer), must be considered.
You Might Also Like