Humeral Shaft Anterior Approach: Master Surgical Techniques

Key Takeaway
In this comprehensive guide, we discuss everything you need to know about Humeral Shaft Anterior Approach: Master Surgical Techniques. The humeral shaft anterior approach exposes the front surface of the humerus for surgical procedures like internal fixation of fractures, treating nonunion, or osteotomy. This approach utilizes specific internervous planes, but the radial nerve is the structure at greatest risk during surgery. Patients are typically positioned supine, with the arm abducted.
Humeral Shaft Anterior Approach Master Surgical Techniques
Introduction and Epidemiology
Fractures of the humeral shaft represent a significant proportion of long bone injuries, accounting for approximately 3-5% of all fractures and up to 20% of all humerus fractures. These injuries predominantly affect younger males through high-energy trauma and older individuals, particularly women, due to low-energy falls associated with osteoporosis. While non-operative management with functional bracing remains the gold standard for many humeral shaft fractures due to the humerus's robust healing potential and ample soft tissue envelope, operative intervention is increasingly indicated for specific fracture patterns, polytrauma patients, or when non-operative treatment fails.
The anterior approach to the humeral shaft is a versatile and commonly employed surgical exposure, primarily exposing the anteromedial and anterolateral aspects of the humerus. It offers direct visualization of the anterior surface of the shaft, facilitating the application of plates and screws for internal fixation. This approach is particularly advantageous for proximal and midshaft fractures, where anterior plate application is biomechanically favorable for resisting bending forces. The primary surgical challenge associated with this approach, and indeed with all approaches to the humerus, is the identification and protection of the radial nerve, which has a variable course but is consistently at greatest risk of iatrogenic injury. This comprehensive guide aims to delineate the anatomical considerations, indications, meticulous surgical technique, and potential complications associated with the anterior approach to the humeral shaft, drawing upon current academic understanding and established surgical principles.
Surgical Anatomy and Biomechanics
A thorough understanding of the regional anatomy is paramount for safe and effective execution of the anterior humeral shaft approach. The surgical plane dissects through distinct tissue layers, necessitating precise identification of muscle intervals, fascial structures, and critical neurovascular elements.
Bony Anatomy and Morphology
The humeral shaft extends from the surgical neck proximally to the supracondylar ridges distally. It is broadly cylindrical in its proximal aspect, transitioning to a more triangular cross-section distally. The anterior surface is relatively flat, making it conducive for plate application. Key anatomical landmarks include the deltoid tuberosity laterally (mid-shaft), the anteromedial and anterolateral surfaces, and the variable width of the medullary canal. The cortex is thickest in the mid-diaphysis, which is a common site for high-energy fractures. The blood supply to the humeral diaphysis primarily derives from the profunda brachii artery, which enters at the posterior aspect via the nutrient foramen, though extensive anastomotic networks exist within the periosteum.
Musculature and Fascial Planes
The superficial muscles relevant to the anterior approach include the deltoid and pectoralis major. The deep muscles covering the anterior humerus are the coracobrachialis and the biceps brachii (medially), and the brachialis (deep to the biceps and coracobrachialis, directly investing the humerus).
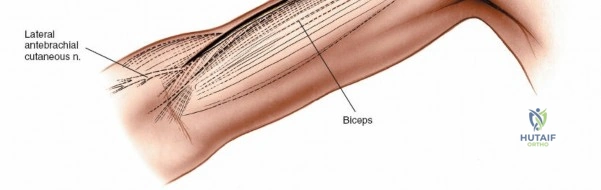
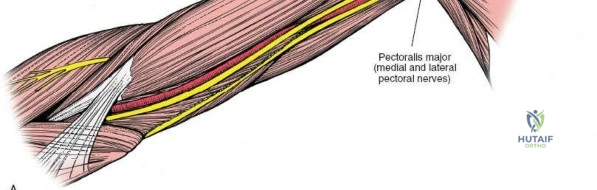
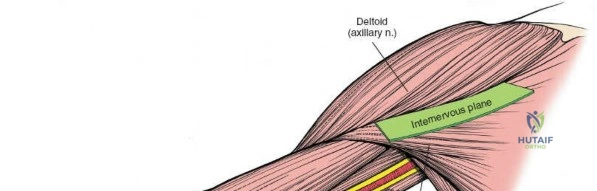
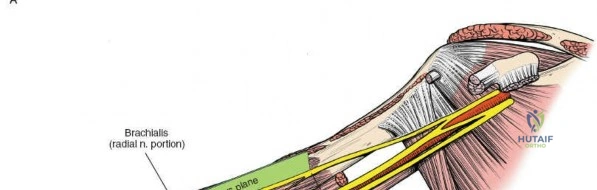
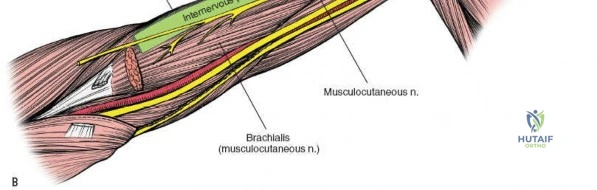
The primary internervous plane for the anterior approach is the deltopectoral groove. This interval lies between the deltoid muscle (innervated by the axillary nerve) laterally and the pectoralis major muscle (innervated by the medial and lateral pectoral nerves) medially. This plane is avascular and provides a direct path to the anterior aspect of the humerus without traversing major neurovascular structures in its proximal extent. Distally, the approach may require elevating or splitting the brachialis muscle. The brachialis muscle receives dual innervation, typically from both the musculocutaneous nerve and a branch of the radial nerve. Splitting the brachialis longitudinally in its midline often minimizes denervation.
Neurovascular Structures
The identification and protection of neurovascular structures are the most critical aspects of this approach.
- Cephalic Vein: Located superficially within the deltopectoral groove, this vein should be identified, ligated if necessary, but ideally preserved and retracted either medially or laterally throughout the procedure.
- Musculocutaneous Nerve: This nerve typically pierces the coracobrachialis muscle approximately 5-8 cm distal to the coracoid process and then travels between the biceps and brachialis muscles. It innervates the coracobrachialis, biceps brachii, and part of the brachialis. Proximally, it is generally safe within the coracobrachialis. Care must be taken during deep dissection to avoid injury, especially when retracting the biceps and coracobrachialis.
- Radial Nerve: This is the structure at greatest risk during the anterior approach to the humeral shaft. It courses from the posterior compartment, spirals around the humeral shaft in the spiral groove (posteriorly and laterally), and then pierces the lateral intermuscular septum to enter the anterior compartment approximately 10-14 cm proximal to the lateral epicondyle. It then descends anterior to the lateral epicondyle, between the brachialis and brachioradialis muscles, dividing into its superficial (sensory) and deep (motor) branches. Its variable exit point from the spiral groove and passage anteriorly makes its precise location unpredictable without direct visualization. Prophylactic identification and gentle retraction are mandatory, particularly for fractures in the middle and distal thirds of the humerus.
- Brachial Artery and Veins: These major vessels lie on the anteromedial aspect of the humerus, medial to the coracobrachialis and biceps. They are generally well protected by these muscles and are typically not encountered directly with careful lateral retraction of the neurovascular bundle during standard anterior plating. However, aggressive medial retraction, especially in comminuted fractures or cases of significant callus, can place them at risk. The profunda brachii artery branches off the brachial artery in the proximal arm and accompanies the radial nerve in the spiral groove.
Biomechanical Considerations
The anterior approach allows for the placement of an anterior plate, which functions as a tension band on the anterior surface of the humerus, resisting anterior bending moments. This biomechanical advantage is particularly relevant given the muscle mass anteriorly and the typical loading patterns of the humerus. For long oblique or spiral fractures, lag screw fixation combined with a neutralization plate can be achieved. For comminuted fractures, a bridging plate construct maintains length and alignment. The thick anterior cortex provides excellent purchase for screws.
Indications and Contraindications
The anterior approach to the humeral shaft is indicated for a range of pathologies, primarily traumatic, but also for specific neoplastic or infectious conditions. The decision for operative versus non-operative management is nuanced, balancing fracture characteristics, patient comorbidities, and functional demands.
Operative Indications for Anterior Approach
The anterior approach is particularly well-suited for fractures of the proximal and mid-diaphysis, offering excellent exposure and biomechanical advantages for plate application.
- Humeral Shaft Fractures:
- Open Fractures: Gustilo-Anderson Type I, II, and select Type III (after appropriate debridement).
- Polytrauma Patients: Facilitates early mobilization and reduces hospital stay.
- Vascular Injury Requiring Repair: Direct exposure for vascular surgeon access in conjunction with fracture stabilization.
- Brachial Plexus Injury Requiring Exploration/Repair: Similar to vascular injury, provides necessary access.
- Pathologic Fractures: Due to metastatic disease or primary bone tumors, requiring stabilization and often biopsy or resection.
- Segmental Fractures: Often unstable and benefit from rigid internal fixation.
- Floating Elbow Injury: Concomitant ipsilateral forearm and humeral shaft fractures benefit from stable humeral fixation.
- Short Oblique or Transverse Fractures of Midshaft: Ideal for compression plating.
- Fractures with Significant Soft Tissue Interposition: Where closed reduction fails.
- Acute Radial Nerve Palsy with Open Fracture: Exploration for nerve integrity and repair if indicated, alongside fracture fixation.
- Nonunion or Malunion: Failed non-operative management or previous fixation, requiring revision surgery, debridement, and bone grafting.
- Other Pathologies:
- Osteotomies: Corrective osteotomies for malunion or developmental deformities.
- Bone Tumors: Biopsy, intralesional curettage, or wide en bloc resection of benign or malignant tumors of the humeral shaft.
- Osteomyelitis: Debridement and stabilization in cases of chronic or refractory humeral osteomyelitis.
Relative and Absolute Contraindications
While versatile, the anterior approach is not universally applicable and has specific contraindications.
- Absolute Contraindications:
- Severe Soft Tissue Compromise: Extensive skin loss, severe contamination, or established deep infection where surgical exposure would compromise wound healing or exacerbate infection.
- Inadequate Surgical Expertise: The complexities of radial nerve identification and protection necessitate experienced surgical hands.
- Relative Contraindications:
- Fractures Better Suited for Other Approaches: Very distal metaphyseal fractures often allow for easier and safer exposure via anterolateral or posterior approaches. Distal spiral or long oblique fractures may also lend themselves to a posterior approach for nerve visualization.
- Patient Comorbidities: Extremely poor anesthetic risk, though this applies to any operative intervention.
- Severe Comminution with Extensive Periosteal Stripping Risk: Although minimized with careful technique, this approach does involve direct exposure of the fracture site.
- Extremely Obese Patients: Can make retraction and visualization challenging.
Operative vs Non Operative Indications Summary
| Indication Type | Specific Condition / Scenario | Operative Treatment | Non Operative Treatment |
|---|---|---|---|
| Fractures | Midshaft Transverse/Short Oblique | ORIF (plate osteosynthesis) via Anterior Approach | Functional Bracing (if stable, compliant) |
| Open Fractures (Gustilo I-II) | ORIF, Debridement, Antibiotics | Not applicable | |
| Segmental Fractures | ORIF (plate osteosynthesis) | Not recommended | |
| Polytrauma Patient | Expedited ORIF for early mobility | Not ideal | |
| Vascular Injury | ORIF concomitant with vascular repair | Not applicable | |
| Brachial Plexus Injury | ORIF concomitant with nerve exploration/repair | Not applicable | |
| Pathologic Fractures | ORIF, Biopsy, Oncologic Resection | Palliative care (non-ambulatory, poor prognosis) | |
| Acute Radial Nerve Palsy (open fx) | Exploration, Neurolysis/Repair, ORIF | Observation (closed fx, no exploration) | |
| Significant Angulation/Shortening (conservative failure) | ORIF | Functional Bracing (initial attempt) | |
| Nonunion/Malunion | Symptomatic Nonunion | Revision ORIF, Autograft/Allograft | Observation (asymptomatic) |
| Symptomatic Malunion | Corrective Osteotomy, ORIF | Observation (asymptomatic) | |
| Other Pathologies | Bone Tumors (requiring excision) | Biopsy, Resection, Reconstruction, ORIF | Observation (benign, asymptomatic) |
| Chronic Osteomyelitis | Debridement, Antibiotic Spacer, ORIF | Long-term antibiotics (limited cases) |
Pre Operative Planning and Patient Positioning
Meticulous preoperative planning is a cornerstone for minimizing complications and achieving optimal outcomes with the anterior humeral shaft approach.
Preoperative Assessment
A comprehensive patient evaluation includes a detailed history, physical examination, and thorough neurovascular assessment of the affected extremity. Baseline neurological function, particularly radial nerve status, must be meticulously documented. Standard orthogonal radiographs (anteroposterior and true lateral views) of the entire humerus, including the shoulder and elbow joints, are essential for characterizing the fracture pattern, comminution, and bone quality. Computed tomography (CT) scans may be beneficial for complex comminuted fractures, articular involvement (though less common in pure shaft fractures), or preoperative templating for tumor cases. Imaging should always include the joint above and below the fracture. Preoperative templating with a contralateral normal humerus radiograph can assist in determining appropriate plate length and screw size. Discuss potential implant options (e.g., standard vs. locked plating, length of plate).
Anesthesia Considerations
General anesthesia is typically employed. Regional anesthesia, such as an interscalene brachial plexus block, can be a valuable adjunct for both intraoperative pain control, reducing anesthetic requirements, and providing excellent postoperative analgesia. This also facilitates early postoperative rehabilitation.
Patient Positioning
The patient is placed in the supine position on the operating table.
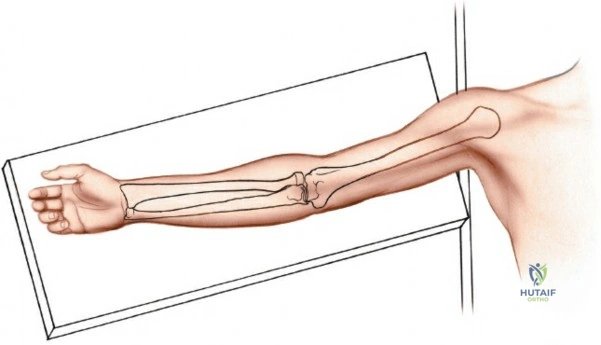
The ipsilateral arm is placed on a radiolucent arm board, abducted approximately 60 degrees from the torso and externally rotated to allow full access to the anterior aspect of the arm. This positioning facilitates both the surgical approach and intraoperative fluoroscopic imaging in both AP and lateral planes without repositioning.

Ensure the arm board is sufficiently stable and positioned to permit full manipulation of the arm during the procedure for reduction and fluoroscopy. Adequate padding for the contralateral arm, head, and heels is crucial to prevent pressure neuropathies.
The surgical field encompasses the entire shoulder, arm, and forearm, extending to the hand. This allows for manipulation of the elbow and wrist to assess radial nerve function post-fixation if warranted. A tourniquet may be used proximally, but its use is controversial given the risk of prolonged ischemia and potential for further nerve compromise, particularly with radial nerve proximity. Many surgeons prefer to operate without a tourniquet, relying on meticulous hemostasis. The surgical area is then prepped with an appropriate antiseptic solution and sterilely draped, ensuring exposure from the deltoid to the elbow crease. The image intensifier should be draped and positioned to allow unobstructed views.

Detailed Surgical Approach and Technique
The anterior approach to the humeral shaft, often referred to as the Henry approach, is a classic exposure that provides excellent access to the anterior and anterolateral aspects of the humerus. A precise, step-by-step technique is crucial for minimizing soft tissue disruption and preventing iatrogenic neurovascular injury.
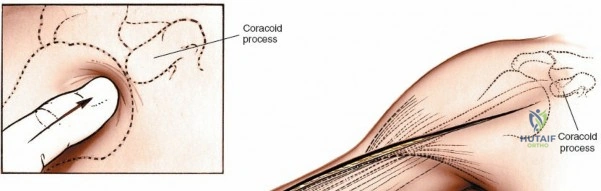
Incision
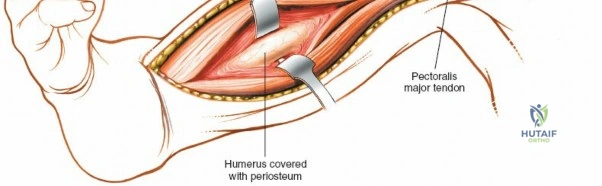
A longitudinal skin incision is made, beginning from the tip of the coracoid process, extending distally along the palpable deltopectoral groove. The incision follows the natural contour between the deltoid and pectoralis major muscles and can be extended distally as needed along the lateral aspect of the shaft of the humerus, between the biceps and brachialis muscles. The length of the incision is dictated by the pathology; typically, it should be sufficient to adequately expose the fracture site and allow for application of an appropriately long plate with at least 6-8 cortices of purchase on either side of the fracture.
The incision is deepened through the subcutaneous tissues. Meticulous hemostasis is maintained throughout using electrocautery.
Superficial Dissection and Internervous Plane
Once the skin incision is made, the superficial fascia is incised. The deltopectoral groove is identified, characterized by the adipose tissue and the readily visible cephalic vein. The cephalic vein is identified and carefully mobilized. It is usually retracted medially with the pectoralis major, though some surgeons prefer lateral retraction or ligation if necessary, particularly if it obscures access. However, preservation is preferred to minimize postoperative swelling.
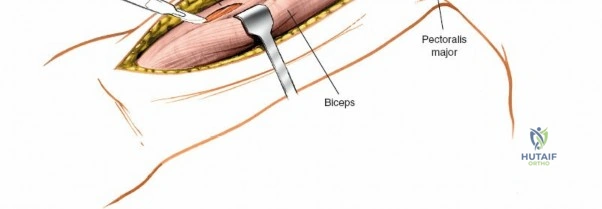
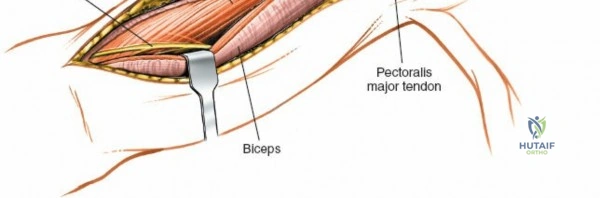
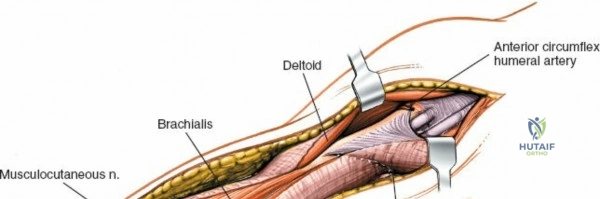
The deep fascia overlying the deltopectoral interval is incised. The plane between the deltoid muscle (laterally) and the pectoralis major muscle (medially) is bluntly dissected. The deltoid is gently retracted laterally, and the pectoralis major, along with the cephalic vein, is retracted medially. This exposes the underlying coracobrachialis and the short head of the biceps.

Deep Dissection and Exposure
As the deltopectoral interval is developed, the deep structures become visible. The coracobrachialis muscle and the short head of the biceps brachii muscle lie medially, with the long head of the biceps traversing the bicipital groove more laterally. The musculocutaneous nerve typically enters the coracobrachialis proximally, approximately 5-8 cm distal to the coracoid process. These muscles (biceps and coracobrachialis) are typically retracted medially, protecting the underlying brachial artery and median nerve.
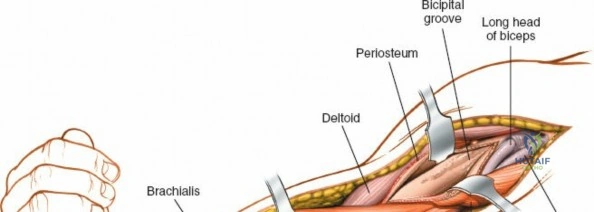
Directly investing the anterior surface of the humerus is the brachialis muscle. This muscle can be approached in two primary ways:
- Splitting the Brachialis: A longitudinal incision is made through the belly of the brachialis muscle, down to the periosteum. This approach minimizes denervation as the brachialis has a dual nerve supply (musculocutaneous and radial nerve contributions), and typically the splitting occurs along the neutral zone between these nerve territories.
- Subperiosteal Elevation: The brachialis can be elevated subperiosteally from the anteromedial and anterolateral surfaces of the humerus. This provides broader exposure but may devascularize segments of the muscle and compromise the periosteal blood supply to the bone. Most surgeons prefer splitting.
Regardless of the method, the goal is to expose the anterior surface of the humeral shaft. Care must be taken during this phase to avoid injury to the deep neurovascular structures.
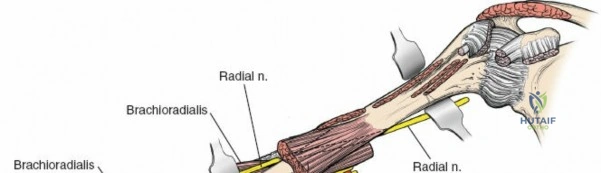
Crucial Step: Radial Nerve Identification and Protection. This is the most critical step of the entire procedure. The radial nerve's course is highly variable. While it generally spirals posteriorly around the humerus, it pierces the lateral intermuscular septum to reach the anterior compartment at varying distances proximal to the lateral epicondyle (typically 10-14 cm). For fractures in the middle and distal thirds of the humerus, prophylactic identification of the radial nerve is mandatory.
The radial nerve can be found deep to the lateral head of the triceps initially, then between the brachialis and brachioradialis muscles as it pierces the lateral intermuscular septum to enter the anterior compartment. It should be meticulously identified, carefully mobilized, and protected with a vessel loop or Penrose drain. Retraction should be gentle and intermittent.

Illustration of the typical zone where the radial nerve crosses from posterior to anterior, requiring meticulous identification.
Intraoperative view of the radial nerve (indicated by retractor) identified and protected.
Once the radial nerve is protected, the brachialis muscle can be split or elevated to expose the bone.
Longitudinal splitting of the brachialis muscle to expose the humeral shaft.
The exposure provides direct access to the anterior and anterolateral surfaces of the humeral shaft.

Deep dissection showing the humeral shaft exposed, with surrounding neurovascular structures identified and protected.

Further deep exposure of the anterior humeral shaft.
Fracture Reduction and Fixation Principles
With adequate exposure of the fracture fragments, the next steps involve reduction and stabilization.
-
Fracture Exposure: The hematoma is evacuated. Careful debridement of any non-viable soft tissue or bone fragments is performed. Minimal periosteal stripping is advocated to preserve the biological environment for healing.
Fracture site exposed after initial dissection. -
Reduction: The fracture fragments are reduced using traction, manipulation, and various reduction tools (e.g., bone clamps, periosteal elevators, reduction forceps). Indirect reduction techniques, using gentle longitudinal traction and direct manipulation, are preferred to minimize further soft tissue stripping. Intraoperative fluoroscopy is used to confirm adequate reduction in both AP and lateral planes, ensuring correct length, rotation, and alignment.
Reduction of fracture fragments prior to plate application. -
Plate Osteosynthesis: A precontoured or manually contoured plate is selected. For the anterior approach, a standard or locking plate can be used. Locking plates are particularly useful in osteopenic bone or highly comminuted fractures where bicortical screw purchase may be limited. The plate is positioned on the anterior or anterolateral surface of the humerus.
- Compression Plating: For simple transverse or short oblique fractures, interfragmentary lag screws across the fracture followed by a compression plate (dynamic compression plate, DCP) or pure compression plating can be applied.
- Bridging Plating: For comminuted or segmental fractures, the plate acts as a bridge, maintaining length and alignment without direct compression at the fracture site. Screws are placed in the proximal and distal main fragments, leaving the comminuted zone untouched (biological osteosynthesis).
- Minimum Fixation: At least 3-4 screws (6-8 cortices) proximal and distal to the fracture are generally recommended for stable fixation.
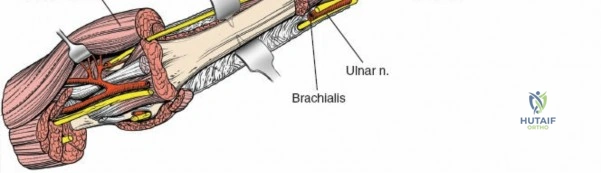
Plate positioned on the anterior surface of the humerus, ready for screw insertion.Screws are inserted following standard AO principles, ensuring bicortical purchase where possible and avoiding over-penetration that could endanger posterior structures (e.g., radial nerve in spiral groove).
Screws being inserted through the plate into the humeral shaft.Final fluoroscopic images are taken to confirm implant position, fracture reduction, and screw lengths.
Final internal fixation construct confirmed with fluoroscopy.
Wound Closure
After achieving stable fixation, the wound is thoroughly irrigated. A careful neurovascular assessment should be performed if a tourniquet was used, or if there were concerns about nerve status. The brachialis muscle is allowed to fall back into place. The biceps and coracobrachialis muscles are released from retraction. The deltopectoral interval is loosely reapproximated. The subcutaneous tissue and skin are closed in layers. A surgical drain may be considered if there is significant dead space or concern for hematoma formation, especially in cases of extensive soft tissue dissection or bleeding diathesis. A sterile dressing is applied, and the arm is placed in a sling for comfort and initial support.
Complications and Management
Despite meticulous technique, complications can arise following the anterior approach to the humeral shaft. A thorough understanding of these potential issues and their management is crucial for optimal patient care.
Intraoperative Complications
- Iatrogenic Radial Nerve Injury: The most feared complication. This can occur during initial exposure, retraction, or screw insertion. If identified intraoperatively, the nerve should be immediately inspected. A clean laceration warrants immediate primary repair or grafting. Neurapraxia due to traction may resolve, but close monitoring is essential.
- Vascular Injury: Damage to the brachial artery or profunda brachii artery, although rare, can occur with aggressive retraction or errant dissection. Immediate vascular surgery consultation and repair are necessary.
- Poor Fixation: Inadequate reduction, incorrect plate placement, insufficient screw purchase, or premature hardware failure can occur. This requires immediate revision of the fixation construct.
Postoperative Complications
- Radial Nerve Palsy (New Onset or Worsening): Can be transient (neurapraxia due to edema or traction) or permanent. Up to 15% incidence of transient palsy post-operatively.
- Management: Initial management involves observation, serial clinical examinations, and electrodiagnostic studies (EMG/NCS) at 6-8 weeks if no recovery. If no signs of recovery by 3-6 months (depending on the level of injury), surgical exploration, neurolysis, or nerve repair/grafting may be indicated. In cases of persistent, irreparable palsy, tendon transfers can restore some motor function.
- Nonunion: Failure of the fracture to heal within 6 months, or no progression of healing for 3 consecutive months. Incidence varies but can be up to 5-10%.
- Management: Revision ORIF with plate exchange, augmentation, autogenous bone grafting (e.g., iliac crest), or intramedullary nailing. Biological augmentation with bone morphogenetic proteins (BMPs) may also be considered. Address any mechanical issues (instability, gap) and biological issues (poor vascularity, infection).
- Malunion: Healing of the fracture in an unacceptable position (e.g., significant angulation, rotation, or shortening), leading to functional impairment or cosmetic deformity.
- Management: Corrective osteotomy and refixation if symptomatic and functionally limiting.
- Infection: Superficial or deep surgical site infection. Incidence 1-5%.
- Management: Superficial infections often respond to oral antibiotics. Deep infections require aggressive surgical debridement, irrigation, tissue cultures, intravenous antibiotics, and potentially removal or exchange of hardware (if stable union achieved) or implant retention with local antibiotic delivery systems (e.g., beads or spacers).
- Hardware Failure/Irritation: Broken plate or screws, or symptomatic hardware requiring removal.
- Management: If stable union, hardware removal after 12-18 months. If unstable, revision fixation.
- Shoulder Stiffness: Restricted range of motion of the glenohumeral joint.
- Management: Early and aggressive physiotherapy. Manipulation under anesthesia or arthroscopic capsular release may be necessary in refractory cases.
- Elbow Stiffness: Restricted range of motion of the elbow joint.
- Management: Physiotherapy is the mainstay. Manipulation under anesthesia or open arthrolysis may be considered for severe contractures.
- Heterotopic Ossification (HO): Ectopic bone formation in the soft tissues around the fracture or surgical site.
- Management: Prophylaxis with NSAIDs (e.g., Indomethacin) or radiation therapy in high-risk patients. Symptomatic HO may require surgical excision after maturation of the bone.
Complications and Management Summary
| Complication | Incidence Range | Management Strategy |
|---|---|---|
| Radial Nerve Palsy (New/Worsening) | 5-15% (post-op, often transient) | Observation (up to 3-6 months), EMG/NCS, Nerve Exploration (if no recovery/complete lesion), Tendon Transfers (for permanent deficits) |
| Nonunion | 5-10% (variable by fracture type) | Revision ORIF, Autograft/Allograft, Plate Exchange/Augmentation, IM Nailing, BMPs |
| Infection | 1-5% | Debridement, Irrigation, IV Antibiotics, Cultures, Hardware Removal/Exchange (if deep) |
| Hardware Failure | <5% | Revision ORIF, Plate Exchange/Augmentation, Hardware Removal (after union) |
| Shoulder Stiffness | Variable | Physiotherapy, Manipulation Under Anesthesia, Arthroscopic Capsular Release |
| Elbow Stiffness | Variable | Physiotherapy, Manipulation Under Anesthesia, Open Arthrolysis |
| Iatrogenic Radial Nerve Injury (intraoperative) | <1% | Immediate repair/grafting, Tendon transfers (if repair fails) |
| Vascular Injury | Rare | Immediate Vascular Surgery Consult and Repair/Reconstruction |
| Heterotopic Ossification | Variable | NSAIDs/Radiation Prophylaxis, Surgical Excision (if symptomatic and mature) |
| Malunion | Variable | Corrective Osteotomy, Refixation (if symptomatic/functional deficit) |
Post Operative Rehabilitation Protocols
A well-structured and progressive postoperative rehabilitation protocol is critical for optimizing functional recovery and preventing complications such as stiffness and muscle atrophy following an anterior humeral shaft approach. The protocol must be individualized based on fracture stability, patient compliance, and any associated injuries or complications.
Immediate Postoperative Period (Day 0 - 2 Weeks)
- Pain Management: Aggressive pain control with multimodal analgesia, including regional blocks, oral narcotics, and NSAIDs (if not contraindicated).
- Wound Care: Daily dressing changes, monitor for signs of infection or wound dehiscence. Suture or staple removal typically at 10-14 days.
- Immobilization: The arm is typically placed in a sling for comfort and protection. Sling use should be primarily for rest and transport, not for prolonged immobilization, to allow for early motion.
- Early Motion:
- Hand and Wrist: Initiate active range of motion (AROM) exercises immediately (flexion, extension, pronation, supination, grip strength).
- Elbow: Passive assisted range of motion (AAROM) and AROM for elbow flexion and extension, within comfort limits. Gravity-assisted elbow flexion and extension can begin as tolerated.
- Shoulder: Pendulum exercises, gentle external rotation and flexion (forward elevation) to 90 degrees with arm supported in the sling for protection against gravity, as tolerated. Avoid active abduction and forceful external rotation initially, particularly if the deltoid was extensively manipulated.
- Neurovascular Monitoring: Close monitoring of radial nerve function (wrist extension, finger extension, thumb abduction) and vascular status.
Early Motion Phase (2 Weeks - 6 Weeks)
- Progressive Range of Motion: Gradually advance shoulder and elbow AROM exercises.
- Shoulder: Aim for full passive and active shoulder flexion, abduction, and rotation. Pulley exercises, stick exercises.
- Elbow: Continue to work towards full flexion and extension.
- Light Strengthening (Isometric): Begin gentle isometric exercises for shoulder and elbow musculature as tolerated, avoiding direct stress on the fracture site.
- Scapular Stabilization: Initiate exercises to improve scapular mobility and stability.
- Functional Activities: Begin light, non-weight-bearing functional activities, encouraging use of the arm for activities of daily living (ADLs) within comfort limits.
Strengthening Phase (6 Weeks - 12 Weeks)
- Radiographic Consolidation: Confirm early signs of fracture healing on radiographs before significantly increasing load.
- Progressive Strengthening: Advance to progressive resisted exercises for all major muscle groups of the shoulder and arm (rotator cuff, deltoid, biceps, triceps).
- Theraband exercises, light weights.
- Increased Functional Activities: Gradually increase the intensity and complexity of functional activities.
- Proprioception and Neuromuscular Control: Exercises to improve coordination and balance.
Advanced Strengthening and Return to Activity (12+ Weeks)
- Full Range of Motion: Patient should have achieved full or near-full pain-free range of motion of the shoulder and elbow.
- Advanced Strengthening: Continue to progress strengthening exercises with increasing resistance, preparing for return to sport or work-specific activities.
- Sport/Work-Specific Training: Incorporate activities relevant to the patient's pre-injury level of function. This may include throwing programs, overhead activities, or heavy lifting simulations.
- Return to Activity: Gradual return to full activities, including contact sports or heavy manual labor, is typically permitted once there is radiographic evidence of solid union, full pain-free range of motion, and restored strength (usually 4-6 months, but can be longer for high-demand activities).
Throughout all phases, patient education on activity restrictions, self-monitoring for complications, and adherence to the physiotherapy program is paramount. Modifications to the protocol are made based on individual progress and tolerance.
Summary of Key Literature and Guidelines
The surgical management of humeral shaft fractures via the anterior approach has evolved significantly, underpinned by advancements in internal fixation technology and a deeper understanding of humeral anatomy and biomechanics. Current literature largely supports operative intervention for specific indications, emphasizing meticulous technique to minimize complications.
Historically, non-operative management with functional bracing has demonstrated high union rates (85-90%) for closed humeral shaft fractures. However, operative fixation, including plate osteosynthesis via the anterior approach, has gained traction due to perceived benefits in specific patient populations and fracture types. Studies comparing operative and non-operative management often highlight faster time to union and lower rates of malunion with surgical intervention, particularly in patients with polytrauma or those requiring earlier functional rehabilitation.
The choice of surgical approach (anterior, posterior, anterolateral) is often debated, with each offering distinct advantages and disadvantages. The anterior approach is favored for proximal and midshaft fractures, providing direct visualization and allowing for anterior plate application, which is biomechanically advantageous against anterior bending forces. However, it necessitates careful identification and protection of the radial nerve, a consistent theme in the literature regarding this approach. Numerous studies report radial nerve palsy rates following ORIF of humeral shaft fractures via various approaches ranging from 5-17%, with a significant portion being transient. Prophylactic identification of the radial nerve is a key recommendation across most surgical guidelines to mitigate this risk.
Modern fixation principles advocate for biological osteosynthesis, utilizing techniques such as minimally invasive plate osteosynthesis (MIPO) where possible, to preserve the periosteal blood supply. While the anterior approach is traditionally open, variations exist that integrate MIPO principles, especially for bridging comminuted fractures. Locked compression plates (LCPs) have become a mainstay, offering enhanced stability in osteopenic bone or highly comminuted fractures by providing angular stable constructs.
Key guidelines, such as those from the Orthopaedic Trauma Association (OTA) and the American Academy of Orthopaedic Surgeons (AAOS), emphasize:
* Patient-specific treatment: Tailoring the approach and fixation to the individual patient's fracture pattern, comorbidities, and functional demands.
* Anatomic Reduction and Stable Fixation: Achieving reduction to restore length, alignment, and rotation, followed by stable fixation that allows for early mobilization.
* Radial Nerve Protection: Universal emphasis on identifying and protecting the radial nerve during all humeral shaft exposures.
* Management of Complications: Detailed algorithms for managing common complications like nonunion, infection, and radial nerve palsy, often involving a staged approach from observation to surgical revision or nerve exploration.
Ongoing research continues to refine indications, fixation strategies, and rehabilitation protocols. Areas of active investigation include optimal timing for radial nerve exploration in acute vs. delayed palsies, comparative effectiveness of plating versus intramedullary nailing for various fracture patterns, and the role of biological adjuncts in accelerating union. The anterior approach remains a cornerstone technique in the armamentarium of the orthopedic trauma surgeon, demanding mastery of anatomy and surgical precision for optimal patient outcomes.
Clinical & Radiographic Imaging