INTRODUCTION TO RHEUMATOID WRIST RECONSTRUCTION
Rheumatoid arthritis (RA) is a systemic autoimmune disease that aggressively targets the synovial tissues of the appendicular skeleton, with the wrist joint and its traversing tendon sheaths being among the most frequently and severely affected regions. The proliferation of rheumatoid pannus leads to a cascade of destructive events: enzymatic degradation of the articular cartilage, attenuation of the intrinsic and extrinsic carpal ligaments, and direct invasion into the flexor and extensor tendons.
Surgical intervention in the rheumatoid wrist is broadly categorized into preventative procedures (such as volar and dorsal tenosynovectomy) and salvage procedures (such as wrist arthroplasty or arthrodesis). The primary goals of these interventions are to relieve pain, prevent attritional tendon ruptures, restore biomechanical alignment, and maximize residual hand function.
This comprehensive guide meticulously details the surgical techniques for volar synovectomy, dorsal synovectomy, and the critical decision-making matrix surrounding wrist arthroplasty in the rheumatoid patient.
BIOMECHANICS AND PATHOANATOMY
Understanding the pathoanatomy of the rheumatoid wrist is paramount for executing a successful synovectomy or arthroplasty. The wrist is the foundational keystone for hand function; instability here translates to profound distal deficits.
The Pathological Cascade
- Synovial Hypertrophy: The initial phase is characterized by aggressive synovial proliferation within the radiocarpal, midcarpal, and distal radioulnar joints (DRUJ), as well as within the flexor and extensor tendon sheaths.
- Ligamentous Attenuation: The hypertrophic synovium produces matrix metalloproteinases (MMPs) that degrade the radioscaphocapitate and radiolunotriquetral ligaments.
- Carpal Collapse and Translocation: Loss of ligamentous integrity leads to ulnar translocation of the carpus, volar subluxation, and supination of the carpus relative to the radius.
- Tendon Rupture: Tendons rupture via two mechanisms: direct enzymatic invasion by the tenosynovium, and mechanical attrition over exposed, jagged bony prominences (e.g., the Mannerfelt-Norman syndrome, where the flexor pollicis longus ruptures over a scaphoid osteophyte).
Clinical Pearl: Prophylactic tenosynovectomy is highly effective. If performed before structural tendon damage or severe carpal collapse occurs, it can halt the local progression of the disease and preserve native joint kinematics for years.
VOLAR SYNOVECTOMY: SURGICAL TECHNIQUE
Volar tenosynovitis in the rheumatoid patient often presents as a boggy, bulging mass on the palmar aspect of the wrist, frequently accompanied by symptoms of median nerve compression (carpal tunnel syndrome) due to the sheer volume of the hypertrophic tissue within the unyielding flexor retinaculum.
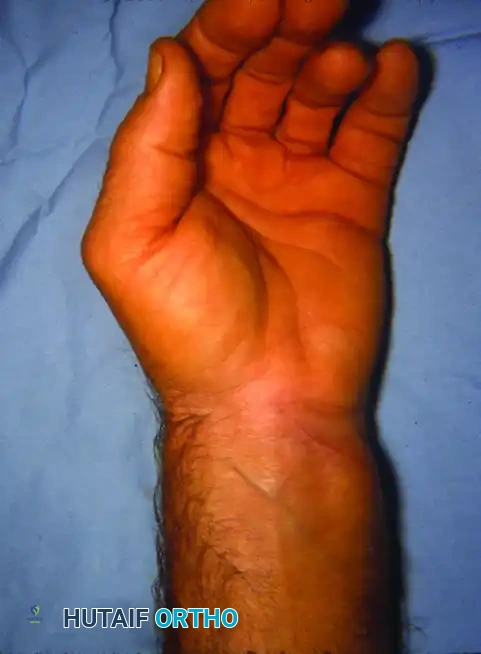
FIGURE 73-45 A: Flexor surface of the left hand and wrist demonstrating severe rheumatoid tenosynovium bulging to the palmar and ulnar (medial) side of the distal forearm.
Preoperative Preparation and Positioning
- Anesthesia: General anesthesia or regional brachial plexus block.
- Positioning: Supine with the operative arm extended on a radiolucent hand table.
- Tourniquet: A well-padded pneumatic tourniquet is applied to the proximal arm and inflated to 250 mm Hg after exsanguination with an Esmarch bandage.
- Magnification: Surgical loupes (2.5x to 3.5x) are highly recommended for meticulous dissection of the visceral synovium from the tendon epitenon.
Step-by-Step Surgical Approach
-
The Incision:
Make a volar longitudinal incision beginning distally at the middle of the palm. Proceed proximally toward the wrist, running parallel to the thenar crease. As the incision crosses the wrist flexion creases, it must curve (typically in a zigzag or Brunner-type fashion) to prevent the formation of a postoperative flexion contracture. Extend the incision proximally into the distal forearm to fully expose the musculotendinous junctions. -
Superficial Dissection and Nerve Decompression:
Deepen the incision through the subcutaneous tissue. Identify and protect the palmar cutaneous branch of the median nerve. Divide the transverse carpal ligament (flexor retinaculum) completely to decompress the median nerve. The median nerve is often flattened and erythematous due to the pressure exerted by the underlying tenosynovial mass. Gently retract the median nerve radially with a Penrose drain. -
Flexor Tenosynovectomy:
The flexor tendons (Flexor Digitorum Superficialis [FDS] and Flexor Digitorum Profundus [FDP]) will be encased in a thick, grayish-red pannus. - Begin the synovectomy proximally in the forearm and work distally.
- Incise the parietal layer of the tenosynovium.
- Using sharp dissection and blunt wiping with a moist sponge, meticulously peel the visceral synovium off each individual tendon.
- Pay special attention to the vincula; preserve them to maintain the blood supply to the tendons.
- Inspect each tendon for partial ruptures or intratendinous nodules. Intratendinous nodules that mechanically block excursion should be carefully excised, followed by tubularization of the tendon with 6-0 non-absorbable suture.
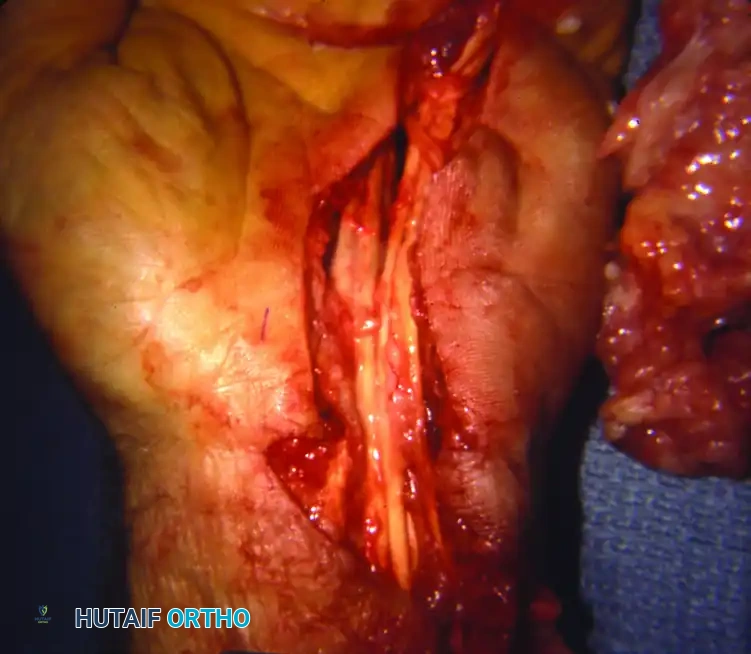
FIGURE 73-45 B: Intraoperative view of the flexor tenosynovectomy. Note the extension of the incision distally into the palm and proximally into the forearm. The massive excised tenosynovial mass lies to the medial side of the hand.
- Closure:
After thorough irrigation and deflation of the tourniquet to achieve meticulous hemostasis, the skin is closed. The transverse carpal ligament is left open to accommodate postoperative swelling and prevent recurrent median nerve compression.
Surgical Warning: The median nerve can be intimately encased in the tenosynovium. Do not perform en bloc resections of the synovial mass until the median nerve and its recurrent motor branch have been definitively identified and protected throughout their entire course.
DORSAL SYNOVECTOMY: SURGICAL TECHNIQUE
Dorsal tenosynovitis presents as a painless, boggy swelling over the dorsum of the wrist. Because the extensor tendons lack the robust vincula seen on the volar side, they are highly susceptible to ischemic necrosis and attritional rupture from the underlying rheumatoid pannus and subluxated ulnar head (Vaughan-Jackson syndrome).
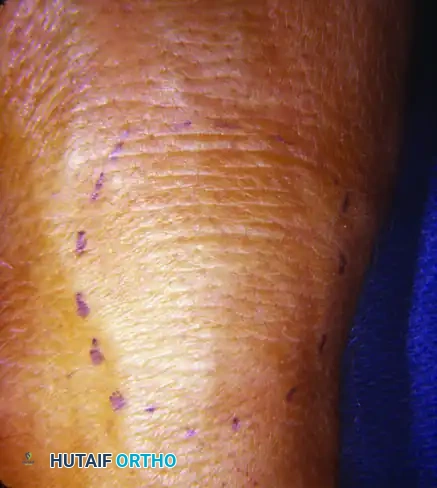
FIGURE 73-44 A: Dorsum of the left wrist demonstrating significant bulging of the extensor tenosynovium and joint synovium. (The thumb is oriented to the top right of the picture).
Step-by-Step Surgical Approach
-
The Incision:
A dorsal longitudinal midline incision is typically utilized, centered over the radiocarpal joint. Alternatively, a slightly curved or lazy-S incision can be used to prevent scar contracture. -
Raising the Retinacular Flap:
Dissect down to the extensor retinaculum. To access the extensor tendons and the dorsum of the joint, a retinacular flap must be raised. - A medially based extensor retinacular flap is commonly utilized.
- Carefully elevate the retinaculum off the underlying extensor compartments, preserving its integrity for later use as a protective interpositional layer.
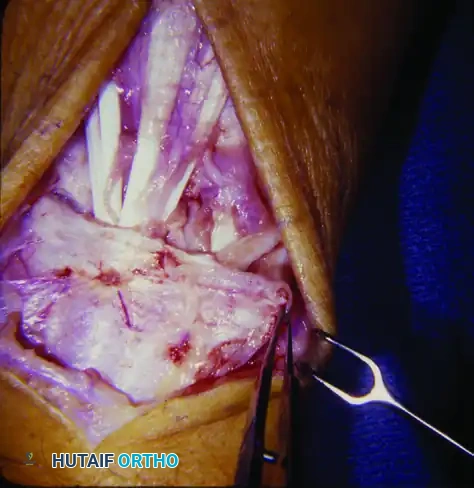
FIGURE 73-44 B: A medially based extensor retinacular flap has been raised to allow full access to the extensor tendons and the dorsum of the radiocarpal joint.
- Extensor Tenosynovectomy and Joint Access:
Perform a meticulous tenosynovectomy of all six extensor compartments. The Extensor Pollicis Longus (EPL) and the Extensor Digitorum Communis (EDC) are particularly prone to invasion. - Once the tendons are cleared of pannus, retract them radially and ulnarly to expose the dorsal wrist capsule.
- Open the capsule via a T-shaped or I-shaped incision to perform a thorough radiocarpal and midcarpal joint synovectomy.
- If the distal ulna is severely eroded and causing attritional wear (caput ulnae), a Darrach procedure (resection of the distal ulna) or a Sauvé-Kapandji procedure may be performed concurrently.
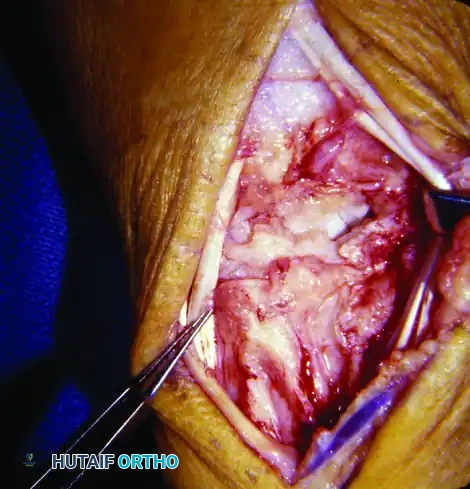
FIGURE 73-44 C: Extensor tenosynovectomy completed. The tendons are retracted to allow access to the dorsum of the wrist. The capsule is opened for a comprehensive joint synovectomy.
- Retinaculum Relocation and Closure:
Following the joint synovectomy and capsular closure, the extensor retinaculum is not repaired in its anatomical position over the tendons. Instead, it is passed beneath the extensor tendons and sutured laterally. - Biomechanical Rationale: Placing the retinaculum beneath the tendons provides a smooth, gliding surface, protecting the tendons from the rough, decorticated dorsal carpus and radius, thereby preventing future attritional ruptures.
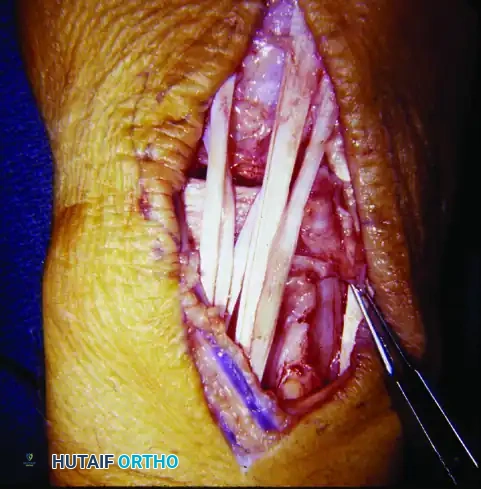
FIGURE 73-44 D: After synovectomy, the extensor retinaculum is replaced beneath the extensor tendons and secured laterally, providing a protective barrier.
WRIST ARTHROPLASTY IN RHEUMATOID ARTHRITIS
When rheumatoid disease progresses to end-stage articular destruction, severe carpal collapse, and intractable pain, synovectomy alone is insufficient. The surgeon must decide between wrist arthrodesis (fusion) and wrist arthroplasty.
If bilateral bony procedures on the wrist are necessary, arthroplasty on at least one side should be strongly considered to allow the patient to perform perineal care and other activities of daily living. In some cases, arthroplasty may be indicated initially because the eventual collapse of the opposite wrist may require future reconstruction.
Resection Arthroplasty
Historically, resection of the distal radius to form a shelf was suggested in cases of palmar dislocation. The goal was to maintain some stability, increase motion, and relieve pain without the insertion of foreign material. However, modern orthopedic consensus dictates that resection arthroplasty does not produce a stable joint and is generally abandoned in favor of implant arthroplasty or fusion.
Silicone Implant Arthroplasty (Swanson)
Silicone implant arthroplasties, pioneered by Swanson, act as dynamic spacers rather than true joint replacements. They rely on encapsulation by host scar tissue to provide stability.
- Advantages: The Swanson wrist arthroplasty does not require fixation by polymethyl methacrylate (bone cement), entails minimal bone resection, and is usually an easily salvaged procedure if failure occurs.
- Indications: It is recommended for patients with stage III or IV disease, patients with low demands on their hands (e.g., no ambulatory aids required), quiescent or inactive rheumatoid arthritis, a well-aligned wrist, and sufficient bone stock.
- Complications: Despite its popularity, it carries a high prosthetic fracture rate of 10% to 52% and an overall revision rate of 14% to 41%. The introduction of titanium grommets has attempted to reduce silicone shear wear, but long-term durability remains a concern.
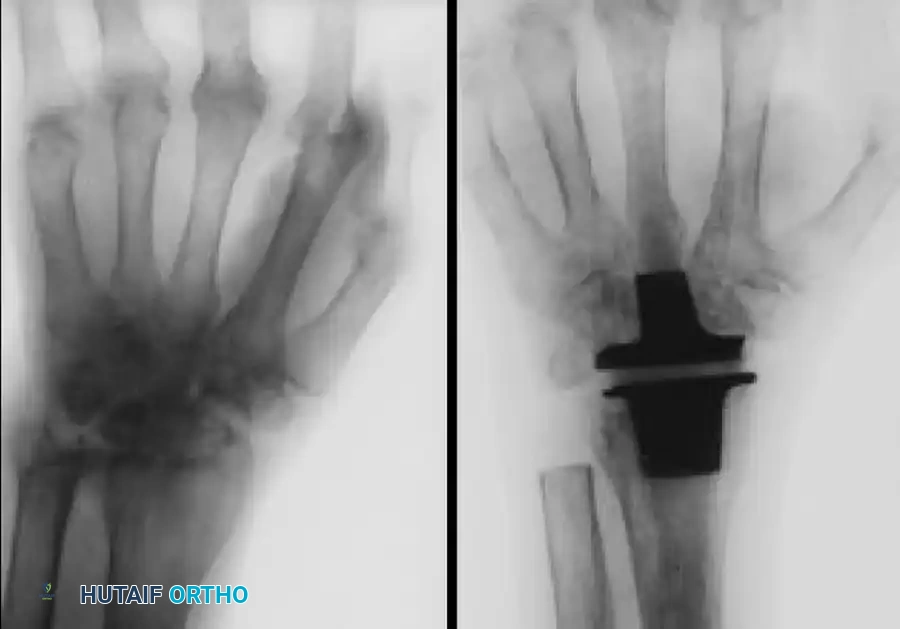
FIGURE 73-46 A & B: (A) Preoperative radiograph of a wrist affected by severe rheumatoid arthritis demonstrating profound carpal collapse and radiocarpal disease. (B) Postoperative radiograph obtained after replacement of the wrist joint with a Swanson silicone implant and titanium grommets.
Total Wrist Arthroplasty (Metal and Plastic)
Total joint arthroplasty (TWA) offers a more anatomical reconstruction.
- Advantages: TWA preserves motion, provides a fixed fulcrum for tendon excursion, and obtains stable fixation. It is ideal for patients with insufficient bone stock for a metal-on-plastic design but who require more stability than a silicone spacer can provide.
- Complications: Problems such as distal component loosening compromise the results in up to 50% of patients. The overall revision rate ranges from 9% to 35% for metal and plastic total wrist implants.
- Design Flaws in Early Models: Constrained designs, such as the early Meuli and Volz wrist implants, allowed excessive forces to be transmitted directly to the prosthesis. This resulted in the displacement of the distal portion of the prosthesis, leading to catastrophic failures including median nerve compression and flexor tendon abrasion. Modern biaxial and unconstrained designs have improved survivorship, but patient selection remains critical.
Pitfall: Do not perform a Total Wrist Arthroplasty in a patient who relies on platform crutches or a walker. The axial loading forces will rapidly lead to distal component subsidence and catastrophic loosening. In such high-demand patients, a total wrist arthrodesis is the gold standard.
POSTOPERATIVE PROTOCOL AND REHABILITATION
The success of both synovectomy and arthroplasty relies heavily on a structured, phased rehabilitation program.
Phase I: Immobilization (Days 1-14)
- The wrist is immobilized in a bulky compressive dressing and a volar plaster splint in neutral to slight extension (10-15 degrees).
- Strict elevation is enforced to mitigate edema.
- Immediate active and passive range of motion (ROM) of the digits (fingers and thumb) is initiated on postoperative day 1 to prevent tendon adhesions, particularly after extensive volar or dorsal tenosynovectomies.
Phase II: Early Motion (Weeks 2-6)
- Sutures are removed at 10 to 14 days.
- The patient is transitioned to a custom-molded thermoplastic splint, which is removed only for hygiene and therapy.
- Active wrist ROM exercises are initiated. For arthroplasty patients, motion is guided by the stability of the implant. Silicone implants require careful monitoring to ensure the capsule heals with appropriate tension.
Phase III: Strengthening (Weeks 6-12)
- Splint wear is gradually weaned, typically transitioning to nighttime use only.
- Gentle strengthening exercises are introduced. However, in the rheumatoid patient, heavy resistance training is contraindicated to protect the fragile joint architecture and the arthroplasty components.
- Maximum medical improvement is typically achieved between 4 to 6 months postoperatively.
CONCLUSION
The surgical management of the rheumatoid wrist requires a nuanced understanding of disease progression, biomechanics, and soft-tissue handling. Volar and dorsal synovectomies remain powerful tools for pain relief and tendon preservation when executed prior to end-stage joint destruction. When the articular surface is beyond salvage, wrist arthroplasty—whether via silicone spacers or total joint components—can restore functional independence, provided the surgeon meticulously matches the implant type to the patient's bone stock and functional demands.
