Introduction to Ulnar Collateral Ligament (UCL) Reconstruction
Ulnar collateral ligament (UCL) insufficiency is a debilitating condition predominantly affecting overhead throwing athletes, most notably baseball pitchers, javelin throwers, and volleyball players. The anterior bundle of the UCL serves as the primary restraint to valgus stress at the elbow between 30 and 120 degrees of flexion. Chronic attenuation or acute rupture of this ligament leads to medial elbow instability, significantly impairing athletic performance and often leading to secondary pathologies such as valgus extension overload and ulnar neuritis.
The evolution of UCL reconstruction has seen significant advancements since the original figure-of-eight technique described by Jobe. The Altchek et al. Docking Technique represents a major paradigm shift in operative orthopaedics. By utilizing a muscle-splitting approach through the flexor carpi ulnaris (FCU) and employing a single closed-end humeral tunnel, this technique minimizes flexor-pronator morbidity, reduces the risk of medial epicondyle fracture (by avoiding multiple large drill holes), and allows for superior, highly controlled graft tensioning.
💡 Clinical Pearl: Biomechanical Advantage
The docking technique provides enhanced biomechanical fixation strength compared to traditional methods. By docking the graft directly into a blind humeral tunnel and tying the sutures over a robust bony bridge, the construct minimizes graft micromotion and creep, facilitating an accelerated rehabilitation protocol.
Preoperative Setup and Diagnostic Arthroscopy
Patient Positioning
- Place the patient supine on the operating table.
- Prepare and drape the affected upper extremity in a standard sterile fashion, ensuring the drape allows for full mobility of the shoulder and elbow.
- Apply a sterile tourniquet high on the brachium.
- To assist in the arthroscopic examination, utilize a McConnell arm holder (or equivalent positioning device) to securely hold the forearm against the patient's chest, allowing for stable manipulation.
Diagnostic Arthroscopy
Before proceeding with the open reconstruction, a diagnostic arthroscopy is highly recommended to address concomitant intra-articular pathology, which is present in a significant majority of throwing athletes.
- Establish standard anteromedial and anterolateral portals.
- Examine the elbow arthroscopically for UCL laxity. This is dynamically assessed by applying a valgus stress to the elbow while it is held in 70 to 90 degrees of flexion. A medial joint space opening of greater than 1 to 2 mm is highly indicative of UCL incompetence.
- Inspect the posterior compartment. Chronic valgus instability often leads to valgus extension overload, characterized by posteromedial olecranon osteophytes and chondromalacia.
- Remove any loose bodies and meticulously resect posteromedial osteophytes using a motorized burr. Care must be taken not to resect excessive olecranon, which could exacerbate valgus instability.
- Once the arthroscopic debridement is complete, release the arm from the McConnell arm holder and transition the extremity to a standard hand table for the open reconstruction.
Graft Harvesting
If a reconstruction is definitively planned based on clinical and arthroscopic findings, the graft should be harvested prior to the medial elbow exposure.
- Primary Graft Choice: The ipsilateral palmaris longus (PL) tendon is the graft of choice due to its ideal length, diameter, and minimal donor site morbidity.
- Harvest Technique: Harvest the PL through a small 5-mm to 1-cm transverse incision placed in the distal volar wrist crease. Use a tendon stripper, advancing proximally to obtain a graft of at least 15 cm in length.
- Alternative Grafts: If the palmaris longus is congenitally absent (occurring in approximately 15% of the population) or deemed deficient, an autogenous gracilis tendon or allograft hamstring tendon may be utilized. When using the gracilis, a 3.2-mm thick portion is typically sufficient for the docking technique.
Surgical Technique: The Altchek Docking Procedure
1. Surgical Approach and Exposure
Make an 8- to 10-cm longitudinal incision centered over the medial epicondyle. Carefully dissect through the subcutaneous tissue, remaining vigilant to identify and protect the branches of the medial antebrachial cutaneous nerve (MABC).
Identify the flexor carpi ulnaris (FCU) fascia. Instead of detaching the flexor-pronator mass from the medial epicondyle (which carries higher morbidity), perform a muscle-splitting approach.
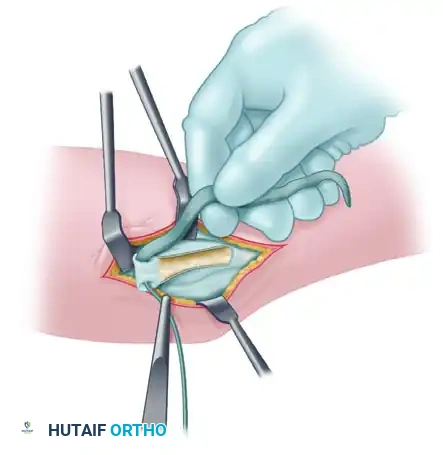
Figure A: Incision through the flexor carpi ulnaris (FCU) fascia, demonstrating the muscle-splitting approach.
Bluntly dissect between the two heads of the FCU to expose the native, attenuated ulnar collateral ligament lying deep to the muscle belly.
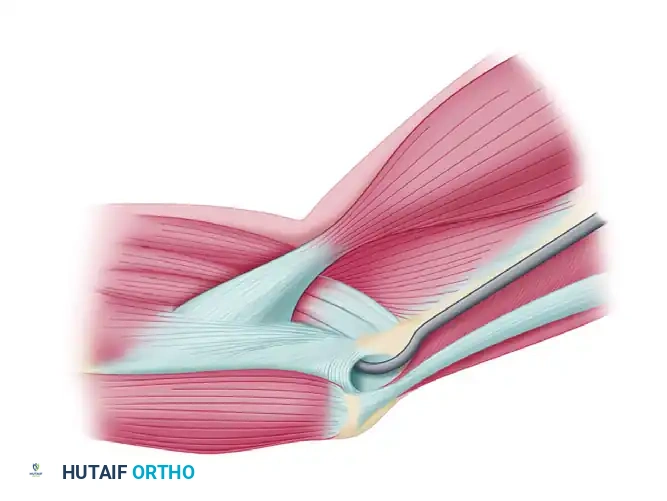
Figure B: Submuscular exposure of the native medial collateral ligament.
2. Ulnar Nerve Management
The management of the ulnar nerve is dictated by preoperative symptoms and intraoperative findings. In this specific technique iteration, an anterior subcutaneous transposition is performed to prevent postoperative neuritis.
- Identify the ulnar nerve in the cubital tunnel.
- Transpose the ulnar nerve anterior to the medial epicondyle.
- Create a flap in the flexor-pronator fascia, leaving its proximal attachments intact at the medial epicondyle. This flap should measure approximately 3 cm long by 1 cm wide. Dissect the underlying muscle tissue away to leave a thin, pliable fascial flap.
- Close the defect in the underlying fascia to prevent muscle herniation.
- Transfer the ulnar nerve subcutaneously and anteriorly to lie comfortably under the newly created fascial flap.
- Loosely reattach the flap distally over the ulnar nerve using nonabsorbable 3-0 sutures. This creates a secure "sling" to maintain the nerve in its transposed anterior position without causing any compression.
🚨 Surgical Warning: Ulnar Nerve Handling
Avoid excessive traction or devascularization of the ulnar nerve during transposition. When closing the split in the FCU or securing the fascial sling, ensure there is absolutely no constriction of the nerve, as iatrogenic ulnar neuropathy is a leading complication of UCL surgery.
3. Tunnel Preparation
Precise tunnel placement is the most critical step in ensuring graft isometry and long-term stability.
Ulnar Tunnels:
1. Expose the sublime tubercle of the ulna.
2. Drill two convergent 3.2-mm holes: one anterior and one posterior to the sublime tubercle, leaving a robust 1-cm bone bridge between them.
3. Connect the holes using a small curved curette or a specialized chamfering tool to create a smooth, U-shaped tunnel.
Humeral Tunnel (The Docking Site):
1. Identify the isometric origin of the UCL on the anterior inferior surface of the medial epicondyle.
2. Drill a single longitudinal blind tunnel (the docking tunnel) using a 4.0-mm or 4.5-mm reamer, depending on graft thickness. Drill to a depth of approximately 15 mm.
3. Drill two smaller (2.0-mm) exit puncture holes superiorly, connecting to the apex of the blind tunnel. These will serve as exit pathways for the tensioning sutures.

Figure C: Preparation of the ulnar tunnel and the single closed-end humeral tunnel with superior exit holes for the suture bundles.
4. Graft Preparation and Passage
- Prepare the harvested graft on the back table. Place a running locking Krackow stitch using No. 1 braided nonabsorbable suture (e.g., Ethibond Excel OS-2) into both ends of the graft.
- Pass the graft through the ulnar tunnel from anterior to posterior.
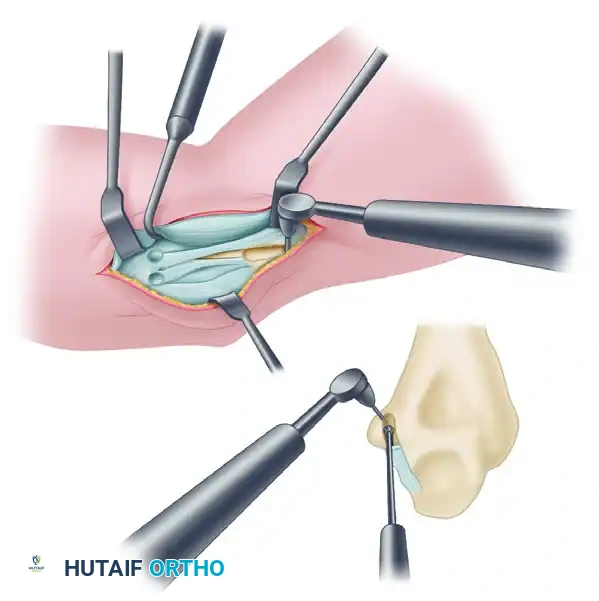
Figure D: Graft passage through the ulnar tunnel from anterior to posterior.
- Assess the length of the graft. The posterior limb of the graft is drawn up toward the humeral tunnel.
- Dock the posterior limb securely into the blind humeral tunnel. Pass the suture tails from this limb out through one of the superior exit holes.
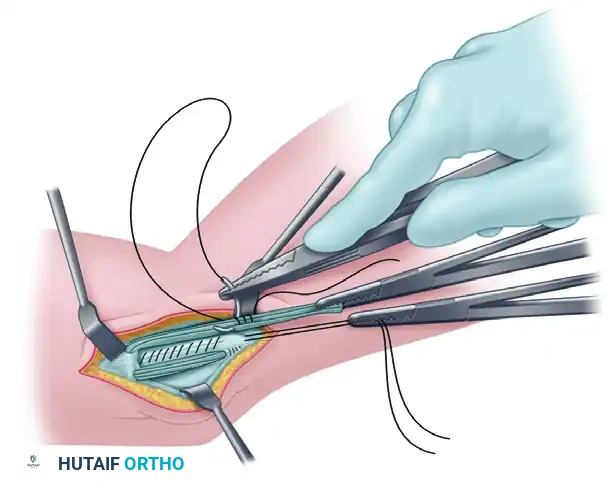
Figure E: The posterior limb of the graft is docked in the humeral tunnel. The anterior limb is prepared with a Krackow stitch for final tensioning.
5. Tensioning and Fixation
- With the posterior limb docked, measure the anterior limb to the humeral tunnel. Trim any excess graft and place a final Krackow stitch in the anterior limb.
- Pass the sutures of the anterior limb through the second superior exit hole.
- Tensioning Protocol: Place the arm in 30 degrees of flexion and apply a strict varus stress to the elbow. This reduces the joint and allows for optimal tensioning of the graft.
- Perform final graft tensioning by moving the elbow through a full range of motion while maintaining the varus stress. This cycles the graft, eliminating creep and ensuring isometric stability throughout the arc of motion.
- Once satisfied with the tension and stability, tie the two sets of graft sutures securely over the bony bridge on the superior aspect of the humeral condyle.
- For added stability, suture the remnants of the native ligament directly to the newly reconstructed graft. Note: Do not place more sutures than necessary, as bulky knots over the medial epicondyle can become symptomatic.
6. Closure
- Deflate the tourniquet and achieve meticulous hemostasis. Copiously irrigate the wound.
- Loosely approximate the split in the flexor carpi ulnaris fascia, ensuring the transposed ulnar nerve remains free of compression.
- Place a subcutaneous drain if necessary.
- Close the subcutaneous tissue with inverted absorbable sutures, followed by a 3-0 absorbable subcuticular closure for the skin.
Postoperative Care and Rehabilitation (UCL)
The rehabilitation protocol following the Altchek docking technique is phased and highly structured, designed to protect the healing graft while preventing elbow stiffness.
- Phase I (Weeks 0-1): The elbow is placed in a posterior plaster splint at 60 to 90 degrees of flexion. Wrist gripping exercises are initiated immediately to maintain forearm muscle tone.
- Phase II (Weeks 2-3): The splint is removed, and a hinged functional brace is applied, initially locked between 30 and 100 degrees. Elbow isometric flexion and extension exercises begin. By week 3, the brace's range of motion is advanced to 15 to 110 degrees.
- Phase III (Weeks 4-8): Light isotonic exercises are introduced in the fourth week. The brace is gradually opened, and full range of motion should be achieved by 6 to 8 weeks. Care is taken to strictly avoid any valgus loading across the elbow during this phase.
- Phase IV (Weeks 9-13): Advanced strengthening begins. This includes eccentric elbow exercises, as well as progressive isometric and isotonic forearm and shoulder strengthening. By 12 weeks, vigorous strengthening, including light-to-moderate bench pressing, is permitted.
- Phase V (Weeks 14-26): An interval throwing program is initiated at week 14 for throwing athletes. Progression is based on pain-free mechanics and fatigue resistance. Return to competitive throwing is typically allowed between 22 and 26 weeks postoperatively, provided the athlete demonstrates normal strength, full ROM, and pain-free throwing mechanics.
Surgical Technique: Lateral Ulnar Collateral Ligament (LUCL) Reconstruction
While medial instability is common in overhead athletes, posterolateral rotatory instability (PLRI) resulting from insufficiency of the Lateral Ulnar Collateral Ligament (LUCL) requires a distinct reconstructive approach. This is often assessed via the pivot-shift maneuver, which reveals laxity of the anterior capsule over the radial head and subluxation of the radiohumeral joint.
LUCL Reconstruction Steps
- Joint Inspection and Capsular Plication: Enter the lateral joint space. Inspect for loose bodies and articular abrasion. Tighten the anterior and posterior aspects of the capsule with plication sutures (left untied initially). If the radial collateral ligament complex is stretched but intact, imbricate and advance it using a Bunnell suture technique, securing it through drill holes at the humeral anatomical origin.
- Graft Selection: If the native tissue is of poor quality, reconstruct the LUCL using an autogenous palmaris longus graft. If the PL is deficient or the patient requires a more robust construct (e.g., global instability post-dislocation), a split hamstring (gracilis) autograft or allograft is utilized.
- Ulnar Tunnel Creation: Create an osseous tunnel just posterior to the tubercle of the supinator crest using a small burr. The entry holes must be spaced at least 7 mm apart to prevent fracture of the osseous bridge.
- Humeral Tunnel Creation: The humeral tunnel is drilled at the isometric point on the lateral epicondyle. This point is located where a line drawn along the anterior humeral cortex intersects a line through the center of the radiocapitellar axis. A closed-end tunnel and docking technique, comparable to the medial side, is preferred.
- Graft Passage: Pass the tendon through the ulnar tunnel. Thread it toward the humeral tunnel. Reflect the tendon graft back onto itself, crossing the joint twice for a robust reconstruction.
- Tensioning: Tie all sutures with the elbow flexed to 30 degrees and the forearm held in full pronation (to close the posterolateral rotatory gap).
- Closure: Test the elbow for resolution of anterolateral/posterolateral rotatory instability. Allow the anconeus and triceps to fall back into position. Close the interval between the anconeus and the extensor carpi ulnaris with absorbable sutures.
- Postoperative Splinting: Apply a splint with the elbow flexed to 90 degrees and the forearm maintained in pronation to protect the lateral reconstruction.
💡 Clinical Pearl: Isometry in LUCL Reconstruction
Stability and isometry are highly sensitive to humeral tunnel placement but less affected by minor variations in ulnar tunnel location. Ensure the humeral drill hole is placed precisely at the isometric center of rotation to prevent graft stretching or joint stiffness during the arc of motion.
By mastering both the Altchek docking technique for the medial side and the precise isometric reconstruction of the lateral side, the orthopaedic surgeon can effectively restore native elbow kinematics and return high-demand athletes to their pre-injury levels of performance.
