Introduction and Biomechanical Rationale
Pronation contracture of the forearm is a profoundly debilitating deformity frequently encountered in patients with upper motor neuron lesions, such as cerebral palsy, traumatic brain injury, and cerebrovascular accidents. In these spastic conditions, the pronator teres and pronator quadratus overpower the relatively weak supinators (biceps brachii and supinator muscle), driving the forearm into a fixed, pronated posture. This severely compromises the patient's ability to perform activities of daily living (ADLs) that require supination, such as feeding, receiving objects in the palm, and personal hygiene.
The transfer of the pronator teres (often referred to as pronator teres rerouting) is a cornerstone orthopedic procedure designed to address this imbalance. The biomechanical genius of this procedure lies in its ability to convert a primary deforming force into a corrective one. By detaching the pronator teres from its native anterolateral insertion on the radius and rerouting it posteriorly (dorsally) through the interosseous membrane, the muscle's line of pull relative to the forearm's axis of rotation is reversed. Consequently, the pronator teres becomes an active supinator, restoring dynamic balance to the forearm.
Indications and Patient Selection
Careful patient selection is paramount for achieving optimal functional outcomes. The procedure is not a universal solution for all pronation deformities and must be tailored to the patient's specific pathoanatomy.
Primary Indications
- Dynamic Pronation Deformity: Spasticity of the pronator teres that actively drives the forearm into pronation during attempted grasp or elbow flexion, but where passive supination remains achievable.
- Static Pronation Contracture: Fixed contractures where soft tissue adaptations (including interosseous membrane contracture) prevent passive supination. In these cases, the transfer must be combined with an extensive interosseous membrane release.
- Brachial Plexus Birth Palsy: Late sequelae involving pronation contractures due to muscle imbalance.
Prerequisites for Surgery
- Adequate Muscle Strength: The pronator teres must have a Medical Research Council (MRC) grade of at least 4/5 to function effectively as a transferred unit.
- Joint Congruency: The proximal and distal radioulnar joints (PRUJ and DRUJ) must be congruent. Subluxation or dislocation of the radial head is a relative contraindication and must be addressed concurrently or prior to tendon transfer.
💡 Clinical Pearl: Dynamic vs. Static Assessment
Always examine the patient under general anesthesia prior to incision. If full passive supination is achieved once the patient is paralyzed, the deformity is purely dynamic, and isolated rerouting is sufficient. If a block to supination persists, a static contracture is present, necessitating a step-wise release of the interosseous membrane and potentially the pronator quadratus.
Preoperative Preparation and Positioning
- Anesthesia: General anesthesia is typically employed, supplemented by a regional block (e.g., supraclavicular or axillary brachial plexus block) for optimal postoperative pain management and vasodilation.
- Positioning: The patient is positioned supine with the operative upper extremity extended on a radiolucent hand table.
- Tourniquet: A well-padded pneumatic tourniquet is applied high on the brachium. The arm is exsanguinated with an Esmarch bandage, and the tourniquet is inflated to standard upper extremity pressures (typically 250 mm Hg or 100 mm Hg above systolic blood pressure).
- Preparation: Standard surgical prep and drape from the fingertips to the axilla to allow full visualization of forearm kinematics during the procedure.
Surgical Anatomy
A profound understanding of the volar forearm anatomy is critical to safely execute this transfer.
* Pronator Teres: Arises via two heads (humeral and ulnar). The median nerve passes between these heads. The muscle courses obliquely to insert on the middle third of the lateral surface of the radius.
* Superficial Radial Nerve (SRN): Emerges from beneath the brachioradialis in the mid-to-distal forearm. It is highly vulnerable during the development of the surgical interval.
* Lateral Antebrachial Cutaneous Nerve (LABCN): Courses superficially in the subcutaneous tissues over the radial aspect of the forearm.
Surgical Technique: Pronator Teres Rerouting
Step 1: Incision and Superficial Dissection
Make a zigzag, curvilinear, or straight longitudinal incision over the anterior and radial aspects of the midforearm. The incision should be approximately 6 to 8 cm in length, centered precisely over the musculotendinous insertion of the pronator teres on the radius.
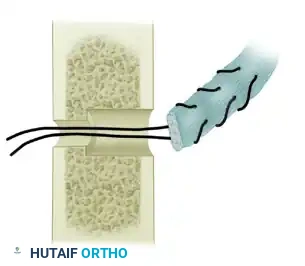
Figure 72-4A: Incision along the radial aspect of the forearm centered over the insertion of the pronator teres.
Carefully deepen the incision through the subcutaneous tissue. Meticulous hemostasis is required. Identify and protect the lateral cutaneous nerve of the forearm (LABCN), which lies in the superficial subcutaneous fat.
Step 2: Interval Development and Nerve Protection
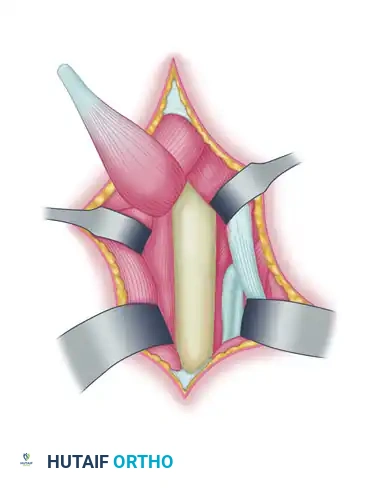
Identify the deep fascia and incise it longitudinally. Develop the surgical interval between the brachioradialis (BR) anteriorly and the extensor carpi radialis longus (ECRL) posteriorly.
Anatomical overview of the forearm musculature highlighting the interval between the brachioradialis and the extensor carpi radialis longus.
⚠️ Surgical Warning: Superficial Radial Nerve
As you retract the brachioradialis radially and volarly, the superficial radial nerve will be exposed on the undersurface of the muscle belly. It must be gently mobilized and protected with a vessel loop throughout the procedure to prevent debilitating postoperative neuromas or sensory deficits.
Step 3: Identification and Detachment of the Pronator Teres
Retract the brachioradialis to expose the broad, flat insertion of the pronator teres on the lateral aspect of the middle third of the radius. Identify the oblique fibers that insert directly into the bone at the musculotendinous junction.
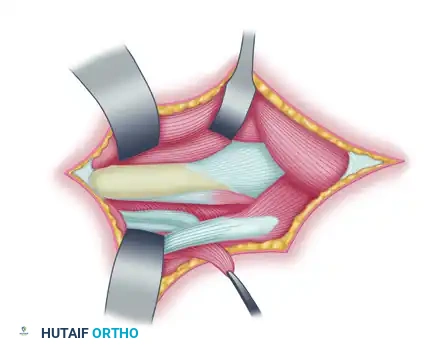
Figure 72-4B: Exposure of the pronator teres insertion on the radius.
To ensure adequate length for the rerouting and to provide robust tissue for suture fixation, the tendon must be harvested with a strip of periosteum. Use a scalpel to outline a rectangular strip of periosteum distal to the insertion. Use a sharp periosteal elevator to detach the insertion of the pronator teres along with this attached strip of periosteum.
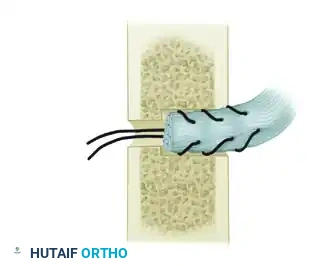
Figure 72-4C: Elevation of the pronator teres insertion with a strip of periosteum from the radius.
Once detached, mobilize the muscle extraperiosteally, dissecting well proximal into the forearm. Freeing the muscle belly proximally is essential to ensure a straight line of pull and to prevent tethering once the tendon is rerouted.
Detail of the mobilized pronator teres tendon prepared with a periosteal extension.
Step 4: Interosseous Membrane Release
Assess the passive supination of the forearm. If full supination (at least 80 to 90 degrees) cannot be achieved effortlessly, the interosseous membrane (IOM) is contracted.
Free the interosseous membrane from the ulnar border of the radius. Use a periosteal elevator to strip the IOM extraperiosteally as far proximally and distally as necessary to gain maximal passive supination. Take extreme care not to plunge into the deep volar compartment, protecting the anterior interosseous nerve and vessels.
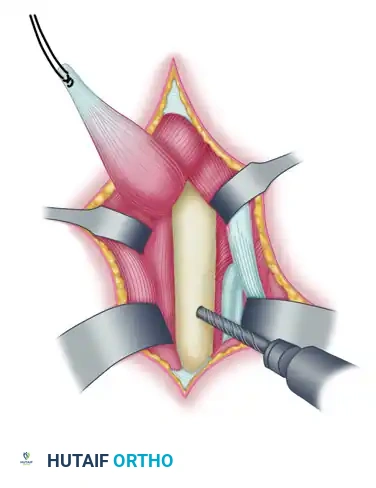
Step 5: Radial Bone Preparation and Drilling
The goal is to pass the tendon through the radius to secure it. At the exact same level as the previous muscle insertion, prepare the bone for the anchoring holes.
Drill a large anchoring hole on the anterolateral aspect of the radial cortex. This hole must be large enough to accommodate the bulk of the pronator teres tendon and its periosteal strip. Enlarge this hole in the anterolateral cortex to 2.8 mm using a drill bit or a small burr.
Next, drill a smaller hole directly opposite, through the posteromedial part of the radius, using a 1.6-mm Kirschner wire. This smaller hole will serve as the exit point for the passing sutures.
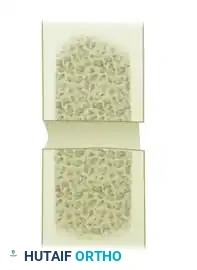
Figure 72-4D: Anchoring hole drilled in the anterolateral part of the radial cortex, with a smaller hole drilled through the posteromedial part.
Detailed cross-sectional view of the radius demonstrating the trajectory of the 2.8-mm anterolateral hole and the 1.6-mm posteromedial exit hole.
Step 6: Rerouting and Tendon Passage
Pass the mobilized pronator teres and its attached periosteum posteriorly (dorsally) and laterally around the radius. This rerouting through the interosseous space changes the muscle's vector, converting its pull from pronation to supination.
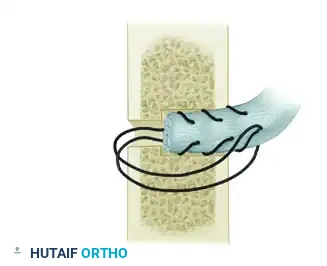
Weave a heavy, non-absorbable suture (e.g., #2 or #1 braided composite suture) through the distal end of the tendon using a Krackow or locking whipstitch technique.
Pass the free ends of the suture through the large anterolateral hole and out through the smaller posteromedial hole. A suture passer or a wire loop can facilitate this step.

Figure 72-4E: Pronator teres tendon rerouted posteriorly through the interosseous membrane and passed from lateral to medial through the hole drilled in the radius.
Detail of the suture passing technique, drawing the tendon stump into the medullary canal of the radius.
Step 7: Tensioning and Fixation
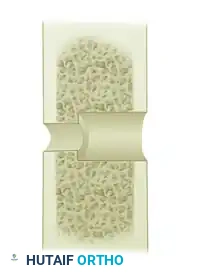
Hold the forearm in approximately 45 degrees of supination. Pull the sutures firmly to snug the tendon into the 2.8-mm anterolateral hole. The tendon must be drawn deep into the intramedullary canal to ensure robust bone-to-tendon healing.
Tie the sutures securely over the posteromedial cortical bridge. Apply further stay sutures through the tendon and the adjacent periosteum at the entry hole as indicated to reinforce the repair.
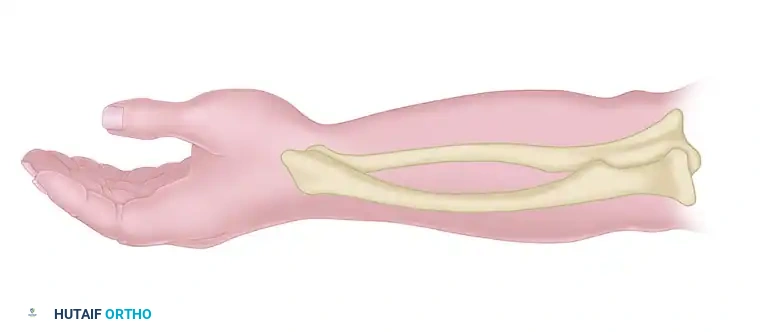
Figure 72-4F: The tendon is introduced into the larger hole and secured under tension.
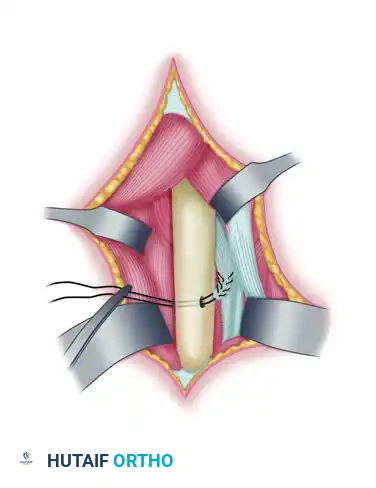
Figure 72-4G: Final view of the secured pronator teres tendon, now acting as an active supinator.
Allow the brachioradialis to fall back into its anatomical position, ensuring no compression on the superficial radial nerve. Deflate the tourniquet, achieve meticulous hemostasis, and close the subcutaneous tissues and skin in a standard layered fashion.
Adjunctive Procedures: The Ozkan Brachioradialis Rerouting Technique
In severe cases of spastic pronation contracture, the brachioradialis (BR) acts as a secondary deforming force. Because the BR originates on the lateral supracondylar ridge of the humerus and inserts on the radial styloid, it acts as a pronator when the forearm is in extreme supination, and a supinator when the forearm is in extreme pronation. In a chronically pronated spastic arm, it contributes to the contracture.
The Ozkan Brachioradialis Rerouting Technique is an elegant adjunct that converts the BR into a pure supinator.
Ozkan Technique Steps
- Tendon Lengthening: Identify the distal tendon of the brachioradialis. Perform a standard Z-lengthening (Z-plasty) of the tendon to gain length and relieve the immediate contracture.
- Rerouting: Pass the distal stump of the cut tendon between the radius and ulna (through the interosseous space) in a dorsal to palmar direction.
- Reattachment: Suture the rerouted distal stump back to the proximal brachioradialis tendon belly. This new trajectory wraps the tendon around the radius, converting its pull into a supination vector.
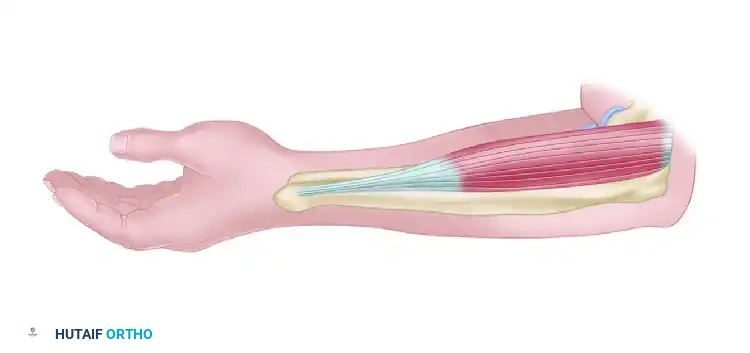
Figure 72-5A: Ozkan brachioradialis rerouting technique. The tendon is cut in a Z fashion.
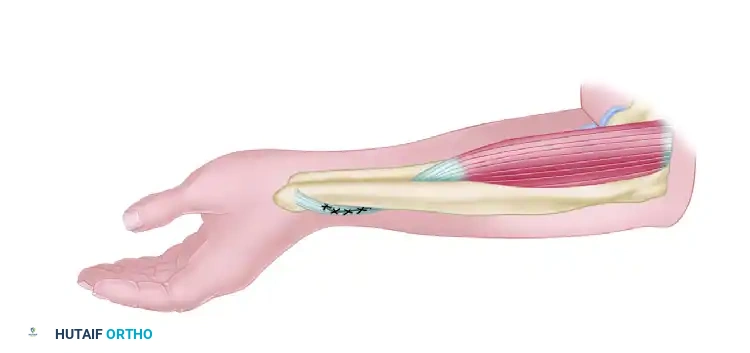
Figure 72-5B: The distal tendon is passed between the radius and ulna in a dorsal to palmar direction and is sutured back to the proximal brachioradialis tendon.
Postoperative Protocol and Rehabilitation
The success of a tendon transfer relies as much on meticulous postoperative rehabilitation as it does on surgical execution. The newly transferred muscle must heal securely to the bone and undergo cortical re-education to fire in its new phase.
Immediate Postoperative Phase (Weeks 0-2)
- Immobilization: In the operating room, apply a well-padded, bivalved long-arm cast.
- Positioning: The elbow must be maintained in 45 degrees of flexion to relax the origin of the pronator teres, and the forearm is locked in 60 degrees of supination to remove all tension from the repair site.
- Edema Control: Elevate the arm strictly immediately after surgery. Monitor neurovascular status closely, particularly the median and superficial radial nerves.
Intermediate Phase (Weeks 2-6)
- Wound Check: At 2 weeks postoperatively, the initial cast is removed, and the surgical incision is inspected. Sutures are removed.
- Re-casting: A new, definitive long-arm cast is applied, maintaining the exact same parameters (45 degrees elbow flexion, 60 degrees forearm supination). This cast is worn for an additional 4 weeks to allow solid bone-to-tendon integration at the radial drill hole.
Late Rehabilitation Phase (Weeks 6-24)
- Splinting: At 6 weeks, the cast is removed. The patient is transitioned to a custom-molded thermoplastic supination splint. This splint is worn continuously for the first 2 weeks, removed only for hygiene and therapy.
- Night Splinting: Crucially, supination splinting at night is continued for a minimum of 6 months to prevent recurrence of the contracture as the spastic tone attempts to reassert itself.
- Physical Therapy: Active and active-assisted range of motion (ROM) exercises begin at week 6. Therapy focuses on cortical retraining—teaching the patient to fire the pronator teres to achieve supination. Biofeedback and neuromuscular electrical stimulation (NMES) are highly beneficial during this phase. Passive stretching into pronation is strictly avoided until at least 10-12 weeks postoperatively to protect the transfer.
Complications and Pitfalls
- Loss of Fixation: Pull-out of the tendon from the radial drill hole is a catastrophic failure. This is avoided by harvesting an adequate periosteal strip, using heavy non-absorbable sutures, and ensuring the tendon is drawn deeply into the 2.8-mm hole.
- Superficial Radial Nerve Injury: Neuroma formation of the SRN can cause debilitating pain, rendering the functional gains of the surgery useless. Meticulous retraction and protection are mandatory.
- Undercorrection: Failure to achieve adequate supination is usually due to an unrecognized static contracture of the interosseous membrane. Always assess passive ROM intraoperatively and release the IOM if necessary.
- Overcorrection: While rare, excessive tensioning in a patient with poor antagonist tone can lead to a fixed supination deformity, which is functionally worse than a pronation deformity. Tensioning at 45 degrees of supination, rather than maximal supination, mitigates this risk.
