INTRODUCTION AND BIOMECHANICAL PRINCIPLES
The loss of thumb adduction is one of the most functionally debilitating consequences of low ulnar nerve palsy. The adductor pollicis muscle is the primary motor unit responsible for powerful key pinch (lateral pinch), contributing approximately 50% to 80% of the total pinch strength. When the adductor pollicis is paralyzed, patients inevitably develop compensatory mechanisms, most notably Froment’s sign (hyperflexion of the thumb interphalangeal joint via the flexor pollicis longus) and Jeanne’s sign (hyperextension of the metacarpophalangeal joint).
To restore functional pinch strength and correct these debilitating deformities, dynamic tendon transfers are indicated. The two most prominent and biomechanically sound procedures for restoring thumb adduction are the Boyes technique (utilizing the brachioradialis or a radial wrist extensor routed through the third interosseous space) and the Smith technique (utilizing the extensor carpi radialis brevis routed through the second interosseous space).
Both techniques require the use of an intercalary tendon graft—typically the palmaris longus or plantaris tendon—to bridge the distance between the dorsal donor muscle and the volar-ulnar insertion of the adductor pollicis.
💡 Clinical Pearl: Biomechanics of Pinch
Successful restoration of thumb adduction relies on recreating the precise vector of the adductor pollicis. The line of pull must be directed proximally and ulnarly across the palm. Routing the tendon graft through the intermetacarpal spaces (second or third) effectively creates a pulley system that mimics the native transverse and oblique heads of the adductor pollicis.
PREOPERATIVE PLANNING AND PATIENT SELECTION
Indications
- Irreversible ulnar nerve palsy with profound weakness or absence of key pinch.
- Severe adductor pollicis atrophy.
- Combined median and ulnar nerve palsies (requiring more complex, multi-tendon reconstruction).
Prerequisites for Surgery
Before any tendon transfer is performed, the surgeon must ensure the following:
1. Supple Joints: The thumb carpometacarpal (CMC), metacarpophalangeal (MCP), and interphalangeal (IP) joints must have full passive range of motion. Any fixed contractures (especially first web space contractures) must be released prior to or concurrently with the tendon transfer.
2. Adequate Donor Strength: The selected donor muscle (Brachioradialis, ECRB, or ECRL) must be Medical Research Council (MRC) Grade 5.
3. Soft Tissue Equilibrium: The soft tissue bed must be free of severe scarring to allow for unimpeded tendon gliding.
SURGICAL TECHNIQUE 1: THE BOYES PROCEDURE
The Boyes technique traditionally employs the brachioradialis (BR) or a radial wrist extensor (ECRL or ECRB) to restore adduction. The brachioradialis is a powerful muscle, but its native excursion is limited.
Step 1: Donor Muscle Harvest and Mobilization
- Make a longitudinal incision over the radial aspect of the distal forearm, centered over the musculotendinous junction of the brachioradialis.
- Identify the brachioradialis tendon and detach it precisely at its insertion on the radial styloid.
- Critical Step: Carefully free the brachioradialis tendon proximally from all fascial attachments. The BR is heavily invested in the antebrachial fascia. Failure to release these fascial bands will result in inadequate excursion (the BR requires at least 30 mm of excursion for effective thumb adduction).
⚠️ Surgical Warning: Radial Sensory Nerve
The superficial branch of the radial nerve emerges from beneath the brachioradialis in the distal third of the forearm. Meticulous dissection is required to protect this nerve during the fascial release of the BR.
Step 2: Tendon Graft Harvest
A tendon graft is mandatory to reach the thumb.
* Palmaris Longus: The preferred graft if present. Harvested via standard minimally invasive transverse incisions using a tendon stripper.
* Plantaris Tendon: An excellent alternative if the palmaris longus is absent, providing ample length and structural integrity.
Step 3: Distal Attachment to the Thumb
- Make a curved or longitudinal incision over the ulnar aspect of the thumb MCP joint.
- Identify the adductor tubercle and the tendinous insertion of the adductor pollicis.
- Anchor the tendon graft to the adductor tubercle using a pull-out wire technique, or weave and suture the graft directly into the robust tendinous insertion of the paralyzed adductor pollicis using non-absorbable braided sutures (e.g., 3-0 or 4-0 polyester).
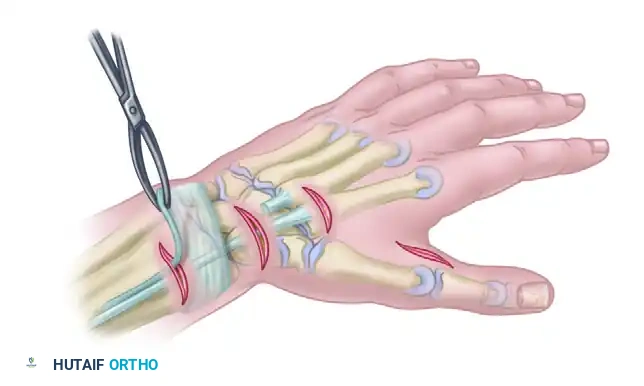
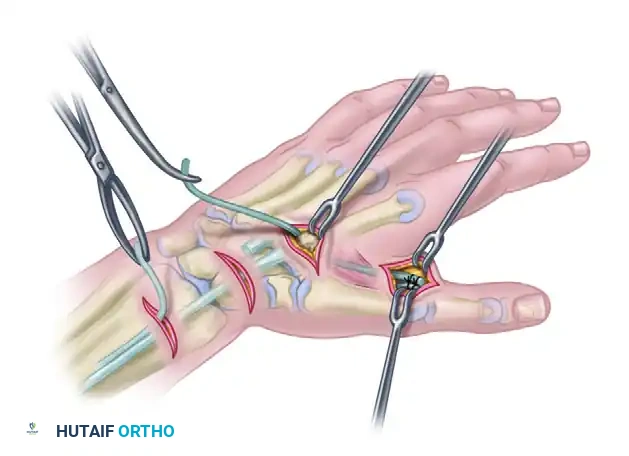
Step 4: Routing the Graft
- Pass the graft proximally along the native path of the adductor muscle belly.
- Direct the tendon passer through the third interosseous space (between the third and fourth metacarpals) to the dorsum of the hand. This specific routing provides an excellent vector that pulls the thumb metacarpal into adduction and slight pronation.
- Retrieve the graft on the dorsal aspect of the hand through a small counter-incision.
Step 5: Proximal Attachment and Tensioning
- Pass the graft subcutaneously in a proximal and radial direction toward the mobilized brachioradialis tendon.
- If a radial wrist extensor (ECRL/ECRB) is used instead of the BR, pass the tendon graft deep to the extensor digitorum communis (EDC) tendons and attach it to the selected wrist extensor.
- Setting the Tension: This is the most critical phase of the operation. The tension should be set maximally with the thumb held in radial and palmar abduction, and the wrist in a neutral position.
- Perform a Pulvertaft weave to secure the graft to the donor tendon, utilizing multiple figure-of-eight sutures.
SURGICAL TECHNIQUE 2: THE SMITH PROCEDURE (ECRB TRANSFER)
Smith described a highly effective modification utilizing the Extensor Carpi Radialis Brevis (ECRB) tendon to provide strong thumb adduction. The ECRB is an ideal donor due to its central location, excellent excursion, and expendability (provided the ECRL is intact to maintain wrist extension). In Smith's original series, key pinch strength was reported to have doubled on average following this specific transfer.
Step 1: Incisions and Exposure
Standard incisions are planned to access the ECRB dorsally, the intermetacarpal space, and the adductor insertion on the thumb.
1. Incision A: A transverse or longitudinal incision over the base of the third metacarpal to access the ECRB insertion.
2. Incision B: A longitudinal incision at the musculotendinous junction of the ECRB in the mid-to-distal forearm.
3. Incision C: A dorsal incision over the second intermetacarpal space.
4. Incision D: A volar-ulnar incision at the thumb MCP joint to access the adductor pollicis insertion.
Step 2: Detachment and Withdrawal of the ECRB
- Identify the ECRB tendon at its insertion on the base of the third metacarpal.
- Transect the tendon as distally as possible to maximize length.
- Withdraw the ECRB tendon proximally through the forearm incision (Incision B). Ensure it is pulled proximal to the dorsal retinacular ligament ("sheath") to allow for a straight line of pull without bowstringing or impingement.
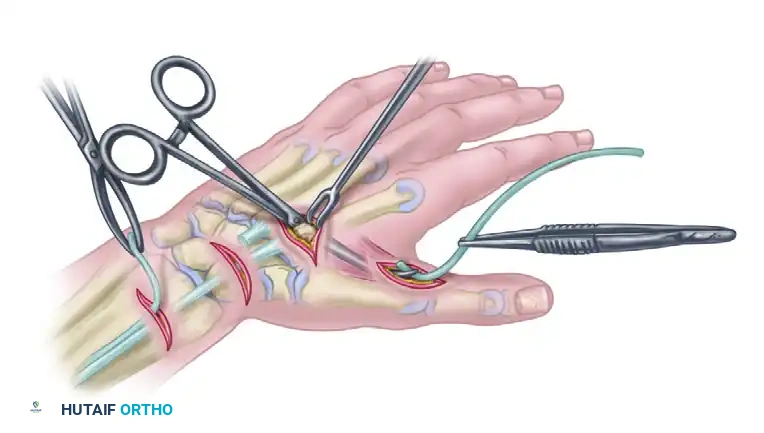
Step 3: Graft Passage Through the Second Interspace
- Harvest a palmaris longus or plantaris tendon graft.
- Using a curved tendon passer, channel the graft deep to the adductor pollicis fascia.
- Pass the graft dorsally between the second and third metacarpals (the second interosseous space). This routing is slightly more radial than the Boyes technique and provides a direct, powerful vector for adduction.
Step 4: Distal Fixation to the Adductor Pollicis
- At the thumb MCP joint, identify the tendinous insertion of the adductor pollicis.
- Suture the distal end of the tendon graft securely to the adductor tendon. A weave technique or robust core sutures should be utilized to prevent distal pull-out under the high forces of key pinch.
Step 5: Subcutaneous Proximal Routing
- Retrieve the proximal end of the tendon graft at the dorsal second interspace incision.
- Pass the graft subcutaneously from the dorsal hand to the proximal forearm incision where the ECRB is waiting. The subcutaneous tunnel must be wide enough to allow unimpeded gliding of the graft-tendon junction.
Step 6: Proximal Suturing and Final Tensioning

- Prepare the ECRB and the tendon graft for a Pulvertaft weave.
- Tensioning Parameters: Suture the tendon graft proximally to the ECRB with the thumb held in full adduction and the wrist at exactly 0 degrees of extension (neutral).
- At this position, the ECRB should be at its resting length.
- Clinical Nuance: If the thenar muscles (median nerve innervated) are also paralyzed, the graft should be made slightly longer to prevent a severe adduction contracture that would block thumb opposition.
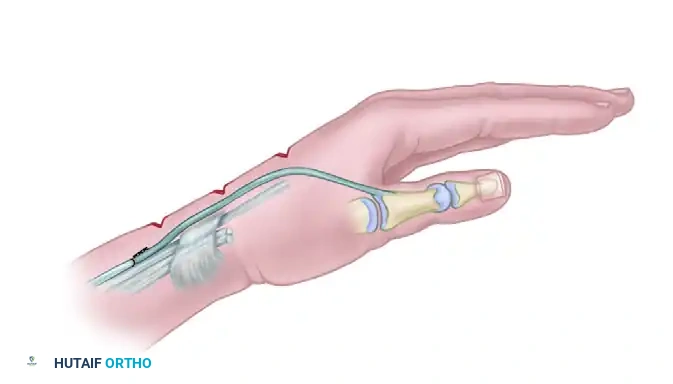
The final construct demonstrates the ECRB withdrawn proximal to the extensor retinaculum, woven into the tendon graft, which dives through the second intermetacarpal space to insert onto the adductor pollicis, creating a seamless and biomechanically optimized dynamic restraint.
POSTOPERATIVE CARE AND REHABILITATION PROTOCOL
The success of a tendon transfer is heavily dependent on meticulous postoperative rehabilitation. The goal is to protect the tendon weave during the initial healing phase while preventing restrictive adhesions.
Phase 1: Immobilization (Weeks 0 to 3)
- Immediately postoperatively, apply a bulky, well-padded plaster splint.
- Positioning: The thumb must be held in strict adduction. The wrist is immobilized in 30 degrees of extension to relieve tension on the transfer (if a wrist extensor or BR was used).
- The fingers are left free to allow active range of motion, which helps reduce edema and prevents stiffness.
Phase 2: Early Active Motion (Weeks 3 to 6)
- At 3 weeks, the rigid plaster splint is removed.
- The patient is transitioned to a custom-molded, removable, forearm-based thumb spica splint.
- Crucial Restriction: The splint must prevent thumb hyperextension and excessive palmar abduction to protect the healing graft.
- Active, gravity-eliminated adduction exercises are initiated. The patient is taught to actively fire the donor muscle (e.g., extending the wrist to activate the ECRB) to facilitate the tenodesis effect and train the brain to incorporate the new motor pattern.
Phase 3: Strengthening and Weaning (Weeks 6 to 12)
- At 6 weeks, passive stretching and gentle strengthening exercises are introduced.
- The protective splint is gradually weaned, initially worn only at night or during high-risk activities.
- Pinch strengthening (using putty or pinch gauges) begins at 8 weeks.
- Full unrestricted activity is typically permitted by 12 weeks, provided that the patient demonstrates adequate motor control and the tendon weave is clinically stable.
COMPLICATIONS AND PITFALLS
While highly successful, tendon transfers for thumb adduction carry specific risks that the operative surgeon must anticipate:
- Under-tensioning: The most common error in tendon transfer surgery. If the graft is left too loose, the donor muscle will expend its excursion simply taking up the slack, resulting in weak or absent pinch strength. Always err on the side of slightly tighter tension, as tendons naturally stretch during the rehabilitation phase.
- Over-tensioning: If the transfer is excessively tight, the patient may develop a fixed adduction contracture of the first web space. This is particularly devastating if the patient has concurrent median nerve weakness, as they will be unable to abduct the thumb for grasping large objects.
- Adhesions: The interosseous spaces are highly fascial environments. Rough handling of the graft or failure to create a wide enough tunnel can lead to severe adhesions, tethering the graft and nullifying the transfer. Meticulous hemostasis and early controlled motion are paramount.
- Donor Site Morbidity: When harvesting the ECRB, care must be taken to ensure the ECRL is robust and intact. Failure to verify ECRL function prior to ECRB harvest can result in a functionally limiting loss of wrist extension power.
By adhering strictly to the biomechanical principles of vector alignment, meticulous soft tissue handling, and precise tensioning, the Boyes and Smith tendon transfers offer reliable, powerful, and life-altering restoration of hand function for patients suffering from ulnar nerve palsy.
