Introduction to Pediatric ACL Reconstruction
The management of anterior cruciate ligament (ACL) injuries in skeletally immature patients presents a unique and complex challenge for the orthopedic surgeon. Historically, nonoperative management or delayed reconstruction was advocated to prevent iatrogenic injury to the open physes. However, contemporary evidence unequivocally demonstrates that delaying surgery in active pediatric patients leads to recurrent instability, devastating meniscal tears, and early-onset chondral damage.
To address this, physeal-sparing techniques have been developed. The transepiphyseal replacement of the anterior cruciate ligament using quadruple hamstring grafts, pioneered and described by Anderson, represents the gold standard for specific subsets of skeletally immature patients. By confining the drill holes entirely within the epiphysis and avoiding the transphyseal route, this technique restores native knee kinematics while mitigating the catastrophic risks of premature physeal closure, angular deformity, and leg-length discrepancy.
Indications and Patient Selection
Patient selection is the most critical determinant of success in pediatric ACL reconstruction. The Anderson transepiphyseal technique is highly specific in its indications based on the physiological maturity of the patient.
- Primary Indications: Patients classified as Tanner Stage I, II, or III of physiological development. These patients possess widely open physes with significant remaining growth potential, making them highly vulnerable to transphyseal drilling.
- Contraindications: Patients in Tanner Stage IV or V. These individuals have nearing or complete skeletal maturity and should undergo conventional transphyseal ACL reconstruction.
Clinical Pearl: Always correlate Tanner staging with radiographic assessments of skeletal age (e.g., Greulich and Pyle atlas using left hand/wrist radiographs) to accurately quantify remaining growth potential before committing to a transepiphyseal approach.
Biomechanics and Preoperative Planning
The transepiphyseal technique relies on the use of a soft-tissue autograft—specifically, a quadruple hamstring (semitendinosus and gracilis) graft. Soft tissue is preferred over bone-patellar tendon-bone (BTB) grafts because the presence of a bone block near or across a physis significantly increases the risk of osseous bridge formation and subsequent growth arrest.
The biomechanical goal is to achieve an anatomical footprint reconstruction. However, because the tunnels must remain strictly within the epiphysis, the trajectory of the tunnels differs from adult reconstruction. The femoral tunnel is drilled from the lateral epicondyle directly into the intercondylar notch, while the tibial tunnel is drilled from the medial epiphysis into the tibial footprint.
Surgical Positioning and Setup
Meticulous operating room setup and patient positioning are non-negotiable prerequisites for this procedure. The reliance on intraoperative fluoroscopy demands an unobstructed radiographic view.
- Patient Positioning: Place the patient supine on a radiolucent operating table.
- Leg Holder: Secure the injured lower limb in an arthroscopic leg holder. Position the thigh such that the hip is flexed to approximately 20 degrees. This specific degree of flexion facilitates unimpeded C-arm fluoroscopic viewing of the knee in the lateral plane.
- Fluoroscopy Setup: Position the C-arm on the side of the table opposite the injured knee. Place the viewing monitor at the head of the table in the surgeon's direct line of sight.
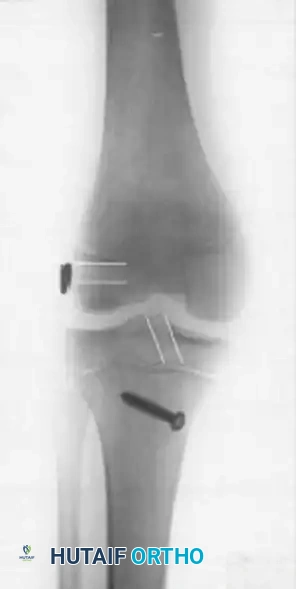
- Pre-Draping Verification: Before the limb is prepped and draped, obtain anteroposterior (AP) and lateral fluoroscopic views of the tibial and femoral physes.
- The "Perfect Lateral": When viewing the distal femur, adjust the C-arm rotation until the medial and lateral femoral condyles superimpose perfectly. Rotate the C-arm to visualize the extension of the tibial physis into the tibial tubercle on the lateral view. Do not proceed until these views are perfected.
Step-by-Step Surgical Technique
1. Graft Harvesting and Preparation
- Incision: Make an oblique 4-cm incision over the pes anserinus insertion, overlying the semitendinosus and gracilis tendons.
- Harvest: Dissect the tendons free from their fascial attachments. Transect them at the musculotendinous junction using a standard closed tendon stripper, and detach them distally.
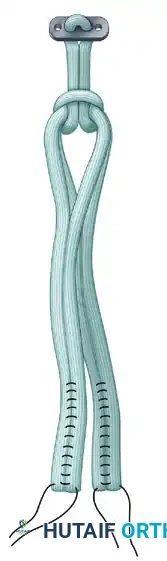
- Preparation: On the back table, double the tendons to create a quadruple graft. Place a No. 5 FiberWire suture (Arthrex, Naples, FL) in the ends of the tendons using a meticulous whipstitch technique.
- Pretensioning: Place the doubled tendons under 4.5 kg (10 lb) of static tension using a Graftmaster device (Acufex-Smith Nephew, Andover, MA). Pretensioning is vital to eliminate creep and prevent postoperative graft elongation.
2. Diagnostic Arthroscopy and Joint Preparation
- Portals: Establish standard anterolateral (viewing) and anteromedial (working) portals.
- Inspection: Perform a comprehensive intraarticular examination. Address any concomitant pathology. Repairing substantial meniscal tears is paramount in the pediatric population to preserve long-term joint health.
- Notch Preparation: Debride the ruptured ACL stump and clear debris from the intercondylar notch. Perform a minimal notchplasty only if necessary to clearly visualize the anatomical footprint of the ACL on the femur.
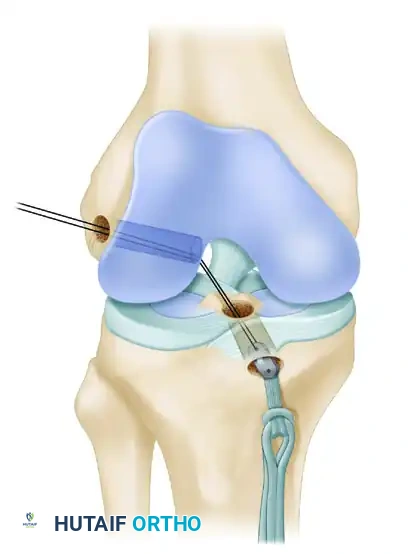
3. Femoral Tunnel Preparation
The creation of the femoral tunnel requires absolute precision to avoid violating the distal femoral physis.
- Fluoroscopic Guidance: With the C-arm in the lateral position, adjust the limb to maintain the perfect lateral view.
- Guidewire Placement: Place the point of the guidewire over the lateral femoral condyle. The correct entry point corresponds to the ACL footprint: approximately one-fourth of the distance from posterior to anterior along Blumensaat's line, and one-fourth of the distance down from Blumensaat's line.
- Approach: Make a 2-cm lateral incision at this precise point. Incise the iliotibial tract longitudinally and strip the periosteum from a small area of the lateral femoral condyle.
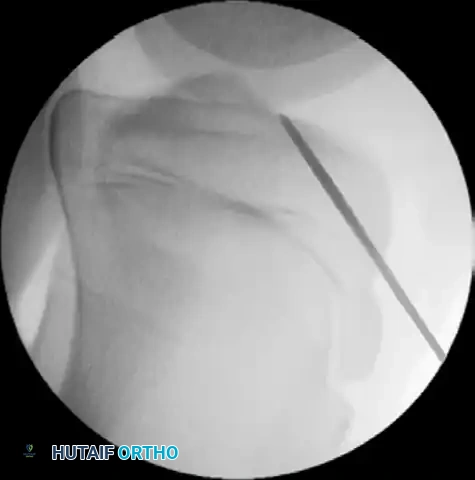
- Drilling the Epiphysis: Using a free-hand technique under C-arm guidance, introduce the guidewire 2 to 3 mm into the femoral epiphysis.
- Crucial Step: Do not angulate the pin anteriorly or posteriorly; keep it strictly perpendicular to the femur in the coronal plane.
- Rotate the C-arm to the AP plane to confirm the guidewire is not angulated superiorly (which would violate the physis) or inferiorly (which would breach the articular cartilage).

- Joint Entry: Drive the guidewire across the femoral epiphysis, perpendicular to the femur and distal to the physis. Arthroscopically visualize the wire entering the intercondylar notch. It should enter the joint 1 mm posterior and superior to the center of the anatomical ACL footprint.
4. Tibial Tunnel Preparation
- Guidewire Placement: Leave the femoral guidewire in place. Insert a second guidewire into the anteromedial aspect of the tibia, directing it through the epiphysis using a tibial drill guide.
- Fluoroscopic Verification: From the direct lateral position, externally rotate the C-arm approximately 30 degrees. This specific rotation clearly delineates the physis extending into the tibial tubercle.
- Drilling: Drill the guidewire into the tibial epiphysis under real-time fluoroscopy. You must lift the handle of the drill guide to ensure the wire clears the anterior portion of the tibial physis.
- Joint Entry: The wire should enter the joint at the level of the free edge of the lateral meniscus, precisely within the posterior footprint of the native ACL on the tibia. Arthroscopically confirm the position of both guidewires before proceeding.
5. Reaming the Transepiphyseal Tunnels
- Sizing: Use tendon sizers to measure the exact diameter of the quadruple hamstring graft (typically 6 to 8 mm).
- Drilling: A snug fit is biologically imperative to promote tendon-to-bone healing and minimize the volume of bone removed from the epiphysis. Use the smallest appropriate cannulated drill bit to ream over both the femoral and tibial guidewires.
- Chamfering: Intraarticularly chamfer the intra-articular edge of the femoral hole using a rasp or shaver to prevent graft abrasion during passage and knee flexion.
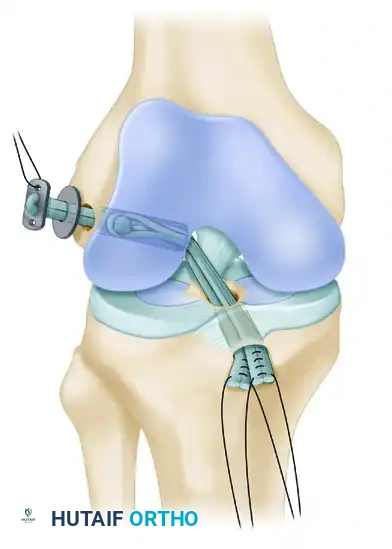
6. Graft Passage and Proximal Fixation
- EndoButton Selection: Measure the total width of the lateral femoral condyle. Select an appropriate EndoButton continuous loop (Acufex-Smith Nephew, Memphis, TN)—usually 2 to 3 cm—ensuring that approximately 2 cm of the quadruple hamstring graft will remain docked within the lateral femoral condyle.
- Graft Loading: Pass the EndoButton continuous loop around the middle of the doubled tendons, looping it inside itself to secure the tendons proximally.
- Passage: Place a No. 5 FiberWire passing suture into one end of the EndoButton. Use a suture passer to shuttle this suture from anterior to posterior, up through the tibial tunnel, across the joint, and out through the lateral femoral condyle.
- Femoral Fixation: Pull the EndoButton and tendons up through the tibia and out the femoral hole. Because the transepiphyseal femoral hole is larger than the standard EndoButton, an EndoButton washer (Smith & Nephew, Memphis, TN) that is 3 to 4 mm larger than the femoral hole must be placed over the EndoButton. Apply distal tension to the graft, pulling the EndoButton and washer flush against the lateral femoral condyle cortex.
7. Impingement Check and Distal Fixation
- Impingement Check: Place the graft under manual tension and cycle the knee through a full range of motion. Arthroscopically evaluate for any impingement of the graft against the intercondylar notch in terminal extension. While an anterior notchplasty is rarely needed with this technique, remove a small portion of the anterior outlet if it indents the graft.
- Tibial Fixation: Position the knee in 10 degrees of flexion. Secure the quadruple hamstring graft distally by tying the No. 5 FiberWire whipstitches tightly over a tibial screw and post.
- Critical Placement: The screw and post must be placed medial to the tibial tubercle apophysis and distal to the proximal tibial physis to avoid growth disturbance.
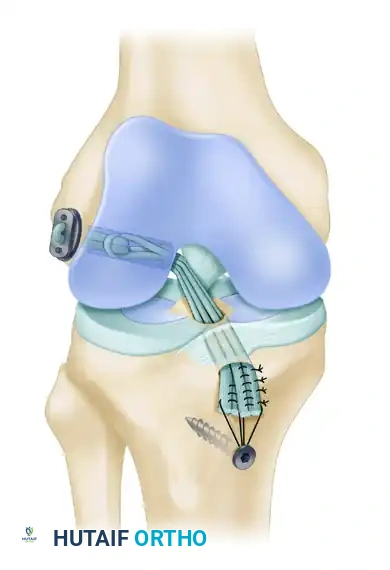
- Augmentation: If the tendon graft extends out through the anterior tibial drill hole, augment the fixation by suturing the tendon directly to the anterior tibial periosteum using multiple No. 1 Ethibond sutures in a figure-of-eight configuration.
Postoperative Protocol and Rehabilitation
- Immediate Post-Op: Close the subcutaneous tissues and skin in a routine fashion. Apply a hinged knee brace locked in extension.
- Weight-Bearing: Patients are typically allowed touch-down weight-bearing with crutches for the first 2 to 4 weeks, depending on concomitant meniscal repairs.
- Range of Motion: Early, controlled range of motion is encouraged to prevent arthrofibrosis, progressing as tolerated within the constraints of the brace.
- Radiographic Follow-up: Serial radiographs are mandatory to monitor tunnel position, hardware integrity, and, most importantly, continued symmetrical physeal growth.
Complication Avoidance: Pitfalls of the Transepiphyseal Technique
Mastery of this technique requires strict adherence to complication avoidance protocols. The following pitfalls must be actively managed:
🚨 Surgical Warnings & Pitfalls (Box 51-2)
Suboptimal Graft Placement
* Optimal graft placement is essential to restore normal knee kinematics and avoid catastrophic physeal injuries.
* Avoid placing the femoral or tibial drill holes too anteriorly; correct positioning is crucial to prevent graft impingement in extension.
* Never proceed without clearly visualizing the physes on both AP and lateral planes using the C-arm.
* Guidewires must be inserted under real-time fluoroscopic viewing.
* Always confirm arthroscopically that the guidewires enter the joint in the exact center of the femoral footprint and the posterior aspect of the tibial footprint.Incorrect Diameter of Transepiphyseal Drill Holes
* Use a drill bit corresponding to the smallest size through which the tendon will easily pass.
* A small-diameter drill bit minimizes the risk of physeal damage, and a snug fit promotes rapid biological healing of the graft to the bone.
* Ease graft passage by chamfering the intra-articular femoral hole and using a blunt instrument through the anteromedial portal to guide the graft while pulling the passing suture.Failure of Fixation
* While the load-to-failure of this construct exceeds normal tensile loads on the native ACL, failure during the early phase of healing can lead to recurrent instability.
* Always verify femoral side fixation with the C-arm to confirm that the EndoButton washer is sitting perfectly flush on the lateral femoral condyle cortex. Soft tissue interposition will lead to graft laxity.Graft Slippage Associated with Suture Post Fixation
* Minimize slippage by executing meticulous whipstitches in the tendon ends. Ensure tight loops are placed in close proximity to one another.
* Aggressively pretension the graft using the Graftmaster device prior to passage.
* When the tendon graft extends through the tibial hole, always augment the primary screw/post fixation by suturing the tendons directly through the robust periosteum of the proximal tibia.
Conclusion
The Anderson transepiphyseal quadruple hamstring ACL reconstruction is a highly demanding but exceptionally rewarding procedure for the skeletally immature athlete. By strictly adhering to the fluoroscopic landmarks, respecting the boundaries of the open physes, and achieving rigid cortical fixation, orthopedic surgeons can successfully restore knee stability, protect the menisci, and allow the pediatric patient to return to high-level activities without compromising their future skeletal development.
