Introduction to Sternoclavicular Joint Pathologies
The sternoclavicular joint (SCJ) represents the sole true synovial articulation linking the axial skeleton to the upper extremity. Because of its inherent osseous incongruity—functioning as a diarthrodial saddle joint—its stability relies almost entirely on a robust ligamentous complex. Injuries to this joint are relatively uncommon, accounting for less than 3% of all shoulder girdle traumas.
Most recurrent dislocations of the sternoclavicular joint are anterior and require only conservative treatment. Posterior dislocations, although uncommon, are true orthopaedic emergencies due to the proximity of the mediastinal structures and require urgent reduction. In the classic literature, Nettles and Lindscheid reported 60 patients with acute sternoclavicular joint dislocations, 57 of which were anterior. Similarly, in Rockwood’s extensive series of 273 dislocations, 221 were anterior.
Recurrent atraumatic anterior subluxation of the sternoclavicular joint, typically occurring with shoulder abduction and extension, is most frequently observed in young females. Often, it is associated with generalized ligamentous laxity (e.g., benign hypermobility syndrome) and, according to Rockwood, is generally a self-limiting condition. Most patients with recurrent anterior SCJ dislocation should be treated non-operatively with a generalized upper extremity strengthening program, focusing on periscapular stabilization, and the avoidance of activities that place undue stress on the joint.
Surgical Warning: Surgery for atraumatic anterior instability is recommended only if severe symptoms completely limit the activities of daily living. Surgical procedures in this region—including open repair of the capsule, joint reconstruction, or medial clavicle resection—are fraught with potentially severe complications. These include iatrogenic injury to major vessels, pneumothorax, persistent pain, unsightly hypertrophic scar formation, and a high rate of recurrent dislocation.
Surgical Anatomy and Biomechanics
A profound understanding of the regional anatomy is non-negotiable when operating on the SCJ. The medial end of the clavicle lies directly anterior to several vital structures:
* Vascular: The brachiocephalic (innominate) veins, the superior vena cava, and the aortic arch.
* Neurological: The vagus and phrenic nerves.
* Visceral: The trachea and esophagus.
The primary stabilizers of the SCJ include the anterior and posterior sternoclavicular capsular ligaments, the interclavicular ligament, and the costoclavicular (rhomboid) ligament. The posterior capsular ligament is the strongest restraint to both anterior and posterior translation. The intra-articular fibrocartilaginous disc acts as a shock absorber and prevents medial displacement of the clavicle over the manubrium.
Principles of Capsular Shift and T-Plasty
When local capsular tissue is sufficient, direct repair or plication of the sternoclavicular joint capsule can be attempted. The principles of capsular tensioning are universal across orthopaedic joint reconstructions. For comparative academic reference, the classic T-plasty capsular shift—originally described by Lieberman et al. for recurrent hip dislocations—illustrates the fundamental biomechanics of capsular tensioning that can be conceptually adapted when managing redundant SCJ capsules.
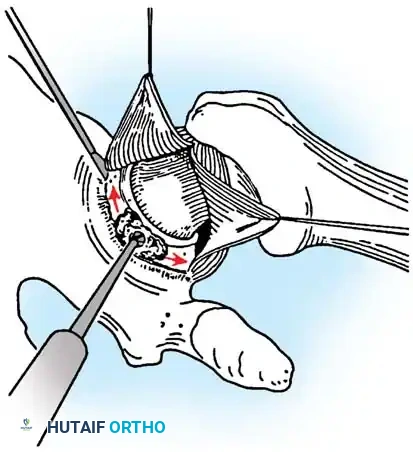
Fig. A: An incision is made in the capsule perpendicular to the joint rim to create a T-plasty. Superior and inferior capsular flaps are tagged with sutures.
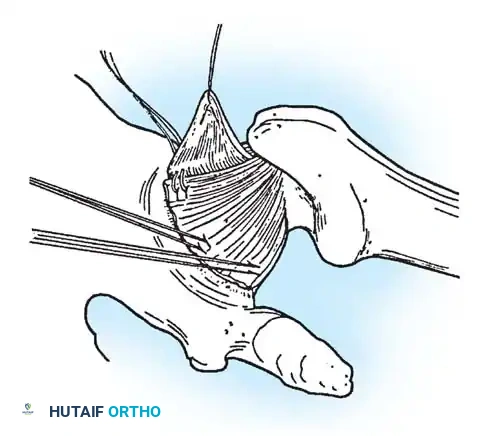
Fig. B: The inferior capsular flap is shifted superiorly; sutures attach it securely to the rim, eliminating inferior redundancy.
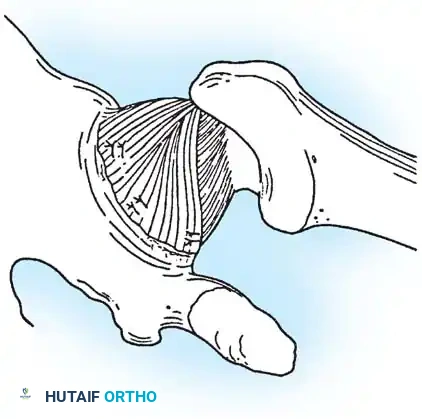
Fig. C: The superior flap is advanced inferiorly to create a robust, double-layer closure. (Adapted principles from Lieberman JR, et al: Recurrent dislocation of a hip with a labral lesion, J Bone Joint Surg 75A:1524, 1993.)
If good capsular and ligamentous materials are unavailable at the SCJ, local tissue reconstruction or resection arthroplasty must be employed.
Technique 45-9: Speed Stabilization Using Fascial Loop
In 1928, Allen described a method of stabilizing the SCJ using a fascial loop passed through holes drilled in the medial clavicle and the second rib. The Speed technique is a refined modification of this operation, utilizing a fascial loop (palmaris longus, gracilis, fascia lata, or allograft tendon) passed around the clavicle and the first rib.
Clinical Pearl: Any surgical stabilization of the sternoclavicular joint is exceptionally difficult. Because vital structures are immediately posterior, the technique must be meticulous. All dissection must be strictly subperiosteal and close to the bone. Drill holes must be placed so that both the entrance and exit points are clearly visible at all times.
🔪 Surgical Steps
- Incision: Beginning at a point 1.3 cm lateral to the midline of the sternum, make an incision 6.5 cm long, parallel to the inferior border of the medial third of the clavicle.
- Exposure: Completely free about 5 cm of the medial third of the clavicle of all soft tissues. Unless intra-articular pathology dictates otherwise, do not open the sternoclavicular joint capsule.
- Rib Preparation: Expose the medial end of the first rib and its cartilage by detaching and retracting a portion of the pectoralis major muscle laterally and distally.
- Subperiosteal Dissection: Using a rib stripper, carefully free about 5 cm of the first rib of soft tissue, keeping its cartilage intact. Perform this dissection slowly and always directly on the bone to protect the underlying pleura.
- Graft Passage: Use a blunt-pointed aneurysm needle (with the eye at the point). Pass it deep to the first rib at approximately the level of the costoclavicular ligament. Thread a nonabsorbable suture attached to a strip of fascia lata (or allograft) about 1.5 cm wide and 20 cm long. Draw the loop deep to the rib. In a similar manner, pass the loop deep to the clavicle.
- Figure-of-Eight: Repeat the procedure to form a double loop of fascia around the clavicle and the first rib. Suture the ends of the fascial strip together with nonabsorbable sutures. At this stage, assess joint stability.
- Augmentation: For enhanced stability, pass another strip of fascia deep to the first rib and clavicle at a more medial level.
- Osseous Fixation: Drill a hole through the clavicle about 1.5 cm lateral to its medial end. Pass this second strip of fascia through the hole in the clavicle and suture its ends together securely.
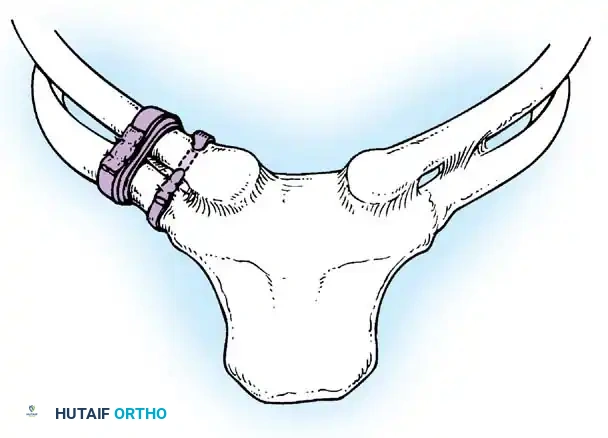
Fig. 45-20: Speed technique for the repair and stabilization of the sternoclavicular joint using a figure-of-eight fascial loop.
Postoperative Care (Speed Technique)
The upper extremity is immobilized in a Velpeau dressing or a strict sling-and-swathe for 3 weeks. Following this period, a phased physical therapy program is initiated, beginning with passive range of motion (ROM) and progressing to active-assisted exercises.
Technique 45-10: Resection Arthroplasty of the Sternoclavicular Joint (Rockwood)
Rockwood recommended that if sufficient capsular material is unavailable for secure fixation, resection of the medial 1 to 1.5 inches of the clavicle should be performed, followed by stabilization of the residual clavicle to the first rib.
Surgical Warning: Resection arthroplasty of the SCJ carries a profound risk of vascular complications, especially in the setting of chronic, unreduced posterior dislocations where scar tissue may adhere to the great vessels. It is highly advisable to have a thoracic surgeon scrubbed or immediately available on standby.
🔪 Surgical Steps: Exposure and Osteotomy
- Positioning: Place the patient supine on the operating table. Place three or four towels or a sandbag between the scapulae to allow the shoulders to fall posteriorly, opening the anterior joint space.
- Incision: Make an 8- to 20-cm skin incision, beginning cephalad to the superior border of the medial aspect of the clavicle, extending to the notch of the manubrium, and continuing caudad 3 to 4 cm onto the anterior surface of the manubrium.
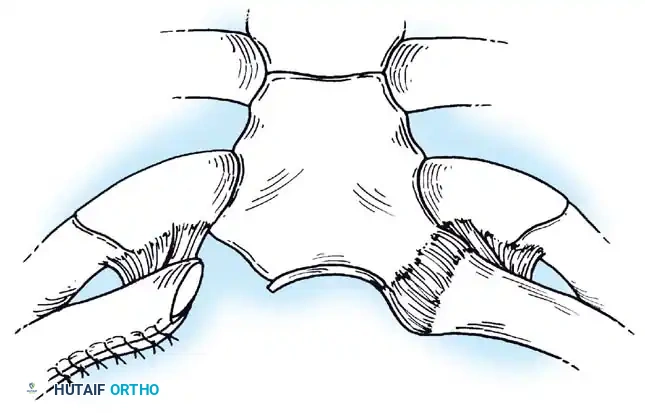
Fig. 45-21A: Skin incision made along the superior border of the medial aspect of the clavicle to the notch of the manubrium.
- Deep Dissection: Make a deep incision along the medial 4 to 5 cm of the clavicle, crossing the capsular ligament and extending caudad onto the manubrium.
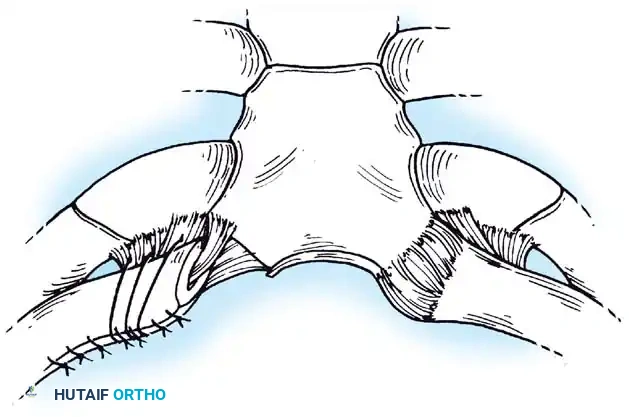
Fig. 45-21B: Deep incision made along the medial clavicle across the capsular ligament.
- Periosteal Elevation: Dissect the periosteum carefully off the medial portion of the clavicle. It is critical to preserve this periosteal tube for later closure and to protect the underlying costoclavicular ligament. Preserve the sternal head of the sternocleidomastoid muscle, but reflect the clavicular head free.
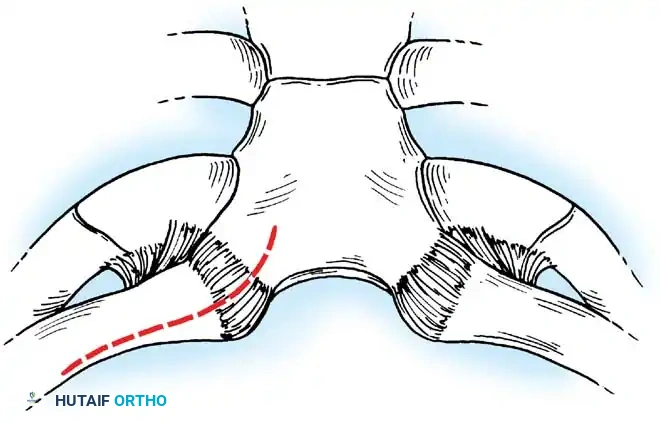
Fig. 45-21C: Periosteum dissected off the medial portion of the clavicle, preserving the periosteal tube.
- Joint Debridement: Debride the capsular ligament and the intra-articular disc ligament to expose the joint. If the intra-articular disc ligament is intact, preserve it carefully for joint stabilization during closure.
- Protection: Pass a curved 1- or 2-cm wide retractor posterior to the clavicle to isolate it and protect the vital posterior vascular structures.
- Osteotomy Preparation: Place the caudal aspect of the osteotomy site medial to the stabilizing costoclavicular ligament to allow resection of exactly 1.5 cm of the medial clavicle. Place a series of drill holes through both cortices at the intended site to prevent splintering.
- Completion of Osteotomy: Complete the osteotomy using an air-powered drill with a side-cutting bit. Bevel the anterior and superior corners of the residual clavicle with a burr to prevent skin irritation.
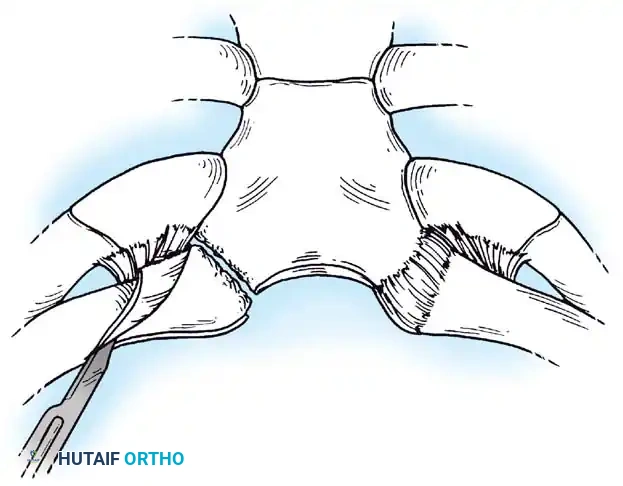
Fig. 45-21D: Drill holes made through both cortices. An air-powered side-cutting drill completes the osteotomy.
🔪 Procedure When the Costoclavicular Ligament is Intact
- Periosteal Repair: Repair the periosteal tube meticulously around the residual portion of the clavicle.
- Disc Ligament Transfer: If the sternal attachment of the intra-articular disc ligament is intact, weave a nonabsorbable No. 1 cotton Dacron suture through the ligament. Drill and curet the medullary canal of the medial end of the clavicle.
- Fixation: Drill two small holes into the superior cortex of the remaining clavicle, 1 cm lateral to the resection site. Pass the free ends of the suture into the medullary canal and out the superior holes. While holding the clavicle in a reduced anteroposterior position, tie the sutures tightly.
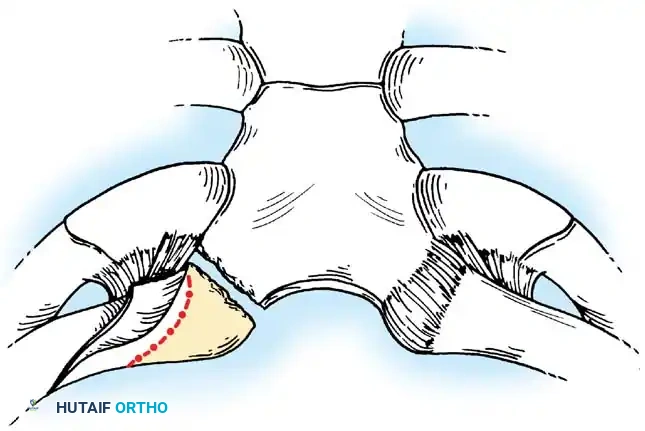
Fig. 45-21E: Closure of the periosteal tube secures the stabilized medial end of the clavicle when the costoclavicular ligament is intact.
🔪 Procedure When the Costoclavicular Ligament is Absent
- Reconstruction Requirement: If the costoclavicular ligament is avulsed or absent, continuity between the remaining clavicle and the first rib must be reestablished. This is conceptually similar to the Weaver-Dunn technique used for acromioclavicular joint reconstruction.
- Suture Passage: Pass two or three pieces of heavy nonabsorbable suture (e.g., 1-mm Dacron tape) around the remaining medial end of the clavicle, through its periosteal tube, and through the residual scar of the old costoclavicular ligament on the dorsal surface of the first rib.
- Rib Fixation: In some patients, it may be necessary to pass these sutures completely around or through drill holes in the first rib for adequate stability.
- Tensioning: Tie the sutures securely, but do not over-tighten them to the point where the medial end of the clavicle is compressed directly onto the first rib, which can cause pain and restrict motion.
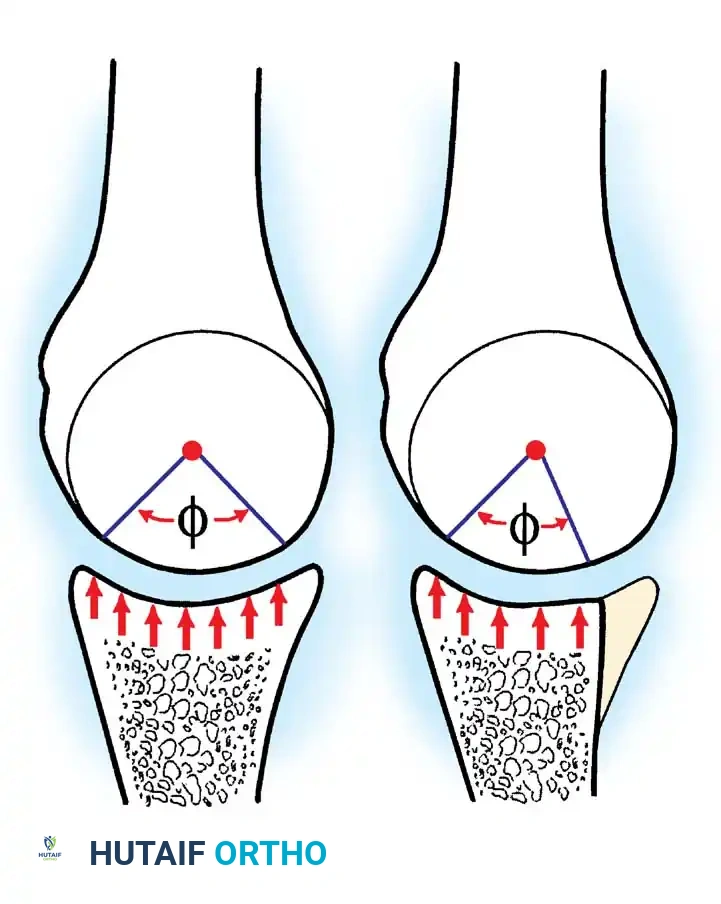
Fig. 45-21F: Closure when the costoclavicular ligament is absent. Sutures are passed through the stump of the old ligament or around the first rib for stability.
Postoperative Care (Rockwood Resection Arthroplasty)
The shoulder is immobilized in a sling or a figure-of-eight clavicle strap for 6 weeks. On the second postoperative day, the patient is allowed to perform gentle pendulum exercises but is strictly cautioned against active flexion or abduction of the shoulder above 90 degrees. Pushing, pulling, and heavy lifting are avoided for 3 months.
Strengthening exercises are initiated at 8 to 12 weeks. If
